Att styla varje WordPress-inlägg unikt är ett smart sätt att få din webbplats att sticka ut. Det låter dig lyfta fram specifikt innehåll och matcha designen med ditt varumärkes känsla.
Vissa webbplatser använder anpassade bakgrunder för klistrade inlägg eller ger varje kategori sin egen stil. Dessa små justeringar hjälper ditt innehåll att kännas mer organiserat och visuellt tilltalande.
Men att göra detta kan vara knepigt. Utan rätt verktyg och steg kan du slösa timmar på försök och misstag – eller värre, av misstag förstöra din webbplats layout.
Vi har gjort research åt dig och hittat några enkla metoder för att styla inlägg på olika sätt.
Med WPCode, det bästa pluginet för kodavsnitt för WordPress, kan du enkelt lägga till anpassade stilar i dina inlägg och skapa en unik look för varje – utan att svettas.
Notera: Den här handledningen kräver att du lägger till anpassad CSS i WordPress. Du måste också kunna använda inspektionsverktyget och ha grundläggande CSS-kunskaper, så det kanske inte passar för helt nybörjare.
💡Snabbt svar: Hur man stylar inlägg olika
Det säkraste sättet att styla specifika WordPress-inlägg utan att redigera temafiler är att använda pluginet WPCode. Det låter dig infoga anpassade CSS-klasser på ett säkert sätt:
- Enskilda inlägg: Rikta in dig på den specifika klassen
.post-id. - Per kategori: Rikta in dig på klassen
.category-name. - Per författare: Lägg till ett anpassat PHP-snippet för att generera författarklasser.
- Efter popularitet: Lägg till ett anpassat PHP-snippet för att styla baserat på kommentarantal.
Fördelar och nackdelar med att styla varje WordPress-inlägg olika
Om du har en WordPress-blogg kan det att styla varje inlägg olika skapa en unik visuell upplevelse där olika färger associeras med olika innehållskategorier.
Det är dock viktigt att väga fördelarna mot de potentiella nackdelarna.
| ✅ Fördelar | ❌ Nackdelar |
|---|---|
| Skapar en unik visuell upplevelse för läsarna | Regelbundet underhåll kan vara tidskrävande |
| Hjälper till att visuellt kategorisera innehållstyper | Kan skapa en inkonsekvent användarupplevelse |
| Fångar uppmärksamhet och kan öka engagemanget | Kan späda ut varumärkesidentiteten och konsekvensen |
| Möjliggör specifik framhävning av viktiga inlägg | Kräver teknisk kunskap (CSS/PHP) |
Om du är nybörjare kan det också vara svårt att lägga till anpassad CSS för att styla varje inlägg. Med det sagt, vi kommer att visa dig hur du enkelt kan styla varje WordPress-inlägg på olika sätt med de säkraste metoderna.
Här är en snabb översikt över alla ämnen vi kommer att täcka i den här guiden:
- Hur man stylar enskilda inlägg i WordPress
- Hur man stylar inlägg i en specifik kategori
- Hur man stylar inlägg olika baserat på författare
- Hur man stylar inlägg baserat på popularitet med hjälp av kommentarantal
- Bonus: Visa ett annat sidofält för varje inlägg i WordPress
- Vanliga frågor om styling av olika inlägg i WordPress
Låt oss börja.
Hur man stylar enskilda inlägg i WordPress
WordPress lägger till standard-CSS-klasser till olika element på din webbplats. Teman använder en kärnfunktion i WordPress som kallas post_class() för att tala om för WordPress var dessa standard-CSS-klasser för inlägg ska läggas till.
Om du besöker din webbplats och använder verktyget Inspektera i din webbläsare, kommer du att kunna se dessa klasser som läggs till för varje inlägg.
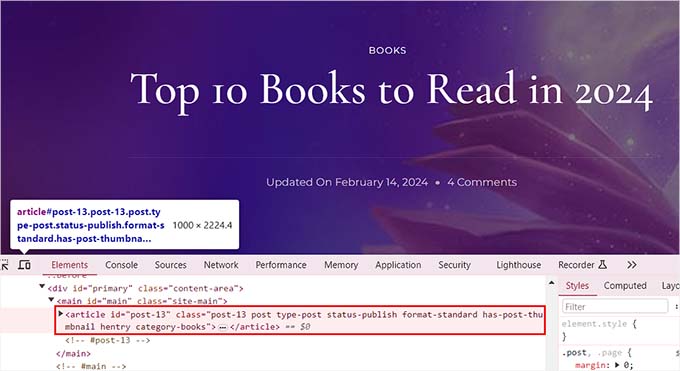
Följande är CSS-klasserna som läggs till som standard baserat på vilken sida en användare tittar på:
- .post-id
- .post
- .attachment
- .sticky
- .hentry (hAtom mikroformat-sidor)
- .category-ID
- .category-name
- .tag-name
- .format-{format-name}
- .typ-{post-typ-namn}
- .has-post-thumbnail
Ett exempel på utdata skulle se ut så här:
<article id="post-412" class="post-412 post type-post status-publish format-standard hentry category-news">
Du kan styla varje WordPress-inlägg på olika sätt med hjälp av respektive CSS-klass eller ID. För att göra detta måste du först hitta inläggs-ID:t för ett enskilt inlägg.
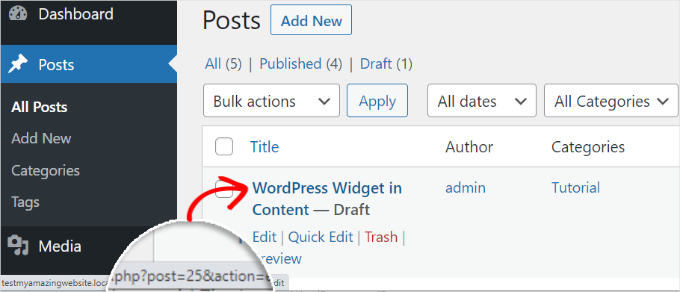
För att göra det måste du besöka sidan Inlägg » Alla inlägg från WordPress-instrumentpanelen och föra muspekaren över ett inlägg.
En URL för att redigera inlägget kommer nu att visas längst ner till vänster på skärmen. Här kan du hitta inläggs-ID:t genom att titta på siffran mellan 'post=' och '&action.'
I exemplet nedan är inläggs-ID:t 25.
När du har gjort det måste du lägga till CSS-klassen tillsammans med anpassad kod till dina temafiler eller i temaanpassaren. Det kan dock vara riskabelt och bryta din webbplats med bara ett fel.
Det är därför vi rekommenderar att använda WPCode istället.
Efter noggrann testning har vi funnit att det är det enklaste och säkraste sättet att lägga till anpassad kod på din webbplats. För att lära dig mer om vår erfarenhet med pluginet, se vår WPCode-recension.
Först måste du installera och aktivera det kostnadsfria WPCode-pluginet. För detaljer, se vår nybörjarguide om hur man installerar ett WordPress-plugin.
Notera: Om du gillar gratisversionen kan en uppgradering till WPCode Pro ta din upplevelse till nästa nivå. Premiumversionen låser upp tillgång till över 100 expertdokumenterade kodavsnitt, smart villkorlig logik, schemalagda kodändringar och mycket mer.
Efter aktivering, besök sidan Kodavsnitt » + Lägg till kodavsnitt från WordPress-instrumentpanelen. Klicka här på knappen ‘Använd kodavsnitt’ under alternativet ‘Lägg till din anpassade kod (nytt kodavsnitt)’.
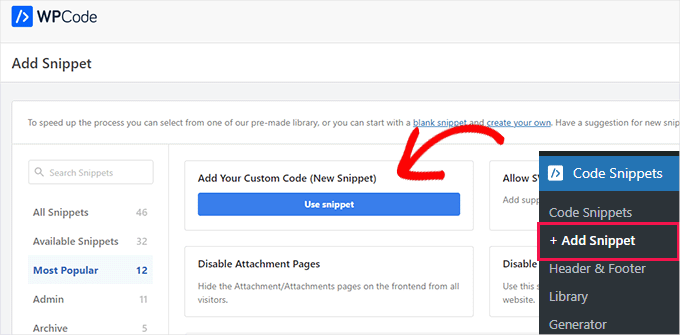
Detta tar dig till sidan 'Skapa anpassat kodavsnitt', där du kan börja med att lägga till ett namn för ditt kodavsnitt. Därefter väljer vi 'CSS-avsnitt' som kodtyp från rullgardinsmenyn till höger.
Ange sedan CSS-väljaren för ditt specifika inläggs-ID i rutan 'Kodförhandsgranskning'.
.post-13 { }Därefter kan du lägga till vilken anpassad CSS-kod som helst mellan hakparenteserna för att styla ditt inlägg.
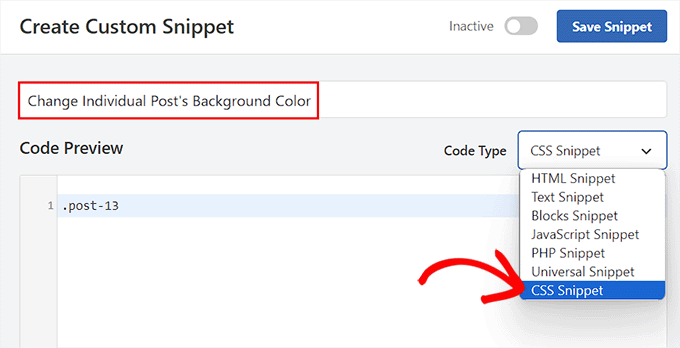
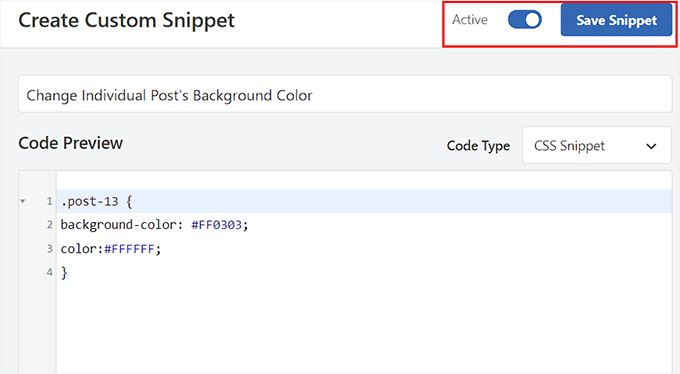
Om du till exempel vill ändra bakgrundsfärgen på ett enskilt inlägg kan du lägga till följande anpassade CSS-kod. Tänk på att du måste ersätta inläggs-ID:t i den här koden med ditt eget ID. Där det står .post-13 kan ditt vara .post-23873.
Du kan också ändra hexkoden för bakgrundsfärgen till vilken färg du vill:
.post-13 {
background-color: #FF0303;
color:#FFFFFF;
}
Växla sedan omkopplaren ‘Inactive’ högst upp till ‘Active’ och klicka på knappen ‘Save Snippet’ för att spara dina inställningar.
Den anpassade CSS-koden kommer nu automatiskt att köras på ditt enskilda inlägg när kodsnutten aktiveras.
Gå vidare och besök ditt WordPress-blogginlägg för att se ändringarna i realtid.
Du kan också lägga till andra anpassade CSS-kodavsnitt i rutan 'Kodförhandsgranskning' för att ändra textmarkeringsfärg, textfärg, länkar inom texten och mycket mer.

För mer information kan du se vår nybörjarguide om hur man anpassar färger i WordPress.
Hur man stylar inlägg i en specifik kategori
Om du vill styla alla inlägg som tillhör en specifik kategori, då kan du också göra det med WPCode.
Du måste besöka sidan Kodutdrag » + Lägg till utdrag och välja alternativet 'Lägg till din anpassade kod (nytt utdrag)'.
Lägg sedan till ett kodavsnittsnamn på den nya sidan och välj 'CSS-avsnitt' som kodtyp. Skriv sedan en specifik kategoris CSS-klass i kodförhandsgranskningsrutan så här, med hjälp av kategorins permalänkslang efter bindestrecket:
.category-books { }
När du har gjort det kan du lägga till vilket anpassat CSS-kodavsnitt som helst i rutan och tillämpa det på alla inlägg i olika kategorier.
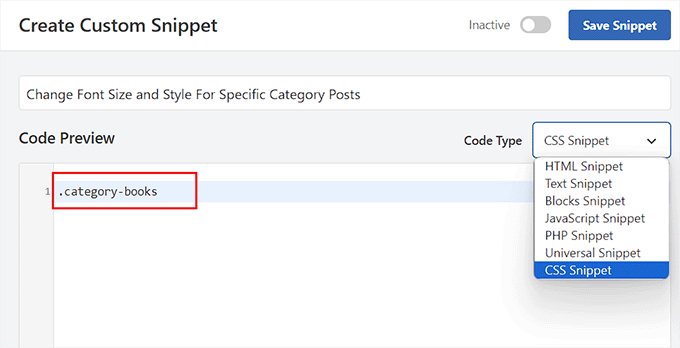
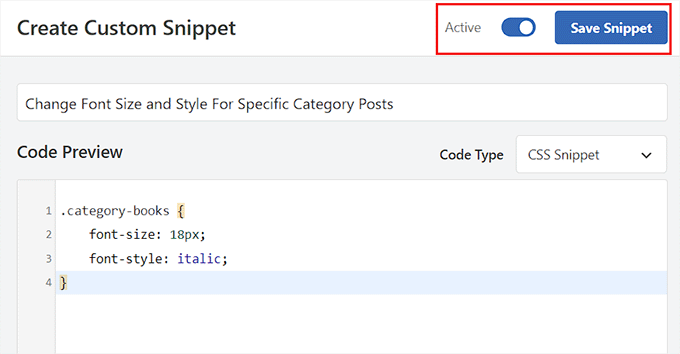
Om du till exempel vill ändra teckensnittsstorlek och stil för alla inlägg i en specifik kategori, kan du använda följande kodavsnitt. Kom bara ihåg att ersätta kategorinamnet enligt din webbplats.
category-books {
    font-size: 18px;
    font-style: italic;
}
Därefter behöver du växla omkopplaren 'Inaktiv' till 'Aktiv' högst upp.
Klicka sedan på knappen 'Spara utdrag' för att lagra dina inställningar.
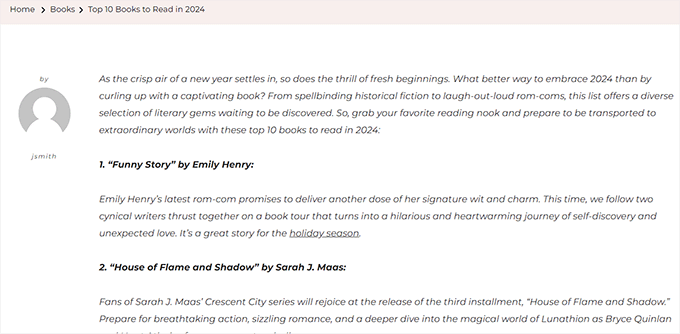
Du kan nu besöka alla inlägg i en specifik kategori för att se ändringarna som har tillämpats med CSS-kod.
Så här såg det ut på vår demosida:
Hur man stylar inlägg olika baserat på författare
De standard-CSS-klasser som WordPress genererar inkluderar inte alltid författarens namn som en användbar stil för varje inlägg baserat på författaren. Du måste först lägga till författarens namn i inläggsklasserna.
För att göra detta med WPCode kan du välja alternativet ‘Lägg till din anpassade kod (nytt kodavsnitt)’.
Detta tar dig till sidan 'Skapa anpassad kodsnutt', där du måste ange ett namn för kodsnutten och välja 'PHP-kodsnutt' som kodtyp.
Lägg sedan helt enkelt till följande anpassade kod i rutan 'Kodförhandsgranskning':
$author = get_the_author_meta('user_nicename'); ?>
<article id="post-<?php the_ID(); ?>" <?php post_class( $author );
Slutligen kan du växla omkopplaren 'Inaktiv' till 'Aktiv' och klicka på knappen 'Spara utdrag' för att spara dina inställningar.
Det bör se ut så här:
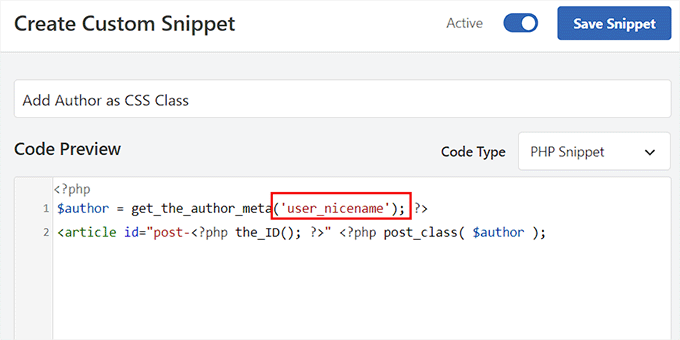
Den här koden kommer nu automatiskt att lägga till användarens smeknamn som en CSS-klass till varje inlägg. Smeknamn är ett URL-vänligt namn som används av WordPress. Det har inga mellanslag och alla tecken är gemener.
Nu måste du besöka sidan Kodavsnitt » + Lägg till kodavsnitt igen och välja alternativet ‘Lägg till din anpassade kod (nytt kodavsnitt)’.
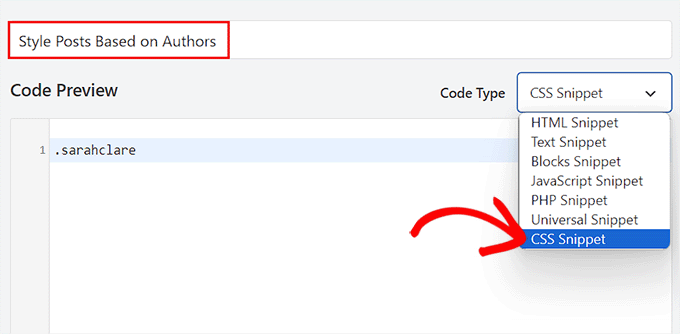
På nästa skärm vill du lägga till ett namn för din anpassade kod och välja 'CSS-utdrag' som kodtyp från rullgardinsmenyn till höger.
Du kan sedan rikta in dig på den specifika författaren med deras smeknamn i rutan 'Kodförhandsgranskning' på detta sätt:
.sarahclare
Nästa steg är att lägga till anpassad CSS-kod för att ändra bakgrundsfärg, kantstorlek, textfärg och mer.
Du kan använda koden nedan för att ändra bakgrundsfärgen på en författares inlägg och lägga till en kantlinje runt innehållsområdet.
.sarahclare {
background-color:#EEE;
border:1px solid #CCC;
}
När du är klar, klicka på knappen 'Spara avsnitt' högst upp.
Glöm sedan inte att växla omkopplaren 'Inaktiv' till 'Aktiv'.
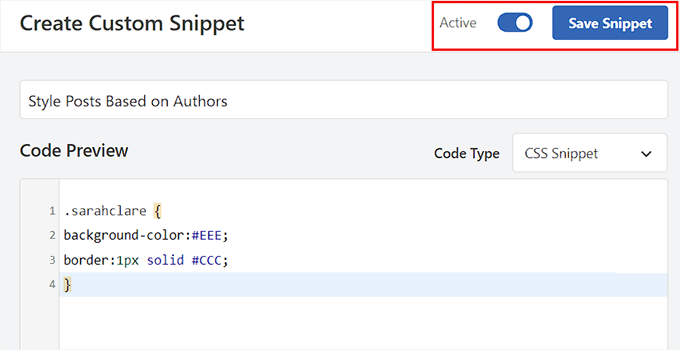
Den anpassade koden kommer att köras automatiskt vid aktivering.
Du kan nu besöka en specifik författares inlägg för att se ändringarna.

Hur man stylar inlägg baserat på popularitet med hjälp av kommentarantal
Du kanske har sett webbplatser med populära inläggswidgetar, som ibland baseras på antal kommentarer. I det här exemplet visar vi hur du stylar inlägg annorlunda med hjälp av antalet kommentarer.
Först måste vi kontrollera antalet kommentarer för varje inlägg och tilldela det en klass baserat på antalet. För att göra detta måste du lägga till en anpassad PHP-funktion med hjälp av ett kodavsnittsplugin som WPCode.
Välj helt enkelt alternativet 'Lägg till din anpassade kod (nytt utdrag)' för att starta sidan 'Skapa anpassat utdrag' i WPCode.
Här vill du välja ‘PHP-kodavsnitt’ som ‘Kodtyp’ och sedan kopiera och klistra in följande kod i rutan ‘Kodförhandsgranskning’:
<?php
    $postid = get_the_ID();
    $total_comment_count = wp_count_comments($postid);
        $my_comment_count = $total_comment_count->approved;
    if ($my_comment_count <10) {
        $my_comment_count = 'new';
    } elseif ($my_comment_count >= 10 && $my_comment_count <20) {
        $my_comment_count = 'emerging';
    } elseif ($my_comment_count >= 20) {
        $my_comment_count = 'popular';
    }
?>
Därefter klickar vi på knappen 'Spara utdrag' och växlar omkopplaren 'Inaktiv' till 'Aktiv' för att spara dina inställningar.
Den här koden kontrollerar antalet kommentarer för inlägget som visas och tilldelar det ett värde baserat på antalet.
Till exempel får inlägg med färre än 10 kommentarer en klass som kallas ny, färre än 20 kallas framväxande, och allt över 20 kommentarer är populärt.
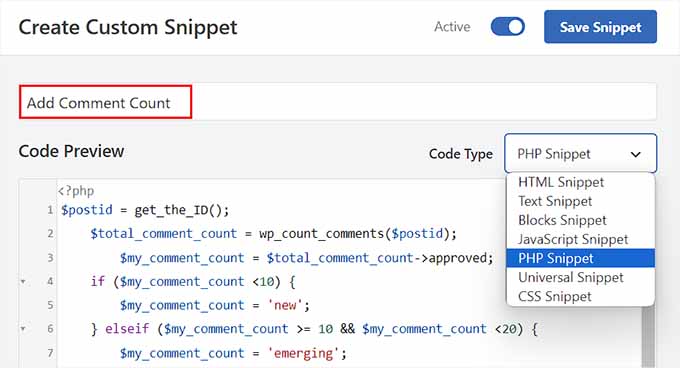
Nu måste du lägga till kommentarsantalet som en CSS-klass till funktionen post_class. För att göra detta måste du öppna sidan ‘Create Custom Snippet’ igen och välja alternativet ‘PHP Snippet’ från rullgardinsmenyn.
Sedan kan du lägga till följande anpassade kod i förhandsgranskningsrutan:
<article id="post-<?php the_ID(); ?>" <?php post_class( $my_comment_count ); ?>>
Därefter klickar du helt enkelt på knappen 'Spara utdrag'.
Sedan kan du växla omkopplaren ‘Inaktiv’ till ‘Aktiv’.
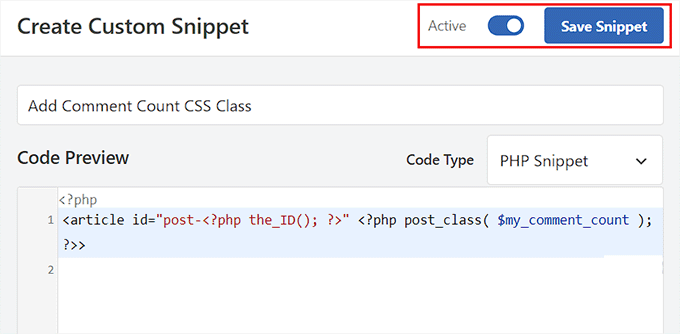
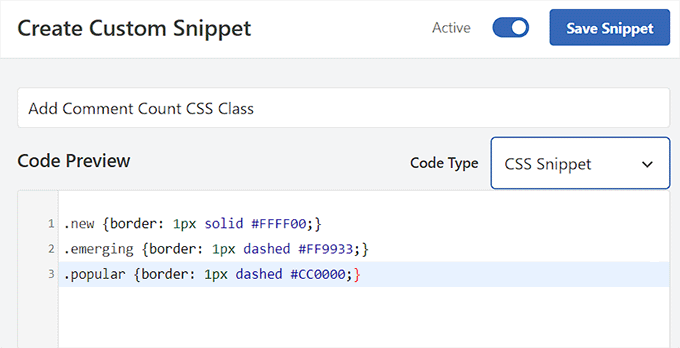
Detta kommer att lägga till CSS-klasserna ny, framväxande och populär till alla inlägg baserat på antalet kommentarer varje inlägg har. Du kan nu lägga till anpassad CSS för att styla varje inlägg baserat på dess popularitet.
Du kan till exempel använda följande kod för att lägga till olika kantfärger för inlägg baserat på antalet kommentarer som publicerats på dem:
.new {border: 1px solid #FFFF00;}
.emerging {border: 1px dashed #FF9933;}
.popular {border: 1px dashed #CC0000;}
När du är klar, glöm inte att klicka på knappen 'Spara utdrag' för att lagra dina inställningar.
Bonus: Visa ett annat sidofält för varje inlägg i WordPress
Efter att ha stylat varje inlägg olika, kanske du också vill lägga till en unik sidopanel för varje inlägg. Detta gör att du kan visa specifikt innehåll relaterat till den artikeln som användare kan vara intresserade av.
Till exempel, om du har en reseblogg och har publicerat ett blogginlägg om platser att besöka i Florida, kan du skapa en specifik sidopanel som visar Florida-resepaket. Alternativt kan du visa en registreringsformulär för en Florida-resa som du organiserar.
Du kan använda SeedProd, den bästa sidbyggarplugin för WordPress, för att visa ett annat sidofält för varje inlägg.
Den har ett dra-och-släpp-gränssnitt, över 320 färdiga mallar och integrationer med e-postmarknadsföringstjänster, vilket gör den till ett utmärkt val.
Vid aktivering av pluginet kan du välja en anpassad sida som din landningssidesign och sedan en layout med en sidopanel.
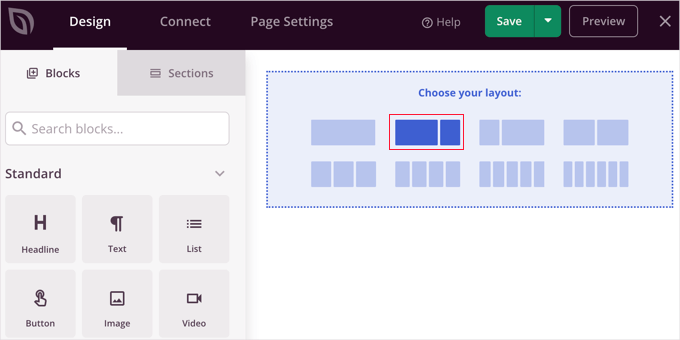
Därefter kan du enkelt dra och släppa block som du väljer från den vänstra kolumnen, inklusive kontaktformulär, arkiv, giveaways, sökrutor, kommentarer och mer.
När du är klar, klicka bara på knapparna 'Spara' och 'Publicera' från rullgardinsmenyn högst upp.
Du har nu framgångsrikt designat en specifik sidopanel för ett WordPress-inlägg eller en sida.
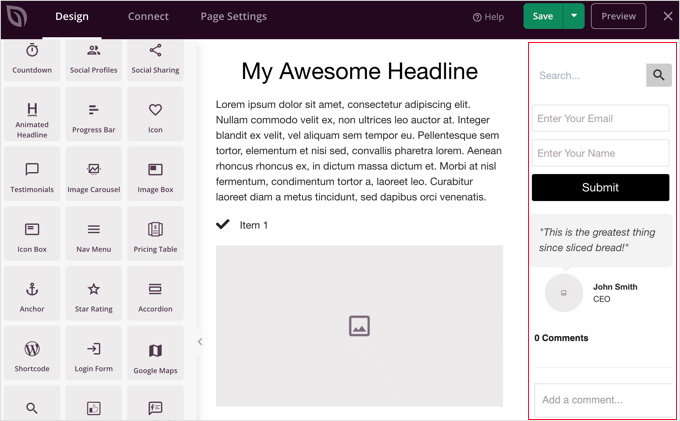
För mer information, se gärna vår handledning om hur man visar ett annat sidofält för varje inlägg och sida i WordPress.
Vanliga frågor om styling av olika inlägg i WordPress
Här är några frågor som våra läsare ofta har ställt om styling av inlägg och andra element i WordPress:
Hur lägger man till stilar i WordPress?
Du kan lägga till stilar med hjälp av Full Site Editor för blockteman eller Theme Customizer för klassiska teman. För avancerad anpassad CSS rekommenderar vi att du använder ett plugin som WPCode för att säkert infoga stilar utan att redigera temafiler.
Hur ändrar jag teckensnittsstil i ett WordPress-inlägg?
Du kan ändra teckensnittsstilen direkt i inställningarna för blockredigeraren. Markera textblocket du vill redigera, titta i sidofältet till höger och använd inställningarna för 'Typografi' för att justera storlek, utseende och teckensnittsfamilj.
Hur anpassar jag text i WordPress?
För att anpassa text kan du markera specifika ord för att använda verktygsfältet för att göra dem fetstilta eller kursiva. För globala ändringar som färg eller justering använder du inställningspanelen för blocket på höger sida av redigeringsskärmen.
Hur ändrar jag inläggsformat i WordPress?
Du kan ändra inläggsformatet i sidofältet för inläggsredigeraren. Leta efter panelen 'Status & synlighet' (eller en dedikerad sektion för 'Inläggsformat', beroende på ditt tema) och välj önskat format, som Standard, Galleri eller Video, från rullgardinsmenyn.
Kan jag anpassa WordPress helt?
Ja, du kan helt anpassa alla aspekter av WordPress. Eftersom det är öppen källkod har du fullständig kontroll över teman, plugins och anpassad kod, vilket gör att du kan bygga vilken design eller funktionalitet du behöver.
Vi hoppas att den här artikeln hjälpte dig att lära dig hur du stylar varje WordPress-inlägg på olika sätt. Du kanske också vill se våra nybörjarguider om hur man lägger till en favicon och hur man lägger till fallande snöflingor till din WordPress-blogg.
Om du gillade den här artikeln, prenumerera då på vår YouTube-kanal för WordPress-videoguider. Du kan också hitta oss på Twitter och Facebook.


Rafael
Bra artikel. Jag antar att jag skulle kunna använda något liknande detta för att kontrollera kategorin för ett inlägg och placera en anpassad CSS för att ändra stilen på en del av webbplatsen enligt kategorin, eller hur?
Jag vill sätta olika färger endast på bakgrunden till inläggets titel för varje kategori i en blogg.
Kany
Hej, bra artikel. Hur anpassar jag CSS-stilen för de senaste bloggnyheterna? Bara den senaste, någon idé? Tack.
WPBeginner Support
Ditt tema skulle behöva lägga till något som kan riktas av CSS, för närvarande har vi ingen rekommenderad metod för att lägga till det.
Admin
Les
Bra artikel. Jag ville ställa in standardteckensnittsstorleken per kategori och följde instruktionerna genom att lägga till koden i filen Style.css, men när jag lade till ett nytt inlägg hade teckensnittet den gamla storleken. Ser du koden? Vad missar jag?
/* Börja ytterligare CSS-stilar */
.art-blockheader .t, .art-vmenublockheader .t {white-space: nowrap;}
.desktop .art-nav-inner{width: 1200px!important;}
.category-firstg {
font-size: 18px;
font-style: bold;
}
/* Slut på ytterligare CSS-stilar */
William D
Bra artikel, tack så mycket. Kan läs mer-knappens färg/textfärg också ändras på ett liknande sätt? Något (jag har förmodligen gjort) har ändrat mina knappar på ett mycket obehagligt sätt och jag har en hel del svårt att lista ut hur jag ska göra dem trevliga igen.
Tack på förhand för all hjälp du kan ge!
Matus
Bra handledning. Enkel och tydlig förklaring.
Neon Emmanuel
Hej, om jag inkluderar detta i single.php så skriver den ut titeln på det aktuella inlägget, men det fungerar bra i index.php, några förslag på detta?
MayMyatKhine
Hej, skicka mig det nya evenemanget för att använda wordpress.
marisa
Det här är en jättebra artikel men jag har problem med att placera
ID, ‘post-class’); ?>
Var exakt i loopen ska jag placera den? Jag använder underscore.me med foundation 5 och min nya klass visas inte.
Alberto Hartzet
Perfekt!, tack. Vad sägs om det första och "det sista" inlägget? Några idéer?
Nadeem
Tack så mycket brorsan..det är väldigt hjälpsamt
RW
ännu ett bokmärke! bra inlägg! tack...
Payal
Mycket informativt, tack. Jag har bokmärkt den här sidan.
Jag har också en fråga: Vad händer om jag vill styla det första (senaste) inlägget annorlunda – så att inlägget som visas högst upp på min indexsida ser annorlunda ut?
James
Hej, jag kämpar med detta just nu..
Min inläggsslinga verkar inte ha en post_class-funktion så jag kan inte lista ut var jag ska placera ovanstående kod...
Detta är loopen jag använder för inlägg, var skulle jag placera koden ovan? Eller hur skulle jag få anpassade fält att fungera med detta?
Redaktionell personal
Du måste lägga till något i stil med detta i din inläggslopp:
1-click Use in WordPress
Admin
Jon Fuller
Hej, jag är ganska ny på att skapa WordPress-teman och jag letar efter ett sätt att visa varje inlägg i en egen ruta som separeras av en marginal upptill och nedtill. Kan du förklara hur detta är möjligt?
Tack
Redaktionell personal
Som standard är varje inlägg inuti sitt eget div-element. Du behöver bara använda CSS för att lägga till marginal uppåt och nedåt.
Admin
Shaun
Nyfiken, hur skulle detta kunna tillämpas för att lägga till en CSS-klass endast till inlägg som har samma "meta value" eller "meta value number"?
Tack för den utmärkta handledningen förresten!
Bästa
Redaktionell personal
Vi visade hur man gör det med anpassade fält, men det görs per nyckel. Men om du har samma nyckel med flera värden, bör du använda funktionen get_post_custom_values.
Admin
Em
Hittade precis detta inlägg och det är bra, tydligt, koncist och mitt i prick, tack så mycket
Jim
Jag skulle vilja göra något där inlägg ett får klassen "1", inlägg två får "2", inlägg tre får "3", och sedan upprepas denna ordning, så att inlägg fyra får "1" igen.
Några tips? det är bara att upprepa tre olika klasser var tredje inlägg.
Redaktionell personal
Du skulle behöva använda super loop-alternativet.
Admin
Brit
Vad jag specifikt försöker göra är att bara se till att när någon landar på min blogg, att miniatyren (som bara är en cirkel med inläggets titel) har en annan färg för ENDAST det senaste inlägget. Jag vet inte hur jag ska få detta att hända. Allt jag har hittat är kategori- eller ordningsspecifikt. Tankar?
Redaktionell personal
Brit, du skulle behöva använda den sista metoden "Super Loop". Det är förmodligen det enda sättet att göra det eftersom allt du skulle göra är att på det första inlägget lägga till en unik klass som "första-inlägg", och sedan styla det med din CSS-fil.
Admin
Jayaseelan Arumugam
Det är ett mycket trevligt och användbart inlägg. Särskilt jag gillar sättet att styla inlägg baserat på anpassade fält. Tack.
Kathleen
Thanks for this great article! It’s exactly what I searched for and so much helpful!
dina
Hur lägger jag till en unik klass till det 3:e, 6:e, 9:e och 12:e inlägget i en superloop. Tack!
vajrasar
Tja, det där var ett mycket bra stycke. Jag förstod vad du sa, men kan du belysa hur jag ska implementera detta på mitt Genesis-drivna News Child-tema, eftersom jag ska göra allt detta med function.php
Jag skulle vilja styla kategorispecifika inlägg annorlunda. Tack så mycket för detta inlägg. Mycket informativt.
Redaktionell personal
Så om du bara använder post class-metoden, har Genesis fältet under sina Layout-inställningar för varje inlägg. Du kan ange en anpassad klass och styla den på det sättet. Resten kan bli ganska komplicerat beroende på alla krokar och sådant. Vi gör inte nödvändigtvis genesis-specifika artiklar här.
Admin
jim
Vad menar du index.php i loopen. vilken index.php. Min har inget liknande din. Detta är det 10:e inlägget jag har läst där ingen har förklarat detta grundläggande koncept ordentligt. Och vad sägs om CSS. De senaste 10 inläggen har inte heller förklarat det. Internet blir sämre och sämre.
Redaktionell personal
Hej Jim,
Varje WordPress-tema gör saker annorlunda. Konceptet med loop är ganska väl förklarat i WordPress Codex. Det kräver en enkel Google-sökning: Loop WordPress vilket tar dig till: http://codex.wordpress.org/The_Loop
Eftersom varje tema varierar, använder vissa en separat loop.php-fil, andra är barn-teman som inte ens har index.php-filer. Det är verkligen svårt att förklara alla dessa koncept. När vi lägger handledningar i en temakategori förväntar vi oss att användarna har en god kunskap om hur WordPress-teman fungerar (även om du inte kan PHP).
Admin
Haider E Karrar
Jag tror att du istället borde använda filter i kombination med mall-taggarna här http://codex.wordpress.org/Conditional_Tags
Till exempel
function my_post_css_filters($content) { if(is_category(…)) return ” $content “; else if (something else) ….
}
add_filter(‘the_content’, ‘my_post_css_filters’, 1) — (prioritet 1, inte säker på vad annat det kan påverka).
Hossein
Hej..
Hur kan jag omsluta var fjärde inlägg i en div?
gashface
Glöm det, jag fick det att fungera, men NU stylar det inte varje inlägg olika, det stylar bara alla enligt den första inläggsförfattaren det hittar?
gashface
Finns det ett sätt att specificera en tagg som H2 stylas av författaren? Jag försöker .username h2{} till exempel men det fungerar inte?
gashface
Detta visar inte författaren hos mig, bara ett tomt utrymme, klistrade in din exakta kod, några idéer? Inlägg gjorda av administratören och är privata, gör det någon skillnad?
wpbeginner
@gashface nej det spelar ingen roll om inlägget är privat eller offentligt… Om det ger en vit sida, då klistrar du in koden på fel ställe.
gashface
Jag insåg att det berodde på att jag placerade koden före anropet till loopen, jag trodde att du menade före if have posts etc.. när det behöver gå efter det, tack för informationen
KimeeDoherty
This was a little helpful, but I am still lost Not sure how to include the loop file in order to override the template. You started the <div> tag but not ended them, what’s inside the div? I’m lost
kristelvdakker
Tack så mycket för detta inlägg! Det har varit mycket hjälpsamt.
Stuart
Hej, tack för idéerna – särskilt superloopen – glad att jag fick det att fungera på min webbplats.
Men jag undrar, som en komplett php-nybörjare, finns det ett sätt att anpassa koden så att varje efterföljande sida med inlägg inte får samma stil som inlägg 1, 2, 3 och 4 får på första sidan.
Med andra ord vill jag bara att de första fyra inläggen på första sidan ska se annorlunda ut än resten.
Hälsningar, Stu
Redaktionell personal
Ja. Du kan använda den villkorliga taggen is_paged() så att den bara visas på första sidan, men inte på de andra. Du kan också använda is_home() ... så bara på startsidan.
Admin
Stuart
Coolt – tack. Ser ut som att is_paged() är den för mig – men tyvärr, mina nybörjarkunskaper gör att jag kämpar med att lista ut hur jag integrerar den i koden.
Stuart
Kom fram till det till slut...
Michael
Om du ville använda det här tillvägagångssättet för att visuellt separera inlägg baserat på deras publiceringsdatum. Hur skulle du gå tillväga? Till exempel: styla de 5 inläggen som publicerades den 1:a med en svart bakgrund, och sedan styla inläggen som publicerades den 2:a med en röd bakgrund? Tack på förhand!
Redaktionell personal
Det bästa sättet att göra detta är att använda superloop-metoden. Där du använder räknarvariabeln för att ställa in värdena för inläggsklassen.
Admin
Dale
Jag försöker styla varje författares namn i en annan färg på vår wordpress-webbplats och jag har följt din kod enligt nedan:
Även om den här koden fungerar på mitt WordPress-tema, lägger den till avslutande citattecken efter class-2 men före författarens namn, så att klassen avslutas utan namnet i sig. Jag upptäckte detta först genom att placera den där php:n inuti body där du kan se hela strängen.
Har någon några idéer om varför detta händer?
Dale
Tyvärr tog den bort php:n jag postade, men här är klassutmatningen för att styla mina inlägg efter författarens namn. Författaren här heter admin, och som du kan se är avslutningstaggen före författarens namn admin.
"post-395 post type-post hentry category-uncategorized class-1 class-2"admin
Bec
Bra inlägg! Den informationen är fantastisk för att lägga till de där extra speciella anpassade funktionerna i din design.
Adam W. Warner
Verkligen ett bra inlägg, hatten av! Jag kunde dock inte låta bli att tänka på när det är dags att uppgradera temat som du gör alla dessa anpassade redigeringar på. Jag försöker använda functions.php-filen när det är möjligt för att undvika över skrivningar.
Jag skulle tro att det vore bättre att rulla in dessa loop-redigeringar i en funktion. Jag vet att med föräldrateman som Thematic, Hybrid, Genesis, etc... är det möjligt (och rekommenderat) att filtrera loopen och därmed lägga till dessa ändringar.
@Ken – Kanske ditt plugin skulle eliminera behovet av några funktioner alls?
Hur som helst, bara mina två cent och grattis Syed och teamet till er fortsatta excellens på den här webbplatsen!
Azad Shaikh
Mycket användbart inlägg verkligen. Varför publicerar du inte några WordPress-teman med dina fantastiska idéer och funktionalitet. Det skulle bli en stor framgång.
Tack!
Ken
Din artikel har gett mig några idéer om hur jag kan förbättra mitt plugin, tack för det!
Jag skrev precis ett plugin (Scripts n Styles) för att lägga till CSS direkt i head-elementet från redigeringsskärmen för inlägg/sidor. (Endast administratörsanvändare kan göra detta dock.) Det är inte lika robust (eller snarare, det hanterar inte samma sak) som din lösning eftersom CSS bara visas i enskilda vyer, inte i listor (arkiv).
Jag funderar på att lägga till funktionaliteten att inkludera ett klassnamn i post_class, men via en metaruta på admin-skärmen. Då behöver administratören bara lägga till CSS i sitt tema. (Eller kanske en inställningsskärm för att underlätta detta?)
Hur som helst, Super Loop verkar användbar för teman i allmänhet, jag måste inkludera det i mitt nästa!
Connor Crosby
Wow, that is a great post! Perfect timing since I am making a new Wordpress theme