Då och då stöter vi på speciella önskemål från våra läsare om att anpassa sin webbplats. Ett av dem var att visa valfritt antal inlägg i en slinga. Eftersom den här funktionen inte är tillgänglig som standard i WordPress skapade vi en anpassad kodsnutt för våra användare.
Med hjälp av loopen bearbetar WordPress vart och ett av de inlägg som ska visas på den aktuella sidan. Sedan formateras de enligt hur de matchar de angivna kriterierna i loop-taggarna.
I den här artikeln visar vi hur du visar valfritt antal posts i en WordPress-loop.

Vad är WordPress Loop?
Loopen används av WordPress för att visa vart och ett av dina inlägg. Det är PHP-kod som används i ett WordPress-tema för att visa en lista med inlägg på en webbsida. Den är en viktig del av WordPress-koden och utgör kärnan i de flesta frågor.
I en WordPress-loop finns det olika funktioner som körs för att visa publicerade posts. Utvecklare kan dock customize hur varje post visas i loopen genom att ändra template-taggarna.
Till exempel kommer bas taggar i en loop att visa rubriken, datumet och innehållet i posten i en loop. Du kan add to customizers och visa ytterligare information som kategori, excerpt, custom fields, författarens namn med mera.
WordPress-loopen låter dig också kontrollera antalet blogginlägg som du visar på varje page. Detta kan vara till hjälp när du utformar en författarmall, eftersom du kan kontrollera antalet posts som visas i varje loop.
Med detta sagt, låt oss se hur man addar valfritt antal posts till en WordPress-loop.
Lägga till valfritt antal posts i en WordPress-loop
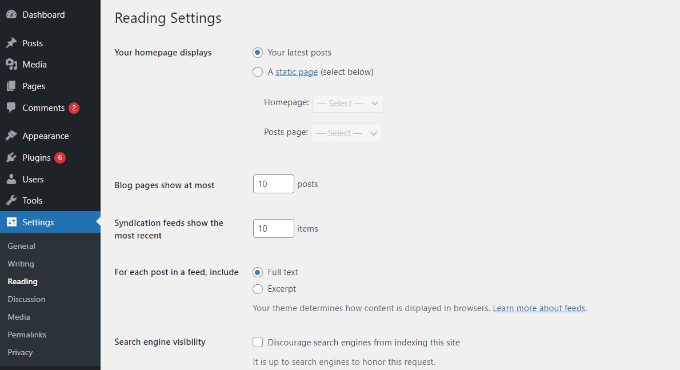
Normalt kan du ställa in antalet posts som ska visas i loopen från din WordPress adminpanel.
Du behöver bara heada till Settings ” Läsa från WordPress dashboard. Som standard kommer WordPress att visa 10 posts.

Du kan dock åsidosätta det antalet genom att använda en Super Loop, vilket gör att du kan visa valfritt antal posts i den specifika WordPress for loop.
This will allow you to customize the display settings of your pages, including author profiles, sidebars, and more.
Först måste du öppna en template-fil där du gillar att placera posterna och sedan helt enkelt add to denna loop:
1 2 3 4 5 6 7 8 9 10 11 12 13 14 15 16 17 18 19 20 21 22 23 24 25 26 27 28 29 30 31 32 | <?php// if everything is in place and ready, let's start the loopif ( have_posts() ) : while ( have_posts() ) : the_post(); ?> // to display 'n' number of posts, we need to execute the loop 'n' number of times // so we define a numerical variable called '$count' and set its value to zero // with each iteration of the loop, the value of '$count' will increase by one // after the value of '$count' reaches the specified number, the loop will stop // *USER: change the 'n' to the number of posts that you would like to display <?php static $count = 0; if ( $count == "n" ) { break; } else { ?> // for CSS styling and layout purposes, we wrap the post content in a div // we then display the entire post content via the 'the_content()' function // *USER: change to '<?php the_excerpt(); ?>' to display post excerpts instead <div class="post"> <?php the_title(); ?> <?php the_content(); ?> </div> // here, we continue with the limiting of the number of displayed posts // each iteration of the loop increases the value of '$count' by one // the final two lines complete the loop and close the if statement <?php $count ++; } ?><?php endwhile; ?><?php endif; ?> |
Note: You will have to replace the value of "n" in the if ( $count == "n" ) part of the code and choose any number.
Ett enkelt sätt att add to denna kod till din WordPress website är genom att använda WPCode tillägget. Det är det bästa code snippet-pluginet för WordPress som hjälper dig att hantera customize-kod.
Genom att använda WPCode behöver du inte redigera temats templates-filer manuellt och riskera att förstöra något. Tillägget kommer automatiskt att infoga koden åt dig.
Först måste du installera och aktivera det gratis pluginet WPCode. För mer detaljer, vänligen se vår guide om hur du installerar ett plugin för WordPress.
Efter aktivering kan du head to Code Snippets ” + Add Snippet från din WordPress dashboard. Därefter måste du välja alternativet “Add Your Custom Code (New Snippet)”.

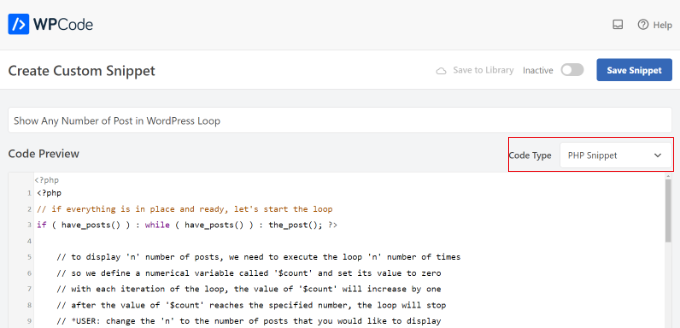
Efter det klistrar du bara in den custom code för WordPress-loopen som vi visade dig ovan i “Code Preview” area.
Du måste också enter ett namn för din kod och ställa in “Code Type” till “PHP Snippet”.

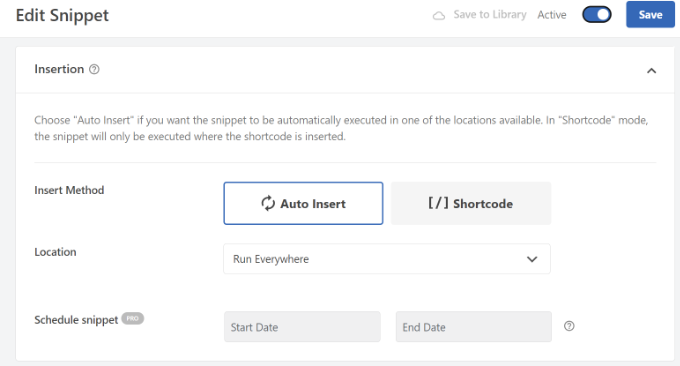
Därefter kan du rulla ner till “Insertion” section och välja var du gillar att run koden.
Som standard kör WPCode den överallt på din WordPress website. Du kan dock ändra location till en specifik page eller använda en shortcode för att inserta koden.

I denna tutorial kommer vi att använda standardmetoden “Auto Insert”.
När du är klar, glöm inte att klicka på toggle högst upp för att göra koden “Activate” och klicka sedan på knappen “Save”. WPCode kommer nu att distribuera koden på din WordPress-blogg och visa det angivna antalet posts i WordPress-loopen.
Vi hoppas att den här artikeln hjälpte dig att lära dig hur du visar valfritt antal inlägg i en WordPress-loop. Du kanske också vill se vår guide om hur du utesluter klibbiga inlägg från loopen i WordPress och våra expertval för de bästa relaterade inläggs-pluginsen för WordPress.
If you liked this article, then please subscribe to our YouTube Channel for WordPress video tutorials. You can also find us on Twitter and Facebook.


THANKGOD JONATHAN
This Super Loop concept is a game-changer! I’ve been struggling with displaying the right number of posts, and this is just what I needed.
Thank you for the helpful post.
WPBeginner Support
Glad our guide was helpful
Admin
Kevin Fonseca
Hey, thank you so much for this trick, I really needed it!!. Keep up the good work!
Uchenna
Please I need help from you guys on how to go about this. the problem is that while i have set a static front page on my Desktop view using a different theme which is Admag magazine and blog theme it appears fine and i like it but my mobile view which i used carrington theme displays nothing & when i try to call up posts on it it displays the link to the page i used on my desktop view which continues to open same link without showing any post. please who can help me find my way here. thanks in advance.
This is my site please help me. its good on desktop but cant call up posts on mobile front page.
ali
hi
How to modify loop to split posts into groups of threes?
example?
Khaled
global $wp_query;
$args = array_merge( $wp_query->query_vars, array( ‘posts_per_page’ => ‘6’ ) );
query_posts( $args );
query_posts( $args );
Inspired from here
Absarul Haque
I want to show 2 Post in Home Pages and 5 Posts in all other archive pages (Like Tag, Category and search results).
Ramon Hitzeroth
Thanks for this tutorial. Just one question though, my posts for some reason only show 50 at most on one page, if I set “n” to anything less than 50 it shows only that number of posts but anything more than 50 it stops at 50.
Holger
Thanks a lot! Perfect solution for my problem… Works great.
SHWAN NAMIQ SALEEM
Thank you very nice code i used this code in my blog to times , to show limit posts in homepage and in sidebar > the code work correctly without any problem . it is very simple code to use
Gustavo
Great! Works perfectly for me. Thanks a lot.
Kirk
It seems that, although I can alter the number of posts displayed using your method, the “number of posts setting” in the admin panel under Settings > Reading still sets the maximum.
So, for instance, if I set that number to 20 in my wp-admin panel and then within my template I set $count to equal any number OVER 20, it will still only show 20 posts. I can, however, set $count in my template to equal a number UNDER 20 and it will only show that amount of posts. So, the number in the admin panel seems to be the maximum. Is there a workaround for this? Thanks
Editorial Staff
You would have to use posts_per_page in the WP_Query variable and then set count 20.
Admin
Roy Omwell
hi team,
row #28 is missing “++”. It should be: count++
otherwise thank you, that was exactly what I was looking.
Editorial Staff
Fixed it.
Admin
AliMohammedAli
in line 28 .. you didn’t increment the $count variable !
JonPage11
Is there any button in the menu…. that make us easiest to edit number of post in wordpress?
Carik
Can not you do it through a function or get_posts query_posts?
Editorial Staff
Yes you could do that through the posts_per_page function in query_posts … this method will allow you to customize each post on the display and much more.
Admin
Bjarni
Thanks for the info, it would be good if there was a link to the code in action too
Editorial Staff
Visit any of our category pages.
Admin