Vi har arbetat med många WordPress-webbplatser genom åren, och ett anpassningstrick vi alltid återkommer till är att lägga till sidans slug i body class. Det är en så enkel sak, men det gör en värld av skillnad när det gäller designflexibilitet.
Här är vad vi menar: Du har förmodligen varit där förut – du vill styla bara en sida annorlunda än resten av din webbplats. Utan sidslugen i din kroppsklass slutar du med att brottas med komplexa CSS-väljare eller skapa separata stilmallar.
Att lägga till en sid-slug i WordPress-temat låter dig göra alla anpassningar du vill utan några komplikationer. Du kan enkelt ändra färger, typsnitt och andra element på enskilda sidor utan att påverka resten av din webbplats.
I den här artikeln visar vi hur du lägger till en sid-slug i body-klassen för dina WordPress-teman. Vi har använt den här metoden på allt från enkla företagswebbplatser till komplexa e-handelsbutiker.
Varför lägga till en sid-slug i body-klassen i ditt tema?
Om du vill anpassa specifika sidor på din webbplats och vill identifiera sidan korrekt, är det mycket användbart att lägga till en sidslug i din temas kroppsklass.
Som standard visar din WordPress-webbplats endast post-ID-klasserna, vilket kan vara knepigt när det gäller att identifiera rätt sida. En sid-slug visar URL:en för ditt blogginlägg, vilket gör det enklare att anpassa sidan.
Dessutom kan du utföra olika anpassningar av dina sidor med hjälp av en sidslug-kroppsklass. Du kan till exempel ändra teckensnitt och färger för ett visst inlägg eller markera en call-to-action-knapp på en specifik landningssida.
Med det sagt, låt oss titta på hur du kan lägga till sidans slug i body class i ditt WordPress-tema.
Lägga till en sid-slug i ditt WordPress-tema
För att hjälpa dig att lägga till URL:en för din sida i body-klassen i ditt WordPress-tema kan du ange följande kod i ditt temas functions.php-fil.
function add_slug_body_class( $classes ) {
global $post;
if ( isset( $post ) ) {
$classes[] = $post->post_type . '-' . $post->post_name;
}
return $classes;
}
add_filter( 'body_class', 'add_slug_body_class' );
Du kan komma åt din temas functions.php-filer genom att gå till WordPress temaredigerare (kodredigerare). Att direkt redigera temafiler är dock mycket riskabelt.
Det beror på att ett misstag vid tillägg av koden kan förstöra din webbplats och blockera dig från att logga in på din WordPress-instrumentpanel.
Ett mycket enklare sätt att lägga till koden i ditt temas body-klass är att använda ett WordPress-plugin som WPCode. Vi använder det på flera webbplatser, se vår fullständiga WPCode-recension för att lära dig mer.

Med WPCode kan du enkelt lägga till kod på din webbplats inom några minuter och utan några fel. Dessutom säkerställer det också att din kod inte tas bort om du uppdaterar eller byter tema i framtiden.
Den levereras också med ett bibliotek av expertgjorda kodavsnitt som du kan installera med ett klick. Så du behöver inga kodningskunskaper för att göra avancerade WordPress-anpassningar.
Faktum är att det att lägga till en sid-slug till body class är tillgängligt som ett färdigt kodavsnitt i WPCode-biblioteket. Detta är den enklaste metoden att följa.
Först måste du installera och aktivera det kostnadsfria WPCode-pluginet på din webbplats. För steg-för-steg-instruktioner kan du hänvisa till vår guide om hur man installerar ett WordPress-plugin.
När pluginet är aktiverat läggs ett nytt menyalternativ som heter 'Kodavsnitt' till i din WordPress adminmeny. Om du klickar på det kommer du till sidan där du hanterar alla dina kodavsnitt.
För att lägga till ditt första kodavsnitt, klicka på knappen 'Lägg till nytt'.
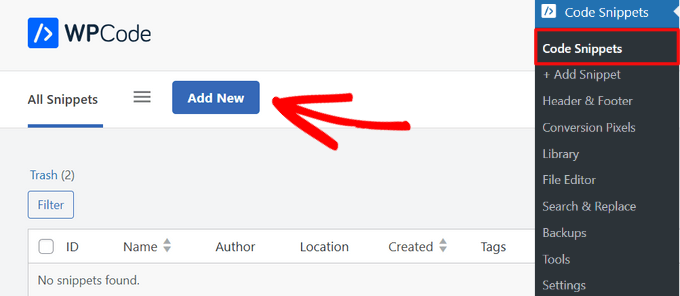
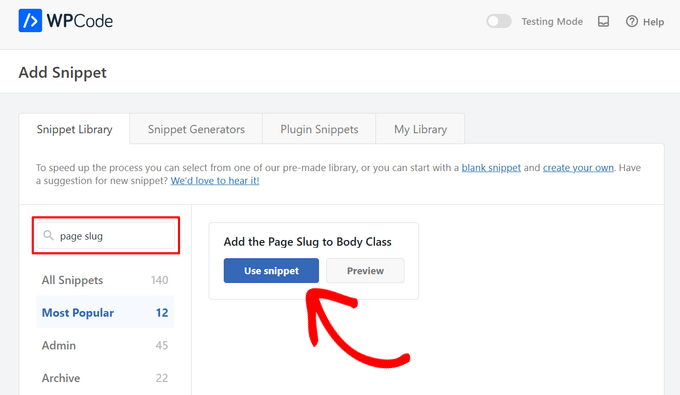
Detta kommer att öppna sidan ‘Lägg till kodsnutt’, där du kan välja en kodsnutt från det förskapade biblioteket.
Sök helt enkelt efter kodavsnittet ‘Add the Page Slug to Body Class’ och när du hittar det, klicka på knappen ‘Use snippet’.
Nu kommer WPCode automatiskt att lägga till koden och ställa in rätt infogningsmetod.
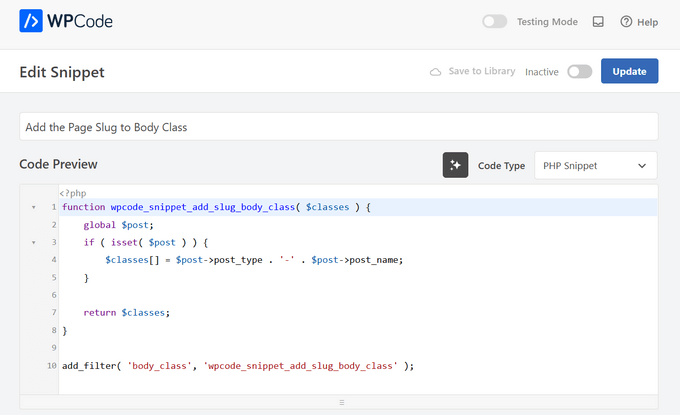
Allt du behöver göra är att växla omkopplaren från 'Inaktiv' till 'Aktiv'. Slutligen, klicka på knappen 'Uppdatera' högst upp på sidan.
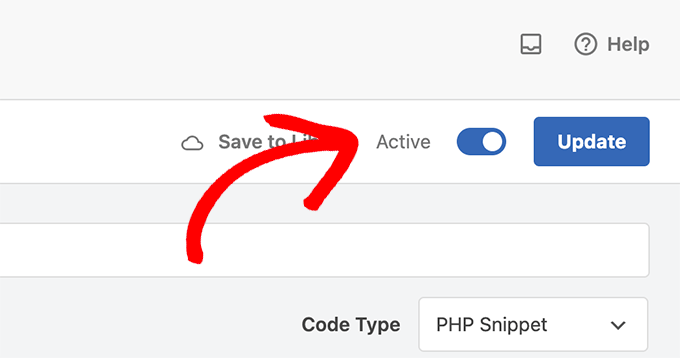
Du kommer nu att börja se en ny body-klass som matas ut så här: page-{slug}. Använd den klassen för att åsidosätta dina standardstilar och anpassa element för specifika sidor.
Till exempel, säg att du ville styla dina sidofältswidgets, men bara på en sida som har sluggen ”education”. I det fallet kan du lägga till CSS så här:
#sidebar .widgets{background: #fff; color: #000;}
.page-education #sidebar .widgets{background: #000; color: #fff;}
För mer information kan du se vår guide om hur du lägger till anpassad CSS i WordPress.
Lägga till anpassad kod manuellt
Om du föredrar att lägga till anpassad kod manuellt istället, här är hur du gör det.
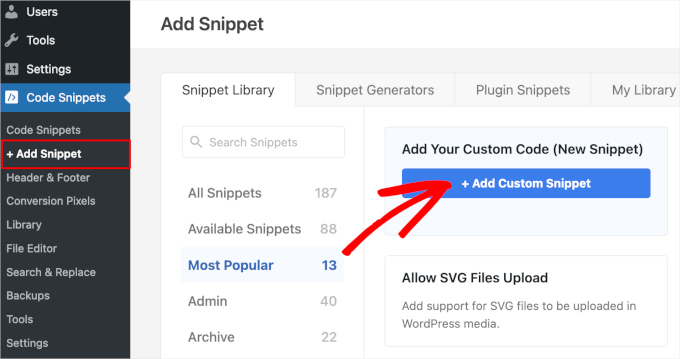
Navigera först till sidan Kodavsnitt » Lägg till avsnitt från din WordPress-instrumentpanel.
Därifrån går du till alternativet 'Lägg till din anpassade kod (nytt kodavsnitt)' och klickar på knappen '+ Lägg till anpassat kodavsnitt'.
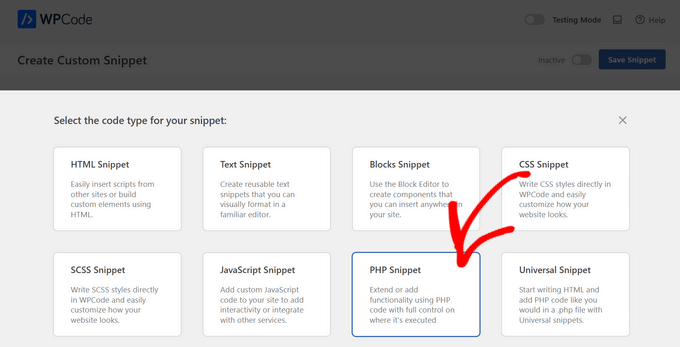
Välj sedan en kodtyp från listan med alternativ som visas på skärmen. För den här handledningen, välj 'PHP-avsnitt'.
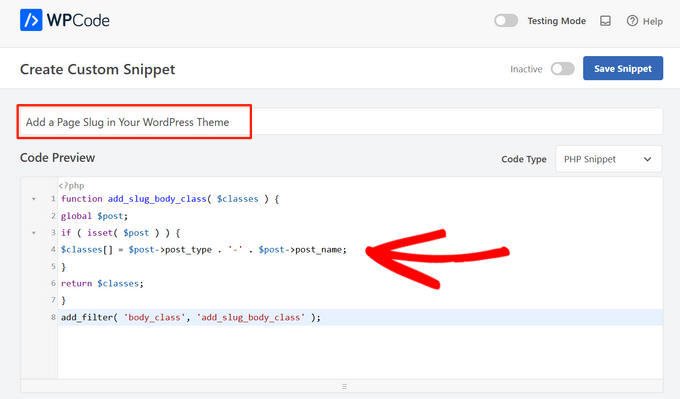
Ange nu en titel för din kodsnutt, som endast är för din referens och kan vara vad som helst för att hjälpa dig att identifiera koden.
Därefter kopierar och klistrar du helt enkelt in koden ovan i rutan 'Kodförhandsgranskning'.
Rulla sedan ner till avsnittet 'Insertion'. Här kan du välja metoden 'Auto Insert' för att automatiskt infoga och köra koden på en specifik WordPress-plats som admin, frontend och mer.
Om du är osäker, behåll standardalternativet 'Kör överallt'.
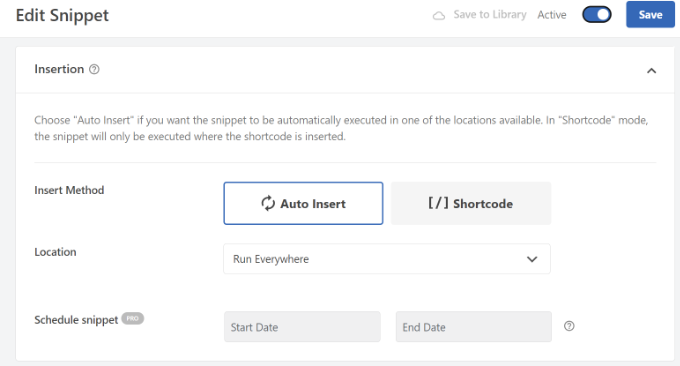
Eller så kan du välja metoden 'Kortkod'. Med den här metoden infogas inte kodavsnittet automatiskt. Du får en kortkod som du manuellt kan infoga var som helst på din webbplats.
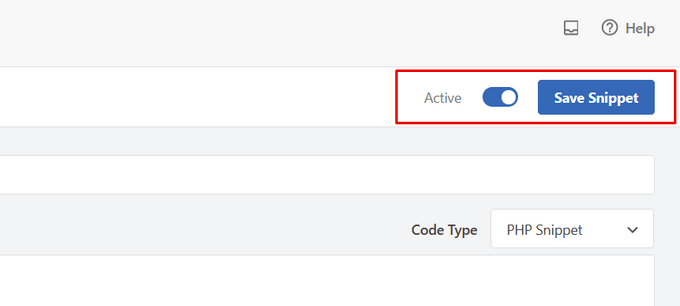
När du är redo, växla omkopplaren från ‘Inaktiv’ till ‘Aktiv’ och klicka på knappen ‘Save Snippet’ i det övre högra hörnet.
För mer information kan du hänvisa till vår guide om hur du lägger till anpassad kod i WordPress.
Vi hoppas att den här artikeln hjälpte dig att lära dig hur du lägger till en sid-slug i body-klassen på ditt WordPress-tema. Du kanske också vill titta på vår guide om WordPress body class och hur du väljer den bästa designprogramvaran.
Om du gillade den här artikeln, prenumerera då på vår YouTube-kanal för WordPress-videoguider. Du kan också hitta oss på Twitter och Facebook.


David
Tack! Enkelt och effektivt.
WPBeginner Support
Varsågod!
Admin
jeba
Tack. Det fungerar
WPBeginner Support
Glad our method worked for you
Admin
Bradley
Tack så mycket! Bokstavligen kopierade & klistrade in den här koden i min functions.php. Fungerade perfekt.
Alds
Vad sägs om att använda global $wp_query istället för $post? Jag har märkt att $post skrivs över om du har kört en wp_query innan functions.php körs.
Pete
Detta behöver ett villkorligt uttalande för att endast tillämpa det på single.php, inte archive.php etc.
Chris
Hur kan jag lägga post-id i body-klassen?
Aaron McGraw
Fantastiskt! Precis vad jag behövde. Tack så mycket!
Daneil
Tack för att du delade med dig, enkel kodbit, men användbar och låter dig skriva mer mänskligt vänliga CSS-filer, snarare än klasser baserade på ID. Skål
Austin
Thank you so much for this! I found out the hard way that page-id can change given different circumstances. This allows me to style individual pages without as much worry.
Kevin
Tack så mycket för detta. Hade lite problem initialt på grund av kodens placering i min CSS-stilmall men när den flyttades till botten fungerade det utmärkt. Önskar bara att detta var standard för WP som andra har sagt och att jag hade känt till detta för länge sedan
Tom McGinnis
Den här koden fungerar ganska bra. Jag upptäckte dock att sökresultaten skulle sluta med att body-klassen inkluderade sluggen från det första listade objektet. Ibland skulle det första objektet ha stilar som skulle åsidosätta stilarna för sökresultatsidan. Konstigt, eller hur!
Jag kom fram till att om du lägger till !is_search() inuti if-satsen, så elimineras detta problem. Om någon annan stöter på detta problem, är lösningen enkel.
Använde du &&?
När du sätter in !is_search() – Hur skrev du koden?
Murhaf Sousli
Detta är precis vad jag letar efter, jag klistrade in koden i function.php, men tyvärr läggs ingen klass till body! Några idéer?
Asaf
Jag har exakt samma problem
Ahir Hemant
Hej, det fungerar för mig. Skicka mig din länk så att jag kan kontrollera.
Tack
WPBeginner Staff
Det är inbyggt i WordPress. Men webbplatsens frontend hanteras av teman, det är därför det lämnas till temaförfattarna att bestämma om de ska använda det eller inte.
MJ
Fantastiskt! Jag önskar att denna funktionalitet var inbyggd i WP dock
Miluette
Tack så jättemycket. Precis vad jag behövde.
Suat
Det är ett bra sätt att redigera CSS.
Tack
Weerayut Teja
You save my work time.
Thanks Syed
Mike
Tack för detta. Jag använde det precis för att skapa ett snabbt plugin för att lägga till sluggen och förfäders sluggar till body-klassen. Alla som är intresserade kan få det här: https://github.com/bigmikestudios/bms-bodyclass-slug
Todd M.
Detta är en utmärkt kodsnutt för alla WordPress-utvecklare. Ingår nu som standard i min temainställning.
Gaurav Ramesh
Tack för detta. Sådana små tips och tricks hjälper mycket för nybörjare som jag.
Randy Caruso
Tack för detta – har fastnat med att hacka mig själv i bitar med sid-ID och lidit av konsekvenserna.