På WPBeginner har vi hjälpt otaliga läsare att anpassa sina WordPress-webbplatser för att förbättra användarupplevelsen, stärka varumärket och driva konverteringar. Och vi har sett att när det görs rätt kan en unik navigeringsmeny hjälpa till att öka engagemanget och hålla folk längre på din webbplats.
Problemet är att alla WordPress-teman har fasta platser där du kan visa en navigeringsmeny, så att ändra detta kan vara knepigt. Detta gäller särskilt om du är nybörjare eftersom modifiering av temafiler är en känslig process.
När du använder ett blocktema kan du göra detta med Full Site Editor. Men, enligt vår erfarenhet, finns det bättre alternativ som fungerar för alla typer av teman.
Till exempel, om du vill ha avancerade anpassningar kan du använda en kraftfull sidbyggare som SeedProd. Eller, om du letar efter ett enkelt sätt att använda anpassad kod, är WPCode det absolut bästa valet.
I den här artikeln visar vi hur du lägger till en anpassad navigeringsmeny i valfritt område av ditt WordPress-tema. Vi går igenom 3 olika alternativ så att du kan välja den handledning som passar dina behov.
Varför lägga till anpassade navigeringsmenyer i WordPress-teman?
En navigeringsmeny är en lista med länkar som pekar på viktiga områden på din webbplats. De gör det enkelt för besökare att hitta intressant innehåll, vilket kan öka sidvisningar och minska avvisningsfrekvensen i WordPress.
Den exakta placeringen av din meny varierar beroende på ditt WordPress-tema. De flesta teman har flera alternativ, så du kan skapa olika menyer och visa dem på olika platser.
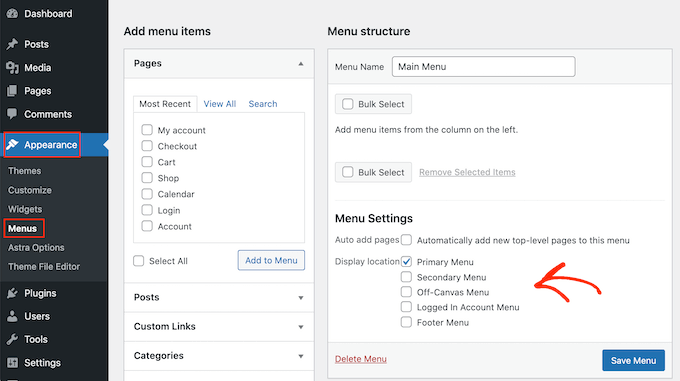
För att se var du kan visa menyer i ditt nuvarande WordPress-tema, gå helt enkelt till Utseende » Menyer och titta sedan på avsnittet 'Visningsplats'.
Följande bild visar de platser som stöds av Astra WordPress-tema.
Ibland kanske du vill visa en meny i ett område som inte är listat som en 'Visningsplats' i ditt tema.
Med det i åtanke, låt oss titta på hur du lägger till en anpassad navigeringsmeny i valfritt område av ditt WordPress-tema. Använd helt enkelt snabblänkarna nedan för att hoppa till den metod du föredrar:
- Metod 1: Använda hela webbplatsredigeraren (endast blockbaserade teman)
- Metod 2: Använda ett sidbyggarplugin (fungerar med alla teman)
- Method 3: Create a Custom Navigation Menu in WordPress Using Code (Advanced)
Metod 1: Använda hela webbplatsredigeraren (endast blockbaserade teman)
Om du använder ett blocktema som ThemeIsle Hestia Pro, kan du lägga till en anpassad navigeringsmeny med Full Site Editing (FSE) och blockredigeraren.
För mer information kan du se vår artikel om de bästa WordPress-teman för fullständig webbplatsredigering.
Den här metoden fungerar inte med alla teman, och den låter dig inte anpassa alla delar av menyn. Om du vill lägga till en helt anpassad meny till vilket WordPress-tema som helst, rekommenderar vi att du istället använder ett sidbyggarplugin.
Om du använder ett blockbaserat tema, gå sedan till Utseende » Redigerare.
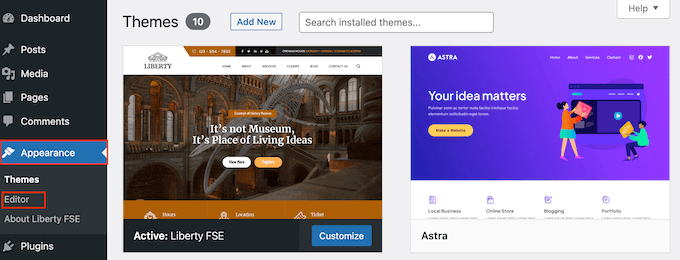
Som standard visar redigeraren för hela webbplatsen din temas startsidsmall, men du kan lägga till en navigeringsmeny i valfritt område.
För att se alla tillgängliga alternativ, välj antingen 'Mallar', 'Mönster' eller 'Sidor'.
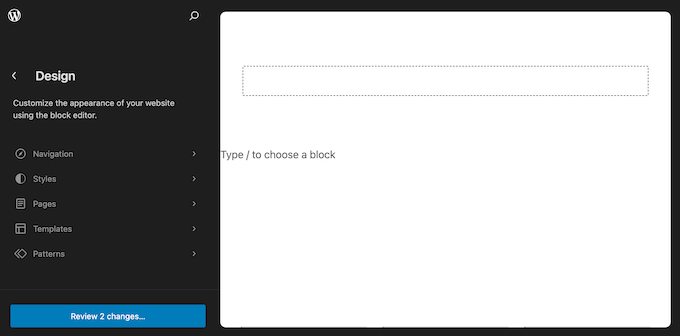
Du kan nu klicka på mallen, malldelen eller sidan där du vill lägga till en anpassad navigeringsmeny.
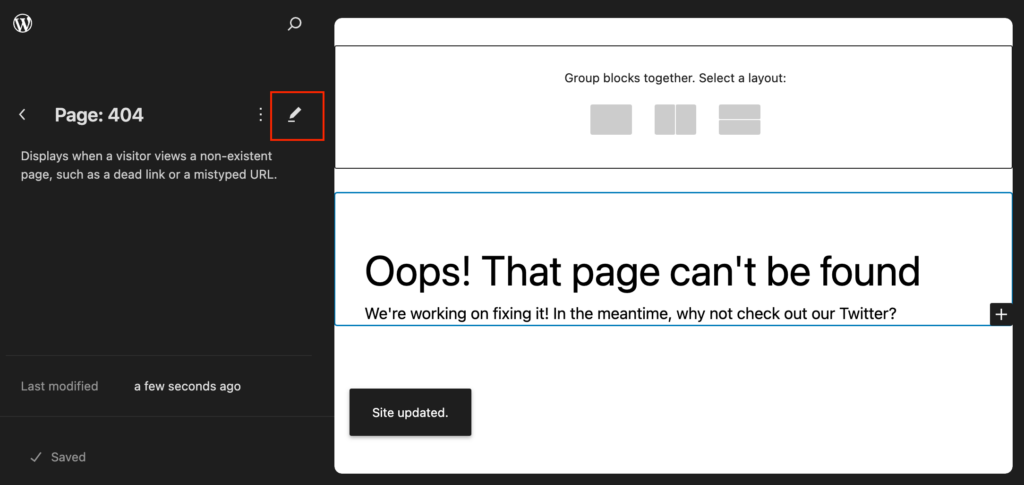
WordPress kommer nu att visa en förhandsgranskning av designen. För att redigera den här mallen, klicka på den lilla pennikonen.
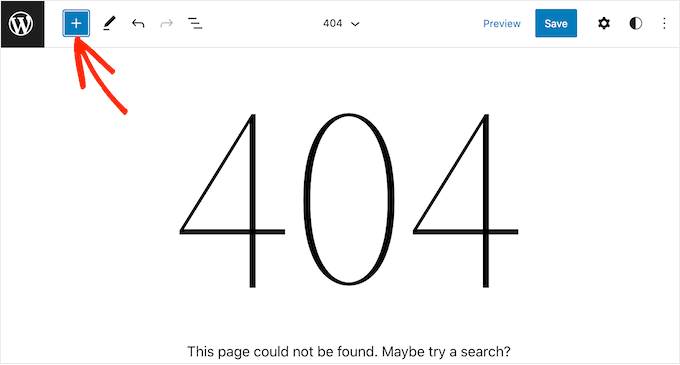
Nästa steg är att lägga till ett Navigationsblock i det område där du vill visa din meny.
Klicka på den blå knappen ‘+’ i det övre vänstra hörnet.
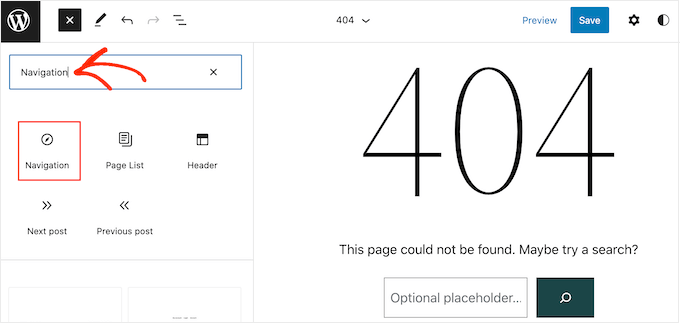
Skriv nu 'Navigation' i sökfältet.
När blocket 'Navigation' visas, dra och släpp det helt enkelt på din layout.
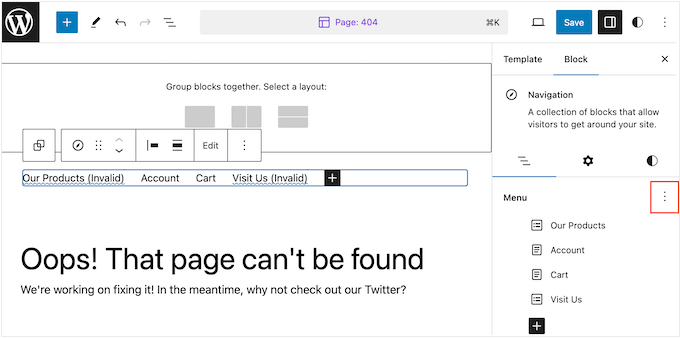
Klicka sedan för att välja Navigeringsblocket.
Om du redan har skapat menyn som du vill visa, klicka sedan för att välja blocket Navigation. I menyn till höger klickar du på ikonen med tre punkter bredvid 'Meny'.
Du kan sedan välja en meny från rullgardinsmenyn.
Ett annat alternativ är att bygga en meny inuti redigeraren för hela webbplatsen genom att lägga till sidor, inlägg, anpassade länkar och mer. För att lägga till objekt i den nya menyn, klicka bara på ikonen ‘+’.
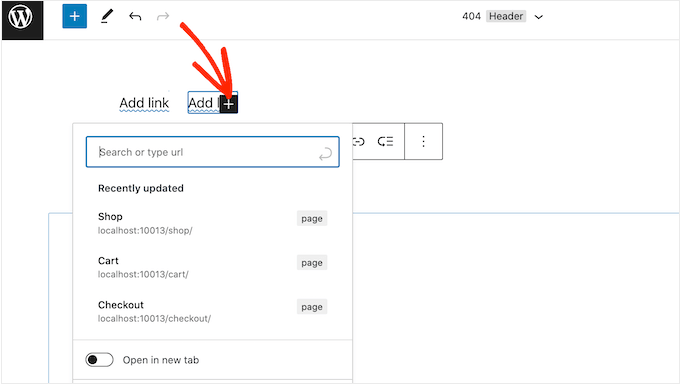
Detta öppnar ett popup-fönster där du lägger till vilket inlägg eller sida som helst och bestämmer om dessa länkar ska öppnas i en ny flik.
Du kan också lägga till en sökfält i WordPress-menyn, lägga till ikoner för sociala medier, och mer. I popup-fönstret, skriv helt enkelt in blocket du vill lägga till i menyn och välj rätt alternativ när det visas.
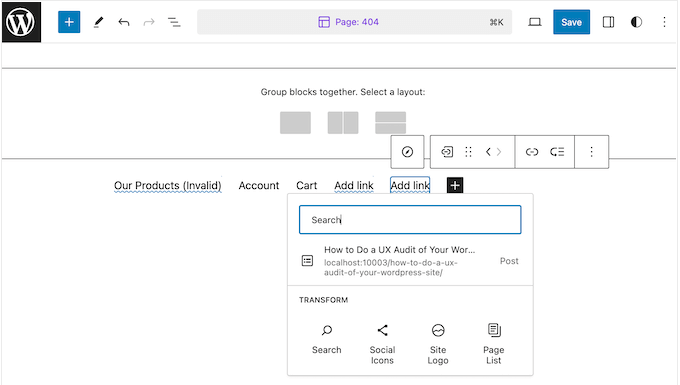
Du kan sedan konfigurera detta block med hjälp av inställningarna i miniverktygsfältet och menyn till höger. Upprepa helt enkelt dessa steg för att lägga till fler objekt i menyn.
När du är nöjd med hur menyn ser ut, klicka helt enkelt på knappen ‘Spara’.
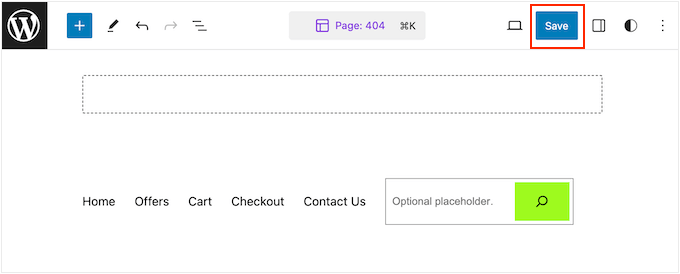
Din webbplats kommer nu att använda den nya mallen, och besökare kan interagera med din anpassade navigeringsmeny.
Metod 2: Använda ett sidbyggarplugin (fungerar med alla teman)
Hela webbplatsredigeraren låter dig lägga till menyer i blockbaserade teman. Men om du vill lägga till en avancerad, helt anpassningsbar meny till vilket WordPress-tema som helst, behöver du ett sidbyggarplugin.
SeedProd är det bästa WordPress sidbyggarpluginet på marknaden som låter dig anpassa varje del av din navigeringsmeny.
Vi har omfattande erfarenhet av att använda detta verktyg för att bygga anpassade navigeringsmenyer, landningssidor och mycket mer. För mer information, kolla in vår kompletta SeedProd-recension.
När det gäller sidor, kommer SeedProd med över 350 professionellt designade mallar som du kan använda som utgångspunkt. Efter att ha valt en mall kan du lägga till en anpassad navigeringsmeny på din webbplats med hjälp av SeedProds färdiga Nav Menu-block.
Först måste du installera och aktivera SeedProd-pluginet. För mer information, se vår steg-för-steg-guide om hur man installerar ett WordPress-plugin.
Notera: Det finns också en gratisversion av SeedProd som låter dig skapa anpassade navigeringsmenyer utan att skriva kod. I den här guiden kommer vi dock att använda SeedProd Pro eftersom den har Nav Menu-blocket, plus extra mallar och avancerade funktioner.
Efter att ha aktiverat pluginet kommer SeedProd att be om din licensnyckel.

Du hittar denna information i ditt konto på SeedProd-webbplatsen. Efter att ha angett nyckeln, klicka på knappen ‘Verifiera nyckel’.
När du har gjort det, gå till SeedProd » Landningssidor och klicka på knappen 'Lägg till ny landningssida'.
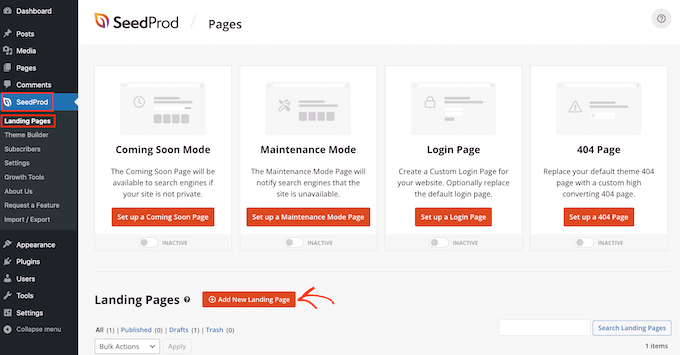
Du kan nu välja en mall för din anpassade sida.
För att hjälpa dig att hitta rätt design är alla SeedProds mallar organiserade i olika kampanxtyper, som kommande och lead squeeze-kampanjer. Du kan till och med använda SeedProds mallar för att förbättra din 404-sida.
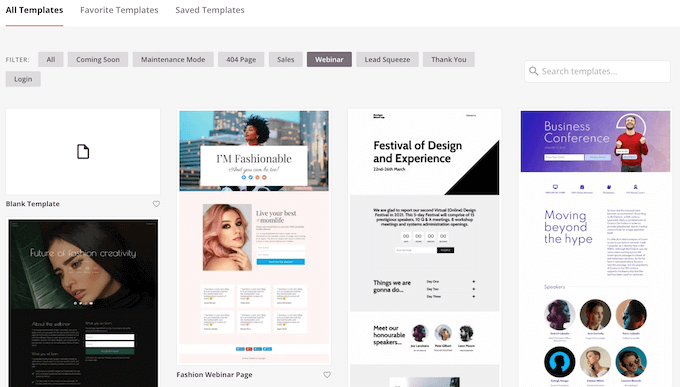
För att titta närmare på en design, för helt enkelt muspekaren över mallen och klicka sedan på förstoringsglaset.
När du hittar en design du vill använda, klicka på 'Välj den här mallen'.

Vi använder mallen 'Black Friday Sales Page' i alla våra bilder, men du kan använda vilken mall du vill.
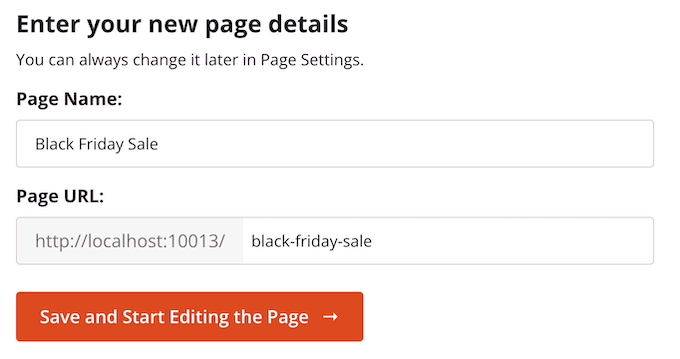
Efter att ha valt en mall, skriv in ett namn för den anpassade sidan. SeedProd kommer automatiskt att skapa en URL baserad på sidans titel, men du kan ändra denna URL till vad du vill.
Till exempel kan du lägga till relevanta sökord för att hjälpa sökmotorer att förstå vad sidan handlar om. Detta kan förbättra din WordPress SEO och hjälpa sökmotorn att visa sidan för personer som letar efter innehåll precis som ditt.
Efter att ha angett denna information, klicka på knappen ‘Spara och börja redigera sidan’.
De flesta mallar innehåller redan några block, som är kärnkomponenterna i alla SeedProd-sidlayouter.
För att anpassa ett block, klicka bara för att markera det i sidredigeraren.
Verktygsfältet till vänster visar nu alla inställningar för det blocket. Till exempel, i bilden nedan ändrar vi texten inuti ett 'Rubrik'-block.
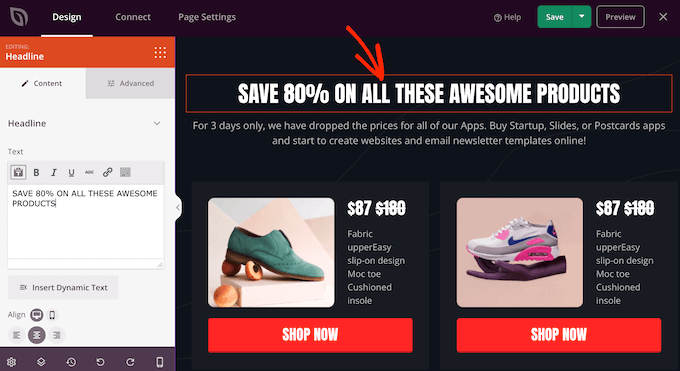
Du kan formatera texten, ändra dess justering, lägga till länkar och mer med hjälp av inställningarna i menyn till vänster.
Om du väljer fliken 'Avancerat' får du tillgång till ännu fler inställningar. Du kan till exempel få blocket att verkligen sticka ut genom att lägga till skuggor och CSS-animationer.
För att lägga till nya block i din design, hitta helt enkelt ett block i menyn till vänster och dra det sedan till sidan. Om du vill ta bort ett block, klicka för att markera det blocket och använd sedan papperskorgsikonen.
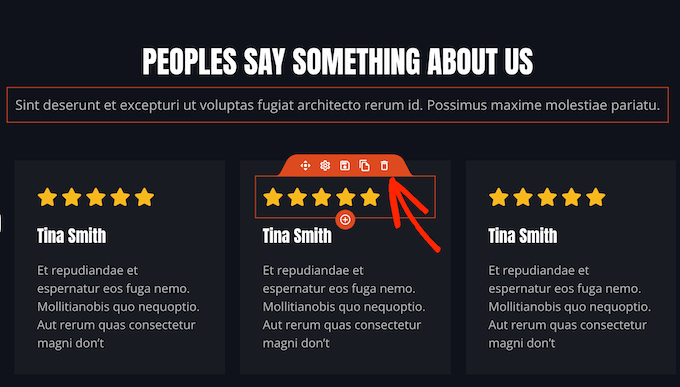
Eftersom vi vill skapa en anpassad navigeringsmeny, dra ett 'Nav Menu'-block till sidan.
Detta skapar en navigeringsmeny med ett enda standardobjekt ‘Om’.
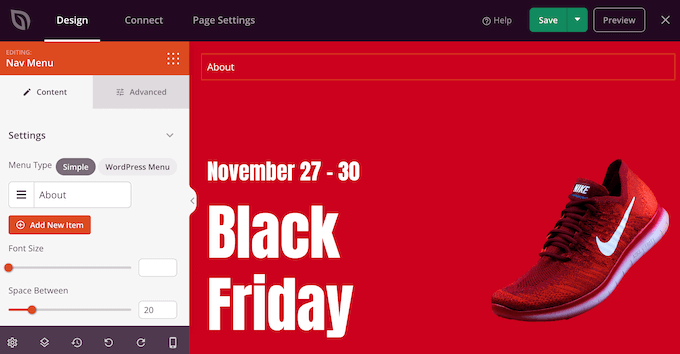
Du kan nu antingen skapa en ny meny i SeedProd-editorn eller välja en meny som du redan har skapat i WordPress-instrumentpanelen.
För att visa en meny du tidigare har skapat, klicka på knappen 'WordPress Menu'. Du kan nu öppna rullgardinsmenyn 'Menus' och välja ett alternativ från listan.
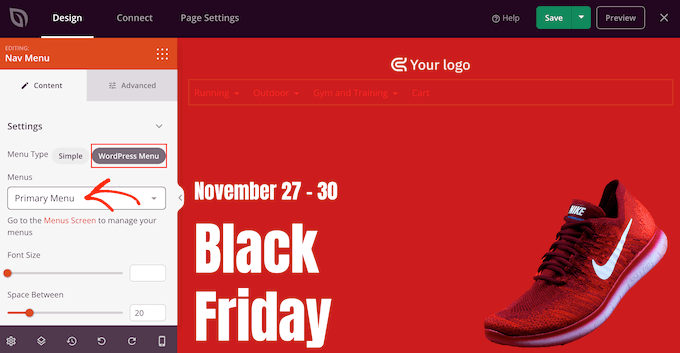
Därefter kan du ändra teckenstorlek, textjustering och mer med hjälp av inställningarna i den vänstra menyn.
Om du vill bygga en ny meny i SeedProd istället, välj sedan knappen ‘Simple’.
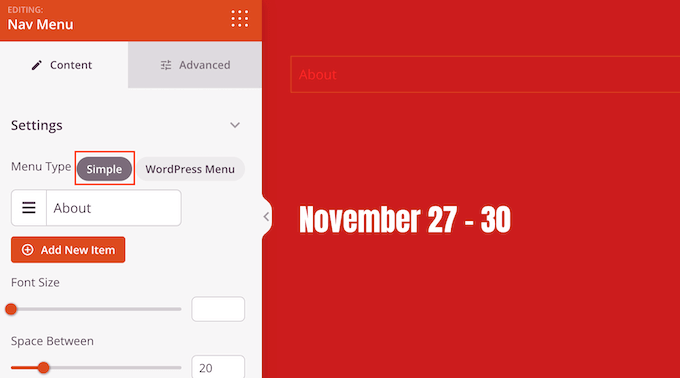
Klicka sedan för att expandera objektet ‘Om’ som SeedProd skapar som standard.
Detta öppnar några kontroller där du kan ändra texten och lägga till URL:en som menyalternativet ska länka till.
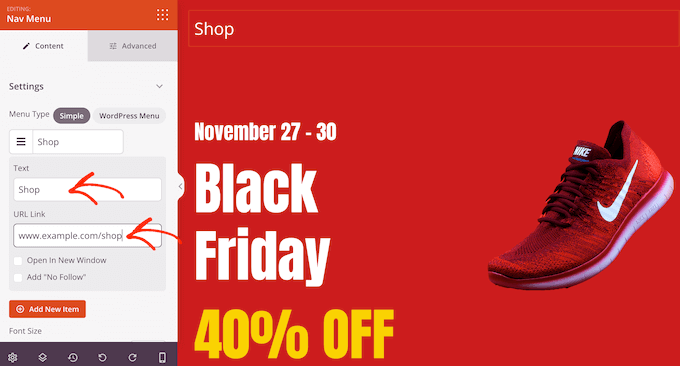
Som standard kommer länken att vara 'dofollow' och öppnas i samma webbläsarfönster. Du kan ändra dessa inställningar med hjälp av kryssrutorna i avsnittet 'URL-länk'.
I följande bild skapar vi en 'nofollow'-länk som öppnas i ett nytt fönster. För mer om detta ämne, se vår nybörjarguide till nofollow-länkar.
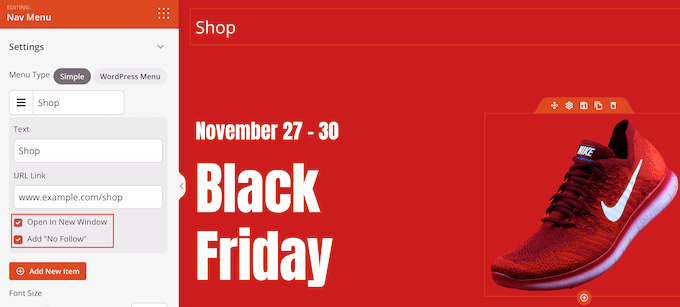
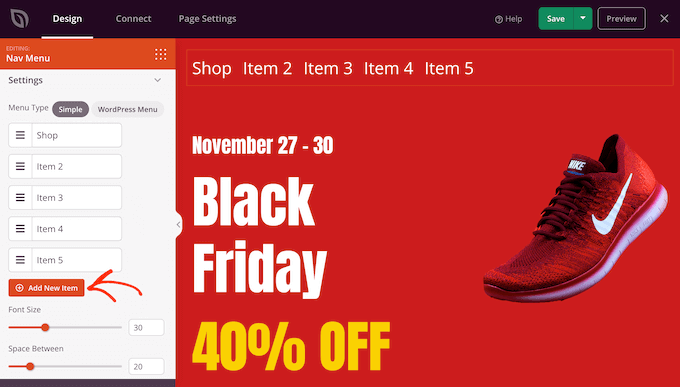
För att lägga till fler objekt i menyn, klicka helt enkelt på knappen 'Lägg till nytt objekt'.
Du kan sedan anpassa vart och ett av dessa objekt genom att följa samma process som beskrivs ovan.
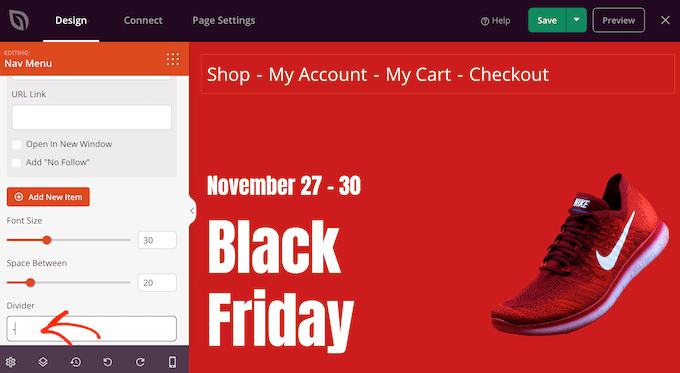
Menyn till vänster har också inställningar som ändrar teckensnittsstorleken och textjusteringen.
Du kan till och med skapa en avdelare, som kommer att visas mellan varje objekt i menyn.
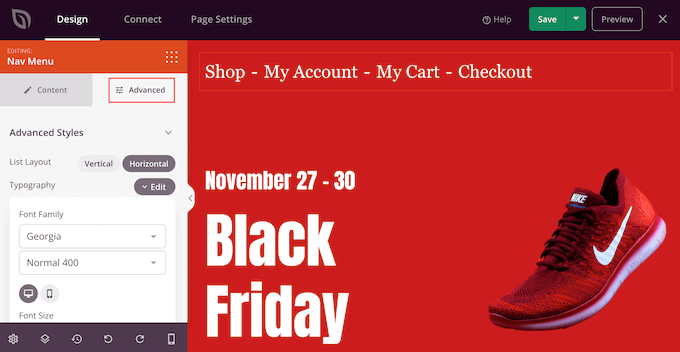
Efter det, fortsätt och byt till fliken ‘Avancerat’. Här kan du ändra menyns färger, avstånd, typografi och andra avancerade alternativ.
När du gör ändringar uppdateras förhandsgranskningen automatiskt, så att du kan prova olika inställningar för att se vad som ser bra ut i din design.
Som standard visar SeedProd samma meny på mobila och stationära enheter. Mobila enheter har dock vanligtvis mycket mindre skärmar jämfört med stationära datorer.
Med detta i åtanke kanske du vill skapa en separat meny att visa på mobila enheter. Till exempel kanske du använder en vertikal layout så att mobilanvändare inte behöver scrolla i sidled. Du kanske också vill visa färre länkar på smartphones och surfplattor.
För att skapa en mobilklar meny, designa bara menyn enligt samma process som beskrivs ovan. Välj sedan fliken 'Avancerat' och klicka för att expandera sektionen 'Enhetssynlighet'.
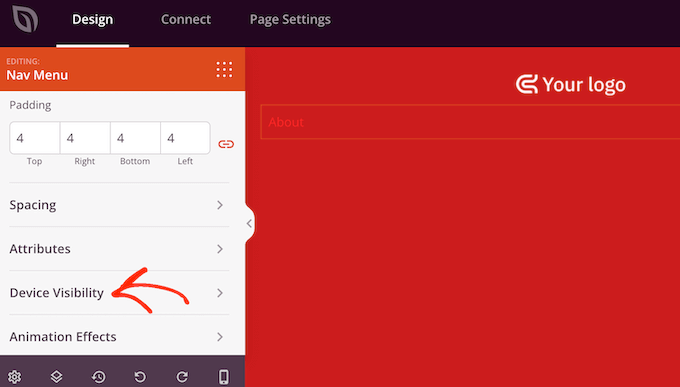
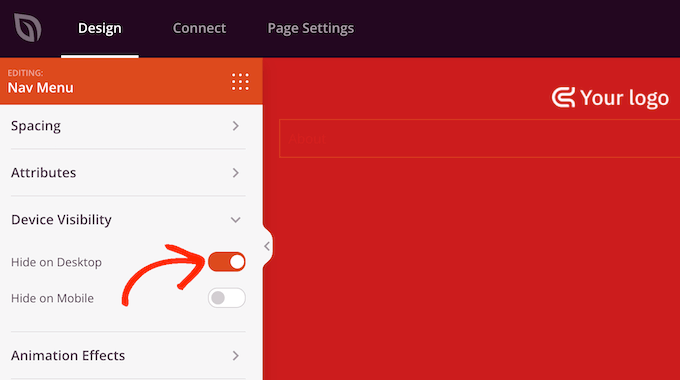
Du kan nu aktivera reglaget ‘Dölj på datorn’.
Nu kommer SeedProd bara att visa den här menyn för mobilanvändare.
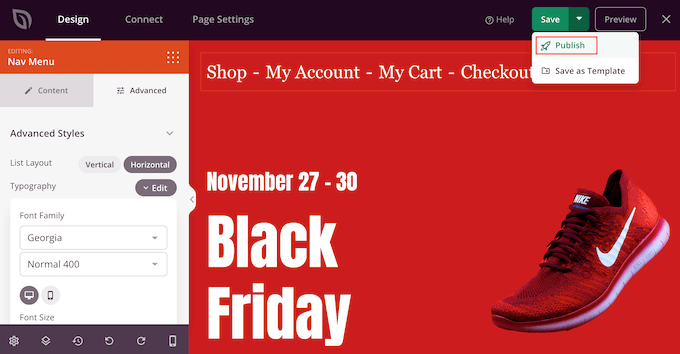
När du är nöjd med hur din anpassade meny ser ut är det dags att publicera den.
Klicka helt enkelt på rullgardinsmenyn bredvid ‘Spara’ och välj sedan ‘Publicera’.
Nu, om du besöker din WordPress-blogg, kommer du att se den anpassade navigeringsmenyn i aktion.
Metod 3: Skapa en anpassad navigeringsmeny i WordPress med kod (avancerat)
Om du inte vill konfigurera ett sidbyggarplugin kan du lägga till en anpassad navigeringsmeny med kod. Du hittar ofta guider med instruktioner om hur du lägger till anpassade kodavsnitt i din temas functions.php-fil.
Vi rekommenderar dock inte den här metoden, eftersom även ett litet fel i din kod kan orsaka ett antal vanliga WordPress-fel eller till och med bryta din webbplats helt. Du kommer också att förlora din anpassade kod när du uppdaterar ditt WordPress-tema.
Därför rekommenderar vi att använda WPCode. Det är det enklaste och säkraste sättet att lägga till anpassad kod i WordPress utan att behöva redigera några kärnfiler i WordPress.
Notera: Det finns massor av olika sätt du kan använda WPCode för att säkert anpassa din WordPress-webbplats. Den har ett inbyggt bibliotek med kodavsnitt och stöder alla de viktigaste WordPress-språken, inklusive PHP, JavaScript, CSS och HTML. För mer information om plugin, kolla in vår kompletta WPCode-recension.
Det första du behöver göra är att installera och aktivera det kostnadsfria WPCode-pluginet. För mer information, se vår steg-för-steg-guide om hur man installerar ett WordPress-plugin.
Efter aktivering, gå till Kodavsnitt » Lägg till kodavsnitt i din WordPress-instrumentpanel.
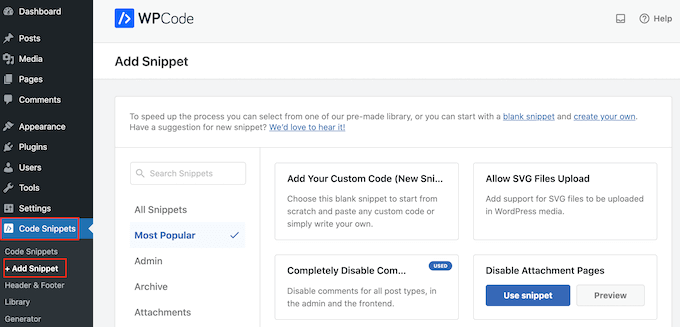
Här ser du alla färdiga kodavsnitt som du kan lägga till på din webbplats. Dessa inkluderar ett kodavsnitt som låter dig helt inaktivera kommentarer, ladda upp filtyper som WordPress normalt inte stöder, inaktivera bilagesidor, och mycket mer.
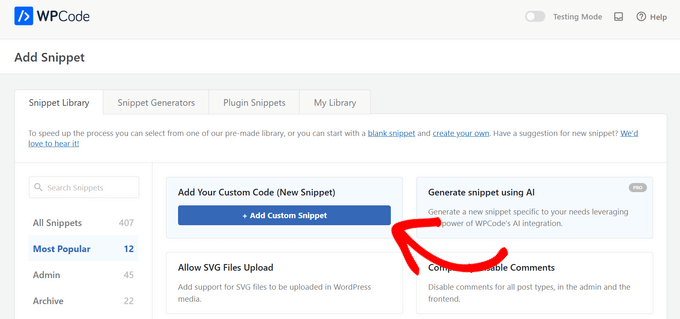
För att skapa ditt eget kodavsnitt, för muspekaren över 'Lägg till din anpassade kod (nytt kodavsnitt)' och klicka sedan på knappen '+ Lägg till anpassat kodavsnitt'.
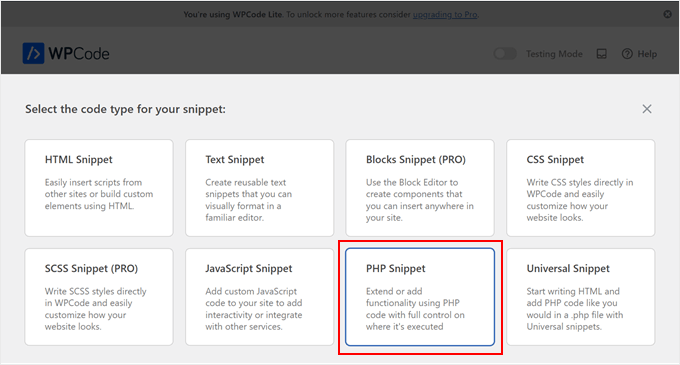
Därefter måste du välja en kodtyp från listan med alternativ som visas på skärmen. För den här handledningen, välj 'PHP-utdrag' som kodtyp.
Du kommer nu att dirigeras till sidan Skapa anpassat utdrag.
För att börja, ange en titel för kodsnutten. Detta kan vara vad som helst som hjälper dig att identifiera snutten i din WordPress-instrumentpanel.
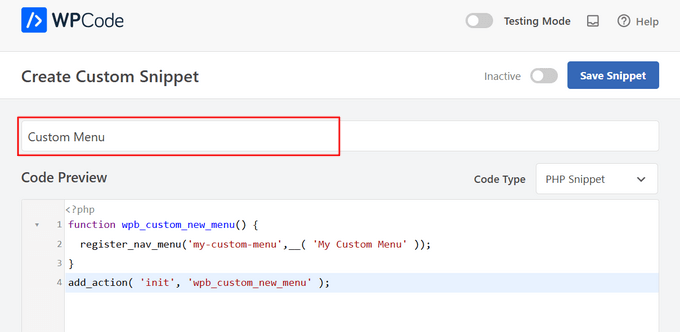
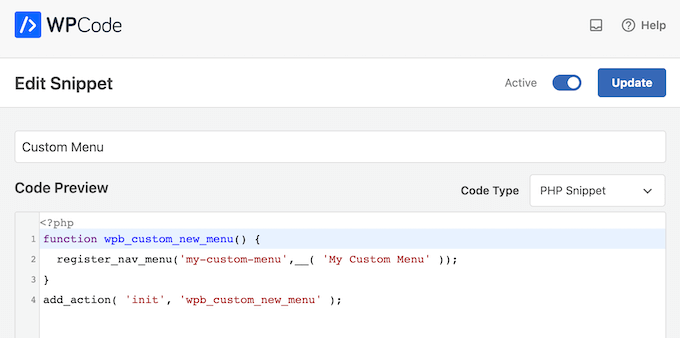
När du har gjort det, klistra helt enkelt in följande kodavsnitt i kodredigeraren:
function wpb_custom_new_menu() {
  register_nav_menu('my-custom-menu',__( 'My Custom Menu' ));
}
add_action( 'init', 'wpb_custom_new_menu' );
Detta lägger till en ny menyplats i ditt tema som kallas ‘Min anpassade meny.’ Om du vill använda ett annat namn, ändra bara kodavsnittet.
Om du vill lägga till mer än en anpassad navigeringsmeny i ditt tema, lägg helt enkelt till en extra rad i kodavsnittet.
Till exempel lägger vi här till två nya menyplatser i vårt tema, kallade 'Min anpassade meny' och 'Extra meny:'
function wpb_custom_new_menu() {
  register_nav_menus(
    array(
      'my-custom-menu' => __( 'My Custom Menu' ),
      'extra-menu' => __( 'Extra Menu' )
    )
  );
}
add_action( 'init', 'wpb_custom_new_menu' );
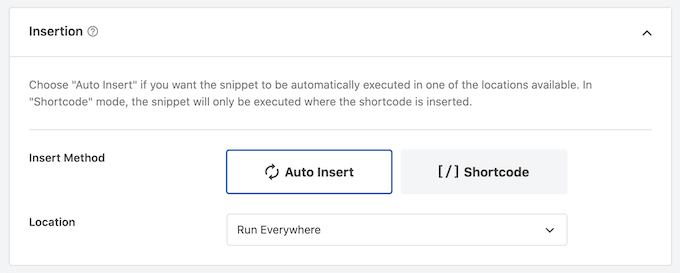
Scrolla sedan ner till alternativen för 'Infogning'. Om det inte redan är valt, välj metoden 'Auto Insert' så att WPCode lägger till kodavsnittet på hela din webbplats.
Öppna sedan rullgardinsmenyn ‘Plats’ och klicka på ‘Kör överallt’.
Nu är du redo att skrolla till toppen av skärmen och klicka på reglaget ‘Inaktiv’ så att det ändras till ‘Aktiv’.
Klicka slutligen på 'Spara' för att göra detta kodavsnitt live.
Gå sedan till Utseende » Menyer och titta på området ‘Visningsplats’.
Du bör nu se ett nytt alternativ 'Min anpassade meny'.
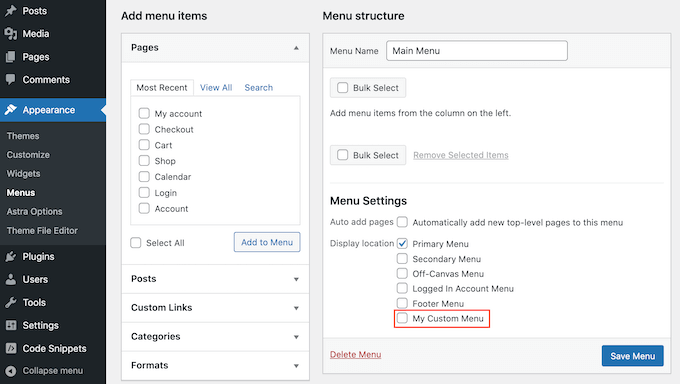
Du kan nu lägga till några menyalternativ till den nya platsen. För mer information, se vår steg-för-steg-guide om hur man lägger till navigeringsmenyer för nybörjare.
När du är nöjd med din meny är nästa steg att lägga till den i ditt WordPress-tema.
De flesta webbplatser visar navigeringsmenyn direkt under sidhuvudet. Detta innebär att menyn är en av de första sakerna besökare ser, tillsammans med webbplatsens logotyp eller titel.
Du kan lägga till den anpassade navigeringsmenyn var som helst genom att lägga till lite kod i din temas mallfil.
I din WordPress-instrumentpanel, gå till Utseende » Temas filredigerare.
I menyn till höger, välj mallen där du vill lägga till menyn. Om du till exempel vill visa den anpassade navigeringsmenyn i din webbplatsens sidhuvud, väljer du vanligtvis filen header.php.
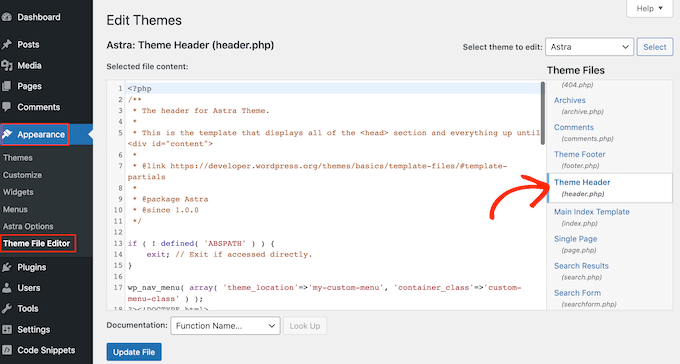
För hjälp med att hitta rätt mallfil, se vår guide om hur du hittar vilka filer som ska redigeras i ditt WordPress-tema.
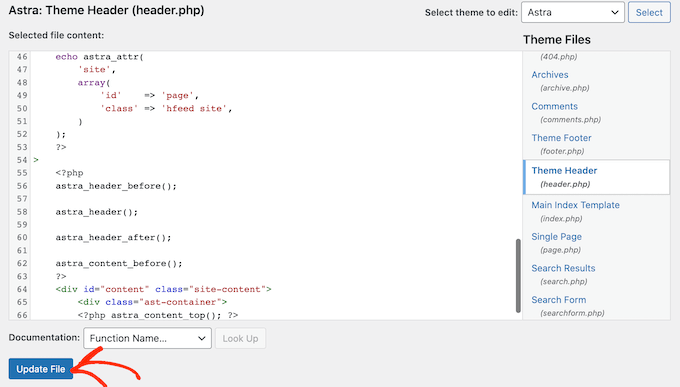
Efter att ha valt filen måste du lägga till en wp_nav_menu-funktion och ange namnet på din anpassade meny.
Till exempel, i följande kodavsnitt lägger vi till 'Min anpassade meny' i sidans sidhuvud:
wp_nav_menu( array( 'theme_location'=>'my-custom-menu', 'container_class'=>'custom-menu-class' ) );
Efter att ha lagt till koden, klicka på knappen 'Uppdatera fil' för att spara dina ändringar.
Nu, om du besöker din webbplats, då kommer du att se den anpassade menyn i praktiken.
Som standard kommer din meny att visas som en enkel punktlista.
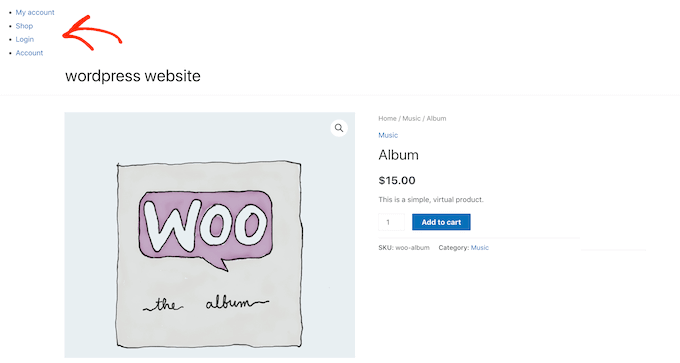
Du kan styla den anpassade navigeringsmenyn för att bättre matcha ditt WordPress-tema eller ditt företags varumärke genom att lägga till anpassad CSS-kod på din webbplats.
För att göra detta, gå till Utseende » Anpassa.
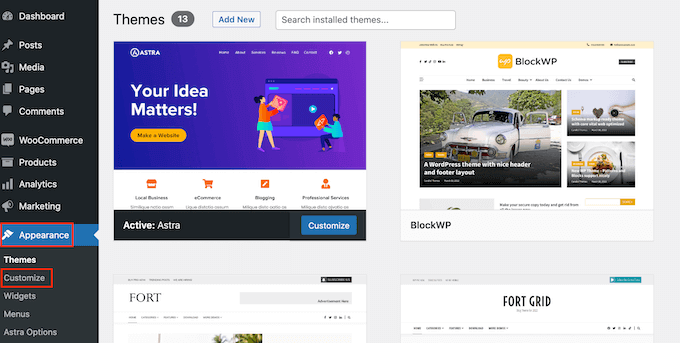
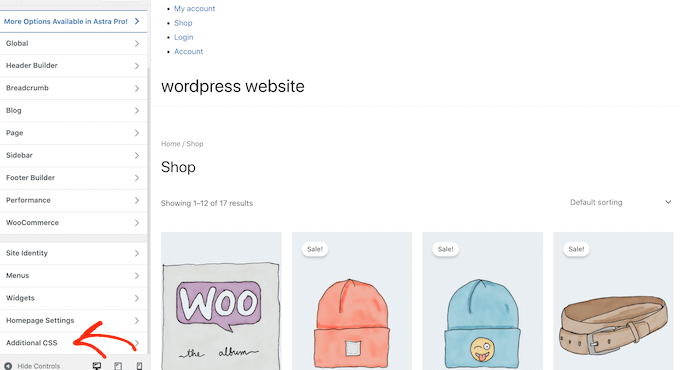
I WordPress temaanpassare, klicka på 'Ytterligare CSS'.
Detta öppnar en liten kodredigerare där du kan skriva in lite CSS.
Du kan nu styla din meny med hjälp av CSS-klassen som du lade till i din temamall. I vårt exempel är detta .custom_menu_class.
I följande kod lägger vi till marginaler och stoppning, ställer in textfärgen till svart och arrangerar menyalternativen i en horisontell layout:
div.custom-menu-class ul {
    margin:20px 0px 20px 0px;
    list-style-type: none;
    list-style: none;
    list-style-image: none;
    text-align:right;
	display:inline-block;
}
div.custom-menu-class li {
    padding: 0px 20px 0px 0px;
    display: inline-block;
}

div.custom-menu-class a {
    color:#000;
}
WordPress-anpassaren uppdateras automatiskt.
Nu kommer det att visas hur menyn kommer att se ut med den nya stilen.
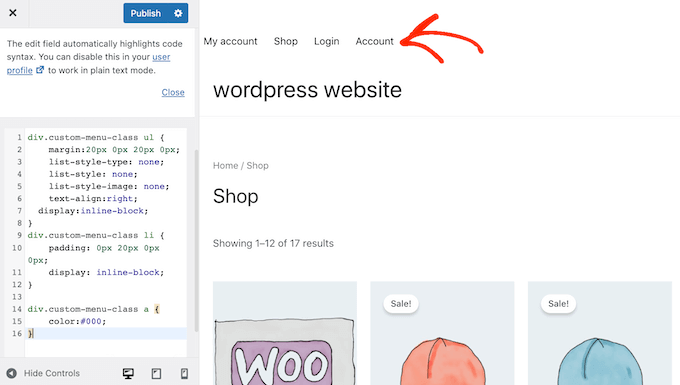
Om du är nöjd med hur menyn ser ut, klicka på 'Publicera' för att göra dina ändringar live.
För mer information, se vår guide om hur man stylar WordPress navigeringsmenyer.
Expertguider: Gör mer med WordPress-navigeringsmenyer
Med WordPress kan du skapa alla typer av hjälpsamma och engagerande menyer. Med det i åtanke, här är några experthandledningar som hjälper dig att få ut ännu mer av dina navigeringsmenyer:
- Hur man lägger till bildikoner med navigeringsmenyer i WordPress
- Hur man lägger till villkorlig logik till menyer i WordPress (steg för steg)
- Hur man lägger till menybeskrivningar i dina WordPress-teman
- Hur man lägger till en fullskärms responsiv meny i WordPress
- Hur man lägger till en megameny på din WordPress-webbplats (steg för steg)
Vi hoppas att denna ultimata guide hjälpte dig att lära dig hur du lägger till en anpassad navigeringsmeny i WordPress. Du kanske också vill se våra guider om hur du lägger till en knapp i din WordPress-sidhuvudmeny eller hur du markerar ett menyalternativ i WordPress.
Om du gillade den här artikeln, prenumerera då på vår YouTube-kanal för WordPress-videoguider. Du kan också hitta oss på Twitter och Facebook.


Jiří Vaněk
Jag ville alltid undvika plugin först för sådana här saker. Det är därför jag alltid uppskattar det när du också erbjuder möjligheten att använda WP Code och snippets. Jag testar dem alltid på en testsida först och den här fungerar utmärkt. Jag sparar sedan dina snippets i mitt eget kodarkiv, som jag alltid kan återvända till vid behov. Tack.
WPBeginner Support
Glad to hear you found our code snippets helpful!
Admin
Mike
Tack för att du visade koden, jag har ett problem, min nya nya visar alltid samma innehåll som huvudmenyn efter att jag applicerat:
wp_nav_menu( array( ‘theme_location’=>’too-right-menu’, ‘container_class’=>’top-right-class’ ) );
Snälla hjälp.
WPBeginner Support
Du kanske använder samma namn som en annan meny som ditt tema har aktiv. Om du inte redan har gjort det, försök med en annan platsnamn.
Admin
Shubham Kumar
Hur kan jag göra den menyn "sticky" (fast), jag använder den första metoden dvs. att klistra in koden i theme’s header.php, nu skulle jag vilja göra det elementet "sticky" om användaren scrollar till från den menyns plats.
Amit Singh
Jag skapade två menyer. En till vänster om logotypen och en annan till höger. Nu vill jag lägga till undermenyer. Jag drar bara menyer under föräldern men det fungerar inte. Har du någon artikel som förklarar hur vi kan lägga till anpassade undermenyer?
WPBeginner Support
Inte för tillfället, men vi kommer definitivt att ta det i beaktande för framtida artiklar.
Admin
Mohit
Fortsätt med det goda arbetet
WPBeginner Support
Glad you continue to enjoy our content
Admin
Saurabh
min meny visas inte i sidhuvudet. den visas under sidtiteln
WPBeginner Support
Du kan behöva ändra var koden infogas i mallen, men om du kontaktar supporten för ditt nuvarande tema bör de kunna tala om var sidhuvudet läggs till i deras tema.
Admin
ian
hej
varför kan jag inte se menyerna på min webbplats?
handledningarnas layout ser absolut ingenting ut som min skärm
tack
WPBeginner Support
Är din webbplats en WordPress.com-webbplats? https://www.wpbeginner.com/beginners-guide/self-hosted-wordpress-org-vs-free-wordpress-com-infograph/
Admin
krishna
hej
jag vill lägga till min egen html för rubriken
hur kan jag göra det?
Mukeshwar Singh
Hej, jag använder Magazine Pro och det finns inget alternativ för anpassad meny i widgetområdet!! Jag använde din kod för att skapa en anpassad meny men jag behöver hjälp eftersom det inte finns något alternativ för anpassad meny i widgetområdet, vilket gör att jag inte kan dra och släppa den i footerområdet... Snälla hjälp mig
Elle
Hej! Jag har slutfört handledningen och jag har kunnat lägga till menyn på önskad plats på min webbplats. Jag har stylat den och allt. PROBLEM: Menyn visas på siduppdatering för ett ögonblick, jag kan till och med klicka på den! Men den försvinner snabbt bakom min header. Den är inte klickbar efter att den försvunnit. Mitt huvud exploderar när jag försöker lista ut detta!!
Furqan
Hej
Först skapar jag tilläggsmenyn med namnet min anpassade meny och den fungerar perfekt och korrekt hämtning och sedan ändrade jag dess namn till sidfotsmeny efter att ha ändrat dess namn anpassad navigering inte hämtning vad är anledningen
Himanshu
Bara en fråga: vad ska jag göra med WordPress befintliga navigeringsfält. Hur tar jag bort det.
karima
Hej, en vän till mig har ett problem, eller flera, hon har den horisontella navigeringsfältet i sidhuvudet men också ett vertikalt bredvid som skymmer sidinnehållet, det visas när man börjar scrolla på hemsidan men är fixerat på allt innehåll på sidorna.. kan någon titta snälla och ge råd, det finns också ett felmeddelande vi inte kan hitta hur vi ska bli av med, all hjälp uppskattas.
sudhakar
hur man tar bort standardbildspel i något tema och hur man lägger till vår nya bildspelsmodell på startsidan
Imran
Jag har en anpassad header byggd för WordPress med hårdkodade menyalternativ. Hur kan jag använda WordPress-menyn i headern istället för den hårdkodade menyn?
cheryl
Jag är ganska ny på WordPress men jag skulle vilja redigera en anpassad meny som vi har skapat eftersom något verkar vara fel i menyn.
Hur gör jag detta?
Manu
Excellent tutorial! This was exactly what I needed right now. Within 5 minutes I was able to set up a footer menu in a theme that by default didn’t have any. Thank you so much
Munna Hossain
Hjälpsam artikel. Jag är en WordPress-användare och dessa tips kommer att hjälpa mig att lägga till anpassade navigeringsmenyer. Tack för att du delade med dig.
Daniel Keith
Hej där,
Bra handledning. Hur kan jag applicera CSS på den här anpassade menyn?
Även om detta är ett bra sätt att lägga till flera menyer, ser webbplatsen konstig ut utan korrekt CSS.
Zaheer Abbas
Jag skapar mitt WordPress-tema men menyn och widgeten visas inte i adminpanelen ???
är det inbyggda funktioner i WordPress eller måste jag skapa menyer och widgets med kod, snälla guida mig
Tabitha
Hur kan jag göra min rullgardinsmeny till kolumner? Min nuvarande rullgardinsmeny är för lång.
Aakash Salunke
Jag är en lite mer avancerad användare. Mitt tema stöder bara en meny. Men jag vill lägga till en meny till. Jag har gjort det men hur kan jag lägga till den?
WPBeginner Support
Först måste du registrera menyplatsen, sedan måste du redigera dina temafiler för att visa din navigeringsmeny.
Admin
bobit
det fungerade, tack för det utmärkta inlägget
Aijaz Ansari
Grymt, handledning, det hjälper verkligen en nybörjare som jag.
tack
Victoria
Tack för artikeln!!! Jag skapade min nya meny.
Jag har dock ett problem.
Min webbplats har en fast bredd, och när jag ändrar storlek på fönstret stannar allt på plats, förutom den nya menyn. Min-width är inte ett alternativ eftersom det inte är exakt det beteende jag vill ha.
Hur kan jag få den att bete sig på samma sätt som resten av sidans innehåll?
Tack!
Joey
TACK! Jag letade länge efter detta, trodde aldrig det var så enkelt.
Cory
jag har ett galet gammalt tema som inte stödde WP 3.0+ menyer. Den här handledningen var så enkel. Det tog mig 3 minuter att uppdatera det lite. Tack så mycket.
Jacques Goudreau
Tack för tipset! Bra handledning!
Emma
Vart går man ens för att göra dessa ändringar? Jag kan inte se några av dessa alternativ under flikarna Tema eller Temaalternativ.
I use the Buenos Theme, but can’t find on the Buenos theme page does it support these changes? I want to put in an Archive menu with a list of all the recipes on my blog… should be easy but proving impossible
Redaktionell personal
De flesta teman stöder detta. Titta under Utseende > Menyer. Den här artikeln är för temadesigners som vill lägga till den här funktionen i sina teman för att låta användare lägga till menyer från backend.
Admin
Zoe
Jag har försökt att lägga till en anpassad klass till en enskild anpassad URL (för att ändra färgen på bara en URL) i avsnittet Top Nav Menus, men det lägger bara till min klass som en förlängning av den befintliga klassen i källkoden och ingenting händer.
Här är min CSS-kod och källkoden som matas ut på min webbplats:
.myCustomClass { color: #FFFF00; }
En engångsfärgad länk
Några förslag på hur jag kan få detta att fungera?
Redaktionell personal
Ja, lägg till det som color: #ffff00 !important; i den klassen. Det borde fungera.
Admin
Jeremy Johnson
Jag kunde implementera dessa ändringar och den anpassade menyn fungerar. CSS i mitt valda tema verkar dock inte stödja undermenyer. Undermenyposten är alltid synlig, att föra muspekaren över föräldraobjektet gör ingenting, och föräldramenyobjektet är lika brett som det bredare barnobjektet vilket trycker de andra menyobjekten längre åt höger än de borde vara. Några förslag på hur undermenyn kan agera dynamiskt? Jag är ganska ny på CSS.
Redaktionell personal
Den bästa platsen att börja skulle vara att ta standardtemat Twenty Eleven. Använd navigerings-CSS därifrån och börja modifiera.
Admin
Cedric
Letar fortfarande efter en lösning på detta.
shaunling
Det här är ju toppen!
digitfox
Ja! Det är en fin handledning för mig! Jag är väldigt ny på WP! Tack
PauloNeves
Jag behöver hjälp.
Följ alla steg, men i panelen Utseende är menyalternativet inte aktiverat.
När jag väljer ett annat tema fungerar det.
Hur aktiverar jag menyalternativet?
Tack.
Paulo Neves
wpbeginner
@PauloNeves Du måste lägga till denna rad i din temas functions.php-fil: add_theme_support( ‘menus’ );
Brad
Tack för detta! Fungerade fantastiskt för mig och hjälpte min klient mycket! – aptdesign
eeebasic
Det hjälpte mig mycket även om WordPress version 3.3 släpptes för några dagar sedan.
citydan
Jag har följt instruktionerna och detta inlägg och inlägget här (https://www.wpbeginner.com/wp-tutorials/adding-a-second-menu-to-the-twenty-ten-theme/), och kommit fram till hur jag får min CSS att visa menyn korrekt, men barnobjekten (undermenyposter) visas inte. Jag har ställt in dem korrekt i menyredigeraren, men de visas inte på webbplatsen. De är inte dolda av CSS eftersom de inte finns i sidans källkod.
Några idéer varför mina undermenyposter inte visas?
GourabMalla
Hej,
Jag har lagt till den anpassade menyn i toppnavigeringen men vill veta hur jag kan aktivera "Aktuell sidklass".
Jag använder WordPress 3.2
Tack
Gourab
DanFlynnDesign
Tack! Älskar hur allt detta är dynamiskt så att klienten kan redigera vid behov, plus att kunna ange vilken som är den aktuella sidan och applicera en hover-effekt! EXAKT vad jag letade efter!
asharperrazor
Jag har försökt detta många gånger. Jag har ett gammalt WordPress-tema. Så gammalt att jag inte ens är säker på vilken version av WordPress det skrevs för. Hur som helst, jag kan få funktionsdelen att fungera. Jag kan spara rätt meny. Jag kan placera koden i andra delar av min webbplats, säg sidfoten, även om den visas som en hierarkisk lista och inte horisontellt.
Visas inte i toppnavigeringsmenyn. Behöver jag ett nytt tema eller är det möjligt att redigera mitt nuvarande tema för att tillåta den nya menyfunktionen?
Tack på förhand. Webbplatsen är http://www.asharperrazor.com
JamesGeorge
Jag implementerade detta utan några problem - tack! Jag tog koden för "nav-meny" och placerade den i div där min klients tema anropade listan över sidor. Jag ersatte den i princip med din kod ovan och laddade upp den, och css behöll samma stil. Det ser bra ut och fungerar perfekt. FANTASTISKT!
ÁlvaroBenavides
Jag behöver verkligen hjälp med att implementera CSS för klasserna, så meddela mig när du är klar!
Bec
Bra inlägg – tack!
Jag har implementerat enligt ovan och mina menyalternativ visas på webbplatsen, enda problemet är att varje sida är tom?!
några idéer?
Redaktionell personal
Låter som ett PHP-fel. Validera din PHP för att säkerställa att det inte finns något fel.
Admin
Joseph McCullough
Snabbt och enkelt – så som jag gillar mina kodavsnitt. Tack så mycket.
Paul
Jag har skapat anpassade navigeringsmenyer ett par gånger. Det som är konstigt är att efter att jag skapar och sparar dem, så visas de ett tag och sedan återgår navigeringsfältet till bara 2 flikar som om inställningarna automatiskt skrivs över. På webbplatser med samma mall där jag aldrig skapat en anpassad meny visas de korrekt.
Några idéer?
Redaktionell personal
Nej, ingen aning om varför det händer.
Admin
Narendra Choudhary
Du kan definiera egna klasser för varje navigering och sedan lägga till en bild i bakgrunden. Du kan till och med använda CSS (text-indent) -egenskapen för att bli av med menytexten om du vill.
Svara
Ram
Jag har en fråga om navigeringsmenyn,
finns det något sätt att lägga till bilden i listan över navigeringsmenyer..
Tack,
Ram
Redaktionell personal
Du kan definiera egna klasser för varje navigering och sedan lägga till en bild i bakgrunden. Du kan till och med använda CSS (text-indent) egenskapen för att bli av med menytexten om du vill.
Admin
Ram
thanks for your response but i need more clearly that custom menu image for the wordpress.
Im using wp_list_categories(‘exclude=4,7&title_li=’); to show the navigational menu so is it any possibility to add the different images to the different menu button. Im trying the CSS but it never works for me
Tack,
Ram
Redaktionell personal
Ja, det är möjligt att lägga till olika bilder med den anpassade menyn. Den du använder är inte den meny vi pratar om i den här artikeln.
Julie @ Inspired to Write
Kan du lägga till kod för att göra det mer presentabelt (typsnitt, knappar, storlek, etc.)? Om så är fallet, kan du ge mig ett exempel och var jag ska placera den här koden? Tack!
Redaktionell personal
Det här är en CSS-relaterad fråga. Du måste lägga till teckenstorleken i lämpliga klasser i CSS-filen. Vi kommer snart att skriva en artikel om CSS-stilar.
Admin
Chris
Fråga om menyhantering.
Jag har en meny som är högerjusterad, så menyalternativen visas i omvänd ordning.
Finns det ett sätt att sortera menu_order i REVERS?
så: sort_column’ => ‘menu_order’ skulle ha något tillagt för att vända ordningen.
Tack!
Redaktionell personal
Bara för att de är högerjusterade, borde det inte få dem att visas i omvänd ordning. För att fixa det, måste du ändra din CSS snarare än att vända kroken. Skapa en behållare div som är högerjusterad, och gör sedan listtaggarna flytande åt vänster.
Admin
Julie
Har följt instruktionerna men efter att ha skapat menyer och lagt till lämpliga kategorier att använda, kan jag inte se dem i min navigeringsfält – några idéer om vad jag har gjort fel?
Redaktionell personal
Har du klistrat in koderna i din header.php eller varhelst den menyn ska visas?
Admin