Vill du lägga till anpassade objekt i specifika WordPress-menyer?
WordPress-menyer är navigeringsmenyer som visas högst upp på de flesta webbplatser. Ibland vill du kanske visa anpassade objekt utöver vanliga länkar i navigeringsmenyer.
I den här artikeln visar vi dig hur du enkelt kan lägga till anpassade objekt i specifika WordPress-menyer.
Varför lägga till anpassade objekt i WordPress-menyer
WordPress-menyer är navigeringslänkar som vanligtvis visas högst upp på en webbplats. På mobila enheter visas de ofta när du trycker på en menyikon.
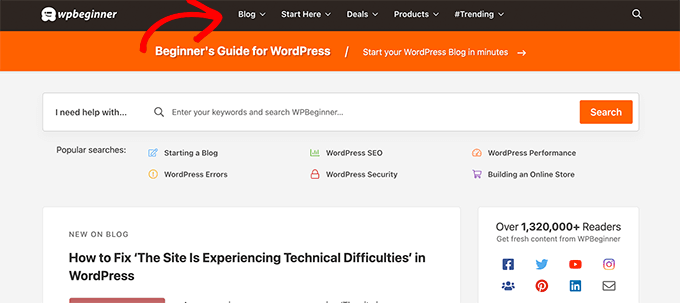
Eftersom detta är en framträdande plats i en typisk WordPress-webbplats layout, är det smart att dra nytta av det genom att placera anpassade objekt utöver vanliga länkar i menyn.
Till exempel kan vissa användare vilja visa sökformuläret som vi gör på WPBeginner. En medlemskapswebbplats kanske vill visa inloggnings- och utloggningslänkar, eller så kanske du vill lägga till ikoner eller bilder i din meny.
Som standard är navigeringsmenyer utformade för att visa vanliga länkar. Du kan dock fortfarande placera anpassade objekt i WordPress-menyer.
Med det sagt, låt oss titta på hur du kan lägga till anpassade objekt i specifika menyer i WordPress samtidigt som resten av din navigeringsmeny förblir intakt.
Lägga till anpassade objekt i specifika navigeringsmenyer i WordPress
Det finns olika sätt att lägga till anpassade objekt i en navigeringsmeny i WordPress. Det beror på vilken typ av anpassat objekt du försöker lägga till.
Vi visar dig några av de vanligaste exemplen. Du kommer att behöva använda plugins för vissa av dem, medan andra kräver att du lägger till lite kod.
Om du vill hoppa framåt till en viss sektion kan du använda innehållsförteckningen:
- Lägg till ett sökfönster i din WordPress-meny
- Lägg till ikoner eller bilder i din meny
- Lägg till inloggnings-/utloggningslänkar i din meny
- Lägg till anpassad text i en WordPress-meny
- Lägg till aktuellt datum i menyn
- Visa användarnamn i din meny
- Visa olika menyer på olika sidor
Låt oss börja.
1. Lägga till en sökpop-up i WordPress-menyn
Normalt kan du lägga till ett sökformulär i din WordPress-sidofält genom att använda standardwidgeten eller blocket Sök. Det finns dock inget sätt att lägga till sökning i navigeringsmenyn som standard.
Vissa WordPress-teman har ett alternativ för att lägga till en sökruta i ditt huvudmenyområde. Men om ditt inte har det kan du använda metoden nedan.
För detta behöver du installera och aktivera pluginet SearchWP Modal Search Form. För mer information, se vår steg-för-steg-guide om hur man installerar ett WordPress-plugin.
Detta plugin är ett tillägg för SearchWP, som är det bästa WordPress sökplugin på marknaden.
Tillägget är gratis och fungerar även med standard WordPress-sökning. Vi rekommenderar dock att använda det med SearchWP om du vill förbättra din WordPress-sökning.
Efter att ha installerat tillägget, gå helt enkelt till sidan Utseende » Menyer. Under kolumnen 'Lägg till menyalternativ', klicka på fliken 'SearchWP Modal Search Forms' för att expandera den.
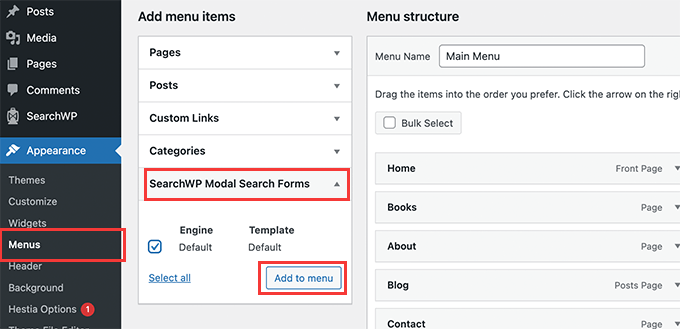
Välj din sökmotor och klicka sedan på knappen Lägg till i menyn.
Pluginet lägger till sökningen i din navigeringsmeny. Klicka på 'Modal search form' under dina menyalternativ för att expandera det och ändra etiketten till Sök eller något annat du vill.
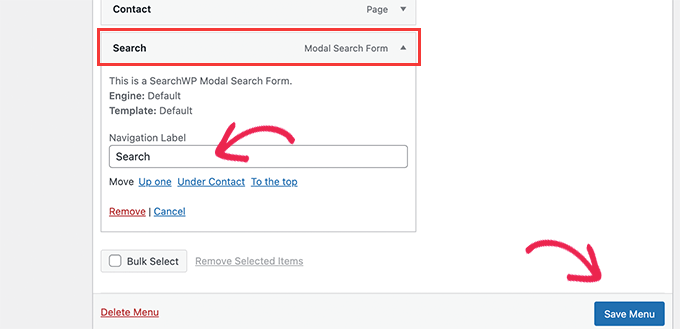
Glöm inte att klicka på knappen Spara meny för att spara dina ändringar.
Du kan nu besöka din webbplats för att se Sök tillagd i din navigeringsmeny. Att klicka på den öppnar sökformuläret i ett lightbox-fönster.

För mer information, se vår guide om hur du lägger till en sökknapp i en WordPress-meny.
2. Lägg till ikoner och anpassade bilder till specifika menyer
Ett annat populärt anpassat objekt som användare ofta vill lägga till i en specifik meny är en bild eller en ikon.
För det behöver du installera och aktivera pluginet Menu Image Icon. För mer information, se vår steg-för-steg-guide om hur man installerar ett WordPress-plugin.
När det har aktiverats, gå till sidan Utseende » Menyer och för muspekaren över menyalternativet där du vill visa en ikon eller bild.
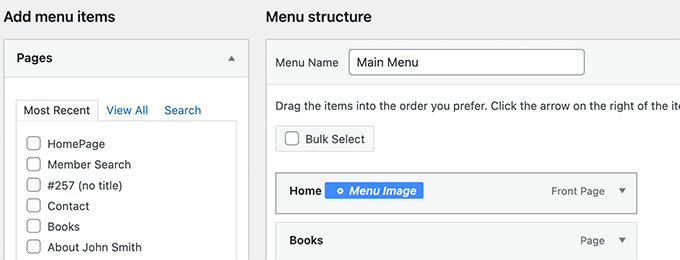
Klicka på den blå knappen Menybild för att fortsätta.
Detta kommer att öppna ett popup-fönster. Härifrån kan du välja en bild eller ikon som ska visas med det menyalternativet.
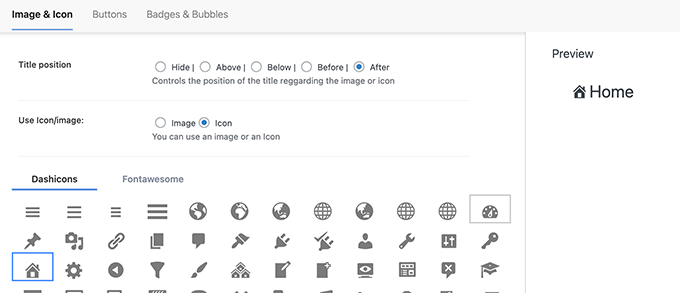
Du kan också välja bildens eller ikonens position i förhållande till menyobjektet. Till exempel kan du visa ikonen precis före menyobjektet som i vårt exempel nedan, eller till och med dölja menyrubriken så att bara ikonen visas.
Glöm inte att klicka på knappen Spara ändringar för att lagra dina inställningar. Upprepa processen om du behöver lägga till ikoner eller bilder till andra menyalternativ.
Därefter kan du besöka din webbplats för att se den anpassade bilden eller ikonen i specifika menyalternativ.

För mer detaljerade instruktioner, se vår handledning om hur man lägger till bilder i WordPress-menyer.
3. Lägg till inloggnings-/utloggningslänkar till specifik WordPress-meny
Om du använder en WordPress medlemskapsplugin eller driver en webbutik, kanske du vill låta användare enkelt logga in på sina konton.
Som standard har WordPress inte ett enkelt sätt att visa inloggnings- och utloggningslänkar i navigeringsmenyer.
Vi visar dig hur du lägger till dem genom att använda ett plugin eller genom att använda kodavsnitt.
1. Lägg till inloggnings-/utloggningslänkar i menyer med ett plugin
Denna metod är enklare och rekommenderas för alla användare.
Först måste du installera och aktivera pluginet Login or Logout Menu Item. Därefter måste du besöka sidan Utseende » Menyer och klicka på fliken Login/Logout för att expandera den.
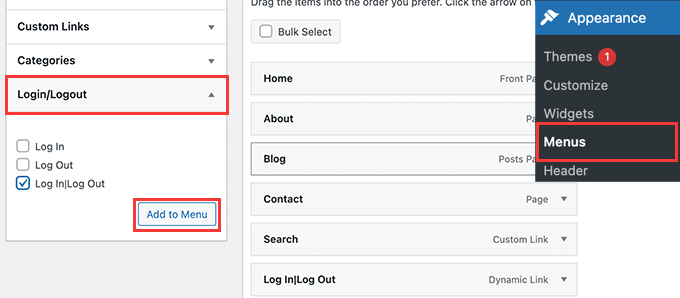
Härifrån behöver du välja objektet 'Logga in|Logga ut' och klicka på knappen 'Lägg till i meny'.
Glöm inte att klicka på knappen Spara meny för att spara dina ändringar. Du kan nu besöka din webbplats för att se din anpassade inloggnings-/utloggningslänk i aktion.

Länken kommer dynamiskt att ändras till inloggning eller utloggning beroende på användarens inloggningsstatus.
Läs mer i vår handledning om hur du lägger till inloggnings- och utloggningslänkar i WordPress-menyer.
2. Lägg till inloggnings-/utloggningslänkar med anpassad kod
Denna metod kräver att du lägger till kod på din WordPress-webbplats. Om du inte har gjort det tidigare, ta en titt på vår guide om hur man lägger till anpassad kod i WordPress.
Först måste du ta reda på namnet som ditt WordPress-tema använder för den specifika navigeringsmenyplatsen.
Det enklaste sättet att hitta detta är genom att besöka sidan Utseende » Menyer och föra muspekaren över menyplatsernas område.
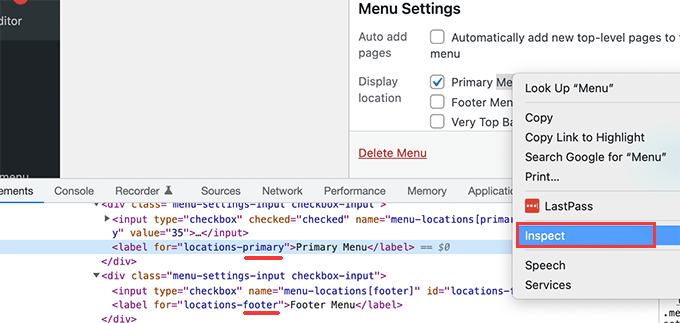
Högerklicka för att välja Inspektera-verktyget och sedan ser du platsnamnet i källkoden nedan. Till exempel använder vårt demodemo primär, footer och top-bar-menu.
Notera namnet som används för din målplats där du vill visa inloggnings-/utloggningslänken.
Därefter måste du lägga till följande kod i din temas functions.php-fil eller ett webbplatsspecifikt plugin.
add_filter( 'wp_nav_menu_items', 'add_loginout_link', 10, 2 );
function add_loginout_link( $items, $args ) {
    if (is_user_logged_in() && $args->theme_location == 'primary') {
        $items .= '<li><a href="'. wp_logout_url() .'">Log Out</a></li>';
    }
    elseif (!is_user_logged_in() && $args->theme_location == 'primary') {
        $items .= '<li><a href="'. site_url('wp-login.php') .'">Log In</a></li>';
    }
    return $items;
}
Efter det kan du besöka din webbplats och du kommer att se länken för inloggning eller utloggning i din navigeringsmeny.

Den här dynamiska länken växlar automatiskt till inloggning eller utloggning baserat på användarens inloggningsstatus.
4. Lägga till anpassad text i din WordPress-navigeringsmeny
Vad händer om du bara ville lägga till text och inte en länk till din navigeringsmeny?
Det finns två sätt du kan göra det på.
1. Lägg till anpassad text till en specifik meny (enkelt sätt)
Gå helt enkelt till sidan Utseende » Menyer och lägg till en anpassad länk med tecknet # som URL, och den text du vill visa som din Länktext.
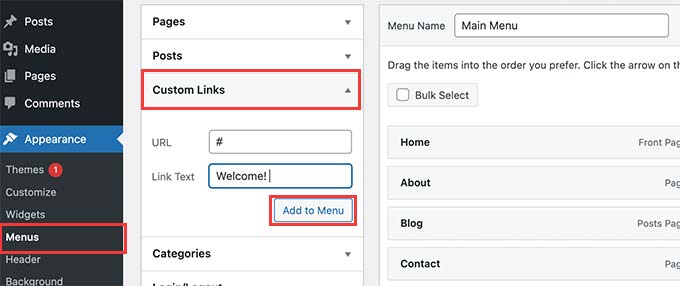
Klicka på knappen 'Lägg till i meny' för att fortsätta.
WordPress kommer att lägga till din anpassade text som ett menyalternativ i den vänstra kolumnen. Klicka nu för att expandera det och ta bort #-tecknet.
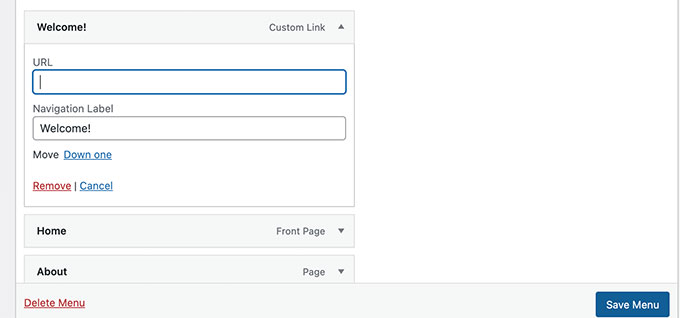
Glöm inte att klicka på knappen Spara meny och förhandsgranska din webbplats. Du kommer att märka att din anpassade text visas i navigeringsmenyn.
Det är fortfarande en länk, men att klicka på den gör ingenting för användaren.

2. Lägg till anpassad text i en navigeringsmeny med kod
För den här metoden lägger du till ett kodavsnitt på din webbplats. Först måste du ta reda på namnet på din temaplats som beskrivs ovan i avsnittet inloggnings/utloggningslänk.
Därefter måste du lägga till följande kod i temas functions.php-fil eller ett webbplats-specifikt plugin.
add_filter( 'wp_nav_menu_items', 'your_custom_menu_item', 10, 2 );
function your_custom_menu_item ( $items, $args ) {
    if ( $args->theme_location == 'primary') {
        $items .= '<li><a title="">Custom Text</a></li>';
    }
    return $items;
}
Byt helt enkelt ut där det står 'Anpassad text' med din egen text.
Du kan nu spara dina ändringar och besöka din webbplats för att se din anpassade text tillagd i slutet av din navigeringsmeny.
Denna kodmetod kan vara användbar om du vill programmatiskt lägga till dynamiska element i specifika WordPress-menyer.
5. Lägg till aktuellt datum i WordPress-menyn
Vill du visa aktuellt datum i en navigeringsmeny i WordPress? Detta knep är användbart om du driver en blogg som uppdateras ofta eller en nyhetswebbplats.
Lägg helt enkelt till följande kod i din temas functions.php-fil eller ett webbplatsspecifikt plugin.
add_filter('wp_nav_menu_items','add_todaysdate_in_menu', 10, 2);
function add_todaysdate_in_menu( $items, $args ) {
    if( $args->theme_location == 'primary')  {

        $todaysdate = date('l jS F Y');
        $items .=  '<li><a>' . $todaysdate .  '</a></li>';

    }
    return $items;
}
Glöm inte att ersätta 'primary' med din menys plats.
Du kan nu besöka din webbplats för att se aktuellt datum i din WordPress-meny.

Du kan också ändra datumformatet efter eget tycke. Se vår handledning om hur du ändrar datum- och tidsformatet i WordPress.
6. Visa användarnamn i WordPress-menyn
Vill du lägga till lite mer personalisering i din navigeringsmeny? Du kan hälsa inloggade användare med deras namn i din navigeringsmeny.
Först måste du lägga till följande kod i ditt temas functions.php-fil eller ett webbplats-specifikt plugin.
add_filter( 'wp_nav_menu_objects', 'username_in_menu_items' );
function username_in_menu_items( $menu_items ) {
    foreach ( $menu_items as $menu_item ) {
        if ( strpos($menu_item->title, '#profile_name#') !== false) {
			 if ( is_user_logged_in() )     {
				$current_user = wp_get_current_user();
				 $user_public_name = $current_user->display_name;
                $menu_item->title =  str_replace("#profile_name#",  " Hey, ". $user_public_name, $menu_item->title . "!");
			 } else {
			 $menu_item->title =  str_replace("#profile_name#",  " Welcome!", $menu_item->title . "!");
			 }
        }
    }

    return $menu_items;
}
Den här koden kontrollerar först om du har lagt till ett menyobjekt med #profile_name# som länktext. Därefter ersätter den det menyobjektet med namnet på den inloggade användaren eller en generell hälsning för användare som inte är inloggade.
Därefter måste du gå till sidan Utseende » Menyer och lägga till en ny anpassad länk med #profile_name# som länktext.
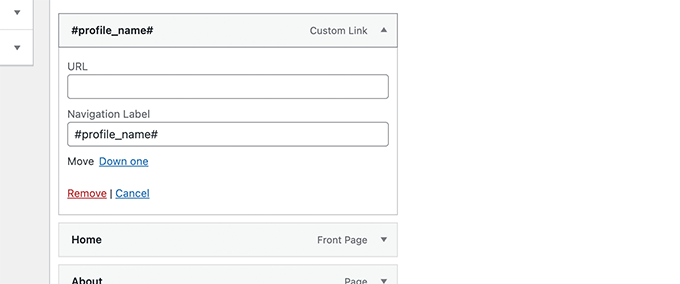
Glöm inte att klicka på knappen Spara meny för att lagra dina ändringar. Därefter kan du besöka din webbplats för att se inloggade användarens namn i WordPress-menyn.

7. Visa villkorliga menyer dynamiskt i WordPress
Hittills har vi visat dig hur du lägger till olika typer av anpassade objekt i specifika WordPress-menyer. Ibland kan du dock behöva visa olika menyalternativ dynamiskt för användare.
Till exempel kanske du vill visa en meny endast för inloggade användare. Ett annat scenario är när du vill att menyn ska ändras baserat på vilken sida användaren tittar på.
Denna metod låter dig skapa flera menyer och bara visa dem när vissa villkor är uppfyllda.
Först måste du installera och aktivera pluginet Conditional Menus. För mer information, se vår steg-för-steg-guide om hur man installerar ett WordPress-plugin.
Vid aktivering måste du besöka sidan Utseende » Menyer. Härifrån måste du skapa en ny meny som du vill visa. Till exempel, i det här exemplet skapade vi en ny meny endast för inloggade användare.
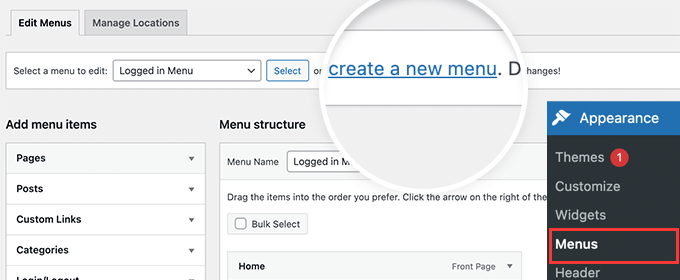
När du har skapat menyn, växla till fliken Hantera platser.
Härifrån behöver du klicka på länken Villkorliga menyer bredvid menyplatsen.
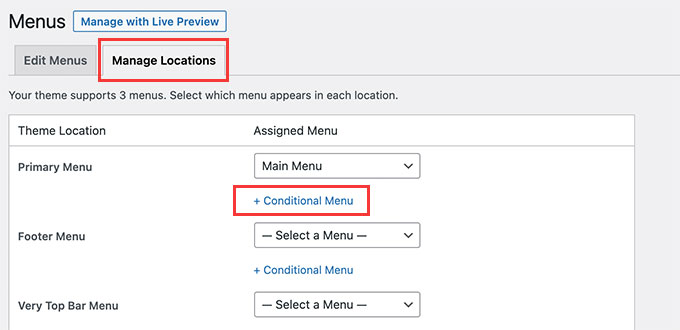
Därefter måste du välja den meny du skapade tidigare från rullgardinsmenyn.
Klicka sedan på knappen '+ Villkor' för att fortsätta.

Detta kommer att öppna ett popup-fönster.
Härifrån kan du välja de villkor som måste uppfyllas för att visa den här menyn.
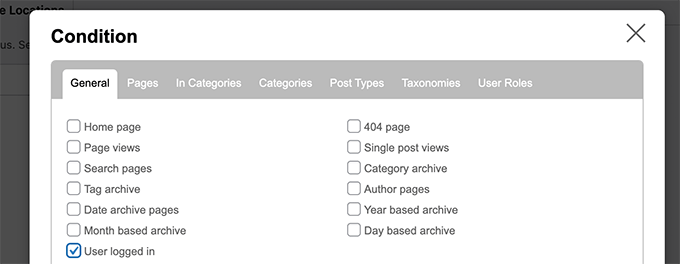
Pluginet erbjuder en mängd villkor att välja mellan. Du kan till exempel visa menyn baserat på specifik sida, kategori, inläggstyp, taxonomi och mer.
Du kan också visa olika menyer baserat på användarroller och inloggningsstatus. Till exempel kan du visa en annan meny för befintliga medlemmar på en medlemskapswebbplats.
Vi hoppas att den här artikeln hjälpte dig att lära dig hur du lägger till anpassade objekt i specifika WordPress-menyer. Du kanske också vill se vår guide om hur man väljer den bästa programvaran för webbdesign, eller vår expertjämförelse av bästa programvaran för livechatt för småföretag.
Om du gillade den här artikeln, prenumerera då på vår YouTube-kanal för WordPress-videoguider. Du kan också hitta oss på Twitter och Facebook.


Jiří Vaněk
Jag gillar implementeringen av sökningen, där istället för det klassiska tomma fältet finns ett popup-fönster. Det ser ut som en bra lösning. Jag var också intresserad av datum och personalisering av den inloggade användaren. Tack för inspirationen.
reza
mycket hjälpsam och enkel
tack tack tack
WPBeginner Support
Glad our guide was helpful
Admin
Denis
Hej,
Tack så mycket för den koden. Finns det ett sätt att ändra ordningen på MENYN? Till exempel vill jag ha knappen Logga in Logga ut först i MENYN. Bara som ett exempel.
Med vänliga hälsningar,
Denis
WPBeginner Support
För tillfället har vi med den här koden ingen enkel metod för att ändra ordning på var tilläggen placeras jämfört med menyalternativen.
Admin
Ben Short
Jag är säker på att detta är för sent för Denis! Men om någon annan vill att deras menyalternativ ska komma FÖRST i listan över menyalternativ, snarare än SIST, här är ett exempel på kod som jag har använt för detta ändamål:
add_filter( ‘wp_nav_menu_items’, ‘your_custom_menu_item’, 10, 2 );
function your_custom_menu_item ( $items, $args ) {
if (is_single() && $args->theme_location == ‘primary’) {
$oldItems = $items;
$items = ‘Visa vad som helst’;
$items .= $oldItems;
}
return $items;
}
Karen
Finns det ett sätt att ha en post i din menyrad som visas vid en viss tidpunkt och ett annat objekt som går ut?
WPBeginner Support
Om jag inte hör något annat, har vi ingen rekommenderad tidbaserad villkorlig visning som vi skulle rekommendera.
Admin
Mary
Hur lägger jag till li-objekt med footer-klass i min sekundära meny i functions.php...?
Saurabh Saneja
Hej,
Hur kan jag lägga till ett sökformulär i början av listan med menyalternativ?
Tack,
Saurabh
PS: big fan of your tuts
Igor
Det här är jättebra. Men skulle det vara möjligt att lägga till en meny i en meny?
Jag vill lägga till en språkmeny till min primära meny.
Jag får språkmenyn på sidan men inte på önskad plats.
istället för
Annemarie
Tack för detta! Precis vad jag behövde i ett projekt.
Tasneem
Jag använde koden för sökfältet, den fungerar perfekt.
Anuj
Fin artikel, hjälpte mig mycket.
Garratt
Fungerar den här koden fortfarande? Ser inget på min meny, inte ens med den grundläggande funktionen med text. Använder ingen speciell typ av meny, bara 'X' & barn-tema.
Garratt
glöm det, förlåt läste precis detta: "Uppenbarligen måste du ha anpassad meny aktiverad i dina teman innan du kan fortsätta."
Garratt
OK, så jag hade fortfarande problemet trots att min meny var anpassad, och jag pillade tills jag tog bort villkoret. (OM), när jag gjorde det visades den på alla sidor inklusive startsidan.
`add_filter( ‘wp_nav_menu_items’, ‘your_custom_menu_item’, 10, 2 );
function your_custom_menu_item ( $items, $args ) {
$items .= ‘Visa vad som helst’;
return $items;
}
sahar
Det fungerade men det förstörde responsiviteten... Jag var tvungen att ta bort koden
Gerson
Hur lägger jag till detta menyobjekt i första positionen?
Gwen
Fantastiskt, tack du räddade mig timmar.
Dilip
Vad är användningen av 10,2 i koden
WPBeginner Support
10 anger i vilken ordning funktionerna som är associerade med en viss åtgärd utförs. Lägre nummer motsvarar tidigare exekvering, och funktioner med samma prioritet utförs i den ordning de lades till åtgärden.
2 är antalet argument som funktionen accepterar.
Admin
Pat
Detta är så användbart och precis vad jag behövde! Tack så mycket för att du delade med dig.
Matt
Inloggningslänken visas inte, bara utloggningslänken. Vad kan orsaka detta?
Ritchie Pettauer
Detta är en fantastisk, rakt på sak-handledning. Jag vill ha ett objekt med dagens datum ("rubriker | DATE") i en av mina menyer.
I didn’t expect the first posting I found to solve my problem thx guys.
Bill Gram-Reefer
fungerar men (lol) för min situation vill jag lägga till "Sök" i primärhuvudet som om det vore ytterligare ett objekt som markerats i
appearance/menus/add-to-menu
Allt jag har sett skapar en helt ny...vad är det en div...(?)
vilket lägger till en helt ny rad i sidhuvudet istället för att placera formuläret i samma rad som OM, etc. objekt i redigeringsfönstret för primär navigering.
OCH ta css som tilldelats navigeringsfältet.
Josalone Wordsworth
Jag gillade verkligen inlägget, så användbart. Men låt oss säga att jag vill lägga till en inloggnings- och utloggningslänk i sidfoten med en if-sats
Hugo Callens
Relaterad fråga: hur lägger man till ett menyalternativ baserat på en specifik användarroll?
Säg att jag har en anpassad användarroll som heter "Student" och jag skulle vilja lägga till ett objekt i menyn endast när användaren har rollen "Student"?
Monilal
Det fungerar men aktuell menyalternativ väljs inte
james
finns det ett sätt att lägga till det i en viss undermeny istället för den översta ul?
Jonathan
Jag skulle vilja veta samma sak. Har någon ett svar på hur man lägger till det i en viss undermeny?
Gerrit
Tack för guiden!
För att vara ärlig förstår jag inte hur du anropar funktionen.
Särskilt saknar jag en omnämning av vilka argument du anropar funktionerna med, dvs. vilka wp-variabler som ska överlämnas som $items och $args.
Kan du förklara för en wp-nybörjare?
Tack,
Gerrit
samuel
hej hur om jag vill lägga till det i undermenyn?
lokitoki
hm några idéer hur jag skulle kunna lägga till html-taggar till bara ett wordpress menyobjekt.
från detta:
Kontakt
till detta:
Kontakt
det ska bara vara för ett menyalternativ. inte för alla
amit
alternativet finns tillgängligt i wp adminpanelen
lokitoki
hm några idéer hur jag kan redigera taggen för ett WordPress-menyobjekt.
från detta:
Kontakt
till detta:
Kontakt
det ska bara vara för ett menyalternativ. inte för alla
gonzela2006
Hej,
Hur kan jag lägga till följande klasser active och current-menu-item samt id:t menu-item-id?
Lại Đình Cường
Hur lägger jag till en ny anpassad meny på en specifik position?
Guillermo
Jag vill lägga en liten bild till vänster om menyn hem, hur kan jag göra det?
Snälla hjälp mig
Pierre Laflamme
I dina exempel lägger du till objekt i primärmenyn (theme_location == ‘primary’).
Hur lägger jag till ett objekt i en specifik meny i widgetområdet? Var får jag tag på theme_location?
WPBeginner Support
temaplaceringar definieras vanligtvis av ditt tema, kontrollera din temas functions.php-fil eller mallen där en meny visas.
Admin
Brad Trivers
Om du vill rikta in dig på en specifik meny (inte en temaplats) använd då $args->menu->slug == 'the_menu_slug' istället för $args->theme_location == 'primary'.
Xúlio Zé
Verkligen användbart!
Tack så mycket Brad
^-^
Peter Lalor
Hej Brad,
Skulle du kunna tala om för mig hur jag får reda på vad värdet på ‘the_menu_slug’ är?
Tack,
Peter
razvan
Hej! Jag använde din handledning för att lägga till en bild som en logotyp som överlappar menyraden. Allt är bra men den här specifika menyn har ett alternativ för hovring som gör färgen vit… Så när jag för musen över logotypen, hovrar den också över länken vilket på sätt och vis förstör sidans utseende.
Detta är min kod:
if( $args->theme_location == ‘primary’ )
return ““.$items;
Hur kan jag dölja a href på sidan och bara visa bilden med länk?
Tack på förhand
Kathy
Hej, jag tror att din kod är nära det jag letar efter, men jag försöker lista ut hur jag kan anpassa den för att göra det jag försöker göra!
Vad jag försöker göra är att skapa ett menyalternativ med en rullgardinslista med författare? Någon idé om hur jag kan uppnå det?
Tack så mycket!
Erik Mitjans
Hej Kathy!
Jag har jobbat med detta i dagar och äntligen fick jag det att fungera.
Titta på: http://wordpress.org/support/topic/creating-a-dropdown-in-menu-that-lists-authors/page/2?replies=45#post-5103035
Tänk också på att jag lägger till extra klasser och attribut eftersom temat är Bootstrap-baserat. Du kanske inte behöver allt det där.
Hälsningar!
Eric
sachi
fantastiskt jag letade efter dessa koder
Brad
Tack, detta var mycket hjälpsamt,
Av ren nyfikenhet kan jag dock inte hitta denna värdefulla filterkrok: “‘wp_nav_menu_items” , jag menar var i WP:s kärnfiler anropas detta??
Tack så mycket!!
WPBeginner Support
Den finns i wp-includes/nav-menu.php, men det rekommenderas inte att ändra kärnfiler. Det är ett filter och du kan anropa det i din temas
functions.php-fil eller ett webbplatsspecifikt plugin.Admin
Lavinia
This isn’t work for me
Andor Nagy
Hur kan jag placera den framför det första menyobjektet? Annars en bra handledning!
Med vänliga hälsningar,
Andor Nagy
Redaktionell personal
Använd returexemplet för sökfältet och flytta objekten mot slutet?
Admin
Cameron Jones
add_filter( ‘wp_nav_menu_items’, ‘your_custom_menu_item’, 10, 2 );
function your_custom_menu_item ( $items, $args ) {
$custom = ‘Show whatever’;
$items = $custom.$items;
return $items;
}
Murugu
Ursäkta min okunskap men vilken php-fil skulle jag redigera?
Redaktionell personal
Detta skulle gå i din functions.php-fil.
Admin
Murugu
Jag lade till följande i mitt temas functions.php men sökfältet visas inte som jag förväntade mig. Några förslag?
add_filter(‘wp_nav_menu_items’,’add_search_box_to_menu’, 10, 2);
function add_search_box_to_menu( $items, $args ) {
if( $args->theme_location == ‘header_extras_inner’ )
return $items.””;
return $items;
}
Elliott Wall
Förlåt att jag kommer in i den här diskussionen så sent
Jag har provat sökformulärdelen och det fungerar utmärkt – tack! Jag har dock problem med att styla det, av någon anledning. Oavsett vad jag gör är platshållartexten i fältet grå. Jag har tittat på stilarnas kaskad och pillat med så många saker – jag kan ändra bakgrundsfärgen till exempel, men ingen lycka med att göra texten svart, så designkontinuiteten i menyn är något komprometterad. Min webbplats är http://elliottwall.com om du bryr dig om att titta. Hälsningar
Redaktionell personal
För platshållartext måste du göra något i stil med detta:
::-webkit-input-placeholder { color: red; } :-moz-placeholder { /* Firefox 18- */ color: red; } ::-moz-placeholder { /* Firefox 19+ */ color: red; } :-ms-input-placeholder { color: red; }1-click Use in WordPress
Admin
Elliott Wall
Detta fungerade perfekt – tack igen!
Sam
Kan vi lägga till anpassad länk före det första objektet istället för i slutet?
xafar Ali
Ja, sammanfoga bara först istället för sist.
$items = “MENU ITEM ” . $items;
piomat
beer!
SAcha
Hej,
Mycket intressant!
Jag lade till en anpassad länk, men är det möjligt att lägga till den på en viss position i menyn? Som "efter det första menyalternativet".
Tack
Redaktionell personal
Osäker på om det är möjligt.
Admin