Undrar du varför dina WordPress-e-postmeddelanden inte når inkorgen? Du är inte ensam om det!
Många webbplatsägare ställs inför det här problemet eftersom de flesta webbhotell begränsar PHP:s standardfunktion för e-post, vilket gör att e-postmeddelanden försvinner eller hamnar i skräppost.
Du kan enkelt åtgärda detta genom att använda Gmail SMTP-server – en pålitlig, kostnadsfri lösning som säkerställer att dina e-postmeddelanden levereras korrekt. Vi har använt den själva och tycker att den är ett utmärkt val för bloggare, småföretag och alla som vill ha problemfri e-post.
I den här guiden visar vi dig exakt hur du ställer in Gmail SMTP i WordPress så att dina e-postmeddelanden når inkorgarna varje gång. ✅
Varför och när du behöver Gmail SMTP Server för WordPress Emails
Din WordPress-webbplats skickar e-postmeddelanden för att meddela dig om ny användarregistrering, återställning av förlorat lösenord, automatiska uppdateringar och meddelanden från dina kontaktformulär.
Som standard använder WordPress PHP:s mail-funktion för att skicka ut e-postmeddelanden. Denna funktion fungerar dock inte som förväntat av flera skäl.
De flesta WordPress webbhotell begränsar användningen av denna funktion för att förhindra missbruk och skräppost.
Spamfilter hos populära e-postleverantörer kontrollerar inkommande e-postmeddelanden för att övervaka om de skickas från autentiska e-postservrar. Ibland kan WordPress standard-e-postmeddelanden misslyckas med denna kontroll och inte ens hamna i skräppostmappen.
SMTP (Simple Mail Transfer Protocol) är industristandarden för att skicka e-post. Till skillnad från PHP:s e-postfunktion använder SMTP korrekt autentisering, vilket ökar leveransbarheten för e-post.
Gmail tillhandahåller en SMTP-tjänst som du kan använda för att skicka ut e-postmeddelanden från din WordPress-webbplats. Deras servrar är det bästa alternativet om du bara vill skicka e-postmeddelanden om WordPress till dig själv och några få användare på din webbplats.
Men om du vill skicka nyhetsbrev via e-post eller ha en webbutik.
Då bör du använda en tjänsteleverantör för massutskick av e-post, som Constant Contact, Brevo (tidigare Sendinblue) eller Mailgun.
Gratis vs. betald Gmail SMTP-tjänst för WordPress
Du kan använda ditt kostnadsfria Gmail-konto för att skicka ut WordPress-e-postmeddelanden. För bättre leveranssäkerhet rekommenderar vi dock att du använder den betalda Google Workspace.
Med Google Workspace får du din egen professionella e-postadress, t.ex. name@yoursite.com.
Google Workspace kräver att du lägger till MX-poster i ditt domännamn. Det innebär att dina e-postmeddelanden ser ut att komma från ditt domännamn, vilket bidrar till att öka äktheten och säkerställa bättre leveransförmåga.
Om du föredrar skriftliga instruktioner är det bara att fortsätta läsa. Här är en snabb överblick över alla metoder som vi går igenom i den här guiden:
Är du redo? Låt oss komma igång.
Hur man skickar email till WordPress med hjälp av Gmail SMTP Server
Om du väljer att använda Google Workspace måste du först konfigurera din domän så att den fungerar med Google Apps. Vi har en Step-by-Step tutorial om hur du ställer in en professionell email address med Google Workspace.
Resten av instruktionerna är desamma om du använder ett betalt eller gratis Gmail account.
Nu är WP Mail SMTP det bästa WordPress SMTP-pluginet på marknaden. Det gör att du enkelt kan använda vilken SMTP-server som helst för att skicka WordPress-e-postmeddelanden med högre leveransförmåga.
📌 O bs: Vi använder WP Mail SMTP själva på vår webbplats, och vi har sett hur det hjälper till att se till att alla våra e-postmeddelanden når användarnas inkorgar – inte skräppostmappen. Se vår fullständiga WP Mail SMTP-recension för insikter i dess funktioner!
Så låt oss installera och aktivera WP Mail SMTP-pluginet. För mer information, se vår steg-för-steg-guide om hur du installerar ett WordPress-plugin.
Det finns en gratis version, men vi rekommenderar att du köper betalversionen som heter WP Mail SMTP Pro, som ger dig tillgång till premium support, fler mailers och en white glove-installation av en av deras experter.
Efter aktivering måste du besöka avsnittet Inställningar ” WP Mail SMTP för att konfigurera plugin-inställningarna. Sedan anger du bara din licensnyckel och klickar på knappen “Verifiera nyckel”. Du kan hitta nyckeln i ditt WP Mail SMTP-kontoområde.
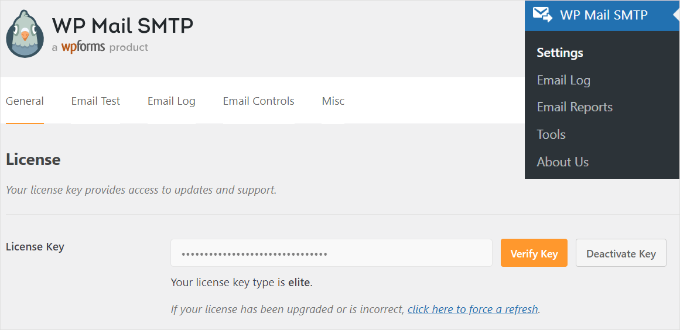
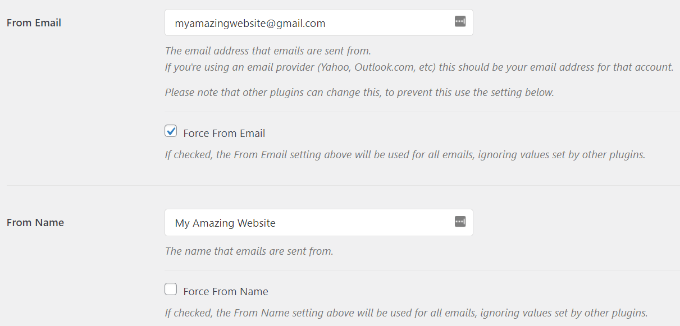
Under fliken “Allmänna inställningar” måste du se till att du använder din Gmail-e-postadress i fältet “Från e-post”.
Därefter måste du ange avsändarens namn.
WP Mail SMTP-plugin erbjuder 3 sätt att ansluta din WordPress-webbplats till Gmail-servrarna:
- Den första metoden använder en installation med ett klick, vilket är det enklaste och mest nybörjarvänliga, men är endast tillgängligt för premiumpluginanvändare.
- Den andra metoden använder OAuth-autentisering. Den här metoden är säker och kräver inte ett premiumplugin.
- Den tredje metoden är att manuellt konfigurera Gmails SMTP-inställningar. I allmänhet rekommenderar vi inte den här metoden eftersom den är mindre säker.
Med detta i åtanke ska vi nu ställa in WordPress så att det använder Gmail SMTP för att skicka e-post.
Metod 1: Ställa in Gmail för att skicka WordPress-e-postmeddelanden med hjälp av installation med ett klick
Den här metoden är den snabbaste och enklaste för alla, vilket innebär att den kan hjälpa dig att spara tid och förvirring.
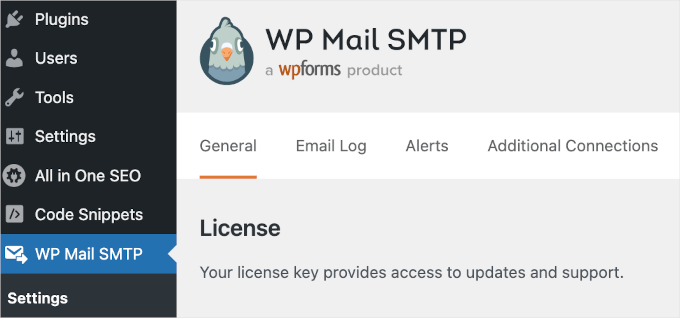
Efter att ha installerat och aktiverat WP Mail SMTP-pluginet, låt oss navigera till WP Mail SMTP ” Inställningar och se till att du är på fliken “ Allmänt”.
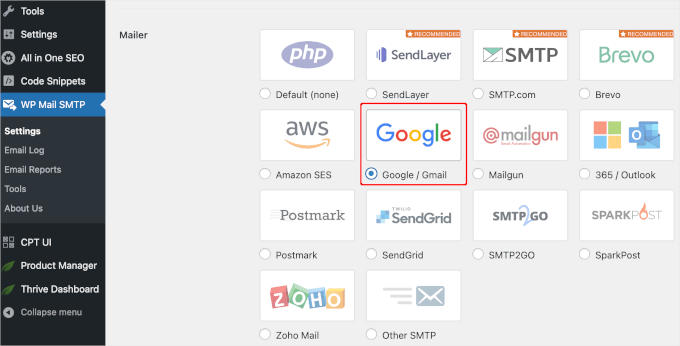
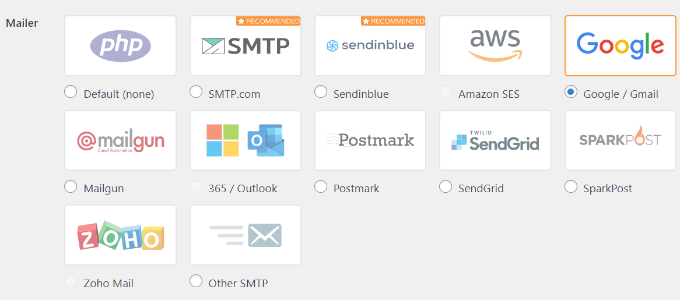
Sedan måste du välja “Google / Gmail” under avsnittet “Mailer”.
Detta gör att du kan använda alternativet “One-Click Setup”.
När det är gjort är nästa steg att auktorisera ditt Google-konto.
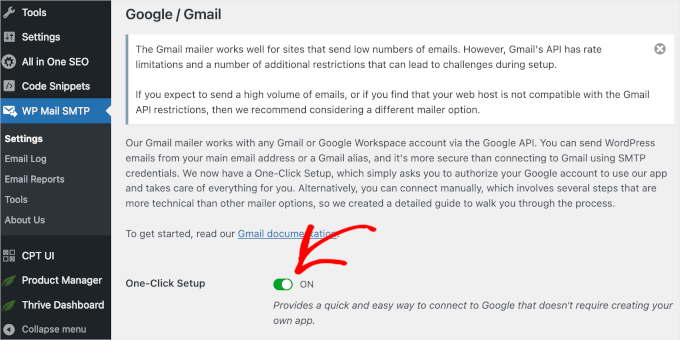
Du kommer att se ett avsnitt “Google / Gmail” under “Mailer” på din skärm. Gå vidare och klicka på strömbrytaren för att aktivera installationsfunktionen med ett klick.
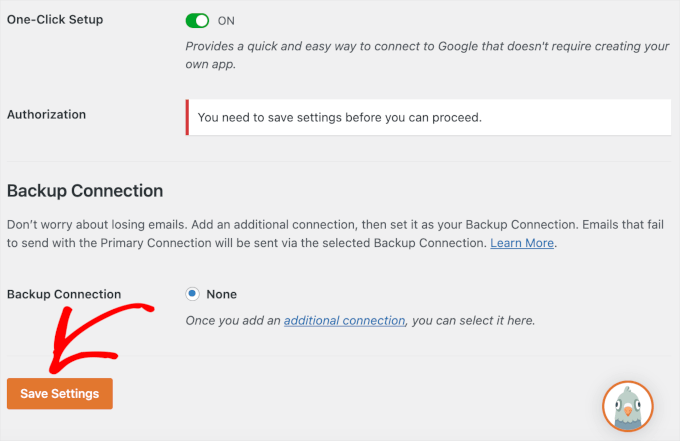
Då kan du se ett meddelande som säger att du måste spara ändringarna först för att fortsätta auktoriseringsprocessen.
Nu klickar vi på knappen “Spara inställningar”.
Efter det bör du kunna fortsätta processen.
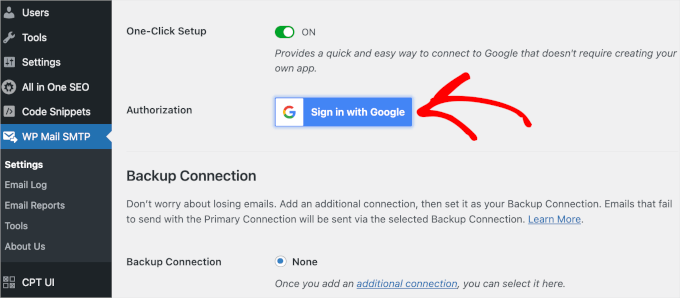
Du blir ombedd att logga in på ditt Google-konto. Klicka bara på knappen “Logga in på Google” och välj ett konto.
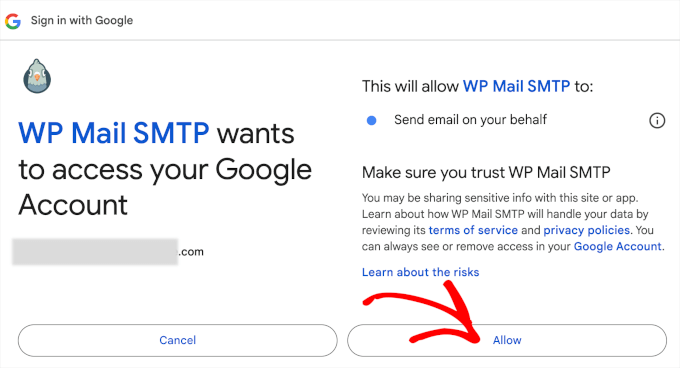
Sedan kommer Google att be dig om tillstånd för WP Mail SMTP att skicka e-post för din räkning.
Du kan klicka på “Tillåt” för att fortsätta.
När du har klickat på knappen kommer du att omdirigeras tillbaka till WP Mail SMTP:s flik “Allmänt” i ditt WordPress-adminområde.
Härifrån vill du bläddra ner till avsnittet “Auktorisering” för att se att det Gmail-konto du konfigurerade är framgångsrikt anslutet.
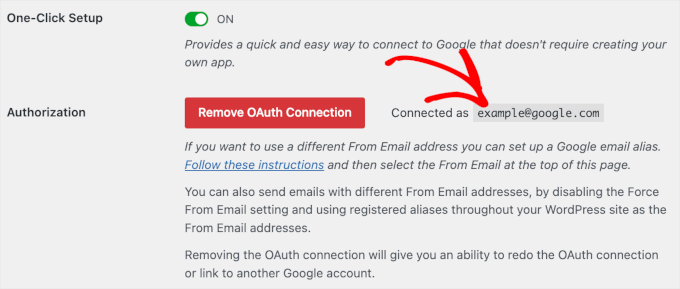
Nu är det klart! Du har framgångsrikt anslutit ditt Gmail-konto till WP Mail SMTP med hjälp av One-Click Setup-metoden!
Metod 2: Ställa in Gmail för att skicka WordPress-e-postmeddelanden med hjälp av OAuth-protokoll
Den här metoden är ett bra alternativ om du använder en gratisversion av WP Mail SMTP-pluginet. Det är säkert, och när du väl har ställt in det behöver du aldrig göra det igen.
Du måste börja med att välja “Google/ Gmail” som din mailer.
Därefter ser du tre fält som du måste fylla i när du rullar ner.
Fyll bara i fälten “Client ID”,“Client Secret“ och“Authorized Redirect URI” när du är där.
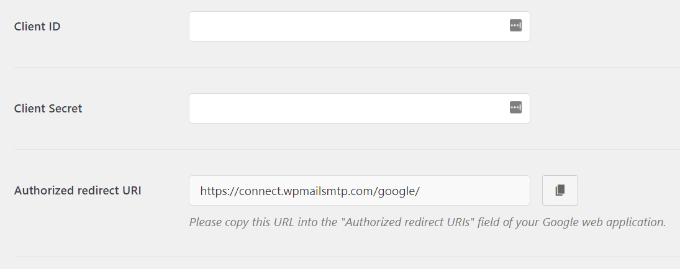
Låt oss ställa in dessa fält.
Skapa en app och generera API-nycklar för Gmail
Börja med att besöka Google Cloud Platforms webbplats och klicka sedan på “My First Project” högst upp på sidan.
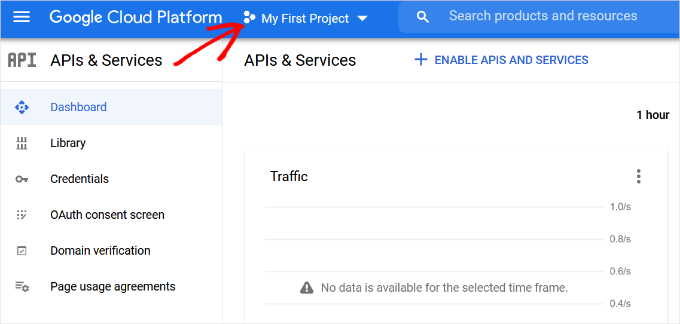
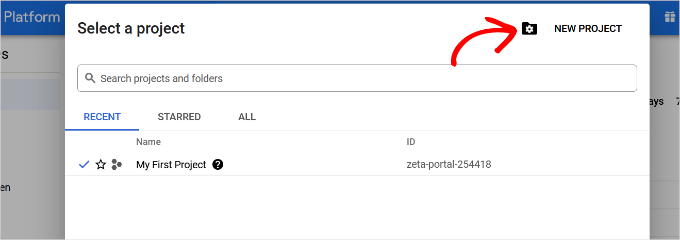
Ett litet popup-fönster öppnas där du kan välja dina projekt.
Gå vidare och klicka på alternativet “Nytt projekt”.
På nästa vy ombeds du att ange ett namn för your projekt.
Vi rekommenderar att du ger den ett minnesvärt namn så att du lätt kan känna igen den i framtiden.
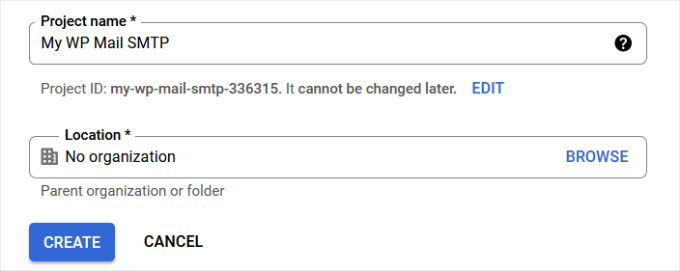
Efter det klickar vi på knappen “Skapa” för att fortsätta.
Utvecklarkonsolen kommer nu att skapa ditt projekt och ta dig till dess instrumentpanel.
Google erbjuder utvecklare tillgång till många av sina API:er och tjänster. Du måste aktivera de API:er som du kommer att behöva för det här projektet.
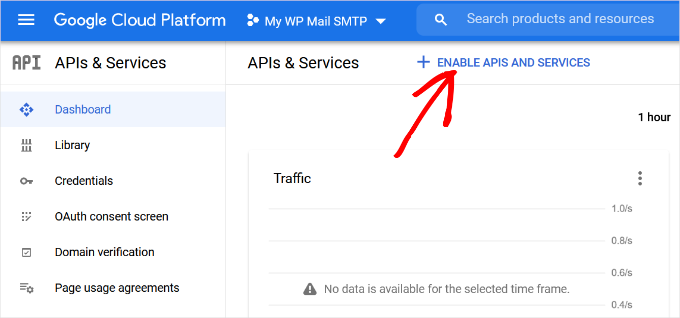
Klicka bara på knappen “Aktivera API:er och tjänster” för att fortsätta.
Du kommer då till sidan för API-biblioteket.
Härifrån kan du skriva Gmail i sökrutan för att snabbt hitta Gmail API och klicka för att välja det.

You will now see an overview of the API and what it can do.
Klicka bara på knappen “Aktivera” för att fortsätta.
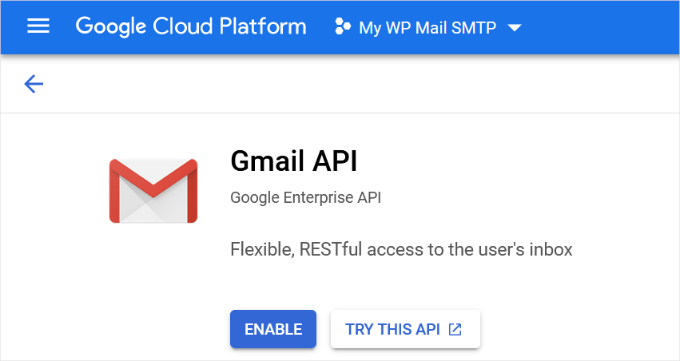
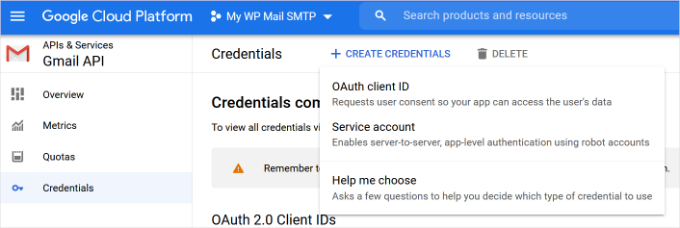
Nu när ditt API är aktiverat är nästa steg att skapa credentials som du kan använda i dina WP Mail SMTP plugin-inställningar.
Klicka på knappen “+ Create Credentials” för att fortsätta och välj alternativet “Help me choose” i rullgardinsmenyn.
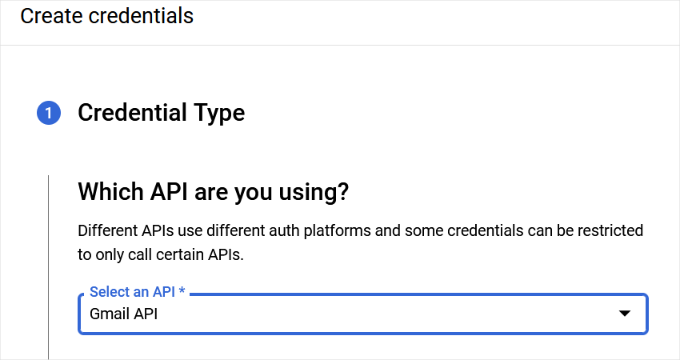
På nästa vy får du frågan om vilket API du vill använda.
Gå vidare och välj “Gmail API” i rullgardinsmenyn för “Vilket API använder du?
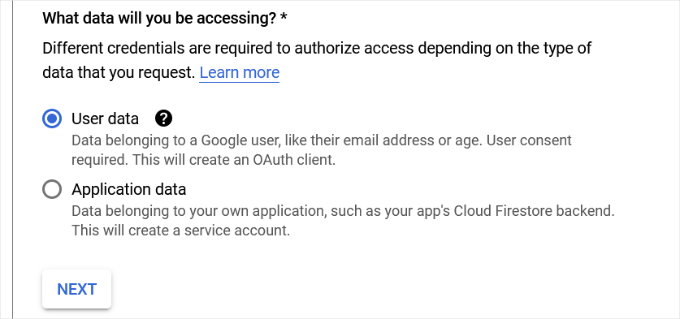
Därefter väljer du “User data” i fältet “What data you will be accessing?”.
När du har gjort det klickar du på knappen “Nästa”.
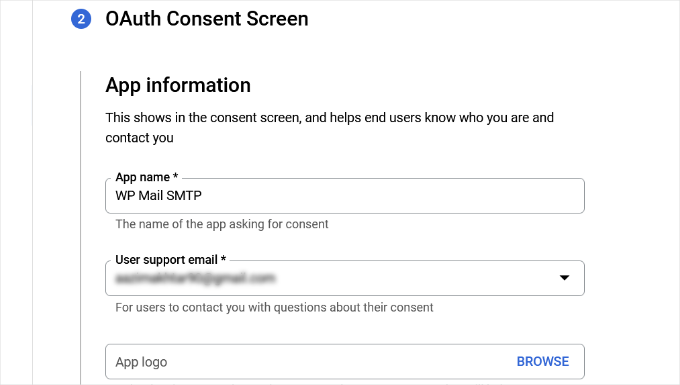
Nu måste du ange information om din app.
Du kan börja med att ge din app ett namn, välja den email address du angav och lägga till en logga om du vill.
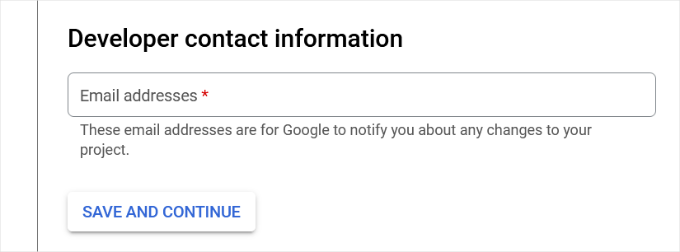
Därifrån måste du skrolla ner och ange en utvecklares kontaktinformation.
När du har enter email addressen klickar du bara på knappen “Save and Continue”.
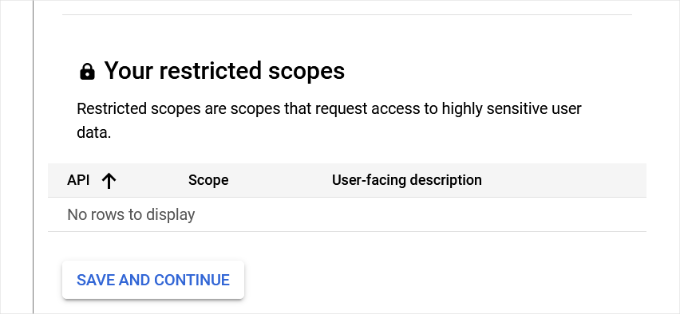
På nästa vy kan du konfigurera “Scopes” för Gmail API. Detta är ett valfritt steg, och du kan hoppa över det för tillfället.
Rulla bara ner längst ner på page och click the “Save and Continue” button.
Därefter går du vidare och anger uppgifter för avsnittet “OAuth Client ID”.
Du kan börja med att välja “Web Application” som “Application type” i rullgardinsmenyn och sedan ange ett namn.
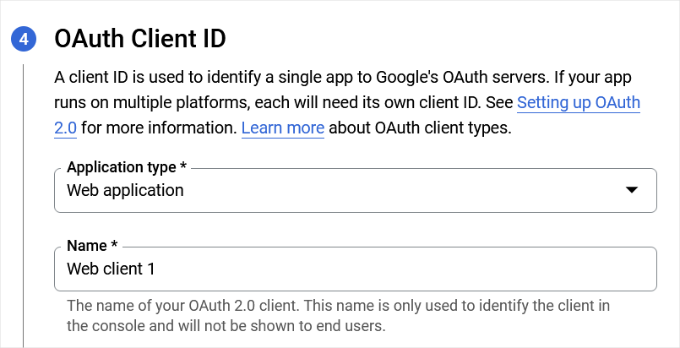
När du rullar ner ser du alternativ för “Auktoriserade JavaScript”-ursprung. Du kan hoppa över detta och gå vidare till “Auktoriserade omdirigerings-URI:er”.
Fortsätt och klicka på knappen “+ Add URL” under “Authorized redirect URIs” och ange https://connect.wpmailsmtp.com/google/ i fältet “URIs” .
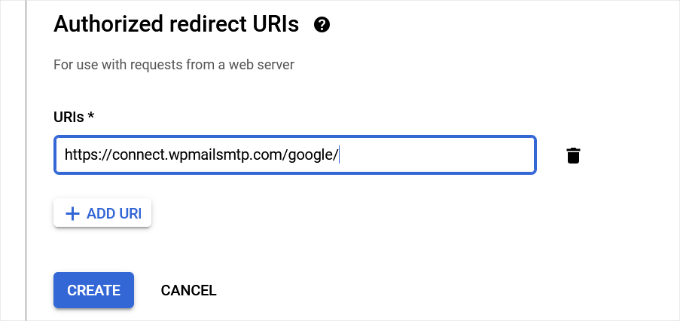
När du har enter URL:en klickar du bara på knappen “Create”.
Därefter ser du dina referenser under området “Your Credentials” (dina referenser).
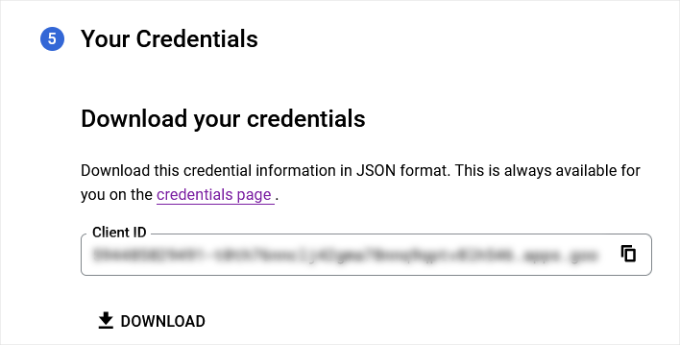
Gå vidare och klicka på knappen “Klar” längst ner för att gå vidare.
Du kommer nu till ditt projekts inloggningssida.
På den här sidan kan du se dina nyligen skapade inloggningsuppgifter listade här. Du måste klicka på redigeringsikonen bredvid dina referenser för att fortsätta.
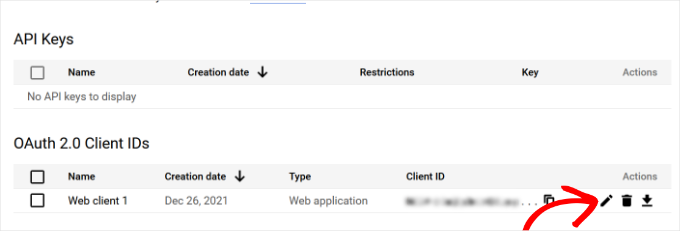
Då kommer du till sidan edit credentials, där du kan se din client secret och client ID:n.
Allt du behöver göra är att kopiera och klistra in nyckeln i ditt plugins inställningssida.
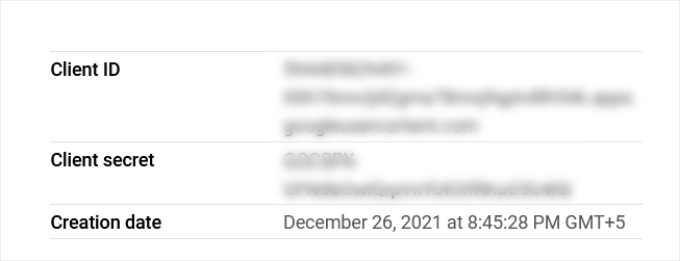
När du har gjort det kan du gå tillbaka till plugin-programmets inställningssida i WordPress-adminområdet.
Nu när du har både klient-ID:n och klientens secret keys måste du klicka på knappen “Save Settings” för att fortsätta.
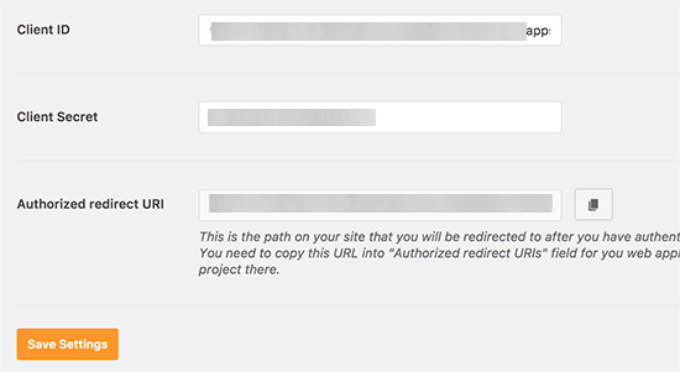
Pluginet kommer nu att lagra dina settings och ladda om page.
Efter det måste du rulla ner längst ner på sidan med inställningar och klicka på knappen “Allow plugin to send emails using your Google account”.
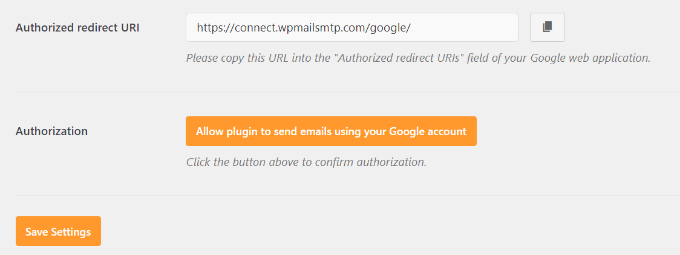
Du kommer då till ditt Google-konto.
Sedan kommer du att bli ombedd att ge webbplatsen behörighet att skicka email för din räkning.
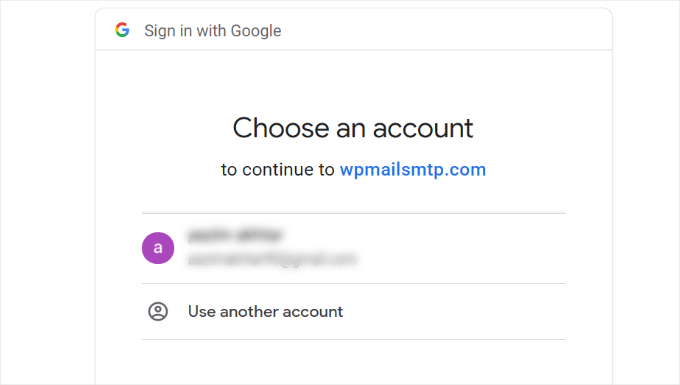
Välj bara ditt Gmail account och ge behörighet att länka ditt Google API-projekt.
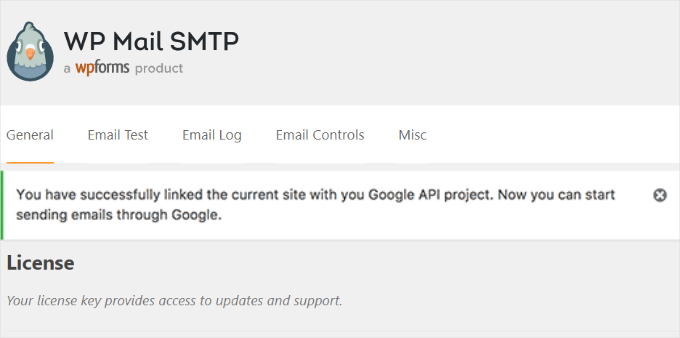
Efter det kommer du att redirectas tillbaka till din website, där du kommer att se ett success message.
Metod 3: Ställa in Gmail SMTP som SMTP-avsändare
Med den här metoden kan du manuellt ansluta till Gmails SMTP-servrar för att skicka dina WordPress-e-postmeddelanden.
Först vill du gå till Inställningar ” WP Mail SMTP från ditt WordPress-adminområde för att konfigurera plugin-inställningarna.
Härifrån kan du börja med att ange den Gmail-adress du vill använda i fältet “From Email” och ditt namn i fältet “From Name”.

Därefter väljer vi “Other SMTP” som din mailare.
Du bör också kryssa i rutan bredvid returvägen.
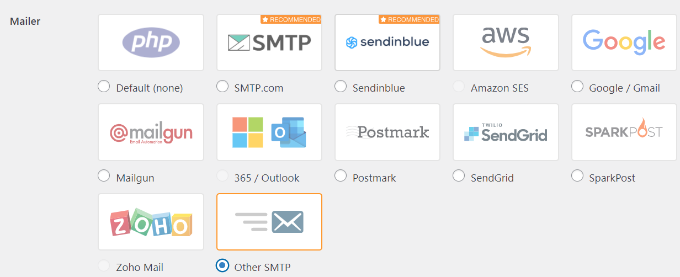
Efter det kan du bläddra ner till avsnittet “Annan SMTP”.
Det är här du konfigurerar fler inställningar för att ansluta till Gmails SMTP-servrar.
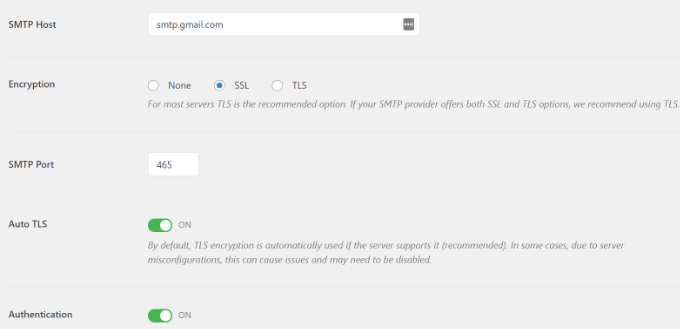
Här är den exakta konfigurationen du behöver add to inställningarna för plugin:
- SMTP.com server: smtp.gmail.com
- Encryption (kryptering): Använd SSL Encryption
- SMTP-port: 465 (detta ska visas automatiskt när du väljer SSL-kryptering)
- Auto TLS: Stäng av TLS
- Autentisering: Slå på autentisering
- SMTP.com användarnamn: Din fullständiga Gmail-adress, t.ex. john.smith@yourdomain.com eller john.smith@gmail.com
- SMTP Password: Password för ditt Gmail account
När du är klar kan du klicka på knappen “Save Changes” för att spara dina inställningar.
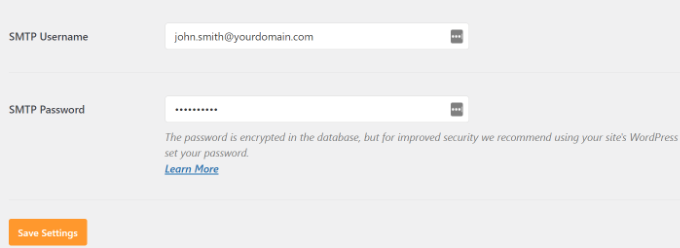
Det är all; you have successfully set up WP Mail SMTP to use Gmail SMTP servers.
Testa dina WP Mail SMTP Settings
WP Mail SMTP plugin allow you att testa dina email settings så att du kan se till att allt fungerar som det ska.
Du måste navigera till Inställningar ” WP Mail SMTP och klicka på fliken ‘Email Test’.
Därefter anger du bara en e-postadress som du kan komma åt i fältet “Skicka till” och klickar sedan på knappen “Skicka e-post”.
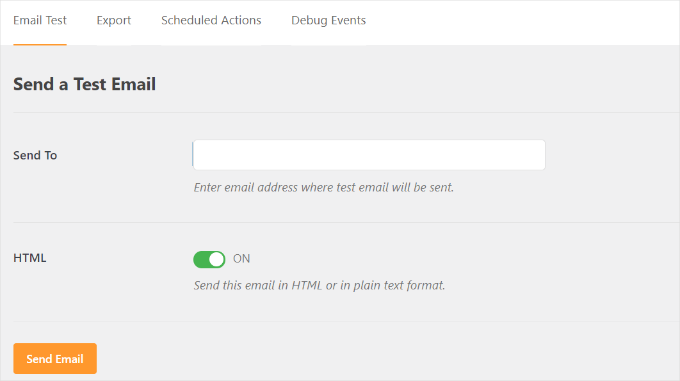
Du bör då se ett framgångsmeddelande.
För att vara säker kan du kontrollera din inkorg för att se ett meddelande med ämnesraden “WP Mail SMTP: Test Email to…”.
Det var allt, du har utan problem konfigurerat din WordPress site för att skicka email med Gmail SMTP servrar.
Få ut mer med WP Mail SMTP Pro
Om du vill ha ännu mer funktionalitet bör du prova WP Mail SMTP Pro. Med Pro-versionen av plugin-programmet kan du ansluta till:
- Googles arbetsyta/Gmail
- Amazon SES
- Mailgun
- Office 365 / Outlook.com
- SendGrid
- Och mer
Du får också ytterligare funktioner som e-postloggar, möjlighet att finjustera eller kontrollera vilka meddelanden din WordPress-webbplats skickar och mycket mer.
Felsökning av Gmail SMTP fungerar inte Issues
Vi har sett användare stöta på några issues när de använder Gmail SMTP med vissa konfigurationer av delade webbhotell.
Du kan vidta följande åtgärder för att åtgärda Gmail SMTP-problemet:
Först måste du logga in på ditt cPanel-konto. Härifrån hittar du knappen “+ Skapa” på sidan för e-postkonton.

Skapa helt enkelt ett e-postkonto som matchar din Google Apps e-postadress.
Genom att skapa e-postkontot gör du i princip servern på webbhotellet medveten om att det finns en email address som ska skicka e-post. Detta steg är en lösning för att övertyga servern om att du skickar email via den, även om du har planer på att använda Gmails SMTP-server.
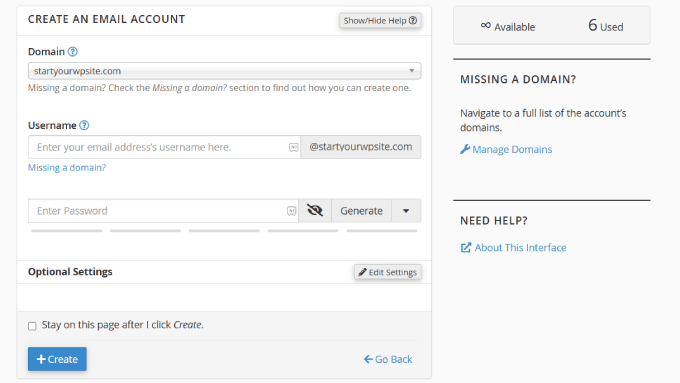
Detta kan tyckas konstigt eftersom du inte använder din server för e-postmeddelanden. Det lurar i princip din server att tro att du skickar e-postmeddelandet via servern.
Från ditt cPanel-konto, låt oss gå till MX-posterna och ändra MX-routningen från automatisk till fjärrkontroll. Observera att detta kan vara lite knepigt att hitta eftersom varje värd nu har ett anpassat cPanel-gränssnitt.
Sedan måste du leta efter en liten länk bredvid MX där det står “Email Routing: Remote Mail Exchanger.
Efter det kan du logga in på din WordPress-webbplats igen och skicka ett testmejl. Om du vill ha mer information kan du följa vår guide om hur du ändrar MX-poster för din WordPress-webbplats baserat på din värdtjänst.
Video Tutorial
🎥 Se vår steg-för-steg videohandledning nedan för att snabbt konfigurera Gmail SMTP i WordPress och se till att dina e-postmeddelanden levereras på ett tillförlitligt sätt.
Tryck bara på play och följ med!
Vi hoppas att den här artikeln hjälpte dig att lära dig hur du skickar e-post i WordPress med hjälp av Gmail SMTP-servern. Du kanske också vill se våra experttips för felsökning när WordPress-formuläret inte fungerar och vår guide om hur du exporterar WordPress-formulärposter till CSV och Excel.
If you liked this article, then please subscribe to our YouTube Channel for WordPress video tutorials. You can also find us on Twitter and Facebook.


David
Hi, I used this tutorial last year to install and configure the Gmail SMTP plugin. Until very recently, the Gmail SMTP plugin in conjunction with my website’s contact form worked perfectly. But I tested my website’s contact form today, and I got the following fatal-error message:
Fatal error: Uncaught exception ‘Google_Auth_Exception’ with message ‘Error refreshing the OAuth2 token, message: ‘{ “error” : “invalid_grant” }”
I don’t have a clue what that means. I get the same fatal-error message when I use the plugin to send a test message at Gmail SMTP plugin>Settings>Test email.
I haven’t changed any of the plugin settings since I first installed it a year ago, and I haven’t done anything new with my Google Console account either. I’m using the most recent version of the Gmail SMTP plugin, and also the newest version of WordPress.
Any ideas or suggestions?
Thanks!
WPBeginner Support
Hey David,
It seems like your Oauth2 token has expired. Try following the tutorial again from the beginning to set it up again.
Admin
Ehsan
Thank U very much – one of my problem was this “my emails goes to spam folder”
with this service(Method 1) Now It’s great – of course after 14 days you must pay for that but still it’s prefect
I have question;
Can I send 100 Emails like newsletter for my customer is it OK for Google!?
I afraid my Emails after it goes to spam folder again
Sharon
I did everything as described, but the contact form on my website still does not work.
Adondriel
Hey, add a thing at the end for the troubleshooting thing: “Check with your website host and verify that they do not block outgoing requests by default.” I know 1. GoDaddy does this, and won’t let you unblock. and 2. Namecheap also blocks by default but you just gotta contact support, give em your info and ask em to unblock port 587 and boom, it’ll all work again.
Lucas
You save my life!
Tks!
adam
i keep getting a Error: redirect_uri_mismatch when i press ‘grant permission’. It’s driving me nuts as I can’t work out what is wrong? Everything seems to match.
Adam
Grzegorz
Same here. i get redirect_uri_mismatch
Macky
This video has been a fantastic help.
I’m a complete WordPress beginner.The step-by step instructions are very easy to follow. Now my emails are working perfectly!! Plus I also learnt how to insert headers & footers with ease.
Thanks once again!!
WPBeginner Support
Hi Macky,
We are glad you found the video helpful. You may also want to subscribe to our YouTube Channel for WordPress video tutorials.
Admin
Fabio
Your tutorial saved my site! Thank you very much mate!
Maggie Z
A follow-up question – because of the login conflict issue, I was also considering using WP Mail SMTP. However, many users on the support forum for that plugin express concern that the password for the email account is visible on the admin page in plain text.
I have a firewall set up that prevents non-admins from getting in to the back end, so is there any real security concern regarding the password showing in plain text? Any advice much appreciated!!!
Maggie Z
After troubleshooting quite a bit, I finally relented and went with WP Mail SMTP, which requires the “allow less secure apps” solution – a tech support person at G Suite told me that it was safe, and it seems like the only way to go for my particular setup. Appears to be working now. Thanks for the incredibly clear instructions!!! I am now a firm fan of this site.
Maggie Zellner
The video is fantastic, and the plugin installed perfectly. Unfortunately I didn’t realize until after I went through the whole process (because I didn’t read the documentation on the plugin carefully), the Gmail SMTP plugin eliminates the need for users to log in, and therefore it interfered with the login process that we have instituted for paid members on our website (which we manage through a plugin called PaidMembershipsPro).
Is there any way to disable that aspect of this plugin, so I can send all email via our Gmail account, but can still have users log in and out?
Eric
Great article! However, I am unclear on something when using WordPress for sending newsletters. What is the difference between those mass emailing service providers (mailgun & Sendgrid) and using Google Apps for work SMTP?
Can’t we use Google Apps for work to send newsletters just as well?
WPBeginner Support
with Google Apps for Work, you can only send an email to 500 recipients max (for paid business accounts). You cannot use it for newsletters.
Admin
Eric
Thanks so much for your response! With Google Apps for Work only limiting to 500 recipients, then I suppose it would work if we sent it to 500 or less people.
My next question, is it max to send all at one time or per day? If we throttle it to only send out a few per minute, do you know if it would allow it to send thousands within a few hours?
Heather
Thank you so much! This was so helpful!
zim ejin
Hi, this was very informative thank you for posting. however i have a website hosted on aws ec2, and route53 for dns. i tried the secure configuration. it didn’t work. Is there a special configuration for self hosted websites on aws ec2/route53. btw : i don’t have a cpanel installed.
Lanrz
After granting access and clicking on the allow button, I was not being redirected back to wordpress and the SMTP status is still not connected.
Any advice on how I should go about doing it?
Thanks!
Nathalie
Doesn’t work: test email retuens Connection: opening to smtp.gmail.com:587, timeout=300, options=array ( ‘ssl’ => array ( ‘verify_peer’ => false, ‘verify_peer_name’ => false, ‘allow_self_signed’ => true, ),)
I checked Email Routing -> Remote Mail Exchanger but it didn’t help
Raph Divine
Thanks for the write-up. It really helped me! 5stars!
Real Name
This guide worked wonderfully until my server stopped sending emails and I can’t get it to work again. The “Test Email” tab doesn’t make it clear if the email has successfully sent or not since it just spews out 52 lines that don’t mean much to me. :/
Boro
Amazing Tutorial !!!!
Thank you
peter
Ok, so I have followed the OAuth instructions and my SMPT status button has gone green. However, whether through test email or my site, I can not send an email through the contact us form (pluggin contact form builder by web Durado). The hanging message say waiting for and eventually I get a 405 error notice.
Any thoughts.
Thomas
Hoping you can help me?
I tried setting up method 1 using gmail and I got the ‘green light’ from wordpress however when testing the email I receive the following error message after waiting 1 minute for it to send:
Connection: opening to smtp.gmail.com:587, timeout=300, options=array ()
Any ideas on how to fix this?
Very best,
Tom
Fernando Santos
This tutorial is awesome!
I have one question, though. I directed the contact form messages to a gmail group email address, but, for some reason, the messages aren’t being delivered. When I direct to a “real” e-mail address like the messages are normally delivered.
I would really appreciate if someone could give me a hand figuring out why this happens.
Thank you!!!
Paul
+1 for this question. Have exactly the same question as wish to use our info@.. address
Andres
Thanks guys for such useful article. I followed all the steps and was able to configure the email correctly. However, when I receive the email from mydomain.com address (sent by wordpress after purchasing a product), the user avatar (gmail picture) doesn’t appear even though mydomain.com has a picture already.
In fact, if I send an email directly from mydomain.com account via google for work, the receiver is able to see the image right away, but it’s not the case if the email is sent via wordpress.
Do you have any suggestions? Thanks a lot, and keep rocking!
Sahar
Thanks for this helpful information. You really helped me out in setting this up, and I appreciate you taking the time to create this useful information!
WPBeginner Support
Glad you found it helpful.
Admin
lokesh kumar CL
What is origin URI of the client application. its not accepting website URL ….please help me out
Susan
Excellent instructions and thanks for walking me through setting this up. I did try the MX record change but no luck there either.
I get a 405 Not allowed message when I try to send an email.
I am hosted by Bluehost and am using the DIVI theme.
If anyone has any ideas I would be very grateful.
Leista
Hello, having a similar issue. Getting a 405 error, and also hosted on Bluehost. By any chance, were you able to fix the problem? Thanks.
JDC
I had the same problem with bluehost. But this gave me the solution.
I uninstalled any extra plugin for mail, including smtp mailer or gmail smtp plugin and just used a random address like mynewaddress@example.com (replace example.com with your own domain name) and it worked. I sent an email to my gmail account I it passes all the filters. It seems that BlueHost validates the address if it is comming from the server that hosts that domain. In gmail you usually get a warning that says that this email might not have being validated, but my email are comming fine with custom wordpress email functions. No extra plugin needed.
Prashant Bhandarkar
Thank you so much. This was of great help. God Bless you!
Karmen
Awesome tutorial!!!
Louise
I have this working brilliantly with a Google apps for work account for a woocommerce solution on wordpress, thank you.
Should this work if I use a Google group mail instead of an account?
Thanks very much.
Brian Treiber
I am not using Google apps for work, I have everything set up and connected. I tried to send a test email however I get a 405 not allowed error. I went into my cpanel and changed the mx records to the recommended” remote.” Still can’t send. Does this mean I need to use the less secure method?
Jason North
I’m getting this error when I try to activate the plugin:
Plugin could not be activated because it triggered a fatal error. Parse error: syntax error, unexpected T_FUNCTION, expecting ‘)’ in /home3/north23/public_html/forcebrain/wp-content/plugins/gmail-smtp/google-api-php-client/src/Google/autoload.php on line 19
genie
Hello, I use gmail-smtp plugin but it conflict with ultimate membership. Could you help me ?
I try another wp mail smtp but in the last feld: user account pass. Google app not allow to login from plugin. Pls help
Thank you
Leslie Andrews
Clearly I’m doing something wrong. When I get to “add credentials” I’m getting this error message and can’t move forward.
Invalid Redirect: must end with a public top-level domain (such as .com or .org)
Any help would be great
WPBeginner Support
If you look at the URL closely, you will notice that you are missing a . between domainname and the TLD, yours is examplecom when it should be example.com.
Admin
Graham
Thanks for the tutorial, but I get this error when I try to send a test email:
Connection: opening to ssl://smtp.gmail.com:587, timeout=300, options=array ()
SMTP ERROR: Failed to connect to server: Connection refused (111)
SMTP connect() failed.
Does it have something to with my site being secured with SSL?
Tony
I’m having the same issue. Did you figure it out?
Tom
Nice Article, I’m having a few issues to get this working. So I Deactivated the Plugin and tested a Contact Form to see if all was the same before setting up Gmail SMTP, unfotunately No Emails are being sent through now.
Even though the Gmail SMTP Plugin is NOT active, do we need to reset back to the default settings somehow?
WPBeginner Support
Nope simply deactivating it would turn it off.
Admin
Jenny
Hi,
I have this all set up properly and the test email worked…I just commented on my own blog to see if I would get an email when a comment was posted but I unfortunately didn’t. Can someone help me figure out where I went wrong?
Sachin
Hey thanks for the tutorial. Everything works fine in Setup, but when mail is being sent the site freezes for about 5 mins. site doesnt open at that time. It doesnt respond at that time. Any idea what might be causing this issue. But the point is mail is sent at last finally
WPBeginner Support
Please contact your WordPress hosting provider. They may be able to help you better.
Admin
crissy
Hi,
I’m having problem with the test email send
Fatal error: Cannot redeclare class phpmailer in /home/mywebsite/wp-includes/class-phpmailer.php on line 29
please help
David
Hi, I just installed this plugin, and everything went perfectly–thanks to your excellent tutorial! (I definitely couldn’t have done it without you.) My website’s outgoing email immediately started landing in people’s inboxes rather than in their spam folders.
But since I’m a novice at these matters and don’t know SMTP from RSVP, I did some reading on SMTP, and on one website I came across made this statement:
“Another strategy that hackers use: If your app sends email using SMTP, the IP address will be recorded in the Received header lines. Either scrub the original Received line [no explanation provided of how that’s done], or don’t use SMTP for email submission.”
Is this something I should be concerned about security-wise? Or does this plugin solve this problem somehow? And if not, how should I fix it?
Thanks!
WPBeginner Support
You shouldn’t be concerned about it. Most popular email service providers and their spam filters can check if an email is originating from the IP address it claims to be coming from.
Admin
Rob
Thank YOU so much for this!! I’ll keep coming back for more!!
Travis
Thanks so much for this tutorial.
Originally I had this all setup and working fine, but I moved my website and did some other fixes to it, and suddenly mailing stopped working.
Previously I spent some time trying to set it up and get it to work, but then it “stopped” working randomly.
Anyways, option #1 really saved me a major headache.
Christine Tabor
I configured, and got the green go to go button… THANKS FOR THE STEP BY STEP…
(doing this on a client test site)…
BUT REGARDING GRAVITY FORMS (or any form plug in)… do I also need to change up the notification emails that I’ve used for the Gravity Forms submissions?
Is it ok for the “from” email I used in the configuration to be different than the gmail used to set i up?
The issue that started all this was client not getting his Gravity Form notifications.
SO, before I install on their live site… (which is ecommerce and SSL)… can you reply to this … and should I still use the TSL for the configuration? I wasn’t sure if a certificate on the site made any difference in configuring this.
Thanks,
Christine
WPBeginner Support
No you don’t need to change notification emails.
It is OK, but to ensure maximum deliverability you should use the email address that is actually sending the email.
You should try with SSL first for the Gmail Configuration.
Admin
Christine
Thanks for reply…little bit more clarification please.
I set up an email…info@domain.com as a forwarder in cpanel, and I forward to their Verizon email.
I left the Verizon email in the GF notification list, added the info email, and another alternate email.
So the info email is the one in Gmail plugin set up that is sending the email…is it ok that it’s a forwarder?
Also, when I set up the plugin, I used a gmail I had created … CompanyName@gmail.com
But not using it as the sending email or anywhere else.
I sent a test and it appears all worked… Should I go back and change to SSL instead of the TSL or leave as is?
Thanks again…
Christine
WPBeginner Support
Sounds about right. However, if it was up to us we would use the Gmail address as the sender and add the forwarding email address as the Reply-to address.
Tribhuwan Bhatt
Thank You
Tim R
Doesn’t work for me on April 14, 2016.
Things I do rarely work.
Connection: opening to smtp.gmail.com:587, timeout=300, options=array ()
SMTP ERROR: Failed to connect to server: Network is unreachable (101)
SMTP connect() failed.
Mailer Error: SMTP connect() failed.
Any point in fussing with this ?
zse
Hi,
I have this same error.
Did you solved this problem?
Regards
Tim R
Here’s a follow up:
Settings of my web host’s server made this impossible.
Switched hosts and now it works easy as pie.
Don’t forget to change settings on gmail account to allow for unregistered apps (a search will discover many instructions to do that so I won’t add it here)
Monica
Hey i tried allowing access for unregistered apps it still doesnt work for me.
I am getting the error:
Connection: opening to smtp.gmail.com:587, timeout=300, options=array ()
SMTP ERROR: Failed to connect to server: Connection refused (111)
SMTP connect() failed.
Any ideas ?
Bclose
Hi ,
Thanks for this ticket ..i was fighting with my emial provider weblayer and nothing. it worked with your magic touch , one simple note .. by the end of Ouauth when explaining to create a fake local email you forgot to include that we must use MX record and what is is , i search on google and found ALT2.ASPMX.L.GOOGLE.COM, but this last simply thing could be a danwfault for all readers
Either way thank you..a lot!
Kay
Thank you soooooo much for this! Worked like a charm. The instructions are 100% on point!
Tyler
Anyone get this working with google apps email? I’ve created API credentials. SMTP status is green. But Test email says connection refused. Already set mx to remote on godaddy. Are there any security setting ls in google apps email that have to be configured?
TJ
Nice article, was able to install the plugin and it sent the email from the plugin test email.
Fails when using Contact Form 7, any recommendations for a contact form plugin that this might work with?
Thanks
WPBeginner Support
You can try it with WPForms.
Admin
Muhammad
thanks for the nice post.i was thinking to set up this for my site.
Ripul
Interesting, however I am getting this error : “Error: redirect_uri_mismatch”
Ripul
I forgot to mention I am testing this on Localhost.
Rashmirekha Moharana
Hi Syed.
Thanks a lot for such a wonderful solution. Let me implement and see.
Kudos to you.