“Din webbplats är för långsam!” Det var den feedback vi fick från besökare redan när vi startade vår första WordPress-blogg. Som många andra nybörjare kände vi inte till cachningsplugins förrän vi upptäckte W3 Total Cache.
Efter att ha testat dussintals cachningsplugins genom åren och hjälpt otaliga webbplatsägare kan vi med säkerhet säga att W3 Total Cache fortfarande är ett av de mest kraftfulla verktygen för att snabba upp WordPress-webbplatser. Det hjälpte oss att minska laddningstiderna från 8 sekunder till under 2 sekunder.
Idag går vi igenom den exakta processen för att konfigurera W3 Total Cache och bryter ner komplexa inställningar till enkla steg som är lätta att följa och som alla kan förstå.
Redaktörens anmärkning: Vi använder inte längre W3 Total Cache på vår webbplats och har bytt till WP Rocket, ett premium caching-plugin. W3 Total Cache är fortfarande en bra lösning som fungerar bra.
Vad är W3 Total Cache?
W3 Total Cache är ett av de bästa tilläggen för caching i WordPress som allow you att enkelt förbättra WordPress prestanda och hastighet.
Som standard använder WordPress PHP för att dynamiskt generera varje page på din website när den requestas av en användare.
PHP är ett programmeringsspråk på serversidan. Detta innebär att varje request från en användare ökar belastningen på din server. Detta påverkar din websites prestanda, användarupplevelse och sökmotorsoptimering.
WordPress tillägg för caching hjälper dig att minska detta genom att hoppa över PHP och servera en cachad kopia av din webbsida.
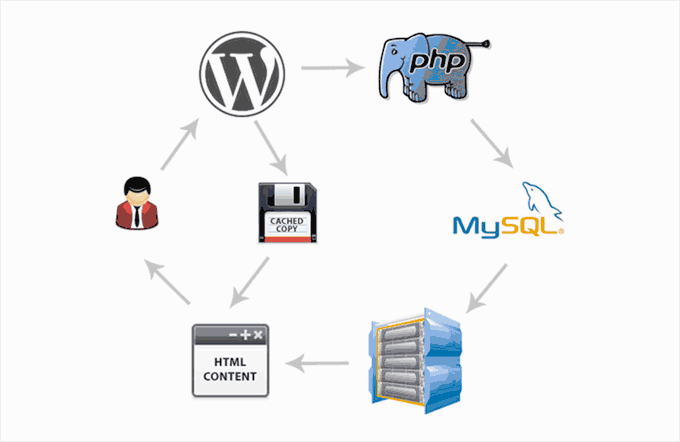
Det allow you också att enkelt ansluta din website till ett CDN (content delivery network) för att ytterligare förbättra din websites prestanda.
Installera W3 Total Cache i WordPress
Innan du installerar W3 Total Cache plugin i WordPress, måste du se till att du deactivate alla andra caching plugin på din website. Detta hjälper dig att save server resurser och förhindra eventuella plugin konflikter.
Därefter kan du gå vidare och installera och aktivera W3 Total Cache plugin. För mer detaljer, se vår Step-by-Step guide om hur du installerar ett WordPress plugin.
Vid aktivering kommer W3 Total Cache att lägga till ett nytt menu-item märkt Performance till din WordPress admin sidebar. Om du klickar på det kommer pluginets installationsguide att startas.
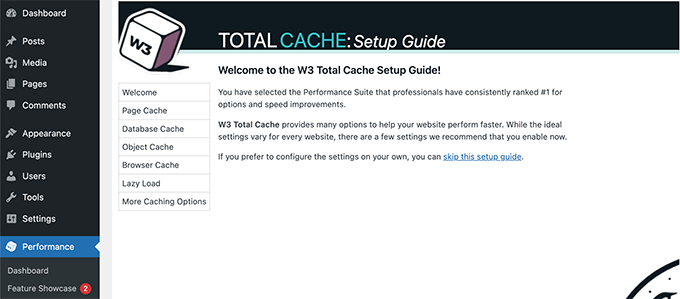
Klicka bara på knappen Nästa för att fortsätta.
Först kommer du att bli ombedd att aktivera Page Caching. Klicka på knappen Test Page Caching för att fortsätta.
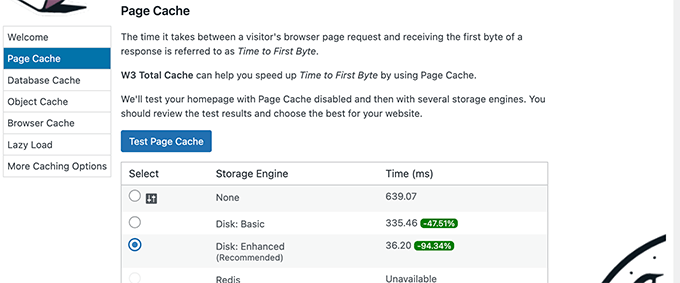
W3 Total Caching kommer att visa dig olika alternativ för lagringsmotorer. Du måste välja den som sparar mest tid åt dig. Vanligtvis kommer det att vara alternativet “Disk: Enhanced”-alternativet för de flesta plattformar för delade webbhotell.
Klicka på knappen Nästa för att fortsätta.
Nu kommer du att få alternativet att testa Database Cache. Vi rekommenderar att du väljer Ingen. För de flesta små till medelstora websites kommer din MySQL server att kunna hämta data snabbare än Database cache.
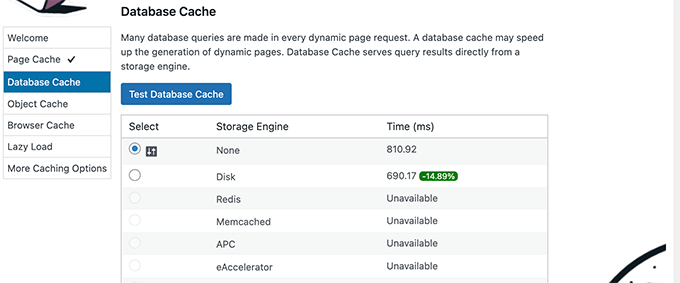
Klicka på knappen Nästa för att gå vidare till nästa steg.
Detta kommer att ta dig till Object Caching section. Object Caching allow W3 Total Cache att store database queries för dynamiska pages och återanvända dem för att förbättra prestanda.
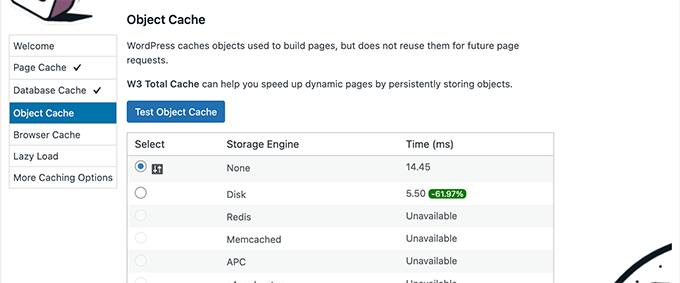
Om testresultatet visar att det bara skiljer några millisekunder kan du välja None.
Klicka på knappen Nästa för att fortsätta.
Därefter klickar du på knappen Test Browser Cache och väljer sedan alternativet “Aktiverad” under testresultaten.
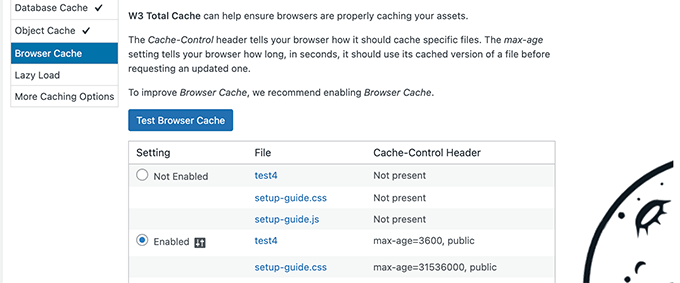
Detta alternativ requestar användarens webbläsare att lagra en kopia av web browsern under en begränsad tid. Att hämta en page från webbläsarens cache går mycket snabbare än att hämta den från web serverns cache.
Klicka på knappen Nästa för att gå vidare till nästa steg.
Slutligen kommer Setup Wizard att be dig att aktivera lazy loading för images.
Nu kommer WordPress med built-in lazy loading för images. Vissa äldre webbläsare kanske dock inte har support för den utvalda funktionen.
W3 Total Cache använder JavaScript för att add to lazy loading för images, vilket kan vara ännu snabbare och mer effektivt.
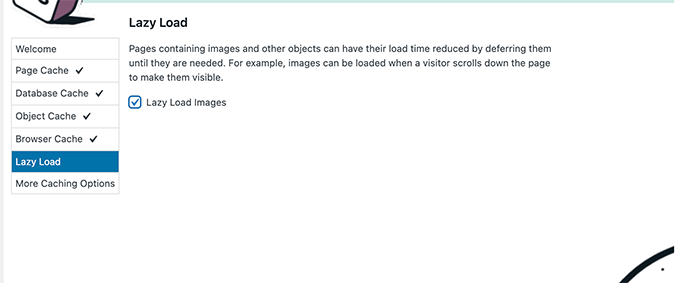
Därefter klickar du på knappen Nästa för att slutför installationsguiden och view W3 Total Cache dashboard.
Avancerade alternativ för caching i W3 Total Cache
Grundinställningarna fungerar för de flesta websites. Det finns dock många avancerade alternativ som du kan konfigurera för att ytterligare förbättra prestandan.
Låt oss ta en titt på de viktigaste.
Minska JavaScript och CSS i W3 Total Cache
Termen “minify” används för att beskriva en metod som gör filstorleken på din website mindre. Detta görs genom att vita utrymmen, rader och onödiga tecken tas bort från källkoden.
Note: Minifiering av JS och CSS-filer kan potentiellt förstöra din website. Om du aktiverar det och din website inte ser bra ut, inaktivera helt enkelt dessa alternativ.
W3 Total Caching allow you to easily minify JavaScript, CSS, and HTML source code as well. Vi rekommenderar dock att du endast minifierar JavaScript- och CSS-filer.
Bara heada över till Performance ” Minify page och rulla ner till JS section.
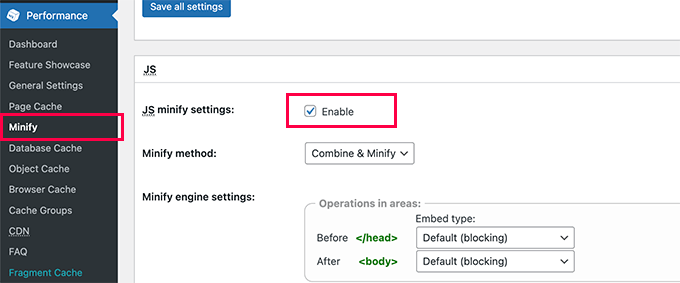
Kontrollera boxen bredvid ‘JS minify settings’ för att aktivera den.
Nu rullar du ner till CSS section och aktiverar CSS minify settings på samma sätt.
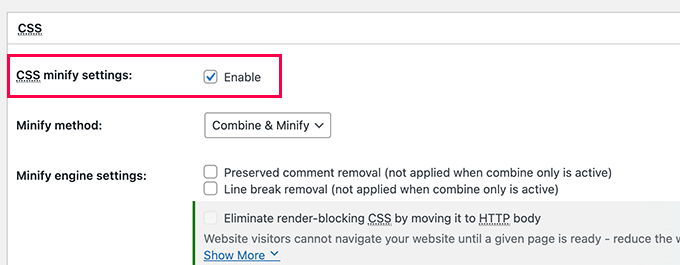
Glöm inte att klicka på knappen Save All Settings för att lagra dina inställningar.
För alternativa metoder, se vår guide om hur du minifierar JavaScript och CSS-filer i WordPress.
Aktivera CDN-stöd i W3 Total Cache
CDN eller content delivery networks hjälper you att ytterligare förbättra din websites prestanda genom att servera statiska filer som gillar images, CSS och JavaScript från ett globalt nätverk av servrar.
Detta minskar belastningen på din WordPress server på webbhotellet och förbättrar sidans laddningshastighet.
W3 Total Caching kommer med built-in support för olika CDN-plattformar.
Vi rekommenderar att du använder Bunny.net som är den bästa CDN-lösningen på marknaden. Det här är vad vi använder för vår OptinMonster website.
Först måste du registrera dig för ett Bunny.net account. När du har registrerat dig måste du skapa en Pull Zone för din website.
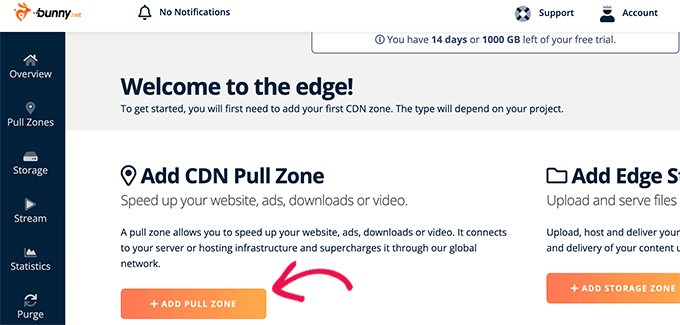
En pull-zon add to ett värdnamn till Bunny.net CDN. Det här värdnamnet används sedan för att servera statiska filer för din website.
Add to ett namn för din pull-zon och ange sedan din websites domain name.
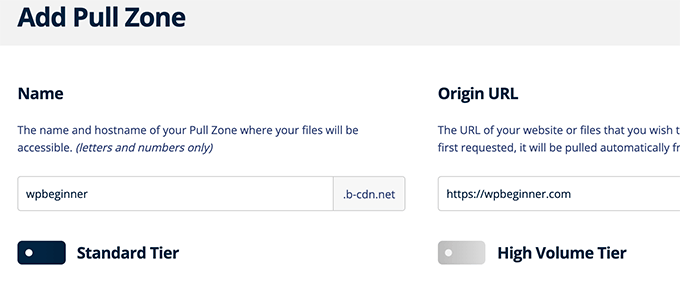
När du har lagt till pullzonen måste du besöka sidan Performance ” General Settings.
Sedan rullar du bara ner till CDN section.
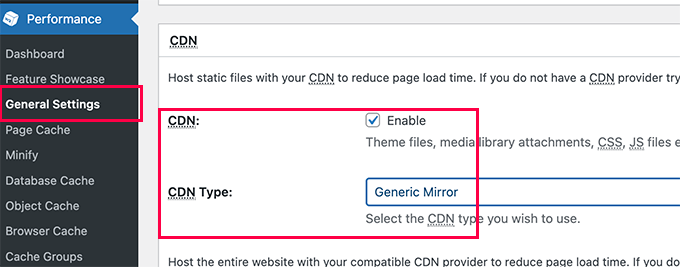
Kontrollera boxen Aktivera bredvid alternativet CDN och välj Generic Mirror bredvid alternativet CDN-typ.
Glöm inte att klicka på knappen Save All Changes för att spara dina inställningar.
Därefter måste du besöka CDN-sidan Performance “ och rulla ner till Configuration: Objects section.
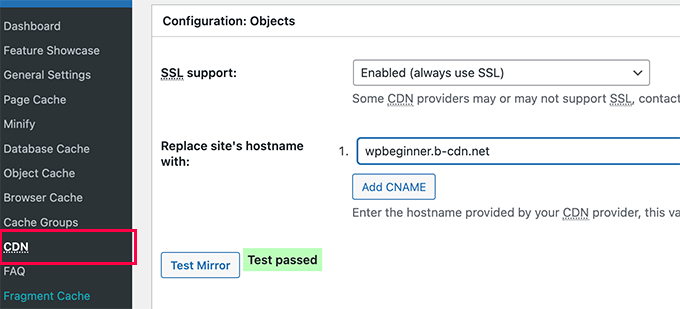
Härifrån måste du add to värdnamnet som du skapade tidigare för din pullzone och klicka på knappen test mirror.
W3 Total Caching kontrollerar tillgängligheten av ditt värdnamn och visar Test Passed message när det är utan problem.
Du kan nu klicka på knappen Save All Changes för att spara dina inställningar.
W3 Total Caching kommer nu att börja servera dina statiska resurser från CDN-servern.
W3 Total Caching fungerar också bra med Cloudflare gratis CDN. Alternativt kan du också använda den med Sucuri som är den bästa website firewall-tjänsten med built-in CDN-tjänst.
Felsökning av W3 Total Cache Issues
När du har konfigurerat W3 Total Cache på rätt sätt bör den fungera sömlöst i bakgrunden för att förbättra WordPress hastighet och öka prestandan.
Ibland kan du stöta på issues där du inte ser ändringar som du gjort på din website direkt, eller så kanske ett plugin inte fungerar som det ska.
Den vanligaste orsaken till dessa issues är att you förmodligen ser en gammal cachelagrad version av your website.
Detta kan enkelt fixas genom att cleara cachen i WordPress.
Klicka bara på menyn Performance högst upp och välj sedan alternativet Purge All Caches. W3 Total Cache kommer att cleara all cached content på din website.
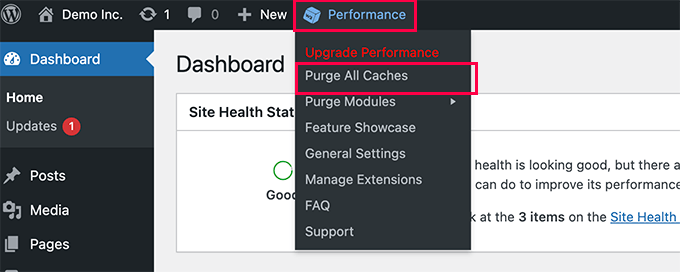
Om du fortfarande ser den gamla versionen av din website kan du också prova att cleara webbläsarens cache.
Expertguider om cachelagring i WordPress
Vi hoppas att den här artikeln hjälpte dig att installera och konfigurera W3 Total Cache i WordPress. Du kanske vill se några andra alternativ för cachelagring i WordPress:
- Bästa cachningspluginsen för WordPress för att snabba upp din webbplats
- Hur man installerar och ställer in WP Super Cache för nybörjare (enkelt sätt)
- Så här installerar och konfigurerar du WP Rocket på rätt sätt i WordPress
- WP Rocket granskning
- LiteSpeed Cache vs. WP Rocket – Vilken är bäst?
- Så här rensar du din cache i WordPress (steg för steg)
If you liked this article, then please subscribe to our YouTube Channel for WordPress video tutorials. You can also find us on Twitter and Facebook.


Rabia
Thanks valuable information.
WPBeginner Support
You’re welcome
Admin
Jiří Vaněk
I would recommend everyone to make a note of the changes you have made, especially. Issues on the website may not manifest immediately. For instance, it happened to me that after a week, WordPress started behaving strangely, and it was happening randomly. It took me quite a while to find the problem in the cache plugin and incorrect settings. If I had documented the changes I made, I would have found the problem more easily. It’s a recommendation for everyone.
Roin
Hello,
I’ve a question:
Does a free version slow the website ? My opinion is that a free version of this plugin makes website slow.. how do you think?
WPBeginner Support
The free version of plugins will not slow down your site, poorly coded plugins can slow down your site.
Admin
Abu Allaah
Thanks for the valuable tips,
I would like to ask if it’s possible to update the article with the latest version of the plugin.
Thanks in advance
WPBeginner Support
We will look into updating the article as soon as we are able
Admin
Balu
I enabled Minify settings in W3 Total cache plugin and also installed cloudflare extension in w3 total cache plugin.
Should I enable minify settings in Cloudflare extension also?
WPBeginner Support
You would want to only use one or the other, if your W3 Total cache minification is working well then stay with that for the moment
Admin
Prajyot Kumbharjuvekar
Do I still need to install a caching plugin if I use CLOUDFLARE CDN
WPBeginner Support
It is not required but it is recommended to use a caching plugin with your CDN
Admin
Duryab
This post is much outdated now, please update this post to the latest W3 total cache plugin.
Thanks.
WPBeginner Support
Thank you for letting us know about this post being outdated, we will update this article as we are able
Admin
Tom Lloyd
Thanks for the great article! I really benefitted from it and have a better performance now 1/4 load time. One thing you should mention is in the Browser Page under Performance tab there is a box at the bottom that says Rewrite URL. Don’t check that it ruined my pages. All links were alterred but I took it off and it’s ok.
Gavin
Thanks for your very easy to follow tutorial (with screenshots) on W3 Total Cache. I noticed an immediate difference in load time of the site.
Bikramjit
Hi, As per your recommendation, I have decided to go for MaxCDN, Is there any new update about CDN? Going to the MaxCDN site, there are different service including Content Delivery Network, Edge Delivery and other. Can your recommend me which service I have to select initially? I have new blog with no affiliate link till now and not planning for the next six month. And I am planning to apply Google adsense in the near future.Presently I installed WP Super Cache.
Do I need to switch W3 Total Cache to configure with MaxCDN? if I can configure MaxCDN with WP Super Cache, do you have any guideline?
HumbleHuman
Hey:)
Thanks for those detailed instructions and I must say that you helped me much in setting up W3TC for my website..
I have a small issue with W3TC.. It is not purging my feed cache even though I have enabled this in the Purge Policy..
Will you help me how to solve this issue?
Thanks in Advance
Brandon
After following this guide, I get the error: “Error: Empty hostname / CNAME list.” I have filled the “Replace site’s hostname with:” with all my cdn.* fields. Has anyone ran into this issue?
Vijay Prajapati
I am Using W3 Total cache plugin for WordPress. My post has one table which updates every minute/hour. But as I do caching, the server does not serves latest version, instead it displays cached copy to the visitor. How can I purge cache every 30 minutes automatically so that it shows latest version of the post at after every 30 minutes?
I have already tried inserting this code in functions.php file but its not purging cache every 1h, instead it dies 2-3h later.
function w3_flush_cache( ) {
$w3_plugin_totalcache->flush_all();
}
// Schedule Cron Job Event
function w3tc_cache_flush() {
if ( ! wp_next_scheduled( ‘w3_flush_cache’ ) ) {
wp_schedule_event( current_time( ‘timestamp’ ), ‘hourly’, ‘w3_flush_cache’ );
}
}
Anna
Thanks for such an easy to follow article. I broke my website yesterday using instructions from another blog. I should have come here first!!
I am a bit surprised by my results though. I did a Pingdom and GT Metrics test before I made all these changes and my page load time was:
Pingdom: 8.91 secs and GT Metrix: 5.3 secs
After I made all the changes I re-ran the tests:
Pingdom: 9.51 secs and GT Metrix: 9.9 secs
I thought my load times were meant to get much better – not worse!!?? What have I done wrong?
WPBeginner Support
Hi Anna,
Allow the plugin to generate cache and recheck your scores. If that doesn’t help try to review your cache settings to make sure everything is setup properly. Alternately, you can try WP Super Cache and see if it helps.
Admin
Roman
Thank you for so great content.
Should I enable “Page cache” option in the process of development of site or only at when I launch it?
For me it is convenient to do this right now, but I think maybe during development it is not good as I visiting thousand times to check the progress.
WPBeginner Support
Hi Roman,
Yes, you are right. You can set up the plugin later once your website is live.
Admin
Jessica Braboy
Hi! Trying to install the W3 Total Cache Plug In, and while it says it is compatible with my version of WordPress, it says that the plug in is unavailable and says “Not allowed on our system due to performance, security or compatibility concerns. Please contact support with any questions.”
First of all… do you know why this is no longer working? And, do you have an alternative cache plug in that you recommend? Thank you!
WPBeginner Support
Hi Jessica,
This means that your WordPress hosting company doesn’t allow the plugin. Most probably because they have their own caching solution integrated into your hosting account which doesn’t work well with W3 total Cache. Please contact your hosting provider for more details.
Admin
Andy Sellers
Hi, I need some help please.
I’ve followed the instructions to serve my static files through CDN (and they’re very clear, thank you) and have found the process straightforward so far- but when I log in to my site the URL still starts with ‘www.’ and not ‘cdn’ so I guess cdn is not operational yet.
One thing I notice is that in the MAXcdn account page there is no option to ‘Update’ the Custom Domain settings as mentioned in the instructions – is this OK? I assume it now updates automatically?
But my main problem is that, assuming I now have to do this, I don’t know how to specify the static files in the custom files list in the custom setting of W3Total Cache. Help please. How should I fill in this Advanced panel – it’s now getting a bit too techie for me? Thank you.
WPBeginner Support
Hi Andy,
You will login to your WordPress site using the normal URL. CDN only serves static files via their network not the whole website.
MaxCDN settings may have changed, but you would still need to setup your domain. Please contact their support and they will be able to guide you.
Admin
sazia kazia
Hi Very helpful and useful article. I set w3 total cache as per above instructions and could see it improved my website speed in good level. I ‘ll use MaxCDN instructions …Thank you so much
Amit Jain
Hello Team! I am following your blog since long now and trust have learnt a lot. Thanks.
I need a little bit of help – Mine is a startup site, but have started with Cloud VPS Server with Data Centre located in Mumbai, India. 2.80*4 CPU and 8GB Ram is the part of Server Configuration. For better Site Security and Performance what should i use – Cloudflare (If cloudflare then free or paid plan) or Sucuri, W3Total Cache, WP Super Cache, Varnish Cache or Some other plugin/software.