Vi har alla öppnat vår WordPress-sida och rynkat på näsan åt samma gamla bilder som fortfarande ligger kvar.
Den där suddiga logotypen? De föråldrade skärmdumparna? Det är förmodligen dags för en uppfräschning. Men att ersätta mediefiler kan kännas som en av de där uppgifterna du hela tiden skjuter upp.
Vi har varit där, klickat igenom mappar, uppdaterat länkar och hoppats att inget går sönder i processen. Det är lätt att ignorera tills en besökare påpekar det eller vår webbplats börjar se lite... försummad ut.
Sanningen är att hålla dina bilder uppdaterade hjälper din webbplats att se mer professionell ut. Det kan till och med förbättra laddningstider och SEO.
Det är därför vi testade en mängd olika sätt att ersätta bilder i WordPress, utan att orsaka huvudvärk.
I den här guiden visar vi hur du enkelt kan ersätta bilder och andra mediefiler på din WordPress-webbplats. Oavsett om du byter ut en bild eller uppdaterar hela ditt bibliotek, kommer den här metoden att spara tid och hålla din webbplats snygg.
Varför ersätta bilder och mediefiler i WordPress?
Att ersätta bilder och mediefiler på din WordPress-webbplats, oavsett om det är produktfoton, framträdande bilder eller miniatyrbilder, är viktigt av flera skäl:
- Uppdaterat innehåll. Färska och relevanta bilder håller din webbplats engagerande och aktuell. De kan också återspegla eventuella ändringar i din verksamhet.
- Förbättrad användarupplevelse. Högkvalitativa, uppdaterade bilder förbättrar användarupplevelsen. De håller besökare kvar på din webbplats längre och uppmuntrar dem att utforska fler sidor.
- SEO (sökmotoroptimering)-fördelar. Optimering av nya mediefiler med relevanta nyckelord kan förbättra deras synlighet i sökmotorer.
- Bättre prestanda. Att ersätta inaktuella eller dåligt optimerade mediefiler med nyare, optimerade kan snabba upp din webbplats. Dessutom förbättrar snabbare laddningstider användarupplevelsen och hjälper sökmotorrankingen.
- Konsekvens och varumärkesbyggande. Att hålla dina bilder och mediefiler i linje med din varumärkesidentitet hjälper till att upprätthålla ett professionellt utseende.
Om du har en webbplats för småföretag, visar regelbunden uppdatering och ersättning av dina bilder och mediefiler för din publik att ditt företag är aktivt och detaljorienterat. Detta gäller även för personer som driver en onlinebutik.
Dessutom gör det att hålla ditt mediabibliotek organiserat och uppdaterat det enklare att hantera innehåll för dig och ditt team.
När du vet att alla dina bilder och mediefiler är aktuella, optimerade och korrekt kategoriserade, blir det lättare att hitta och använda rätt tillgångar när de behövs. Detta sparar tid och minskar stressen med att hantera hundratals eller tusentals mediefiler.
Så du kan fokusera på att planera ditt innehåll och skapa högkvalitativa artiklar för din publik.
Med detta i åtanke visar vi hur du enkelt kan ersätta bilder och mediefiler i WordPress. Här är en snabb översikt över de 3 stegen vi kommer att gå igenom i den här guiden:
- Steg 1. Installera Sök & Ersätt Allt av WPCode
- Steg 2. Välj de bilder eller mediefiler som ska ersättas
- Steg 3. Kontrollera om dina nya bilder eller mediefiler är live
- Bonustips: Använd Lazy Loading för bilder för att snabba upp saker
- Vanliga frågor: Byt ut bilder och mediefiler i WordPress
- Videohandledning
- Fler WordPress-guider för effektiv bildanvändning
Redo? Låt oss börja.
⚠️ Viktig anmärkning: Innan du ersätter dina bilder och mediefiler, låt oss se till att du har en säkerhetskopia. Detta steg är avgörande för att skydda dina filer från eventuella oavsiktliga fel under ersättningsprocessen. Tillägg som UpdraftPlus eller Duplicator kan hjälpa dig att skapa säkerhetskopior av webbplatsen.
Steg 1. Installera Sök & Ersätt Allt av WPCode
Det första du behöver göra är att installera och aktivera det kostnadsfria Sök & ersätt allt-pluginet från WPCode.
Vårt team skapade pluginet Search & Replace Everything by WPCode för att åtgärda en betydande begränsning i WordPress: bristen på en inbyggd funktion för att söka och ersätta.
Bristen på denna funktion lämnade webbplatsägare med två frustrerande alternativ. För det första kunde de manuellt uppdatera varje sida, vilket är tidskrävande. För det andra kan de behöva anlita en utvecklare för att skriva en SQL-fråga, vilket kan vara dyrt.
Sök & Ersätt Allt förenklar denna process genom att erbjuda en enkel och kostnadseffektiv lösning för alla som hanterar en WordPress-webbplats.
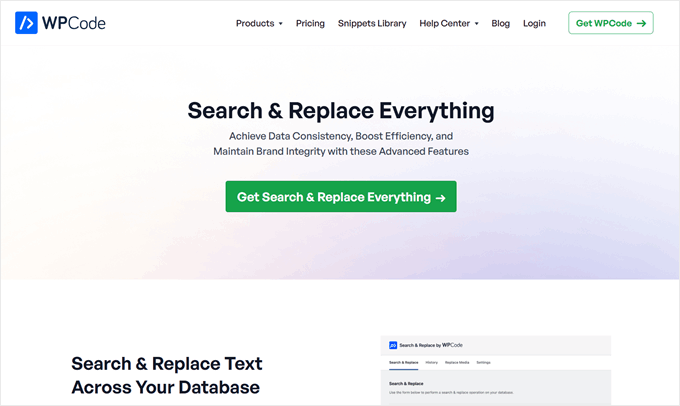
Här är några av pluginets användningsområden:
- Byt snabbt ut föråldrade bilder på hela webbplatsen med ett enda klick.
- Massuppdatera allt innehåll på din webbplats inlägg eller sidor på ett ögonblick.
- Ersätt enkelt gamla URL:er med nya för att fixa brutna länkar efter att ha migrerat en webbplats.
Den goda nyheten är att du kan använda verktygets gratisversion för att ersätta bild- och mediefiler. Att uppgradera till Search & Replace pro-versionen låser dock upp historikfunktionen, där du kan ångra dina ändringar, ersätta bilder från WordPress blockredigerare och mer.
Om du behöver hjälp med att installera pluginet kan du kolla in vår guide om hur man installerar ett WordPress-plugin.
💡 Expert Tips: Om du redan har WPCode Pro, kan du installera och aktivera Sök & Ersätt Allt från WPCode-instrumentpanelen inom WordPress-administrationsområdet.
Allt du behöver göra är att navigera till Kodavsnitt » Sök & Ersätt och sedan klicka på knappen 'Installera Sök & Ersätt Allt'.
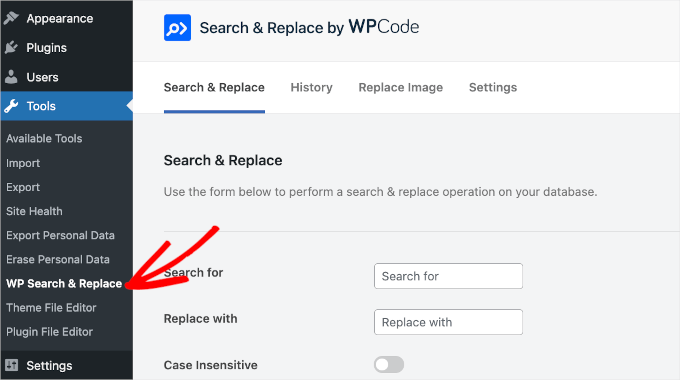
Efter aktivering kan du komma åt instrumentpanelen för Sök och ersätt allt genom att navigera till Verktyg » WP Sök och ersätt.
Du behöver inte konfigurera något, så du kan använda verktyget direkt.
Steg 2. Välj de bilder eller mediefiler som ska ersättas
För att ersätta bilder eller mediefiler, låt oss gå till fliken 'Ersätt bild' i Sök & Ersätt-instrumentpanelen.
I det här området kan du se alla dina befintliga bilder.
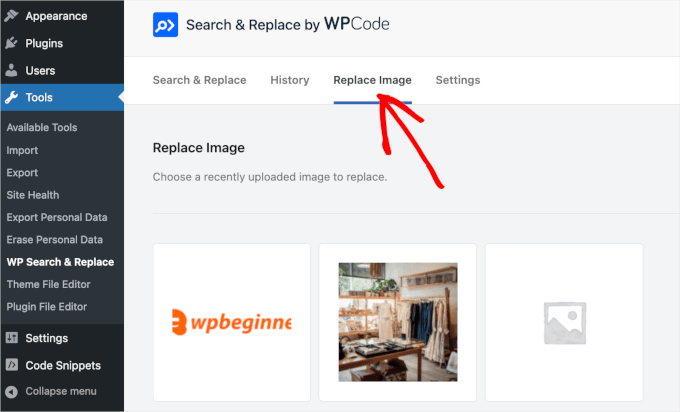
Nu vill du hitta filen du vill ersätta.
När du har hittat filen, för muspekaren över den och du kommer att se en knapp märkt 'Ersätt.' Du kan klicka på den.
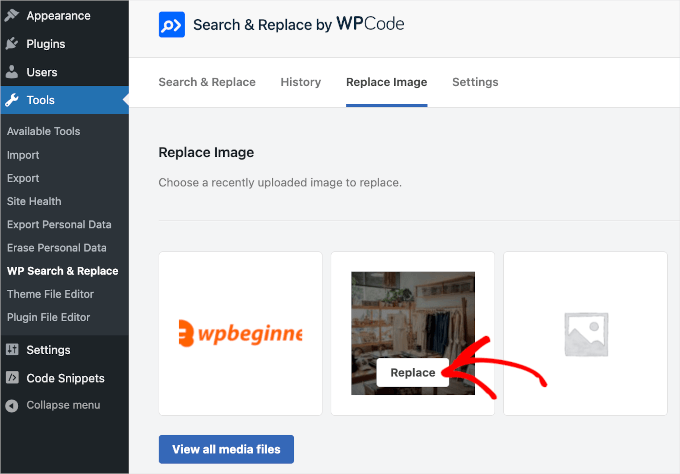
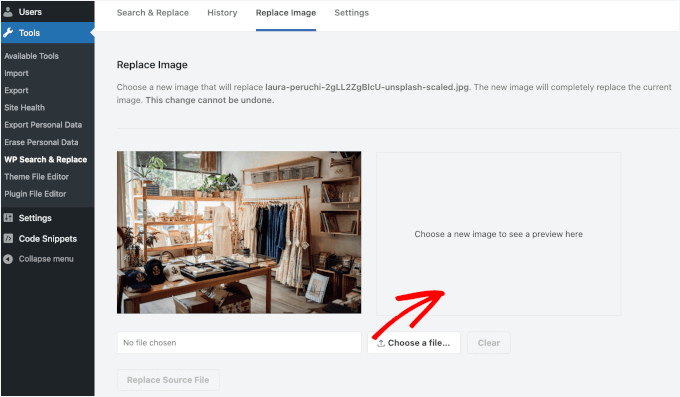
Detta tar dig till panelen 'Ersätt bild'.
Du kan ladda upp din nya fil genom att klicka på knappen 'Välj en fil' eller rutan 'Välj en ny bild för att se en förhandsgranskning här'.
Oavsett vilket kommer det att omdirigera dig till din dators lokala lagring för att välja en bildersättning.
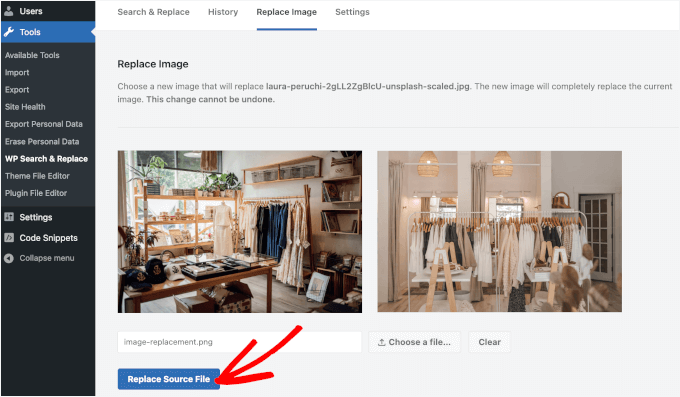
När du har valt en fil kommer den att visas i rutan till höger om den gamla bilden.
Om allt ser bra ut, klicka på knappen 'Ersätt källfil'.
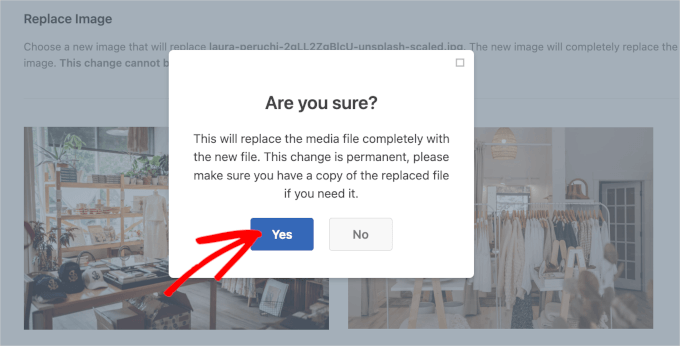
Du kommer då att se ett varningsfönster som säger att ändringen kommer att vara permanent.
Klicka helt enkelt på knappen 'Ja' för att påbörja processen om du är säker på att allt är redo.
💡 Notera: När du ersätter en bild kommer annan data som mediasfilens titel och alt-text att förbli densamma. Du kan uppdatera dessa detaljer senare när ersättningsprocessen är klar. Men att se till att din nya bild eller mediefil kan använda samma bildtitel och alt-text hjälper till att spara tid.
Därefter kommer Search & Replace Everything att bearbeta ersättningen.
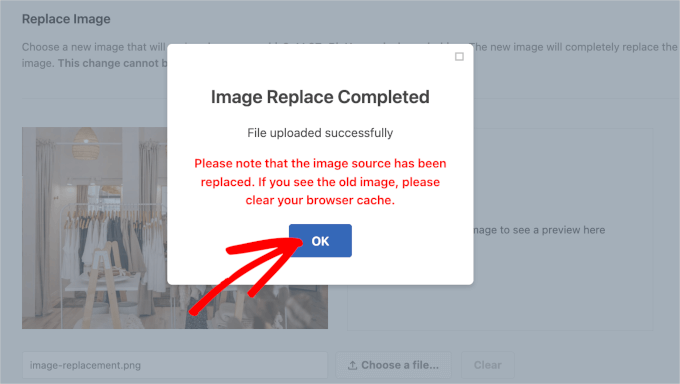
När det är klart ser du ett annat popup-fönster. Här står det 'Bildersättning klar', följt av några anteckningar.
Du kan klicka på ‘OK’ för att slutföra processen.
Steg 3. Kontrollera om dina nya bilder eller mediefiler är live
Du kan nu besöka dina inlägg eller sidor där den här mediefilen var kopplad och se den ersatt med den nya filen du just laddade upp.
Här är hur vår ser ut:
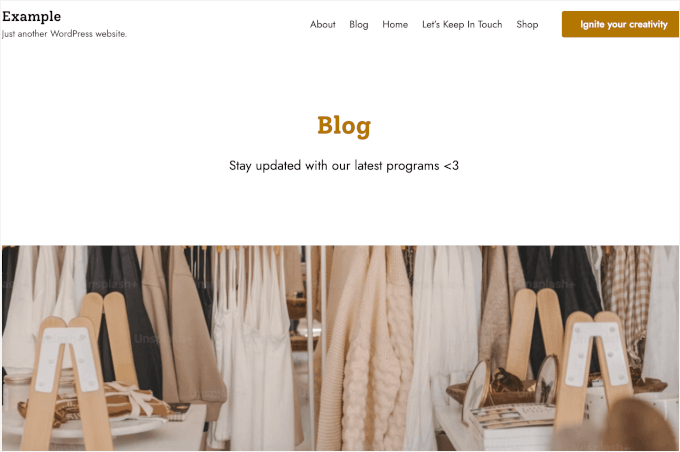
Om du ser den gamla bilden bör du försöka rensa din cache.
För mer detaljerade instruktioner kan du se vår detaljerade steg-för-steg-guide om hur man rensar din cache i WordPress.
Bonustips: Använd bild-lazy loading för att snabba upp saker
Bilder är ofta den största anledningen till att din WordPress-webbplats laddas långsammare. Lat laddning hjälper till att lösa detta genom att bara ladda bilder när någon är på väg att se dem, snarare än alla på en gång.
Detta gör att din webbplats laddas snabbare direkt, hindrar besökare från att studsa bort, och kan till och med hjälpa dig att ranka bättre på Google.
Från och med WordPress 5.5 är lazy loading inbyggt som standard. Men om du vill ha mer kontroll, som lazy loading av bakgrundsbilder, kan du använda ett plugin som Optimole eller WP Rocket.
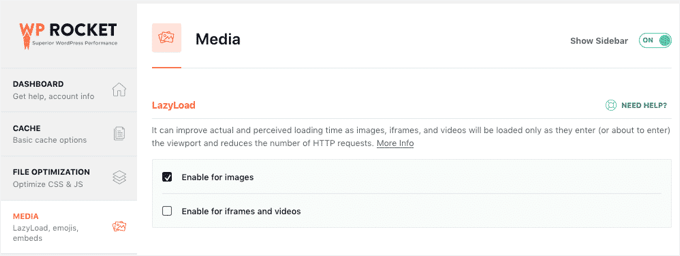
För mer information kan du hänvisa till vår guide om hur man enkelt lazy loadar bilder i WordPress. Sedan kan du kombinera lazy loading med bildkomprimering för ännu bättre resultat!
Vanliga frågor: Byt ut bilder och mediefiler i WordPress
Här är några vanliga frågor om att ersätta bilder och mediefiler i WordPress:
Kan jag ersätta flera bilder samtidigt?
Ja, men massersättningar måste hanteras med försiktighet.
Pluginet Search & Replace Everything stöder bildersättning, men att uppdatera många bilder samtidigt kan vara riskabelt om det inte hanteras korrekt. Det är bäst att köra massuppgifter under tider med låg trafik för att minimera eventuella störningar.
Vad ska jag göra om mina bilder inte uppdateras efter ersättning?
Du kan börja med att rensa din webbläsar- och webbplats-cache. Om du använder en CDN som Cloudflare, se till att rensa dess cache också, eftersom den kan servera äldre versioner av dina bilder.
Påverkar byte av en bild dess SEO?
Det kan det, särskilt om du ändrar filnamnet eller alt-texten. För att bevara eller till och med förbättra din SEO, använd tydliga, beskrivande filnamn och alt-text som återspeglar bildens innehåll.
Är det möjligt att ångra en ersättning?
Om du använder Pro-versionen av Sök & Ersätt Allt, kan du komma åt historikfunktionen för att återställa ändringar. Annars kan en nyligen gjord säkerhetskopia låta dig återställa din webbplats vid behov.
Videohandledning
Behöver du en steg-för-steg-guide? Titta gärna på vår videoguide för att byta ut bilder och mediefiler i WordPress.
Fler WordPress-guider för effektiv bildanvändning
Vi hoppas att den här artikeln hjälpte dig att hitta ett enklare sätt att ersätta bilder och mediefiler i WordPress.
Vill du ta din bildoptimering till nästa nivå? Kolla in dessa extra WordPress-guider som hjälper dig att använda bilder som ett proffs:
- WebP vs. PNG vs. JPEG: Bästa bildformatet för WordPress
- Hur man byter namn på bilder och mediefiler i WordPress
- Hur man gör grundläggande bildredigering i WordPress (beskära, rotera, skala, vända)
- Hur man ändrar storlek på och gör bilder större utan kvalitetsförlust
- Hur man visar bilder i full storlek i WordPress
- Hur man massredigerar utvalda bilder i WordPress
- Hur man åtgärdar färg- och mättnadsförlust i bilder i WordPress
- Hur man skapar ett bildgalleri i WordPress (steg för steg)
- Bästa plugins och verktyg för utvalda bilder för WordPress
Om du gillade den här artikeln, prenumerera då på vår YouTube-kanal för WordPress-videoguider. Du kan också hitta oss på Twitter och Facebook.


Daniel Whalen
Jag älskar dina videor men snälla sakta ner hur man gör, äldre personer behöver se det långsamt.
WPBeginner Support
Tack för din feedback på vår video!
Admin
Phil
Finns det ett sätt att ersätta i batch? Jag är fotograf och har ibland över 100 bilder per blogginlägg. Jag ville ersätta dem med mindre filstorlekar för att hjälpa till med mina sidhastigheter. Är detta möjligt?
Många tack
WPBeginner Support
Inte manuellt men det finns plugins som hjälper till att göra processen enklare för dig som vi täcker i vår lista nedan:
https://www.wpbeginner.com/plugins/best-wordpress-image-compression-plugins-compared/
Admin
Jeff Vetterick
Om jag använder pluginet för att bara "ersätta bild endast" (med en med samma filnamn) kommer alt-texten, bildbeskrivningen och bildtexten för originalbilden att skrivas över eller bevaras. Om de bevaras skulle det spara mig massor av tid.
WPBeginner Support
Den bör behålla den informationen om den kan, du vill kontakta plugin-supporten för specifika detaljer.
Admin
jg
Det här alternativet är inte tillgängligt i den nya versionen eftersom det bara tillåter dig att ta bort eller redigera det. Om jag tar bort det vet jag inte URL:en att ersätta det med?
WPBeginner Support
Du kanske vill se till att du är i rätt vy för ditt mediebibliotek eftersom funktionen för närvarande är tillgänglig
Admin
Sanjay Sajeev
Tack för ditt inlägg.
Jag installerade pluginet enable media replace på min webbplats. Men när jag ersätter en bild som jag använde i ett blogginlägg, ser jag att bilden har ersatts i mediebiblioteket. Men när jag kontrollerar bilden i blogginlägget, finns det ingen förändring av bilden och dess filstorlek. Vad ska jag göra för att lösa detta?
WPBeginner Support
Du kanske vill prova att rensa din cache och om det inte fungerar, kontakta plugin-supporten för att de ska titta på möjliga problem.
Admin
Linda Joyce
Kan jag göra samma sak manuellt genom att ersätta bilden via FTP? Kommer det att ändra bilden?
WPBeginner Support
Hej Linda,
Det skulle fungera. Men WordPress kommer inte att kunna generera om miniatyrbilder och bildstorlekar.
Admin
Rehan
Kan jag inaktivera detta plugin permanent efter att alla bilder har ersatts i mediabiblioteket?
Fede
Hej. Jag får ständigt request timeout. Samma som när jag laddar upp via vanliga wp-metoder. Det är därför jag var tvungen att byta till att ladda upp via ftp och sedan ladda dem genom ett plugin avsett för det. Jag behöver verkligen få detta att fungera eftersom några av bilderna inte skalas ordentligt och jag behöver ändra dem. All hjälp skulle uppskattas. Tack.
hitesh
Hej
i min wordpress-admin finns det inget alternativ som ersätt media..i mitt finns det bara 3 alternativ 1) REDIGERA 2) RADERA PERMANENT 3) VISA
Så vad är problemet där ..är det en gammal version eller har det något annat problem kan du förtydliga det så att jag kan ersätta dessa mediefiler
Hälsningar
Hitesh
Luke
Det är därför du behöver installera det nämnda pluginet.
Nicole
Hjälp
Jag är en artist som kontaktar agenter och försökte ersätta röstinspelningar efter att ha installerat din plugin framgångsrikt (jag trodde det var det säkraste sättet att göra det)
Nu är de tomma – jag har rensat webbläsarens cache.
Jag följde instruktionerna
min mediaspelare är den här:
svnlabs HTML5 Mp3 player 3.6 installerad
snälla hjälp :0
Riccardo
Hej tack för artikeln, pluginet fungerar utmärkt. Det är en sak jag inte förstår dock: bildersättning verkar bara påverka bilden i dess ursprungliga storlek, när webbplatsen visar bilden i andra format (miniatyrbilder, förhandsvisningar, etc.) kan jag fortfarande se den gamla bildfilen.
Hur kan jag tvinga bildersättning på alla andra bildfiler (t.ex. bildnamn-300×200.jpg)?
Tack
Rehan
Använd pluginet Regenerate thumbnails för att återskapa dina bilder. Därefter kommer du att se de ersatta bilderna.
Leed
Tack så mycket.
Du hjälper mig med det här problemet.
Panagiotis Tabakis
Pluginet Enable Media Replace utgör en säkerhetsrisk, jag skulle helt undvika det. Det är synd att föreslå användare att använda farlig programvara. Vänligen undersök innan du publicerar.
Exploateringen har pågått sedan 2011.
För mer information se
WPBeginner Support
Hej Panagiotis,
Problemet löstes omedelbart av plugin-utvecklaren i nästa utgåva (se pluginets ändringslogg och scrolla ner till version 2.4).
Det är därför vi rekommenderar användare att hålla sina WordPress-webbplatser och plugins uppdaterade.
Admin
Panagiotis Tabakis
Ja, du har rätt. Jag ber om ursäkt, jag såg ett supportinlägg som plugin-utvecklaren inte svarade på och trodde att det inte var löst.
Exploiten patchades @ 09 februari 2011 (samma dag).
Jag undrar varför författaren inte har svarat, men jag kommer att informera forumanvändarna.
Återigen, förlåt.
WPBeginner Support
No problem It’s good to be cautious about security issues. Hopefully, your answer on the support forums will help other users.
Blake
Jag kör WP 4.6.1 bootstrap och jag vill ta bort en bakgrundsbild och ersätta den med en som finns i mitt galleri. Kan du tala om för mig hur jag gör det, tack
Sky
Jag följde stegen och i biblioteket visas den nya bilden men där bilden finns på hemsidan kvarstår det gamla fotot. Osäker på vad jag ska göra...
Christian Scholz-Flöter
Kanske är det ett problem relaterat till webbläsarens cache och du behöver rensa/ta bort webbläsarens cache. Om du inte vet hur du gör det, googla ditt webbläsarvarumärke och "rensa webbläsarens cache".
jorge
Det här pluginet fungerar utmärkt på mediasidan. Jag skulle dock också vilja ersätta bilder/media inifrån modal-fönstret för media i en inläggs-/sidoredigeringssida utan att lämna sidan. Några idéer?
Tack för detta fantastiska inlägg!
Marilyn
Jag önskar att jag hade vetat detta tidigare! Jag kopplade inte bort mina mediefiler innan jag raderade dem. Jag ersatte dem med en ny bild. Problemet är att det resulterade i trasiga bilder. Även om jag går tillbaka och återansluter/väljer rätt bild senare, så blir den trasig igen. I mitt Easy recipe-program ser jag platshållaren för den raderade bilden och programmet letar efter den. Finns det en lösning på detta? Tyvärr är det cirka 200 filer som gör detta.
Rosy
Hej, tyvärr visas inte länken "ersätt media" som ett alternativ?