Vill du displaya WordPress posts i en grid layout?
En grid layout ger dig mer flexibilitet när du visar dina posts i WordPress. Detta kan vara till hjälp när du skapar customize pages.
I den här artikeln visar vi hur du enkelt kan visa dina WordPress-poster i en grid layout var som helst på din site.
När behöver du en grid layout för WordPress?
Alla teman i WordPress har support för den traditionella vertikala layouten för blogginlägg, och det fungerar bra för de flesta typer av webbplatser. Den här layouten kan dock ta upp mycket utrymme, särskilt om du har många posts.
Om du skapar en custom homepage för din site, kanske du vill använda grid layout för att visa dina senaste inlägg.
Detta ger dig mer utrymme att add to andra element till din home page.
Dessutom kommer ditt post grid att lyfta fram dina utvalda images, så det är visuellt tilltalande och klickbart. Du kan också använda post grid för att visa upp din kreativa portfölj och andra typer av custom post content.
Många teman för magasin och fotografier använder redan den grid-baserade layouten för att displayed posts. Men om ditt theme inte stöder den här funktionen måste du add to den.
Med det sagt, låt oss visa you hur du visar dina WordPress posts i en grid layout. Använd bara snabblänkarna under för att hoppa direkt till den metod du vill använda.
- Skapa en grid layout med WordPress block editor
- Skapa en layout med grid med tillägget Post Grid
- Skapa en grid layout med hjälp av SeedProd page builder
- Skapa en grid layout genom att lägga till kod i WordPress
Video Tutorial
Om du föredrar skriftliga instruktioner är det bara att fortsätta läsa.
Metod 1. Skapa en WordPress Post Grid Layout med Block Editor
Med den här metoden kan du helt enkelt displayed dina posts och inläggsminiatyrer i en inläggsraster layout med hjälp av WordPress block editor. Det finns ett built-in post grid block som låter dig skapa ditt eget grid.
För att göra detta, öppna upp sidan du vill editera, klicka sedan på knappen “Plus” add block och search efter “Query Loop”, klicka sedan på blocket för att lägga till det.
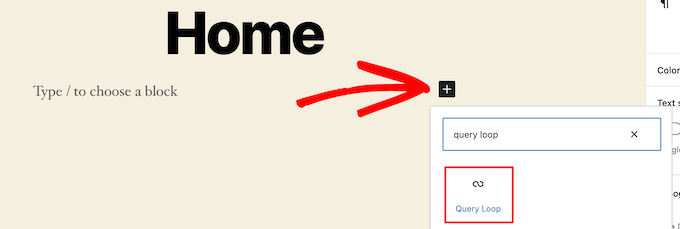
Detta block addar din post loop till din page.
Klicka sedan på alternativet “Start Blank” högst upp i blocket för att skapa ett post grid.

Detta ger några olika val beroende på vilken typ av information du vill visa med ditt post grid.
Vi väljer alternativet “Image, Date, & Rubrik”, men du kan välja vad du gillar.

Därefter hoverar du över imagen och väljer alternativet “Grid View”.
Detta förvandlar din lista till ett inläggslista.

Därefter kan du customize den information som du vill visa.
Först ska vi ta bort sidonumreringen längst ner i blocket. För att göra detta klickar du bara på det och klickar på menyn “Three Dots”.
Klicka sedan på “Remove sidonumrering”.

Detta kommer automatiskt att ta bort elementet från blocket.
Du kan ta bort datumen från posterna på samma sätt eller lämna mer information om posterna till dina besökare.
Nästa inlägg lägger vi till links till både inläggsminiatyren och inläggstiteln.
Klicka bara på inläggsminiatyren och slå på toggeln “Link to Post” i den högra panelen med alternativ.

Gör sedan samma sak för din rubrik på posten.
När du är slutförd klickar du på knappen ‘Update’ eller ‘Publicera’ för att göra din post grid live.
Nu kan du besöka din WordPress website för att se din new WordPress post grid.

Du kan add to det här blocket till vilken page eller post som helst. Om du gillar att använda detta som din blogg archive page, kan du se vår guide om hur man skapar en separat page för blogginlägg i WordPress.
Metod 2. Skapa en layout för ett grid för WordPress-poster med tillägget Post Grid
Denna metod erbjuder ett enkelt sätt att lägga till ett anpassningsbart post grid som du kan lägga till var som helst på din website.
Det första du behöver göra är att installera och aktivera pluginet Post Grid. För mer detaljer, se vår guide om hur du installerar ett plugin för WordPress.
Efter aktivering måste du besöka Post Grid ” Add New för att skapa ditt första post grid.
Ge sedan din post grid en rubrik. Detta kommer inte att visas någonstans på din page, det är bara för att hjälpa dig att komma ihåg.

Under detta hittar du inställningarna för post grid uppdelade i olika sektioner med flera tabs.
Först måste du clicka på tabben “Query Post”. Det är här du definierar de posttyper som du vill visa i boxen “Post types”.
Som standard kommer det bara att visa posts, men du kan add to pages och även custom post types.

Efter det måste du klicka på tabben “Layouts”.
Klicka sedan på knappen “Create layout”. Detta öppnas i ett new fönster.

Du måste namnge din layout. Klicka sedan på alternativet “Allmänt”, så öppnas en lista med tags.
Dessa taggar är den information som kommer att visas i din post grid.

Vi väljer alternativet “Thumbnail with link” och alternativet “Post title with link”.
Klicka sedan på “Publicera” eller “Update” för att save din layout.

Gå nu tillbaka till den ursprungliga post grid editor i föregående inlägg, och det kommer att finnas ett nytt layout alternativ tillgängligt som du kan välja.
Klicka bara på den nya layouten i sectionen “Item layouts” längst ner på vyn.

Klicka sedan på tabben “Item style”. Här kan du ställa in storleken på ditt grid.
Standardinställningarna bör fungera för de flesta webbplatser, men om ej kan du ändra dem här.

När du är slutförd klickar du på knappen “Publicera” högst upp på page och ditt grid är redo att addas till din WordPress-blogg.
Nu måste du klicka på tabben “Shortcode” och sedan kopiera shortcoden i boxen “Post Grid Shortcode”.

Därefter öppnar du upp sidan där du vill visa din inläggslista och klickar på knappen “Plus” för att lägga till block.
Sök sedan efter “Shortcode” och välj blocket “Shortcode”.

Därefter klistrar du in shortcoden som du kopierade tidigare i boxen.
Klicka sedan på knappen “Update” eller “Publicera”.

Nu kan du viewa din page för att se din WordPress post grid layout live.

Metod 3. Skapa en WordPress Post Grid Layout med SeedProd Page Builder Plugin
Ett annat sätt att skapa en layout med grid för post är att använda pluginet SeedProd page builder. Det är den bästa drag and drop WordPress page builder på marknaden som används av över 1 miljon webbplatser.
SeedProd hjälper dig att enkelt skapa custom pages och till och med helt custom WordPress themes utan att skriva någon kod. Du kan använda pluginet för att skapa vilken typ av sida du vill, gillar 404 sidor, coming soon sidor, landing pages, och mycket mer.
För mer information, se vår guide om hur du skapar en customize page i WordPress.
I SeedProd builder, när du customiserar din sida, klickar du helt enkelt på plus ‘Add Section’ knappen var som helst på sidan.
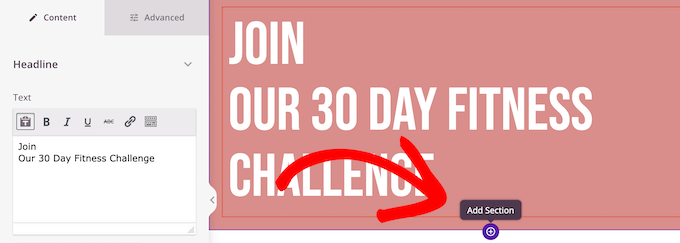
Då visas ett alternativ för att add a new block.
Därefter drar du blocket “Inlägg” över till din sida, och det kommer automatiskt att lägga till en lista med inlägg på din sida.

Nu kan du customize det här blocket med den vänstra panelen med alternativ.
Först rullar du ner till “Layout” section. Här kan du ställa in antalet Column för ditt blogginlägg grid och slå på “Show Featured Image” och “Show Rubrik” toggles.
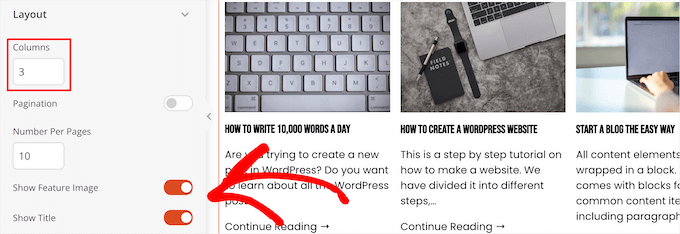
Nästa, rulla ner till “Visa excerpt” toggle och “Visa Läsa mer” toggles och stäng av dem för att skapa en enkel blogginlägg grid layout.

Om du vill customize färgschema, text med mera, clickar du på tabben “Advanced” högst upp i den vänstra colonnen.
Sedan klickar du på rullgardinsmenyn “Text” och gör dina ändringar.

Du kan fortsätta customize din page och blogginläggets grid layout så mycket som du gillar.
När du är klar klickar du på knappen “Save” och väljer rullgardinsmenyn “Publicera” högst upp på sidan för att göra dina ändringar live.
Nu kan du view your new post grid på din website.

Metod 4. Skapa en WordPress Post Grid Layout genom att lägga till kod i WordPress
Den här metoden är obligatorisk för att förstå hur man lägger till kod i WordPress. Om du inte har gjort det tidigare kan du läsa vår guide om hur du copy and paste kod i WordPress.
Innan du lägger till kod måste du skapa en new image-storlek som du kommer att använda för ditt post grid. För mer information, se vår guide om hur du skapar ytterligare storlekar på images i WordPress.
Därefter måste du hitta rätt WordPress theme-fil där du ska lägga till code snippet. Du kan till exempel add to din single.php, så att den visas längst ner i alla dina inlägg.
Du kan också skapa en custom page template och använda den för att displaya din blogginlägg grid layout med inläggsminiatyrer.
För mer information, se vår WordPress mall-hierarki fusklapp för att hjälpa till att hitta rätt temamallfil.
När du har gjort det kan du börja lägga till kod i WordPress. Eftersom code snippet är ganska långt kommer vi att bryta ner det sektion för sektion.
Först addar du följande code snippet till din template-fil för temat.
1 2 3 4 5 6 7 8 9 10 11 12 | <?php$counter = 1; //start counter $grids = 2; //Grids per row global $query_string; //Need this to make pagination work /*Setting up our custom query (In here we are setting it to show 12 posts per page and eliminate all sticky posts*/query_posts($query_string . '&caller_get_posts=1&posts_per_page=12'); if(have_posts()) : while(have_posts()) : the_post();?> |
Detta code snippet ställer in sökning av post loop. Du kan ändra variabeln “posts_per_page” för att visa fler posts per page om du gillar det.
Add sedan följande code snippet till din template-fil för temat.
1 2 3 4 5 6 7 8 9 10 11 12 13 14 15 16 17 18 19 20 21 22 23 24 25 | <?php//Show the left hand side columnif($counter == 1) :?> <div class="griditemleft"> <div class="postimage"> <a href="<?php the_permalink(); ?>" title="<?php the_title_attribute(); ?>"><?php the_post_thumbnail('category-thumbnail'); ?></a> </div> <h2><a href="<?php the_permalink(); ?>" title="<?php the_title_attribute(); ?>"><?php the_title(); ?></a></h2> </div><?php//Show the right hand side columnelseif($counter == $grids) :?><div class="griditemright"> <div class="postimage"> <a href="<?php the_permalink(); ?>" title="<?php the_title_attribute(); ?>"><?php the_post_thumbnail('category-thumbnail'); ?></a> </div> <h2><a href="<?php the_permalink(); ?>" title="<?php the_title_attribute(); ?>"><?php the_title(); ?></a></h2> </div><div class="clear"></div><?php$counter = 0;endif;?> |
Detta code snippet skapar två Column för våra posts och kommer att visa titeln och post image. Det skapar också en CSS-klass som vi ska visa you hur man stylar senare.
Den hänvisar också till “postimage”, så du måste ändra detta till namnet på den image-storlek som du skapade tidigare.
Följ detta och add to följande code snippet i slutet.
1 2 3 4 5 6 | <?php$counter++;endwhile;//Post Navigation code goes hereendif;?> |
Detta code snippet closar helt enkelt slingan. Det ger också alternativet att add to post navigation, men de flesta website ägare använder ett annat plugin för detta, så vi inkluderade inte det för att undvika kodkonflikter.
Så här ser det slutliga code snippet ut tillsammans.
1 2 3 4 5 6 7 8 9 10 11 12 13 14 15 16 17 18 19 20 21 22 23 24 25 26 27 28 29 30 31 32 33 34 35 36 37 38 39 40 41 42 43 44 45 46 47 | <div id="gridcontainer"><?php$counter = 1; //start counter $grids = 2; //Grids per row global $query_string; //Need this to make pagination work /*Setting up our custom query (In here we are setting it to show 12 posts per page and eliminate all sticky posts) */query_posts($query_string . '&caller_get_posts=1&posts_per_page=12'); if(have_posts()) : while(have_posts()) : the_post(); ?><?php//Show the left hand side columnif($counter == 1) :?> <div class="griditemleft"> <div class="postimage"> <a href="<?php the_permalink(); ?>" title="<?php the_title_attribute(); ?>"><?php the_post_thumbnail('category-thumbnail'); ?></a> </div> <h2><a href="<?php the_permalink(); ?>" title="<?php the_title_attribute(); ?>"><?php the_title(); ?></a></h2> </div><?php//Show the right hand side columnelseif($counter == $grids) :?><div class="griditemright"> <div class="postimage"> <a href="<?php the_permalink(); ?>" title="<?php the_title_attribute(); ?>"><?php the_post_thumbnail('category-thumbnail'); ?></a> </div> <h2><a href="<?php the_permalink(); ?>" title="<?php the_title_attribute(); ?>"><?php the_title(); ?></a></h2> </div><div class="clear"></div><?php$counter = 0;endif;?><?php$counter++;endwhile;//Pagination can go here if you want it.endif;?></div> |
Nu måste du add to följande CSS till din site för att se till att ditt post grid visas snyggt.
Om du inte har gjort det tidigare kan du läsa vår guide om hur du enkelt lägger till custom CSS på din site i WordPress.
1 2 3 4 5 6 7 8 9 10 11 12 13 14 15 16 17 18 19 20 | #gridcontainer{ margin: 20px 0; width: 100%; }#gridcontainer h2 a{ color: #77787a; font-size: 13px;}#gridcontainer .griditemleft{ float: left; width: 278px; margin: 0 40px 40px 0;}#gridcontainer .griditemright{ float: left; width: 278px;}#gridcontainer .postimage{ margin: 0 0 10px 0;} |
Du kan ändra de olika CSS-selektorerna för att se hur de ändrar olika element i din post loop.
Vi hoppas att den här artikeln hjälpte dig att lära dig hur du visar dina WordPress-poster i en grid layout. You may also want to see our guide on how to choose the best web design software and our expert picks of the best chattsupport software for small businesses.
If you liked this article, then please subscribe to our YouTube Channel for WordPress video tutorials. You can also find us on Twitter and Facebook.


Rachel
I tried to do this under ‘posts’ for my blog that has already been created. It didn’t work.
WPBeginner Support
You would want to ensure you have multiple blog posts published live on your site for them to be visible as the most common reason for that issue.
Admin
julie
Hi
I have tried this on my static homepage but it is not working.
Do I just add the one shortcode or both ( ie the php code also?)
using make theme.
do i just add it to the page as a paragraph and shortcode?
thanks
julie
WPBeginner Support
You should only need to add the shortcode to the page, if you reach out to the plugin’s support they should be able to let you know why it is not displaying properly
Admin
Paige
Is there a way to customize the thumbnails? I have mine set to the featured image, however some are different sizes and are cut off in the wrong areas.
WPBeginner Support
In the layout settings, you should be able to customize the display of the featured iamges
Admin
Lisa
I’m following all the steps to set this grid up on my homepage but it’s not displaying. I created a page, added the short code, and under settings–>reading I set my homepage to static with that page. What am I doing wrong?
p.s. I purchased a child theme (Foodie Pro), could that be my issue? Thanks!
WPBeginner Support
There may be a page template that could be causing a display issue, if you reach out to Post Grid’s support they should be able to help have it display properly
Admin
Jess
This was GREAT!!! Thankyou! I was able to apply this for my main blog page however I also have navigation for the different categories within my blog. How can I make it so that each of these category pages also displays as a grid?
Lu
I installed this plugin but my WordPress site have been automatically updated to Gutenberg and now a box appears in all my WordPress Post pages, covering the content so I can’t see it! The only way I can get rid of it is to de-install Post Grid. Anyone have any other ideas so I can use the Post Grid? Thanks for any help! L
Robert
I have the page set up but I have 5 posts that I did before that are not showing up on the new Post Grid.
How do I get the posts to show up on the grid?
Travenjo
Can anyone help me to have page grid and (not post grid) for my pages. How ro customize?
Hector
I’m using the Twenty Fourteen theme and this only gave me one option for layout instead of what you are showing and the one they let me use is a double but it just doesn’t work even the pagination got stuck on me so I don’t know what to do,is there a better plugin for my theme?
Aurangzaib
What a simple solution, i understand WP and PHP on a good level and this is the smartest and easiest solution to make a grid of posts and fetch them up from the DB, although the need is pretty rare if you are willing to make a different page for any purpose otherwise there are themes that have built-in support of many kinds of grids designs i customized and designed a bit on my web there at simspk.com, also keeping simple and clean content is the simplest way to achieve better ranks, Great post bro, keep them up!
Daniel Grove
What about for blog category pages? They just get listed vertically in my theme and it looks lame and wastes so much space! I want it to grid them just like the home blog page does.
Jess
Meeeee tooooo!!!!! Following to see if there is a response…..
WPBeginner Support
Hey Daniel and Jess,
The plugin’s premium version claims to have the option to create post grid for category archive pages. We didn’t test the premium version for the article. Please check the plugin website to learn more before buying.
Admin
Lori
I have the Dara theme with the Premium plan, and I am VERY NEW. Unfortunately, I just realized that plug-ins are only available with the Business plan, which I cannot afford to invest in at this time since it would triple my cost. Dara has a grid page option, but it only allows child pages to be displayed – I want POSTS to display from a specific category. Looks like I would have to create a static child page every time I want new content to appear in this Premium plan Dara grid page option, right??
WPBeginner Support
Hi Lori,
You can start with a self-hosted WordPress.org website which allows you to install plugins out of the box.
Admin
Carl
This is great but is this same process possible WITHOUT installing a plugin. How do you shows 10 different category separately? How select images for grid?
Brianna
This is awesome! Is there a way to edit from two across ( 2 columns) to three or four? When I change the settings to 20 posts a page, I am getting 2 columns and 10 rows.
Dale Kevin
Hi, I followed all the steps but it doesnt work. The page where I posted the shortcode of postgrid doesnt show up as my how page. Whats wrong? Maybe the Php code is needed?
I need you guidance. Thank you. I appreciate you response
Mr Thanh
Hi, that’s great plugin.
But i can’t creat a grid with three colums, only two colums.
How can i?
Holly
Hi,
I’ve used this plugin on all the sites i’ve created, i love it its so easy to use but im having a problem with the layout a little bit. Im using Layout 1 with 4 Columns and for some reason a row splits into two different rows, how do i stop this from happening?
Dee
Hello there. This was very helpful thank you. It works fine on the front page of my blog but wouldn’t work in the categories. Whenever a category is clicked in the header, the page shows the theme grid and not the Post Grid. How do I go about this? What page do I copy the code into please?
Thank you
DEE
Can anyone help with this please
Liah
My current theme doesn’t have the grid layout for the blog section. I’ve download the plugin and it works great but when I upload a new blog post does it automatically update the grid to include the latest post? Thank you for the super helpful video!
WPBeginner Support
Hi Liah,
Yes it will automatically update the grid.
Admin
Leanne
I’m trying to make the blog section of my site look nicer here – is there a way to automatically style the current blog posts in a grid rather than creating a new page and adding shortcode or editing php files?
WPBeginner Support
Hey Leanne,
You’d need to look for a WordPress theme that automatically displays your blog posts in a grid layout.
Admin
Joseph
Hi Thank you for the nice Article. Is there any way to make the same without plugin. If so how could i ?
Thanks
leighton
I want to use this but i am confused, I follow it but I dont see anything, I copy the shortcode but still nothing, do I have to upload images and text? can someone help?
Shahid
Great Article, just wanted to know if we can add post excerpt length in this plugin?
mike
This is cool for pages only. What if my posts belong under categories only. How do I add the shortcode to category archive. Thanks
Henry
This is just fine for pages! Still can’t figure how it works for posts! Someone help pls.
Dave Parks
I finally found “Taxonomy” setting on the plugin homepage – available if you buy the premium.
Which means the freebee is of zero value.
Dave Parks
The only category setting I see is
“Exclude by post ID
you can exclude post by ID, comma(,) separated”
With all due respect to the creator of this plugin, there’s no way I’m going input all the IDs I do not want to appear. The list is too long, and it will grow as I develop this site.
So is there some place to put in the one ID that I want to appear?
Tina Davidson
Hi – I finally have my blog up and running – yay! But want to add a store element to it. A “Shop Now” page. Do you think this its the best type of plug-in to use or is the one more efficient for a store set-up? Thanks so much! Tina
hasan
thanks for good knowledge
my website has two kinds of contents : post and pages.
can i add my new pages on homepage automatically without using widgets?
thanks again
Karthik
hi thanks for kind info,
please help me how to filter post by categories
hasan
thank you for good knowledge
i use a theme support magazine template on my site but it includes only posts .
how can i use this template for pages also not only posts ?
thanks again
WPBeginner Support
Please contact theme developer they will be able to help you better.
Admin
anil singh
thanks who do not know php and how to cutomize homepage this article will be helpful. i have one question which i searched all the web but not find any article. quetion is how can custmize homepage with category list without showing post area in homepage please make article for it . you can see example on freejobalert.in
judit
Will this pluggin work on wordpress.com?
WPBeginner Support
Please see our guide on the difference between self hosted WordPress.org vs free WordPress.com blog.
Admin
Tonia
Hi – i see an image in your blog article, does this support featured content image ?
natalie james
Thank you so much for this article, it is as though you were reading my mind and my wish list for my blog. I was easily able to follow your step by step instructions until the very end. Im not sure how to put my query correctly, I think what Im trying to say is that I would like the grid page to be my landing page of my blog. At the moment it is inside a post with a post heading. You do mention at the end that I can past the code into my themes file but unfortunately I dont know where that is. Hope this makes sense and I look forward to your reply.
thanks
Natalie
Paul Wandason
Hi Natalie,
I maybe wrong here – but I think you need to create a *page* with the grid on it, then if you go to “settings” then “reading” in the wordpress admin dashboard, you can set “Front page displays” to a static page, and select the page you’ve just created with the grid on it under the “front page” drop down menu.
Hope this helps, and good luck!
Paul