Microsoft Outlook är ett utmärkt val för företag av alla storlekar. Men om du använder en gratis plan kommer du att fastna med standard e-postdomänen. Det betyder att du kommer att se “@outlook.com” i slutet av din e-postadress.
Att behålla standarddomänen för e-post är inte idealiskt, eftersom det inte kommer att ge ett särskilt gott intryck på din publik. Detta beror på att en generisk e-postadress inte stöder en stark varumärkesidentitet eller ser särskilt professionell ut.
Som tur är kan du med Microsoft 365 Business Premium-planen använda ditt domännamn för att skapa en e-postadress för företag med Outlook. Detta ger ett mer professionellt utseende när du skickar e-post. Dessutom ger premiumplanen dig kraftfulla funktioner som skräppostskydd och bättre säkerhet.
I den här artikeln visar vi hur du ställer in en e-postadress med eget varumärke i Outlook.

Vad är en professionell email address med varumärkesprofil?
En professionell email har ditt företagsnamn i sig. Till exempel är “support@yourdomain.com” en professionell email address. Däremot är “yourdomain@yahoo.com” inte en professionell email address.
Det finns många sätt du kan skapa en professionell email address på. You can use the built-in mail server that comes with most WordPress hosting companies.
Detta fungerar för de flesta nybörjarwebbplatser med en stram budget. Det saknar dock flera kritiska funktioner som bättre spam- och antivirusskydd, förbättrad säkerhet, enkel kontohantering och mer.
Om du vill ha de kraftfulla funktionerna som nämns ovan behöver du en professionell e-posttjänst för företag som fungerar med ditt befintliga företagsnamn eller domain name.
Vad är Outlook.com?
Outlook är en tjänst för email som erbjuds av Microsoft. Du kan skapa ett gratis “yourname@outlook.com” account för att använda tjänsten.
Men om du vill skapa en professionellt märkt email address med Outlook.com, måste du registrera dig för ett Microsoft 365 Business Account Premium.
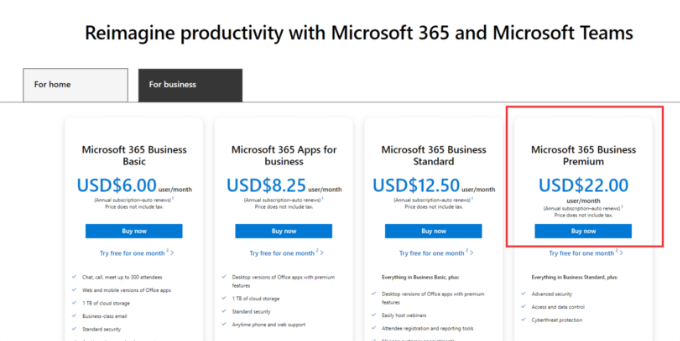
Det är en betaltjänst från $6,00 per användare/månad. Det inkluderar 1 TB OneDrive-lagring och de senaste versionerna av Outlook, Word, Excel och PowerPoint för din PC eller Mac.
På WPBeginner använder vi och rekommenderar Workspace eller G Suite by Google för email addresses för företag eftersom de är mer kostnadseffektiva. Vi föredrar också Google Cloud eftersom vårt team är bekant med Gmail och andra Google Apps.
För mer detaljer kan du se vår jämförelse av G Suite vs. Office 365 för att lära dig hur det står sig mot Outlook.com.
Med detta sagt, låt oss ta en titt på hur du skapar en custom-branded email address med Outlook.com.
Registrera dig för Outlook Premium med Microsoft 365
Först måste du besöka Microsoft 365-webbplatsen och registrera dig för prenumerationen “Microsoft 365 Business Premium”.
Det är den enda prenumerationen som inkluderar support för customize domäner. För att börja, klicka bara på knappen “Köp nu”.
Du måste ange din email address i nästa steg. Det kan vara din befintliga email på jobbet eller i skolan.
När du har enter din email klickar du på knappen “Next”.
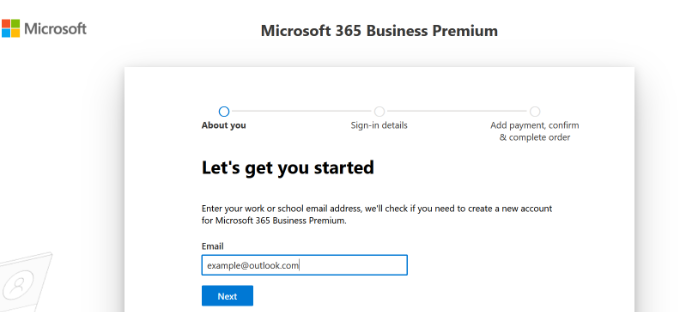
Den kontrollerar sedan om adressen redan är kopplad till ett Microsoft-konto eller om du behöver skapa ett new.
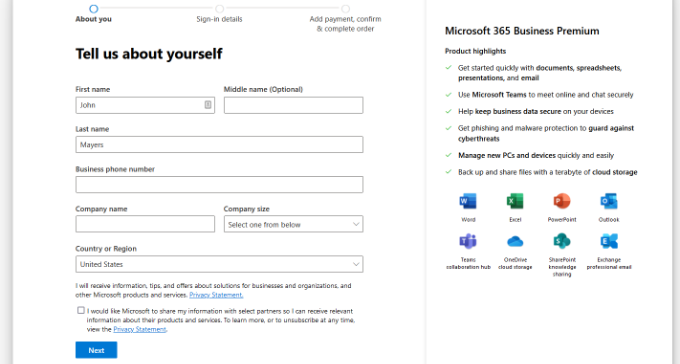
Därefter kommer du att bli ombedd att ange personlig information, som ditt namn, telefonnummer till företaget, företagsnamn, företagsstorlek och land.
När du har enter dessa details går du vidare och clickar på knappen “Next”.
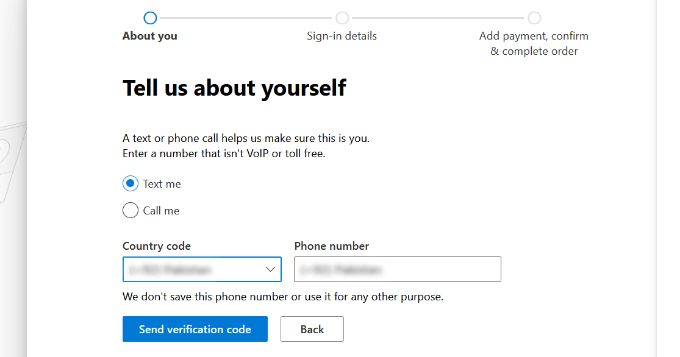
På nästa vy måste du kontrollera ditt företagstelefonnummer.
You can select to receive a text message or receive a phone call to get the verifieringskode.
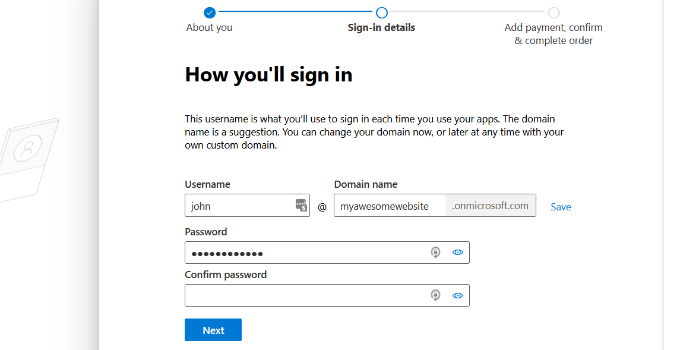
Efter verifiering kommer du att bli ombedd att enter ett password och domain name.
Du kan klicka på knappen “Next” när du är klar.
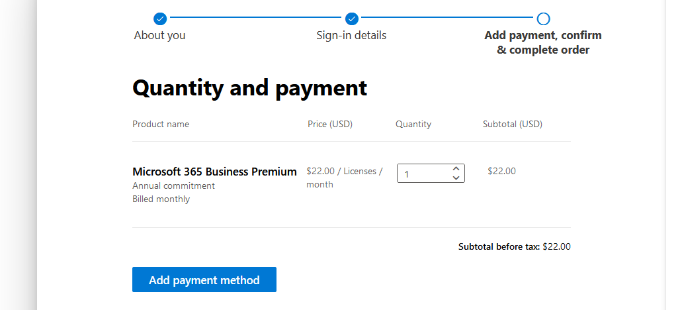
Härifrån måste du välja det antal Microsoft 365 Business Premium-konton du vill ha.
Efter det klickar du på “Add betalsätt” för att fortsätta.
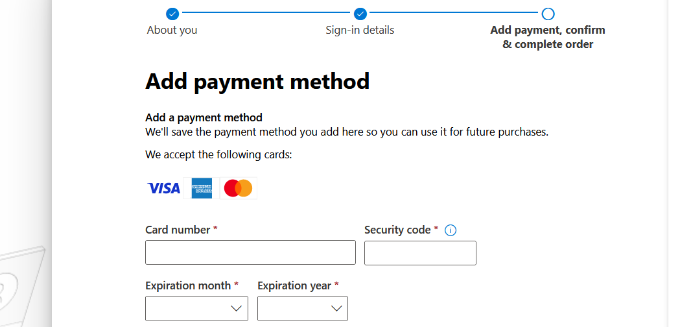
Microsoft kommer nu att be dig att select en betalsätt, gillar ett credit card.
Gå vidare och enter betalningsdetaljerna för att slutföra registreringsprocessen.
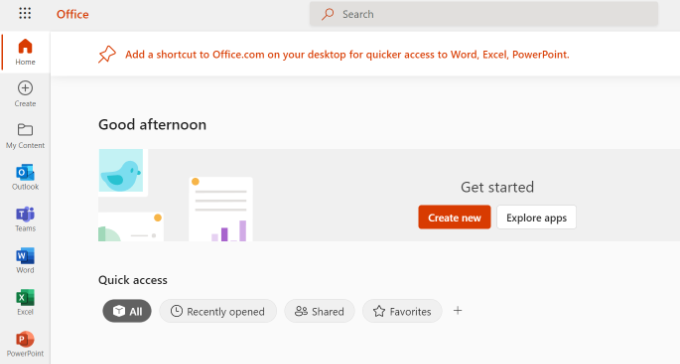
Efter det kommer du att hamna på Office 365 dashboard.
Konfigurera Outlook Email med Custom Domain
I adminpanelen ser du olika tools och appar som Microsoft erbjuder inom ramen för Office 365-sviten.
Den vänstra sidebaren är fylld med genvägar till de olika tjänster och appar som du får tillgång till med din prenumeration.
Därefter kan du klicka på alternativet “Apps” från sidebar-menyn.
Fler tools kommer nu att visas under Apps. Gå vidare och välj alternativet “Admin”.
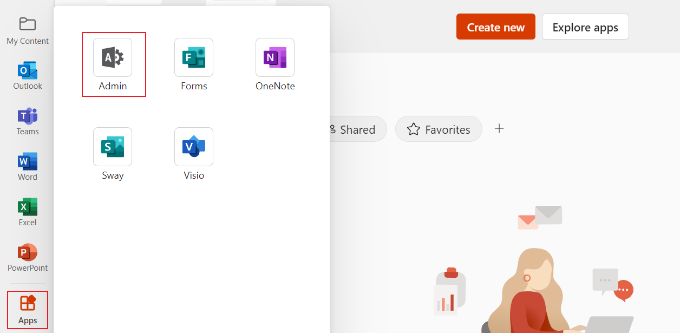
Därefter kommer du att se “Microsoft 365 admin center” högst upp på sidan.
Härifrån kan du välja alternativet “Set up email with a custom domain”.
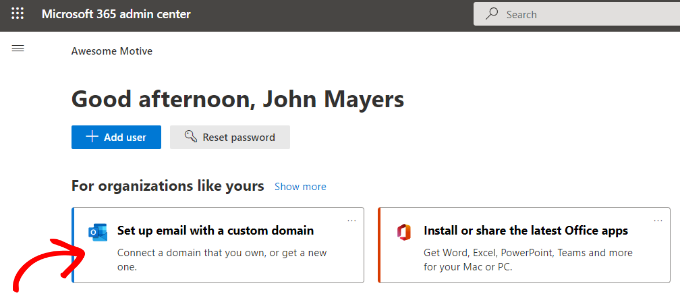
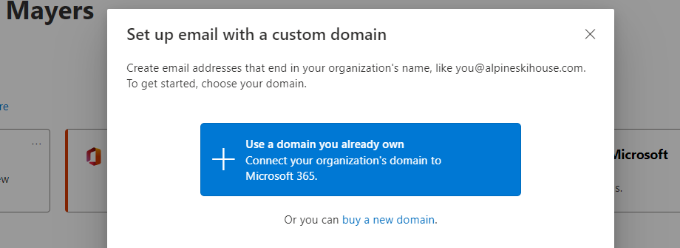
Därefter öppnas ett popup-fönster där du blir ombedd att använda en befintlig domän eller köpa en new.
Klicka bara på knappen “Använd en domän som du redan äger”.
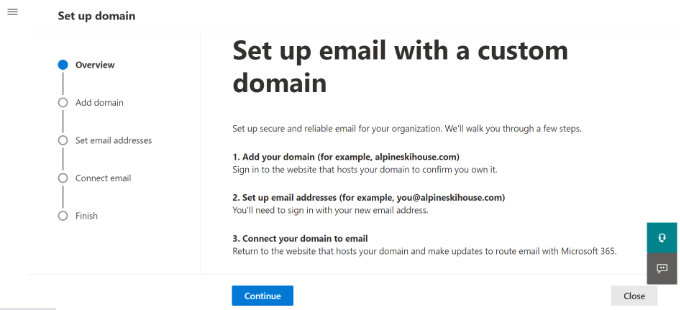
Efter det öppnas en Setup Wizard som hjälper dig att konfigurera en custom domän med Outlook.
Det första steget ger dig en överblick över de steg du behöver följa. Gå vidare och klicka på knappen “Fortsätt” längst ner.
På nästa vy ombeds du att enter det domain name som du vill konfigurera.
När du har enter domain name klickar du på knappen “Continue”.
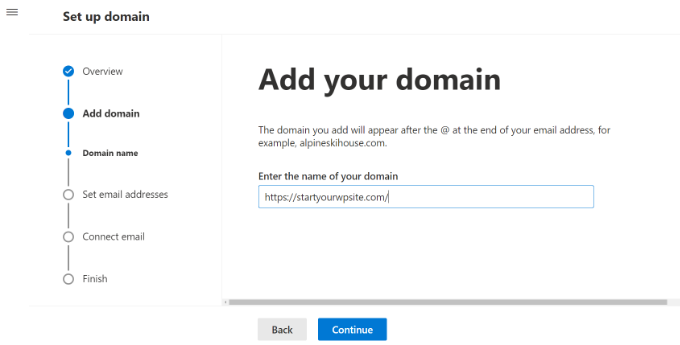
Microsoft kommer nu att leta upp ditt domain name.
Efter det kommer det att be dig att kontrollera ägandet genom att lägga till information i din domäns DNS-inställningar.
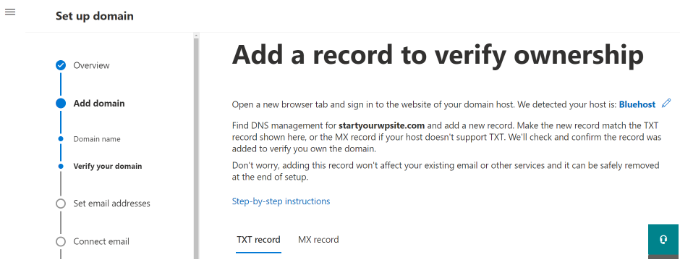
För att göra detta måste du öppna en new tab eller ett nytt fönster i webbläsaren och gå till sidan med inställningar för din domän. Beroende på din domänregistrator kommer den här sidan att finnas i ditt konto. Du måste hitta alternativet DNS-inställningar.
Om din domän är registrerad av ditt WordPress webbhotell, kommer du att hitta domänens inställning i din cPanel dashboard märkt som “Zone Editor” eller “DNS Zone Editor”.
Note: Om du är en SiteGround-användare kommer du ej att ha cPanel. Du hittar detta i sektionen Domän i din dashboard för Site Tools.
För denna handledning kommer vi att använda Bluehost-instrumentpanelen. Till att börja med kan du gå till Domäner från menyn till vänster. Leta sedan upp din webbplats och klicka på knappen “Inställningar”.
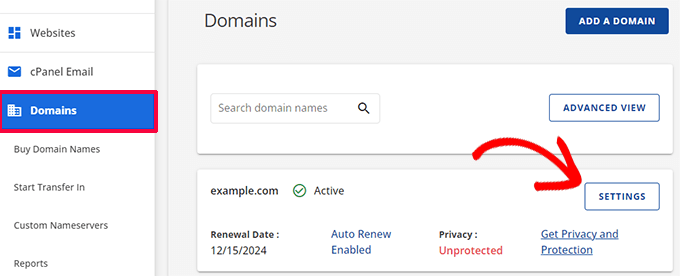
Härifrån kan du bläddra ner i domäninställningarna.
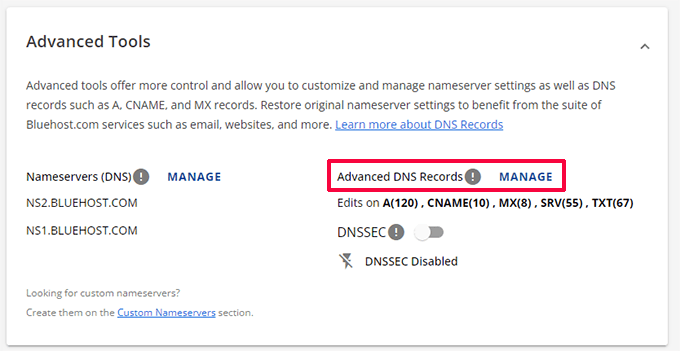
Gå vidare och klicka på alternativet “Avancerade verktyg”.
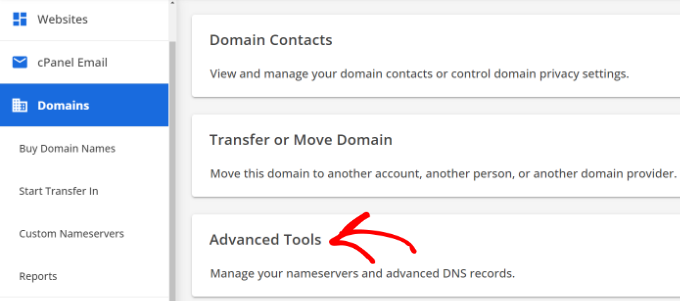
Här kommer Bluehost att visa namnservrarna för din domän och andra poster.
Om du vill hantera DNS-poster kan du klicka på knappen “Hantera” bredvid “Avancerade DNS-poster”.
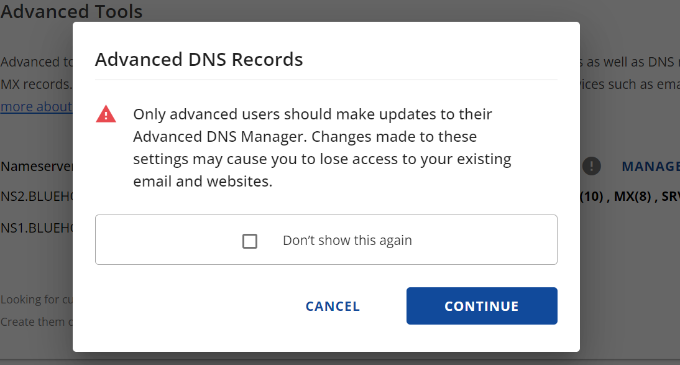
Bluehost kommer då att visa ett varningsmeddelande.
Du kan klicka på knappen “Fortsätt” för att gå vidare.
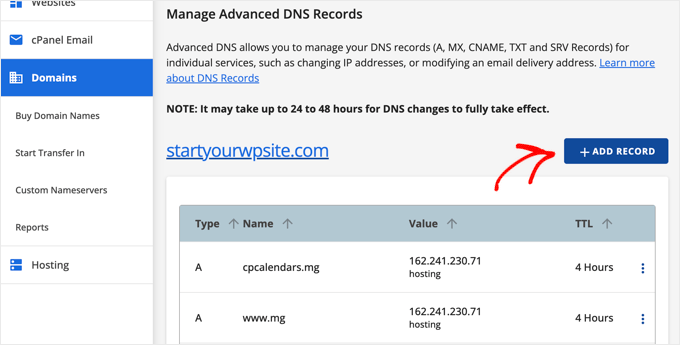
Därefter ser du olika typer av DNS-poster.
Klicka bara på knappen “+ Lägg till post”.
Nu visas ett nytt popup-fönster där du kan lägga till posten.
Klicka sedan på rullgardinsmenyn och välj “TXT” som typ.
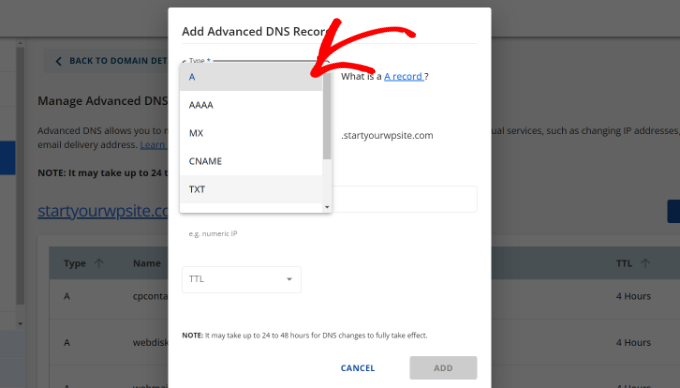
Härifrån måste du enter TXT details. Dessa inkluderar posten för server, TXT-värde och TTL-tid.
Du kan enkelt hitta denna information i Microsoft Office 365 tabs.
När du har lagt till uppgifterna klickar du på knappen “Lägg till”.
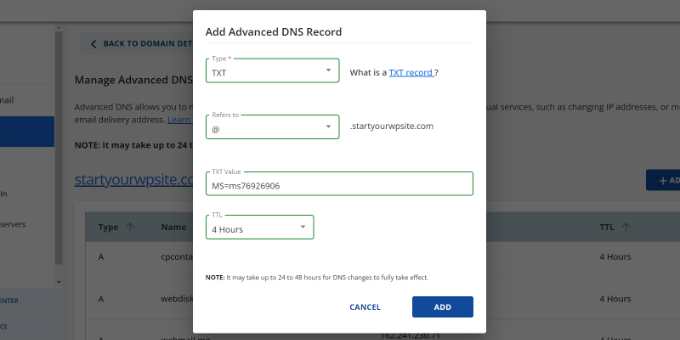
När du lägger till en DNS-post ska du se till att den information du enter matchar den information som visas av Office 365.
Därefter måste du växla tillbaka till Microsoft Office 365-adminportalen och klicka på knappen Kontrollera.
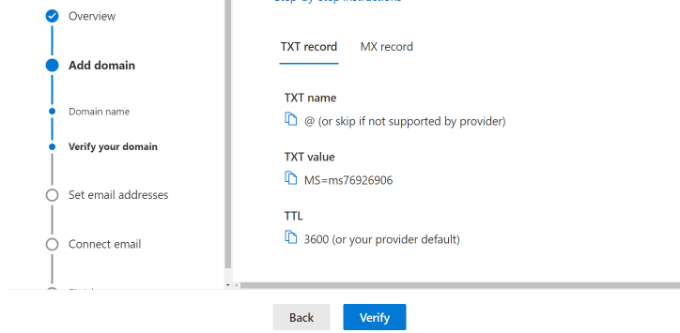
Office 365 kommer nu att kontrollera DNS-poster för att verifiera att du äger domain name. Verifiering av DNS kan ta 5 – 10 minuter eftersom dina DNS Settings ibland inte uppdateras direkt.
Efter verifiering kommer du att bli ombedd att ange din nya email address. När det är gjort klickar du bara på knappen “Update and sign out”.
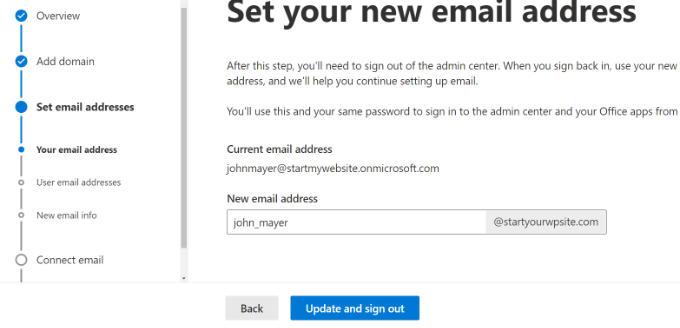
Därefter måste du logga in igen med den nya email addressen som du just har lagt till.
När du är inloggad ser du fler poster att lägga till i din domän och ansluta till Outlook email.
Email-utväxlingen behöver tre DNS-poster att arbeta med, inklusive en MX-post, en CNAME-post och en TXT-post.
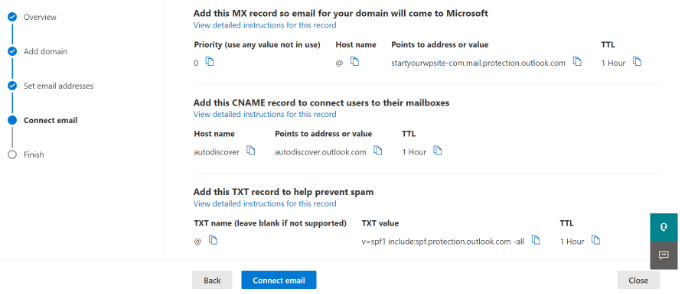
Återigen måste du gå till din domäns DNS settings page och add to dessa poster individuellt.
För det första har du en MX-post, som innehåller instruktioner om var e-postmeddelandena ska levereras.
I Bluehost går du till webbplatsens DNS-inställningar och klickar på knappen “+ Add Record” för att lägga till en ny MX-post.

Därefter visas en popup med skivinställningarna.
Klicka först på rullgardinsmenyn längst upp och välj alternativet “MX”.

Om din website redan hade en MX-post kommer den att ersättas med den här. Detta säkerställer att du kan använda Outlooks mailservrar för att skicka och ta emot email från din custom domain email address.
Efter det har du en TXT-post, som hjälper till att förhindra att någon förfalskar din email för att skicka skräppost.

Slutligen har du en CNAME-post, som låter programvara som gillar Outlook upptäcka och ansluta till email-tjänsten.
Lägg bara till en ny CNAME-post i Bluehost och enter detaljerna från Microsofts dashboard.
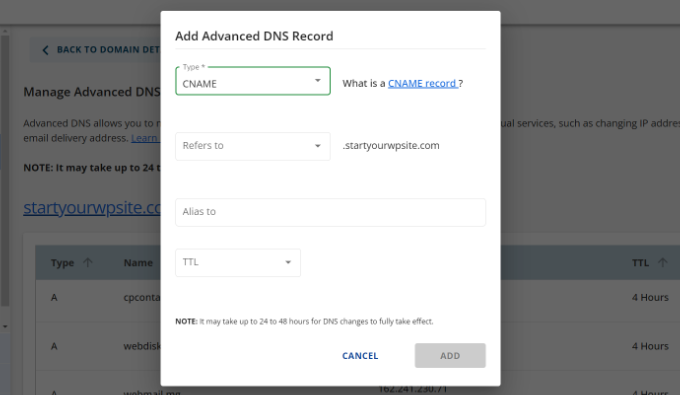
När du har enter alla DNS-poster kan du gå tillbaka till Microsoft Office 365 tabs och klicka på knappen “Anslut email”.
Office 365 kommer nu att kontrollera din domäns DNS-inställningar. Obs/observera att det kan ta 24-48 timmar för TXT-poster att kontrolleras.

När allt är kontrollerat är du framme vid slutet av installationen.
I det sista steget ser du en summary av din konfiguration. Gå vidare och close Setup Wizard.
Nu är det klart! Du har utan problem ställt in ditt domain name så att det fungerar med Outlook.
Lägga till Custom Branded Email Address i Outlook
Du är nu redo att skapa custom domain email addresses med hjälp av Outlook.
Från din Office 365 dashboard, gå till Användare ” Aktiva användare.
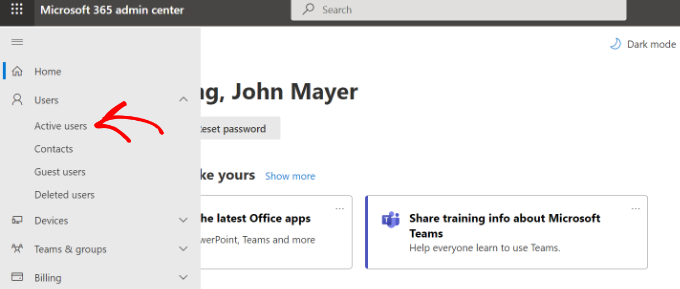
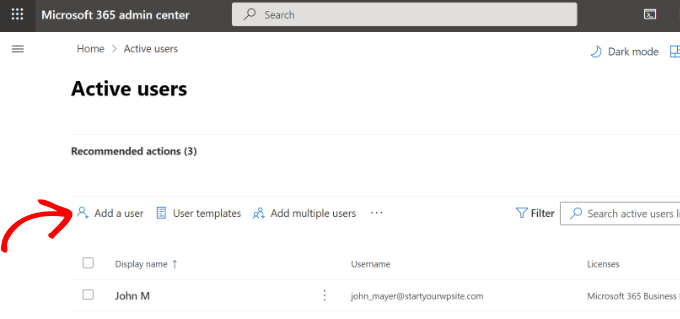
Därefter kommer du att se en lista över dina aktiva användare.
Gå vidare och klicka på alternativet “Add a user”.
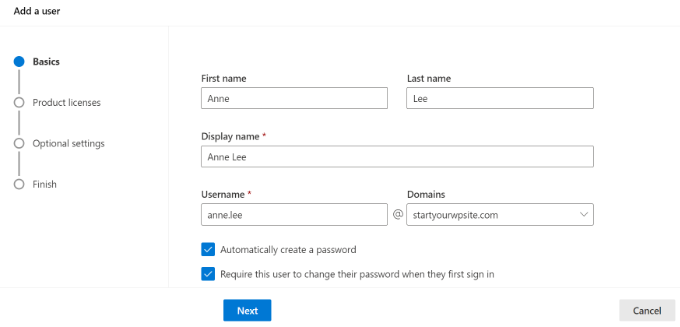
På nästa vy måste du ange användarens personliga information och sedan välja en email address.
När du har enter detaljerna klickar du bara på knappen “Next”.
Sedan måste du välja en geografisk location för din användare och tilldela en produktlicens.
I Microsoft 365 Business Premiumpaketet kan du tilldela upp till 25 licenser. När du är klar klickar du bara på knappen “Next”.
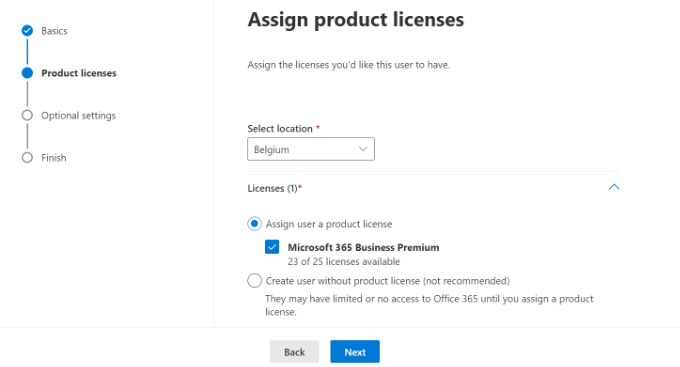
Microsoft erbjuder också ytterligare Settings för nya profiler för användare.
You can for example select a user role and grant access to the Admin Center. Det finns också ett alternativ att add to profil information, gillar jobbtitel, avdelning, kontor, och mer.
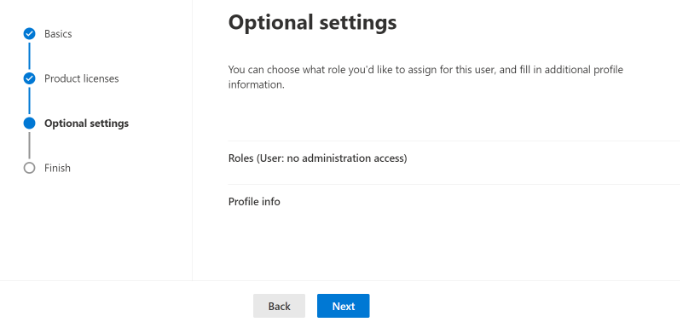
Dessa är valfria settings och du kan lämna dem tomma också. När du är klar klickar du bara på knappen “Next”.
Slutligen ser du en summary av den nya användaren som du just har addat. Du kan reviewer detaljerna, göra nödvändiga ändringar och sedan clicka på knappen “Finish adding”.
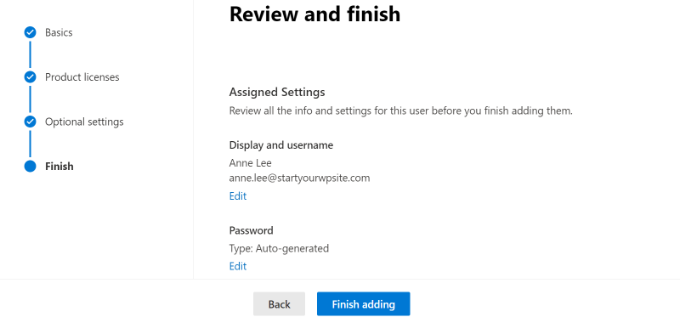
Nu har du lagt till en ny användare och skapat en e-postadress med varumärke i Outlook.
Du kan nu logga in med den email address och password som du skapade i det tidigare steget för att använda din nya professionella email i Outlook.
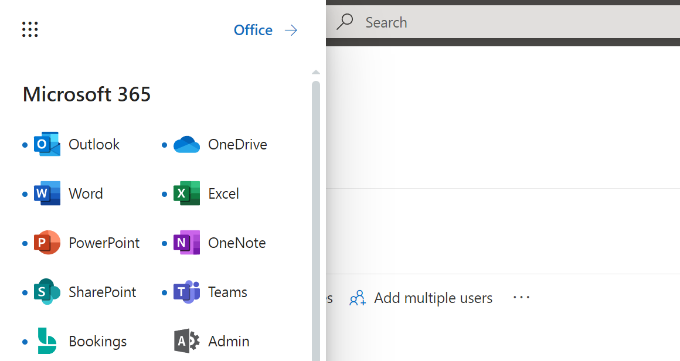
Du kan också installera Office 365-appar på din Mac och PC, inklusive Outlook. Detta allow you to use your branded Microsoft Outlook business email address with offline access via Outlook app.
Vi hoppas att den här artikeln hjälpte dig att lära dig hur du ställer in en professionell e-postadress med Outlook. Du kanske också vill läsa vår artikel om de bästa SMTP-leverantörerna med hög leveranssäkerhet för e-post och vår nybörjarguide till WordPress e-postautomatisering.
If you liked this article, then please subscribe to our YouTube Channel for WordPress video tutorials. You can also find us on Twitter and Facebook.


Nishant Thakur
Was looking for this! Perfect!
Peter
Hello, thanks for this tutorial, please where do I need to add this
v=spf1 include:hotmail.com ~all
Jay
its more than 72 hrs of changing my dns. but now also it is showing “You need to prove ownership of this domain by creating a DNS record. Use the settings below.”
WPBeginner Support
This probably means your DNS records are not correctly set.
Admin
Abhay
hey! nice article…thank you
Rani
Hi,
I set up the account following your instructions.Thanks
But I have this problem , i am not receiving any mails in my inbox. when i send mails from other accounts to this mail it is bounced.
i checked the microsoft support. looks like it is some internal problem and not a settings problem. people are reporting other issues with accounts.Microsoft says they resolved the issue. But doesnt look like so.
http://answers.microsoft.com/en-us/outlook_com/forum/oemail-osend/my-outlookcom-email-account-is-not-receiving-any/02581144-c02b-4cdc-9132-98a8e0531ab1?msgId=2fd9d76f-6dfa-45bc-9a46-81e11265a7a1&page=1
R
Ankush
Hi,
I am trying to setup emails for my domain. This tutorial is really helping me since I am a non technical person. I have set up my live account and I am getting a message ‘You need to prove ownership of this domain by creating a DNS record. Use the settings below’.
When contacted a person where I have hosted my site, he is saying that the settings displayed here are for CPANEL and my sited is on DreamHost. DreamHost has its own CPANEL and that doesn’t support entries like ‘Priority: 10 (or High priority)’ etc.
Can you please guide us to take this forward.
Thanks,
Ankush
WPBeginner Support
Ankush dreamhost does support A records and Max records. For records ask the person managing your account to go to Mail » Custom MX in Dreamhost Panel. As for A or TXT records go to Domains and then click on DNS.
Admin
Ria Parish
I don’t suppose you’d still be able to use this email for Google+ and YouTube account though, eh…. Better than nothing, I guess.
Thanks for the alternative!
princess
Hi I set up my domain via Godaddy.com..and I already have my live mail set up. My question is: When I tried replying to the email my replies bounces back. what could be the problem?
WPBeginner Support
seems like you have not correctly configured your site to use Outlook’s mail servers.
Admin
Verma
Hi- I did a setup of outlook.com with my domain. All seems to be working fine except i am not able to get emails from MS Outlook. If it is possible to access email via MS Outlook app please let me know.
Paul Jones
Great article thanks.
We run a mail server and batch import mail into a sql server database. Would it be viable/possible to switch our mx to outlook.com and forward all inbound and outbound email to our mail server so that we can still import mail into sql?
WPBeginner Support
Sounds doable. But make sure before you implement it.
Admin
Chris
Hi, I just created an outlook email admin account with my own domain name. i create 2 users. Will I be able to see the emails sent to the users I created? If so, how do I enable that feature? Thank you Great article by the way. Thanks.
sivakumar
Now showing it
You can create up to 50 accounts in your domain.
How to create 500 accounts
WPBeginner Support
Contact outlook support for more accounts.
Admin
david
If you want users to use mail.yourdomain.com to sign in for email address, then you can create a CNAME record in your domain’s custom DNS settings or in cpanel’s Simple DNS Editor. Enter Mail in the Name field, and enter subdomain in CNAME field, e.g. mail.example.com.
this is not well explained. Could you please…
WPBeginner Support
Using a subdomain will allow users to sign in to their accounts by typing in your domain name instead of outlook.com.
Admin
kaycee
please how can i create the sub domain
kaycee
If you want users to use mail.yourdomain.com to sign in for email address, then you can create a CNAME record in your domain’s custom DNS settings or in cpanel’s Simple DNS Editor. Enter Mail in the Name field, and enter subdomain in CNAME field, e.g. mail.example.com
…..Please can you provide a guide on how to create this? cos am using ipage and they said its not possible for me to have mail.businessname.com
thank you
Kelly
Hi, thanks for your tutorial.
So after a week of waiting for the service to become active it is now saying that “Your service is suspended. Please make the required DNS changes.” Can somebody please help?
Letitia
I’m having the same problem
Asad
Currently outlook allows 50 free Email addresses. If I need more Account then what is the procedure ?
WPBeginner Support
Contact outlook support and they will extend your user account limit.
Admin
Tihomir Valkanov
Very good article!!! It save me a lot of time Thank you!
phil
Hi I have a question, I bought my domain name off Godaddy, but I built the site and its being hosted by wix.com, I want to use my own domain with outlook so who do I update my mx and txt with godaddy or wix?
Hope to hear from you soon
Phil
WPBeginner Support
Go Daddy if your domain is controlled by GoDaddy.
Admin
Murali
Thank you. I also got good email service.
Lynn Jackson
Awesome post! Very user-friendly. This was almost effortless. I was up and running after about 10 minutes! Thanks.
JANARTHANAN
Hi Syed, as said earlier I’ve done setting of my domains mails on outlook.com. Let me know how to configure this on blackberry and iPhone devices.
Thanks – Janarthanan
tilak
I want to view my old mails from my previous employers where we were using Outlook server. I have those .pst data files in my external hard disk. But don’t know how to configure them in Outlook 2013. Could any one please help me on the step by step guide. thanks.
Haseeb Ahmad Ayazi
Guys the New UI of outlook is tooooo slow. While loading it makes my PC also slow. Outllook can compete Gmail but will loss badly only due to his loading speed.
Jon Adams
Check your computer. Due to the new Gmail compose debacle, I have been testing Outlook.com for the past few months in case Google makes the change permanent and mandatory. The only reason I don’t make the switch now is six years of company emails in twenty accounts. Not to mention everything that lives in Google Drive.
The Outlook UI is vastly superior to Gmail even without consideration of the new compose.
Kunal
I already have an email account on Google Apps, if I were to move to Outlook, what would happen to emails that I already have in my existing accounts on changing the MX record ? Do I have to transfer my emails from google apps to outlook?
quocnt
Thank you. I have successfully setup my professional email.
But can I go to mail.mydomain.com to check mail or must I go to outlook.com every time?
Ana
Hi,
I followed the steps and everything went fine. But when I started using the email, I can send emails, but not receive them. Any idea what can be the issues?
Thanks!
hunter
I have the exact same problem. help
JANARTHANAN
Hi Ana,
Have you got the solution, did your mail work fine on both send & receive ways!
If you got the solution pls let me know.
Thanks
Ankush
Hi Ana,
Did you get solution to your problem? Are you able to send/receive from your new email account. Please guide us as well.
Thanks,
Ankush
Leon
Hi! I finally finally got to the last part.. I had to login using my old @live.com account, I never saw the DNS options when trying to signup using just my domain name http://hempconnection.net
Anyways I was able to create an info@ email for my domain, but now where do I go to login? I tried mail.mydomain.net and I just see the last page I was on showing the emails I created, but not able to actually access my new email
Leon
Screw this, Outlook and Microsoft sucks… I’ve been trying for 3 hours.. this is freaking ridiculous
marco
Me too, I’ve been trying for 3 days using chrome, maybe I should try using I.E.
JANARTHANAN
Hi Syed,
I have my website already set up at windows live admin center and the emails are already in use by users.
But now i planned to migrating my domain from godaddy to a Blue Host (i came to know about the cheapest and best service of this host by reading your site), what should i do so the emails will not be deleted and users can continue using the same mails.
Pls give me clarification thru email or on you blog. It will be very helpful for me and all others.
Thanks in advance
Janarthanan
Editorial Staff
In your bluehost account setup the MX records. Then do the transfer, and it will work.
Admin
JANARTHANAN
Hi Buddy, Thanks for the info. But i’ve a doubt, before transfering a domain from Godaddy how can i setup MX records in Bluehost for the same domain. PLs explain as i was a newbie on this field.
Thanks
Editorial Staff
In the DNS settings in your Bluehost cPanel, you can specify MX records. Bluehost support will be able to help you with this.
JANARTHANAN
Hi Syed,
Thanks for your info, i followed your tuts, also as per your comment i get details from Blue Host too. Now i successfully transferred my domain. And all my emails associated to it (functions on outlook.com) work fine.
Thanks once again for your great tuts.
Janarthanan
Tuyen
Hi I set up my professional mail on outlook.com, it’s work fine for about a month but now when I send email to client it alway have hotmail_77425feceaf13aa1@live.com on behalf of my email, pls advise how to remove (hotmail_77425feceaf13aa1@live.com on behalf of my email)
hope to hear soon
all the best
WPBeginner Support
Please contact outlook support, they would be able to help you better.
Mohamed
Guys,
Be careful when trying to create a “professional” email account that uses your domain; particularly when using Microsoft Outlook/Live/Hotmail…. It will send your email to the recipient, on receipt of your email the recipient will see “hotmail [a random number]@live.com ON BEHALF OF yourname@yourdomain,com”. This is not professional at all. Its actually less embarrassing than using a regular free @hotmail.com.
O, and Microsoft has no plans to correct this! I’ve tried several forums and made multiple requests.
All the best.
Ed Fishman
This isn’t true as far as I can tell. I have a couple of domains that use Outlook.com and all of them send as the actual sender. No ‘On Behalf Of’ appears anywhere – either in From: or even hidden in the message headers.
Now that Google isn’t offering a free version of Google Apps, Outlook.com is still your best bet for setting up a free, non-pop, e-mail system that can use your own domain.
Ed
Verna
Are u sure about this, does yourname@yourdomain.com not appear in the recipient mail?
Glenn F
Thanks for posting this Mohamed. There is no way I plan on using this now.
Joshua Caluette
If you follow the directions and confirm that your DNS is configured properly and you are not sending your email through your live account as an alias of your professional domain, then this does not happen. I have mine setup and it works just fine. I have seen similar issues on Google Apps as well, but it is always due to mis-configuration.
Marco
I need a catch all alias to be sure to receive all the email adressess i used in the past…. How do i setup a catch-all with live domains? Can’t find it.
lmcpa
When switching from a paid hosted version with godaddy is there a way to save or move emails from the godaddy service to this free outlook.com setup?
Editorial Staff
Not entirely sure about that. Perhaps asking Godaddy would be best. Usually it is hard.
Admin
pishka
I have my website already set up at domains.live.com and the emails are already in use by users. Currently i’m migrating my domain to a new host, what should i do so the emails will not be have to be deleted and users can continue using the same mails?
If i add the mx records on the new host i can continue to use the mails on the same domains.live.com account I had?
Pls reply its important
Thanks
nick bacon
Hi, I am following the instructions but when i get to the screen that will give you a choice to either use an existing Microsoft account to administer this domain or create a new Microsoft account on your own domain name, e.g. yourname@yourdomain.com.
I do not get this option, it automatically goes to a regular live sign in page?
any tips?
Muhammad Tauseef
Thanks you so much buddy.
Your article resolve my biggest problem.
God Bless You
Vivie
Hi, is it possible to have more than one administrator for one domain?
Thanks
Julia
Hi,
Thanks much for the tutorial, and I’ve set up the service successfully. However, for some reason, the interface is the old version of hotmail, which is very ugly. In case you wonder what the old interface looks like, here it is http://4.bp.blogspot.com/-kDpSR53bY5U/UBnXmDiySfI/AAAAAAAAAlo/PwjJaZhdAFA/s1600/2-hotmail.jpg
Is this the interface everyone sees? How do I change it to the better interface?
Thanks.
Editorial Staff
They said they are slowly moving users over.
Admin
pishka
on the right side drop down click on upgrade to outlook or something similar
Lauren
Thank you! Outlook’s support is slooooow, you’ve helped me set up my email accounts, and in the comments above I learned that I could delete and recreate an email account.
Stephanie
Great tutorial!!!!!!! Worked like a charm. Using Joomla CMS though & Hostgator
Thank you so much! We were using the free <10 google apps accounts and have been looking for a replacement for awhile now.
Christine
Im being asked to verify my account. Outlook is sending the verification email to the same account Im trying to access. Do you know a way around that or if I can contact Outlook?
Christine
Also, can I just remove the domain email and just start over?
Editorial Staff
Yes you can do that.
Admin
Carlos Rivera
I followed the steps above and after clicking refresh Windows Live Admin Center says the service has been suspended. Any ideas how to get this corrected?
tony
Thank you! These instructions are much better than on the Live Admin site. Thank you, thank you!
Serge Conus
Thanks for the awesome post. Google apps for personal use was an amazing toolset, I have been forced to create forwarders to my personal gmail account which works ok for a small site, but an organization needs something bigger. I will check out outlook’s pro mail choice.
Rich C
Anyone know why I’d be getting this error message for any domain I’m entering in:
“This domain name can’t be used because it contains a protected word or inappropriate language. Please contact support if you feel this is not the case.”
Aamir Rizwan
I get the following error :
This domain name can’t be used because it contains a protected word or inappropriate language. Please contact support if you feel this is not the case.
Editorial Staff
Not sure why that is. We would suggest that you contact their support like the error ask you to do.
Admin
Héctor
I had the same thing! I searched in their forums and there were few people who had the same issue.
Bikash
I have a created email address in Microsoft using my domain and
How to Manage the user account in my admin panel in Microsoft account. Is there any option to reset the user password and read the user inbox mail for admin.
thanks
Bikash
Scott
My problem is this:
Step 2: Setting up DNS MX Records to use Outlook.com
After the registration, you will reach Windows Live Admin Center’s domain control page and it will be showing MX and TXT record strings which you need to add to your DNS settings.
After the registration, it did not take me to any such page.
Noumaan Yaqoob
@Scott: you can find those strings by going to Your domains click on YourDomain.com and then click on Domain Settings link in the left sidebar.
If that doesn’t work, check the email you provided during registration for an activation email.
Scott
OK. Now I was working with the support people on hostgator to try and figure out this tutorial between the two of us. The support person at hostgator showed me where to put all the codelines from the Windows Live Admin Center. Their chat support allowed him to tell me exactly where to copy and paste the lines of code, and where to paste them.
So…….On to step 3. According to your tutorial, The Windows Live Admin Center should say, “Your service is active” after 48 hours. I obligingly waited the 48 hours, logged in again, and it still was inactive, so I saw that the Windows support says it can take 72 hours. Now a week later I log in, and all it says is: “Your service is Suspended. Please make the required DNS changes.” I was never able to get the thing to the point where it says, “Your service is active.”
So, please kindly tell me what’s going on.
Rudy
When I click on mydomain.com in the YourDomains area, I’m just brought back to the YourDomains area again. It doesn’t go to a page that gives me the settings, etc.
Ed Nailor
Syed,
This is a great article and one work really investigating. I was disappointed to see Google do away with the free version of their Google Apps for Business. I had not yet really looked into Outlook.com, but will certainly have to try this out so I can best recommend options to my clients. Thanks for bringing this to light!
Ed
Damien Carbery
I take a simpler method – just set up a forwarder in the hosting control panel. In my client’s existing free email account (Yahoo/Gmail/Hotmail) I add the new account I want to send email as. This sends a verification email which, due to the forwarder, arrives in the existing inbox.
An advantage of Yahoo/Gmail/Hotmail is that they are built in account types in iOS. You can select the From address on your iOS device. I will admit that you are not using your hosting company email servers.
Editorial Staff
That is one way of doing it, and we have already shown that method a long time ago. Sometimes, when using that it ends up revealing your “real email” that you were sending it from. Even though you can mask it so it can be sent from yourname@domain.com, it will show sent from you@gmail.com
Admin
Carlos Acha
Hello,
I have tried to follow these steps but there is no Get Started button anywhere, I do get a Login button but it only sends me to Live Login Page. The address I am visiting is: domains.live.com
Any help I will appreciate.
Best regards,
Carlos
Noumaan Yaqoob
@Carlos: It is right above the sign in button. You can also click here to get started.
Noumaan Yaqoob
@Haseeb Ahmad Ayazi : Outlook allows you to create up to 500 accounts on one domain name. However, if you reach that limit and you need more free email accounts on your domain then you can contact support to extend your free accounts limit.
@Raheem Khan: I would recommend that you stick with Google Apps and try outlook.com separately by creating a yourname@outlook.com account. That way you can decide which one you like better.
Haseeb Ahmad Ayazi
You! There must be a comparison. How much accounts are allowed in free version?
Raheem Khan
Now there should be a compartision between Google Apps and Outlook Professional Emails. And do tell us which one is better. Currently I’m using Google apps.