En snabb webbplats är en förutsättning för nöjda besökare och topplaceringar i sökmotorerna. Det beror på att sökmotorer som Google nu anser att webbplatsens hastighet är en viktig rankningsfaktor.
WP Super Cache är ett populärt plugin som skapar statiska HTML-filer av dina webbsidor. Detta innebär att din server inte behöver arbeta lika hårt, vilket gör att din webbplats laddas snabbare för besökare.
Vi använder prestandaplugins som Cloudflare och WP Rocket för att förbättra WPBeginners hastighet. WP Super Cache är ett gratis alternativ som kan förbättra prestandan avsevärt, öka SEO och förbättra användarupplevelsen för webbplatsens besökare.
I den här artikeln guidar vi dig genom installation och konfigurering av WP Super Cache på din WordPress-webbplats. Vi förklarar varje steg tydligt, så även om du inte är tekniskt kunnig kan du följa med. I slutändan kommer du att ha en snabbare webbplats som besökare och sökmotorer kommer att uppskatta.
Vad är WP Super Cache och varför ska du använda det?
WP Super Cache är ett av de mest populära och bästa cachelagringspluginsen för WordPress. Det är ett gratisverktyg och har över en miljon aktiva installationer.
WP Super Cache gör en cachad kopia av varje sida på din webbplats i form av en statisk HTML-fil. På så sätt visas den kopierade versionen snabbt när någon besöker din webbplats, istället för att hela webbplatsen genereras från grunden.
Som ett resultat förbättras hastigheten och prestandan på din WordPress webbplats dramatiskt. Caching-pluginet hoppar över många steg bakom kulisserna för att se till att dina besökare inte behöver vänta på att sidan ska öppnas.
Detta kommer att förbättra upplevelsen för dina webbplatsbesökare. En webbplats som laddas snabbt uppmuntrar människor att besöka den oftare, vilket leder till mer engagemang och konverteringar när användarna tillbringar mer tid på dina inlägg och sidor.
Dessutom kan du med en webbplats med snabb laddning också se ett uppsving i din WordPress SEO och sökmotorrankning. Det beror på att Google ger en betydande fördel till snabbare webbplatser, eftersom de använder webbplatsens hastighet som en rankningsfaktor.
Är du nu redo att installera WP Super Cache på din webbplats? Låt oss sätta igång!
Setting Up WP Super Cache – det enkla sättet
Det första du behöver göra är att installera och aktivera pluginet WP Super Cache på din website. För mer detaljer kan du följa vår guide om hur du installerar ett plugin för WordPress.
När WP Super Cache aktiveras meddelar den dig att caching för närvarande inte är aktiverad på din website.
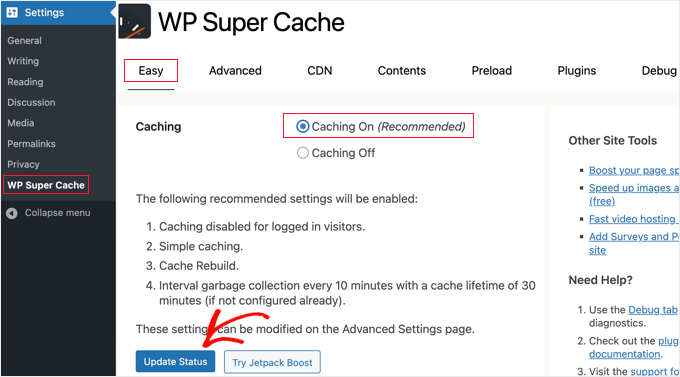
För att aktivera cache, gå till Inställningar ” WP Super Cache. Sedan, under fliken “Easy”, gå vidare och klicka på alternativet “Caching On”. När du har gjort det klickar du på knappen “Uppdatera status”.
När du har aktiverat cacheminnet måste du bläddra ner till avsnittet “Cache Tester”.
När du väl är där ska du klicka på knappen “Test Cache” för att kontrollera om det fungerar.
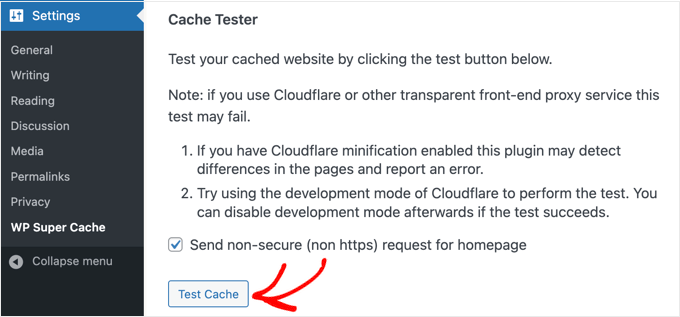
WP Super Cache kommer att hämta din WordPress-webbplats två gånger och jämföra tidsstämplarna för båda sidorna. Om båda tidsstämplarna matchar betyder det att cachelagringen fungerar på din webbplats nu.
WP Super Cache avancerad inställning
WP Super Cache är ett kraftfullt WordPress-plugin som levereras med massor av avancerade alternativ. Dessa alternativ kan ytterligare förbättra din webbplats prestanda och ge dig mer kontroll över hur pluginet kommer att cacha din webbplats.
Aktivera caching
För att ställa in WP Super Cache med avancerade alternativ, gå till fliken “Avancerat” i WP Super Cache plugin-inställningar. Klicka sedan på kryssrutan för “Aktivera cachelagring”.
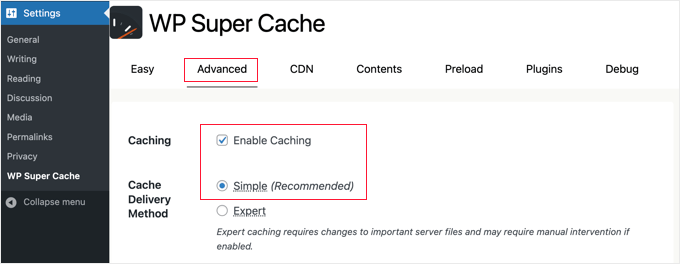
Under cachelagring ser du alternativ för “Cache Delivery Method”. Vi rekommenderar att du använder alternativet “Simple” om du är nybörjare och inte är bekant med att redigera dina serverfiler.
När du har valt cachelagringsalternativ ska du klicka på knappen “Uppdatera status”.
Aktivera komprimering i WP Super Cache
Compression allow WP Super Cache to serve cached files as compressed files, which improves load time. Dessa filer är mindre och kan downloadas snabbare av webbläsare.
För att aktivera komprimering, bläddra ner till avsnittet “Diverse” i fliken “Avancerade inställningar” och markera rutan som säger “Komprimera sidor så att de visas snabbare för besökare”.

Klicka återigen på knappen “Update Status” för att spara dina ändringar.
Aktivera dynamisk caching
Om du vill hålla vissa delar av en webbsida dynamiska under caching, erbjuder WP Super Cache ett alternativ för det.
Att aktivera dynamisk caching är användbart i vissa situationer, särskilt om du har pages som innehåller content som ändras ofta. Till exempel kan du snabba upp pages som innehåller annonser genom att allow dynamic caching.
För att aktivera det här alternativet kan du gå till avsnittet “Avancerat” och klicka i kryssrutan för “Aktivera dynamisk cachelagring”.

Se till att spara ändringarna när du är klar.
Konfigurera utgångstid och sophämtning
Med WP Super Cache kan du också ställa in utgångstid och frekvens för radering av cachade sidor från din server.
Börja med att scrolla ner till avsnittet “Expiry Time & Garbage Collection” under fliken “Advanced” för att konfigurera det.
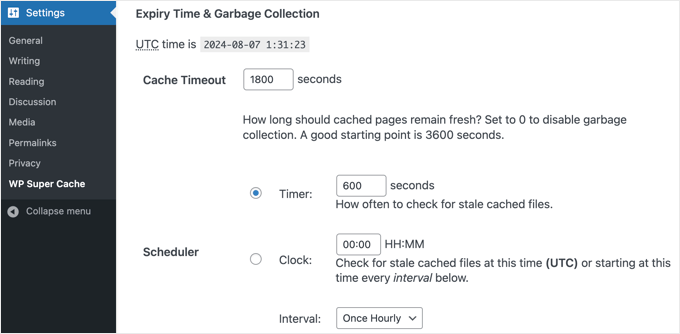
‘Cache Timeout’ talar om för pluginet att ta bort den cachade page och utföra en ny cache. Pluginet kommer att ställa in den till 1800 sekunder som standard, vilket är bra för en högtrafikerad website.
Men om you har en new website som inte får så mycket trafik är 3600 sekunder en bra utgångspunkt.
Utöver det kan du schemalägga en tid för pluginet att kontrollera om det finns inaktuella cachelagrade filer och ta bort dem.
När du är klar med dina val måste du klicka på knappen “Change Expiration” för att spara dina ändringar.
Ange pages you don’t want to be cached (sidor du inte vill ska cachelagras)
Som standard kommer plugin-programmet att cacha alla sidor på din webbplats. Detta kan öka storleken på dina cachefiler och använda mer resurser. WP Super Cache låter dig dock välja sidor som du inte vill ska cachas.
Du kan bläddra ner till avsnittet “Avvisade URL-strängar” på fliken “Avancerat” för att använda den här funktionen. I textrutan går du vidare och anger URL-strängen för de sidor som du inte vill att pluginet ska cacha.
Om du till exempel har en ecommerce store kan du utesluta pages som besökare inte besöker ofta och på så sätt save server resources. Det kan vara sidan för kassan, sidan för account och sidan för Thank you.
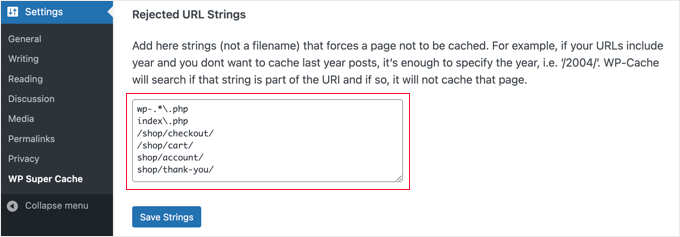
När du är klar, glöm inte att clicka på knappen “Save Strings”.
Konfigurera WP Super Cache för att fungera med ditt CDN
Om du också använder en CDN-tjänst (Content Delivery Network) för att snabba upp din webbplats kan du konfigurera WP Super Cache så att den fungerar med den. Annars kan du hoppa över det här avsnittet.
Ett CDN är ett nätverk av servrar som distribueras över olika geografiska platser, vilket hjälper till att snabbt leverera innehåll till dina besökare. För mer information, ta en titt på vår infografik om varför du behöver ett CDN.
Tips: Vi rekommenderaratt du använder Cloudflare eftersom det är en kostnadsfri CDN-leverantör som är enkel att konfigurera. Se vår handledning om hur du konfigurerar Cloudflares kostnadsfria CDN på din WordPress-webbplats.
För att ställa in WP Super Cache så att den fungerar med ditt CDN, gå vidare och klicka på fliken CDN i dina inställningar. Markera sedan rutan bredvid alternativet “Aktivera CDN-stöd”.
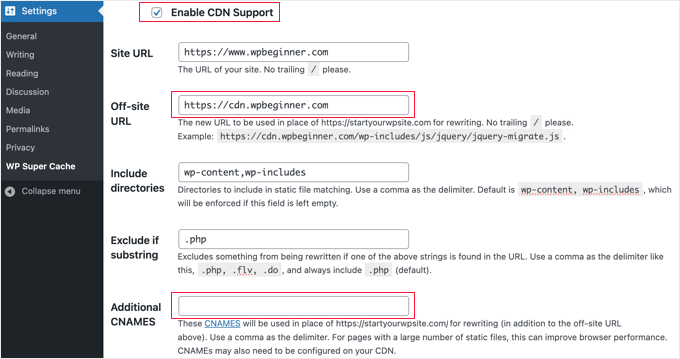
Därefter måste du ange din “Off-site URL”. Detta är ditt CDN:s “pull zone”, vilket är den URL där dina filer lagras på CDN.
Inställningen här beror på din CDN-tjänst, men här är några tips:
- Om du använder Cloudflare ska du lämna det här fältet tomt. WP Super Cache kommer automatiskt att upptäcka och arbeta med Cloudflare.
- Om du använder en annan CDN-tjänst ska du ange något i stil
med:https://cdn.wpbeginner.com. Se till att du ersätter “wpbeginner.com” med din webbplats domännamn. - Om du är osäker kan du logga in på din CDN-tjänst och kontrollera inställningarna för “domän”, “CDN-domän” eller “CDN-URL” i instrumentpanelen för ditt konto.
Om du vet att ditt CDN har flera webbadresser kan du ange dem i fältet “Additional CNAMES”, t.ex. http://cdn1. wpbeginner.com, http://cdn2.wpbeginner.com, http://cdn3.wpbeginner.com. Annars bör du lämna detta fält tomt.
Du kan låta de andra inställningarna vara standardinställningar. Markera slutligen rutan “Hoppa över https-URL:er för att undvika fel med “blandat innehåll”” och klicka sedan på knappen “Spara ändringar”.
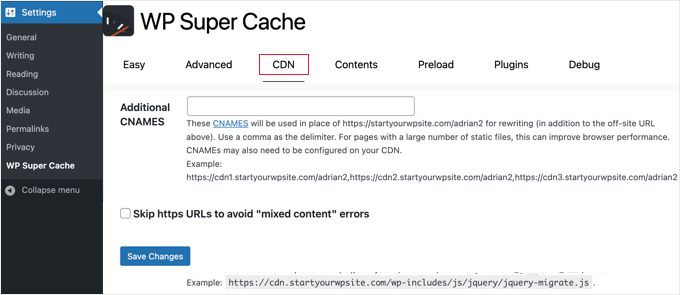
Nu är din webbplats redo att servera statiskt innehåll från ett CDN.
Servera en statisk webbplats med WP Super Cache
Preload-läget i WP Super Cache allow you to create super cache static files for all your posts and pages and serve a static website. På så sätt kommer ditt content att hämtas snabbt när någon besöker din site.
En statisk fil med supercache hjälper till att spara resurser på servern, servera en gammal site som inte längre uppdateras och förbättra webbplatsens hastighet genom att endast servera statiskt content.
För att börja, gå till fliken “Preload” i WP Super Cache-pluginet. Därefter kan du ställa in tiden för uppdatering av de förladdade cachefilerna.
Som standard kommer pluginet att ställa in den på 600 minuter, men du kan minska tiden om du publicerar flera artiklar varje dag.
Kom ihåg att det tar lite tid att förladda hela din WordPress-webbplats och att det förbrukar mycket av serverns resurser. Du kan låta den vara 0 om du inte vill att dina statiska filer ska löpa ut någonsin, såvida du inte manuellt uppdaterar cacheminnet.
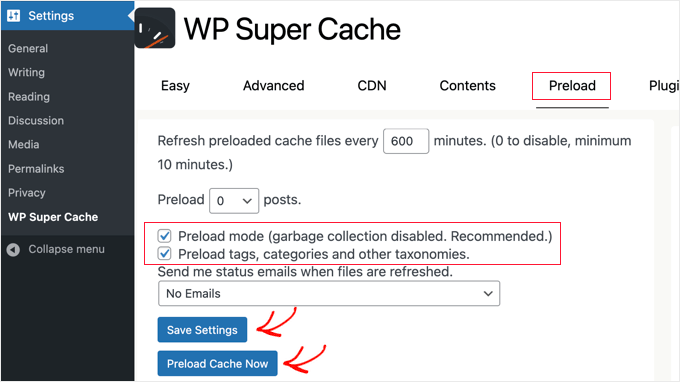
Se sedan till att kryssa i rutorna för “Förladdningsläge (skräpsamling inaktiverad. Rekommenderas)”. Du kan också aktivera förinläsning för olika taggar, kategorier och andra taxonomier på din webbplats.
Pluginet erbjuder också ett alternativ för att få email alerts när dina filer uppdateras. Som standard kommer det att använda inställningen “No Email”, men du kan ändra det genom att välja ett alternativ från dropdown-menyn.
När du är klar går du vidare och sparar dina settings och klickar sedan på knappen “Preload Cache Now”.
Expertguider om WordPress Caching
Vi hoppas att den här guiden hjälpte dig att konfigurera WP Super Cache på din WordPress-blogg. Du kanske vill se några andra artiklar relaterade till WordPress-cache:
- Hur man enkelt fixar Leverage Browser Caching-varning i WordPress
- Så här clearar du din caching i WordPress (steg för steg)
- Bästa tillägg för caching i WordPress för att snabba upp din website
- LiteSpeed Cache vs. WP Rocket – Vilken är bättre?
- Så här installerar och konfigurerar du WP Rocket på rätt sätt i WordPress
- Hur man installerar och konfigurerar W3 Total Cache för Beginner
- Den ultimata guiden för att öka hastigheten och prestandan i WordPress
- Hur man snabbar upp WooCommerce prestanda
If you liked this article, then please subscribe to our YouTube Channel for WordPress video tutorials. You can also find us on Twitter and Facebook.


Anze
Hey; I have a question – so preload mode enabled does not deletes old cached files – but does that means then when preloaded files are refreshed, the old ones are deleted and replaced, or does it just adding files, which would mean space on server would eventually run out?
WPBeginner Support
When the page is preloaded a new time, the old preloaded version would be deleted and replaced.
Admin
James Omeke
Thanks so much . This was very helpful.
I got my website up and running now
WPBeginner Support
You’re welcome, glad our guide was helpful!
Admin
Mike Royden
Plug in installed, but can’t get past this;
Permalink Structure Error
A custom url or permalink structure is required for this plugin to work correctly. Please go to the Permalinks Options Page to configure your permalinks.
I have gone to the Permalinks Options Page to configure your permalinks, but can’t see where I’m going wrong. Going round in circles, please help. Thanks
WPBeginner Support
You would want to ensure your permalinks are not set to plain for that error. We recommend using the Post name structure.
Admin
Mike Royden
Sorted! Many thanks for your advice and taking the time to reply. Cheers.
Katherine
I’m trying to set up this plug in to get the best results, and I’m not tech-savvy at all. Your Wp advanced cache set up section is not the same as the current plugin advanced options.
WPBeginner Support
Thank you for letting us know, we will be sure to take a look into this and update our article when able.
Admin
Simon
I was able to speed up my homepage significantly but unfortunately it only worked for the homepage. The subpages like i.e. ‘Services’ are still really slow.
What could be the problem?
WPBeginner Support
You would want to run a speed test for that using our guide below to figure that out:
https://www.wpbeginner.com/beginners-guide/how-to-properly-run-a-website-speed-test-best-tools/
Admin
Rainey
Unable to activate the plugin. I get a warning message that a .php file already exists and I should manually delete it before using the plugin. Since I am not a techie I do not know where to go to delete the file. If you could put language in your update to the tutorial to guide us would be really helpful.
WPBeginner Support
For that error, you may want to follow our guide below:
https://www.wpbeginner.com/wp-tutorials/how-to-fix-destination-folder-already-exists-error-in-wordpress/
Admin
Paul
This post is dated. When will this post be updated? Would like to know the current status of WP Super Cache?
WPBeginner Support
Thank you for letting us know, we do not have a specific date that content will be updated but we will take a look into updating this article
Admin
Nic
Is there a way to export settings once you get done?
WPBeginner Support
At the moment WP Super Cache does not have a built-in option to export settings.
Admin
ShoaiB
Thank you for this Awesome Guide.
I’m using WP Super Cache (Version 1.7.0 ). In the above tutorial, many features are not included. plz, Update Post.
WPBeginner Support
Thank you for your request, we will look into updating the post
Admin
Christopher
not as easy as described…
A custom url or permalink structure is required for this plugin to work correctly. Please go to the Permalinks Options Page to configure your permalinks.
WPBeginner Support
Thank you for reminding us of that, we’ll be sure to look into updating the article for clarification.
Admin
Ana
Hello Support!
Thank you for all your work, I’m a complete newbie and without you, I don’t know how I’d manage.
I’m confused as regards what off-site URLs and CNames are, so I’m unable to fill in that in the form. Do I have to refer to somewhere on my page to find out or do I just create it my indicating something?
Just in case it affects somehow I’d like to inform that I run a multisite.
Thank you so much & hope you can help me,
Ana
WPBeginner Support
Hi Ana,
The off site URL is the URL of your CDN location and CNames are different pullzones you have created on your CDN server. If you are not using a CDN, then you don’t need to make any changes to these settings.
Admin
krishna
can i use this plugin for testing in localhost ??
i installed this plugin in localhost and in “Cache Contents” nothing cached
displaying this …
WP-Cache (0KB)
0 Cached Pages
0 Expired Pages
WP-Super-Cache (0KB)
0 Cached Pages
0 Expired Pages
is it because i can’t use cache plugin in localhost or some other issue ?
Hardik
There is nothing called MOD_REWRITE. Everything from that step seems completely different. Please update the tutorial.
Mike
No matter what settings I use Pingdom still gives me an F and says “The following cacheable resources have a short freshness lifetime. Specify an expiration at least one week in the future for the following resources:” and I see and “expiration not specified” message in the details. Am I missing a setting?
Akshay
Hi Team ,
Thanks for the amazing article .
I have installed WP Super Cache with cloudflare (newbie blogger).
Can you please help me, how can I integrate cloudflare with WP super cache .
I did not found any articles or vidoes for the same .
I thought of installing WP Total , but it has not releasedthe update for recent wordpress version 4.8.1
Thank You
Sumaiya
Hi, I wanted to speed up my site. I used this guide and customized the settings as you shown. But before installing this plugin I tested my site speed it was 4.20 sec. But after installing I check it was 6.78 sec. Why is it like this? please guide me well.
WPBeginner Support
Hi Sumaiya,
Please test it again. If the result persists, then deactivate the plugin.
Admin
Rajeev jaiswal
hello sir, I’m trying to integrate js and CSS code elements in twenty-seventeen WordPress theme. I use enqueue methods but it does not work, so suggest me to all about.
Sara
I just downloaded WP Super Cache and the “Advanced” Page doesn’t have the same setup (or some of the same options!) as your screenshot and instructions. Are those dates, or did I somehow end up with an older version of the plugin?
Carrie
Same here, my settings are different.
Abner
Hi guys – Thanks for sharing this. I am using wp super cache and my wordpress is 4.0.1. At first, i don’t have any problem. Until recently, having a problem. My post did not appear on my website. I tried to put the caching off and my post appear. After that, I put the caching on again. My workaround was after posting article to my website, I will put my caching off to appear the post in my website, then after a few minutes, I will put the caching to on.
Few weeks doing that, and now, when I put the caching on, my post will disappear again to my website. As of now, my caching is still off.
Thanks and hope you can help me.
WPBeginner Support
Hi Abner,
Seems like WP Super Cache is not clearing the cache when you publish new content. Please see our article on how to clear cache in WordPress.
Admin
Mark Layton
Hello Support,
Thank You for your help with this issue while trying to install WP Super Cache.
Here is a copy of issue :
Warning! Could not update /var/www/website/wp-config.php! WPCACHEHOME must be set in config file.
Warning! /var/www/website/wp-content/advanced-cache.php does not exist or cannot be updated.
1. If it already exists, please delete the file first.
2. Make /var/www/website/wp-content writable using the chmod command through your ftp or server software. (chmod 777 /var/www/website/wp-content) and refresh this page. This is only a temporary measure and you’ll have to make it read only afterwards again. (Change 777 to 755 in the previous command)
3. Refresh this page to update /var/www/website/wp-content/advanced-cache.php
If that doesn’t work, make sure the file /var/www/website/wp-content/advanced-cache.php doesn’t exist:
1. Open /var/www/website/wp-content/plugins/wp-super-cache/advanced-cache.php$wp_cache_file in a text editor.
2. Change the text CACHEHOME to /var/www/website/wp-content/plugins/wp-super-cache/
3. Save the file and copy it to /var/www/website/wp-content/advanced-cache.php and refresh this page.
Cannot continue… fix previous problems and retry.
Already use your Envira Gallery and WP Forms and those are fantastic.
Should I just use W3 Total Cache instead?
Thank You so much for your help.
Mark Layton
WPBeginner Support
Hey Mark,
You can try following the instructions shown in WP Super Cache. If you find them too complicated, then you can try W3 Total Cache. Good luck
Admin
sheikave Jhurreea
Initially my website was loading for under 8 seconds which is pretty bad. But using your tutorial I was able get 90/100 for desktop performance.
But the mobile platform it remained 74/100. Could you suggest some resources where I could look up too or what is your suggestion.
WPBeginner Support
Hey Sheikave,
Congrats! That’s impressive. You may also want to see our guide on how to fix render-blocking JavaScript and CSS in WordPress.
Admin