Oavsett om du skriver blogginlägg, utformar sidor eller hanterar en webbplats med flera författare kan du spara tid och skapa professionellt innehåll om du vet hur du använder WordPress-redigeraren på ett effektivt sätt.
På WPBeginner använder vi Gutenberg-redigeraren för alla våra inlägg och sidor. Våra skribenter hittar alltid nya sätt att arbeta snabbare🕒, till exempel genom att använda kortkommandon, textformateringsverktyg och återanvändbara block.
De här små förändringarna gör verkligen skillnad, sparar tid och gör skrivprocessen mer effektiv📜.
I den här guiden ger vi dig praktiska tips för att arbeta smartare i WordPress-redigeraren. På så sätt kan du lära dig att använda innehållsredigeraren som ett proffs.
Fördelarna med att behärska WordPress innehållsredigerare
Om du använder WordPress regelbundet kommer du att få det mycket lättare om du behärskar innehållsredigeraren.
Det är där du skriver, formaterar och strukturerar ditt innehåll. Ju mer bekväm du är med Gutenbergs blockredigerare, desto snabbare och smidigare blir dina arbetsflöden.
Tänk på hur mycket tid du lägger på att justera formatering eller åtgärda layoutproblem.
Att lära sig rätt genvägar och verktyg kan hjälpa dig att skriva, redigera och publicera innehåll mer effektivt. Det innebär att du kommer att lägga mindre tid på små detaljer och mer tid på att skapa bra innehåll.
En välorganiserad editor gör också att dina inlägg ser rena och professionella ut.
Oavsett om du lägger till bilder, bäddar in videor eller strukturerar rubriker kan du skapa en bättre upplevelse för dina läsare genom att känna till redigeringsprogrammet.
Med det sagt, låt oss ta en titt på några fantastiska tips som hjälper dig att bemästra WordPress innehållsredigerare. Du kan också använda länkarna nedan för att hoppa till det tips du vill ha.
- Learning the Basic Blocks
- Start Using Keyboard Shortcuts
- Single and Double Line Spacing
- Rearranging the Edit Screen
- Changing Font Size in WordPress Visual Editor
- Add Headings into Your Articles
- Adding Columns to Your Posts
- Adding Image Next to Text
- Adding YouTube Videos in WordPress
- Creating Tables in WordPress Posts
- Adding Buttons in WordPress Posts and Pages
- Add Cover Images in WordPress Posts
- Highlighting Text in Your Posts
- Add Widgets into Your Posts
- Adding Custom HTML in WordPress Posts
- Get The Word Count and Other Stats for Your Posts
- Adding Reusable Blocks to Your Posts
- Bonus Tip: Remove Blocks in WordPress
1. Lära sig de grundläggande blocken
När du använder WordPress innehållsredigerare kommer du att märka att blocken utgör grunden för ditt innehåll. Med dem kan du lägga till text, bilder, videor, knappar och mycket mer utan att behöva röra en enda rad kod.
Om du lär dig att använda dem blir redigeringen mycket enklare.
Du kan enkelt se alla block som WordPress har att erbjuda genom att klicka på knappen Lägg till block (+) i det övre vänstra hörnet av skärmen. Då öppnas en meny med en lista över alla tillgängliga block.
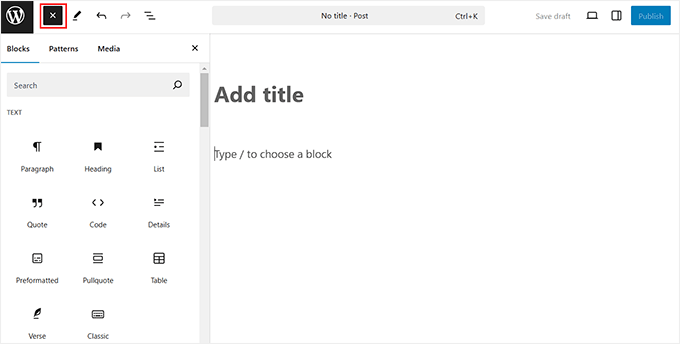
Därifrån kan du helt enkelt dra och släppa de du behöver i ditt inlägg.
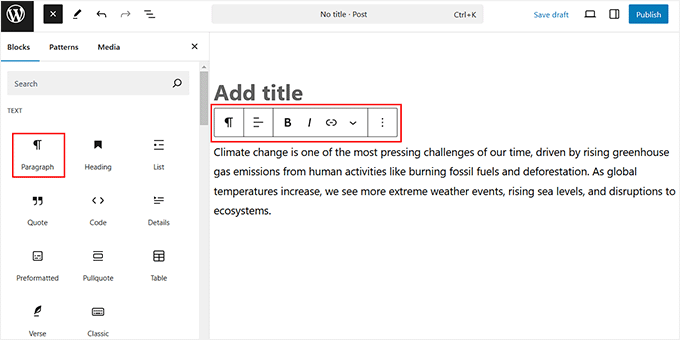
Till exempel är Paragraph-blocket det du kommer att använda mest. Det är till för att skriva text, precis som här. Du kan formatera den med fetstil, kursiv stil eller länkar för att göra ditt innehåll mer engagerande.
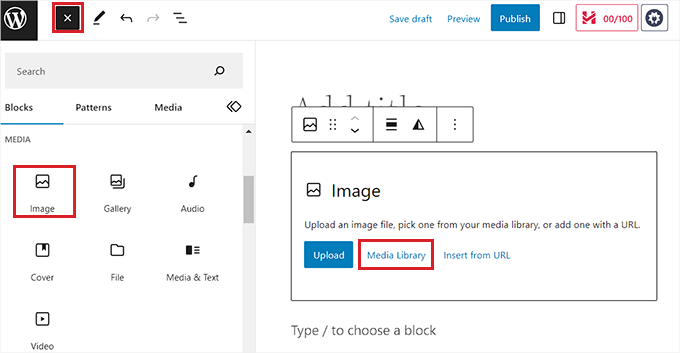
Å andra sidan hjälper Imagely-blocket dig att lägga till bilder i dina inlägg. Du kan ladda upp bilder, dra runt dem och justera deras storlek direkt i redigeraren.
Sedan finns det ett rubrikblock som hjälper till att bryta upp innehållet. Rubriker gör ditt inlägg mer lättläst och hjälper sökmotorer att förstå ditt innehåll bättre.
När du har lärt dig de grundläggande blocken blir det lättare för dig att navigera i redigeraren och skapa innehåll.
2. Börja använda kortkommandon på tangentbordet
Tangentbordsgenvägar kan vara ett bra sätt att spara tid när du skriver i WordPress. Istället för att klicka för formateringsalternativ kan du använda snabba tangentkombinationer för att få saker gjorda snabbare.
Med Ctrl + B (Cmd + B på Mac) blir texten till exempel fet och med Ctrl + I (Cmd + I på Mac) blir den kursiv.
På samma sätt kan du markera texten och trycka på Ctrl + K (Cmd + K på Mac) för att lägga till en länk.
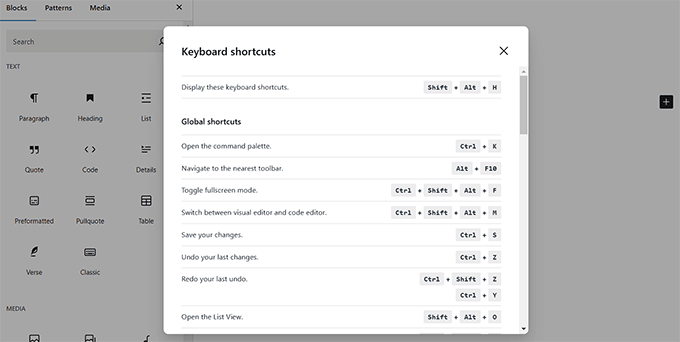
Du kan också använda kortkommandon för att organisera ditt innehåll. Om du skriver ## följt av ett mellanslag skapas en rubrik 2 direkt, medan du skriver – och trycker på mellanslag skapar en punktlista.
På WPBeginner använder våra skribenter alltid kortkommandon för att förbättra sina arbetsflöden. För att lära dig mer om dem, kolla in vår guide om kortkommandon i WordPress.
3. Enkelt och dubbelt radavstånd
Många nybörjare tycker att det är svårt att skapa stycken och radbrytningar i WordPress.
Som standard lägger WordPress enkelt till ett nytt stycke med dubbelt radavstånd när du trycker på Enter / Return-tangenten.
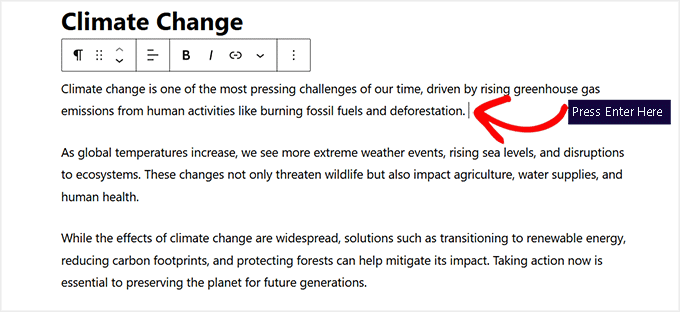
Men om du bara vill ha en enda radbrytning måste du trycka på tangenterna Shift + Enter samtidigt.
Detta flyttar texten till nästa rad utan att lägga till extra utrymme, vilket gör det perfekt för till exempel adresser, poesi eller kompakt formatering.
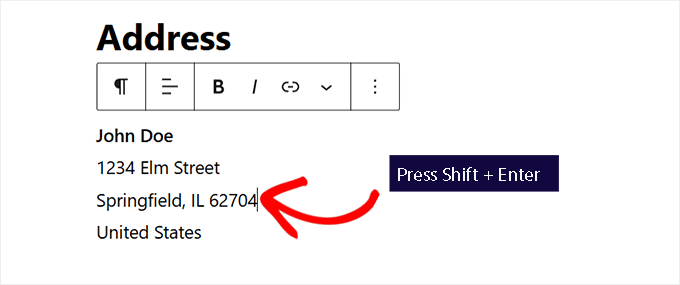
För detaljerade instruktioner, se vår guide om hur du lägger till en radbrytning i WordPress.
4. Omarrangering av redigeringsskärmen
Innehållsredigeraren är i princip en ren duk med en övre bar och en kolumn till höger. Detta ger dig ett rent användargränssnitt för att skapa dina inlägg.
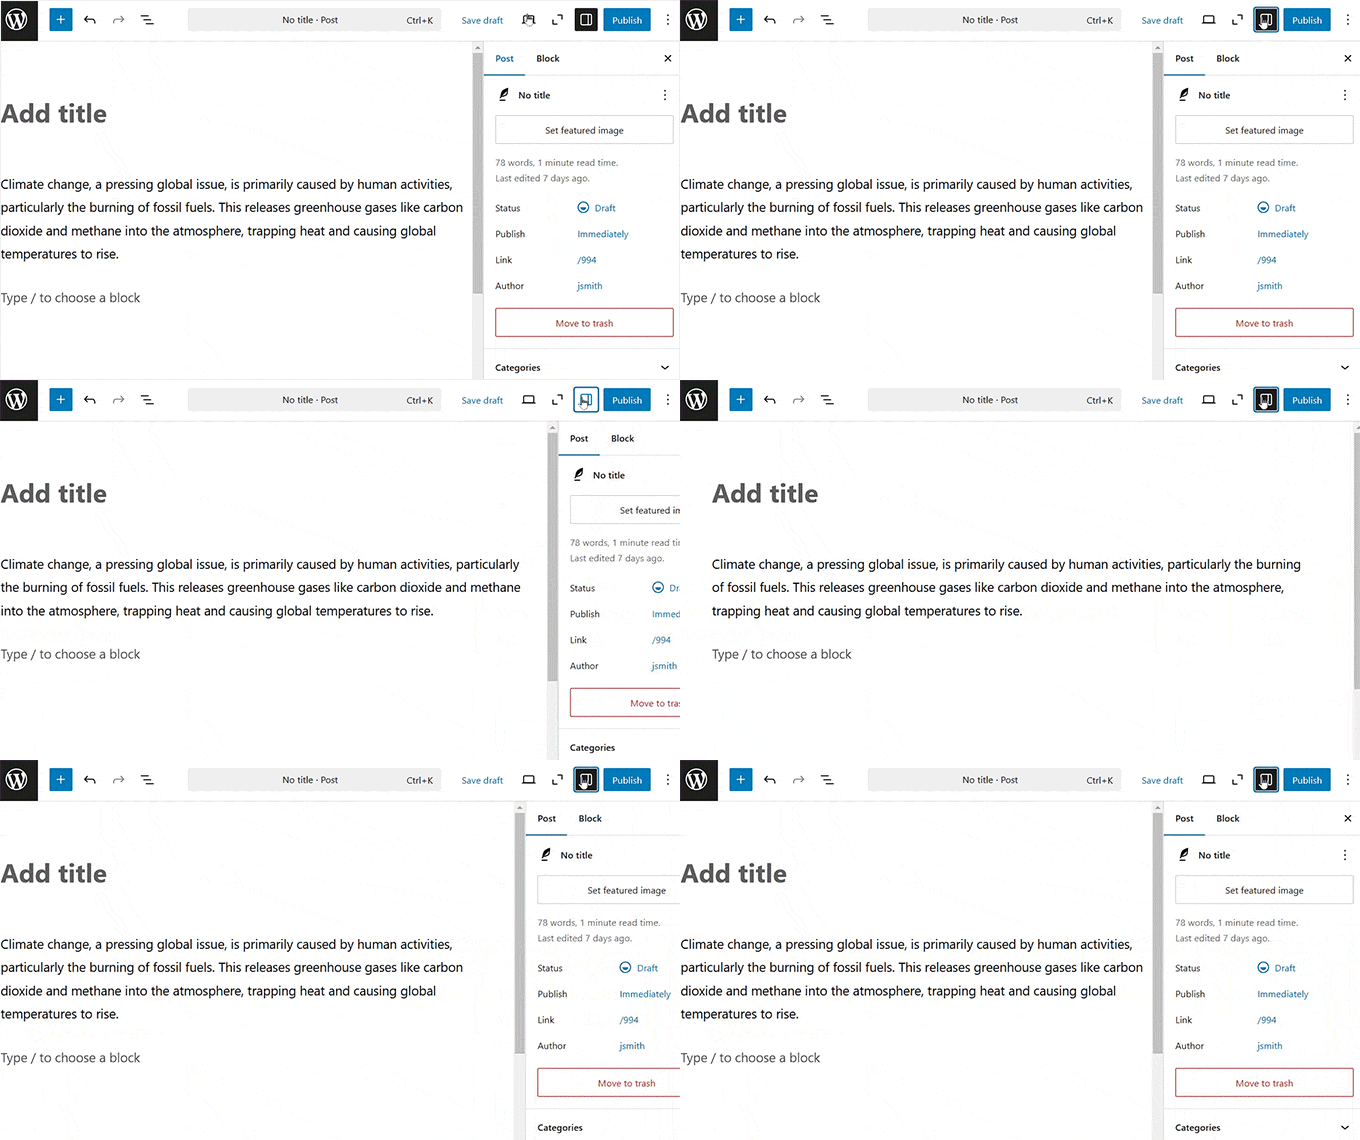
Editorn visar ett verktygsfält ovanpå det block som du håller på att redigera. Du kan dock flytta verktygsfältet genom att klicka på menyn med tre punkter i det övre högra hörnet av skärmen.
När rullgardinsmenyn öppnas väljer du alternativet “Top toolbar”.
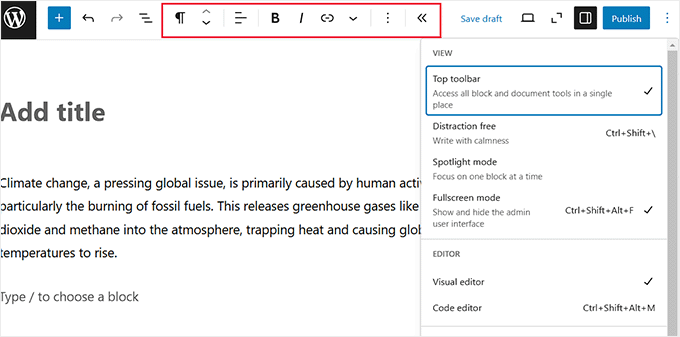
Du kan också ta bort blockpanelen till höger för att skapa ett tydligt skrivutrymme för ditt innehåll.
För att göra detta klickar du bara på ikonen “Inställningar” längst upp till höger för att ta bort kolumnen.
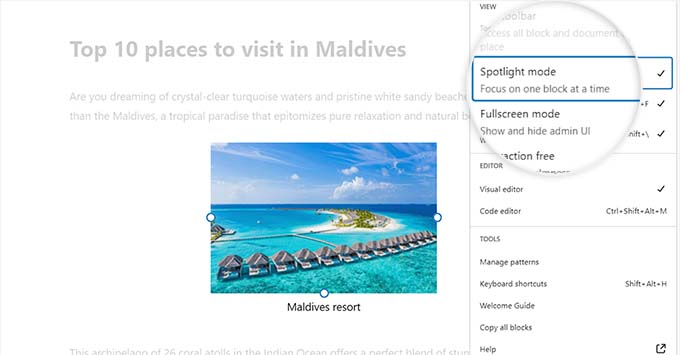
Utöver detta kan du växla till Spotlight-läget genom att klicka på ikonen med tre punkter i det övre högra hörnet och välja alternativet “Spotlight Mode”.
Detta är perfekt om du lätt blir distraherad eftersom det dämpar alla andra block och bara lyfter fram det du arbetar med för tillfället.
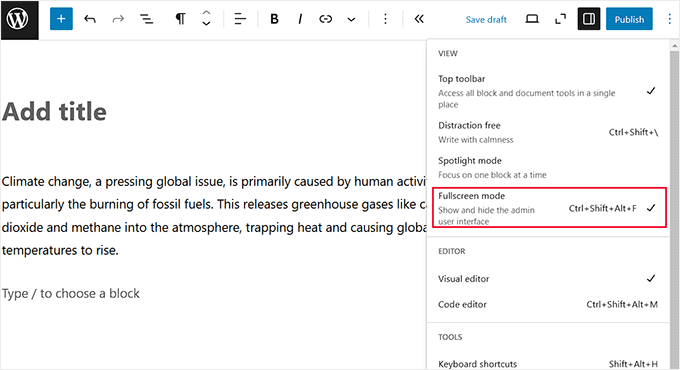
När du använder blockredigeraren kommer du att märka att WordPress admin-sidofält visas på vänster sida, vilket kan vara ganska distraherande.
I så fall rekommenderar vi att du använder det distraktionsfria helskärmsläget som tar bort adminpanelen och ger dig en tydlig miljö att arbeta med.
För att lägga till detta läge klickar du bara på ikonen med tre punkter i det högra hörnet och väljer alternativet “Fullskärmsläge”.
För mer detaljerade instruktioner, se vår guide om hur du omorganiserar redigeringsskärmen för inlägg i WordPress.
5. Ändra teckenstorlek i WordPress visuella redigerare
Ibland passar inte standardstorleken på texten för ditt innehåll. Om du gör teckensnittet större eller mindre kan du förbättra läsbarheten och få viktiga punkter att framträda tydligare.
Du kan enkelt ändra teckenstorleken i WordPress-redigeraren genom att välja ett textblock. När du har gjort det växlar du till fliken “Styles” i blockpanelen till höger.
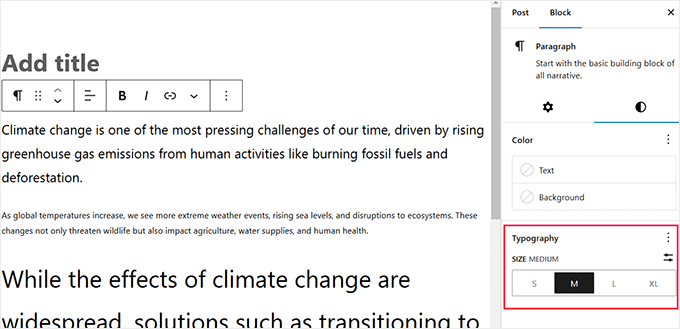
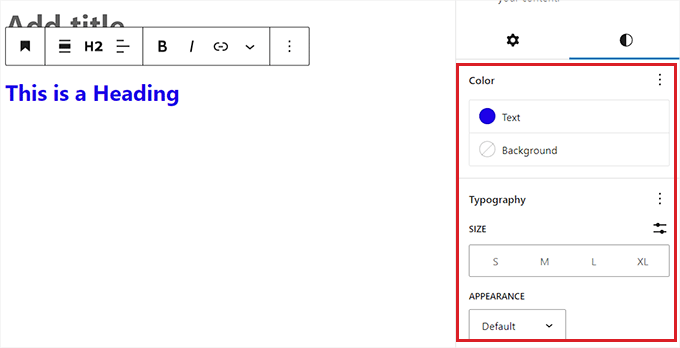
Du kan nu välja mellan förinställda storlekar eller ange en anpassad storlek i avsnittet Typografi. Du kan också ändra text- och bakgrundsfärg för ditt styckeblock härifrån.
Mer information finns i vår handledning om hur du ändrar teckenstorlek i WordPress.
6. Lägg till rubriker i dina artiklar
Rubriker spelar också en viktig roll för att förbättra läsbarheten. Det är därför sökmotorer som Google anser att de är viktiga för SEO.
Om du använder dina fokusnyckelord (ord som användarna använder för att söka) i rubrikerna hjälper du sökmotorerna att förstå vikten av dessa nyckelord.
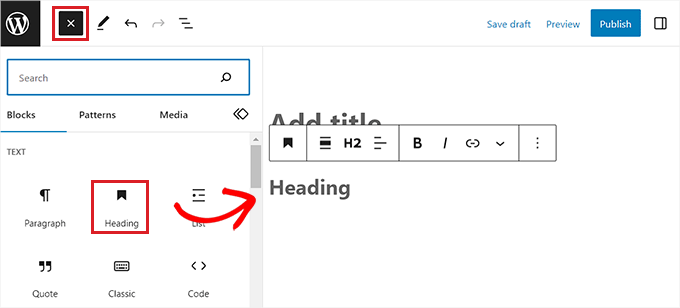
Innehållsredigeraren gör det superenkelt att lägga till rubriker i dina artiklar. Allt du behöver göra är att välja blocket “Rubrik” i menyn.
När du har gjort det kan du ändra rubrikens storlek genom att klicka på rullgardinsmenyn “H2” i blockverktygsfältet. Du kan också lägga till en länk i rubriken, göra den fet eller kursiverad.
Du kan också ändra färg och storlek på texten genom att gå till fliken “Styles” i blockpanelen.
Mer information finns i vår handledning om hur man använder rubriktaggar på rätt sätt i WordPress.
7. Lägga till kolumner i dina inlägg
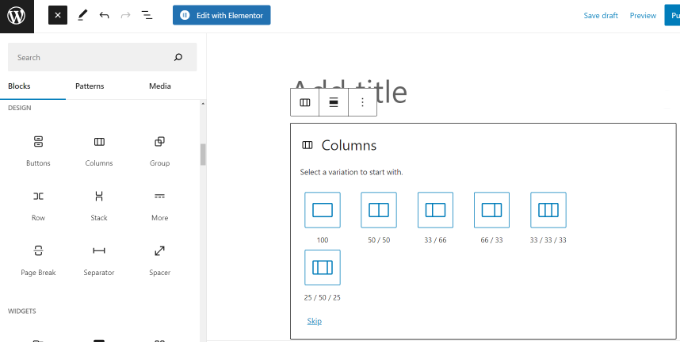
WordPress innehållsredigerare har ett inbyggt Columns-block som gör att du kan lägga till innehåll i kolumner. Detta kan göra det lättare för dig att organisera ditt innehåll och förbättra läsbarheten för dina användare.
För att lägga till en kolumn klickar du bara på knappen “Lägg till block” och lägger till blocket “Kolumner”. Sedan måste du välja antalet kolumner du vill lägga till på din sida.
När du har gjort det kan du lägga till block i var och en av dina kolumner. Du kan t.ex. välja blocket Paragraph och lägga till innehåll i det.
Du kan också lägga till en bild, blockcitat, video med mera.
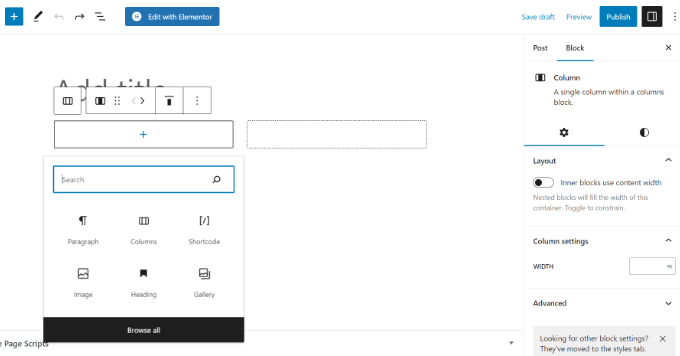
Du kommer också att kunna se blockinställningarna för “Kolumner” till höger. Härifrån kan du redigera varje kolumns bredd, ändra bakgrundsfärg och mycket mer.
För detaljerade instruktioner, se vår nybörjarguide om hur du lägger till innehåll i flera kolumner i WordPress-inlägg.
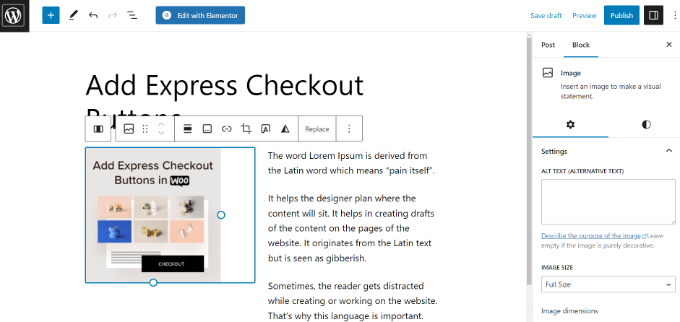
8. Lägga till bild bredvid text
I äldre versioner av WordPress var det ganska svårt att lägga till en bild bredvid en text med rätt justering.
Detta problem har dock åtgärdats med Media & Text-blocket.
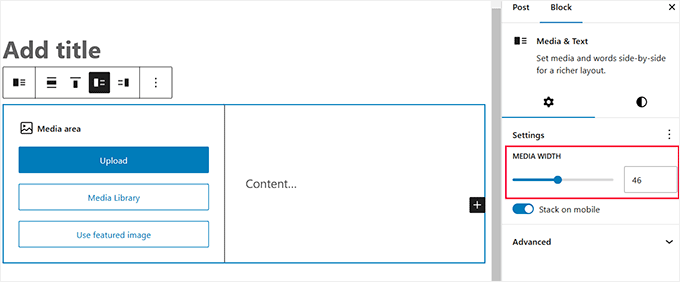
Det gör att du kan lägga till en bild bredvid textblocket och automatiskt justera bredden och avståndet mellan de två avsnitten med hjälp av växeln till höger.
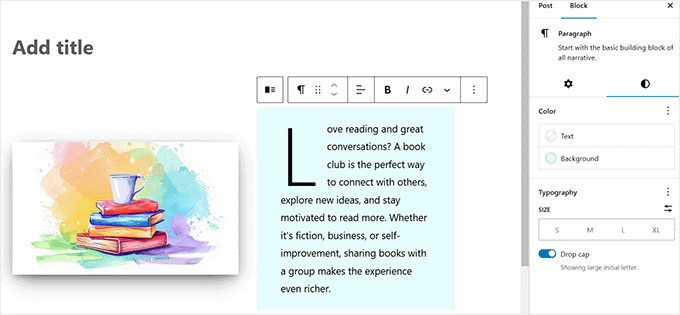
Du kan också byta till fliken “Styles” för att göra blocket mer attraktivt med färger.
Du kan lägga till dropplock, ändra typografi och mycket mer.
9. Lägga till YouTube-videor i WordPress
Du kan ladda upp videor till din WordPress-webbplats. WordPress är dock inte gjord för att användas som streamingplattform och de flesta hostingföretag kan inte hantera stora filer på ett tillfredsställande sätt.
Mer information om detta finns i vår artikel om varför du aldrig ska ladda upp videor till din WordPress-webbplats.
Istället rekommenderar vi att du laddar upp dina videor till YouTube eller andra streamingwebbplatser och sedan bäddar in dem i dina inlägg och sidor.
Du kan till exempel använda blocket “YouTube Embed” för att klistra in webbadressen till den YouTube-video du vill lägga till, och WordPress kommer automatiskt att bädda in den åt dig.
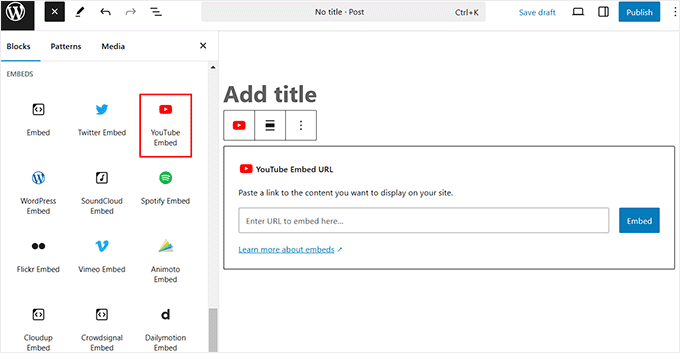
Utöver det erbjuder WordPress också Vimeo Embed, Dailymotion Embed och TikTok embed-block som du kan använda.
Du kan också klistra in video-URL:en i ett stycke eller i ett textblock, så konverterar WordPress den automatiskt till YouTube-blocket.
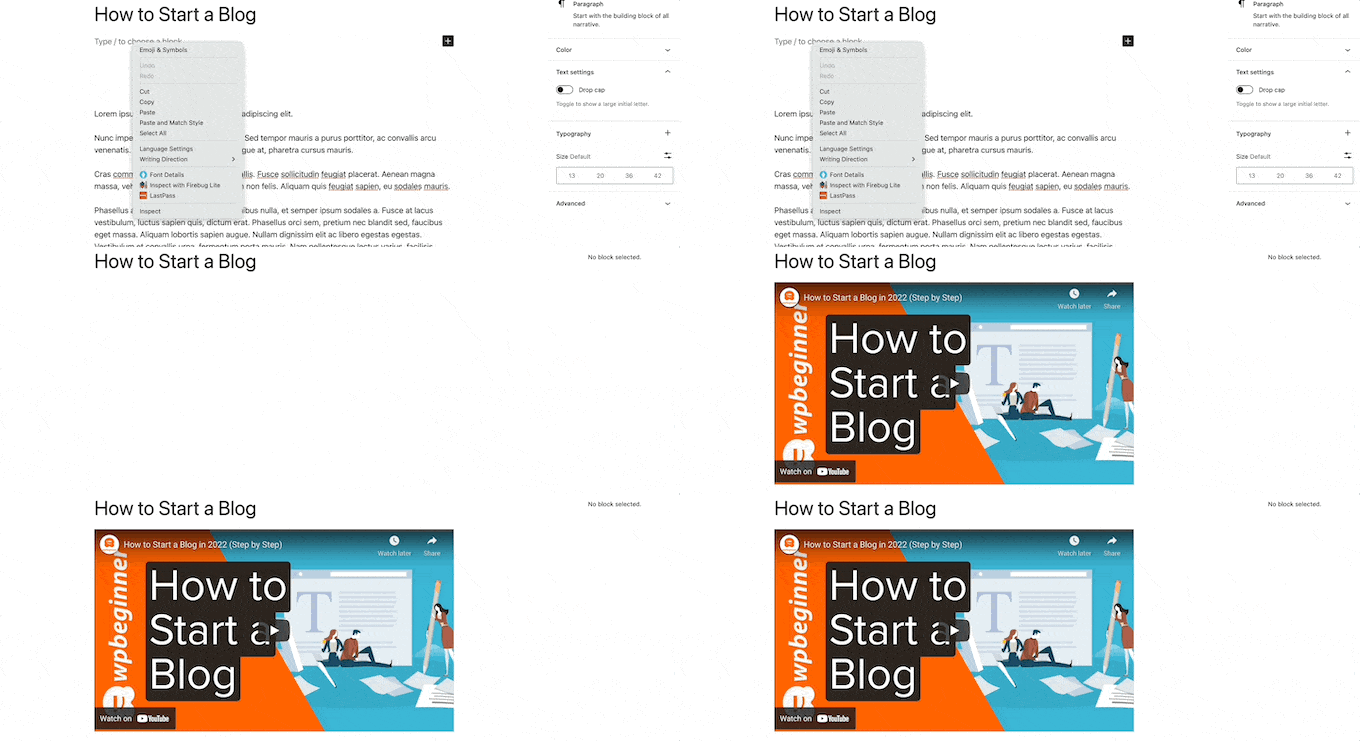
För att komma igång kan du läsa vår handledning om hur du enkelt bäddar in videor i WordPress-blogginlägg.
10. Skapa tabeller i WordPress-inlägg
Inläggsredigeraren har också ett block för att lägga till tabeller i dina WordPress-inlägg och sidor.
För att göra detta lägger du bara till tabellblocket och väljer det antal kolumner och rader du vill lägga till. Oroa dig inte, du kommer alltid att kunna lägga till fler kolumner och rader senare om det behövs.
Hemlig avslöjande 😇: Vi använder samma block för att skapa våra topp 5- eller topp 10-plugin-tabeller i våra showcase-artiklar. Detta håller layouten konsekvent och lätt att läsa.
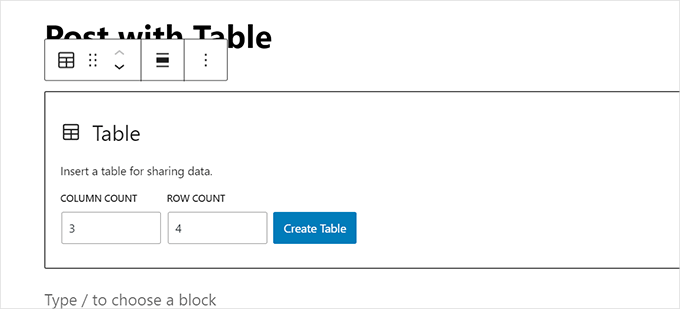
Efter det ser du en vanlig tabell där du kan lägga till eller ta bort tabellceller med hjälp av blockverktygsfältet.
Du kan också byta till fliken “Styles” från blockpanelen för att ändra bakgrunds- och textfärg för din tabell. Dessutom kan du lägga till en rubrikrad och markera rader enligt dina önskemål.
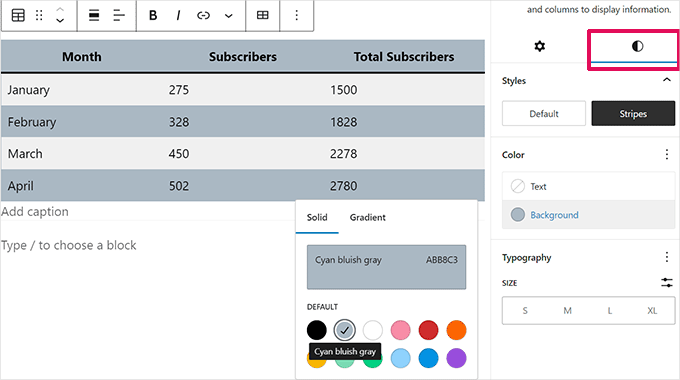
Mer information finns i vår guide om hur du enkelt lägger till tabeller i WordPress-inlägg.
11. Lägga till knappar i WordPress-inlägg och -sidor
Knappar spelar en viktig roll när du vill lägga till en uppmaning till handling i dina inlägg eller sidor. Tack och lov har innehållsredigeraren ett grundläggande block som gör att du kan lägga till en knapp med bara några klick.
Gå vidare och lägg till Buttons-blocket i ditt inlägg. När du har gjort det skriver du en CTA-fras i området “Lägg till text…”. Du kan också lägga till en länk för din knapp med hjälp av blockets verktygsfält.
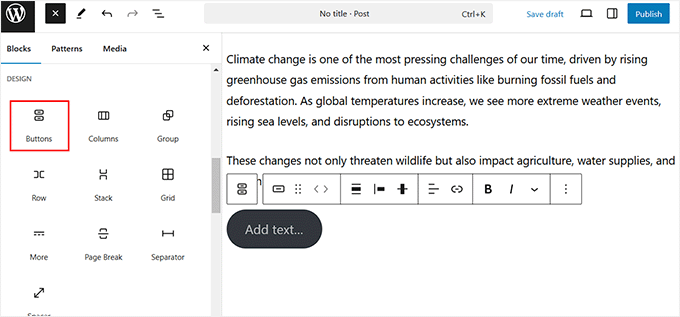
Gå sedan till fliken “Stilar” för att ändra knappens textfärg, bakgrundsfärg, typografi och radie.
Du kan också placera knappen i mitten, till vänster eller till höger, beroende på vad du föredrar.
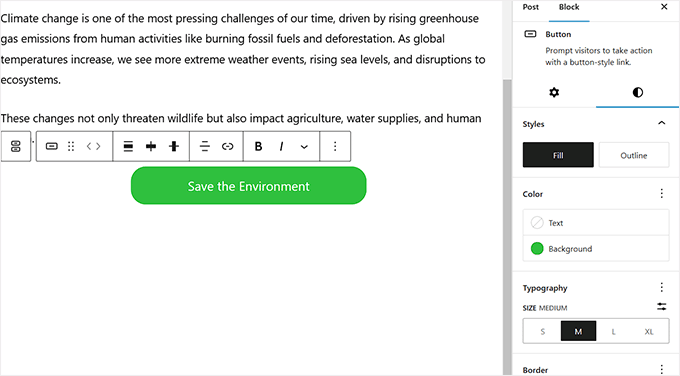
För detaljerade instruktioner, se vår guide om hur du lägger till en call to action-knapp i WordPress.
12. Lägg till omslagsbilder i WordPress-inlägg
Du kanske har sett omslagsbilder som används mitt i en artikel i populära publikationer som New York Times. En omslagsbild är helt enkelt en bild som placeras i mitten av en artikel, ibland med en överliggande text.
Syftet är att göra ditt innehåll mer engagerande och ge dig en paus från läsningen av texten.
I innehållsredigeraren är det enkelt att lägga till omslagsbilder i dina inlägg. Du kan börja med att klicka på knappen “Lägg till block” (+) högst upp och hitta blocket Omslag.
När du lägger till blocket kommer du att bli ombedd att välja en färg eller bild från WordPress mediebibliotek. Denna bild eller färg kommer att användas som bakgrund.
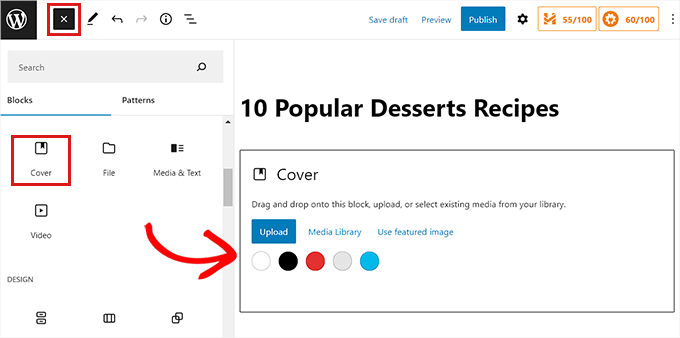
Efter det kan du helt enkelt dra och släppa vilket block du vill i Cover-sektionen. Du kan till exempel lägga till text, bädda in en video, lägga till bilder och mer.
Gå sedan till fliken “Styles” i inställningspanelen för att justera blockets dimensioner, överläggets opacitet, typografi och färg.
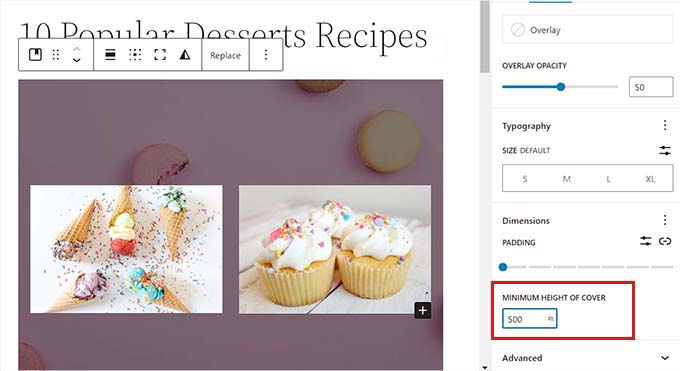
För att lära dig mer om blocket, se vår guide om omslagsbild vs. utvald bild i WordPress blockredigerare.
13. Markera text i dina inlägg
Ibland behöver du lyfta fram vissa ord eller fraser för att fånga uppmärksamheten och göra ditt innehåll mer engagerande.
Du kan enkelt göra detta med Gutenberg-redigeraren. Markera bara den text du vill markera och klicka på ikonen “Mer” i blockets verktygsfält.
Detta öppnar en rullgardinsmeny där du måste välja alternativet “Highlight”.
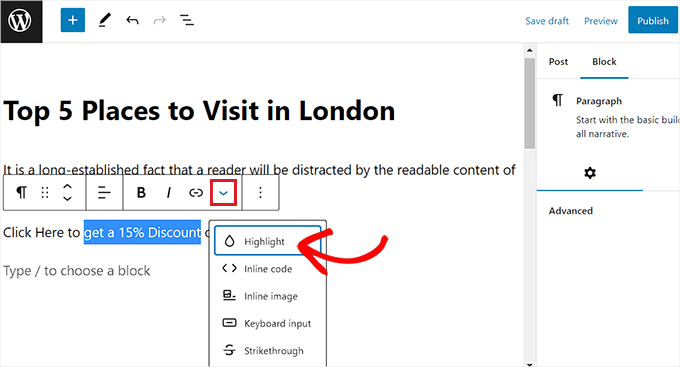
Därefter visas ett färgplockarverktyg där du måste byta till fliken “Bakgrund”.
Välj sedan en markeringsfärg från de angivna alternativen. Du kan också välja en anpassad färg för att markera text genom att klicka på alternativet “Anpassad” och starta ett pipettverktyg.
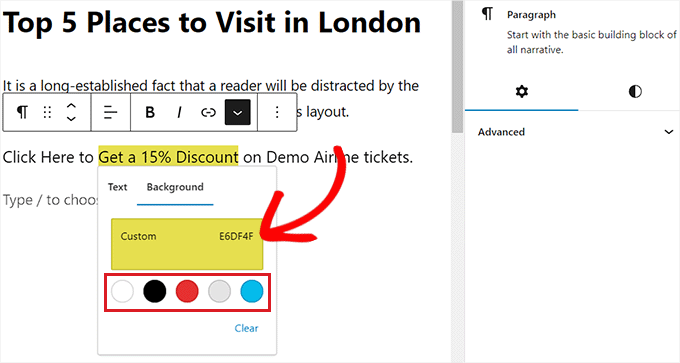
Mer information hittar du i vår handledning om hur du markerar text i WordPress.
14. Lägg till widgetar i dina inlägg
Widgets är ganska lika block. De gör att du kan lägga till webbelement på din WordPress-webbplats utan att lägga till kod.
Widgetar används vanligtvis i sidofältet eller sidfoten på en webbplats. Du kan dock också lägga till några widgetar i innehållsområdet, som arkiv, senaste inlägg eller kortkoder.
Leta bara efter Widgets-avsnittet under blockmenyn.
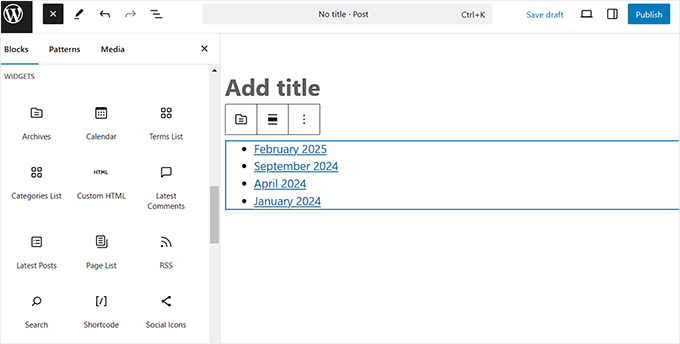
Härifrån kan du använda de vanligaste widgetarna i dina inlägg och sidor.
15. Lägga till anpassad HTML i WordPress-inlägg
Innehållsredigeraren i WordPress är en helt visuell WYSIWYG-redigerare. Du kan dock fortfarande lägga till HTML-kod om du behöver det.
Det enklaste sättet att göra detta är genom att lägga till Custom HTML-blocket i ditt inlägg. Efter det kan du helt enkelt klistra in den HTML som du vill lägga till.
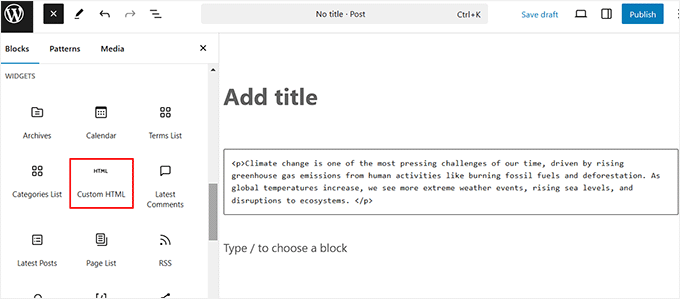
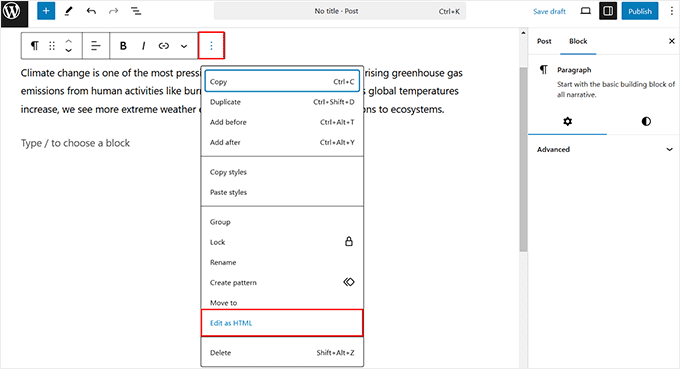
Du kan dock även se befintligt innehåll i anpassad HTML genom att klicka på ikonen med tre punkter i blockverktygsfältet. När rullgardinsmenyn öppnas väljer du alternativet “Redigera som HTML”.
Du ser nu HTML-texten för ett enskilt block och kan redigera den som du vill.
Mer information finns i vår handledning om hur du redigerar HTML i WordPress kodredigerare.
16. Få ordräkning och annan statistik för dina inlägg
När du arbetar med en längre artikel kanske du vill se en snabb översikt över artikeln, hur många ord den har och hur allt är placerat.
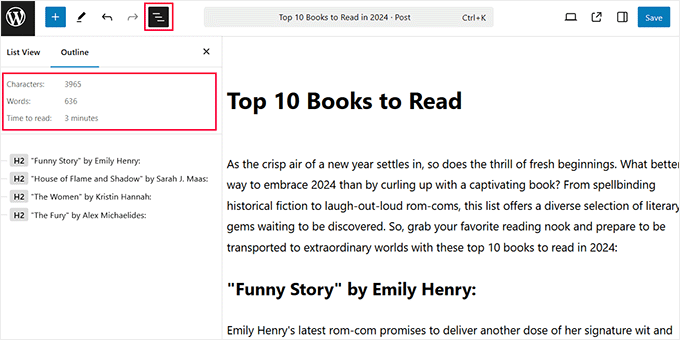
WordPress-innehållet gör det superenkelt att kontrollera denna statistik. För att göra detta klickar du bara på knappen “Dokumentöversikt” längst upp och växlar till fliken “Disposition”.
Du kan nu se ordantal, teckenantal och beräknad lästid för ditt inlägg eller din sida. Tänk på att ordräkningen uppdateras automatiskt när du fortsätter att skriva.
Du kan också visa en disposition av din artikel utifrån de rubriker som du har använt.
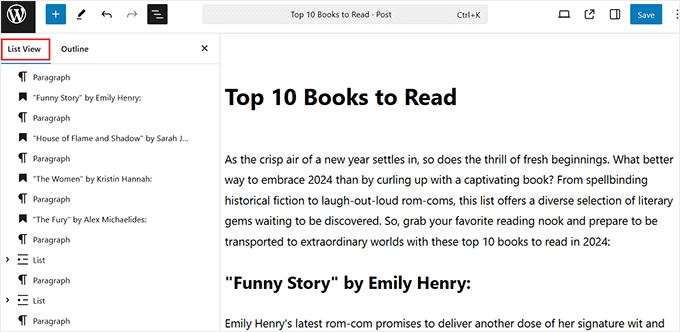
Men om du vill se alla block som du har använt i din artikel kan du växla till fliken “List View” längst upp.
För att få mer detaljerade uppgifter kan du läsa vår guide om hur du får statistik över ordräkning i WordPress.
17. Lägga till återanvändbara block till dina inlägg
Med återanvändbara block, som nu kallas blockmönster, kan du spara ett innehållsblock och återanvända det i andra inlägg och sidor på din webbplats.
Du kan till exempel skapa en CTA-knapp en gång och sedan infoga den där den behövs med bara några få klick.
Hemligt tips😇: Vi har skapat ett återanvändbart block för vår CTA för prenumeration, som du ser i slutet av varje WPBeginner-artikel. Istället för att återskapa det varje gång, kan våra skribenter helt enkelt infoga det färdiga blocket i sina inlägg.
Det sparar tid och gör att våra uppmaningar till handling är konsekventa på hela webbplatsen.
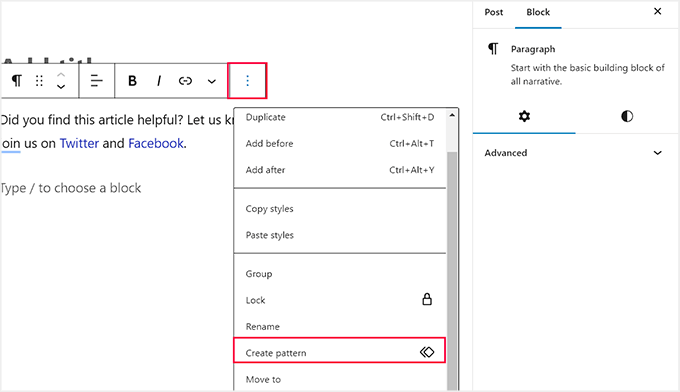
För att skapa ett mönster klickar du bara på ikonen med tre punkter i blockverktygsfältet för det block som du vill spara.
Välj sedan “Skapa mönster” och ge det ett namn i popup-fönstret som öppnas.
När du har gjort det öppnar du blockmenyn och växlar till fliken “Mönster”. Här kommer du att se en lista över alla standardkategorier som erbjuds av mönsterfunktionen.
Välj bara den kategori som du valde tidigare för ditt återanvändbara block. Om du inte har valt någon kategori kommer ditt mönster att lagras under fliken “Uncategorized”.
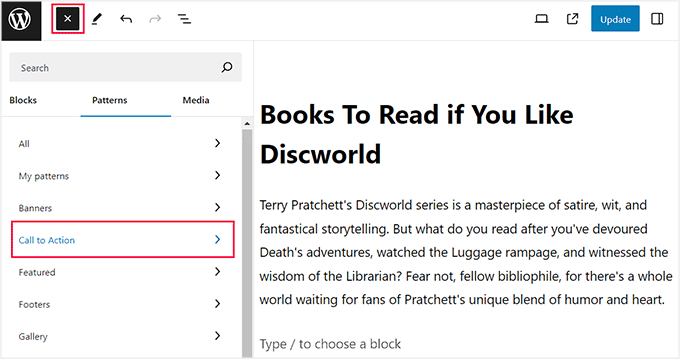
Gå vidare och klicka på lämplig kategori. När du har gjort det öppnas en prompt bredvid blockmenyn med en lista över alla mönster som sparats i det specifika avsnittet.
Nu är det bara att klicka på det återanvändbara block som du har skapat för att lägga till det på din WordPress-sida eller i ditt inlägg.
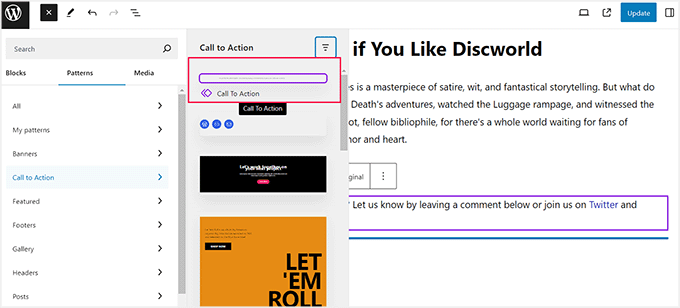
För detaljerade instruktioner, se vår guide om hur du skapar ett återanvändbart block i WordPress.
Bonus Tips: Ta bort blockeringar i WordPress
Om du är nybörjare kanske du inte behöver använda flera av standardblocken i WordPress. I så fall rekommenderar vi att du tar bort de onödiga blocken för att rensa upp din blockmeny.
Detta hjälper dig att hålla fokus genom att göra det lättare att snabbt hitta de block du behöver.
Och oroa dig inte, för du kan alltid ta tillbaka de block du gömt med bara några klick.
Om du vill ta bort block klickar du på ikonen med tre punkter längst upp till höger i innehållsredigeraren. När en rullgardinsmeny visas väljer du alternativet “Inställningar”.
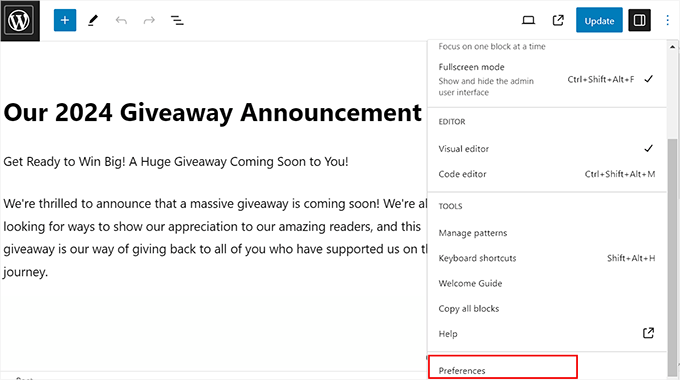
Detta kommer att öppna en popup på skärmen, där du måste byta till fliken “Blocks”. Avmarkera sedan rutorna bredvid de block som du vill dölja i inläggsredigeraren.
När du är klar klickar du bara på ikonen “X” för att avsluta prompten. Du har nu lyckats dölja blocken i WordPress.
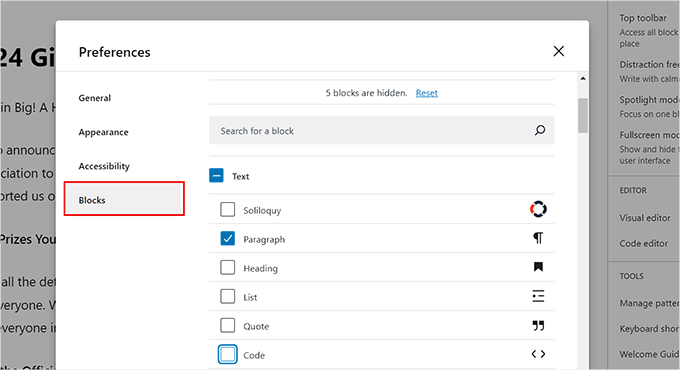
Mer information finns i vår guide om hur du tar bort ett block i WordPress.
Vi hoppas att den här artikeln hjälpte dig att upptäcka nya tips för att bemästra WordPress innehållsredigerare. Du kanske också vill se vår jämförelse av WordPress-widgets vs. block och våra toppval för de bästa Gutenberg-blockpluginsen för WordPress.
If you liked this article, then please subscribe to our YouTube Channel for WordPress video tutorials. You can also find us on Twitter and Facebook.


Mrteesurez
Nice post.
I didn’t see any way to see word count, number of paragraphs,l and others in block before, I used to switch to Classic editor to do it.
This post just teach me with block editor. Their are many things we still need to know about WordPress and blogging generally.
Thanks.
WPBeginner Support
You’re welcome, glad we could share how to do this in the block editor
Admin
Kadir
This is a really complete guide. Thanks
WPBeginner Support
You’re welcome
Admin
Khalid
I cannot find the heading block in my editor. Is it that I have inadvertently deleted it. How can I have it back.
WPBeginner Support
Your theme’s header is decided by your theme, not the post/page editor. For changing it you would normally go under Appearance>Customize.
Admin
Sanavi
Very helpful for beginners. Bookmarking this article. I will surely implement these tips in my blog.
WPBeginner Support
Glad you found our article helpful
Admin
Michael Torres
Very helpful for new blogger like me. Basics are very important.
WPBeginner Support
Glad our article could be helpful
Admin
Bob
Good article, looks to be a great tool for beginners like me, are there
any video tutorials as I like to be shown what to do?
WPBeginner Support
For that, you would want to take a look at our video section here: https://videos.wpbeginner.com/
Admin
Abhijit Bangal
I was trying to use the new gallery plugin for testing how it’d work with new blocks, which are now more flexible than before. But I stumbled upon the columns thing and tried out a few combinations. I think, to an extent, I’ll use less of the gallery plugin and more of columns. Of course, the columns cannot be everything that a gallery plugin can do/does. But to me, it’s helped me save a lot of time and energy.
Extremely helpful! Thanks team!
WPBeginner Support
Thanks for sharing how you’re using the block editor, while it won’t have all the features it can help those looking for a custom gallery setup
Admin
Kurt
Single line break…Shift + Enter…sweet. Wish I had known about that before now.
WPBeginner Support
Glad we could teach you something new and hope this trick helps with your content
Admin
Michael Walther
Very good article about the Gutenberg editor. However, I am still not convinced. For me, the Gutenberg editor stays what it is – an excellent answer to a question that I did not ask. Like a huge SUV to drive my daughter to kindergarten. Don’t get me wrong, shiny huge SUVs are a fine thing, but I am just a wordpress author. I’ll stick with my trusty Toyota (ie the ‘old’ WP editor via plugin) as long as I possibly can.
WPBeginner Support
Understandable, as the block editor improves it should become more useful for new WordPress users and have tools that those who have used the classic editor want to use
Admin
Mohamed Hassan
Thanks, an informative useful post.
WPBeginner Support
You’re welcome, glad our post could be helpful
Admin
Valentin Born
Nice overview … but
`By default, WordPress visual editor allows you to change the font size into paragraph text, headings, etc.`
This is incorrect (and implies terrible advice)—don’t use “paragraph“, “heading“ etc. for font-sizes (… but for marking up paragraphs and headings)! While you offer a slightly better option in your mentioned article on how to change font sizes (namely, adding a font-sizes dialog, e.g. using TinyMCE Advanced), only at the very bottom of that article do give the important advice:
`Note: If you want to change the font size of all paragraphs (i.e the entire post content), then DO NOT use the TinyMCE advanced. Rather, you would need to adjust the styling in your style.css file.`
This should even be expanded upon: “If you ever want to change the font-size of a piece of content for purely stylistic purposes, create a class for that and add it to that element“ (perhaps with the help of a plugin)—otherwise you will manually have to crawl through every post and page, readjusting those manually set font-sizes, every time you change your theme’s base font-size.
Pawan Singh
Hi Admin, would you please tell all your readers which editor you use. i’m impressed with the styling of text.
Amanda
Great article! I learned some very helpful things, and was reminded of other helpful things I’ve learned from you! Thanks so much!
Bob Diebel
Thanx much! much learned, much appreciated!
kittkatt123
Is there a keyboard shortcut to switch between the text editor and the visual editor? Or do I have to click every time?
Rick Teisan
I asked how to add a visual to the media library. I was directed to thispage. There isnothing about adding a visual to the library. SUCKS. 39 MINUTES JUST TRYING TO ADD A PHOTO TO THE LIBRARY TO PUT IT IN THE BLOG POST.
MAKE IT EASY
!!!!!!
WPBeginner Support
Hi Rick,
On the post edit screen you will see a button labeled ‘Add Media’ you can click on it and then upload your photo.
You can also add a photo to your WordPress library by visiting Media > Add New page in your WordPress admin area.
Let us know if this solved your issue.
Admin
Hamid
thanks for sharing such valuable tips.
Nadeem
Thanks so much for this easy and simple explanation of all the necessary suggestions for writing an article on wordpress. Keep posting such amazing articles.
Rufus B
One of the best news letters yet from you guys. The links to other recommended articles was super helpful.
Ahmed
Great tips, thanks
jagmohan singh negi
hi syed , its my first landing page of my secrch in google and i dont think i have to go to other sourses to find any information about wprdpress ,blog ,adsense etc.
really nice post with complete information and presentaion is 10/9 in my view.
WPBeginner Staff
WordPress themes are responsible for handling all things related to the visual appearance of your content. Having said that, since each WordPress theme is different, the Visual Editor can not automatically guess what styles to use. To solve this issue, it is a standard practice to add an editor stylesheet in WordPress themes. It seems like your theme does not have one. You can ask your theme developer for support. Or you can create your own editor-style.css file and copy the rules from your theme’s main stylesheet.
Gary Neal Hansen
Thanks for the great tips. At the beginning you say the visual editor is a WYSIWYG environment — but I don’t see what I type in its proper format and font until I hit the “preview” button. Is there a setting to have the editor function as true WYSIWYG?
Chris Finnegan
Excellent roundup, I’ll be using the keyboard shortcuts for headings from now on!
WPBeginner Staff
You are confusing “Paste as Text” button with “Paste From Word” button which is no longer available since 3.9.
Dave Porter
Yep, you are quite correct!
Derek Wyatt
When switching from HTML to Visual editor and vice versa, how do you keep the html information from stripping away? I haven’t noticed a pattern as to how this happens, it just springs up when I least want it to…
As a safety measure, I just stick to the HTML editor because I don’t want to lose my formatting. Unless someone knows a way to prevent this?
Dave Porter
Hi Derek, check out Tiny MCE Advanced
https://wordpress.org/plugins/tinymce-advanced/
And checkout the settings – there is an option to not strip out html like and
John Mauldin
I must say that anyone who doesn’t know about all the wonderful information your site supplies is really missing out on a Great opportunity. I love the fact that you present the information in direct, no b.s., format and written in easily understandable language most anyone can digest. Keep up the GREAT work! JM
Roger Lill
Hi, Thanks for the summary, that should save some time.
Dave Porter
isn’t #13 obsolete with WP 3.9 ?
And ‘TinyMCE Advanced’ is worth a mention
Dave