No WPBeginner, usamos a CDN grande e rápida da Cloudflare para tornar nosso site mais rápido para usuários em todo o mundo. Isso nos ajudou a aumentar significativamente o desempenho do WordPress, e é por isso que frequentemente recomendamos a Cloudflare aos nossos leitores.
O Cloudflare é um dos melhores serviços de CDN para WordPress disponíveis no mercado. Eles oferecem uma CDN gratuita que acelera seu site e poderosos recursos de segurança para sites de pequenas empresas.
No entanto, o processo de configuração inicial da Cloudflare pode ser difícil para novos usuários.
Neste guia, vamos orientá-lo em uma configuração completa do Cloudflare no WordPress para ajudá-lo a melhorar a velocidade do seu site.
O que é uma CDN?
Uma CDN ou rede de distribuição de conteúdo é um sistema de servidores distribuídos que ajuda a entregar os arquivos do seu site mais rapidamente aos usuários com base na localização deles.
Normalmente, um serviço de hospedagem na Web atende aos visitantes do seu site em um único local. Todos os usuários acessam o mesmo servidor, independentemente de onde estejam localizados.
Isso pode causar um atraso na entrega de conteúdo para usuários que moram mais longe do servidor de hospedagem central do seu site.
É por isso que as CDNs configuram vários servidores de borda em diferentes locais do mundo.
Esses servidores CDN salvam cópias de conteúdo estático do servidor de origem do seu site e as apresentam aos usuários quando eles visitam seu site WordPress.
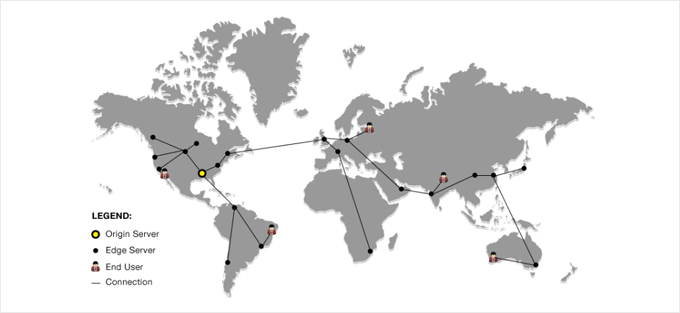
Quando houver uma solicitação do usuário, o servidor CDN mais próximo do local do usuário a atenderá.
Por exemplo, se alguém nos EUA quiser acessar um site hospedado no Reino Unido, um servidor CDN nos EUA atenderá a essa solicitação, e não o servidor principal no Reino Unido.
Com uma CDN, todas as solicitações dos usuários são tratadas pelos servidores CDN mais próximos. Isso reduz a distância física entre os visitantes e o servidor do seu site.
Como resultado, uma CDN melhora o desempenho e a velocidade do seu site para todos os usuários, independentemente de sua localização geográfica.
Um site mais rápido também melhora a experiência do usuário e pode dar ao seu site um leve impulso nas classificações de SEO. O uso de uma CDN também reduz a carga em seu servidor principal e o protege contra falhas durante picos de tráfego.
Se quiser saber mais, consulte nosso guia sobre por que você precisa de uma CDN para seu blog do WordPress.
O que é a CDN da Cloudflare?

A Cloudflare é um dos provedores de CDN gratuitos mais populares da Internet. É uma grande rede de servidores distribuídos globalmente que armazena automaticamente em cache o conteúdo estático e fornece conteúdo dinâmico rapidamente.
Além de um serviço de CDN, a Cloudflare também é um firewall de site baseado em nuvem e um servidor proxy distribuído. Isso significa que ele monitora todo o tráfego de entrada para o seu site e bloqueia o tráfego suspeito antes mesmo que ele chegue ao seu servidor.
Ele oferece um plano básico gratuito adequado para sites e blogs de pequenas empresas e planos pagos a partir de US$ 20 por mês.
A Cloudflare é uma excelente opção para pequenas empresas que procuram uma CDN gratuita. No entanto, se você quiser utilizar plenamente todos os recursos da Cloudflare, precisará do plano Business, que custa US$ 200 por mês.

Relacionado: Veja nosso post sobre por que o WPBeginner mudou da Sucuri para a Cloudflare.
Dito isso, vamos dar uma olhada em como configurar a CDN gratuita da Cloudflare no WordPress. Você pode usar os links rápidos abaixo para ir para as diferentes partes do tutorial:
Configuração de sua conta Cloudflare
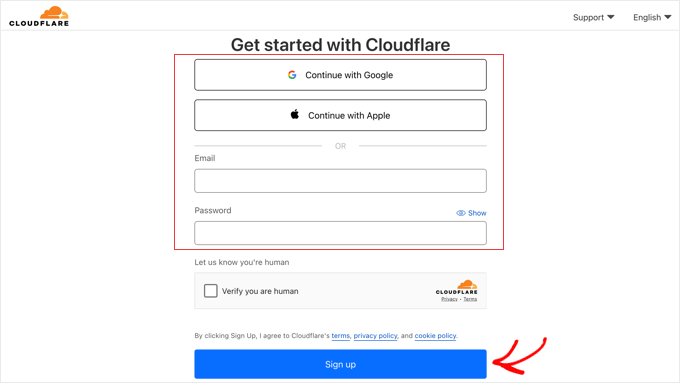
Para começar, você precisa visitar o site da Cloudflare e clicar no botão “Start for free”.

Na próxima página, você precisa inserir seu endereço de e-mail e senha para criar uma conta na Cloudflare. Como alternativa, você pode se inscrever usando suas credenciais do Google ou da Apple.
Basta inserir as informações necessárias e clicar no botão “Sign up” (Registrar-se).
Quando terminar de se inscrever, você poderá conectar seu site para começar a enviar o tráfego da Web por meio da Cloudflare. Você só precisa inserir seu site no campo “Enter an existing domain” (Insira um domínio existente).
Certifique-se de digitar apenas o nome de domínio do seu site, como example.com. Não é necessário digitar o URL completo ou qualquer caractere extra.
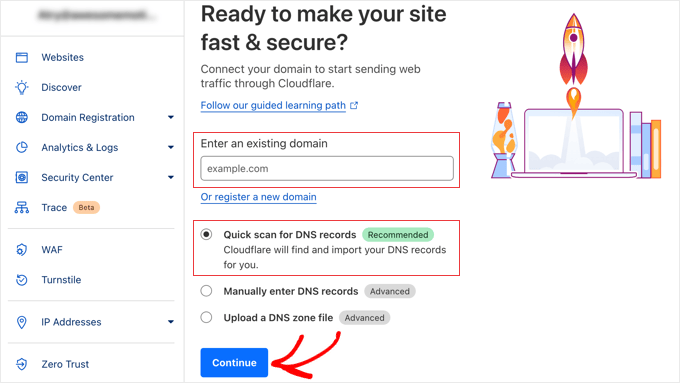
Certifique-se de que a opção “Quick scan for DNS records” esteja selecionada e clique no botão “Continue”.
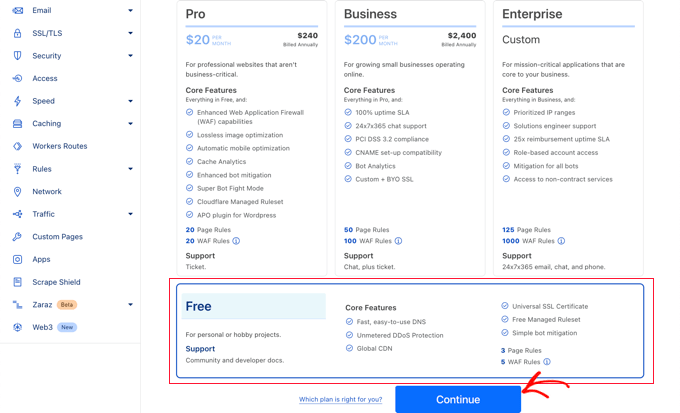
Na próxima tela, você será solicitado a escolher o tipo de plano da Cloudflare que deseja. Para este tutorial, escolheremos o plano gratuito da Cloudflare. Em seguida, clique no botão “Continue”.
Depois disso, a Cloudflare mostrará uma lista de todos os registros DNS encontrados pelos sistemas. Eles também incluirão seus subdomínios.
Os registros DNS que você deseja que passem pela Cloudflare devem ter um ícone de nuvem laranja, enquanto os registros DNS que passarão pela Cloudflare terão um ícone de nuvem cinza.
Você precisa revisar a lista para ter certeza de que seu domínio principal está ativo na Cloudflare com um ícone de nuvem laranja. Basta clicar no botão de alternância “Proxy status” para alterar o status.
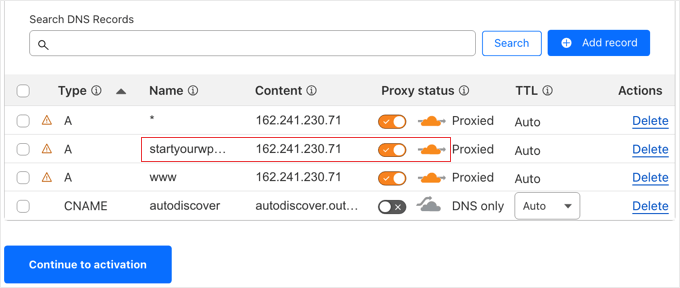
Depois de verificar seus registros DNS, basta clicar no botão “Continue to activation”.
Durante a próxima etapa de sua configuração, a Cloudflare solicitará que você atualize seus servidores de nomes. Você será solicitado a alterar seus servidores de nomes para os novos servidores atribuídos pela Cloudflare.
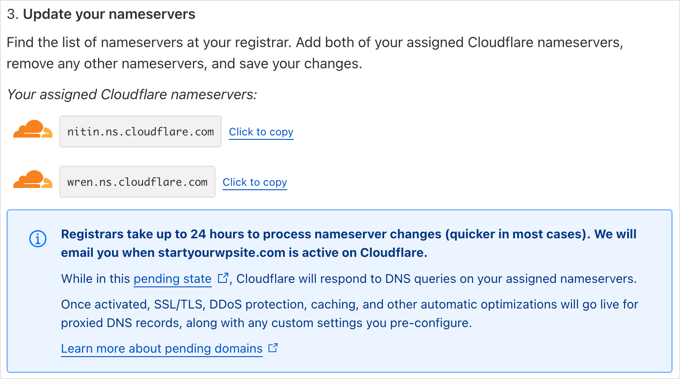
Observação: a alteração dos servidores de nomes pode levar algum tempo para se propagar pela Internet. Durante esse tempo, seu site pode ficar inacessível para alguns usuários.
Você pode alterar os servidores de nomes na sua conta de registrador de domínios, como Domain.com.
Ou, se você obteve um domínio gratuito do seu provedor de hospedagem na Web, terá que alterar os servidores de nomes fazendo login na sua conta de hospedagem.
Para fins deste tutorial, mostraremos como alterar os servidores de nomes no painel de controle da Bluehost.
Embora o processo seja semelhante em todas as empresas de hospedagem, você sempre pode solicitar ao seu provedor de hospedagem instruções detalhadas sobre o painel de controle.
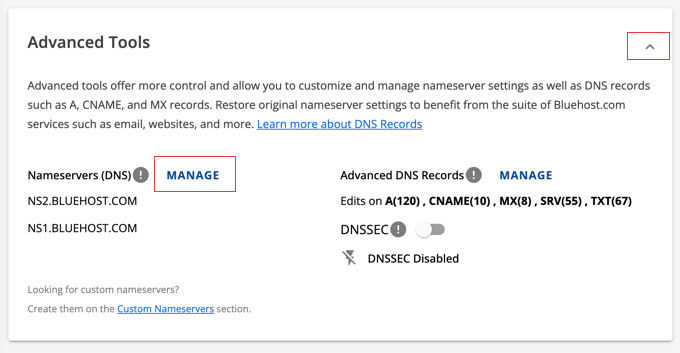
Depois de fazer login no painel da Bluehost, vá para a seção “Domains” (Domínios) e clique no botão “Settings” (Configurações) ao lado do seu nome de domínio.

Em seguida, é necessário rolar para baixo até a seção Advanced Settings (Configurações avançadas) e expandi-la clicando na seta à direita da tela. Isso mostrará as configurações de DNS de seu site, inclusive os servidores de nomes.
Ao lado de “Nameservers (DNS)”, você deve clicar no botão “Manage” (Gerenciar).
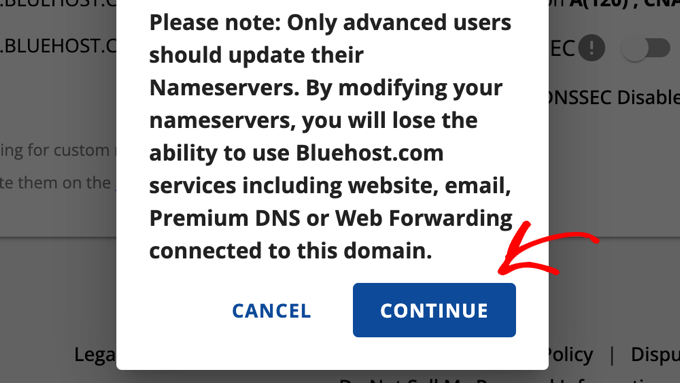
Isso exibirá um aviso de que somente usuários avançados devem atualizar seus servidores de nomes.
Você precisa clicar no botão “Continuar” para confirmar isso e passar para a próxima etapa.
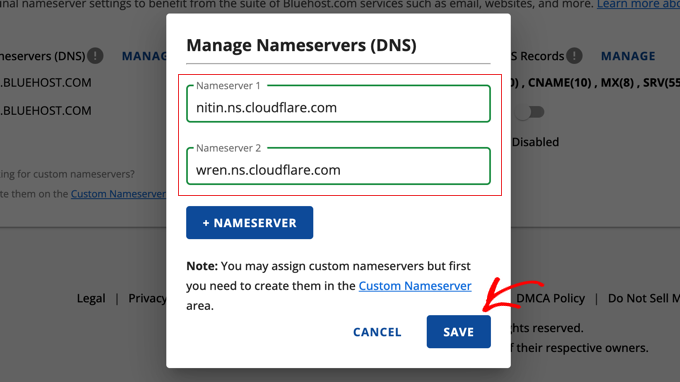
Em seguida, você precisa inserir os servidores de nomes fornecidos pela Cloudflare.
Em seguida, clique no botão “Salvar”.
Depois disso, você precisa voltar à página de configuração da Cloudflare e clicar no botão “Check nameservers now”. A Cloudflare verificará seus nameservers periodicamente e lhe enviará um e-mail quando eles estiverem ativos.
Enquanto isso, você pode clicar no botão “Continue” (Continuar) para concluir a configuração.
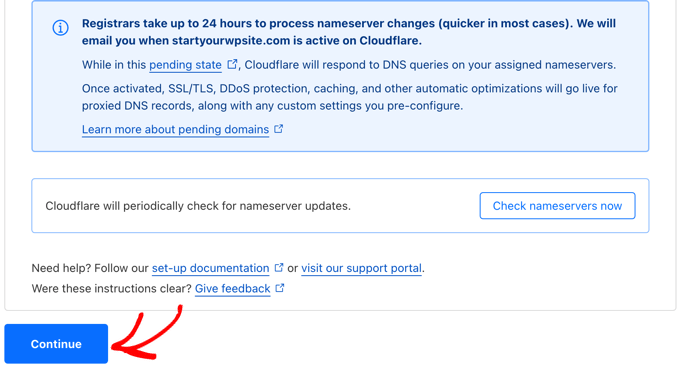
É isso aí! Levará alguns minutos para atualizar os nameservers de seu domínio e ativar o Cloudflare.
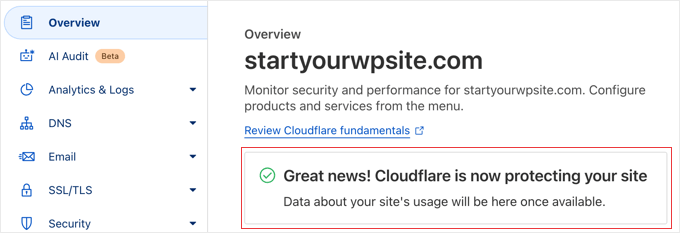
Depois de ativado, você verá a mensagem de sucesso no painel do Cloudflare.
Observação: As capturas de tela acima mostram o painel de controle da Bluehost. As configurações do seu servidor de nomes podem ser diferentes se você estiver usando um provedor de hospedagem diferente.
Definição de uma configuração importante do Cloudflare
Embora a Cloudflare esteja agora protegendo seu site, você precisa definir uma configuração importante enquanto ainda estiver no site da Cloudflare. Depois de fazer isso, você instalará o plug-in da Cloudflare em seu site do WordPress para concluir o processo de configuração.
Recomendamos configurar o Cloudflare com regras de página para que sua área de administração do WordPress não passe por ele. Isso evita possíveis problemas de cache que podem afetar a funcionalidade administrativa.
A Cloudflare permite que você configure três regras de página gratuitas. Se você quiser adicionar mais regras de página, precisará pagar US$ 5 por mês por 5 regras extras.
Primeiro, você precisa clicar na opção Rules ” Page Rules no menu à esquerda da página. Depois disso, você pode clicar no botão “Create Page Rule”.
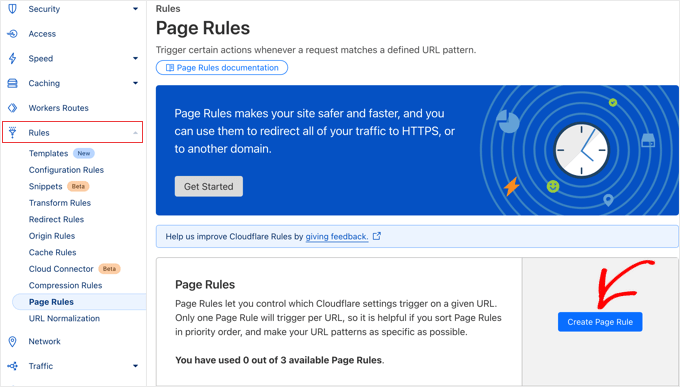
Agora, você precisa digitar as seguintes configurações na regra. Você pode clicar no botão “+ Add a Setting” para adicionar novas linhas para configurações adicionais:
- URL da página: example.com/wp-admin*
- Nível de cache – Bypass
- Desativar desempenho
- Desativar aplicativos
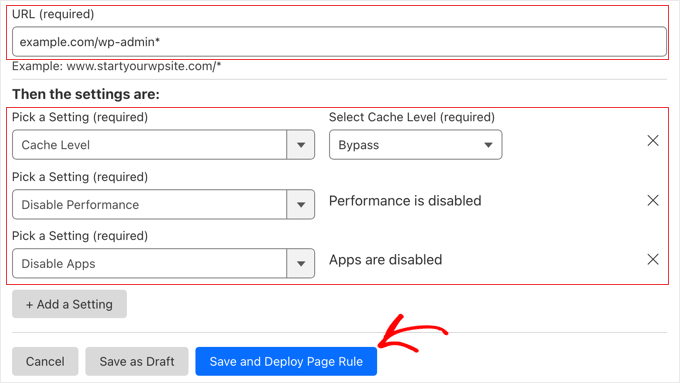
Quando terminar, certifique-se de clicar em “Save and Deploy” para adicionar a nova regra.
Depois de fazer isso, você concluirá a configuração do Cloudflare usando o plug-in oficial do Cloudflare para WordPress.
Otimização do Cloudflare para WordPress usando um plug-in
A Cloudflare oferece um plug-in dedicado ao WordPress para configurações otimizadas para o WordPress com um clique. Ele integra os recursos da Cloudflare sem problemas ao WordPress para oferecer a melhor compatibilidade e funcionalidade.
O plug-in permite que você configure rapidamente o Cloudflare em seu site WordPress, adicione conjuntos de regras de firewall de aplicativo da Web (WAF), limpe automaticamente o cache e muito mais.
Para começar, instale e ative o plug-in da Cloudflare em seu site. Para obter mais detalhes, consulte nosso guia passo a passo sobre como instalar um plug-in do WordPress.
Observação: embora esse plug-in não tenha sido atualizado há algum tempo, nós o testamos e ele ainda funciona corretamente. Para obter mais informações, consulte nosso guia sobre se é seguro usar plug-ins desatualizados do WordPress.
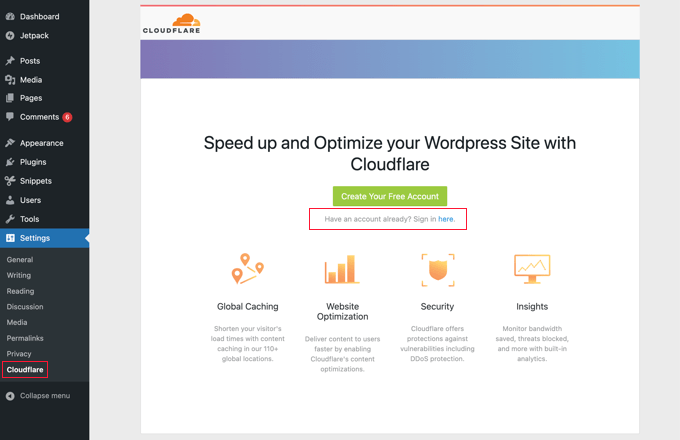
Depois disso, você precisa acessar Settings ” Cloudflare em seu painel de administração para definir as configurações do Cloudflare.
Na página de configurações, você verá um botão “Create Your Free Account” e uma opção de login para contas existentes. Basta clicar no link “Sign in here” (Entrar aqui).
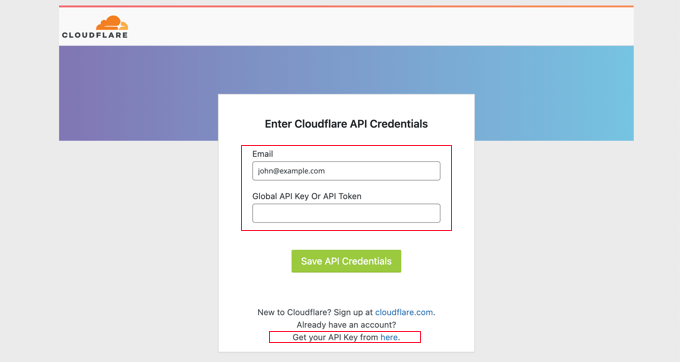
Na próxima tela, você precisará inserir seu e-mail e a chave de API da Cloudflare.
Clique no link “Get your API key from here” (Obtenha sua chave de API aqui).
Isso abrirá uma janela pop-up para a área de sua conta no site da Cloudflare.
Verifique se você está na página “My Profile” e clique na guia “API Tokens” na barra lateral esquerda.
Depois disso, vá para a seção “Global API Key” e clique no botão “View”.
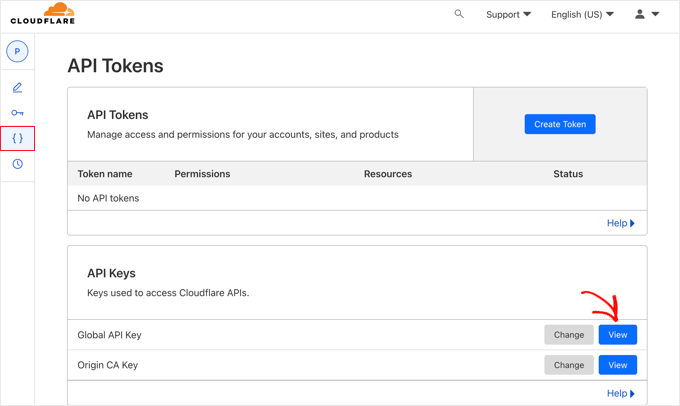
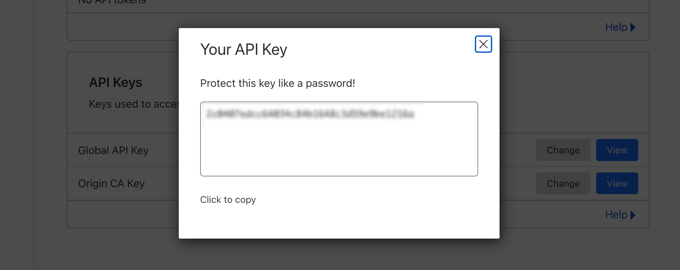
Isso abrirá uma janela pop-up e exibirá sua chave de API.
Basta clicar na chave para copiá-la.
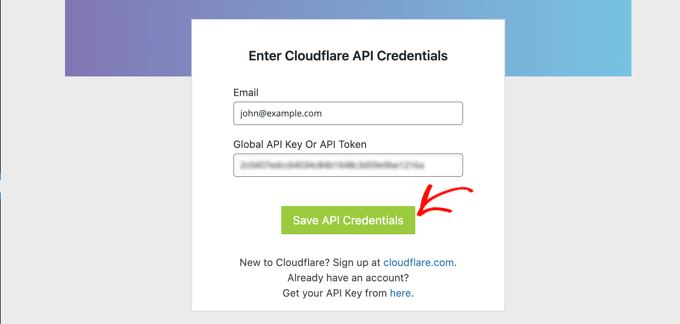
Em seguida, você precisa voltar ao painel do WordPress e inserir seu endereço de e-mail e a chave da API.
Em seguida, clique no botão “Save API Credentials” (Salvar credenciais da API).
Depois disso, as configurações do Cloudflare aparecerão em seu painel.
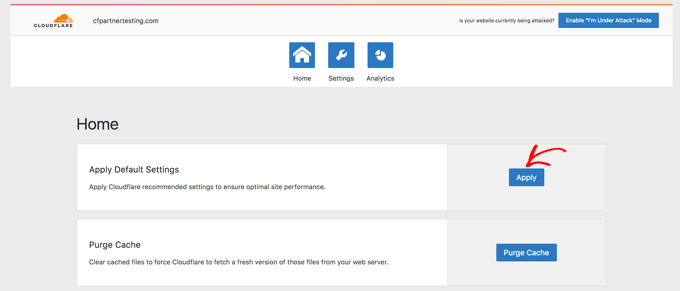
A partir daí, você pode aplicar uma otimização do WordPress com um único clique, limpar o cache, ativar o cache automático e muito mais.
Para otimizar seu site WordPress, clique no botão “Apply” (Aplicar) ao lado de “Apply Default Settings” (Aplicar configurações padrão). Isso executará algumas alterações de configuração que a Cloudflare recomenda para otimizar o desempenho do WordPress.
Em seguida, clique na opção de menu “Settings” (Configurações).
Aqui, você encontrará mais configurações de otimização do site.
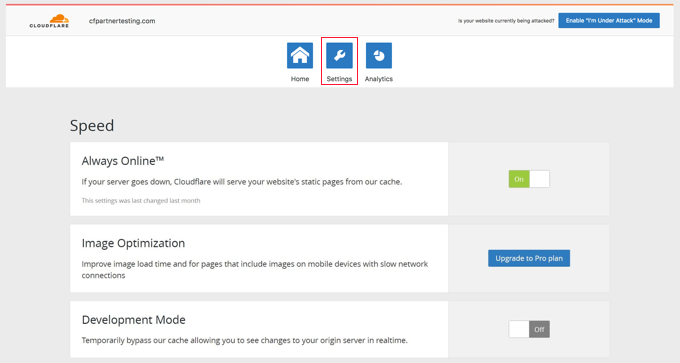
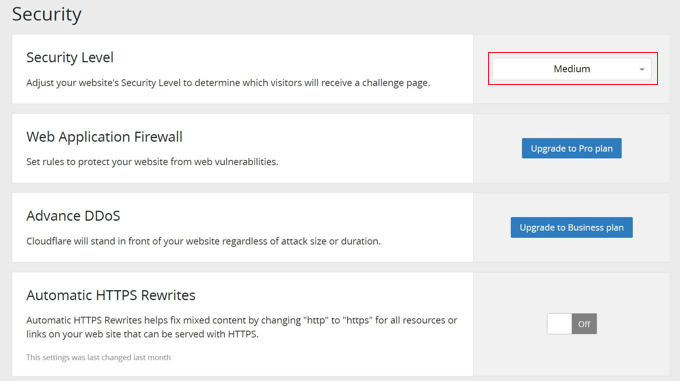
Role para baixo nessa tela para encontrar a seção “Security” (Segurança).
O nível de segurança é médio por padrão. Para aumentar a segurança do seu site, você pode selecionar “Alto” na lista suspensa.
E é isso! Está tudo pronto.
Esperamos que este artigo tenha ajudado você a aprender como configurar a CDN gratuita da Cloudflare no WordPress. Talvez você também queira ver nosso guia definitivo sobre como aumentar a velocidade e o desempenho do WordPress e nossas escolhas de especialistas para os melhores plug-ins de cache do WordPress.
Se você gostou deste artigo, inscreva-se em nosso canal do YouTube para receber tutoriais em vídeo sobre o WordPress. Você também pode nos encontrar no Twitter e no Facebook.


Andrew Hansen
My hosting plan through Host gator says it has cloudflare installed. Is that good, or should I uninstall it through the hosting plan and manually add it so i can customize my options?
WPBeginner Support
It would depend on how Cloudflare is set up on your account, if you have access to cloudflare’s settings then you can continue to use what is on your account without worrying.
Admin
Andrew Hansen
I do not have control over settings.
WPBeginner Support
Jus to be safe, check with your host as there may be a hidden settings area for Cloudflare in the hosting settings.
Andrew Hansen
I checked the information regarding cloudflare through Hostgator. you can manage what level caching (assets only, assets and web pages, or assets and web pages extended) and you can clear the cache, but hostgator says under the cons of using it “No option to customize – Currently, you cannot customize cache settings (for example, which content gets cached, the cache timing, etc.) for the CDN.”
Jiří Vaněk
I use Cloudflare DNS along with their CDN. The integration of Cloudflare CDN into the WP Rocket plugin, which I use for caching, is fantastic. The CDN can be linked with the caching plugin, allowing for the simultaneous clearing of both the website cache and the CDN cache with a single button in WP Rocket.
WPBeginner Support
Connections like that to help simplify the process are very helpful
Admin
Ralph
I plan on making website from europe server (cheaper) to US users and this guide is godsend! Even better it is possible to do it for free. Thank you for this detailed guide. It will definitely help me setting everything up as I never really understood how to do this. Every other guide was lacking details and was too general.
WPBeginner Support
Glad to hear our guide was helpful
Admin
Salman
Hi, I use the “WPS Hide Login” plugin. While creating a page rule for the login page should I use the default login URL or the new login URL which I am using with the help of the plugin?
WPBeginner Support
If the login page is on a different URL you would want to set the page rule for the active login page that users would visit.
Admin
Neal Umphred
Thanks for another useful how-to article!
Regarding the ‘Always Use HTTPS’ option, you wrote: “Some users have reported issues when using this setting with Cloudflare.”
What are those issues?
WPBeginner Support
The errors vary between sites so we don’t have a specific list of errors to point to at the moment.
Admin
Sohil Jain
If I setup comment on my main domain wil it will be setup automatically to subdomain too? Because I don’t want cloudflare setup to apply to subdomain as I only want on main domain. So where to click so that it will not apply to subdomain
Thanks
WPBeginner Support
There is an option in Cloudflare to exclude a subdomain so you wouldn’t need to worry about that.
Admin
Evindu Shavinda
I added Cloudflare to my website today. So, I had to remove my hosting’s nameservers & replace them with Cloudflare nameservers from my domain registrar.
This is the question – 1. So, how my hosting account still works? I have removed its nameservers from the domain registrar
Aftab
Don’t worry about hosting. Cloudflare doesn’t modify or change your hosting configuration. Your site will be hosted on your current host only. The reason why cloudflare asks you to change the nameserver because it passes your site through their DNS. It routes your web traffic through the Cloudflare network. So they can proxy your traffic through their network. Cloudflare offers security, ddos protection to all the sites that are configured with their nameservers. You don’t need to spend a single penny to configure your site through network. It’s a part of the free plan. No matter how many sites you have.
Nina Cen
When I tried to add the page rules for my wordpress login page, I got message “Not Acceptable! An appropriate representation of the requested resource could not be found on this server. This error was generated by Mod_Security.”
Is anything I did wrong? Or I just need to wait for a little while to try again?
WPBeginner Support
You would want to check with your hosting company for that specific error as that normally means they have a security rule set to prevent certain things on your site.
Admin
Shyam
I s there a way to turn off the second loading screen for security verification purposes and that CAPTCHA page which you have mentioned in the Cons of Cloudflare?
WPBeginner Support
You should be able to change the settings to remove that if you wanted but you would want to check with CloudFlare for the current method.
Admin
Lou
I’m setting up Cloudflare – thanks to your article! I’ve already got W3 super cache plugin – do I need both? Are they going to confuse each other? Total newb question I know!
WPBeginner Support
They have slightly different functions and there is an integration so the two can work with each other without an issue.
Admin
Faith Nte
Thank you for this guide. It helped me reduce the time my page loads
WPBeginner Support
Glad our guide was helpful
Admin
Muntaha
What if someone mistakenly adds the wrong parameters in page rules and then deployed it. Is there any way back to change page rules after deploying it?
WPBeginner Support
You can change your settings after setting them if you need to.
Admin
bali kratom
thanks for sharing this content
WPBeginner Support
You’re welcome
Admin
Will
Probably a noob question, but I have a lot of existing video and photo files on my site. Will they all be migrated to Cloudflare’s CDN or do I have to do that manually? I followed the setup steps, but my content still takes forever to load, and when I view its URL, it’s still showing my site’s URL and path.
WPBeginner Support
You shouldn’t need to transfer your content, for the slow loading you may want to reach out to CloudFlare for them to take a look
Admin
Brooke
Thanks so much for this, helps a lot!
Just to be clear, even though I’ve added my site to cloudflare, I still need to get an SSL cert separately? Cloudflare does not supply ssl cert?
Thanks again!
WPBeginner Support
You would want to take a look again under the Configuring Most Important Cloudflare Settings section for CloudFlare’s SSL
Admin
Ibraham Aali
Admin, kindly answer these question like
After changing the DNS, who is actually will my hosting provider? The hoster OR cloudflare and all editing can be done by same cpanel?
WPBeginner Support
Your hosting provider would still be your hosting provider.
Admin
Soumya
thank you very much, I was looking for a proper step-by-step Cloudflare set up! and TA DA!! you guys are savior.
It would be great if you publish about the best of cloudflare settings, from the plugin.
WPBeginner Support
Glad you found our article helpful
Admin
Alabura
Thank you for such a great publications, it really help me set up my cloud flare account easily. Keep the good work.
WPBeginner Support
You’re welcome, glad our guide was helpful
Admin
Bryan Wagar
Very helpful information and with the pictures for verification i could confirm everything instead of guessing, thankyou very much for compiling this! It is BRILLIANT
WPBeginner Support
You’re welcome, glad our guide could be helpful
Admin
PKV
superb guide, easy to follow thanks
WPBeginner Support
Glad our guide was helpful
Admin
randhir singh
I want to know which is the best CDN ? cloud Flare or max
WPBeginner Support
Hi Randhir,
At WPBeginner, we recommend MaxCDN. However, if you want to use the free CDN, then Cloudflare can be a good solution.
Admin
anurag saxena
If i will use cloudfare free version and will change the nameserver then it means my website will run on cloudfare server then how i can edit my website? through cloudfare or my present hosting provider? pls tell me detail.
andy
The only reason I use cloudflare because you can hide where you hosting the site.
Mehmet
i am wondering..
for cloudflare, we need to point the DNS to theirs..
so how we gonna use custom email set up using our own domain (which also need to point the DNS to the email provider) ?
as far as i know, we can’t use two DNS .. (actually we can, but it is expensive)
Aqib
I am using custom email and cloudflare. Cloudflare doesn’t affect my custom email working.
Abhi
If my domain is from go daddy and hostino is from inmotion hosting and I change my domain name server to my hosting now I want to join cloudfare to it then what can I do?
andy
I try to help answer. from godaddy change nameserver to cloudflare, and from cloudflare, set up your DNS and point to your in motion hosting ip address.
Syed Shan
After Setting Our Host DNS To Cloudfare DNS, Which bandwidth and storage will be used from our local hosting plan e.g godaddy, namecheap etc or Cloudfare ?
Haydrion Rayel
The reasons why I don’t use cloudflare is because of changing the nameservers and second like in this article : it blocks some of the legitime users and that is what I really hate.
I don’t use third party websites where I don’t have full control of it. I saw a couple of times there are you human google click on pictures and it takes forever.
MaxCDN is the only option because you only have to add a cname .. but still ..
Haydrion Rayel
The reasons why I don’t use cloudflare is because of changing the nameservers and second like in this article : it blocks some of the legitime users and that is what I really hate.
I don’t use third party websites where I don’t have full control of it. I saw a couple of times there are you human google click on pictures and it takes forever.
MaxCDN is the onlly option because you only have to add a cname .. but still ..
abhishek purohit
My site is on wordpress and running on godaddy vps server with ssl certificate but it has lots of page load time, now, should I go for cdn cloud flare free account if yes than what about all static IP given with vps account , they will not useable and is vps based site need cloud flare ?
Munna Hossain
Page loading time is an important issue to get good user experience. This LoudFlare helps us to increase the page loading. Can you tell me which one is better to improve page speed, plugin or CDN?
Iain
HI
Just to let you know
I have had a joomla website working on the Free plan and SSL
Not sure if your previous post is now outdated but it is possible.
Regards
Mircea Pop
You can use the provided Cloudflare SSL but you are unable to use your own SSL on free account
koushil
bro can we use this for blogspot blog ?
King Rayhan
of course why not
Ikechukwu
This was very helpful. Thanks.
munetsi
i am actually caught in between-
which provider should i choose for my site,
between cloudfare or maxcdn
Editorial Staff
We use MaxCDN for our sites.
Admin
SOTHEA
This is truly awesome tip. Anyways, I have a question. If my website contents and domain name are hosted in different hosting companies. In this case, I need to change Name Servers to CloundFlare for both. Am I correct?
Anubhav
Did you find the solution for this as i have different hosting provider and domain name provider is different .If you know the solution then please let me know
Ummi Mental
after changing the DNS, who is actually will my hosting provider? The hoster OR cloudflare and all editing can be done by same cpanel?
Captain Asif
Really very helpful article i have setup my wordpress site with cloudflare
Joe
What minification services do you recommend that work well with Cloudfare? This is for a WordPress site that may have potentially high traffic spikes out of the blue. Thanks
bobzyouruncle
I live at the bottom of Africa (Cape Town) with none of their servers close to me am I correct in thinking that Cloud Flare will slow down my website. Most of my traffic is local. I have the same issues with CDNs none of them are close to my location, Europe is the closest. Is my thinking correct?
Damon Billian
CloudFlare would add a little latency because we currently don’t have any data centers in SA just yet (being looked at). Visitors from SA would currently hit a data center in Europe.
On the other hand, if you have visitors from a lot of other locations (EU, America, Asia, etc.), then the site would be faster for them.
munetsi
was just checking ,looks like they have servers in johannesburg.
Adesanmi Adedotun
I have heard about cloudflare but have not tried to make use of it, bout talking about the fact that my site might be down during the propagation of my name server,how long could this take?
WPBeginner Support
It varies, it can take a few hours to a full day.
Admin
Einstein
You will not experience any downtime while you switch to Cloudflare if you do it correctly.
Damon Billian
You should not have any downtime at all switching to CloudFlare’s nameservers.
Robby McCullough
I am a huge fan of CloudFlare. At my shop, we do a lot of sites for professional photographers. CF does an amazing job at making image heavy pages load in a snap!
One tip, don’t forget about CF’s developer mode when you’re making changes. I’ve bashed my head against the wall for some time when my CSS changes weren’t showing up — CF was serving a cached page!
Boby
When my website has ‘heavy load’ CloudFlare will make the users access screenshot of the website.
Abhisek
Cloudflare breaks my site’s design. I have a off-canvas menu and Cloudflare’s rocketloader and minification breaks ,y site’s design. So, I have to stick with basic W3 Total cache. Besides Cloudflare actually speeds up your site.
Damon Billian
Those features are actually optional and easy to turn off. If you’re using a minify service already, then you don’t want to turn ours on as well (something eventually will break running two minify options at the same time). Rocket Loader would have the potential to impact JavaScript and jQuery & would generally impact something like widgets.
Joe
What WordPress theme were you using? That way we can know to avoid using that theme with Cloudfare.