Você está planejando mover seu site WordPress para uma nova empresa de hospedagem ou um servidor diferente? É uma grande decisão e, compreensivelmente, você provavelmente tem algumas preocupações sobre perda de dados e tempo de inatividade potenciais.
Em nossa experiência, esses são definitivamente os maiores riscos ao trocar de hospedagem web ou migrar um site. No entanto, você pode mudar com segurança para um novo host ou servidor sem comprometer a experiência do usuário ou o tempo de atividade.
Na verdade, mudamos o site WPBeginner de HostGator para SiteGround em 2020. Portanto, navegamos com sucesso nesse processo nós mesmos, sem impactar negativamente nossos leitores.
Neste tutorial passo a passo, mostraremos como migrar seu site WordPress com segurança para um novo host sem nenhum tempo de inatividade. Também responderemos a perguntas frequentes sobre como mover um site WordPress para um novo provedor de hospedagem.
Importante: Antes de começarmos, queremos que você saiba que muitas empresas de hospedagem WordPress oferecem um serviço de migração gratuito. Pode não estar listado em seus sites, então tudo o que você precisa fazer é perguntar. Geralmente, é gratuito, mas alguns podem cobrar uma pequena taxa.
Dito isso, vamos ver as etapas que cobriremos para mover o WordPress para um novo servidor de hospedagem (sem tempo de inatividade):
- Escolha Seu Novo Host WordPress
- Configure o Duplicator para Migração Fácil
- Importe seu site WordPress para o novo host
- Altere o arquivo Hosts para evitar tempo de inatividade
- Criando um banco de dados MySQL em seu novo host
- Inicie o processo de migração do Duplicator
- Atualize seus servidores de nome de domínio (DNS)
- Perguntas Frequentes
Pronto? Vamos começar.
Etapa 1: Escolha seu novo host WordPress
Se você está preso com um provedor de hospedagem lento, mesmo após otimizar a velocidade e o desempenho do WordPress, é hora de mover seu site WordPress para um novo host que possa lidar com seu tráfego crescente.
Ao procurar um novo provedor de hospedagem WordPress, é importante escolher com cuidado para não ter que se mudar novamente tão cedo.
Aqui estão nossas recomendações:
- Para hospedagem compartilhada confiável, recomendamos Bluehost. Eles são oficialmente recomendados pelo WordPress.org. Usando nosso cupom Bluehost, os usuários do WPBeginner obtêm até 70% de desconto e um nome de domínio gratuito.
- Para hospedagem compartilhada mais rápida, recomendamos Hostinger. Eles estão entre as principais empresas de hospedagem WordPress e oferecem servidores mais rápidos com suporte ao cliente excepcional.
- Se você está procurando por hospedagem em nuvem ou provedores específicos de localização, recomendamos que você confira SiteGround. Eles têm data centers em três continentes diferentes.
- Se você está procurando por hospedagem WordPress gerenciada, então recomendamos que você confira WP Engine. Eles são o melhor e mais conhecido provedor do setor.
Após comprar sua nova hospedagem, NÃO instale o WordPress. Faremos isso em uma etapa posterior.
Por enquanto, sua nova conta de hospedagem web deve estar vazia, sem arquivos ou pastas em seu diretório principal.
Etapa 2: Configurar o Duplicator para Migração Fácil
A primeira coisa que você precisa fazer é instalar e ativar o plugin Duplicator no site que você deseja mover. Para mais detalhes, veja nosso guia passo a passo sobre como instalar um plugin do WordPress.
O Duplicator é o melhor plugin de migração do WordPress do mercado. Ele também vem com backups agendados automatizados, suporte a armazenamento em nuvem, restauração com 1 clique e migrações inteligentes.
Observação: O Duplicator também tem uma versão gratuita chamada Duplicator Lite. Ele pode ser usado para mover seu site, mas tem recursos limitados em comparação com a versão pro.
Depois de instalar e ativar o Duplicator, vá para a página Duplicator » Backups na sua área de administração do WordPress.
Em seguida, você precisa clicar no botão ‘Add New’ (Adicionar Novo) no canto superior esquerdo.
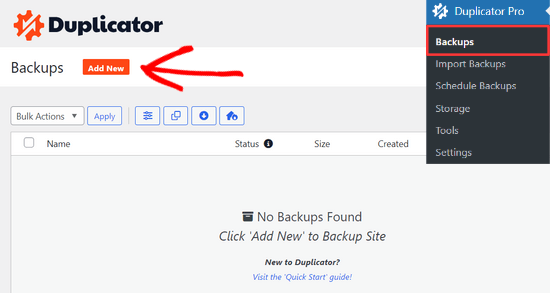
Isso iniciará o assistente de backup do Duplicator.
Na próxima tela, você pode inserir um nome para o seu backup ou usar as tags dinâmicas para criar automaticamente um formato de nome, como a data e o título do seu site.

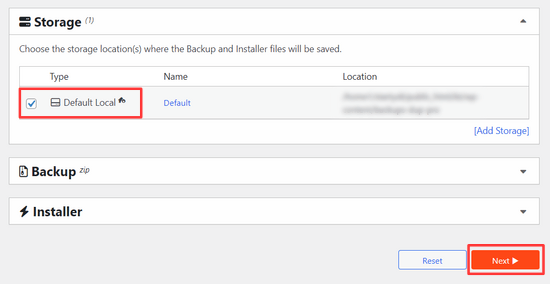
Em seguida, você pode expandir a seção ‘Storage’ (Armazenamento) para selecionar um local de armazenamento. Para este tutorial, usaremos o local padrão, mas você pode adicionar um novo local como Dropbox ou Google Drive clicando no link ‘Add Storage’ (Adicionar Armazenamento).
Simplesmente clique no botão ‘Next’ (Próximo) para continuar.
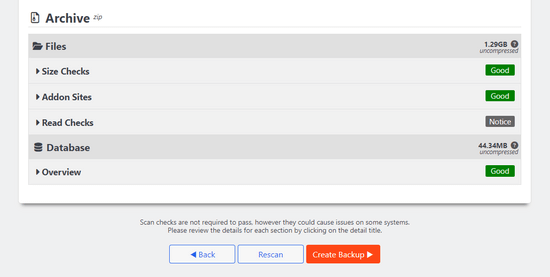
Em seguida, o Duplicator escaneará seu sistema para garantir que tudo esteja em ordem para preparar o pacote.
Certifique-se de que os resultados da sua varredura estejam corretos (tudo deve dizer “Bom”) e, em seguida, clique no botão ‘Criar Backup’.
O processo pode levar vários minutos para ser concluído, portanto, deixe a aba aberta enquanto o plugin faz seu trabalho.
Assim que o processo for concluído, você verá opções de download para o Instalador e o pacote Arquivo. Você precisa clicar no botão ‘Download’ e, em seguida, selecionar a opção ‘Ambos os Arquivos’.
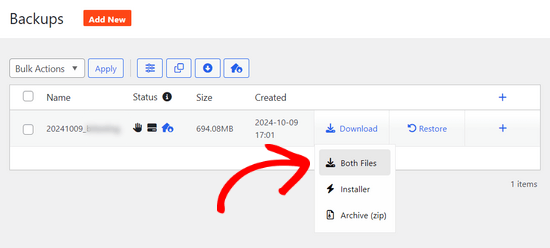
O arquivo de arquivo é uma cópia completa do seu site, e o arquivo instalador automatizará o processo de instalação para você.
ℹ️ Prefere não lidar com a migração sozinho? O Duplicator também oferece Serviços de Migração de WordPress especializados. Esta é uma solução totalmente feita para você, gerenciando o backup, a transferência e as verificações finais para uma migração tranquila e sem estresse, com zero complicação técnica.
Etapa 3: Importe seu site WordPress para o novo host
Agora que você baixou os arquivos de arquivo e instalador, o próximo passo é carregá-los para o seu novo host da web.
Você pode fazer isso conectando-se ao seu novo host da web usando FTP.
Se você nunca fez isso antes, confira nosso guia para iniciantes sobre como carregar arquivos via FTP para o WordPress.
Normalmente, você inseriria o nome de domínio do seu site como host ao conectar seu cliente FTP.
No entanto, como seu nome de domínio ainda aponta para o seu host antigo, você precisará se conectar inserindo o endereço IP do seu servidor ou o nome do host do servidor.
Você pode encontrar essas informações no painel de controle da sua conta de hospedagem.
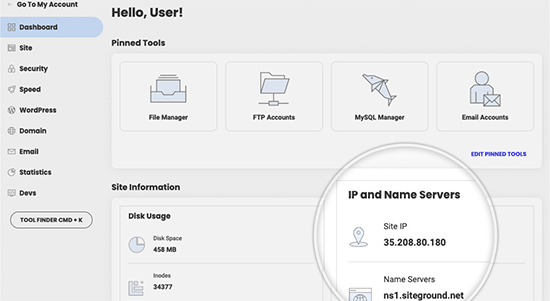
Se você não conseguir encontrar essas informações, poderá solicitar suporte à sua nova empresa de hospedagem da web, e eles o ajudarão.
Usando o cliente FTP, você precisa carregar o arquivo installer.php e o seu arquivo .zip de arquivo para o diretório raiz do seu site.
Geralmente, esta é a pasta /username/public_html/.
Novamente, se você não tiver certeza, pergunte à sua empresa de hospedagem da web.
Certifique-se de que seu diretório raiz esteja completamente vazio. Algumas empresas de hospedagem instalam o WordPress automaticamente quando você se cadastra.
Se você tem o WordPress instalado no seu diretório raiz, então você precisa excluir o WordPress primeiro.
Assim que isso for feito, você precisará fazer o upload do arquivo zip do arquivo e do arquivo installer.php para o diretório raiz do seu site.
Passo 4: Altere o Arquivo Hosts para Evitar Tempo de Inatividade
Assim que você fizer o upload de ambos os arquivos para seu novo host, você precisará acessar o arquivo installer.php em um navegador.
Normalmente, este arquivo pode ser acessado usando um URL como este:
http://www.example.com/installer.php
No entanto, este URL o levará ao seu antigo provedor de hospedagem e você receberá um erro 404. Isso ocorre porque o nome do seu domínio ainda aponta para o seu antigo provedor de hospedagem.
Normalmente, outros tutoriais podem dizer para você alterar seus nameservers de domínio e apontá-los para sua nova empresa de hospedagem, mas isso está errado.
Se você fizer isso agora, seus visitantes verão um site quebrado enquanto você o migra.
Mostraremos como você pode acessar temporariamente seu novo site em seu computador sem afetar seu site antigo.
Isso é feito com o arquivo hosts em seu computador.
O arquivo hosts pode ser usado para mapear nomes de domínio para endereços IP específicos. Em outras palavras, ele permite que você engane seu computador fazendo-o pensar que o site foi movido, mesmo que não tenha sido.
Vamos ver como adicionar uma entrada para o nome do seu domínio no arquivo hosts para que ele aponte para sua nova empresa de hospedagem.
Fazer essas alterações permitirá que você acesse os arquivos em seu novo host usando seu próprio nome de domínio, enquanto o resto do mundo ainda estará acessando seu site do host antigo. Isso garante 100% de tempo de atividade.
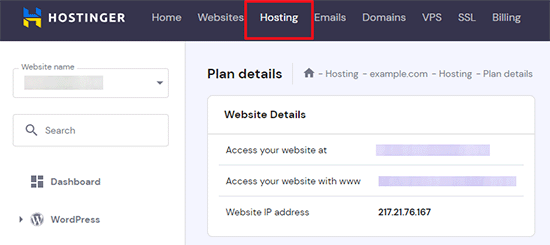
A primeira coisa que você precisa fazer é encontrar o endereço IP do seu novo servidor de hospedagem web.
Para encontrar isso, você precisa fazer login no seu painel cPanel e clicar no link expandir estatísticas na barra lateral esquerda. O endereço do seu servidor será listado como 'Endereço IP Compartilhado'.
Por exemplo, na Hostinger, você encontrará o endereço IP do seu servidor nos detalhes do seu plano de hospedagem.
Se você estiver usando um PC com Windows, precisará abrir o aplicativo Bloco de Notas com privilégios de administrador.
Simplesmente clique no botão ‘Iniciar’ e, em seguida, procure pelo aplicativo Bloco de Notas. Clique com o botão direito do mouse no ícone do aplicativo Bloco de Notas e selecione ‘Executar como administrador’.
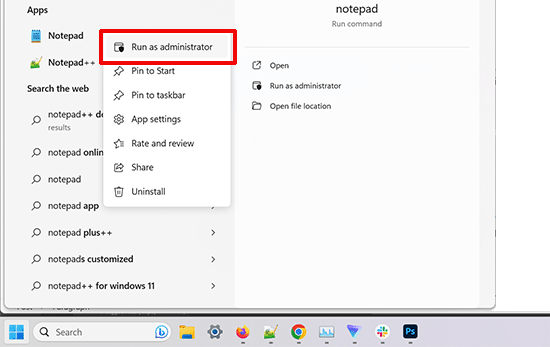
Um prompt UAC do Windows aparecerá, e você precisará clicar em ‘Sim’ para iniciar o Bloco de Notas com privilégios de administrador.
Na tela do Bloco de Notas, vá em Arquivo » Abrir e navegue até a pasta C:\Windows\System32\drivers\etc. A partir desta pasta, selecione o arquivo hosts e abra-o.
Se você estiver usando um Mac, precisará abrir o aplicativo Terminal e digitar este comando para editar o arquivo hosts:
sudo nano /private/etc/hosts
Tanto para usuários Windows quanto Mac, na parte inferior do arquivo hosts, você precisará inserir o endereço IP que copiou e, em seguida, inserir o nome do seu domínio. Assim:
192.168.1.22 www.example.com
Certifique-se de substituir o endereço IP pelo que você copiou do cPanel e example.com pelo nome do seu próprio domínio.
Assim que terminar, salve suas alterações.
Agora você pode acessar seus arquivos no novo host usando o nome do seu domínio em seu computador.
Importante: Não se esqueça de desfazer as alterações feitas no arquivo hosts após concluir a migração (etapa 6).
Etapa 5: Criando um Banco de Dados MySQL em seu Novo Host
Antes de executar o instalador no novo host, você precisará criar um banco de dados MySQL em sua nova conta de hospedagem. Se você já criou um banco de dados MySQL, pode pular para a próxima etapa.
Criando um Banco de Dados no cPanel
Acesse o painel cPanel da sua nova conta de hospedagem, role para baixo até a seção Bancos de Dados e clique no ícone ‘MySQL Databases’.
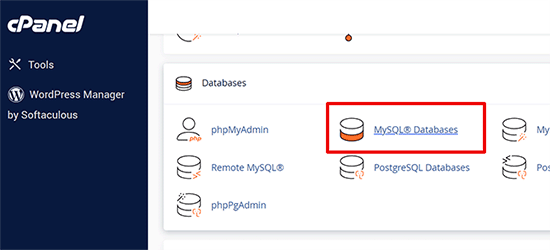
Você verá um campo para criar um novo banco de dados.
Digite um nome para o seu banco de dados e clique no botão ‘Criar Banco de Dados’.

Após criar o banco de dados MySQL, você precisa rolar para baixo até a seção Usuários MySQL.
Em seguida, forneça um nome de usuário e senha para seu novo usuário e clique no botão ‘Criar Usuário’.
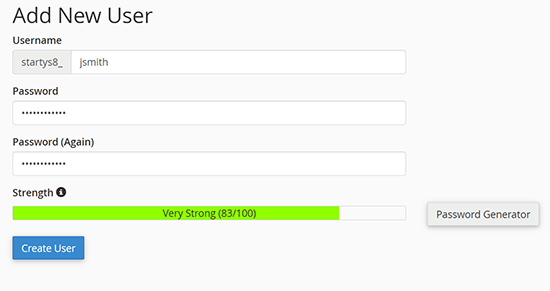
Depois disso, você precisa adicionar este usuário ao seu banco de dados. Isso dará ao nome de usuário que você acabou de criar todas as permissões para trabalhar nesse banco de dados.
Você pode fazer isso rolando para baixo até a seção ‘Adicionar Usuário a um Banco de Dados’. Simplesmente selecione o usuário do banco de dados que você criou no menu suspenso ao lado do usuário, em seguida, selecione o banco de dados e clique no botão ‘Adicionar’.
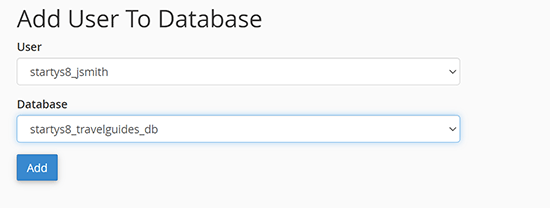
Seu banco de dados está pronto para ser usado com o WordPress. Certifique-se de anotar o nome do banco de dados, nome de usuário e senha. Você precisará dessas informações na próxima etapa.
Etapa 6: Inicie o Processo de Migração do Duplicator
Agora, estamos prontos para executar o instalador. Navegue até o seguinte endereço em sua janela do navegador, substituindo example.com pelo nome do seu domínio:
http://www.example.com/installer.php
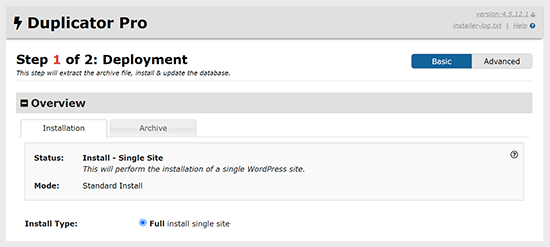
O instalador executará alguns testes e mostrará ‘Pass’ ao lado dos testes de arquivo e validação.
Você precisa marcar a caixa de seleção de termos e condições e continuar clicando no botão ‘Próximo’.
Agora, você será solicitado a inserir seu host MySQL, nome do banco de dados, nome de usuário e senha.
Seu host provavelmente será localhost. Depois disso, você inserirá os detalhes do banco de dados que criou na etapa anterior.
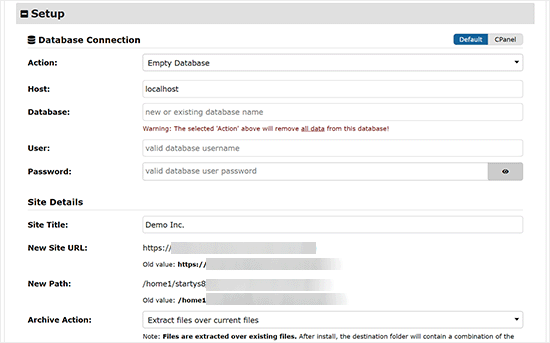
Em seguida, o Duplicator precisará verificar se ele pode se conectar ao banco de dados e se é capaz de executar a instalação.
Clique no botão ‘Validar’ na parte inferior para continuar.

Se o Duplicator conseguir se conectar, você verá os resultados dos testes como Pass.
Agora você pode marcar a caixa de seleção de termos e avisos e clicar no botão ‘Próximo’.
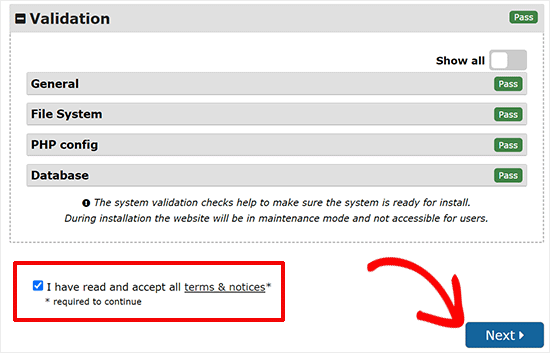
Clique no botão ‘Próximo’ para continuar.
O Duplicator importará agora seu banco de dados do WordPress do arquivo zip para o seu novo banco de dados.
Em seguida, ele pedirá para você atualizar o URL ou Caminho do site. Como você não está alterando os nomes de domínio, você NÃO precisa alterar nada aqui.
Simplesmente clique no botão ‘Next’ (Próximo) para continuar.
O Duplicator executará as etapas finais e mostrará o botão de login.
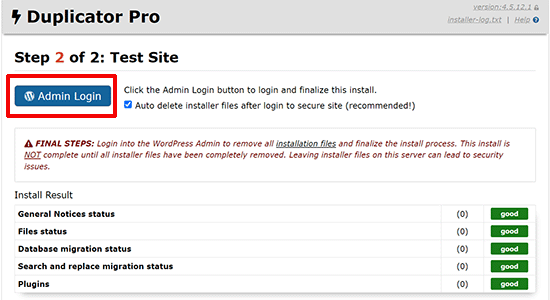
Agora você pode fazer login no seu site WordPress no novo host para garantir que tudo esteja funcionando como esperado.
Etapa 7: Atualize seus Servidores de Nome de Domínio (DNS)
Neste ponto, você criou uma cópia completa do seu banco de dados e arquivos WordPress no seu novo servidor de hospedagem, mas seu domínio ainda aponta para sua conta de hospedagem web antiga.
Para atualizar seu domínio, você precisa trocar seus servidores de nomes DNS. Isso garante que seus usuários sejam direcionados para o novo local do seu site quando digitarem seu domínio em seus navegadores.
Se você registrou seu domínio com seu provedor de hospedagem, é melhor transferir o domínio para um novo host.
Por outro lado, se você usar um registrador de domínio como Network Solutions ou GoDaddy, então você precisará atualizar seus nameservers.
Você precisará das informações dos servidores de nomes DNS do seu novo host web. Geralmente são alguns URLs que se parecem com isto:
ns1.hostname.comns2.hostname.com
Para fins deste guia, mostraremos como alterar os servidores de nomes DNS com o GoDaddy.
Para outros provedores de hospedagem, consulte nosso guia sobre alterar servidores de nomes de domínio.
Dependendo do seu registrador de domínio ou host web, as capturas de tela podem parecer diferentes. No entanto, o conceito básico é o mesmo.
Você precisa procurar a área de gerenciamento de domínio e, em seguida, procurar por nameservers. Se precisar de ajuda para atualizar seus nameservers, você pode perguntar à sua empresa de hospedagem de sites.
Para GoDaddy, você precisa fazer login na sua conta GoDaddy e, em seguida, clicar em ‘Domínios’.
Depois disso, você precisa clicar no botão ‘Gerenciar’ ao lado do nome de domínio que deseja alterar.

Vá para a seção ‘Configurações Adicionais’.
Em seguida, você precisará clicar em ‘Gerenciar DNS’ para continuar.
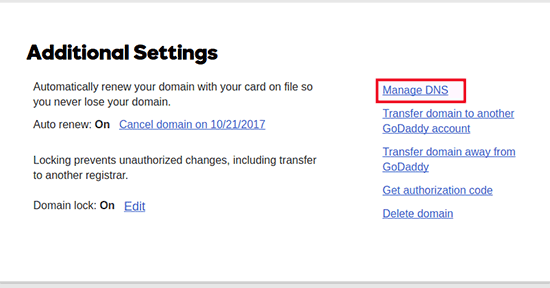
Em seguida, você precisa rolar para baixo até a seção ‘Nameservers’.
Aqui, clique no botão ‘Alterar’.
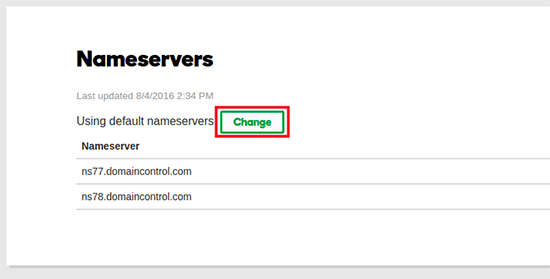
Primeiro, você precisará mudar o menu suspenso do tipo de nameserver de ‘Padrão’ para ‘Personalizado’.
Depois disso, você pode preencher as informações do seu novo provedor de hospedagem em Nameservers.
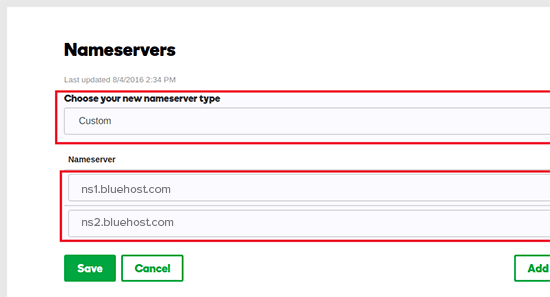
Não se esqueça de clicar no botão ‘Salvar’ para armazenar suas alterações.
Você alterou com sucesso os nameservers do seu domínio. As alterações de DNS podem levar de 4 a 48 horas para se propagarem para todos os usuários.
Como você tem o mesmo conteúdo em seu host antigo e no novo host, seus usuários não verão nenhuma diferença. Sua migração do WordPress será perfeita, sem tempo de inatividade.
Para garantir, recomendamos que você espere para cancelar sua conta de hospedagem antiga até 7 dias após a migração.
Perguntas Frequentes
Aqui estão algumas perguntas que muitos de nossos usuários fazem ao mover o WordPress de um host para outro.
1. Como faço para migrar meu site WordPress para outro host?
Você pode migrar seu site WordPress movendo seus arquivos e banco de dados do WordPress de seu host antigo para o novo provedor de hospedagem.
Algumas empresas de hospedagem oferecem serviços gratuitos de transferência de sites também, mas você precisará perguntar a elas. Alternativamente, você pode fazer isso sozinho transferindo arquivos usando um cliente FTP e importando o banco de dados via phpMyAdmin.
2. Posso migrar meu site WordPress para outro provedor de hospedagem?
Sim, você pode migrar seu site WordPress para outro provedor de hospedagem.
3. Posso me inscrever para a nova conta de hospedagem sem registrar um nome de domínio?
Sim, você pode absolutamente se inscrever para uma conta de hospedagem sem registrar um nome de domínio.
Nome de domínio e hospedagem são dois serviços diferentes, e você não precisa necessariamente registrar um nome de domínio ao se inscrever em um novo host. Para mais detalhes, consulte nosso guia sobre a diferença entre nome de domínio e hospedagem web.
Alguns provedores de hospedagem pedirão que você selecione um nome de domínio como primeiro passo ao comprar hospedagem. Eles também permitirão que você insira um nome de domínio se você já tiver um.
4. Preciso transferir meu nome de domínio para o novo host?
Não, você não precisa transferir seu nome de domínio para o novo host. No entanto, transferir seu nome de domínio para sua nova hospedagem facilitará a renovação e o gerenciamento sob o mesmo painel da sua nova conta de hospedagem.
Para mais informações sobre este tópico, consulte nosso guia definitivo sobre nomes de domínio e como eles funcionam.
5. Como corrijo o erro de estabelecimento de conexão com o banco de dados no Duplicator?
Se você estiver vendo um erro ao conectar ao banco de dados ou o erro de conexão com o banco de dados no Duplicator, então você provavelmente inseriu informações incorretas para sua conexão com o banco de dados.
Certifique-se de que o nome do seu banco de dados, nome de usuário MySQL e senha estejam corretos. Algumas empresas de hospedagem web não usam localhost como host para seus servidores MySQL. Se for esse o caso, você precisará pedir à equipe de suporte do seu host web para fornecer as informações corretas.
6. Como verifico se meu site está carregando do novo host?
Existem várias ferramentas online que permitem ver quem está hospedando um site. Depois de transferir seu site para o novo provedor, você pode usar qualquer uma dessas ferramentas, e elas mostrarão o nome da empresa de hospedagem de sites que está hospedando seu site.
Se não faz muito tempo que você migrou seu site e fez alterações no seu servidor de nomes de domínio (DNS), então é provável que seu site ainda carregue do seu antigo host. Alterações no nome de domínio podem levar até 48 horas para se propagarem completamente.
7. Preciso excluir algum arquivo ou dado do host antigo?
Ao trocar de provedores de hospedagem, recomendamos que você mantenha seu site antigo por pelo menos uma semana. Depois disso, você pode excluir os arquivos do seu antigo host web. Se você estiver cancelando sua conta, seu provedor de hospedagem excluirá todos os seus dados de acordo com a política deles.
8. Por quanto tempo devo manter minha conta ativa no host antigo?
Depois de migrar seu site para o novo host e se você não tiver nenhum outro site hospedado com seu antigo host web, você pode cancelar sua antiga conta de hospedagem web.
No entanto, em alguns casos, você pode já ter pago por hospedagem anual. Você deve verificar a política de reembolso deles para ver se você é elegível para algum reembolso no cancelamento.
9. Como mover um site WordPress com SSL/HTTPS?
Você precisará instalar um certificado SSL no seu novo provedor de hospedagem. Depois disso, você pode seguir os mesmos passos mencionados acima. Apenas certifique-se de usar HTTPS nos URLs, como https://exemplo.com
10. Bônus: Migração Gratuita do Site pelo Seu Novo Host
Se você está procurando trocar sua hospedagem web, mas os passos acima parecem muito complicados, então você pode escolher os seguintes provedores, e eles migrarão seu site para você.
SiteGround, Hostinger e WP Engine oferecem migração gratuita de sites para usuários do WPBeginner.
Esperamos que este tutorial tenha ajudado você a mover o WordPress para seu novo host sem qualquer tempo de inatividade. Você também pode querer ver nossas seleções especializadas de melhor hospedagem WordPress barata ou nosso guia sobre os erros mais comuns do WordPress e como corrigi-los, caso encontre algum problema com a migração do seu WordPress.
Se você gostou deste artigo, por favor, inscreva-se em nosso Canal do YouTube para tutoriais em vídeo do WordPress. Você também pode nos encontrar no Twitter e no Facebook.


Shane
Na próxima etapa, os usuários do Windows precisam ir em Programas » Todos os Programas » Acessórios, clicar com o botão direito em Bloco de Notas e selecionar Executar como administrador. Uma solicitação UAC do Windows aparecerá, e você precisará clicar em Sim para iniciar o Bloco de Notas com privilégios de administrador.
Na tela do Bloco de Notas, vá em Arquivo » Abrir e depois em C:\Windows\System32\drivers\etc. Selecione o arquivo hosts e abra-o.
Estou tendo problemas com esta etapa. Alguém pode me dar alguma luz?
WPBeginner Support
Olá Shane,
Você só precisa abrir o aplicativo Bloco de Notas como administrador para poder editar o arquivo hosts.
Admin
Shane
Ah, apenas o simples Wordpad da Microsoft e então "executar como administrador"?
É só isso que eu tenho que fazer?
Muhammed Shabeer
Obrigado pelo truque maravilhoso. Exatamente o truque foi destinado a migrar o Wordpress para um novo host, mas eu o usei para migrar do root para subdomínio/subpasta. Foi feito com sucesso com o plugin. Obrigado por compartilhar o truque.
Kenneth Aycox
Obrigado por um produto maravilhoso! funcionou perfeitamente.
James Crow
Brilhante! Muito obrigado, acabei de mover alguns sites sem nenhum problema.
Max
Infelizmente, isso também não funcionou para mim. Excluí todos os arquivos do site como instruído, fiz o upload para o arquivo installer.php e o pacote, mas quando acessei website.com/installer.php, recebi um erro 404: Not Found
A URL solicitada /installer.php não foi encontrada neste servidor.
Acho que é mais fácil transferir o site do jeito antigo, como outros mencionaram. Não há necessidade de scripts que podem não funcionar.
Max
Por favor, desconsidere meu comentário. Mais tarde, notei que a pasta raiz estava definida como httpdocs. Então, criei uma pasta, nomeei-a httpdocs e coloquei o pacote e o installer.php lá. Então, o website.com/installer.php funcionou sem problemas. Tudo correu muito bem depois disso.
Nandan Jha
Olá Max,
Na verdade, funcionou para mim no final. Imagino que você moveu o instalador e o arquivo para seu novo host, correto?
Por favor, procure o endereço IP no cpanel ou equivalente do novo host e tente acessar pelo endereço IP
http://ENDERECOIP/installer.phpKB
Parece um bom tutorial, mas não tive sorte com ele. Há também algumas etapas/telas na sequência do Duplicator que foram diferentes das minhas. O resultado final foi que recebi um erro 404 ao clicar em Login do Site – Login para finalizar a configuração na Etapa 4 de 4 da tela do Site de Teste. Isso difere substancialmente do acima. No canto superior direito, há um número de versão 1.2.30. Tenho quase certeza de que tenho a versão mais atualizada do plugin. Se eu usar o Gerenciador de Arquivos para ver o conteúdo de public_html, não vejo a lista normal de arquivos wp que acho que deveria ver, além de um diretório wp-snapshots, alguns arquivos web.config, alguns arquivos de instalador e o archive.zip… ah, e database.sql. Então, algo claramente deu errado, mas não consigo entender o quê. Então… aí está.
Stephen Duffield
Deixe-me adivinhar, você tentou migrar de um site Wordpress.com? Duplicator & Duplicator Pro não funcionam para sites wp.com. Nada funciona a menos que você use um dos dois sites de hospedagem que eles recomendam. O Duplicator, após muita ajuda, acabou me dando um reembolso.
Rob
Hey, Just wanted to say thanks for this tutorial. Went perfectly smoothly and would use this duplicator again
Nandan Jha
Ótimo artigo.
Amigos, como faço para que funcione para um Domínio Adicional. Contratei um novo plano com a GoDaddy e agora preciso mover meus sites para lá. Que entrada devo fazer no meu arquivo hosts para navegar até o install.php? Obrigado,
Nandan Jha
Eu tentei com meu Domínio Adicional. Funcionou para mim após algumas iterações. A coisa a cuidar é fornecer o nome de domínio correto na Etapa 3 (ou Etapa 4). O valor padrão que ele seleciona é ‘primarydomain.com/addondomain’. Exclua o valor padrão e coloque addondomain.com
Obrigado.
Sean
Recentemente mudei de provedor e meu plano de hospedagem original expirou. Não consegui criar um backup antes que expirasse. Tenho uma cópia local do meu site no meu computador (uso o Dreamweaver para FTP). Existe alguma maneira de recriar o site com os arquivos locais?
Obrigado.
Dave Porter
Oi Sean,
Tente usar o WayBack Machine – ele tira instantâneos de sites ao longo do tempo…
Você pode conseguir pegar o código-fonte, imagens, etc… e recriá-lo a partir disso. Já tive que fazer isso algumas vezes para clientes que vieram até mim depois de perderem contato com o desenvolvedor deles…
Espero que ajude, Dave
Miki
Olá,
Eu usei o Wayback Machine e consegui fazer uma cópia do meu site. Infelizmente, me envolvi com uma empresa duvidosa que tinha outros planos para o meu negócio (vendendo seus serviços no meu site) sem total transparência no início. Agora tenho a tarefa de encontrar um novo programador para terminar o site, embora seja em WordPress. Eu não tenho WordPress no momento, pois não estava desenvolvendo o site; no entanto, meu entendimento a partir dessas postagens é que, se eu mover o site para outro host, poderei acessar o WordPress. Isso está correto?
WPBeginner Support
Olá Miki,
Sim, você pode mover um site WordPress existente para qualquer outro provedor.
Michael
atualização…
funciona….
tenha cuidado com as informações do endereço IP…. você deve ler as informações com atenção…
Obrigado
Michael
Sem sorte..
Após alterar o arquivo host, meu navegador mostra a mensagem:
Este site não pode ser alcançado
example.com demorou muito para responder.
Pesquise no Google por inspirações de ideias
ERR_CONNECTION_TIMED_OUT
Eu fiz flush dns, net stop, dan net start e reiniciei meu computador & modem, ainda não está funcionando…
Navajo
Tenho outra pergunta:
No texto diz:
“Neste ponto, você criou uma cópia completa do seu banco de dados e arquivos do WordPress no seu novo servidor de hospedagem. Mas seu domínio ainda aponta para sua conta de hospedagem antiga.
Para atualizar seu domínio, você precisa alterar os nameservers do seu DNS. Isso garante que seus usuários sejam direcionados para o novo local do seu site quando digitarem seu domínio em seus navegadores.
Se você registrou seu domínio com seu provedor de hospedagem, então é melhor transferir o domínio para o novo host.”
Pensei que quando eu compro um novo espaço de hospedagem, eu também e imediatamente tenho que nomear um nome de domínio. Como em: comprar um espaço de hospedagem está sempre ligado à compra de um domínio. Então o novo endereço IP para o qual eu fiz o upload do meu site antigo, e que eu tenho que vincular ao meu nome de domínio antigo, já TEM um nome de domínio (recém-comprado).
Ou posso comprar um espaço de hospedagem, e obter um endereço IP que posso usar neste tutorial, sem que ele já tenha um nome de domínio?
Atenciosamente, Navajo
WPBeginner Support
Olá Navajo,
É um equívoco comum. Hospedagem e nome de domínio são dois serviços diferentes e você pode comprá-los de duas empresas diferentes. Na mesma página onde as empresas de hospedagem oferecem o registro de nome de domínio, elas também mostram outra opção para indicar que você já possui um nome de domínio e pode continuar sem registrar um novo.
Para mais detalhes, consulte nosso guia detalhado em O que é um nome de domínio e como os domínios funcionam?
Admin
Uldis
Isso é realmente profundo. Eu estava apenas coçando a cabeça sobre como migrar o site do cliente sem interrupção enquanto trocava os nameservers. Eternamente grato!
Shadat
Olá, eu enfrento o problema de falha na conexão do banco de dados.
você pode me ajudar, por favor? por favor
veja as capturas de tela
Dave Porter
Shadat – este é um artigo bastante antigo agora – e você não dá muitas informações – eu procuraria ajuda da sua empresa de hospedagem, ou entraria em um fórum de discussão do WordPress onde há pessoas ativas que podem te ajudar.
Mas se você estiver recebendo uma mensagem de erro de conexão com o banco de dados, geralmente é porque o nome/usuário ou senha do banco de dados está incorreto.
Eu tentaria uma das ferramentas de backup como o Duplicator e veria se isso funciona melhor para você.
Slade
Você configurou um novo banco de dados e usuário no seu novo host?
Você deve garantir que o nome do banco de dados, o usuário e a senha estejam todos corretos para o novo host.
Geralmente, um erro de conexão com o banco de dados é uma simples falha, como um erro de digitação ou algo parecido.
Michael Goriany
Thanks for this excellent tutorial
If I have well understood, the hosts file (Step 4) is providing for 100% uptime only for the Webmanager but not for the public
How can the DNS switchover time be shortened, or how can the downtime for the public be avoided ?
Slade
Editar o arquivo host permite que você veja seu site no seu novo host. Até que você atualize os nameservers do seu DNS, o público continuará acessando o site antigo.
O tempo que leva para as alterações de DNS serem atualizadas (propagadas) não é algo que possa ser controlado. No entanto, este guia está correto ao fornecer uma solução sem tempo de inatividade.
O que está acontecendo no backend que o público não vê é que seu site está sendo hospedado em dois locais. Os nameservers dizem ao público qual host eles estão visualizando. Durante o processo de atualização do DNS, os usuários ainda verão o site no host antigo até que a propagação seja concluída.
Assim que a alteração de DNS entrar oficialmente em vigor, o público estará visualizando o site no seu novo host.
Novamente, para fornecer a transferência sem tempo de inatividade, você precisaria alterar o arquivo host em sua máquina local (isso diz ao seu computador que você deseja visualizar o site no novo host).
Isso permite que você faça a instalação real do seu site no novo host.
Espero que ajude
Lydia
Tive que mover o site de um cliente de nosso subdomínio para a hospedagem deles durante a noite e isso REALMENTE salvou minha vida! Especialmente porque o domínio precisava ser redirecionado sem problemas! Só tive problemas com o FTP, não sei o que estava errado com todos os logins, mas não consegui fazer funcionar. Felizmente, meu provedor de hospedagem sempre tem um gerenciador de arquivos incrível no cpanel.
Então sim, quase sem falhas, estou apenas testando os formulários de contato agora, que parecem precisar do tempo de troca de DNS para funcionar corretamente...
E uma coisa a acrescentar, o Duplicator mudou a configuração do banco de dados SQL para a Etapa 2 em sua última versão, o que realmente me deixou um pouco apavorado.
Muito obrigado pelo tutorial detalhado e extremamente útil!
Kurt
Estou me preparando para seguir este tutorial. Uma pergunta: estou trocando de servidor, mas também estou trocando de nomes de domínio. Devo alterar o endereço do meu site nas configurações do administrador do WP antes de executar o duplicador ou depois? (A ordem importa?) Obrigado!
Johel Fernandez
Este tutorial funcionou perfeitamente em abril de 2017. Muito obrigado!
Ravijit
Olá,
Usei este plugin tantas vezes. Inclusive, uma vez usei para isso também. Eu realmente gosto deste plugin, mas o problema é que ele não extrai o pacote grande. Temos que descompactá-lo manualmente ou fazer o upload dos dados descompactados para o novo host.
Alguma solução para isso? Responda o mais rápido possível.
Archit
O Duplicator não funciona corretamente com o serviço de hospedagem Linux cPanel da GoDaddy. O script é encerrado mesmo que as configurações no php.ini sejam alteradas. Por favor, sugira o que fazer para fazer o Duplicator funcionar lá? Se não for possível, qual seria a melhor alternativa?
Hernan
Oi Archit,
Eu acabei de migrar um site para a GoDaddy e funcionou perfeitamente. Qual parte falhou?
abraço
Hernán
Susan Taunton
Este ótimo tutorial me guiou com sucesso através da minha primeira migração de um site Wordpress para um host diferente! Especialmente salvador foi a instrução sobre como mudar “sudo nano /private/etc/hosts” no Terminal – funcionou como um encanto. wpbeginner.com tem os tutoriais mais concisos, articulados e inteligentes, nos quais passei a depender.
Obrigado!!!!
Susan
Prinze
oi, por favor, tenho tido problemas para fazer upload do meu site para um novo servidor usando um cliente FTP, minha empresa de hospedagem tentou me dar tutoriais sobre como transferir sem resultado.
os tutoriais que estou recebendo do seu site são sobre o uso de um plugin duplicado. meu site está fora do ar, não consigo acessar meu wp-admin para instalar o plugin.
eu uso um plugin de backup quando meu site está no ar, então tenho um arquivo de backup do plugin que usei e também fiz um backup do cpanel do meu servidor antigo.
por favor, preciso de um tutorial sobre como fazer upload dos meus arquivos de backup para o meu novo servidor, qual é o melhor para fazer upload?
o backup do plugin ou o backup do cpanel...
Por favor, ajude!
Greg Draven
Qual plugin de backup você usou?
Ritadrik Chowdhury
Olá Senhor,
Estou travado na terceira parte, que é a parte de verificação. Mudei os permalinks e consigo ver o painel como de costume, mas o site não está funcionando. Sempre que clico em "TESTAR SITE", ele retorna o erro 404: Arquivo não encontrado. Tentei os documentos de ajuda deles. Fiz as alterações de costume, mas sem sucesso. Você pode me ajudar?
saurabh shelar
Olá Senhor. Eu sou saurabh da Índia. Eu amo seu site. Tenho um blog sobre revisão de software. E eu vi seus posts e observei que você editou imagens com efeito de microscópio. Isso é realmente fantástico. Você pode me dizer como você faz isso ou por favor, crie tutoriais para isso, por favor.
Obrigado.
WPBeginner Support
Olá Saurabh,
Obrigado pelas palavras gentis. Na verdade, existem muitos tutoriais já. Tente pesquisar como adicionar efeito de lupa no Photoshop.
Admin
Brad
Olá,
Tenho uma situação em que seria ideal ter o banco de dados em um servidor separado. Simplesmente porque o servidor do site atual não oferece mysql. Não posso mover o site (por ser de uma empresa)
Posso instalar o wordpress no hosting atual em um subdomínio e ter o banco de dados em outro host? Eu nunca usei nada além de “localhost” no arquivo wp-config? Obrigado!
Sachin
php não é suportado, eles estão dando essa razão?? o que fazer??
Samuel
Funciona em domínio adicional?
Porque existe este passo
“Certifique-se de que seu diretório raiz esteja completamente vazio. Se você tiver o WordPress instalado em seu diretório raiz, precisará excluir o WordPress primeiro”
Enquanto meu domínio principal já está funcionando
Cory
Este é um artigo bem elaborado, bom trabalho, pessoal!
Apenas como um aviso para os usuários que leem os comentários, qualquer comentário anterior a 06/12/2016 não se refere ao artigo acima ou ao plugin Duplicator especificamente.
Este artigo foi originalmente escrito usando o plugin Backup Buddy e, desde então, foi atualizado e reescrito usando o plugin Duplicator. Isso deve ajudar a esclarecer qualquer confusão, caso alguns dos comentários não façam muito sentido ou se refiram a tópicos não abordados no artigo.
Mark Rudder
Este é um excelente tutorial.
Eu também acredito que esta é a maneira mais fácil e rápida de migrar um site.
Migrar arquivos e tabelas de banco de dados com o phpMyAdmin é o caminho mais longo.
Usar o Duplicator ou o BackupBuddy dá muito menos trabalho e você está menos propenso a erros dessa forma.
Você precisa alterar o DNS, não importa qual método você escolha, então esse aspecto não pode ser contado em relação a qual método é o melhor.
Alterar as configurações de TTL para 1 hora (3600 segundos), como Dave Porter apontou, é a única peça que falta no quebra-cabeça. (mesmo que isso não seja essencial para o sucesso)
Augusto
Bom artigo, pessoal!
Sinto que o ponto mais crítico na migração de um site para outro host é o serviço de e-mail. Se a solução de e-mail padrão fornecida pelo host precisar ser substituída, muito trabalho virá.
Alguém quer compartilhar seu fluxo de trabalho para fazer esse tipo de coisa?
Obrigado!
Frans Kemper
olá,
Este procedimento também funcionaria para subdomínios?
Tenho um domínio adicional para transferir com cerca de 10 subdomínios relacionados.
Obrigado
Dave Porter
Alguns dias antes de mover um domínio, eu entro nas configurações de DNS e altero as configurações de TTL para 1 hora (3600 segundos), para que o site se mova rapidamente (e faço isso durante a noite – para que a nova localização seja exibida para todos pela manhã)
(Eu esperava que isso fosse mencionado no artigo quando vi o título!)
E para responder à pergunta do Dave, você pode ter quantas entradas quiser no seu arquivo Hosts – eu tenho uma conta de revendedor com minha empresa de hospedagem e frequentemente trabalho em 2 ou mais sites que estão localizados em um servidor diferente. Você não pode especificar um subdiretório na entrada – a única entrada apontará para todos os locais desse domínio – para fazer o que você quer, é melhor usar subdomínios – então, por exemplo, exemplo.com é o local principal, então você pode ter play1.exemplo.com como subdomínios que terão sua própria entrada hosts.
Harindepreet singh
Eu acho que você deveria fazer um vídeo ou anexar capturas de tela
David no Mississippi
Outro artigo – diretamente relacionado a este, mas suficientemente diferente para justificar seu próprio artigo separado – seria “Substituindo um Site Legado por um Site WordPress Totalmente Desenvolvido”.
Isso já aconteceu comigo várias vezes. Tenho clientes com sites mais antigos, do tipo legado (não WordPress), e eles me pedem para converter seus sites para WordPress.
Eu tenho dois métodos que uso para fazer isso, e um deles envolve construir o site WordPress novinho em folha em uma URL de desenvolvimento temporária. Quando estiver pronto, preciso transferi-lo para a URL existente do cliente.
Em outras palavras, eu o desenvolvo em DesenvolvimentoSite, e quando estiver pronto, eu o movo para SiteLegadoExistente
Eu acho que seria mais fácil fazer isso do que o procedimento descrito no seu artigo acima, mas ainda assim seria útil se você fizesse um artigo sobre este tipo de migração.
Obrigado.
Dave
Corrijam-me se estiver a perder alguma coisa, mas esta 'alteração do arquivo hosts' só funcionará se tiver apenas um site no seu plano nesse novo endereço IP. Tenho vários sites de baixo uso hospedados num único plano. Eles estão em subdiretórios sob phulic_html.
Então, fazer isto:
192.168.1.22 http://www.example.com
no arquivo hosts não especificará qual dos seus 5 sites ele deve apontar. E parece que a única coisa que você pode especificar no arquivo hosts é um endereço IP e uma URL.
Você não pode fazer algo como isto:
192.168.1.22/sitea http://www.example.com
Estou errado?
Felipe
Acho que isto está correto, não funcionará para domínios partilhados.
Está melhor explicado aqui: a resposta votada diz "Se tiver hospedagem partilhada, isto tornará o seu site inacessível por IP direto. Num ambiente de hospedagem partilhada, o host (GoDaddy) terá vários sites no mesmo endereço IP. Quando um navegador solicita um site, o servidor depende do nome do domínio para determinar qual dos muitos sites servir. Sem um nome de domínio, o servidor não tem como saber o que o navegador realmente quer, então você não obtém o seu site. Para evitar esta situação, você precisará que um host lhe dê o uso exclusivo de um endereço IP."
Acho que isto deveria ser destacado no artigo.
WPBeginner Support
Uma vez que tenha adicionado o seu nome de domínio ao seu novo host, o seu servidor web saberá que está a hospedar o nome de domínio example.com e o seu diretório raiz (Não importa se também está a hospedar outros domínios). No entanto, os servidores DNS levam tempo a propagar, então em vez de enviar o seu pedido para o seu novo servidor web, eles enviarão os utilizadores para o local antigo por um tempo. O arquivo hosts permite que envie o seu pedido diretamente para o novo servidor. Espero que isto esclareça a confusão.
Admin
Matt Davis
Corrija-me se estiver errado, mas acredito que você pode digitar (diretamente na barra de endereço do navegador) o endereço IP seguido por uma barra (/) e, em seguida, o subdiretório do site que você está tentando acessar. Eu evitaria alterar o arquivo hosts completamente. A maioria das empresas de hospedagem que usei também geralmente atribui URLs temporárias a cada novo site, então, se for esse o caso, você pode usá-lo em vez do IP ou mexer no arquivo hosts.
Niko
Isso está correto, MATT. Usar temporariamente o endereço IP em vez de alterar o arquivo hosts parece uma abordagem melhor. No entanto, ambos funcionam bem.
Vyse
olá. bom artigo, mas e o multisite do wp?
Tanisia
Tentei por quatro horas fazer com que estas instruções funcionassem. O resultado? Agora não consigo acessar meu site no meu antigo host. Tentei seguir as instruções deste artigo de 2 anos atrás (haverá uma atualização, já que o BackupBuddy evoluiu?) e agora tudo está uma bagunça.
Usei o FTP para fazer o upload dos arquivos e editei o arquivo hosts conforme instruído, mas o script PHP do ImportBuddy não roda. Ele apenas me mostra o código. Tentei entrar em contato com a Bluehost para obter assistência, e eles não ajudaram. Então, tentei redefinir todas as minhas outras configurações para onde estavam antes de começar essa odisseia, e agora não consigo ver meu site de forma alguma. Nem o painel de administração, nada.
WPBeginner Support
Tanisia, por favor, consulte nosso guia sobre o que fazer quando você está bloqueado da área de administração do WordPress (wp-admin).
Admin
Tanisia
Voltei para meu antigo provedor – meus servidores precisaram se propagar novamente a partir do Bluehost, e isso levou mais tempo do que eu esperava. Ainda estou com o BackupBuddy não funcionando como deveria. Novamente, você tem instruções atualizadas de 2014, já que houve várias atualizações para o BackupBuddy desde que isso foi escrito? Quando fiz a atualização do Bloco de Notas no Windows 10, ele parecia diferente do que foi descrito aqui, então não pude ter certeza se esse truque funcionou.
Obrigado por responder.
Fahim
Se fosse um domínio principal, posso seguir este processo? Preciso mover e esse domínio é o domínio principal/primário, como posso mover, você pode me ajudar?
Mark
Fiquei preso na etapa 4, posso simplesmente adicionar um domínio e alterar o DNS no novo host? Depois disso, C:\Windows\System32\drivers\etc., não há nada no meu etc, nada como o arquivo hosts, aliás, ótimo tutorial fácil de seguir, obrigado
Jacob
Eu esperava que houvesse uma maneira mais fácil de fazer isso com um serviço de terceiros, mas não vou gastar 80 dólares apenas para fazer isso.
Ash
As etapas do BackupBuddy na nova versão mudaram bastante. Nada a temer, no entanto. Consegui migrar com sucesso de uma instância t1.micro na AWS para uma t2.small. Até agora, tudo bem.
David
Algumas perguntas para você:
1. Não existe uma maneira SIMPLES de fazer backup de um site (temas, temas filhos, plugins e dados de postagens) e depois restaurá-lo em outro site?
Deveria ser tão simples quanto (a) Fazer backup para (Dropbox mysite.zip), e depois (b) Restaurar de (Dropbox mysite.zip).
2. É possível, talvez até FÁCIL, desenvolver o site de um cliente no seu servidor de desenvolvimento e depois usar o Backup Buddy (ou algum outro programa de backup/restauração) para migrá-lo para o site do cliente?
3. O Backup Buddy, ou qualquer outro programa de backup/restauração que você conheça, oferece a capacidade de restaurar em uma instalação WP existente? Em outras palavras, você pode configurá-lo para restaurar tudo, exceto os arquivos principais do WP?
Obrigado por este artigo.
David no Mississippi
WPBeginner Support
Na verdade, no artigo mostramos como o BackupBuddy faz exatamente o que você está pedindo. Você simplesmente faz backup do seu site, baixa um arquivo de arquivo e um arquivo importador. Carregue esses arquivos para o novo local e execute o script. Espero que isso ajude.
Admin
Ash
@David, com o backupbuddy você pode escolher quais arquivos excluir durante o backup. Assim, você pode excluir os arquivos principais do WP.
Robert
oi pessoal,
Um amigo acabou de criar um novo site em WordPress para mim e o enviou para minha conta de hospedagem. Agora, quero mudar o domínio e a conta de hospedagem e quero enviar o site para a nova conta de hospedagem.
Meu amigo me enviou o arquivo com todos os arquivos do site, incluindo o banco de dados. Como é possível enviar o site para meu novo host?
Agradeço sua resposta.
obrigado
Ricardo Clarke
Na verdade, acabei de passar por esse processo ontem e preciso transferir outro site hoje. Este é, sem dúvida, o guia mais completo que já vi. O prazo de 4 a 48 horas realmente ajudou, pois pensei que algo tinha dado errado, mas a transferência apenas precisou de tempo para se propagar pela internet.
Equipe WPBeginner
Assim que você descobrir que seu novo domínio recuperou as posições de busca do seu site antigo. Esperamos que você tenha configurado redirecionamentos 301 no domínio antigo, caso contrário, os mecanismos de busca não saberiam que seu conteúdo antigo foi movido permanentemente para o novo domínio.
Equipe WPBeginner
Qual é a maneira mais rápida de fazer isso?
Sebastien
Olá, obrigado pelo seu tutorial, aqui está outra maneira de fazer isso... de graça.
1. Ferramentas > exportar posts e páginas do painel de administração. Se você também precisar do DB, exporte as tabelas do phpMyAdmin do banco de dados. Importe-as no novo banco de dados. Verifique se a extensão das tabelas é a mesma (por exemplo, _wp)
2. edite seu arquivo de configuração de host virtual, adicione o que segue entre seu server {}
permitir seu_ip_público;
negar tudo;
3. Acesse o site pelo seu IP. (certifique-se de definir o IP do seu novo servidor em vez da URL em phpmyadmin > wp_options > siteurl e home options)
4. Ferramentas > importar posts e páginas
5. Altere seus registros DNS no host antigo.
6. Pronto. Use outro plugin como UpdraftPlus para fazer backup gratuitamente.
Ash
Tentei o UpdraftPlus. Não fez nada.
Rachel Charles
Limpo e moderno e fácil de modificar!
Kate_H
Ótimo guia. Posso confirmar que estes passos funcionam brilhantemente, pois recentemente movi um site WP de 5 anos de um domínio para outro domínio e troquei de provedores de hospedagem também.
A única diferença que fiz foi redirecionar o site antigo para o novo site via .htaccess, pois não estava migrando o nome de domínio antigo na época.
Por curiosidade, quanto tempo você esperaria antes de excluir todo o conteúdo antigo do site antigo e configurar um redirecionamento de URL permanente através do seu registrador?
zimbrul
Eu realmente odeio o Backup Buddy. Em 80% dos casos, tive erros e o suporte deles não é muito bom. Eu prefiro mover um site com o plugin gratuito Duplicator para WordPress
Equipe WPBeginner
Zimbrul, o Duplicator também é um bom plugin. No entanto, já movemos muitos sites WordPress usando o BackupBuddy e ele sempre funcionou perfeitamente para nós. É por isso que o recomendamos.
Jim
Concordo totalmente. O Duplicator nunca me deixou na mão e já fiz backup e instalei muitos sites que não consigo contar. Não há necessidade de um plugin pago.
Dennis Does Cricket
Essa é uma maneira ridiculamente longa de fazer isso.
Jonathan
Eu estava procurando por isso. Isso já assume conhecimento de FTP, etc., então por que não simplesmente:
1. Copie todos os arquivos (baixe localmente, faça upload para o novo servidor).
2. Exporte o banco de dados (você pode usar a versão gratuita do Migrate DB se não conseguir acessar o phpmyadmin do host antigo ou algo assim). Além disso, se você estiver mudando de um domínio diferente, ele substitui os URLs, etc.
3. Crie um novo banco de dados no seu novo host, importe o banco de dados.
4. Transfira o domínio.
Mesmo resultado, sem mexer com scripts de instalação e similares.
Matt Davis
É assim que eu faria.. Além disso, você também precisaria editar seu arquivo wp-config.php com as novas informações do banco de dados (especificamente a entrada do host do banco de dados, pois acredito que importar o banco de dados antigo criará o mesmo nome de banco de dados, usuário e senha no novo). Além disso, eu evitaria editar seu arquivo hosts e, em vez disso, usaria o endereço IP diretamente na barra de endereço do seu navegador, seguido pelo nome do seu subdiretório (se necessário) ou usaria o URL temporário que a maioria dos hosts fornece quando uma nova conta é configurada.
As etapas neste artigo são boas para alguém que não quer mexer nos arquivos de configuração em suas pastas do WordPress, ou que deseja uma solução completa que obtenha seu site e banco de dados em uma única etapa.