
Muitos usuários do WordPress preferem trabalhar em seus sites usando um servidor local em seus computadores. Isso permite que você trabalhe em seu site de forma privada antes de disponibilizar as alterações on-line.
Eventualmente, você precisará movê-lo para um servidor ativo para torná-lo acessível aos visitantes on-line. Essa transição é crucial para garantir que seu website funcione adequadamente no site ativo.
Como trabalhamos em muitos sites locais, tivemos que aprender a maneira mais fácil de transferir conteúdo para sites ativos.
Neste artigo, forneceremos instruções passo a passo sobre como mover o WordPress de um servidor local para um site ativo.
")
Por que mover o WordPress de um servidor local para um site ativo?
Criar seu blog WordPress em um servidor local é uma maneira segura de testar as alterações em seu site sem afetar os visitantes.
Quando você terminar de aperfeiçoar seu site, a próxima etapa é passar do servidor local para um site ativo.
Vamos mostrar duas maneiras de mover seu site de um servidor local para um site ativo.
O primeiro método usa um plug-in de migração do WordPress e é recomendado para iniciantes.
No segundo método, mostraremos como mover manualmente o WordPress de um servidor local para um site ativo.
Você pode escolher o método que funciona melhor para você:
Antes de migrar seu site WordPress
Para migrar o WordPress de um servidor local para um servidor ativo, você precisa de alguns fatores.
Primeiro, presumimos que você tenha um site WordPress em execução em um servidor local (também chamado de localhost) no seu computador e que tenha acesso total a ele.
Em seguida, você precisará ter um nome de domínio e uma hospedagem na Web.
Já ouvimos inúmeras histórias de iniciantes que começaram com provedores de hospedagem na Web ruins ou gratuitos e se arrependeram. Em nossa experiência, a escolha do provedor de hospedagem correto é fundamental para o sucesso de qualquer site.
Para facilitar sua decisão, recomendamos o uso da Bluehost. Eles são uma empresa de hospedagem WordPress oficialmente recomendada e estão oferecendo aos usuários do WPBeginner um desconto exclusivo + domínio e SSL gratuitos.
Basicamente, você pode começar por apenas US$ 1,99 por mês.
Se você quiser uma ótima alternativa ao Bluehost, pode dar uma olhada no Hostinger. Eles também estão oferecendo um desconto exclusivo para usuários do WPBeginner com um nome de domínio gratuito.
Se você puder pagar um pouco mais, dê uma olhada no SiteGround. Eles também têm uma oferta especial para os leitores do WPBeginner.
Se precisar de ajuda para configurar seu site, siga nosso guia passo a passo sobre como criar um site.
Por fim, você precisará de um programa de FTP e saberá como usar o FTP para fazer upload do site do servidor local para o site ativo.
Pronto? Vamos começar a migrar seu site WordPress.
Tutorial em vídeo
Se você preferir instruções por escrito, continue lendo.
Método 1: Transferir o WordPress do servidor local para o site ativo usando um plug-in de migração (recomendado)
Esse método é mais fácil e recomendado para iniciantes. Usaremos um plugin de migração do WordPress para mover o WordPress do host local para um site ativo.
Etapa 1: Instalar e configurar o plug-in do Duplicator
Primeiro, você precisa instalar e ativar o plug-in do Duplicator em seu site local. Para obter mais detalhes, consulte nosso guia passo a passo sobre como instalar um plug-in do WordPress.
Dica profissional: Há também uma versão profissional do Duplicator que oferece backups seguros, armazenamento em nuvem, restauração fácil do site e muito mais.
Após a ativação, você precisa ir para a página Duplicator ” Backups e clicar no botão “Create New” (Criar novo).
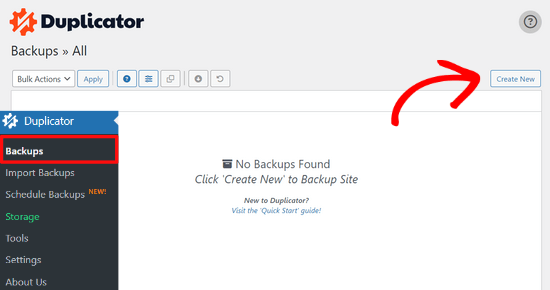
Isso o levará a uma tela na qual você poderá dar um nome ao backup.
Em seguida, clique no botão “Next” (Avançar).
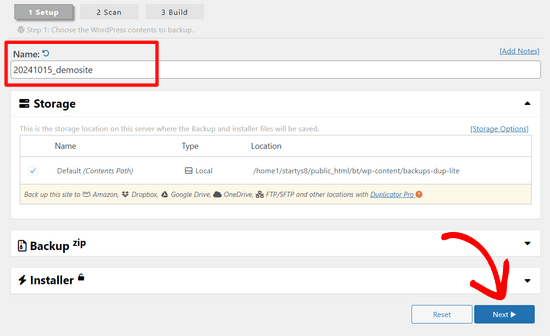
O Duplicator agora executará alguns testes para verificar se tudo está em ordem.
Se todos os itens estiverem marcados como “Bom”, clique no botão “Construir”.

Esse processo pode levar alguns minutos, dependendo do tamanho de seu site. Você deve deixar essa guia aberta até que seja concluída.
Quando terminar, você verá opções de download para os pacotes “Installer” e “Archive”. Você precisa clicar no botão “Download Both Files” (Baixar ambos os arquivos) para baixar os dois arquivos para o seu computador.

O arquivo “Archive” é uma cópia completa do seu site WordPress. Ele inclui todos os arquivos principais do WordPress, bem como suas imagens, uploads, temas, plug-ins e um backup do seu banco de dados do WordPress.
O arquivo “Installer” é um script que automatizará todo o processo de migração, descompactando o arquivo que contém seu site.
Etapa 2: Crie um banco de dados para seu site WordPress ativo
Antes de executar o instalador ou carregar o site do WordPress do host local para o servidor de hospedagem, é necessário criar um banco de dados MySQL para o novo site ativo.
Se você já tiver criado um banco de dados MySQL, poderá pular esta etapa.
Para criar um banco de dados, você precisa acessar o painel do cPanel da sua conta de hospedagem. Em seguida, localize a seção “Databases” (Bancos de dados) e clique no ícone “MySQL Database Wizard” (Assistente de banco de dados MySQL).

Na tela seguinte, há um campo para criar um novo banco de dados.
Basta fornecer um nome para o seu banco de dados e clicar no botão “Create Database” (Criar banco de dados).

O cPanel criará um novo banco de dados para você.
Depois disso, é necessário inserir um nome de usuário e uma senha para o novo usuário e, em seguida, clicar no botão “Create User” (Criar usuário).

Em seguida, você precisa adicionar o usuário que acabou de criar ao banco de dados.
Primeiro, clique na caixa de seleção “All Privileges” (Todos os privilégios).

Em seguida, role a tela para baixo e clique no botão “Make Changes” (Fazer alterações) para salvar suas alterações.
Seu banco de dados está pronto para ser usado com seu site WordPress. Não se esqueça de anotar o nome do banco de dados, o nome de usuário e a senha. Você precisará dessas informações na próxima etapa.
Etapa 3: Fazer upload de arquivos do servidor local para o site do WordPress ativo
Agora, você precisa carregar o arquivo e os arquivos do instalador do seu site local para a sua conta de hospedagem.
Primeiro, conecte-se ao seu site ativo usando um cliente FTP. Uma vez conectado, certifique-se de que o diretório raiz de seu site esteja completamente vazio.
Normalmente, o diretório raiz é a pasta /home/public_html/.
Algumas empresas de hospedagem WordPress instalam automaticamente o WordPress quando você se inscreve. Se você tiver arquivos do WordPress lá, precisará excluí-los.
Depois disso, você pode carregar os arquivos archive.zip e installer.php do Duplicator para seu diretório raiz vazio.

Etapa 4: Execução do script de migração
Depois de fazer o upload dos arquivos de migração, você precisa visitar o seguinte URL no navegador:
http://example.com/installer.php
Não se esqueça de substituir “example.com” por seu próprio nome de domínio.
Isso iniciará o assistente de migração do Duplicator.
O instalador executará alguns testes e inicializará o script.

Na seção Setup (Configuração), você será solicitado a inserir o host do MySQL, o nome do banco de dados, o nome de usuário e a senha.
Seu host provavelmente será um host local. Depois disso, você digitará os detalhes do banco de dados que criou na etapa anterior.
Em seguida, clique no botão “Validate” (Validar) para garantir que os detalhes inseridos estejam corretos.

Depois disso, clique no botão “Next” (Avançar) para continuar.
O Duplicator agora importará o backup do banco de dados do WordPress do arquivo para o novo banco de dados.
Ele também atualizará os URLs que apontam para o site local e seu novo site ativo.
Agora você pode clicar no botão “Admin Login” para entrar na área de administração do WordPress do seu site ativo.

Quando você fizer login no site ativo, o Duplicator limpará automaticamente os arquivos de instalação.
Isso é tudo. Você transferiu com êxito o WordPress do servidor local para o site ativo.
Método 2: Transferir manualmente o WordPress do servidor local para o site ativo
Neste método, mostraremos como mover manualmente o WordPress do servidor local para seu site ativo. Ele será útil se o primeiro método não funcionar ou se você preferir fazer isso manualmente.
Etapa 1: Exportar o banco de dados local do WordPress
A primeira coisa que você precisa fazer é exportar seu banco de dados local do WordPress. Usaremos o phpMyAdmin para fazer isso.
Se não estiver familiarizado com ele, talvez queira dar uma olhada em nosso guia sobre gerenciamento de banco de dados do WordPress usando o phpMyAdmin.
Basta acessar http://localhost/phpmyadmin/ e clicar em seu banco de dados do WordPress. Em seguida, clique no botão “Export” na barra de menu superior.

Na opção “Export method:” (Método de exportação), você pode escolher “Quick” (Rápido) ou “Custom” (Personalizado). A opção Personalizada lhe dará mais opções para exportar seu banco de dados.
Mas recomendamos escolher “Quick” (Rápido) e clicar no botão “Go” (Ir) para fazer o download do banco de dados.

Etapa 2: Faça upload dos arquivos do WordPress para o site ativo
Agora, precisaremos mover todos os arquivos do seu site para o site ativo.
Para começar, abra seu cliente FTP e conecte-se à sua conta de hospedagem na Web.
Depois de se conectar ao seu site ativo, certifique-se de carregar os arquivos no diretório correto. Por exemplo, se você quiser que o site seja hospedado em “yoursite.com”, deverá carregar todos os arquivos no diretório public_html.
Agora, selecione seus arquivos locais do WordPress e carregue-os no servidor ativo.

Etapa 3: Crie um banco de dados MySQL em seu site ativo
Enquanto o cliente FTP estiver carregando os arquivos do WordPress, você poderá começar a importar o banco de dados para o servidor ativo.
A maioria dos provedores de hospedagem WordPress oferece o cPanel para gerenciar sua conta de hospedagem, portanto, mostraremos como criar um banco de dados usando o cPanel.
Primeiro, é necessário fazer login no painel do cPanel e clicar no ícone “MySQL Database Wizard” (Assistente de banco de dados MySQL), que pode ser encontrado na seção “Databases” (Bancos de dados).

Na tela seguinte, você pode criar um novo banco de dados.
Você precisa fornecer um nome para o banco de dados e, em seguida, clicar em “Create Database” (Criar banco de dados).

O cPanel criará automaticamente um novo banco de dados para você.
Em seguida, é necessário inserir um nome de usuário e uma senha para o novo usuário e clicar em “Create User” (Criar usuário).

Depois disso, você precisa adicionar o usuário que acabou de criar ao banco de dados.
Primeiro, marque a caixa de seleção “All Privileges” (Todos os privilégios).

Em seguida, role a tela para baixo e clique em “Make Changes” (Fazer alterações) para salvar suas alterações.
Você criou com sucesso um novo banco de dados para seu site WordPress ativo.
Etapa 4: Importar o banco de dados do WordPress para o site ativo
A próxima etapa do processo é importar seu banco de dados do WordPress.
Vá para o painel do cPanel, role para baixo até a seção “Databases” (Bancos de dados) e clique em “phpMyAdmin”.

Isso o levará ao phpMyAdmin, onde você deverá clicar no banco de dados que acabou de criar acima. O phpMyAdmin mostrará seu novo banco de dados sem tabelas.
Em seguida, clique na guia “Import” (Importar) no menu superior. Na página de importação, clique no botão “Choose File” (Escolher arquivo) e selecione o arquivo de banco de dados do site local que você salvou na primeira etapa.

Depois disso, clique no botão “Go” (Ir) na parte inferior da página. Seu banco de dados será importado automaticamente para o phpMyadmin.
Etapa 5: Alterar o URL do site
Agora, você precisa alterar o URL do site no banco de dados para que ele se conecte ao seu site WordPress ativo.
No phpMyAdmin, procure a tabela wp_options em seu banco de dados que você acabou de importar acima.
Se você alterou o prefixo do banco de dados, em vez de wp_options, pode ser {new_prefix}_options.
Em seguida, clique no botão “Browse” (Procurar) ao lado de wp_options. Ou clique no link na barra lateral para abrir a página que tem uma lista de campos na tabela wp_options.

Em seguida, na coluna options_name, você precisa procurar a opção siteurl.
Em seguida, clique no ícone “Editar”.

Isso abre uma janela na qual você pode editar o campo.
Na caixa de entrada option_value, você verá o URL da sua instalação local, que será algo como http://localhost/test.
Você precisa inserir o URL do novo site nesse campo, por exemplo: https://www.wpbeginner.com.
Em seguida, você pode salvar o campo clicando no botão “Go” (Ir).

Em seguida, você precisa seguir as mesmas etapas descritas acima para o nome da opção home. O menu wp_options pode ter algumas páginas. Normalmente, a opção home estará na segunda página.
Em seguida, atualize o URL da página inicial para que ele seja igual ao URL do site ativo.
Etapa 6: Configure seu site ativo
Agora que você importou o banco de dados e fez o upload do conteúdo, é hora de configurar o WordPress.
Nesse momento, seu site deve estar exibindo o erro“Erro ao estabelecer uma conexão com o banco de dados“.
Para corrigir isso, conecte-se ao seu site usando um cliente FTP e abra o arquivo wp-config.php.
Você procurará as seguintes linhas de código:
1 2 3 4 5 6 7 8 9 | // ** MySQL settings - You can get this info from your web host ** ///** The name of the database for WordPress */define( 'DB_NAME', 'database_name_here' );/** MySQL database username */define( 'DB_USER', 'username_here' );/** MySQL database password */define( 'DB_PASSWORD', 'password_here' );/** MySQL hostname */define( 'DB_HOST', 'localhost' ); |
Você precisará fornecer o nome do banco de dados, o nome de usuário e a senha que criou anteriormente.
Em seguida, salve o arquivo wp-config.php e carregue-o novamente no servidor de hospedagem do WordPress.
Agora, quando você acessar seu site, ele deverá estar ativo.
Depois disso, você precisa fazer login no painel de administração do WordPress e ir para Configurações ” Geral. Em seguida, sem alterar nada, role até a parte inferior e clique no botão “Salvar alterações”.

Isso garantirá que o URL do seu site seja corrigido em qualquer outro lugar que seja necessário.
Depois de fazer isso, vá para Configurações ” Permalinks, role para baixo e clique em “Salvar alterações” para garantir que todos os links de postagem estejam funcionando bem.

Etapa 7: Corrigir imagens e links quebrados atualizando os caminhos
Sempre que estiver movendo um site do WordPress de um domínio para outro ou de um servidor local para um site ativo, você se deparará com links quebrados e imagens ausentes.
Mostraremos duas maneiras de atualizar URLs. Você pode escolher a que funciona melhor para você.
1. Atualizar URLs usando o plugin Search & Replace Everything (recomendado)
A maneira mais segura de corrigir isso é usar o Search & Replace Everything. Ele é um poderoso plug-in do WordPress que permite executar facilmente tarefas de atualização em massa em seu site sem escrever consultas complexas ao banco de dados.
Primeiro, você precisa instalar e ativar o plug-in Search & Replace Everything.
Após a ativação, vá para a página Tools ” WP Search & Replace.

A partir daí, você precisa inserir o URL do site local no campo “Search for” (Pesquisar por) e o URL do site ativo no campo “Replace with” (Substituir por).
Role um pouco a tela e clique em “Select All” (Selecionar tudo) abaixo das tabelas. Isso garante que o plug-in procurará o URL antigo em todos os lugares do banco de dados.

Agora, clique no botão “Preview Search & Replace” para continuar.
O plug-in pesquisará em seu banco de dados todas as instâncias do URL antigo e, em seguida, visualizará os resultados.

Se tudo estiver correto, clique em “Replace All” (Substituir tudo) para salvar as alterações.
Você verá um aviso sobre as alterações que está fazendo. Clique em “Yes” (Sim) para continuar.
O plug-in atualizará o banco de dados e substituirá os URLs locais pelo URL atual do seu site.
2. Atualizar URLs manualmente (avançado)
Outra maneira de atualizar os URLs é usar a seguinte consulta SQL:
1 | UPDATE wp_posts SET post_content = REPLACE(post_content, 'localhost/test/', 'www.yourlivesite.com/'); |
Basta acessar o phpMyAdmin, clicar em seu banco de dados e, em seguida, clicar em “SQL” no menu superior e adicionar a consulta acima.
Certifique-se de alterá-lo para os URLs do site local e do site ativo e clique no botão “Go” (Ir).

É isso aí. Agora você migrou com sucesso o WordPress do seu servidor local para um site ativo.
Esperamos que seu site ativo esteja funcionando sem problemas. Se você notar algum erro, consulte nosso guia de erros comuns do WordPress para obter ajuda na solução de problemas.
Esperamos que este artigo tenha ajudado você a migrar o WordPress de um servidor local para um site ativo. Talvez você também queira consultar nosso guia sobre como mover um site ativo para um servidor local ou dar uma olhada na lista de verificação definitiva de migração de sites para obter etapas práticas de migração do WordPress.
Se você gostou deste artigo, inscreva-se em nosso canal do YouTube para receber tutoriais em vídeo sobre o WordPress. Você também pode nos encontrar no Twitter e no Facebook.


 in 2024")

Christian
In step 6, wpbeginner support said, need to update these lines in wp-config.php file for an answer of comment (In Nov 2, 2017 at 12:34 am). Here are lines.
define(‘WP_HOME’,’http://example.com’);
define(‘WP_SITEURL’,’http://example.com’);
My question is, After which line should i need to updates these lines in wp-config.php file?
Here is wp-config.php file without comments.
<?php
define('DB_NAME', 'db');
define('DB_USER', 'user');
define('DB_PASSWORD', 'pass');
define('DB_HOST', 'localhost');
define('DB_CHARSET', 'utf8');
define('DB_COLLATE', '');
define('AUTH_KEY', 'put your unique phrase here');
define('SECURE_AUTH_KEY', 'put your unique phrase here');
define('LOGGED_IN_KEY', 'put your unique phrase here');
define('NONCE_KEY', 'put your unique phrase here');
define('AUTH_SALT', 'put your unique phrase here');
define('SECURE_AUTH_SALT', 'put your unique phrase here');
define('LOGGED_IN_SALT', 'put your unique phrase here');
define('NONCE_SALT', 'put your unique phrase here');
$table_prefix = 'wp_';
define('WP_DEBUG', false);
if ( !defined('ABSPATH') )
define('ABSPATH', dirname(__FILE__) . '/');
require_once(ABSPATH . 'wp-settings.php');
WPBeginner Support
Hi Christian,
You can add them any where before the comment line that says:
/* That’s all, stop editing! Happy blogging. */
To be more precise, you can add these lines after:
define('WP_DEBUG', false)1-click Use in WordPress
Admin
Ian Billingham
Hi there.
Would somebody be able to tell me if this ‘how to’ would overwrite an existing established website? I’m guessing it would.
WPBeginner Support
Hi Ian,
Yes, it will overwrite an existing established website.
Admin
Ravishankar
You are awesome!!! Thank you so much, this was super helpful!
Kate
Hi
Thanks for this informative post. I followed all the instructions carefully and when I tried to see if the site was live at step 6, it came up with the same page that it was had originally. It says ‘Index of/’ as the heading and then has 2 options below (with details of date modified etc). The 2 options are cgi-bin which brings up a 403 error and wordpress which goes to a blank page. Any ideas on what I might have done wrong? I’m very new to this so might have got something confused!
Thanks
Ahmed
Thank you very much, this is very useful
Kritika
Nice and helpful. Thanks
Muhammad Azhar
Hi
i am trying to upload my localhost word press site to live.
I am stuck at where it said “error database connection” i edit the wp-config file and now the only white screen appearing on my web site. I am confused what to do next? “Next, you need to login to your WordPress admin panel and go to Settings » General. be.” I have to install word press at my hosting to perform this step. Please guide.
CK Cheung
Hi,
Many thanks for the instruction. I would like to ask is it possible that I just copy the exported database and upload to the FTP site?
Then I can keep the local host for the future upgrade and testing?
If yes, in future which file I should upload to the ftp and make it live??
Many thanks.
kathy
Hi, I wonder if you can help. I’ve got all the way to editing the config file and uploading i would now appear to be at a sticking point – any ideas on the below? Everything has gone fine to this point. I’ve amended the name, user and password as advised. Would really appreciate any pointers. Thanks
Server Error in ‘/’ Application.
Runtime Error
Description: An application error occurred on the server. The current custom error settings for this application prevent the details of the application error from being viewed remotely (for security reasons). It could, however, be viewed by browsers running on the local server machine.
Amelia
Hi There. I just want to thank you for such an informative site you are running. I feel like you guys literally held my hand the whole way through, and every glitch I had, you had an article about how to fix it.
I’m happy to say my site is now up and running, while I still have to do a few finishing touches though. Just a great big thank you, I could not have done it without following your website step by step.
Nick
I am having issues with step 6, mainly the part where it says “Next, you need to login to your WordPress admin panel and go to Settings » General. Without changing anything, scroll to the bottom and click the Save Changes button. This will ensure that the site URL is corrected anywhere else that it needs to be.
After that go to Settings » Permalink and click Save Changes to ensure that all post links are working fine”. I cannot go into the settings because I cannot login, I have gotten to the login page but it won’t let me login and I cannot create an account because the link is not connected. How would I get around this problem.
WPBeginner Support
Hi Nick,
You can update the URLs in wp-config.php file as well. Connect to your live website using an FTP client and then add these two lines:
define('WP_HOME','http://example.com');define('WP_SITEURL','http://example.com');1-click Use in WordPress
Don’t forget to replace example.com with your own URL.
Admin
Nisa
Thank you very much its was very helpful, I was moving WP files from one server to another.
But I cannot compete the 6th step latter part, I can type the Admin username and password, so the site shows I am logged in as the admin from right hand side corner up, but I cannot access the admin panel
I get the error message : “Sorry, you are not allowed to access this page.”
Judit
Hello,
I took ages to set up my website locally, and now I am ready to move it to a live site. However, when I go to I get an error message:
#1045 – Access denied for user ‘xxx'(my username)@’localhost’ (using password: YES)
I’m pretty sure my username and password are correct and yet I cannot log in or change my password.
Please help – I’m afraid that I invested so much time into setting up WP and now I cannot move it to a live site because of this issue.
WPBeginner Support
Hi Judit,
You will need to edit the phpmyadmin’s configuration file:
c:\wamp\apps\phpmyadmin4.1.14\phpmyadmin.conf
Try root for username and leave password field blank. Set ‘AllowNoPassword’ to true. Save your changes and restart WAMPSERVER
Admin
TH
Hi. I moved my site from my local host wamp to my hosting service.
I did all the steps 1-7 but am facing the following problems:
(I had deleted all my plugins to ensure no conflicts)
– when I login as admin, it shows me the login page instead of the homepage and the admin dashboard.
– header menu bar tabs are working OK except for the HOME tab. When I click on HOME it takes me to localhost. Other tabs take me to the right pages.
– Top bar menu tabs (Favorites, Notifications, Logout) are not working. When I click on Favorites it shows: domainname/login/?redirect_to=http%3A%2F%2domainname%2Fdashboard%2Fprojects%2F#favorites and still shows the login page.
– when I click on logout, it shows domainname/login/domainname/wp-login.php?action=logout&_wpnonce=942fbc8980
– when click on > domainname>dashboard it goes to : domainname/login/?redirect_to=http%3A%2F%2Fdomainname%2Fwp-admin%2F and still shows login page
1. What are the problems with the setup? How do I fix them?
2. Should I delete all the WP files and DB on the live server and try again?
Please help.
Thanks.
TH
WPBeginner Support
Hi,
You may want to follow the steps in our WordPress troubleshooting guide. It will help you figure out what’s causing the issue and how to fix it.
Admin
Tara Giltner
Hi,
I followed these directions, they were great. Thank you. My problem is that I still have an error establishing database. I realize it’s probably because the old website is still on the public_html files as well. Is it ok to delete them?
WPBeginner Support
Hi Tara,
Make sure you download the files as backup on your computer before deleting them.
Admin
Jheel
Kindly revert soon.
Jheel
i followed all the steps mentioned above. the website is blank. and i cant even log in my wordpress website i created offline. after doing all the steps when i try to see if the site is live. i get PAGE NOT FOUND & the page contains the home page without bimage & captions. Please tell me what am i suppose to do?
Klaas Cornelis
I Get the “Forbidden: PHP engine is disable” error after completing this steps, I recon i’ve done something wrong. Anyone has an idea of where the fault can be located?
Jolie King
Hello,
I will like to ask if it possible to upload my wordpress website files by zipping all the folders & files, using the upload button in the cpanel to upload it, and then unzipping it after the upload.
Has anyone tried this? Are there any problems encountered after doing this??
Thanks.
Jim Thorne
Jolie, yes…I Zipped my entire WordPress folder and uploaded it using cPanel and then decompressed it into the public_html folder. It worked fantastic.
alan
wow. i better do it again since this look so difficutl
Amirreza
Very useful. Thanks!
Abneer
Hi,
I successfully moved my website from localhost to live site (with a few exceptions). But i had to work on my localhost also so i used update options method given on Codex . I am able to use my admin panel on localhost and only the frontpage. if i click on any other page on the website i get the wamp configuration page. How can i resolve this issue?
Please help me soon!
Thankyou!
Vince
I could really use anyones help desperately; I spent 2 weeks putting a site together and now I can’t get MAMP to work!!!
I had everything working, built the site then had a power outage. Hadn’t used my computer over the weekend and when I came back had the MySQL Error #2002 in the browser window. None of the other windows had content in them as well.
I’ve tried even going back in my Time Machine and still can’t get it to work. When I start MAMP the Apache Server starts but the MySQL Server doesn’t. I even tried things like restarting Apache and MySQL in Terminal and clearing the cache, but still nothing. And I’ve tried fiddling with the preferences in MAMP.
I’ve used MAMP before, a few years ago without any issues or problems. Loved it!!! Worked Great!!!
I’m using Sierra 10.12.6. I first installed MAMP 4.1.1 then when I started having problems I tried to upgrade to 4.2 to see if that help, but no. Had a few problems at first, but did get it to work.
I have another computer running El Capitan and the MySQL Server just doesn’t start on that either. I thought maybe it was the version of PHP that runs on MacOS, so I ran an upgrade and still nothing!
I’m really despise because the site has a scheduled live date, and the customer will freak if it’s not up and running, not to mention my employer!!! Any help would be greatly appreciated!!!
Cheers, Vince
WPBeginner Support
Hey Vince,
It is a common issue with MAMP and you’ll find various solutions online that have worked for other users. The most common solution is to delete the log files located in MAMP/db/mysql directory and then restarting MAMP.
Admin
Sarah
Hello my web page is still showing blank after enabling WP-DEBUG to true
Chamini
I did every step and now my site is in live.
But now I have another two issues,
1.all of my styles and images were not in the site
2.When I’m trying to go to other menus I can’t go to them.It shows 500 Internal Server Error.
Please help me to get out from here
Chris
Hi, did you fix this? I’m having the same problem.
I’ve deleted .htaccess and created a new one. I’ve changed permalink structure to %postname%, I’ve used the velvet blues AND SQL links update but still get this error. Not sure where else to go from here…
Maiyo
I recommend changing the WP_DEBUG option to true value in the wp_option doc to see what errors are occurring if you have a blank page or HTTP 500 error message
Jordan
I followed the steps exactly, but when I got to step 6 when I loaded the website, it worked, but all the information and templates and pages I designed were not there.
I was still able to access my localhost website and I tried to use WP Migrate to transfer all the information across, but that didn’t work. So I followed this guys instructions:
Now my localhost website does not work anymore…..
I guess I’m just going to have to redesign the entire website online now.
WPBeginner Support
Hi Jordan,
Please review your database settings. Go to phpMyAdmin to compare your live site database with your local server database.
Admin
Nou Kanvanny
Hello sir my appearance dnt see tool option, pleas help me
thank you
Craig
I recieve this error when trying to import my database:
Error
SQL query:
—
— Database: `wordpress_test`
—
CREATE DATABASE IF NOT EXISTS `wordpress_test` DEFAULT CHARACTER SET utf8 COLLATE utf8_general_ci;
MySQL said: Documentation
#1044 – Access denied for user ‘craigpar4_root’@’%’ to database ‘wordpress_test’
Can someone help me?
Thanks
Liv
This seems to have worked, but only on my local computer. The new WordPress website shows up at the proper domain on my computer. But when trying the same domain on my phone or a different computer, the old website still pops up.
Patricia LaCroix
Did you clear the cache on those other computers? Sometimes, that’s the issue.
Susan Keogh
I’m failing at Step 1! I type in the phpmyadmin address – and nothing is found. What am I doing wrong?
MrPET
Dear,
everything you said worked for me. Had some problem with admin back end page but after deleted .htaccess file and refresh, everything is just fine.
Jason
Dear WPBeginner,
I had followed all your steps correctly but now my wp-admin page is gone! it says 404!
Even tho the wp-admin folder exsisted.
Please help
WPBeginner Support
Hi Jason,
Try refreshing your WordPress permalinks structure. Since you can’t access admin area, you will need to do it via FTP. Connect to your website, and locate .htaccess file. Download it to your computer as backup, and then delete the file from your server. Visit the homepage of your website and WordPress will regenerate the .htaccess file for you. You can then try to login.
Admin
Jason
Yeah, you are too late 19 days to respond to my comment…
I had moved my site with pain… that means re-install and copy and pasting stuff from old one to the new one T-T
WPBeginner Support
Hi Jason,
Our apologies for the late reply. We try to respond to comments and questions in a timely manner but due to large number of comments we can sometimes miss legit questions.
Tiernan
Many thanks for the very helpful advice that has really simplified an otherwise tricky process
Kariena
Hi, very useful thanks.
Just a question, when adding content to a plugin on my localhost wp-admin, do I need to import my database again to my live site in order to update changes. (I mean do I need to import my database every time I make changes ?)
Laura
Hello, thanks for the post, it’s super helpful!!! Quick question – should I create my XML sitemap and submit it to Google / Webmaster tools while my site is still on my local server or should I upload it to the live server first?
WPBeginner Support
Hey Laura,
Your would need to upload your site to a live server first.
Admin
jenny
Thank you this is very usefull thank you again
Kim Sofo
I am having problems with this. I think its step 2. Can you please clarify where I should be uploading the wordpress files from? Are they installed as part of WAMP? So thats where I would find them? Or are they elsewhere? Thanks
Rohit Gogoi
Can you make a video on this please…Some steps are not clear. Like the second step. I didn’t got it. Please help me out.
WPBeginner Support
Hey Rohit,
We will try to add a video soon. Meanwhile, you will need an FTP client for the step 2. Once you are connected to your website, you will then upload local WordPress files from your computer to the live website.
Admin
Collins
Thanks a lot, the write up was helpful. However after exporting my database and importing it to my live server, i lost some database files. Is there any possible means or tools to retrieve them back? Help please
Rizki Suciana
Very useful.. thank you so much!
Ari
Thanks for the outstanding post. It really was comprehensive and allowed me to successfully transfer my site from local to server!
The only part I had to be ‘externally resourceful’ on was the save settings when exporting my SQL database, to make sure it didn’t create a new one (as you correctly speculated, my ISP only allowed for one database).
Ritul
Is it safe to transfer website from localhost to live server??because I want to know whether I should start with live hostingOrLocal Server for making my blog??
Kirsty
Please helpppppp
When I changed my url from the .dev to .com it’s telling me 404 site not found and I can’t event get back to wordpress to fix it. :'(
WPBeginner Support
Please see our guide on how to fix 404 error in WordPress.
Admin
Tony Clarkson
Hello, I’m having trouble importing the localhost db content in to the new database, I’ve double checked the step-by-step and as far as I can see I’m doing the right thing but I’m getting this error when importing:
Error
SQL query:
—
— Database: `push_db`
—
— ——————————————————–
—
— Table structure for table `wp_commentmeta`
—
CREATE TABLE `wp_commentmeta` (
`meta_id` BIGINT( 20 ) UNSIGNED NOT NULL ,
`comment_id` BIGINT( 20 ) UNSIGNED NOT NULL DEFAULT ‘0’,
`meta_key` VARCHAR( 255 ) COLLATE utf8mb4_unicode_520_ci DEFAULT NULL ,
`meta_value` LONGTEXT COLLATE utf8mb4_unicode_520_ci
) ENGINE = INNODB DEFAULT CHARSET = utf8mb4 COLLATE = utf8mb4_unicode_520_ci;
MySQL said: Documentation
#1273 – Unknown collation: ‘utf8mb4_unicode_520_ci’
When I choose the custom option for exporting the local database, I’m assuming all the other settings remain as default, just change to ‘Save output to a file’
What do you think it could be?
Tony
Tony Clarkson
I got past this bit, the version of MySQL on the local site was newer then the server, however, I’ve come to a halt again at step 6. When I browse the site I just get an Http Error 500. Not sure where to start…
Peter Singh
Hi Tony,
I had a similar problem with another site that I had to get live a while ago. I found that the root of the http 500 error was due to insufficient memory allowance in the php.ini file. I know you cant really get in and change that about on a webserver. I found a little trick by defining it within the wp-config/php file. Just stick this in at the top line.
define( ‘wp_max_memory_limit’ ‘256m’ )
and bob’s your uncle.
Dawn
I tried this and there was no change… Still either a 500 error or a blank page. :'(
WPBeginner Support
Hey Dawn,
Please try these WordPress troubleshooting steps to figure out what’s causing the issue.
Victor
Hey, Tony. How do you managed the problem with MySQL version? I’m getting the same error here and have no idea where to start. Could you clarify this for me?
Victor
Hello, I managed to bypass this issue, but now I’m with a different one.
All my pages, including WP admin (login, dashboard etc) are showing in plain HTLM. As if there no layout and styling. What could it be?
goutam majumder
Thanks so much for this detail steps. You saved my day.
God bless you
Che Devert
Such a wonderful write up. Thanks.
H Finn
This tutorial is excellent. As long as you follow the steps, and you have no problems on your own end – it works like a charm.
Thank you for this post.
Mohanraj
Hello Friends,
I have done one WordPress project in Local Server. I need to upload wp project in a Sub-Directory. Tell me the Procedures
Stephanie
Hi
I transfered a local website to my live server and followed all steps. I just updated all the URL found with localhost:888 by my final URL
All pages are fine except one where I lost one slider and one table on the page.
Anyone to help me please?
Alex Hammerschmied
I also appreciate this post very much!
It becomes handy everytime i need to walk threw a migration…
Thx for that! And keep on the good work!
Best,
Alex
WPBeginner Support
Hey Alex,
We are glad you find it helpful Don’t forget to join us on Twitter for more WordPress tips and tutorials.
Admin