Muitos usuários do WordPress preferem trabalhar em seus sites usando um servidor local em seus computadores. Isso permite que você trabalhe em seu site de forma privada antes de disponibilizar as alterações on-line.
Eventualmente, você precisará movê-lo para um servidor ativo para torná-lo acessível aos visitantes on-line. Essa transição é crucial para garantir que seu website funcione adequadamente no site ativo.
Como trabalhamos em muitos sites locais, tivemos que aprender a maneira mais fácil de transferir conteúdo para sites ativos.
Neste artigo, forneceremos instruções passo a passo sobre como mover o WordPress de um servidor local para um site ativo.
Por que mover o WordPress de um servidor local para um site ativo?
Criar seu blog WordPress em um servidor local é uma maneira segura de testar as alterações em seu site sem afetar os visitantes.
Quando você terminar de aperfeiçoar seu site, a próxima etapa é passar do servidor local para um site ativo.
Vamos mostrar duas maneiras de mover seu site de um servidor local para um site ativo.
O primeiro método usa um plug-in de migração do WordPress e é recomendado para iniciantes.
No segundo método, mostraremos como mover manualmente o WordPress de um servidor local para um site ativo.
Você pode escolher o método que funciona melhor para você:
Antes de migrar seu site WordPress
Para migrar o WordPress de um servidor local para um servidor ativo, você precisa de alguns fatores.
Primeiro, presumimos que você tenha um site WordPress em execução em um servidor local (também chamado de localhost) no seu computador e que tenha acesso total a ele.
Em seguida, você precisará ter um nome de domínio e uma hospedagem na Web.
Já ouvimos inúmeras histórias de iniciantes que começaram com provedores de hospedagem na Web ruins ou gratuitos e se arrependeram. Em nossa experiência, a escolha do provedor de hospedagem correto é fundamental para o sucesso de qualquer site.
Para facilitar sua decisão, recomendamos o uso da Bluehost. Eles são uma empresa de hospedagem WordPress oficialmente recomendada e estão oferecendo aos usuários do WPBeginner um desconto exclusivo + domínio e SSL gratuitos.
Basicamente, você pode começar por apenas US$ 1,99 por mês.
Se você quiser uma ótima alternativa ao Bluehost, pode dar uma olhada no Hostinger. Eles também estão oferecendo um desconto exclusivo para usuários do WPBeginner com um nome de domínio gratuito.
Se você puder pagar um pouco mais, dê uma olhada no SiteGround. Eles também têm uma oferta especial para os leitores do WPBeginner.
Se precisar de ajuda para configurar seu site, siga nosso guia passo a passo sobre como criar um site.
Por fim, você precisará de um programa de FTP e saberá como usar o FTP para fazer upload do site do servidor local para o site ativo.
Pronto? Vamos começar a migrar seu site WordPress.
Tutorial em vídeo
Se você preferir instruções por escrito, continue lendo.
Método 1: Transferir o WordPress do servidor local para o site ativo usando um plug-in de migração (recomendado)
Esse método é mais fácil e recomendado para iniciantes. Usaremos um plugin de migração do WordPress para mover o WordPress do host local para um site ativo.
Etapa 1: Instalar e configurar o plug-in do Duplicator
Primeiro, você precisa instalar e ativar o plug-in do Duplicator em seu site local. Para obter mais detalhes, consulte nosso guia passo a passo sobre como instalar um plug-in do WordPress.
Dica profissional: Há também uma versão profissional do Duplicator que oferece backups seguros, armazenamento em nuvem, restauração fácil do site e muito mais.
Após a ativação, você precisa ir para a página Duplicator ” Backups e clicar no botão “Create New” (Criar novo).
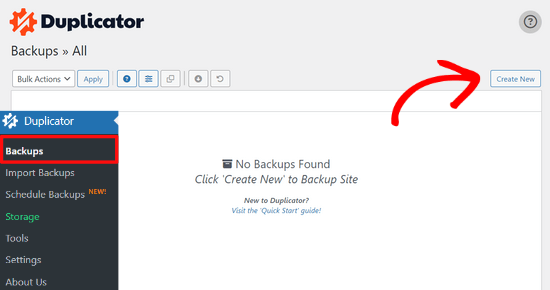
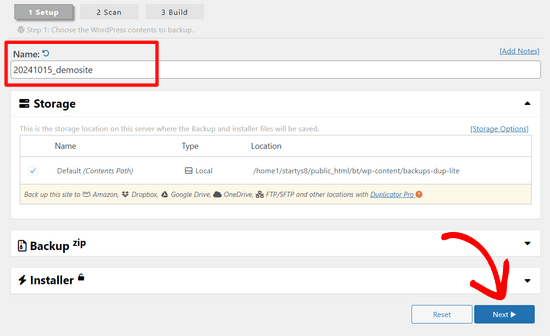
Isso o levará a uma tela na qual você poderá dar um nome ao backup.
Em seguida, clique no botão “Next” (Avançar).
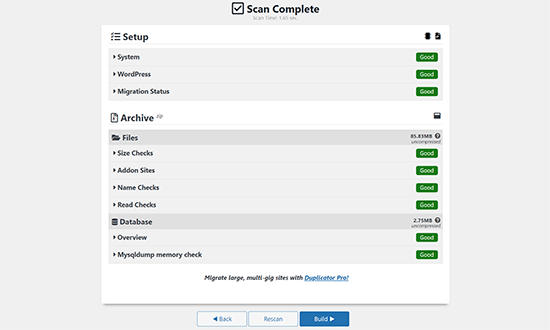
O Duplicator agora executará alguns testes para verificar se tudo está em ordem.
Se todos os itens estiverem marcados como “Bom”, clique no botão “Construir”.
Esse processo pode levar alguns minutos, dependendo do tamanho de seu site. Você deve deixar essa guia aberta até que seja concluída.
Quando terminar, você verá opções de download para os pacotes “Installer” e “Archive”. Você precisa clicar no botão “Download Both Files” (Baixar ambos os arquivos) para baixar os dois arquivos para o seu computador.
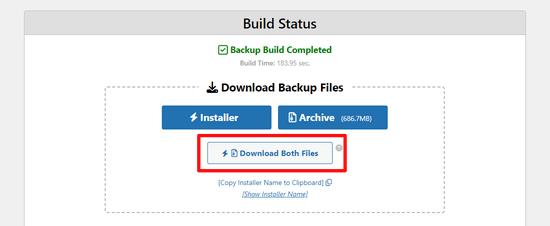
O arquivo “Archive” é uma cópia completa do seu site WordPress. Ele inclui todos os arquivos principais do WordPress, bem como suas imagens, uploads, temas, plug-ins e um backup do seu banco de dados do WordPress.
O arquivo “Installer” é um script que automatizará todo o processo de migração, descompactando o arquivo que contém seu site.
Etapa 2: Crie um banco de dados para seu site WordPress ativo
Antes de executar o instalador ou carregar o site do WordPress do host local para o servidor de hospedagem, é necessário criar um banco de dados MySQL para o novo site ativo.
Se você já tiver criado um banco de dados MySQL, poderá pular esta etapa.
Para criar um banco de dados, você precisa acessar o painel do cPanel da sua conta de hospedagem. Em seguida, localize a seção “Databases” (Bancos de dados) e clique no ícone “MySQL Database Wizard” (Assistente de banco de dados MySQL).
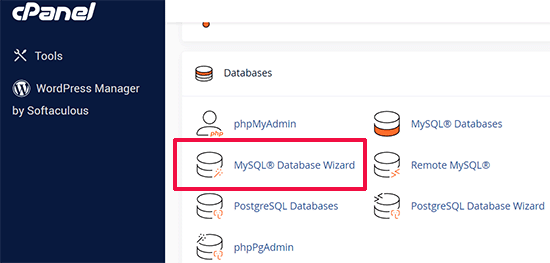
Na tela seguinte, há um campo para criar um novo banco de dados.
Basta fornecer um nome para o seu banco de dados e clicar no botão “Create Database” (Criar banco de dados).

O cPanel criará um novo banco de dados para você.
Depois disso, é necessário inserir um nome de usuário e uma senha para o novo usuário e, em seguida, clicar no botão “Create User” (Criar usuário).
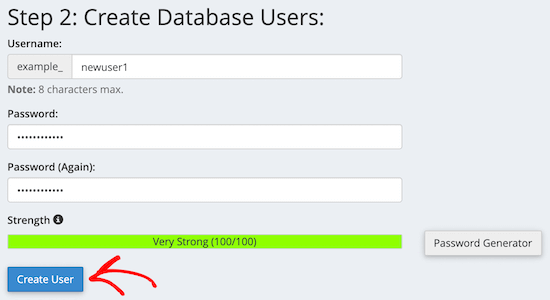
Em seguida, você precisa adicionar o usuário que acabou de criar ao banco de dados.
Primeiro, clique na caixa de seleção “All Privileges” (Todos os privilégios).
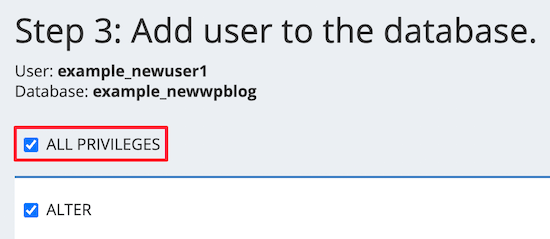
Em seguida, role a tela para baixo e clique no botão “Make Changes” (Fazer alterações) para salvar suas alterações.
Seu banco de dados está pronto para ser usado com seu site WordPress. Não se esqueça de anotar o nome do banco de dados, o nome de usuário e a senha. Você precisará dessas informações na próxima etapa.
Etapa 3: Fazer upload de arquivos do servidor local para o site do WordPress ativo
Agora, você precisa carregar o arquivo e os arquivos do instalador do seu site local para a sua conta de hospedagem.
Primeiro, conecte-se ao seu site ativo usando um cliente FTP. Uma vez conectado, certifique-se de que o diretório raiz de seu site esteja completamente vazio.
Normalmente, o diretório raiz é a pasta /home/public_html/.
Algumas empresas de hospedagem WordPress instalam automaticamente o WordPress quando você se inscreve. Se você tiver arquivos do WordPress lá, precisará excluí-los.
Depois disso, você pode carregar os arquivos archive.zip e installer.php do Duplicator para seu diretório raiz vazio.

Etapa 4: Execução do script de migração
Depois de fazer o upload dos arquivos de migração, você precisa visitar o seguinte URL no navegador:
http://example.com/installer.php
Não se esqueça de substituir “example.com” por seu próprio nome de domínio.
Isso iniciará o assistente de migração do Duplicator.
O instalador executará alguns testes e inicializará o script.
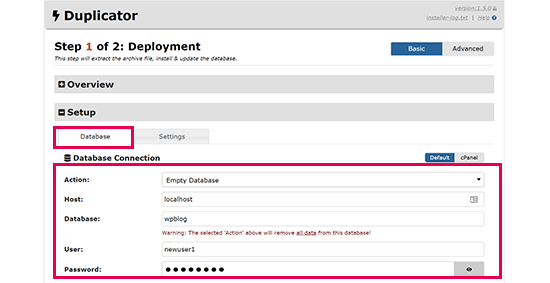
Na seção Setup (Configuração), você será solicitado a inserir o host do MySQL, o nome do banco de dados, o nome de usuário e a senha.
Seu host provavelmente será um host local. Depois disso, você digitará os detalhes do banco de dados que criou na etapa anterior.
Em seguida, clique no botão “Validate” (Validar) para garantir que os detalhes inseridos estejam corretos.
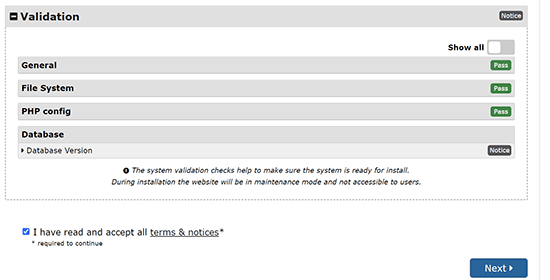
Depois disso, clique no botão “Next” (Avançar) para continuar.
O Duplicator agora importará o backup do banco de dados do WordPress do arquivo para o novo banco de dados.
Ele também atualizará os URLs que apontam para o site local e seu novo site ativo.
Agora você pode clicar no botão “Admin Login” para entrar na área de administração do WordPress do seu site ativo.

Quando você fizer login no site ativo, o Duplicator limpará automaticamente os arquivos de instalação.
Isso é tudo. Você transferiu com êxito o WordPress do servidor local para o site ativo.
Método 2: Transferir manualmente o WordPress do servidor local para o site ativo
Neste método, mostraremos como mover manualmente o WordPress do servidor local para seu site ativo. Ele será útil se o primeiro método não funcionar ou se você preferir fazer isso manualmente.
Etapa 1: Exportar o banco de dados local do WordPress
A primeira coisa que você precisa fazer é exportar seu banco de dados local do WordPress. Usaremos o phpMyAdmin para fazer isso.
Se não estiver familiarizado com ele, talvez queira dar uma olhada em nosso guia sobre gerenciamento de banco de dados do WordPress usando o phpMyAdmin.
Basta acessar http://localhost/phpmyadmin/ e clicar em seu banco de dados do WordPress. Em seguida, clique no botão “Export” na barra de menu superior.

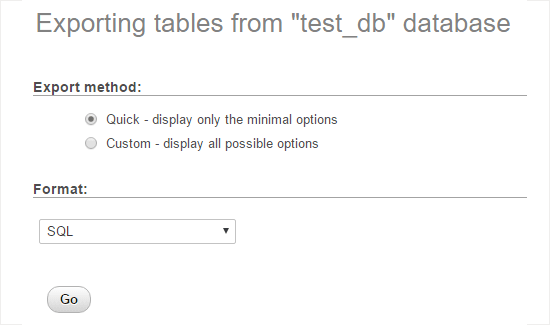
Na opção “Export method:” (Método de exportação), você pode escolher “Quick” (Rápido) ou “Custom” (Personalizado). A opção Personalizada lhe dará mais opções para exportar seu banco de dados.
Mas recomendamos escolher “Quick” (Rápido) e clicar no botão “Go” (Ir) para fazer o download do banco de dados.
Etapa 2: Faça upload dos arquivos do WordPress para o site ativo
Agora, precisaremos mover todos os arquivos do seu site para o site ativo.
Para começar, abra seu cliente FTP e conecte-se à sua conta de hospedagem na Web.
Depois de se conectar ao seu site ativo, certifique-se de carregar os arquivos no diretório correto. Por exemplo, se você quiser que o site seja hospedado em “yoursite.com”, deverá carregar todos os arquivos no diretório public_html.
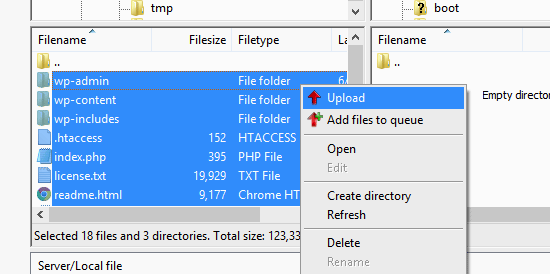
Agora, selecione seus arquivos locais do WordPress e carregue-os no servidor ativo.
Etapa 3: Crie um banco de dados MySQL em seu site ativo
Enquanto o cliente FTP estiver carregando os arquivos do WordPress, você poderá começar a importar o banco de dados para o servidor ativo.
A maioria dos provedores de hospedagem WordPress oferece o cPanel para gerenciar sua conta de hospedagem, portanto, mostraremos como criar um banco de dados usando o cPanel.
Primeiro, é necessário fazer login no painel do cPanel e clicar no ícone “MySQL Database Wizard” (Assistente de banco de dados MySQL), que pode ser encontrado na seção “Databases” (Bancos de dados).

Na tela seguinte, você pode criar um novo banco de dados.
Você precisa fornecer um nome para o banco de dados e, em seguida, clicar em “Create Database” (Criar banco de dados).

O cPanel criará automaticamente um novo banco de dados para você.
Em seguida, é necessário inserir um nome de usuário e uma senha para o novo usuário e clicar em “Create User” (Criar usuário).
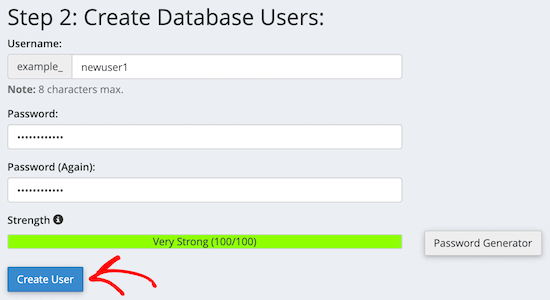
Depois disso, você precisa adicionar o usuário que acabou de criar ao banco de dados.
Primeiro, marque a caixa de seleção “All Privileges” (Todos os privilégios).
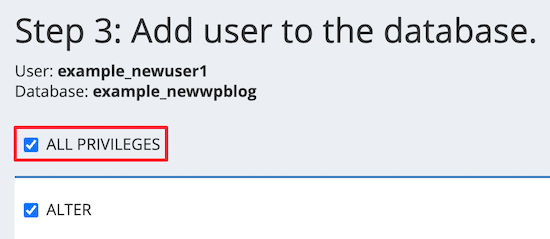
Em seguida, role a tela para baixo e clique em “Make Changes” (Fazer alterações) para salvar suas alterações.
Você criou com sucesso um novo banco de dados para seu site WordPress ativo.
Etapa 4: Importar o banco de dados do WordPress para o site ativo
A próxima etapa do processo é importar seu banco de dados do WordPress.
Vá para o painel do cPanel, role para baixo até a seção “Databases” (Bancos de dados) e clique em “phpMyAdmin”.
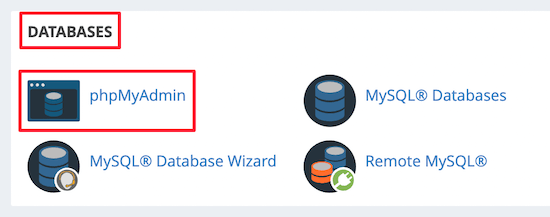
Isso o levará ao phpMyAdmin, onde você deverá clicar no banco de dados que acabou de criar acima. O phpMyAdmin mostrará seu novo banco de dados sem tabelas.
Em seguida, clique na guia “Import” (Importar) no menu superior. Na página de importação, clique no botão “Choose File” (Escolher arquivo) e selecione o arquivo de banco de dados do site local que você salvou na primeira etapa.
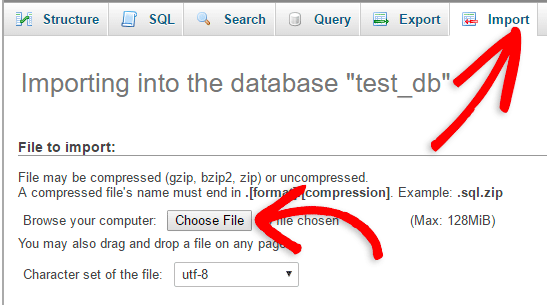
Depois disso, clique no botão “Go” (Ir) na parte inferior da página. Seu banco de dados será importado automaticamente para o phpMyadmin.
Etapa 5: Alterar o URL do site
Agora, você precisa alterar o URL do site no banco de dados para que ele se conecte ao seu site WordPress ativo.
No phpMyAdmin, procure a tabela wp_options em seu banco de dados que você acabou de importar acima.
Se você alterou o prefixo do banco de dados, em vez de wp_options, pode ser {new_prefix}_options.
Em seguida, clique no botão “Browse” (Procurar) ao lado de wp_options. Ou clique no link na barra lateral para abrir a página que tem uma lista de campos na tabela wp_options.
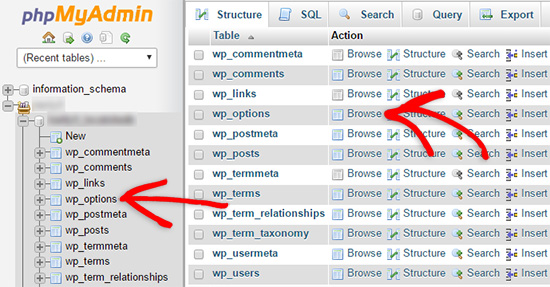
Em seguida, na coluna options_name, você precisa procurar a opção siteurl.
Em seguida, clique no ícone “Editar”.

Isso abre uma janela na qual você pode editar o campo.
Na caixa de entrada option_value, você verá o URL da sua instalação local, que será algo como http://localhost/test.
Você precisa inserir o URL do novo site nesse campo, por exemplo: https://www.wpbeginner.com.
Em seguida, você pode salvar o campo clicando no botão “Go” (Ir).
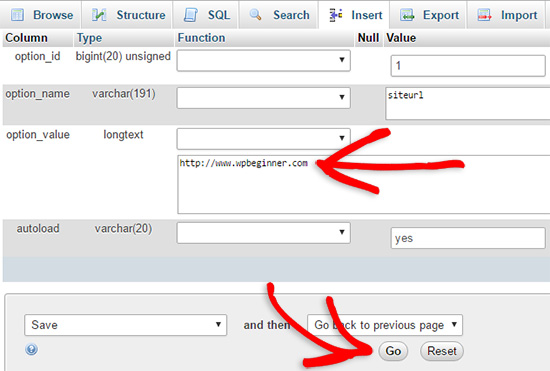
Em seguida, você precisa seguir as mesmas etapas descritas acima para o nome da opção home. O menu wp_options pode ter algumas páginas. Normalmente, a opção home estará na segunda página.
Em seguida, atualize o URL da página inicial para que ele seja igual ao URL do site ativo.
Etapa 6: Configure seu site ativo
Agora que você importou o banco de dados e fez o upload do conteúdo, é hora de configurar o WordPress.
Nesse momento, seu site deve estar exibindo o erro“Erro ao estabelecer uma conexão com o banco de dados“.
Para corrigir isso, conecte-se ao seu site usando um cliente FTP e abra o arquivo wp-config.php.
Você procurará as seguintes linhas de código:
1 2 3 4 5 6 7 8 9 | // ** MySQL settings - You can get this info from your web host ** ///** The name of the database for WordPress */define( 'DB_NAME', 'database_name_here' );/** MySQL database username */define( 'DB_USER', 'username_here' );/** MySQL database password */define( 'DB_PASSWORD', 'password_here' );/** MySQL hostname */define( 'DB_HOST', 'localhost' ); |
Você precisará fornecer o nome do banco de dados, o nome de usuário e a senha que criou anteriormente.
Em seguida, salve o arquivo wp-config.php e carregue-o novamente no servidor de hospedagem do WordPress.
Agora, quando você acessar seu site, ele deverá estar ativo.
Depois disso, você precisa fazer login no painel de administração do WordPress e ir para Configurações ” Geral. Em seguida, sem alterar nada, role até a parte inferior e clique no botão “Salvar alterações”.
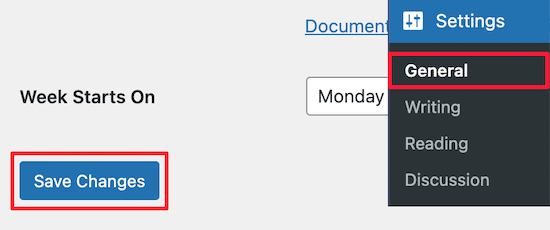
Isso garantirá que o URL do seu site seja corrigido em qualquer outro lugar que seja necessário.
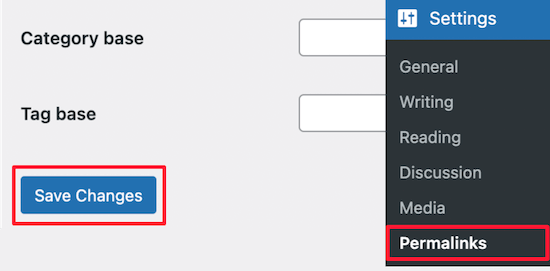
Depois de fazer isso, vá para Configurações ” Permalinks, role para baixo e clique em “Salvar alterações” para garantir que todos os links de postagem estejam funcionando bem.
Etapa 7: Corrigir imagens e links quebrados atualizando os caminhos
Sempre que estiver movendo um site do WordPress de um domínio para outro ou de um servidor local para um site ativo, você se deparará com links quebrados e imagens ausentes.
Mostraremos duas maneiras de atualizar URLs. Você pode escolher a que funciona melhor para você.
1. Atualizar URLs usando o plugin Search & Replace Everything (recomendado)
A maneira mais segura de corrigir isso é usar o Search & Replace Everything. Ele é um poderoso plug-in do WordPress que permite executar facilmente tarefas de atualização em massa em seu site sem escrever consultas complexas ao banco de dados.
Primeiro, você precisa instalar e ativar o plug-in Search & Replace Everything.
Após a ativação, vá para a página Tools ” WP Search & Replace.
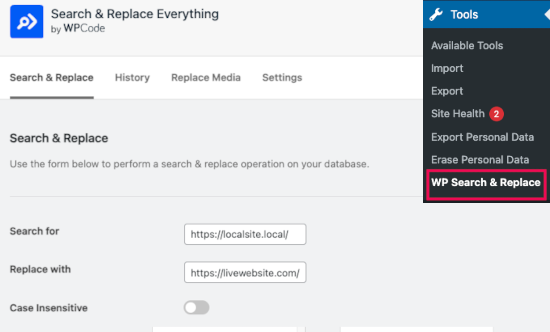
A partir daí, você precisa inserir o URL do site local no campo “Search for” (Pesquisar por) e o URL do site ativo no campo “Replace with” (Substituir por).
Role um pouco a tela e clique em “Select All” (Selecionar tudo) abaixo das tabelas. Isso garante que o plug-in procurará o URL antigo em todos os lugares do banco de dados.
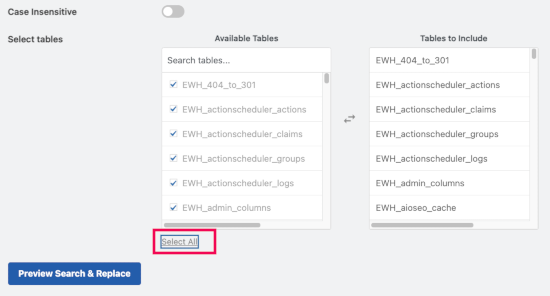
Agora, clique no botão “Preview Search & Replace” para continuar.
O plug-in pesquisará em seu banco de dados todas as instâncias do URL antigo e, em seguida, visualizará os resultados.
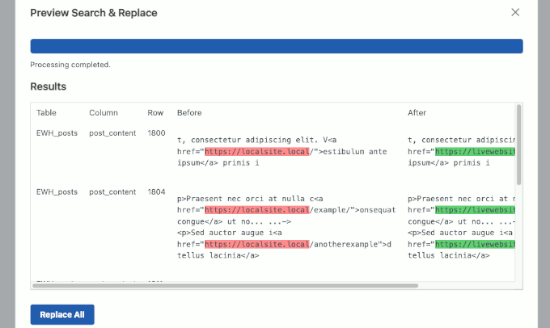
Se tudo estiver correto, clique em “Replace All” (Substituir tudo) para salvar as alterações.
Você verá um aviso sobre as alterações que está fazendo. Clique em “Yes” (Sim) para continuar.
O plug-in atualizará o banco de dados e substituirá os URLs locais pelo URL atual do seu site.
2. Atualizar URLs manualmente (avançado)
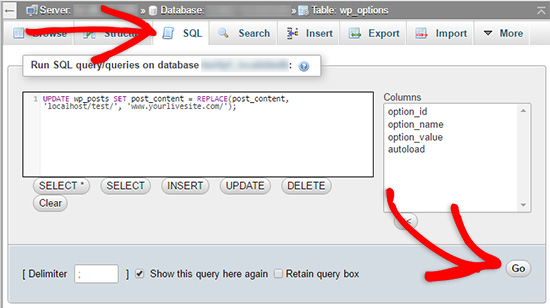
Outra maneira de atualizar os URLs é usar a seguinte consulta SQL:
1 | UPDATE wp_posts SET post_content = REPLACE(post_content, 'localhost/test/', 'www.yourlivesite.com/'); |
Basta acessar o phpMyAdmin, clicar em seu banco de dados e, em seguida, clicar em “SQL” no menu superior e adicionar a consulta acima.
Certifique-se de alterá-lo para os URLs do site local e do site ativo e clique no botão “Go” (Ir).
É isso aí. Agora você migrou com sucesso o WordPress do seu servidor local para um site ativo.
Esperamos que seu site ativo esteja funcionando sem problemas. Se você notar algum erro, consulte nosso guia de erros comuns do WordPress para obter ajuda na solução de problemas.
Esperamos que este artigo tenha ajudado você a migrar o WordPress de um servidor local para um site ativo. Talvez você também queira consultar nosso guia sobre como mover um site ativo para um servidor local ou dar uma olhada na lista de verificação definitiva de migração de sites para obter etapas práticas de migração do WordPress.
Se você gostou deste artigo, inscreva-se em nosso canal do YouTube para receber tutoriais em vídeo sobre o WordPress. Você também pode nos encontrar no Twitter e no Facebook.


Mark
Hi!
I’ve done until step 6 and was able to get the Error Database Connection and I was thrilled! when i changed the parameters the error changed to Error 500. And now I’m stuck.
My local MAMP DB is named “localdatabase” and the new one that I created in the live site have a prefix that I cannot edit so now my new database name in the live site is “web_localdatabase”
Question:
1. Should the my local database name be the same with the one in the live site?
2. If not, is there any other changes I need to do aside from the changes in Step 6?
Thanks!!!!!!!
Cindy
Hi there,
I thought I followed your steps to the letter. I accessed localhost through WAMP. cPanel is through StableHost. FTP using FileZilla. After the migration I looked at my site and saw that half of my most recent post was missing. It had never been published; it was the first post I created in localhost. (I recently moved from wp.com to wp.org. Had less than 20 posts at time of transfer. All of them migrated from localhost to live with no errors.) I had no ‘failed transfers’ during the FTP upload. No errors that I noticed.
After seeing the incomplete blog post, I tried to access localhost to view the original content using WAMP. That project name can no longer be displayed. I cannot access my blog content on localhost using the name I assigned prior to the migration. The folder is still present in www.
I must have done something right since part of a post that was never on my live site did make it there. Can you tell me what happened to my localhost? I don’t have anything in sub folders…it’s all pretty straight forward and I tried to keep it simple.
Troubleshooting:
Ran SQL query per your Step 7, message is: #1146 – Table ‘sxxxxx_wp574.wp_posts’ doesn’t exist. wp_574 is the database name I created in Step 3. Query was localhost name and website domain.
Restarted computer.
WAMP ‘Restart all services’ option.
Right now I’m completely confused! I not only do not know what to do next but am fearful of trying a Google suggestion for fear of really screwing things up. Can you help me? Any insight into the incomplete migration would be good to know too but I’m more freaked out about localhost at the moment. Thanks so much. You’re instructions are very easy to follow and understandable.
Kind Regards, cindy
Lea Jacta Est
Hello!
I have issues updating my links (step 7). It seems to be an URL match problem. Using Velvet Blues, I’m typing my old URL in the required field and I do the same for the new URL but there’s an error message showing every time I try.
Just to check :
– my old URL = my localhost URL which is in the general settings and which shows in the address bar when I go to my homepage
– my new URL : my brand new domain name which ends by .com
… right ?
Does the error comes from somewhere else or am I doing it this wrong ?
Thanks a lot for your help.
Jeff Bradbury
I currently have my live site at. I want to download it to MAMP (Mac) and begin the process of redesigning locally and then I want to put it back fresh.
1) When I’m ready to upload the new site, do I put it over top of the current folder? Do I create a new folder (or subdomain) and stick it in that directory and then move the domain/DNS to the new site?
2) I have a bunch of pretty links on the live site that I wish to download and begin working on … I think i’m correct in thinking that Pretty links just take the form of whatever the domain currently is.
3) Is this the best process if you want to constantly be working locally and updating your site on a daily/weekly basis? This appears to be a great method if you want a One and Done method of updating a site. If there is another way or method of working locally and then uploading the changes …. or even syncing a live/local site, I would love some help and advice. THANK YOU!
WPBeginner Support
1. Depends on what files you have changed and what changes you made that are stored in the database. We assume that you will be working on your theme and would probably make few changes that will be stored in database. In that case, you can just overwrite your theme files and update your database from a backup.
2. If by pretty links you mean the permalink settings, then we think that those will not be affected.
3. If you are planning on continuously working on your site, then this strategy would work but it is not the best solution. You need a solution that allows you to automatically sync your development site to your live site. For example, take a look at our tutorial on how to create a staging environment for your WordPress site. Subscribe to WPBeginner, we will soon cover this topic in an upcoming article with detailed instructions.
Admin
Felipe Stabile
THANK YOU GUYS!
Things went smooth after some problems and thinking, but it was because my host is a little different, and i´ve got problems uploading my files to the FTP using Filezilla. Serious docs got a failure message, but i solve that by doing the following:
If someone here is using smarterasp, you´d be better not using Filezilla, use the integrated (HostingControlPanel/MyWebsites//FileManager).
With your database clean, You have to zip your files from HTDOCS/wordpress, and then upload this zip file.
In the integrated File Manager you have the option for unzip. wait a little bit, until all folders and docs appear.
Then follow the tutorial above and you´ll be ok.
Mohit
Hey wpbeginner,
Thanks a lot for this tutorial. Its the best one I have came across.
Followed this step by step and got the expected results.
Keep up the good work !
Cheers!
Abhay
Many-many thanks bro. it worked very well.
Biniam
Thanks a million!!!
jay capulong
hi all is ok, but the others picture is not showing,
what do you mean localhost/test? (local site)
thanks
M3N
Hi. Thanks for this great tutorial.
One question though…
Following steps you described doesn’t cause problem with serialized data. I saw some tutorials recommended to use a script or other thing to avoid the problem with serialized data when changing file paths manually.
Any idea or suggestion ?
Mark
Hi, I don’t know if anyone suffered from a redirect to their local host when they ran wp-admin. I did but I found a post over at stackoverflow that sorted me out. Basically I had to update the filepaths in the WP-Options table.
Good luck.
MT
Mujtaba Zia
*** This is the best ever tutorial of my life ***
I know about html/css but never worked on wordpress, this tutorial helps me lot and have my site live by following every step and wordings of it. Thank you so so much!
Now very eager to learn more through this website.
Kathy
I’m encountering some serious problems when transferring to live server. Locally I have 2 sites using the same theme. Both running off separate databases and sites, both work perfectly locally. One site is uploaded and running fine and i’m in the process of uploading the second, here’s where it goes wrong. I’ve exported and created the database, working perfectly all images appear correct. I uploaded all the files and amended the config then ran in to problems. I appear to have no content loading and only half a theme along with the incorrect logo of the site. I tried to login in to amend all links but i am returning an ‘internal server error’ the sever encountered internal error or misconfiguration and was unable to complete your request.
I have rolled the site back to it’s previous look but i am at a complete loss as to next steps, can anyone help? I can not understand how we are working perfectly locally and then an epic fail on live.
Kathy
p.s. I have screenshots if that helps.
DaveJorg
Heads up that sometimes after the migration is complete only the home page works.
If this is the case visit Dashboard > settings > pemalinks and click save changes. I believe it updates the mod_rewrite and should fix the issue. It did for me.
RW
Please remove my email from the comments thread. I’ve tried to unsubscribe each time and it’s not working.
Carlo
Thanks for this guide. I’m a more than a beginner in this field. How can I proceed if I have a database already installed on my hosting. Do I have to delete it and make new one, cancel the tables or simply empty them? Thanks in advance for your help
WPBeginner Support
You can create a totally new database.
Admin
Nathan
I moved everything and it went smooth until I tried logging in to WP it keeps saying password incorrect. I even tried changing details in phpMyAdmin. Could the problem be that I ran your query before logging in to WP?
Nathan
I fixed the problem, i just signed in to WP and re-saved permalinks and whole site was update. Thanks for the great tutorial.
Angela
Unfortunately, I wasn’t able to move my site from localhost to online. I got to the login page and it wouldn’t accept my login information. Any idea what the problem could be? I don’t want to give up on it so I may try again.
Omar Zeidan
Hi Angela,
Well, you might forgot to import the DB files to your live server, did you ?
If nothing worked with you then try the following,
Access your DB admin panel, find the wp_users and manually add one there.
Hope this helps.
Pranesh
Excellent guide. Everything went fine. Thanks a lot !!
Ziga
Hello, i followed all steps, and at step #4, i choose .gzip file to import, and got the following error:
#1064 – You have an error in your SQL syntax; check the manual that corresponds to your MySQL server version for the right syntax to use near ‘?’ at line 2
Any help?
Justin
Everything works except my other pages…. Can’t figure it out
Matt
Similar issue for me. Have added it to a subfolder on another one of my domains, but when I navigate to it, I’m shown the Themes 404 page. When I try to go directly to any of the other pages, I get my hosts 404 page. Any ideas anyone?
Ryan
I’ve gone through all the steps, and my site ends up not looking at all like it did. It appears most of the CSS didn’t transfer over. I was using the Divi theme.
Here is what it looks like:
Any tips?
Amefon
HELLO
i got this error while trying to import my database onto the site
Error
SQL query:
—
— Database: `lcmi`
—
CREATE DATABASE IF NOT EXISTS `lcmi` DEFAULT CHARACTER SET latin1 COLLATE latin1_swedish_ci;
MySQL said: Documentation
#1044 – Access denied for user ‘lazarbwn’@’localhost’ to database ‘lcmi’
how do i solve this?
WPBeginner Support
Check your MySQL username, MySQL host, Database, and MySQL Password.
Admin
Amefon
i do not understand. Am I to change the MySQL details or what.
Mike Casile
Have not done this yet, but local site is looking good. I do have 2 questions (which may really be too big and may require follow-on articles).
1. If I go thru this and it comes out nice on the live site … but I want to continue doing new development locally, is there a similar process for incremental changes?
2. How will this be impacted if I use multiSite (which I’m NOT doing right now).
Thanks,
Roman
It depends on what your changes are affecting – if you have changed some css or php code in theme, you will need tu push changed files on server using FTP. If you change some wordpress settings, you only need to go through steps of copying your database.
Ameira
Thank you for this tutorial – after 2 weeks of trying everything under the sun finally found out what was missing. I have been able to access my website but images are missing and the layout is all over the place. I followed step 7 and it did improve the improve slightly but still quite a mess – any ideas on what else I can do?
Soo
Easy to understand and follow.
The best tutorial about”How to Move WordPress From Local Server to Live Site”.
Thank you
zavera
Hi WPBEGINNER SUPPORT, i have created custom wordpress site with some pages and used all the steps you mentioned here and all worked correctly but my pages urls are still localhost how to change these urls for pages?
WPBeginner Support
If you can access the admin area then go to settings -> General and change your WordPress URL and Site URL. Or look at the step 5 to do that through phpmyadmin.
Admin
Daniel Afriyie Gyimah
ples we need the information in a downloadable PDF format
Andres
Hello ! I tried using this method and I get the following error:
lessphp fatal error: load error: failed to find /Applications/MAMP/htdocs/breg/wp-content/themes/theme43776/bootstrap/less/bootstrap.lesslessphp fatal error: load error: failed to find /Applications/MAMP/htdocs/breg/wp-content/themes/theme43776/style.less
Warning: Cannot modify header information – headers already sent by (output started at /home/weliketo5/public_html/breg/wp-content/themes/CherryFramework/includes/less-compile.php:155) in /home/weliketo5/public_html/breg/wp-includes/pluggable.php on line 1207
Could anybody help me out?
Alfredo Garcia
While doing step #4: Import WordPress Database on Live Site, I get the following SQL error:
Error
MySQL said: Documentation
#1064 – You have an error in your SQL syntax; check the manual that corresponds to your MySQL server version for the right syntax to use near ‘?’ at line 105
Can you tell me what is wrong and how I can fix this?
WPBeginner Support
The backup file you are trying to import could be corrupt. Export a fresh copy and then try again. If this does not work, then ask your web hosting provider to update your MySQL version.
Admin
Alfredo Garcia
Thank you. I’ll try it tonight.
Ngabe R
I was missing step 5. Thanks a lot. Very helpful!
Adam
Do I need to install WordPress on my server before beginning this process, or do I just follow the steps as listed?
WPBeginner Support
No, please see step 2. You will upload WordPress files from your local server to the live server.
Admin
Adam
Thanks, I’ve got it all working now! This was a really, really helpful tutorial!
Rod
Thanks, very helpful ! Once I worked out the correct server name on the host et all went well.
Yonatan
Great article and really helpful.
Tnx!
Momodu Oladapo Abraham
it worked thanks, however there arre still some links connecting to the local server address most experienced on the posts and blogs…what do i do ..please help…every other thing has worked fine except the posts. Thanks
Natharza
Hey
Everything worked out but the post links are not working. I do run the sql query still links were broken with the error “No input file specified.”
Please help
Michael
Thanks for this article. It saves me from stress of redesign online
Sarah
Thanks for a great tutorial, followed every steps and nothing went wrong !
THUMBS UP +++
Fongoh Tayong
Man, you are the bomb.
It worked for me like charm.
More power to you to write more tutorials on this. I am newbee to wordpress.
Thanks again.
Louise
Hi,
With step 2, if you dont have a public_html directory where else can you upload the file under? as per Milos question. I have gone into file manager and to httpdocs file and uploaded it there.
Thanks
Max
Thank you for a really simple, easy to follow tutorial on how to migrate a database. I notice that you didnt’ state to update the DB_HOST name, but otherwise this was great.
Stefano
Hi! First of all thnx for the detailed guide.
I followed all the steps without problem. Anyways, the theme and all the plugins i had installed on localhost are missing causing the page looking completely different. What can i do to import all previous plug-in and settings? Thank you in advance for toyr reply
WPBeginner Support
You can upload them from your computer using an FTP client.
Admin
Junn
Hi thank you for this tutorial, It works for me! However, I cant find the pages I created locally and settings are not right. It did let me install a new wordpress.
What went wrong?
Monique
hello. thanks for this tutorial. but i have a problem at step 6. All first 5 steps are done. but when i reload my site after changing URL in database. there is no such message as “Error Establishing Database Connection error” and my site is still opening in local host. please help what i should do now
Alex
How to create MySql db on my actual site. My provider can help me?
WPBeginner Support
Yes they can help you.
Admin
Miloš
Hi, it is me again. Now I have a problem with step seven. I put that code with my own web page
in my sql but 2 of five pages still don’t work. I propably didn’t understand your instructions very well. What do you mean by ”but don’t forget to change it with your own local site and live site URLs. ”?
Nadeem
Hi
could you please check your menu under the appearance and then click one by one those menu which is not working properly. hopefully you’ll find the errors.
Nady
Nikhil
Hi,
Thanks for the help…
All the steps are working perfect….
But When I am trying to login or Click on Any link….
It show me following msg….
My Website :
Internal Server Error
The server encountered an internal error or misconfiguration and was unable to complete your request.
Please contact the server administrator at webmaster@ to inform them of the time this error occurred, and the actions you performed just before this error.
More information about this error may be available in the server error log.
Additionally, a 500 Internal Server Error error was encountered while trying to use an ErrorDocument to handle the request.
What’s the solution of this error…
Dwayne Smith
Hi NIKHIL I am having the same problem did you manage to figure out what the problem was. If so could you please let me know your solution
Cheers
Dwayne
Mustapha
Very helpful post
thank you
Milos
I have a problem with step 6 since that I don’t know how to edit wp-config.php. The thing is that when I click right mouse and open view/edit there are no options for entering database name, user and password.
Also in step 3 I uploaded my WP files in htdocs file because that’s the only folder that I see. I use FileZilla.
I would appreciate very much if you could answer me on my email.
Miloš B.
Andrej
Milose… When you open wp-config.php file, you need to open it as a notepad document, and find at the beggining of the text database name, user and password, edit text manually and then save again.
Matt
I ran into an sql error 1064 when importing using a compressed export. Finally got it working by exporting as an uncompressed .sql