Muitos usuários do WordPress preferem trabalhar em seus sites usando um servidor local em seus computadores. Isso permite que você trabalhe em seu site de forma privada antes de disponibilizar as alterações on-line.
Eventualmente, você precisará movê-lo para um servidor ativo para torná-lo acessível aos visitantes on-line. Essa transição é crucial para garantir que seu website funcione adequadamente no site ativo.
Como trabalhamos em muitos sites locais, tivemos que aprender a maneira mais fácil de transferir conteúdo para sites ativos.
Neste artigo, forneceremos instruções passo a passo sobre como mover o WordPress de um servidor local para um site ativo.
Por que mover o WordPress de um servidor local para um site ativo?
Criar seu blog WordPress em um servidor local é uma maneira segura de testar as alterações em seu site sem afetar os visitantes.
Quando você terminar de aperfeiçoar seu site, a próxima etapa é passar do servidor local para um site ativo.
Vamos mostrar duas maneiras de mover seu site de um servidor local para um site ativo.
O primeiro método usa um plug-in de migração do WordPress e é recomendado para iniciantes.
No segundo método, mostraremos como mover manualmente o WordPress de um servidor local para um site ativo.
Você pode escolher o método que funciona melhor para você:
Antes de migrar seu site WordPress
Para migrar o WordPress de um servidor local para um servidor ativo, você precisa de alguns fatores.
Primeiro, presumimos que você tenha um site WordPress em execução em um servidor local (também chamado de localhost) no seu computador e que tenha acesso total a ele.
Em seguida, você precisará ter um nome de domínio e uma hospedagem na Web.
Já ouvimos inúmeras histórias de iniciantes que começaram com provedores de hospedagem na Web ruins ou gratuitos e se arrependeram. Em nossa experiência, a escolha do provedor de hospedagem correto é fundamental para o sucesso de qualquer site.
Para facilitar sua decisão, recomendamos o uso da Bluehost. Eles são uma empresa de hospedagem WordPress oficialmente recomendada e estão oferecendo aos usuários do WPBeginner um desconto exclusivo + domínio e SSL gratuitos.
Basicamente, você pode começar por apenas US$ 1,99 por mês.
Se você quiser uma ótima alternativa ao Bluehost, pode dar uma olhada no Hostinger. Eles também estão oferecendo um desconto exclusivo para usuários do WPBeginner com um nome de domínio gratuito.
Se você puder pagar um pouco mais, dê uma olhada no SiteGround. Eles também têm uma oferta especial para os leitores do WPBeginner.
Se precisar de ajuda para configurar seu site, siga nosso guia passo a passo sobre como criar um site.
Por fim, você precisará de um programa de FTP e saberá como usar o FTP para fazer upload do site do servidor local para o site ativo.
Pronto? Vamos começar a migrar seu site WordPress.
Tutorial em vídeo
Se você preferir instruções por escrito, continue lendo.
Método 1: Transferir o WordPress do servidor local para o site ativo usando um plug-in de migração (recomendado)
Esse método é mais fácil e recomendado para iniciantes. Usaremos um plugin de migração do WordPress para mover o WordPress do host local para um site ativo.
Etapa 1: Instalar e configurar o plug-in do Duplicator
Primeiro, você precisa instalar e ativar o plug-in do Duplicator em seu site local. Para obter mais detalhes, consulte nosso guia passo a passo sobre como instalar um plug-in do WordPress.
Dica profissional: Há também uma versão profissional do Duplicator que oferece backups seguros, armazenamento em nuvem, restauração fácil do site e muito mais.
Após a ativação, você precisa ir para a página Duplicator ” Backups e clicar no botão “Create New” (Criar novo).
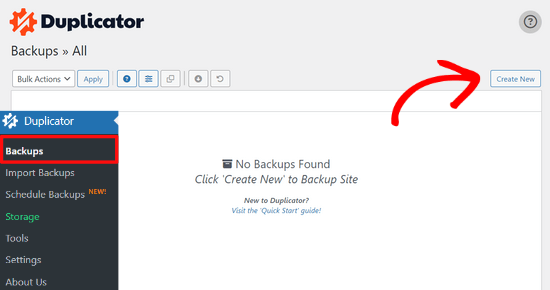
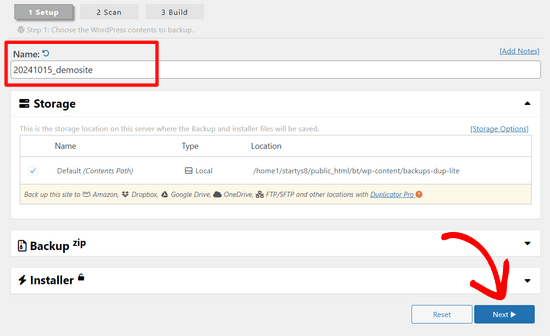
Isso o levará a uma tela na qual você poderá dar um nome ao backup.
Em seguida, clique no botão “Next” (Avançar).
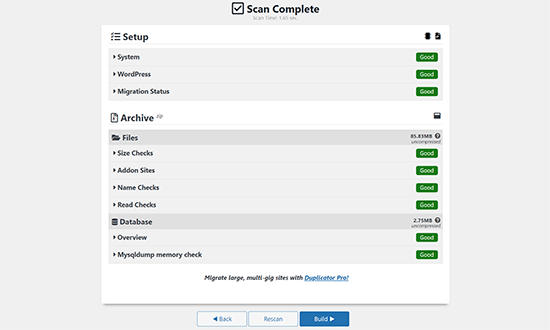
O Duplicator agora executará alguns testes para verificar se tudo está em ordem.
Se todos os itens estiverem marcados como “Bom”, clique no botão “Construir”.
Esse processo pode levar alguns minutos, dependendo do tamanho de seu site. Você deve deixar essa guia aberta até que seja concluída.
Quando terminar, você verá opções de download para os pacotes “Installer” e “Archive”. Você precisa clicar no botão “Download Both Files” (Baixar ambos os arquivos) para baixar os dois arquivos para o seu computador.
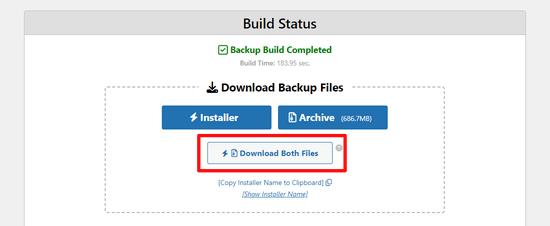
O arquivo “Archive” é uma cópia completa do seu site WordPress. Ele inclui todos os arquivos principais do WordPress, bem como suas imagens, uploads, temas, plug-ins e um backup do seu banco de dados do WordPress.
O arquivo “Installer” é um script que automatizará todo o processo de migração, descompactando o arquivo que contém seu site.
Etapa 2: Crie um banco de dados para seu site WordPress ativo
Antes de executar o instalador ou carregar o site do WordPress do host local para o servidor de hospedagem, é necessário criar um banco de dados MySQL para o novo site ativo.
Se você já tiver criado um banco de dados MySQL, poderá pular esta etapa.
Para criar um banco de dados, você precisa acessar o painel do cPanel da sua conta de hospedagem. Em seguida, localize a seção “Databases” (Bancos de dados) e clique no ícone “MySQL Database Wizard” (Assistente de banco de dados MySQL).
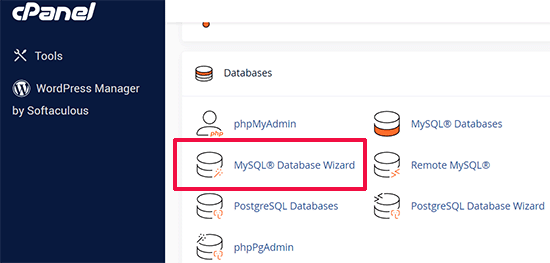
Na tela seguinte, há um campo para criar um novo banco de dados.
Basta fornecer um nome para o seu banco de dados e clicar no botão “Create Database” (Criar banco de dados).

O cPanel criará um novo banco de dados para você.
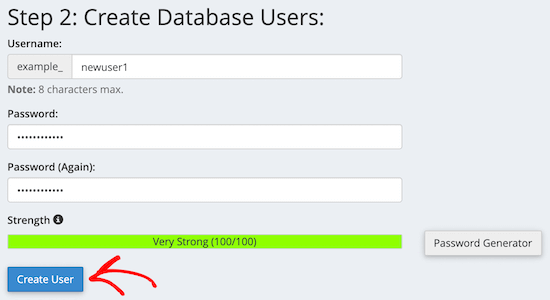
Depois disso, é necessário inserir um nome de usuário e uma senha para o novo usuário e, em seguida, clicar no botão “Create User” (Criar usuário).
Em seguida, você precisa adicionar o usuário que acabou de criar ao banco de dados.
Primeiro, clique na caixa de seleção “All Privileges” (Todos os privilégios).
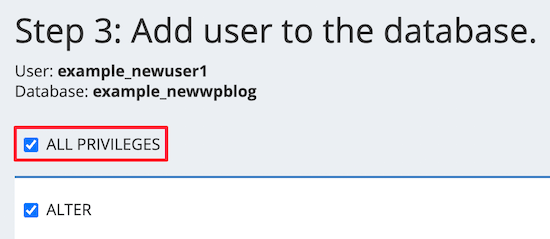
Em seguida, role a tela para baixo e clique no botão “Make Changes” (Fazer alterações) para salvar suas alterações.
Seu banco de dados está pronto para ser usado com seu site WordPress. Não se esqueça de anotar o nome do banco de dados, o nome de usuário e a senha. Você precisará dessas informações na próxima etapa.
Etapa 3: Fazer upload de arquivos do servidor local para o site do WordPress ativo
Agora, você precisa carregar o arquivo e os arquivos do instalador do seu site local para a sua conta de hospedagem.
Primeiro, conecte-se ao seu site ativo usando um cliente FTP. Uma vez conectado, certifique-se de que o diretório raiz de seu site esteja completamente vazio.
Normalmente, o diretório raiz é a pasta /home/public_html/.
Algumas empresas de hospedagem WordPress instalam automaticamente o WordPress quando você se inscreve. Se você tiver arquivos do WordPress lá, precisará excluí-los.
Depois disso, você pode carregar os arquivos archive.zip e installer.php do Duplicator para seu diretório raiz vazio.

Etapa 4: Execução do script de migração
Depois de fazer o upload dos arquivos de migração, você precisa visitar o seguinte URL no navegador:
http://example.com/installer.php
Não se esqueça de substituir “example.com” por seu próprio nome de domínio.
Isso iniciará o assistente de migração do Duplicator.
O instalador executará alguns testes e inicializará o script.
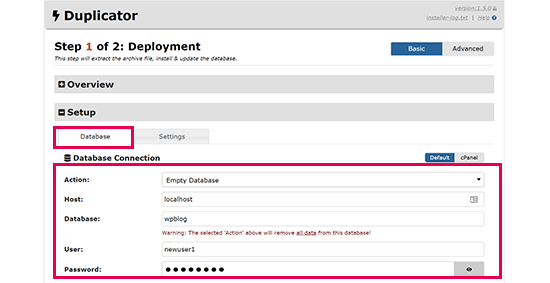
Na seção Setup (Configuração), você será solicitado a inserir o host do MySQL, o nome do banco de dados, o nome de usuário e a senha.
Seu host provavelmente será um host local. Depois disso, você digitará os detalhes do banco de dados que criou na etapa anterior.
Em seguida, clique no botão “Validate” (Validar) para garantir que os detalhes inseridos estejam corretos.
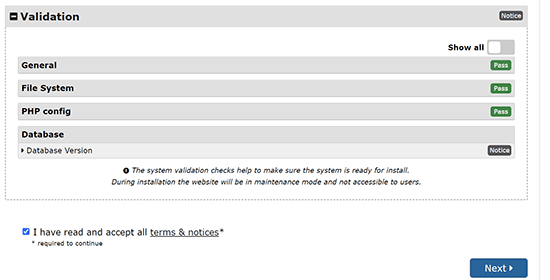
Depois disso, clique no botão “Next” (Avançar) para continuar.
O Duplicator agora importará o backup do banco de dados do WordPress do arquivo para o novo banco de dados.
Ele também atualizará os URLs que apontam para o site local e seu novo site ativo.
Agora você pode clicar no botão “Admin Login” para entrar na área de administração do WordPress do seu site ativo.

Quando você fizer login no site ativo, o Duplicator limpará automaticamente os arquivos de instalação.
Isso é tudo. Você transferiu com êxito o WordPress do servidor local para o site ativo.
Método 2: Transferir manualmente o WordPress do servidor local para o site ativo
Neste método, mostraremos como mover manualmente o WordPress do servidor local para seu site ativo. Ele será útil se o primeiro método não funcionar ou se você preferir fazer isso manualmente.
Etapa 1: Exportar o banco de dados local do WordPress
A primeira coisa que você precisa fazer é exportar seu banco de dados local do WordPress. Usaremos o phpMyAdmin para fazer isso.
Se não estiver familiarizado com ele, talvez queira dar uma olhada em nosso guia sobre gerenciamento de banco de dados do WordPress usando o phpMyAdmin.
Basta acessar http://localhost/phpmyadmin/ e clicar em seu banco de dados do WordPress. Em seguida, clique no botão “Export” na barra de menu superior.

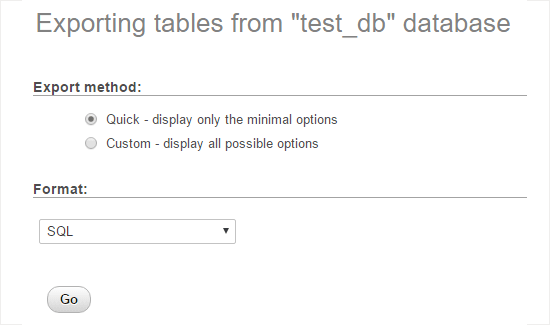
Na opção “Export method:” (Método de exportação), você pode escolher “Quick” (Rápido) ou “Custom” (Personalizado). A opção Personalizada lhe dará mais opções para exportar seu banco de dados.
Mas recomendamos escolher “Quick” (Rápido) e clicar no botão “Go” (Ir) para fazer o download do banco de dados.
Etapa 2: Faça upload dos arquivos do WordPress para o site ativo
Agora, precisaremos mover todos os arquivos do seu site para o site ativo.
Para começar, abra seu cliente FTP e conecte-se à sua conta de hospedagem na Web.
Depois de se conectar ao seu site ativo, certifique-se de carregar os arquivos no diretório correto. Por exemplo, se você quiser que o site seja hospedado em “yoursite.com”, deverá carregar todos os arquivos no diretório public_html.
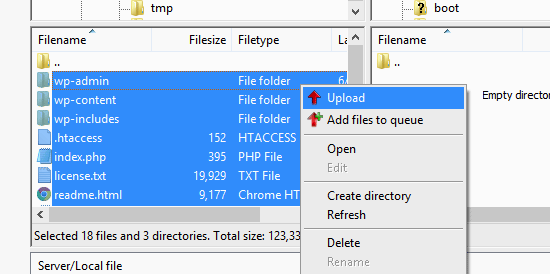
Agora, selecione seus arquivos locais do WordPress e carregue-os no servidor ativo.
Etapa 3: Crie um banco de dados MySQL em seu site ativo
Enquanto o cliente FTP estiver carregando os arquivos do WordPress, você poderá começar a importar o banco de dados para o servidor ativo.
A maioria dos provedores de hospedagem WordPress oferece o cPanel para gerenciar sua conta de hospedagem, portanto, mostraremos como criar um banco de dados usando o cPanel.
Primeiro, é necessário fazer login no painel do cPanel e clicar no ícone “MySQL Database Wizard” (Assistente de banco de dados MySQL), que pode ser encontrado na seção “Databases” (Bancos de dados).

Na tela seguinte, você pode criar um novo banco de dados.
Você precisa fornecer um nome para o banco de dados e, em seguida, clicar em “Create Database” (Criar banco de dados).

O cPanel criará automaticamente um novo banco de dados para você.
Em seguida, é necessário inserir um nome de usuário e uma senha para o novo usuário e clicar em “Create User” (Criar usuário).
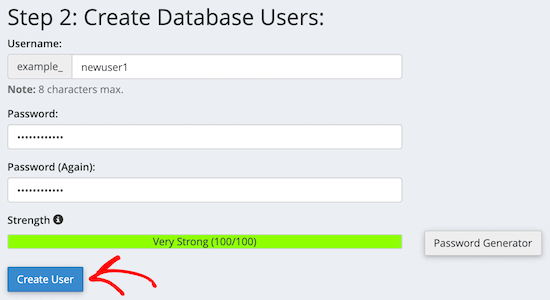
Depois disso, você precisa adicionar o usuário que acabou de criar ao banco de dados.
Primeiro, marque a caixa de seleção “All Privileges” (Todos os privilégios).
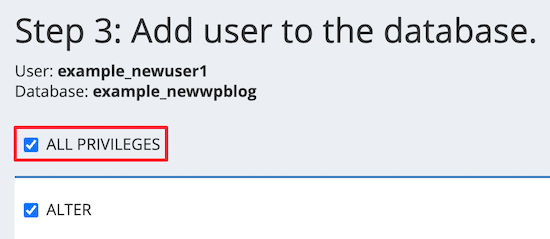
Em seguida, role a tela para baixo e clique em “Make Changes” (Fazer alterações) para salvar suas alterações.
Você criou com sucesso um novo banco de dados para seu site WordPress ativo.
Etapa 4: Importar o banco de dados do WordPress para o site ativo
A próxima etapa do processo é importar seu banco de dados do WordPress.
Vá para o painel do cPanel, role para baixo até a seção “Databases” (Bancos de dados) e clique em “phpMyAdmin”.
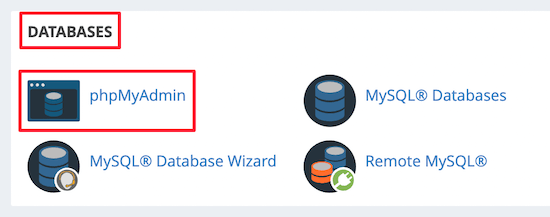
Isso o levará ao phpMyAdmin, onde você deverá clicar no banco de dados que acabou de criar acima. O phpMyAdmin mostrará seu novo banco de dados sem tabelas.
Em seguida, clique na guia “Import” (Importar) no menu superior. Na página de importação, clique no botão “Choose File” (Escolher arquivo) e selecione o arquivo de banco de dados do site local que você salvou na primeira etapa.
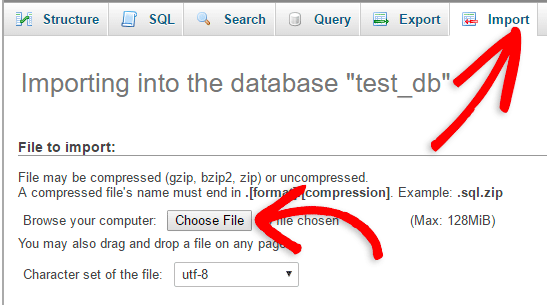
Depois disso, clique no botão “Go” (Ir) na parte inferior da página. Seu banco de dados será importado automaticamente para o phpMyadmin.
Etapa 5: Alterar o URL do site
Agora, você precisa alterar o URL do site no banco de dados para que ele se conecte ao seu site WordPress ativo.
No phpMyAdmin, procure a tabela wp_options em seu banco de dados que você acabou de importar acima.
Se você alterou o prefixo do banco de dados, em vez de wp_options, pode ser {new_prefix}_options.
Em seguida, clique no botão “Browse” (Procurar) ao lado de wp_options. Ou clique no link na barra lateral para abrir a página que tem uma lista de campos na tabela wp_options.
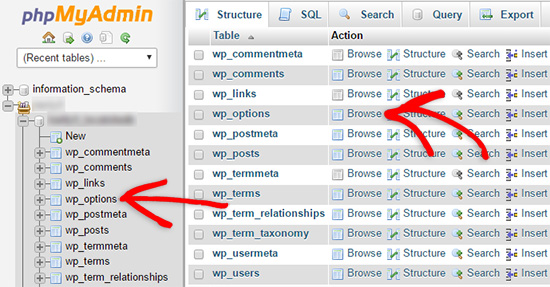
Em seguida, na coluna options_name, você precisa procurar a opção siteurl.
Em seguida, clique no ícone “Editar”.

Isso abre uma janela na qual você pode editar o campo.
Na caixa de entrada option_value, você verá o URL da sua instalação local, que será algo como http://localhost/test.
Você precisa inserir o URL do novo site nesse campo, por exemplo: https://www.wpbeginner.com.
Em seguida, você pode salvar o campo clicando no botão “Go” (Ir).
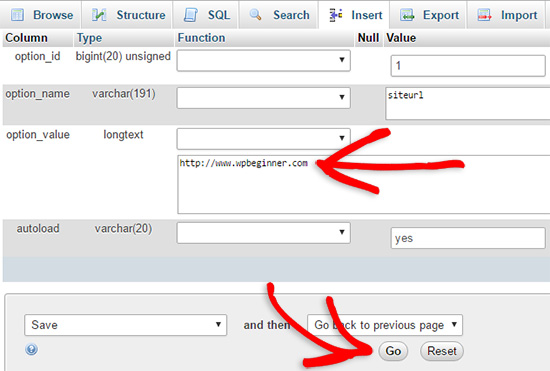
Em seguida, você precisa seguir as mesmas etapas descritas acima para o nome da opção home. O menu wp_options pode ter algumas páginas. Normalmente, a opção home estará na segunda página.
Em seguida, atualize o URL da página inicial para que ele seja igual ao URL do site ativo.
Etapa 6: Configure seu site ativo
Agora que você importou o banco de dados e fez o upload do conteúdo, é hora de configurar o WordPress.
Nesse momento, seu site deve estar exibindo o erro“Erro ao estabelecer uma conexão com o banco de dados“.
Para corrigir isso, conecte-se ao seu site usando um cliente FTP e abra o arquivo wp-config.php.
Você procurará as seguintes linhas de código:
1 2 3 4 5 6 7 8 9 | // ** MySQL settings - You can get this info from your web host ** ///** The name of the database for WordPress */define( 'DB_NAME', 'database_name_here' );/** MySQL database username */define( 'DB_USER', 'username_here' );/** MySQL database password */define( 'DB_PASSWORD', 'password_here' );/** MySQL hostname */define( 'DB_HOST', 'localhost' ); |
Você precisará fornecer o nome do banco de dados, o nome de usuário e a senha que criou anteriormente.
Em seguida, salve o arquivo wp-config.php e carregue-o novamente no servidor de hospedagem do WordPress.
Agora, quando você acessar seu site, ele deverá estar ativo.
Depois disso, você precisa fazer login no painel de administração do WordPress e ir para Configurações ” Geral. Em seguida, sem alterar nada, role até a parte inferior e clique no botão “Salvar alterações”.
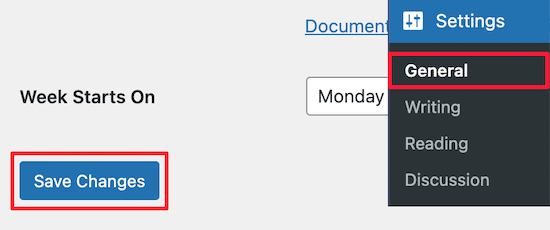
Isso garantirá que o URL do seu site seja corrigido em qualquer outro lugar que seja necessário.
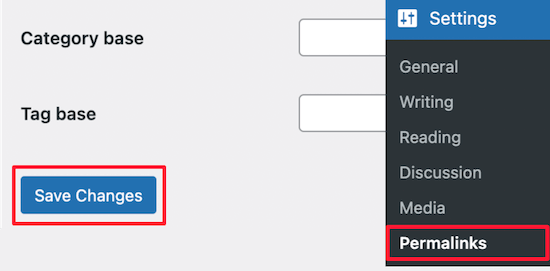
Depois de fazer isso, vá para Configurações ” Permalinks, role para baixo e clique em “Salvar alterações” para garantir que todos os links de postagem estejam funcionando bem.
Etapa 7: Corrigir imagens e links quebrados atualizando os caminhos
Sempre que estiver movendo um site do WordPress de um domínio para outro ou de um servidor local para um site ativo, você se deparará com links quebrados e imagens ausentes.
Mostraremos duas maneiras de atualizar URLs. Você pode escolher a que funciona melhor para você.
1. Atualizar URLs usando o plugin Search & Replace Everything (recomendado)
A maneira mais segura de corrigir isso é usar o Search & Replace Everything. Ele é um poderoso plug-in do WordPress que permite executar facilmente tarefas de atualização em massa em seu site sem escrever consultas complexas ao banco de dados.
Primeiro, você precisa instalar e ativar o plug-in Search & Replace Everything.
Após a ativação, vá para a página Tools ” WP Search & Replace.
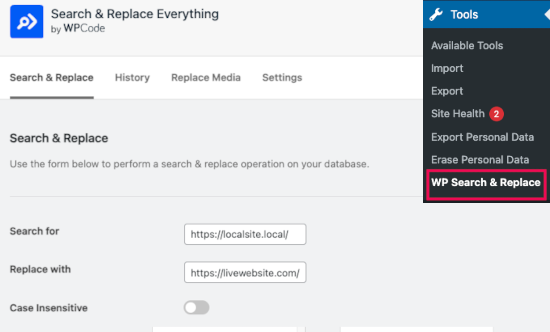
A partir daí, você precisa inserir o URL do site local no campo “Search for” (Pesquisar por) e o URL do site ativo no campo “Replace with” (Substituir por).
Role um pouco a tela e clique em “Select All” (Selecionar tudo) abaixo das tabelas. Isso garante que o plug-in procurará o URL antigo em todos os lugares do banco de dados.
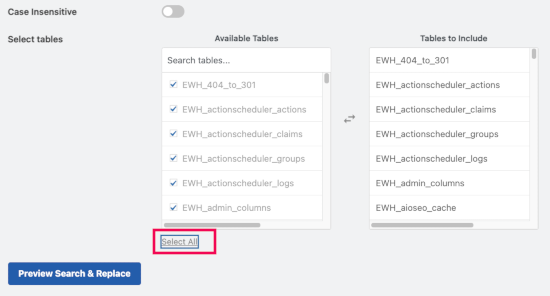
Agora, clique no botão “Preview Search & Replace” para continuar.
O plug-in pesquisará em seu banco de dados todas as instâncias do URL antigo e, em seguida, visualizará os resultados.
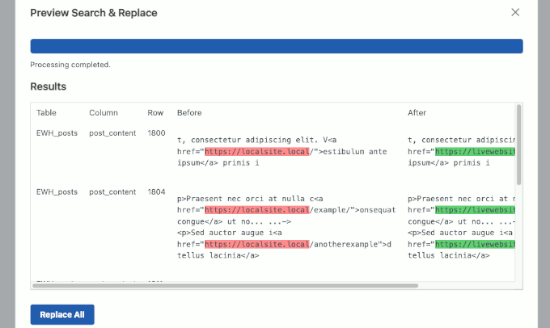
Se tudo estiver correto, clique em “Replace All” (Substituir tudo) para salvar as alterações.
Você verá um aviso sobre as alterações que está fazendo. Clique em “Yes” (Sim) para continuar.
O plug-in atualizará o banco de dados e substituirá os URLs locais pelo URL atual do seu site.
2. Atualizar URLs manualmente (avançado)
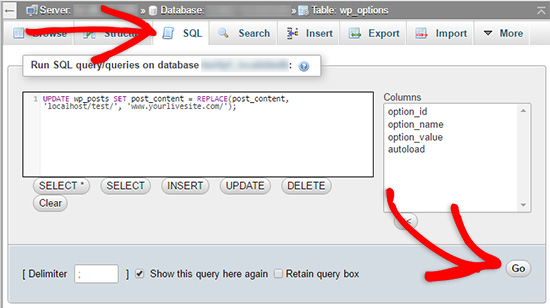
Outra maneira de atualizar os URLs é usar a seguinte consulta SQL:
1 | UPDATE wp_posts SET post_content = REPLACE(post_content, 'localhost/test/', 'www.yourlivesite.com/'); |
Basta acessar o phpMyAdmin, clicar em seu banco de dados e, em seguida, clicar em “SQL” no menu superior e adicionar a consulta acima.
Certifique-se de alterá-lo para os URLs do site local e do site ativo e clique no botão “Go” (Ir).
É isso aí. Agora você migrou com sucesso o WordPress do seu servidor local para um site ativo.
Esperamos que seu site ativo esteja funcionando sem problemas. Se você notar algum erro, consulte nosso guia de erros comuns do WordPress para obter ajuda na solução de problemas.
Esperamos que este artigo tenha ajudado você a migrar o WordPress de um servidor local para um site ativo. Talvez você também queira consultar nosso guia sobre como mover um site ativo para um servidor local ou dar uma olhada na lista de verificação definitiva de migração de sites para obter etapas práticas de migração do WordPress.
Se você gostou deste artigo, inscreva-se em nosso canal do YouTube para receber tutoriais em vídeo sobre o WordPress. Você também pode nos encontrar no Twitter e no Facebook.


ANTONIO
Some days ago I posted I had used method #1 successfully. I am now trying again, from scratch, with no success.
I have two webs in one host (two subdomains: www and blog). one seats in /public/ and the other seats in /public_blog/.
(so, not a subfolder but a sibling, in my host provider). Both (www and blog subdomains) have a SSL.
I got to enter the WP admin area, clean the remaining files; posts and pages are listed, but clicking preview shows a blank page. No errors on the log
I don’t know how to trace and find out the steps (although I have the dup-installer-log.txt
thanks
WPBeginner Support
You would likely want to reach out to your hosting provider to ensure that the subdomain is set to the correct folder location for the most common reason for that issue.
Admin
Rob H
Brilliant tutorial.
I went with option 1. Got write through to point 4, but then on trying to launch WordPress, I received a “too many redirects”. Spent ages trying to figure out what I had done wrong, trying all the suggested for the error type and turned out not to be my fault. It wasn’t working because the database version I was using on Wamp was newer than the version on my hosting company 1and1 ionos.
I called up 1and 1 CS’s to ask if they could update the database version and it appears they must have had other complaints. 2 days later, database version updated and my local website transferred to the live site within minutes.
So…… database versions is another thing to consider if you get problems.
Thanks for such an excellent tutorial, I will use this method again in the future.
WPBeginner Support
Thanks for sharing your solution should anyone else run into this issue
Admin
Antonio
Perfect. I used method #1. Now the site (in server) is up and running.
But, then, when I add some posts, pages, menus in localhost,… how can I update the real site, without starting from scratch again?
thanks
WPBeginner Support
You could use the duplicator method to move the updated content over to your current site
Admin
Antonio
Thanks. I will try.
I didn’t notice my post was published yesterday, so I just wrote a new one asking the same question.
Sorry for the inconvenience.
WPBeginner Support
No worries
Bahadur
My website working fine on localhost but when i upload it to my live domain some of the Social button images are not showing can you help please ?
WPBeginner Support
We would first recommend reaching out to the support for the plugin you are using to ensure there isn’t a hiccup that is specific to transferring the content.
Admin
Luisa
Hi! I followed every step but once I get to step 4 and click on Admin Login I get an error saying “Too many redirects occurred trying to open […]. This might occur if you open a page that is redirected to open another page which then is redirected to open the original page”.
How can I fix that?
WPBeginner Support
For that error you would want to try the troubleshooting steps in our article here: https://www.wpbeginner.com/wp-tutorials/how-to-fix-error-too-many-redirects-issue-in-wordpress/
Admin
Anita Steen-van Meerveld
Hi, I’ve followed the instructions so far, and everything seems to go as it has, but the problem begins on step 4.
I’ve uploaded the migration files, after check the file is 1.2 gig.
After launching the installer.php the message is : file is 4k, please upload the complete file.
I am sure that the uploaded file is completely uploaded.
The process stops here, what can I do?
WPBeginner Support
You would want to reach out to duplicator’s support and let them know the error and they will be able to assist.
Admin
Jessica
Thankyou for this fantastic tutorial! I am building a new website locally but I already have a live site running that I will want to completely overwrite with the new one. Do I need to delete my whole live website before migrating? Both are running WordPress but are completely different themes… thanks!
WPBeginner Support
It would normally be best to remove the site you are replacing so you do not have unnecessary additional files on your server.
Admin
nurudeen
In my opinion I recommend you guys to please organize a complete video tutorial, it gonna be a great practical guide and more helpful and much easier, for it may allow to view in real doing until results achieve.. Thanks you guys for good job you are offering.
WPBeginner Support
Thank you for your recommendation
Admin
Reggie
Hi, I did this and now my slider/carousel does not work live but it shows and works on localhost. What can I do to fix this? Thank you.
WPBeginner Support
It would depend on what error you are running into at the moment. If you reach out to the slider plugin’s support they should be able to assist.
Admin
Gage
Hi I really appreciate the in depth explanation. I am completely finished with step 5, changed my URL and Home to my actual URL i am using, but now when I type in my URL it still gives me the “if you are the owner login to launch site”. Not sure what I’m missing but i dont get an error message.
WPBeginner Support
Hi Gage,
Please recheck if you uploaded WordPress files to the correct directory. If you are unsure, then ask your hosting provider and they will let you know which directory you should upload it to.
Admin
Vladimir
Thank. Very useful tutorial.
WPBeginner Support
Thank you
Admin
Tarun Bisht
Thanks for sharing the post, i will surely try.
WPBeginner Support
Glad our post can help you
Admin
Hazel beaver
I normally love your tutorials and have built my two personal websites with your help and guidance… But this is too complicated for me!
When I run Duplicator If doesn’t list all the entries as ‘good’. The size check and add on checks come back as having a warning. so I can’t get any further. My site isn’t that big.. but I think it’s trying to package everything ( including back-up and plugins that I assume I don’t need to migrate. Is there a way round this ( I’m trying to down load my live site to WAMP so I can work on using a new theme )
WPBeginner Support
As long as they are only warnings you should be able to continue, if you click on the section with the warning it should let you know different options on how to change from warning to good. You can also enable filters to ignore certain files/folders
Admin
Fahim
Good post.
WPBeginner Support
Thank you
Admin
Ravi gupta
Great! Thanks for sharing this information I am so very happy to read this information
WPBeginner Support
Glad you like our article
Admin
Rosa
Hi there! I’ve followed your instructions so far, and everything seems to go as it has, but I’ve stuck on Step 6.
I read: “To fix this, connect to your website using an FTP client and edit wp-config.php file. Provide the database name, user and password you created earlier in Step 3. Save the wp-config.php file and upload it back to your server. Visit your website, and it should be live now.”
Can you please be more specific? Where exactly do I find wp-config.php file and how do I edit it?
WPBeginner Support
You would find the wp-config file where your WordPress folders are which is normally in the public_html or www folder of your hosting. You would use a text editor such as notepad or similar to edit the content of the file
Admin
Hirr
Could be more helpful if you uploaded a video..
WPBeginner Support
Thank you for your recommendation, we’ll certainly take a look for a possible video
Admin
Mike
“Click on the Import tab in the top menu. On the import page, click on Choose File button and then select the database file you saved in Step 1.” I cannot locate this file – no idea where to even look.
WPBeginner Support
Hi Mike,
In the first step you would have saved a file to your computer. This is the file you need to import here.
Admin
Samad
Thank you very much for the information,
I have been doing these wrong in the past.
Jim Thorne
Fantastic how-to article. I followed it and easily migrated my site from localhost to the live server. Thanks for posting! I’m a newbie at moving a site, so I had to figure out some of the simplest things. One thing I had to discover was how to move the file folders from my computer to the host server using cPanel. After researching this, I discovered to ZIP the entire folder with all of its subfolders into a ZIP file and then upload that one file.
Christian
Fix Images and Broken Links by Updating Paths: How to update background images? The method mention in step 7, only work normal image not background images. So how to update images?
WPBeginner Support
Hi Christian,
You’ll have to manually update those.
Admin
Alex
Hi guys, great tutorial.
But when i try to access my site through the url, it asks me to re-install WordPress (i mean is shows me the wizard of the WordPress when it starts)
Plus, when you say go to the database and create a new user, mySQL doesn’t have an option.
Olaniyan
Hello please i followed all the steps but at the end of it all am getting an error message stating Erro In Establishing a database connection message
Steph
Hi, how do I proceed if there is no cPanel? Thank you in advance!
Jasonas
Hello! Great article. Just two things that I think would be cool to read on this subject.
1.Are there any tips of workflow in order to avoid the broken links, images etc. that you mention?
2.Also, I’ve read plugin reviews where users claim that some bad plugins will leave “trash code” (unusable code and files) after the uninstall/deletion of the plugin, which eventually makes their website slower. Is that true? If yes how could we, as beginners, detect that “trash code” (essentially the leftovers of plugins that we deleted) and remove it?
In my local website I try many plugins that I don’t intend to use and will end up deleting (like many others do), so I am interested in this.
Thank you in advance.
WPBeginner Support
Hi Jasonas,
1. You can follow the steps above in order they appear to avoid broken links.
2. You can view leftover data in your WordPress database by using phpMyAdmin. However, we don’t recommend beginners to do that unless they are certain that this data is slowing down their website.
Admin
Sally
Hi,
I have been building my site on the local server, I now want to move it over to a temporary Url on my WordPress which is installed on my hosting package to finish and then once ready it will be pointed to the domain name which currently hosts the old site, I have attempted the above steps but I get as far as step 1 and have no idea where the export file goes?
Sorry if this is a silly question but can’t seem to find it anywhere!
Any help would be much appreciated.
Thanks,
Sally
WPBeginner Support
Hi Sally,
Export file is automatically downloaded to your computer. Check your computer’s Downloads folder or any other folder where your browser usually stores downloaded files.
Admin
Sally
Hello,
Thanks, sorry can’t find it there at all. I emptied the folder and did it again but nothing appeared in there at all, hence asking the question.
All Safari downloads go into the normal download folder, so don’t know where it could be going. Going to give it a go with Duplicator and see if I get any further!
Thanks,
Sally
Sheuen
I think maybe you can try choose download custom instead of download quick, and then in output field, choose “Save output to a file” > Compression: > gzipped
JD Simpkins
Depending on your setup, it may not automatically download. It may open up in a new screen and you can then copy/paste it into a file and save yourself. Not sure if this is just a MAMP thing or what but when I migrated over to working on a Mac, this part of the steps changed.
Sally
Hi,
Your tutorials are great, thank you!
I have just been following this thread and not sure if what I am doing is wrong but I do Step 1 (Export) but no idea where the file that I am exporting goes?
I am running a local server on my Mac and have got stuck here, am I missing something?
I am trying to get my website from the local server to WordPress running on my hosting package with 123 Reg. This is going onto a temporary URL until I am ready to move onto the domain which has currently got the old website on it.
Any help will be much appreciated.
Many thanks
Sally
Ahmad Lone
Thank you so much.
Ismail
I have a wordpress website on live server, i want to replace it by another wordpress server that i created on localhost, i want to keep the same host and same domaine name. what should i do please ?
Sandy
This is very helpful. I want to ask about the next step. What if I continue to develop locally and want to sync changes from time to time ? Do you have a tutorial for that ?
DEAN O
I have an issue where my laptop died with localhost MAMP server. I have been able to extract the all the files from the hard disc but I can’t run a database export.
I have an laptop set up with XAMP.
Any thoughts?
Mauricio
Sunday evening.
The client wants the website.
I have tried Duplicator all day long, no way.
Problems with PHP and DB, just doesn’t work… until I get to your post.
Back to basics man, manually put the live on air.
Thanks for sharing.
Its the simpler idea yet we try to automate things and get less work done sometimes.
Had to share with you my truly akcnowledgment.
Nicely done
Stefan
Thank you! This guide is perfect. I use it every time I forget how I move wordpress from local to live!
Chell
I have recieved a complete WP “filesystem” through an FTP server from a supplier of mine, and I want to creat a new webpage with these files, but with my own domain.
Can I use this “walk-through” for this?
Sorry silly questions, but I have only worked on WP through a cloud solution
WPBeginner Support
Hi Chell,
You will also need the WordPress database not just the files. Once you have both database and WordPress files, then you will be able to upload them to your own domain name and import the database.
Admin
Scott
Hello. I have finished building my site on a local server and ready to move it to my live server. I am assuming that before I follow your steps, that I would need to install WordPress on my hosting account first. Is that correct? And if so, should I click the box that says “Automatically create a new database for this installation” ? If I do that, I will need to replace that database with the one from my local server, right? Or should I leave that box unchecked since I’m about to migrate a new database to it? Thanks.
WPBeginner Support
Hi Scott,
No, instead of installing WordPress you will be moving one from your local server to the live site. Similarly, you will export your local database and then import it on your live server’s hosting account using phpmyadmin via cpanel.
Admin
Bryn Why
Hi, after updating my wp-config.php file to reflect the database information, I am now presented with the below when accessing the live site:
Fatal error: Class ‘WP_Widget_Media’ not found in /home/…/wp-includes/widgets/class-wp-widget-media-audio.php on line 17
Manos Liakos
Dude, you are a life saver. That thing with the SQL query to change the links just saved me. I’ve been trying for 2 days straight to fix the site not displaying properly when accessing it from public ip through my domain name, even if “siteurl” and “home” were correctly configured. Thanks!
WPBeginner Support
Hi Manos,
Glad you found the solution. Don’t forget to join us on Twitter for more WordPress tips and tutorials.
Admin
Shreshta
Thank you in advance.
I have to upload the word press website from my local machine to the web server my company owns which sits in the same building as I work. My problem is I am not using any hosting services so I am not sure what to do when it comes to the file manager step for the database transfer. Just to be clear, how would I go if I were to upload the website from my local machine to the private company server without using a web hosting service.
Dimitris
Hello I am going to do this migration, but I have a question. What happened if i have to upload a website to a server but in my localhost this website is a part of multisite? How can I isolate this website from the local WordPress Network and finally upload it to a real web server?
Olumide
phpMyAdmin – Error
Error during session start; please check your PHP and/or webserver log file and configure your PHP installation properly. Also ensure that cookies are enabled in your browser.
session_start(): open(SESSION_FILE, O_RDWR) failed: No such file or directory (2)
The above is what i get and my site is not working please help.
WPBeginner Support
Hi Olumide,
If the error occurs on your live site, then please contact your hosting provider. If this happens on your local server, then this means your local server set up is not properly configured.
Admin
Angela
I just followed these steps to move a local site to active and none of my local site transferred over.
Olakorede O
Please i am having issues with step 7. i imputed the life site but what will i put for the local site? thanks
Dimitri
Thanks god for this article !
The Step 6 saved my life, it could not be found anywhere on the internet !!!
Kisses from France
Marlon
Hi WPBEGINNER SUPPORT et al,
Thanks I have found your article helping people out there. I hope I can find your favor to my problem. After having modifies by adding codes in functions.php (live site) i can’t view or access the website anymore, it always shows the message saying:
Notice: ob_end_clean(): failed to delete buffer. No buffer to delete in /home/dh_awey63/website/wp-content/plugins/nextgen-gallery/nggallery.php on line 92
ParseError thrown
syntax error, unexpected ‘ang’ (T_STRING)
I used to searched in google the message error and got some advices to access it thru FTP FileZilla client, but I can’t login successfully I always got an error in: “Response: 530 Login incorrect”. “Error: Critical error: Could not connect to server”. Is there a way i can edit the functions.php file to delete my comments there and put back the site in normal, I just don’t know if the web developer have configured ftp account, that freelance developer left his messy and lousy stuff in his web design and has gone out after he receives the payment. I am really new to this area and don’t know what to do. Please help. Thank you very much.
WPBeginner Support
Hi Marlon,
You can also access your WordPress files using the File Manager in cPanel under your web hosting account dashboard. Once you are connected to your site using file manager, you need to locate your functions.php file and undo the changes you made earlier.
Admin
Marlon
Hi WPBEGINNER SUPPORT,
Thank you for your prompt reply. I sad I really have no idea if the guy who build the site created a cpanel account, I really don’t know the login details if there’s any. That bad guy never replies my messages after he receives the money from us. Please help me what to do if there’s any available options. Please visit the website at rheumacares.ph. Thank you very much.
Victor
Hi, I’m with a problem in step 4. After importing my database I get an error message. I don’t now what I did wrong in the process and I don’t know how to fix it. Could you give me some advice? I’m posting the error message below
Thanks
Error
SQL query:
—
— Database: `meusite`
—
— ——————————————————–
—
— Table structure for table `wp_commentmeta`
—
CREATE TABLE `wp_commentmeta` (
`meta_id` bigint(20) UNSIGNED NOT NULL,
`comment_id` bigint(20) UNSIGNED NOT NULL DEFAULT ‘0’,
`meta_key` varchar(255) COLLATE utf8mb4_unicode_520_ci DEFAULT NULL,
`meta_value` longtext COLLATE utf8mb4_unicode_520_ci
) ENGINE=InnoDB DEFAULT CHARSET=utf8mb4 COLLATE=utf8mb4_unicode_520_ci
MySQL said: Documentation
#1050 – Table ‘wp_commentmeta’ already exists
WPBeginner Support
Hi Victor,
The table in your database already exists. If you do not have any content on your live site, then you can simply DROP all tables in your WordPress database and then try to import again.
Admin
Jonathan
Thank you for a fantastic article!
I have locally built a wordpress site which I would like to replace a site currently live online.
If I want to upload the local site to a test environment online, am I able to do this without the need to setup a new database? i.e. am i able to share the same database being used by the live site? If so how can I do this?
Cheers, Jon
Jon
Fantastically helpful article thankyou! I have been building a wordpress site locally to replace one that is hosted online.
I would like to move the locally hosted one to online in a test environment so that it does not replace the existing site.
You instructions suggest that I need to setup a new SQL database for which I will incur charges. Is there a way that I can upload the test site to the existing database without disturbing the live site? If so how?
Thanks,
Jon
WPBeginner Support
Hi Jon,
It is not recommended, but you can change the table prefix in the wp-config.php file of your test site to something unique. Use the same MySQL database as your live site. Doing so your live website’s database will have tables for different WordPress installs.
Admin
Jojo Esposa Jr
Can I use the Cpanel Softaculous installation of WordPress, then simply upload the sql database and the current theme I used? Uploading the entire wordPress files from my laptop to the live site using ftp takes very long since my internet connection is extremely slow, (2 mbps).
WPBeginner Support
Hello Jojo Esposa Jr,
Yes, you can do that.
Admin
Lyada Emmanuel
Hello i followed all the steps ,however when i open login page to wordpress i get this
Internal Server Error
WPBeginner Support
Hi Lyada,
Please see our guide on how to fix internal server error in WordPress.
Admin
Madison Duncan
Hello,
I am confused by step two. When I click on my FTP client account it prompts me to use Cyberduck, but then I am not sure which files to upload or where (how to I make sure it is on public html?). I completed step one, so are those the files that I am supposed to upload? I just don’t see all of those anywhere. Thanks!
WPBeginner Support
Hi Madison,
This tutorial is about moving a WordPress website built on local server (Your computer) to a live website. If you have a local server installed on your computer (programs like Wamp, MAMP, XAMP), then you will find local files on your computer. These are the files you need to upload.
The first step only exports your database. You will need it in Step 4.
Admin