Você já tentou fazer upload de um arquivo para o seu site WordPress e bateu de cara com um muro? É super frustrante quando você não consegue fazer o upload da imagem, plugin ou tema que precisa. Nossos leitores frequentemente nos pedem ajuda com problemas de upload de arquivos, pois eles podem desacelerar seu fluxo de trabalho.
Às vezes, esses limites de upload de arquivos podem impedi-lo inesperadamente de adicionar conteúdo à sua biblioteca de mídia ou de instalar aqueles plugins e temas maiores que você precisa. É como ficar de mãos atadas. E é ainda mais irritante quando você não sabe como consertar!
Mas não se preocupe, estamos aqui para ajudar. Adoramos que o WordPress seja uma plataforma tão configurável, e muitas vezes existem várias maneiras de resolver o mesmo problema.
Neste guia, mostraremos as maneiras mais fáceis de aumentar o tamanho máximo de upload de arquivos no WordPress. Vamos superar essas limitações para que você possa voltar a fazer o que ama – gerenciar seu site!
Por que Aumentar o Tamanho Máximo de Upload de Arquivos no WordPress?
Seu provedor de hospedagem WordPress definirá um tamanho máximo de upload de arquivo padrão quando você se inscrever e instalar o WordPress. Seu provedor de hospedagem define esse limite, e ele geralmente varia de 2MB a 500MB.
Para a maioria dos proprietários de sites WordPress, esse limite será mais do que suficiente.
No entanto, há momentos em que você precisará aumentar esse limite para não encontrar erros de upload.
Por exemplo:
- Você gerencia um site de fotografia e precisa fazer upload de imagens grandes.
- Seu portfólio de design ou fotografia tem imagens grandes.
- Você deseja instalar um tema ou plugin WordPress maior.
- Você deseja vender produtos digitais como eBooks, fotos, vídeos e muito mais.
- Você atualiza conteúdo regularmente e adiciona áudio, fotos e mais que excedem o limite atual.
Dito isso, vamos mostrar como você pode aumentar o tamanho máximo de upload de arquivos no seu site WordPress.
Observação: Lembre-se de que exibir muitos arquivos grandes em seu site pode diminuir seriamente sua velocidade e desempenho. É por isso que geralmente recomendamos nunca fazer upload de vídeos para o WordPress.
Como a maioria dos usuários tem configurações de hospedagem WordPress diferentes, cobriremos o seguinte:
- Como Verificar o Limite de Tamanho Máximo de Upload de Arquivos no WordPress
- Método 1: Contate seu Provedor de Hospedagem WordPress
- Método 2: Crie ou Edite um Arquivo php.ini Existente
- Método 3: Adicione Código ao Arquivo functions.php do seu Tema WordPress
- Método 4: Adicione Código ao seu Arquivo .htaccess
- Method 5: Use a WordPress Plugin to Increase File Upload Size
Como Verificar o Limite de Tamanho Máximo de Upload de Arquivos no WordPress
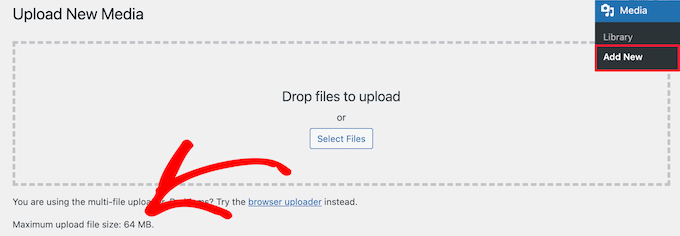
O WordPress mostrará automaticamente o limite máximo de tamanho de upload de arquivos quando você estiver fazendo upload de imagens ou outras mídias.
Para verificar isso, basta ir em Mídia » Adicionar Nova no seu painel de administração do WordPress, e você verá o limite máximo de tamanho de arquivo para upload do seu site WordPress.
Agora que você sabe como encontrar o limite de tamanho, vamos mostrar como aumentar o tamanho máximo de upload no WordPress.
Método 1: Contate seu Provedor de Hospedagem WordPress
Uma das maneiras mais fáceis de aumentar o tamanho máximo de upload de arquivos no WordPress é entrar em contato com seu provedor de hospedagem WordPress.
Esta é uma tarefa relativamente simples para a equipe de atendimento ao cliente deles e pode ser feita em alguns minutos.
Para iniciantes, isso pode ser muito mais fácil do que adicionar código ao WordPress e editar arquivos do servidor.
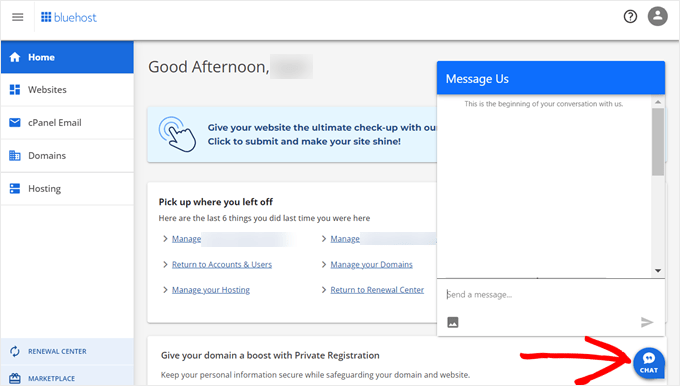
Basta acessar o site do seu provedor de hospedagem, como o Bluehost, e fazer login.
Em seguida, clique no ícone 'Chat' na parte inferior da tela. Você pode então pedir à equipe de suporte para aumentar o tamanho do upload de arquivos no seu site WordPress.
Você também pode entrar em contato com o suporte diretamente do painel da sua conta de hospedagem.
Método 2: Crie ou Edite um Arquivo php.ini Existente
Outra maneira de aumentar o tamanho máximo de upload de arquivos é criando ou editando um arquivo chamado php.ini. Este arquivo controla muitas configurações para o seu ambiente de hospedagem WordPress.
A maioria dos provedores de hospedagem WordPress, como o Bluehost, possui um cPanel amigável para iniciantes para ajudar a gerenciar seu site.
Se o seu provedor de hospedagem tiver um painel cPanel, você poderá aumentar o tamanho do upload de arquivos através das ferramentas integradas.
Observação: O seguinte é do cPanel do Bluehost. No entanto, a maioria dos provedores de hospedagem compartilhada terá etapas semelhantes.
Você encontrará um botão do cPanel na parte inferior da guia Hospedagem no Bluehost.
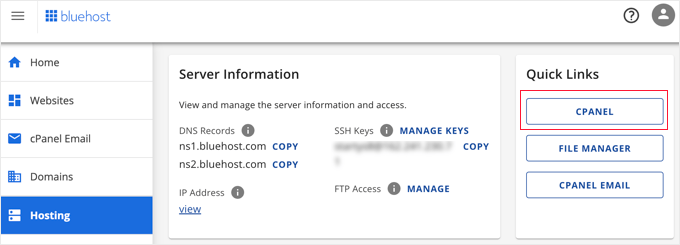
Clicar neste botão abrirá seu painel cPanel.
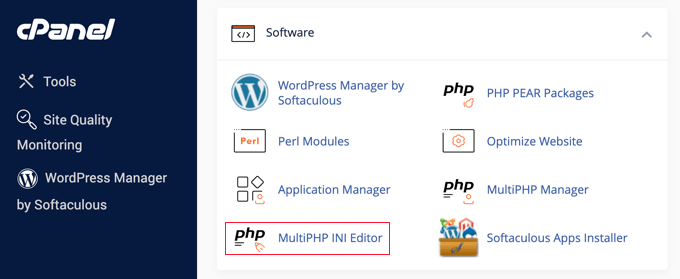
Agora você precisa rolar para baixo até a seção Software e clicar em 'MultiPHP INI Editor'.
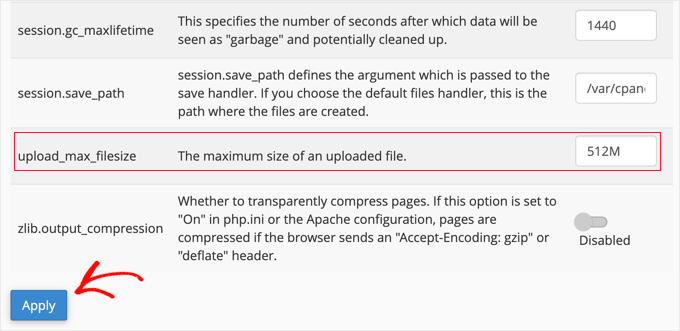
Em seguida, role para baixo até a seção rotulada 'upload_max_filesize' e insira um novo tamanho máximo de arquivo na caixa.
Em seguida, clique no botão 'Aplicar'.
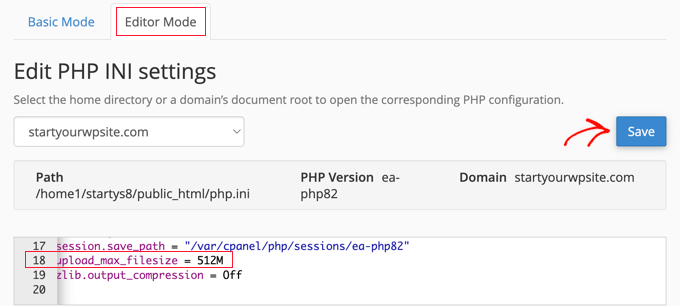
Alternativamente, você pode clicar na aba do menu 'Modo Editor' e, em seguida, poderá alterar o tamanho máximo de upload de arquivos diretamente no editor.
Você precisa editar a seção 'upload_max_filesize' para aumentar o tamanho do seu upload de arquivos.
Quando terminar, basta clicar no botão 'Salvar'.
Editar php.ini Adicionando Código
Se o seu provedor de hospedagem atual não oferecer a opção cPanel, você precisará editar este arquivo manualmente.
Para fazer isso, você pode usar um cliente FTP ou a opção de gerenciador de arquivos no painel de controle de hospedagem do seu WordPress.
Se você estiver usando hospedagem compartilhada, talvez não veja o arquivo php.ini no seu diretório de hospedagem. Se não vir um, simplesmente crie um arquivo chamado php.ini e envie-o para a sua pasta raiz.
Em seguida, adicione o seguinte trecho de código ao arquivo:
upload_max_filesize = 256M
post_max_size = 256M
max_execution_time = 300
Você pode modificar o limite de ‘256M’ para o tamanho de arquivo que você precisa para o seu blog WordPress.
Método 3: Adicione Código ao Arquivo functions.php do seu Tema WordPress
Este método envolve adicionar código ao seu arquivo functions.php no seu tema WordPress.
Em vez de editar o arquivo diretamente, recomendamos usar o WPCode. É o melhor plugin de snippets de código que permite adicionar código ao seu site sem quebrá-lo.
Se você nunca fez isso antes, consulte nosso guia para iniciantes sobre como adicionar código personalizado no WordPress.
Primeiro, você precisa instalar o plugin gratuito WPCode. Para mais detalhes, veja nosso guia passo a passo sobre como instalar um plugin do WordPress.
Após a ativação, você deve navegar para Snippets de Código » + Adicionar Snippet.
Você precisará passar o mouse sobre a opção ‘Adicionar seu código personalizado (Novo Snippet)’ e, em seguida, clicar no botão ‘+ Adicionar Snippet Personalizado’.

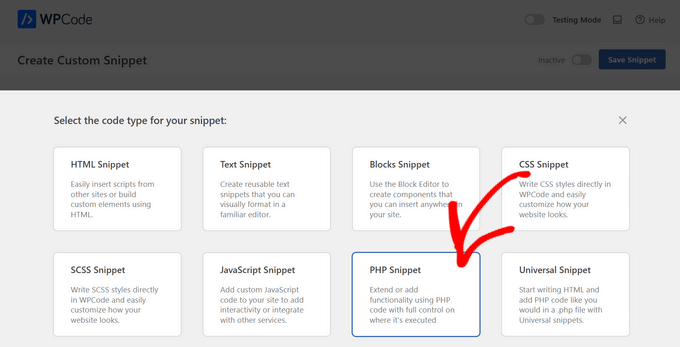
Em seguida, você precisa escolher ‘Snippet PHP’ como o tipo de código na lista de opções que aparecem.
Na tela seguinte, insira um nome para o seu novo snippet, que pode ser qualquer coisa para ajudá-lo a lembrar para que serve o código.
Em seguida, você pode copiar e colar o seguinte trecho de código em ‘Code Preview’. Certifique-se de alterar ‘256M’ para o tamanho máximo de arquivo que você precisa:
@ini_set( 'upload_max_size' , '256M' );
@ini_set( 'post_max_size', '256M');
@ini_set( 'max_execution_time', '300' );
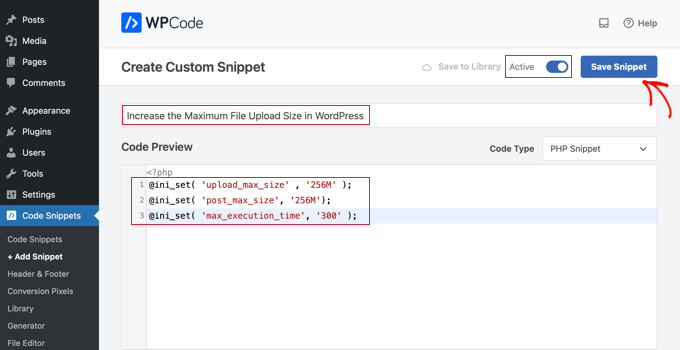
Finalmente, mude o interruptor no topo para ‘Active’ e, em seguida, clique no botão ‘Save Snippet’. O código agora será executado em seu site.
Método 4: Adicione Código ao seu Arquivo .htaccess
Outra maneira de aumentar o tamanho máximo do arquivo é modificando o arquivo .htaccess. Este arquivo controla as configurações de configuração de alto nível para o seu site.
Para fazer isso, você precisa fazer login no servidor do seu site via FTP. Se você nunca fez isso antes, consulte nosso guia sobre como usar FTP para fazer upload de arquivos para o WordPress para iniciantes.
Depois disso, você precisa localizar seu arquivo .htaccess na pasta raiz do seu site.

Se você não conseguir encontrar seu arquivo .htaccess, ele pode estar oculto pelo seu gerenciador de arquivos ou cliente FTP. Para saber mais, consulte nosso guia sobre por que você não consegue encontrar o arquivo .htaccess no seu site WordPress.
Em seguida, você precisa adicionar o seguinte trecho de código ao seu arquivo .htaccess:
php_value upload_max_filesize 256M
php_value post_max_size 256M
php_value max_execution_time 300
php_value max_input_time 300
Para aumentar ainda mais o tamanho máximo de upload de arquivos, basta alterar o ’64M’ para o tamanho que você precisa.
Método 5: Use um Plugin do WordPress para Aumentar o Tamanho do Upload de Arquivos
Outra maneira de aumentar o limite máximo de upload de arquivos é usando o plugin WP Increase Upload Filesize. Se você não se sente confortável em adicionar código ao WordPress, esta pode ser uma boa opção para você.
A primeira coisa que você precisa fazer é instalar e ativar o plugin. Para mais detalhes, consulte nosso guia sobre como instalar um plugin do WordPress.
Após a ativação, navegue até Mídia » Aumentar Limite de Upload no seu painel de administração do WordPress.
Isso o levará a uma tela onde você pode selecionar um novo tamanho de upload de arquivo no menu suspenso ‘Escolher Tamanho Máximo de Arquivo para Upload’.
Em seguida, clique no botão ‘Salvar Alterações’.

Observação: O tamanho máximo de upload de arquivo será definido pelo seu provedor de hospedagem. Se você precisar de um limite de tamanho de arquivo maior do que o listado no menu suspenso, precisará entrar em contato com seu provedor de hospedagem e solicitar o aumento do limite.
Tutorial em Vídeo
Se você não gosta de seguir instruções escritas, pode conferir nosso tutorial em vídeo:
Esperamos que este artigo tenha ajudado você a aumentar o tamanho máximo de upload de arquivo no WordPress. Você também pode querer ver nosso guia sobre como adicionar tipos de arquivo adicionais para serem enviados no WordPress e nossas principais escolhas de plugins e dicas para melhorar a área de administração do WordPress.
Se você gostou deste artigo, por favor, inscreva-se em nosso Canal do YouTube para tutoriais em vídeo do WordPress. Você também pode nos encontrar no Twitter e no Facebook.


Abduaziz
Muito obrigado!!! O Método 3 funcionou para mim.
WPBeginner Support
Glad our recommendation could help
Admin
Alexander Gartley
Obrigado, isso me ajudou a solucionar um limite de upload. Estou em uma instalação de rede multisite do WordPress, então acabou sendo uma configuração nas Configurações de Administrador da Rede.
Fiquei confuso no início, porque minhas configurações de PHP permitiam uploads maiores, mas estava restrito nas Configurações de Rede.
WPBeginner Support
Thanks for sharing what solved the problem for you
Admin
Ernesto
Teria sido ótimo se você tivesse incluído o método .user.ini.
.user.ini carregado na pasta raiz com o mesmo valor/texto no seu php.ini editado
Na maioria das vezes, apenas este método funciona para hospedagem compartilhada.
ErnestPH
WPBeginner Support
The php.ini file should work the same as the user.ini file unless your specific host ignores the php.ini but thank you for sharing your recommendation
Admin
Mark
Esta é a única solução que funciona no meu servidor de hospedagem compartilhada. Obrigado Ernesto!
Tamir Davidoff
Não está funcionando para mim.
Segui este guia e verifiquei o arquivo php.ini para ter certeza de que as alterações foram salvas. Altere o arquivo htaccess para aumentar os limites. e também tentei modificar os arquivos phpMyAdmin httpd-app.conf e php-settings.conf. Todos esses arquivos refletem um upload máximo maior que 40m e meu site WP não reflete NENHUMA dessas alterações. Realmente frustrado aqui.
Por favor, me ajude, obrigado!
WPBeginner Support
If you haven’t already, you would want to reach out to your hosting provider to ensure there is not a setting on their end that is overriding what you are setting
Admin
rajesh
Eu tentei todos os 3 métodos, nenhum deles funcionou. Estou tentando fazer upload do tema newspaper no meu site wordpress. mas toda vez aparece que o arquivo php.ini tem um limite máximo de upload de arquivo.
Por favor, me ajude
WPBeginner Support
Você deve entrar em contato com seu provedor de hospedagem para garantir que eles não tenham uma configuração que esteja substituindo as alterações que você fez.
Admin
Adam Walsworth
Cuidado com arquivos php.ini ocultos. Na minha configuração, encontrei 2 deles. Aquele que realmente resolveu o problema foi encontrado em
./etc/php/7.0/apache2/php.ini
modificar este arquivo corrigiu meu problema.
WPBeginner Support
Obrigado por compartilhar sua solução. Com a localização desse arquivo, recomendaríamos que a maioria dos usuários entrasse em contato com seu provedor de hospedagem antes de procurar em locais como esse.
Admin
Rafiq khan
Valeu amigo, resolvi meu problema adotando o método 2 editando meu arquivo php.ini
Muito obrigado, você está trabalhando muito bem
WPBeginner Support
Glad our article could help
Admin
Carla
Nenhum dos acima funcionou para mim. Na verdade, editar o arquivo htaccess quebrou meu site, mesmo depois de excluir o código acima. Sobrescrever com um novo arquivo corrigiu o problema.
Eu tenho um servidor dedicado na Bluehost. O que funcionou para mim foi entrar na raiz do WHM, não no cpanel nem no acesso FTP. Procure por MultiPHP INI Editor. Dê pelo menos 5 minutos para carregar se você só vir o título e o ícone. Você pode definir seu tempo de upload, tamanho de postagem, etc. lá. Funciona instantaneamente, mesmo que seu site esteja usando Cloudflare, sem colocá-lo em modo de desenvolvimento ou limpar o cache. Espero que isso ajude alguém.
WPBeginner Support
Thank you for sharing what worked for you, should other users be on a dedicated server, if they reach out and let BlueHost know the need to increase the upload size then BlueHost can normally edit that for them
Admin
Pezza
Ótimo material! .htaccess funcionou para mim!
WPBeginner Support
Thank you, glad our guide could help
Admin
ReineR
O método htaccess funcionou para mim, obrigado!
WPBeginner Support
Glad our article could help
Admin
Ahmed
Funcionou para mim
3. Método .htaccess
você precisa clicar em (mostrar arquivos ocultos para visualizar e editar este arquivo).
WPBeginner Support
Glad our article could help
Admin
rahul
quando tentei isso
Não foi possível comunicar de volta com o site para verificar erros fatais, portanto, a alteração do PHP foi revertida. Você precisará fazer o upload da alteração do seu arquivo PHP por algum outro meio, como usando SFTP.
isso aconteceu comigo
qual a solução para isso
WPBeginner Support
Você precisaria usar FTP em vez do próprio WordPress para adicionar o código: https://www.wpbeginner.com/beginners-guide/how-to-use-ftp-to-upload-files-to-wordpress-for-beginners/
Admin
Ephraim
Eu estava tentando o método php.ini, mas nunca funciona, por favor, como posso configurá-lo..
Ou você deveria, por favor, me dizer onde colar em function.php
WPBeginner Support
Normalmente, você usaria um editor de texto para definir o conteúdo no arquivo php.ini. Para o seu functions.php, ele normalmente deve ir no final para que possa ser removido posteriormente, conforme necessário. Você também pode verificar com seu provedor de hospedagem se estiver tendo problemas com esses métodos, para ver se eles podem ajudar a aumentar o tamanho do arquivo para você.
Admin
Ivos G.
Nenhum funcionou para mim. Mas este resolveu – adicione esta linha ao seu .htaccess:
LimitRequestBody 104857600
WPBeginner Support
Thanks for sharing your solution for this issue
Admin
Achilleas
Estou usando Nginx e já configurei corretamente os valores para php no php.ini, mas o que resolveu foi colocar o mesmo valor no bloco do servidor com a variável client_max_body_size xxxM;
Estou escrevendo isso esperando que ajude alguém.
Equipe Editorial
Thank you for sharing this with us
Admin
RAHUL
Isso funcionou para mim, obrigado
WPBeginner Support
Glad our tutorial could help
Admin
Adriana Sabo
Nenhuma das opções funcionou para mim. Nada aconteceu quando tentei as duas primeiras, e a última gerou um erro 500. Você pode ajudar de alguma forma?
Carl
Muito útil, obrigado!
Md. Rana
The third option is worked for me.
WPBeginner Support
Olá Rana,
Fico feliz que tenha dado certo para você. Não se esqueça de nos seguir no Facebook para mais dicas e tutoriais do WordPress.
Admin
Tom Allen
A explicação acima é boa para sites hospedados, mas e para nós que usamos localhost? Ainda não consigo entender o erro “upload_max_filesize” ao baixar Updfaftplus de WP Plugins ou de um arquivo zip de download. Sou iniciante e preciso de ajuda passo a passo neste processo. Agradeço a ajuda.
crystal
o acesso hta funcionou.
vocês precisam colocar o código antes de #END Wordpress
se vocês colocarem depois de #end wordpress, o site apresentará erro interno do servidor 500, na minha experiência com hospedagem godaddy
Luis Felipe Lino
Obrigado.
Jaime Lopes
Na maioria dos sites compartilhados com cPanel que configurei:
-alterar o .htaccess derruba o site inteiro (erro interno 500)
-adicionar arquivos php.ini ou php5.ini não faz nada
-não há opção para escolher 'Site Software' no cPanel...
Joseph
Muito obrigado. O arquivo .htaccess funcionou para mim
John S
Muito obrigado. O arquivo .htaccess funcionou para mim!
Karina
Thanks you so much!!! The .htaccess version worked for me
Megan
Obrigado! Isso foi de grande ajuda! Eu nem conseguia fazer upload de plugins porque meu limite estava pré-definido em 2MB… Agora consegui aumentar para 64MB e estou conseguindo trabalhar.
Obrigado!
Okimi Solomon
Muito obrigado. A segunda opção funcionou para mim. Deus te abençoe
Benj
Modificar o arquivo .htaccess funcionou para mim. Muito obrigado..
Martin Croker
Na vidahost (agora TSOhost).
Adicionar o seguinte php.ini funcionou para mim... no entanto (e ainda estou um pouco confuso por quê), apenas colocá-lo na raiz http não funcionou – tive que duplicar o arquivo php.ini dentro dos diretórios wp-admin e wp-include dentro do wordpress.
Kabelo
Muito útil. Muito obrigado.
Dwayne S
Estou na HostGator e atualmente tenho problemas com o tempo máximo de execução. Isso ocorreu há algumas semanas e o suporte da HostGator resolveu o problema. Agora reapareceu e o suporte está me dizendo que não pode resolver porque estou em um servidor compartilhado. O agente até travou meu site editando manualmente o arquivo htaccess e não verificou se estava funcionando ou não. No entanto, ele recomendou um plugin que editaria o arquivo htaccess com código para aumentar o limite, mas não funciona. Acho que a HostGator bloqueia isso
Jessany
Adicionei o código na pasta de funções .php, e agora o Wordpress não carrega. Como resolvo este problema??
WPBeginner Support
Oi Jessany,
Você pode excluir o código que adicionou acessando seu site via FTP ou Gerenciador de Arquivos no cPanel.
Admin
bala
faça o upload do código fornecido acima para o arquivo .htaccess, está funcionando
Caleb
Eu tenho hospedagem GoDaddy e entrei em contato com eles para me ajudar a aumentar o tamanho do meu upload de arquivos. Foi moleza — não precisei criar nenhum arquivo, adicionar código ao meu tema, ou nada parecido. Então, para aqueles de vocês que têm GoDaddy ou controles tipo cPanel, esqueçam hacks e usem suas configurações de administrador.
Aqui está o que o suporte me fez fazer:
1. Vá para o seu cPanel Admin (um painel de hospedagem semelhante pode funcionar de forma um pouco parecida)
2. Role para baixo até 'Software' e clique em 'Selecionar Versão do PHP'
3. Clique em 'Mudar para Opções do PHP' no canto superior direito E TADA! Lá estão todas as suas Opções de PHP!
4. Basta descer e alterar 'post_max_filesize' e 'upload_max_filesize' para o que você quiser, aplicar e salvar suas alterações, e você agora é um proprietário de site seguro e feliz que não precisa codificar.
Boa sorte!
ZafB
Obrigado, funcionou perfeitamente
Alissa
Obrigado por postar isso! Funcionou muito bem!
Alejandra
Muito obrigado! Funcionou mesmo!!
Paul Palmer
Solução brilhante – funcionou perfeitamente e facilmente! Muito obrigado.
Rich Perozich
Isso funcionou para mim, mas para sequer encontrar esses arquivos, tive que ligar para a GoDaddy, onde me guiaram por esses passos ou eu nunca teria conseguido navegar até o cPanel Admin sem a ajuda deles.
1. Faça login na GoDaddy
2. Clique em meus produtos no canto superior esquerdo
3. Em hospedagem web, clique em gerenciar tudo
4. Clique em hospedagem web com Cpanel
5. Clique no ícone Cpanel Admin
6. Role para baixo até Software e clique em selecionar versão do php
7. Clique em mudar para opções do php
8. Na parte inferior da página, clique no número upload_max_filesize e selecione o número desejado como o tamanho máximo do arquivo
9. Clique em aplicar. Funciona. Agora os tamanhos dos arquivos podem ser enviados para o máximo selecionado.
Chris Sandford
Usuários Multisite:
Se você é um bobão como eu, pode ter tentado de tudo em vão.
Não se esqueça que se você estiver usando o WordPress Multi-site, de alterar as configurações de upload para sites individuais.
Admin da Rede > Configurações > Tamanho máximo de arquivo para upload
Você ainda pode precisar usar as dicas deste artigo, mas sem alterar as configurações de upload para multisite, você não saberá se está funcionando.
Stef Thoen
Você é meu herói. Tenho pesquisado este problema por tempo demais até que finalmente vi sua postagem. Muito obrigado.
Ron
Obrigado por isso! Isso deveria estar no corpo deste artigo!
Hitesh L.
FUNCIONOU! parabéns pra você!!!!!!!
Emanuel Pietri
Método 3 – com .htaccess – funciona bem para mim com o tema
Stefanos Kargas
Obrigado!! Eu mudei o arquivo .htaccess e funcionou.
haadi
oi. muito obrigado. o terceiro funcionou para mim
Jim R
A opção 2 funcionou bem. Obrigado pela informação.
Tor Helge
Funcionou quando fiz o último com .htaccess
mara
Alguém aqui conseguiu fazer isso funcionar com Godaddy? Eles são muito inúteis. Eu sei que preciso criar o arquivo php.ini (e eu criei), mas nenhuma das soluções que você postou funcionou. Qualquer ajuda é apreciada.
WangTuanJie
depois do método 3, eu não consegui ver sucesso.
Mahadi
Valeu cara!! .htacces funcionou para mim!
Lynn
Wish you wouldn’t assume everyone looking for this solution knows what you mean by our “Theme Functions File” – do you mean functions.php? I’m not an expert, and I’m really good at following precise directions, and don’t want to even put a toe in the water of editing files if I don’t know EXACTLY what file you’re talking about! No clues were provided, like what other code I might look for in the file to know I’m in the right place, etc. So…this didn’t help me at all
WPBeginner Support
Olá Lynn,
Sim, você precisa adicioná-lo ao arquivo functions.php do seu tema.
Admin
Justin
Sim, mas onde ele vai no functions.php. No topo, no final, no meio? Dentro das ""
WPBeginner Support
Olá Justin,
No final.
jack
obrigado, todos esses passos me ajudaram
Alex
Obrigado, o método 3 realmente funcionou para mim
php_value upload_max_filesize 64M
php_value post_max_size 64M
php_value max_execution_time 300
php_value max_input_time 300
vikram
OI
Você usa hospedagem compartilhada?
shahrin
ótimo! o método htaccess funcionou para mim. Estou tão aliviado, pessoal! Obrigado antecipadamente
Samba Siva
.htaccess method worked for me
nelson
htaccess funcionou para mim, obrigado
Sagar
php.ini funcionou para mim.
Valeu.
Valeu cara !!
Mituka
Isso funcionou para mim.
Abra seu arquivo .htacess com o notepad.
Ignore tudo o que você vê e, no final.
Cole o seguinte e salve.
php_value upload_max_filesize 64M
php_value post_max_size 64M
php_value max_execution_time 300
php_value max_input_time 300
Thomas
Onde exatamente você colou?
# BEGIN WordPress
RewriteEngine On
RewriteBase /
RewriteRule ^index\.php$ – [L]
RewriteCond %{REQUEST_FILENAME} !-f
RewriteCond %{REQUEST_FILENAME} !-d
RewriteRule . /index.php [L]
# FIM WordPress
php_value upload_max_filesize 64M
php_value post_max_size 64M
php_value max_execution_time 300
php_value max_input_time 300
É antes da instrução #END WordPress? (Eu recebo um erro quando faço isso)
Ou deve ser depois da instrução #END WordPress?
WPBeginner Support
Olá Thomas,
Você precisa colar no final do seu arquivo .htaccess, após a linha #END WordPress.
Admin