
Você já tentou fazer upload de um arquivo para o seu site WordPress e se deparou com um obstáculo? É muito frustrante quando você não consegue carregar a imagem, o plug-in ou o tema de que precisa. Nossos leitores frequentemente nos pedem ajuda com problemas de upload de arquivos, pois eles podem atrapalhar seu fluxo de trabalho.
Às vezes, esses limites de upload de arquivos podem impedi-lo inesperadamente de adicionar conteúdo à sua biblioteca de mídia ou de instalar os plug-ins e temas maiores de que você precisa. É como estar de mãos atadas. E é ainda mais irritante quando você não sabe como resolver isso!
Mas não se preocupe, estamos aqui para ajudar. Adoramos o fato de o WordPress ser uma plataforma tão configurável, e muitas vezes há várias maneiras de resolver o mesmo problema.
Neste guia, mostraremos a você as maneiras mais fáceis de aumentar o tamanho máximo de upload de arquivos no WordPress. Vamos ajudá-lo a superar essas limitações para que você possa voltar a fazer o que gosta: administrar seu site!

Por que aumentar o tamanho máximo de upload de arquivos no WordPress?
Seu provedor de hospedagem WordPress definirá um tamanho máximo de upload de arquivo padrão quando você se inscrever e instalar o WordPress. Seu provedor de hospedagem define esse limite, que geralmente varia de 2 MB a 500 MB.
Para a maioria dos proprietários de sites WordPress, esse limite será mais do que suficiente.
No entanto, há ocasiões em que você precisará aumentar esse limite para não ter erros de upload.
Por exemplo:
- Você administra um site de fotografia e precisa fazer upload de imagens grandes.
- Seu portfólio de design ou fotografia tem imagens grandes.
- Você deseja instalar um tema ou plug-in maior do WordPress.
- Você deseja vender produtos digitais, como livros eletrônicos, fotos, vídeos e muito mais.
- Você atualiza regularmente o conteúdo e adiciona áudio, fotos e outros itens que estão além do limite atual.
Dito isso, vamos mostrar como você pode aumentar o tamanho máximo de upload de arquivos em seu site WordPress.
Observação: lembre-se de que a exibição de muitos arquivos grandes em seu site pode reduzir seriamente a velocidade e o desempenho dele. É por isso que normalmente recomendamos nunca fazer upload de vídeos para o WordPress.
Como a maioria dos usuários tem diferentes configurações de hospedagem do WordPress, abordaremos o seguinte:
- How to Check Your Maximum File Upload Size Limit in WordPress
- Method 1: Contact Your WordPress Hosting Provider
- Method 2: Create or Edit an Existing php.ini file
- Method 3: Add Code to Your WordPress Theme functions.php File
- Method 4: Add Code to Your .htaccess File
- Method 5: Use a WordPress Plugin to Increase File Upload Size
Como verificar o limite máximo de tamanho de upload de arquivos no WordPress
O WordPress mostrará automaticamente o limite máximo de tamanho de upload de arquivos quando você estiver fazendo upload de imagens ou outras mídias.
Para verificar isso, basta ir para Mídia ” Adicionar novo no painel de administração do WordPress e você verá o limite máximo de tamanho de upload de arquivo para o seu site WordPress.

Agora que você sabe como encontrar o limite de tamanho, vamos mostrar como aumentar o tamanho máximo de upload no WordPress.
Método 1: Entre em contato com o provedor de hospedagem do WordPress
Uma das maneiras mais fáceis de aumentar o tamanho máximo de upload de arquivos no WordPress é entrar em contato com o provedor de hospedagem do WordPress.
Essa é uma tarefa relativamente simples para a equipe de atendimento ao cliente e pode ser feita em alguns minutos.
Para iniciantes, isso pode ser muito mais fácil do que adicionar código ao WordPress e editar arquivos do servidor.
Basta acessar o site do seu provedor de hospedagem, como a Bluehost, e fazer login.
Em seguida, clique no ícone “Chat” na parte inferior da tela. Em seguida, você pode solicitar à equipe de suporte que aumente o tamanho do upload de arquivos em seu site do WordPress.

Você também pode entrar em contato com o suporte no painel da sua conta de hospedagem.
Método 2: Criar ou editar um arquivo php.ini existente
Outra maneira de aumentar o tamanho máximo de upload de arquivos é criar ou editar um arquivo chamado php.ini. Esse arquivo controla várias configurações do seu ambiente de hospedagem do WordPress.
A maioria dos provedores de hospedagem WordPress, como a Bluehost, tem um cPanel amigável para iniciantes para ajudar a gerenciar seu site.
Se o seu host da Web tiver um painel cPanel, você poderá aumentar o tamanho do upload de arquivos por meio das ferramentas integradas.
Observação: o texto a seguir foi extraído do cPanel da Bluehost. No entanto, a maioria dos provedores de hospedagem compartilhada terá etapas semelhantes.
Você encontrará um botão do cPanel na parte inferior da guia Hosting na Bluehost.

Clicar nesse botão abrirá o painel do cPanel.
Agora você precisa rolar para baixo até a seção Software e clicar em ‘MultiPHP INI Editor’.

Em seguida, role para baixo até a seção denominada ‘upload_max_filesize’ e insira um novo tamanho máximo de arquivo na caixa.
Em seguida, clique no botão “Apply” (Aplicar).

Como alternativa, você pode clicar na guia do menu “Editor Mode” e alterar o tamanho máximo de upload de arquivos diretamente no editor.
É necessário editar a seção “upload_max_filesize” para aumentar o tamanho do upload do arquivo.
Quando terminar, basta clicar no botão “Salvar”.

Editar o php.ini adicionando código
Se o seu provedor de hospedagem atual não oferecer a opção cPanel, você precisará editar esse arquivo manualmente.
Para isso, você pode usar um cliente FTP ou a opção de gerenciador de arquivos no painel de controle da hospedagem do WordPress.
Se você estiver usando hospedagem compartilhada, talvez não veja o arquivo php.ini no diretório de hospedagem. Se não encontrar um, basta criar um arquivo chamado php.ini e carregá-lo em sua pasta raiz.
Em seguida, adicione o seguinte trecho de código ao arquivo:
1 2 3 | upload_max_filesize = 256Mpost_max_size = 256Mmax_execution_time = 300 |
Você pode modificar o limite de “256M” para o tamanho de arquivo necessário para o seu blog do WordPress.
Método 3: Adicionar código ao arquivo functions.php do tema do WordPress
Esse método envolve a adição de código ao arquivo functions.php em seu tema do WordPress.
Em vez de editar o arquivo diretamente, recomendamos o uso do WPCode. É o melhor plug-in de snippets de código que permite adicionar código ao seu site sem quebrá-lo.
Se você nunca fez isso antes, consulte nosso guia para iniciantes sobre como adicionar código personalizado no WordPress.
Primeiro, você precisa instalar o plug-in gratuito WPCode. Para obter mais detalhes, consulte nosso guia passo a passo sobre como instalar um plug-in do WordPress.
Após a ativação, você deve navegar até Code Snippets ” + Add Snippet.
Você precisará passar o mouse sobre a opção “Add Your Custom Code (New Snippet)” e, em seguida, clicar no botão “+ Add Custom Snippet”.
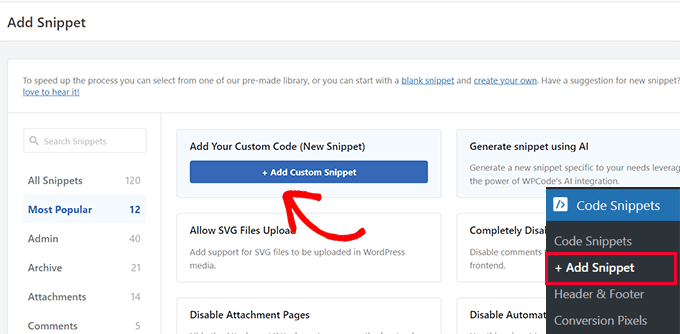
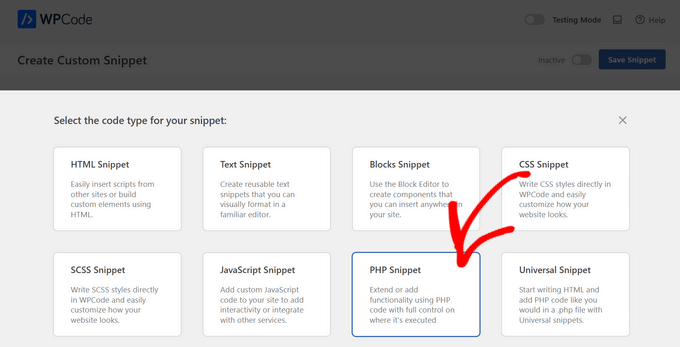
Em seguida, você precisa escolher “PHP Snippet” como o tipo de código na lista de opções que aparece.
Na tela seguinte, digite um nome para o novo snippet, que pode ser qualquer coisa que o ajude a lembrar para que serve o código.
Em seguida, você pode copiar e colar o seguinte trecho de código em “Code Preview” (Visualização de código). Certifique-se de alterar “256M” para o tamanho máximo de arquivo que você precisa:
1 2 3 | @ini_set( 'upload_max_size' , '256M' );@ini_set( 'post_max_size', '256M');@ini_set( 'max_execution_time', '300' ); |

Por fim, alterne a alternância na parte superior para “Active” (Ativo) e, em seguida, clique no botão “Save Snippet” (Salvar snippet). O código agora será executado em seu site.
Método 4: Adicionar código ao seu arquivo .htaccess
Outra maneira de aumentar o tamanho máximo do arquivo é modificar o arquivo .htaccess. Esse arquivo controla as definições de configuração de alto nível do seu site.
Para fazer isso, é necessário fazer login no servidor do site via FTP. Se você nunca fez isso antes, consulte nosso guia sobre como usar o FTP para fazer upload de arquivos no WordPress para iniciantes.
Depois disso, você precisa localizar o arquivo .htaccess na pasta raiz do seu site.

Se você não conseguir encontrar o arquivo .htaccess, ele pode estar oculto pelo gerenciador de arquivos ou pelo cliente FTP. Para saber mais, consulte nosso guia sobre por que você não consegue encontrar o arquivo .htaccess em seu site WordPress.
Em seguida, você precisa adicionar o seguinte trecho de código ao seu arquivo .htaccess:
1 2 3 4 | php_value upload_max_filesize 256Mphp_value post_max_size 256Mphp_value max_execution_time 300php_value max_input_time 300 |
Para aumentar ainda mais o tamanho máximo de upload de arquivos, basta alterar o valor “64M” para o tamanho desejado.
Método 5: Use um plug-in do WordPress para aumentar o tamanho do upload de arquivos
Outra maneira de aumentar o limite máximo de upload de arquivos é usar o plug-in WP Increase Upload Filesize. Se você não se sente à vontade para adicionar código ao WordPress, essa pode ser uma boa opção para você.
A primeira coisa que você precisa fazer é instalar e ativar o plug-in. Para obter mais detalhes, consulte nosso guia sobre como instalar um plug-in do WordPress.
Após a ativação, navegue até Mídia ” Aumentar limite de upload no painel de administração do WordPress.
Isso o leva a uma tela em que você pode selecionar um novo tamanho de upload de arquivo no menu suspenso ‘Choose Maximum Upload File Size’.
Em seguida, clique no botão “Save Changes” (Salvar alterações).

Observação: o tamanho máximo de upload de arquivos será definido pelo seu provedor de hospedagem. Se precisar de um limite de tamanho de arquivo maior do que o listado no menu suspenso, será necessário entrar em contato com o provedor de hospedagem e solicitar o aumento do limite.
Tutorial em vídeo
Se você não gosta de seguir instruções escritas, pode conferir nosso tutorial em vídeo:
Esperamos que este artigo tenha ajudado você a aumentar o tamanho máximo de upload de arquivos no WordPress. Talvez você também queira ver nosso guia sobre como adicionar tipos de arquivos adicionais para upload no WordPress e nossas escolhas de especialistas de plugins e dicas para melhorar a área de administração do WordPress.
Se você gostou deste artigo, inscreva-se em nosso canal do YouTube para receber tutoriais em vídeo sobre o WordPress. Você também pode nos encontrar no Twitter e no Facebook.


 in 2024")
Sushil Kumar
Thank you Yasir Imran it works for me via .htaccess
Pedro Viana
.htaccess rules! thanks.
Amit Kumar Gupta
Very useful Article for me . Thanks wpbeginner
Steve S
I figured out a work-around that does not involve messing with php.ini, .htaccess, functions.php, or any other systtem files. All I did was the following:
* FTP the file up to /wp-content/uploads/year/month/filename.mp4
* New Post –> Add Media –> Insert from URL
* Cut and paste the appropriate URL based on where you uploaded the file.
* Hit Insert Into Post. Done.
kenny
Perfect! ps if you are inserting an image for a slide background in slider Revolution, use option ‘External URL’
vic
the .htaccess worked fine for me. thanks alot
Anchal Singh
my website have got the same issue but thanks to this post its now work perfect
Matt
Thanks. I want to also know how to make a website portal using wordpress. Any information from you will be highly appreciated.
marta
Thanks. For me htaccess Method did his job
Rifqi Arief
Thanks Bro, Its Work On My Free Hosting via .htacess
RT
Please try below steps as well after creating the php.ini
(1) Go to My Sites -> Network Admin -> Settings from WordPress admin dashboard.
(2) Uncheck the checkbox for “Site upload space: Limit total size of files uploaded to 10 MB” and Save changes.
(3) Done.
Regards,
-RT
Suika
Thanks, I forgot there was a setting there for that.
Abhishek
I’m on goddady hosting, none of the 3 solutions worked for me.
But some users reported .user.ini file worked for them in goddady.
can anybody tell me where to put this file?
I have tried root folder and wp-admin folder nothing worked.
Raman Gutyan
htaccess Method is working great in my localhost.
Thanks for sharing.
DVR
If you are hitting a wall. Go to your host. Advance setting for PHP. Scan the code looking for max upload & file size. Change it to your required setting.
Done.
See NICOLAS’ reply above.
martin kendall
Hi DVR I had tried everything and nothing worked, with what had been posted here. I tried multi times in every why to get it to work. Nothing, but your post put me on the correct answer. Thanks very much for that.
Ok this is what i did, Signed into my host server, where my website is. the host server runs on cPanel and the theme is paper_lantern. It should not matter what your sever is or the theme. If you do not have access to this area you will have to get your host to make the changes y cotacting your technical help.
In the panel you will have categories like = files, database, domains, email etc and what you are looking for is software, under software / apps look for multiPHP INI Editor or something like that. Its going to be different on other platforms but should be in that area. What you are looking for is configure PHP INI basic settings or editor mode. I got offered home directory or my domain name. I picked the domain name but maybe need to change both but I did not need to. Scrolled down to upload_max_filesize and changed to 64M but this did not work as you have to also change the momory_limit to 64M also. They have to be the same figure. and then it will work.
Has I understand, when you make the changes in wordpress code. the instruction talk to your data base through the PHP files and instruct the server software to change the database settings. For some reason It would not work for me. So this route, bypass that and making the changes on the server software and not on the wordpress software. In future I will go this way as it was really quick. I hope this helps as a last resort. Martin p.s. this was WordPress 4.8.1 and I found that it did not have, after loading it any PHP.INI or .htaccess files. I did install them but made no difference and or where I put them.
Jeet Patel
THank you so much it’s working really
Silentnight
Thank u so much… I increased my uploading size.
Gopi krishnan
For me, this is not working, but i did this in htaccess file in this way,
php_value post_max_size 10M
php_value upload_max_filesize 40M
php_value memory_limit 500M
This works !
agnieszka00
Thank you!!!!!
Michael Serovey
I have my websites hosted with GoDaddy and so far, NONE of the above suggestions have worked! I have paid for this plugin and now I that I wasted my money!
Paul
Hi,
To avoid the plugin upload limit you can just upload the plugin with filezilla to your plugin directory. After uploading you can extract the zip file in the file manager and after you have done this the plugin is visible and ready to activate in your admin –> plugin panel
Hope this helped.
Cheers
Pooya
WOW! THANK YOU PAUL!!
This worked perfectly for me!
and it is MUCH easier and more reliable than any of those methods.
just go to File Directory under the cPanel -> Public-html -> [ you site folder] -> wp-content ->themes or plugins
Then upload the zip file here and extract it.
login to your wp-admin dashboard. and bam, you got yourself the theme or plugin.
Tom
Thank the Lord (paul) this took way too long.
Nicolas
Just go to your hosting control pannel -> Advanced -> PHP Settings -> upload_max_filesize ( it usually is on 2M you can change it up to 8M in my case… the point is that it shouldn’t be higher than your post_max_size)
You are welcome!
Jake
Best answer yet.
Steven Gliebe
functions.php is not the best place to put the code because raising the PHP max upload size limit is unrelated to a specific theme. Users shouldn’t be changing theme files directly anyway. wp-config.php is probably a better place. The .htaccess or php.ini method is even better (or just ask the host).
Stephanie
php.ini needs to be in wp-admin folder. This article states it needs to be in the root, which I tried but it made no difference. FYI
Thank you for the information!
Aaron
Thanks so much for your reply Stephanie. Your information was exactly what I needed.
Mike Serovey
So far, NONE of the above suggestions have worked. My control panel does NOT allow me to change the PHP Settings, modifying the .htaccess created an internal server error and modifying the theme failed to work as well. Have any other suggestions?
Mike Serovey
With GoDaddy hosting, I discovered that I needed to use the lines of code that someone posted for the .user.ini file and then refresh my browser and recheck the plugin about three times each before the thing FINALLY worked!
Robert
Thank you! ini file need to be uploaded in wp-admin folder.
Emmanuel Parbey
Thank you.
It worked perfectly.
Somnath
@Stephnie Thanks a Lot .It Workz
Sorin
In wp-admin put php.ini and work
Angel Rodriguez
This worked for me as well.
shemmy
thanks ..this works fine
Prabhat
yes this is helpfull
Matt
Worked Immediately! Thanks! By the way if anyone else wants to know, my host is BlueHost and I am using a Genesis Theme.
Panagiotis Sakalakis
Using the .htaccess I got an Internal Error, and then I just removed the code and it fixed. After that, I created a php.ini file in /public_html/wp-admin, pasted the code and saved it. Everything’s work like a charm now and I can upload my files just fine without any problem.
Umesh Shejole
Yes, Useful……
Subin Babukuttan
htaccess worked fine .thanks 4 d post
hol
Hi
Does anyone know why if the PHP.INI file is changed as mentioned why when the file has completed to 100% nothing happens and it displays http error.
I can upload small files and small videos.
I cant upload anything bigger than say 200mb
I had this working and accepting larger files then I had a restore done on website.
I have changed the PHP.INI…
Is there any reason why just large files don’t work ?
do I need to edit the hta.access file ?
thanks
Ian
.htaccess method worked for Media Temple grid hosting, others didnt affect it, just in case anyones wondering…
Jay
IF YOUR STILL FINDING NOTHING IS WORKING..
(In my case the problem was with WP MULTISITES)..,
FIRST CHECK THE FOLLOWING:
1. check your hosting limits (although this was not my problem) make sure your hosting allows the limit you are trying to set ie if on a shared hosting you might find the maximum is 64M.
NOTE: The following solution may also apply If in WordPress, Maximum upload file size will not change even when changed in the php.ini file etc.
The 1M max upload problem lies with WP MULTISITES default settings!!
To change this, do the following to change the Maximum upload file size within WP admin:
LOG INTO YOUR ADMIN DASHBOARD:
1. At the top, hover over My Sites and then click Network Admin.
2. At the left, hover over Settings and then click Network Settings.
3. Scroll to the bottom of the page and change the Max upload file size to whatever you would like in KB.
4. Click Save Changes.
Hope this helps
Gregg
YESSSS. Thank yo sir.
Milton
Thanks Jay you were right on point for WP multisites
Denis
Worked for me. The site used to work and I couldn’t understand why it didn’t anymore. It was my conversion to multisite which caused the ptoblem.
Sam
Amazing!!! This works!
Adam
Thanks!!!! Jeez there’s not much help on the changes mutli-site makes!
Bhanu uday
It worked like a charm. Thank you very much.
AmanDeep Singh
Working !.I use Create or Edit an existing PHP.INI file method and after applying the settings as mentioned in the article now i am able to upload themes and plugins which are large in size.Thanks for sharing solution.
Judy
I am new to WordPress, I usually use Joomla but I have a new client that wants a WordPress site. When trying to upload images the WordPress message was that the file limit was 3Mb. I spent hours searching websites for an answer. I am using WAMP and localhost to create the site. Through localhost phpinfo() I could verify which php.ini was active, the one in Apache. I had a file limit of 64Mb but still WordPress had a 3Mb limit. This site gave the instructions under #3 to edit the .htaccess file in the WordPress folder. I copied and pasted the text into this file and IT WORKED! Thank you wpbeginner.
KenSanDiego
forgot to mention, my WP site is in a subdirectory with a domain pointer. Powweb’s php applies to everything in all subdirectories. So if you have any installations in subdirectories the change applies to all installations.
Ugyen Zangmo
Create php.ini in wp-admin folder
In the file put the following 3 lines:
upload_max_filesize = 2048M
post_max_size = 2048M
max_execution_time = 3000
Goto to your website as admin and check the upload new media page, it should now display Maximum upload file size: 2 GB.
Thanks to Yasir Imran for sharing your tip!
This worked for me. Thank you James for sharing the Yasir Imran tip. Cheers
sadiq
it is not working i have done same
in godaddy server
Raton Miah
working!
Brendan
That was a great tip… it worked for me.. thanks!
Ben
Holy crap! Thanks so much man, after the last wordpress update to 4.3.1 my upload size reverted back to the default of 50 MB even though my php.ini, .htaccess, and wp-config.php files hadn’t changed and were still reflecting a max upload size of 512 MB! You’re a hero!
Alain
Thank you very much!
I tried ALL of the three methods with no results.
I asked the webhost and the raised the limit to 40 MB.
Then, finally, I tried yours and it worked fantastically!
dominio público
post_max_size should be larger than upload_max_filesize to allow room for other information. The defaults are 2MB max file size and 8MB max post size.
From PHP’s documentation:
post_max_size integer
Sets max size of post data allowed. This setting also affects file upload. To upload large files, this value must be larger than upload_max_filesize.
Nori
Thanks for this! Tried the php.ini and I am quite surprised it worked and was so easy
Dan
php.ini file worked perfectly for me. I simply changed the existing values to 100M. All good. Thanks for the advice.
James
Create php.ini in wp-admin folder
In the file put the following 3 lines:
upload_max_filesize = 2048M
post_max_size = 2048M
max_execution_time = 3000
Goto to your website as admin and check the upload new media page, it should now display Maximum upload file size: 2 GB.
Thanks to Yasir Imran for sharing your tip!
Zain
Hy,
Please tell me the names of best themes for softwares/download sites?
i am waiting.
Thanks,
Zain.
Markus Aurelius
Nothing of the above worked for me on GoDaddy so I had to use .user.ini instead of php.ini and that worked fine. Thanks for pointing me in the right direction!
Keith
Thank you so much. I am on GoDaddy and this worked whereas several other methods did not.
Raj Kothari
Hi Keith, can you tell me under which folder you have put this file? .user.ini
Need help
Oliver
Thanks .user.ini worked for me on Godaddy
sam
1:- open “C:wampbinapacheapache2.4.9bin” folder and find “php” which is a configuration file and open it in ur notepad and again find “upload_max_filesize” and “post_max_size” and change both and save.
2:- open “C:wampbinphpphp5.5.12” folder and find “php” and “phpforapache” which are configuration file and open both in ur notepad and again find “upload_max_filesize” and “post_max_size” and change both and save.
3:- finally restart all services of wamp and enjoy…lov u all
Decb
Hi Guys, I’m REALLY new to this but can you look at what I see when I click to edit the .htaccess file – where do i add the code? at the start? at the end? Do I put my cursor at the begining and click return (then put it in) ??? Please help
Gerard ONeill
Deb, it wouldn’t matter where you added it; but make sure its outside of a block. To be safe, just add it at the end.
However, the better way (as of php5.5) is to modify the .user.ini file in a per directory basis. If you did the top level directory, it would apply to all sub directories (unless overridden).
http://php.net/manual/en/configuration.file.per-user.php
And obviously the system wide php.ini works too.
BenPDX
+1 for Alex’s solution. Upload php.ini folder to wp-admin folder worked for me on Lithium Hosting. 30 second Google search and 1 min to create text file and upload to server!
Dede Erik
I choice the third method and this is worked to me, thanks so much
Hasan Tareq
.htaccess works for my wpenigne site
Vineesh
Hi alex, you are right. php.ini file should be added to wp-admin folder. It will work perfectly…. thanks alex
Rafael
Just adding the php.ini file into wp admin folder worked perfectly!!! thanks!
chandan
thnx alot Alex this worked for me to..
Tony_atf
I keep getting http error even with your suggestion. im on godaddy I have filesize 300m but anything over 150Mb chokes. it uploads, sits for a few seconds and then the http error displays. wordpress never shows the error.
SunnyK
same with me. did you found any solution yet?
WPBeginner Staff
You can connect to your website using an FTP client and undo the changes you made.
Nitesh Magan
Hey I added the 1st code to my theme function file, but now everything on my site went blank. I cant even access my wp-admin of my site !!
Please Help …
Chris
If you’re just trying to upload files yourself in the admin panel (media), make a new plain text document, save it as whatever name (including extension) of the large file you’re trying to upload. So if you’re trying to upload “files.zip,” save a blank text document as files.zip. Upload this blank text file you just created in WordPress. Then, go to FTP or file manager, go to wp-content/uploads/(whatever year it is)/(whatever month it is). You should fine files.zip there. Delete that file (which is just a plain text file) then upload the real files.zip, making sure the names match up. Then when you go back to media it will be the right file.
Yasir Imran
I tried htaccess method and found 500 internal server error, then placed php.ini with 3 given lines in root directory, again didn’t work. Then I placed it in wp-admin folder and it worked. I think the author should mention it.
Alexandre
This worked for me while everything else had failed. Thanks for sharing.
Mel
I had the exact same experience and this worked for me. Thanks Yasir!
Les B
Thank you Yasir Imran…your method works where all others, including .htaccess fails!
(The php.ini must be in the wp-admin folder.)
Les