Você já tentou fazer upload de um arquivo para o seu site WordPress e bateu de cara com um muro? É super frustrante quando você não consegue fazer o upload da imagem, plugin ou tema que precisa. Nossos leitores frequentemente nos pedem ajuda com problemas de upload de arquivos, pois eles podem desacelerar seu fluxo de trabalho.
Às vezes, esses limites de upload de arquivos podem impedi-lo inesperadamente de adicionar conteúdo à sua biblioteca de mídia ou de instalar aqueles plugins e temas maiores que você precisa. É como ficar de mãos atadas. E é ainda mais irritante quando você não sabe como consertar!
Mas não se preocupe, estamos aqui para ajudar. Adoramos que o WordPress seja uma plataforma tão configurável, e muitas vezes existem várias maneiras de resolver o mesmo problema.
Neste guia, mostraremos as maneiras mais fáceis de aumentar o tamanho máximo de upload de arquivos no WordPress. Vamos superar essas limitações para que você possa voltar a fazer o que ama – gerenciar seu site!
Por que Aumentar o Tamanho Máximo de Upload de Arquivos no WordPress?
Seu provedor de hospedagem WordPress definirá um tamanho máximo de upload de arquivo padrão quando você se inscrever e instalar o WordPress. Seu provedor de hospedagem define esse limite, e ele geralmente varia de 2MB a 500MB.
Para a maioria dos proprietários de sites WordPress, esse limite será mais do que suficiente.
No entanto, há momentos em que você precisará aumentar esse limite para não encontrar erros de upload.
Por exemplo:
- Você gerencia um site de fotografia e precisa fazer upload de imagens grandes.
- Seu portfólio de design ou fotografia tem imagens grandes.
- Você deseja instalar um tema ou plugin WordPress maior.
- Você deseja vender produtos digitais como eBooks, fotos, vídeos e muito mais.
- Você atualiza conteúdo regularmente e adiciona áudio, fotos e mais que excedem o limite atual.
Dito isso, vamos mostrar como você pode aumentar o tamanho máximo de upload de arquivos no seu site WordPress.
Observação: Lembre-se de que exibir muitos arquivos grandes em seu site pode diminuir seriamente sua velocidade e desempenho. É por isso que geralmente recomendamos nunca fazer upload de vídeos para o WordPress.
Como a maioria dos usuários tem configurações de hospedagem WordPress diferentes, cobriremos o seguinte:
- Como Verificar o Limite de Tamanho Máximo de Upload de Arquivos no WordPress
- Método 1: Contate seu Provedor de Hospedagem WordPress
- Método 2: Crie ou Edite um Arquivo php.ini Existente
- Método 3: Adicione Código ao Arquivo functions.php do seu Tema WordPress
- Método 4: Adicione Código ao seu Arquivo .htaccess
- Method 5: Use a WordPress Plugin to Increase File Upload Size
Como Verificar o Limite de Tamanho Máximo de Upload de Arquivos no WordPress
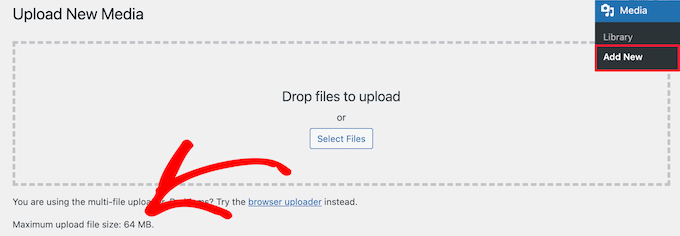
O WordPress mostrará automaticamente o limite máximo de tamanho de upload de arquivos quando você estiver fazendo upload de imagens ou outras mídias.
Para verificar isso, basta ir em Mídia » Adicionar Nova no seu painel de administração do WordPress, e você verá o limite máximo de tamanho de arquivo para upload do seu site WordPress.
Agora que você sabe como encontrar o limite de tamanho, vamos mostrar como aumentar o tamanho máximo de upload no WordPress.
Método 1: Contate seu Provedor de Hospedagem WordPress
Uma das maneiras mais fáceis de aumentar o tamanho máximo de upload de arquivos no WordPress é entrar em contato com seu provedor de hospedagem WordPress.
Esta é uma tarefa relativamente simples para a equipe de atendimento ao cliente deles e pode ser feita em alguns minutos.
Para iniciantes, isso pode ser muito mais fácil do que adicionar código ao WordPress e editar arquivos do servidor.
Basta acessar o site do seu provedor de hospedagem, como o Bluehost, e fazer login.
Em seguida, clique no ícone 'Chat' na parte inferior da tela. Você pode então pedir à equipe de suporte para aumentar o tamanho do upload de arquivos no seu site WordPress.
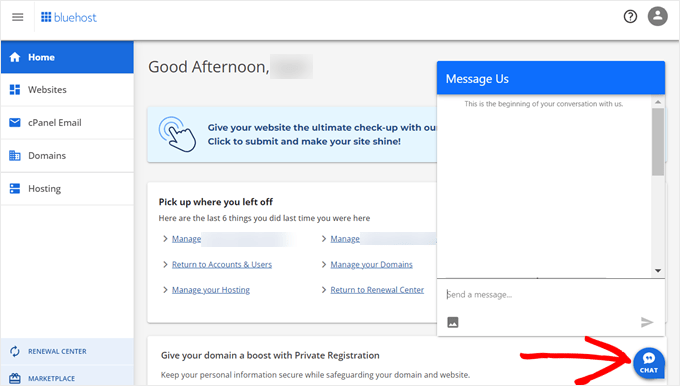
Você também pode entrar em contato com o suporte diretamente do painel da sua conta de hospedagem.
Método 2: Crie ou Edite um Arquivo php.ini Existente
Outra maneira de aumentar o tamanho máximo de upload de arquivos é criando ou editando um arquivo chamado php.ini. Este arquivo controla muitas configurações para o seu ambiente de hospedagem WordPress.
A maioria dos provedores de hospedagem WordPress, como o Bluehost, possui um cPanel amigável para iniciantes para ajudar a gerenciar seu site.
Se o seu provedor de hospedagem tiver um painel cPanel, você poderá aumentar o tamanho do upload de arquivos através das ferramentas integradas.
Observação: O seguinte é do cPanel do Bluehost. No entanto, a maioria dos provedores de hospedagem compartilhada terá etapas semelhantes.
Você encontrará um botão do cPanel na parte inferior da guia Hospedagem no Bluehost.
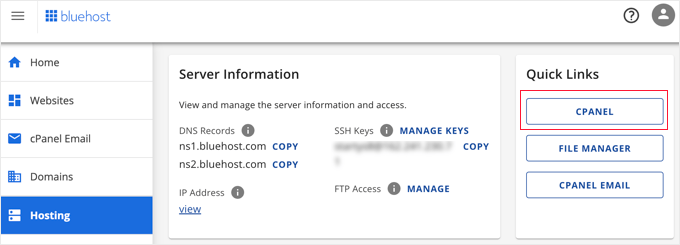
Clicar neste botão abrirá seu painel cPanel.
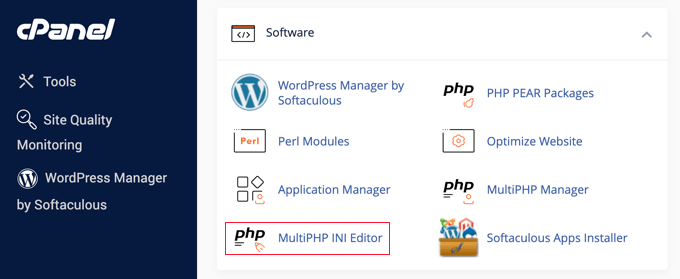
Agora você precisa rolar para baixo até a seção Software e clicar em 'MultiPHP INI Editor'.
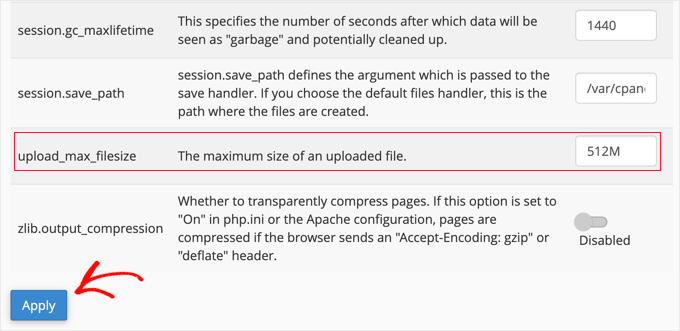
Em seguida, role para baixo até a seção rotulada 'upload_max_filesize' e insira um novo tamanho máximo de arquivo na caixa.
Em seguida, clique no botão 'Aplicar'.
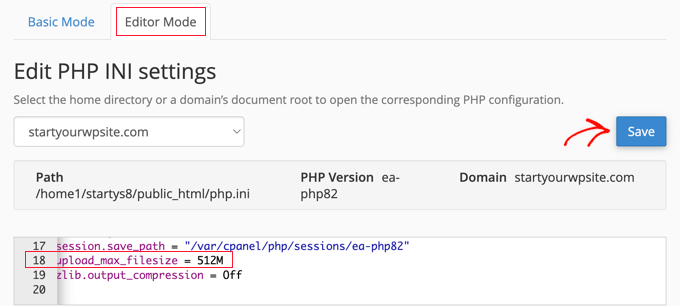
Alternativamente, você pode clicar na aba do menu 'Modo Editor' e, em seguida, poderá alterar o tamanho máximo de upload de arquivos diretamente no editor.
Você precisa editar a seção 'upload_max_filesize' para aumentar o tamanho do seu upload de arquivos.
Quando terminar, basta clicar no botão 'Salvar'.
Editar php.ini Adicionando Código
Se o seu provedor de hospedagem atual não oferecer a opção cPanel, você precisará editar este arquivo manualmente.
Para fazer isso, você pode usar um cliente FTP ou a opção de gerenciador de arquivos no painel de controle de hospedagem do seu WordPress.
Se você estiver usando hospedagem compartilhada, talvez não veja o arquivo php.ini no seu diretório de hospedagem. Se não vir um, simplesmente crie um arquivo chamado php.ini e envie-o para a sua pasta raiz.
Em seguida, adicione o seguinte trecho de código ao arquivo:
upload_max_filesize = 256M
post_max_size = 256M
max_execution_time = 300
Você pode modificar o limite de ‘256M’ para o tamanho de arquivo que você precisa para o seu blog WordPress.
Método 3: Adicione Código ao Arquivo functions.php do seu Tema WordPress
Este método envolve adicionar código ao seu arquivo functions.php no seu tema WordPress.
Em vez de editar o arquivo diretamente, recomendamos usar o WPCode. É o melhor plugin de snippets de código que permite adicionar código ao seu site sem quebrá-lo.
Se você nunca fez isso antes, consulte nosso guia para iniciantes sobre como adicionar código personalizado no WordPress.
Primeiro, você precisa instalar o plugin gratuito WPCode. Para mais detalhes, veja nosso guia passo a passo sobre como instalar um plugin do WordPress.
Após a ativação, você deve navegar para Snippets de Código » + Adicionar Snippet.
Você precisará passar o mouse sobre a opção ‘Adicionar seu código personalizado (Novo Snippet)’ e, em seguida, clicar no botão ‘+ Adicionar Snippet Personalizado’.

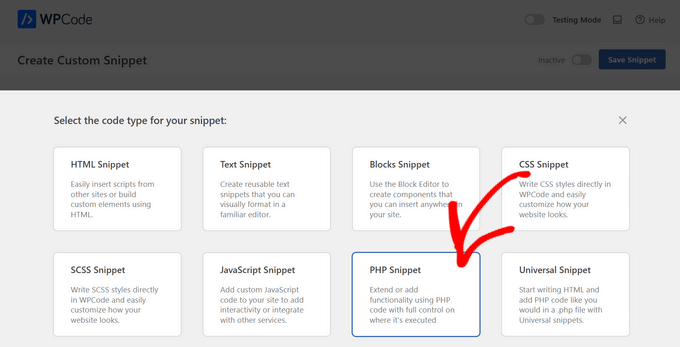
Em seguida, você precisa escolher ‘Snippet PHP’ como o tipo de código na lista de opções que aparecem.
Na tela seguinte, insira um nome para o seu novo snippet, que pode ser qualquer coisa para ajudá-lo a lembrar para que serve o código.
Em seguida, você pode copiar e colar o seguinte trecho de código em ‘Code Preview’. Certifique-se de alterar ‘256M’ para o tamanho máximo de arquivo que você precisa:
@ini_set( 'upload_max_size' , '256M' );
@ini_set( 'post_max_size', '256M');
@ini_set( 'max_execution_time', '300' );
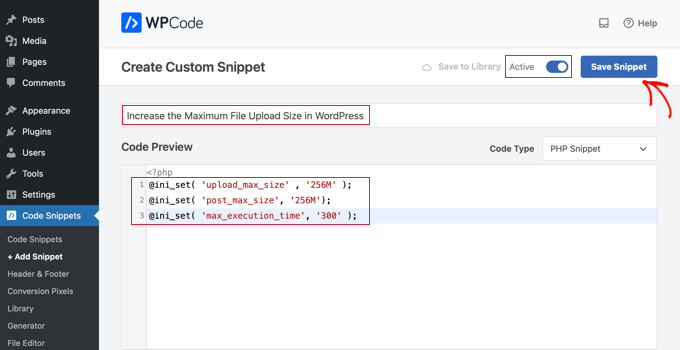
Finalmente, mude o interruptor no topo para ‘Active’ e, em seguida, clique no botão ‘Save Snippet’. O código agora será executado em seu site.
Método 4: Adicione Código ao seu Arquivo .htaccess
Outra maneira de aumentar o tamanho máximo do arquivo é modificando o arquivo .htaccess. Este arquivo controla as configurações de configuração de alto nível para o seu site.
Para fazer isso, você precisa fazer login no servidor do seu site via FTP. Se você nunca fez isso antes, consulte nosso guia sobre como usar FTP para fazer upload de arquivos para o WordPress para iniciantes.
Depois disso, você precisa localizar seu arquivo .htaccess na pasta raiz do seu site.

Se você não conseguir encontrar seu arquivo .htaccess, ele pode estar oculto pelo seu gerenciador de arquivos ou cliente FTP. Para saber mais, consulte nosso guia sobre por que você não consegue encontrar o arquivo .htaccess no seu site WordPress.
Em seguida, você precisa adicionar o seguinte trecho de código ao seu arquivo .htaccess:
php_value upload_max_filesize 256M
php_value post_max_size 256M
php_value max_execution_time 300
php_value max_input_time 300
Para aumentar ainda mais o tamanho máximo de upload de arquivos, basta alterar o ’64M’ para o tamanho que você precisa.
Método 5: Use um Plugin do WordPress para Aumentar o Tamanho do Upload de Arquivos
Outra maneira de aumentar o limite máximo de upload de arquivos é usando o plugin WP Increase Upload Filesize. Se você não se sente confortável em adicionar código ao WordPress, esta pode ser uma boa opção para você.
A primeira coisa que você precisa fazer é instalar e ativar o plugin. Para mais detalhes, consulte nosso guia sobre como instalar um plugin do WordPress.
Após a ativação, navegue até Mídia » Aumentar Limite de Upload no seu painel de administração do WordPress.
Isso o levará a uma tela onde você pode selecionar um novo tamanho de upload de arquivo no menu suspenso ‘Escolher Tamanho Máximo de Arquivo para Upload’.
Em seguida, clique no botão ‘Salvar Alterações’.

Observação: O tamanho máximo de upload de arquivo será definido pelo seu provedor de hospedagem. Se você precisar de um limite de tamanho de arquivo maior do que o listado no menu suspenso, precisará entrar em contato com seu provedor de hospedagem e solicitar o aumento do limite.
Tutorial em Vídeo
Se você não gosta de seguir instruções escritas, pode conferir nosso tutorial em vídeo:
Esperamos que este artigo tenha ajudado você a aumentar o tamanho máximo de upload de arquivo no WordPress. Você também pode querer ver nosso guia sobre como adicionar tipos de arquivo adicionais para serem enviados no WordPress e nossas principais escolhas de plugins e dicas para melhorar a área de administração do WordPress.
Se você gostou deste artigo, por favor, inscreva-se em nosso Canal do YouTube para tutoriais em vídeo do WordPress. Você também pode nos encontrar no Twitter e no Facebook.


Sendo Furtivo
Adicionar o arquivo php.ini na pasta wp-admin funcionou para mim. Yahoooo, obrigado.
Mouad Chafai
Obrigado, o método do php.ini funcionou perfeitamente.
i’ve created the php.ini
wp-adminphp.ini
add lines:
upload_max_filesize = 64M
post_max_size = 64M
max_execution_time = 300
obrigado pelo artigo.
Saleh Shaukat
Obrigado, o .htaccess funcionou perfeitamente para mim!!
Dan Rosenberg
O método do PHP.INI funcionou perfeitamente. Obrigado!
Ben Peacock
Desculpe, por favor, encontre isto em vez disso: Faça login na máquina raiz, digite o seguinte comando: nano /usr/lib/php.ini
encontre ; Tamanho máximo dos dados POST que o PHP aceitará.
post_max_size = 2M altere isto para 64
Save and exit and then you should be able to upload what you need hope this helps
QuangPham
Obrigado pelas instruções sobre como corrigir.
Voicu Ioan Virgil
Obrigado, ótimo tutorial!
Maria McCarthy
Adicionar o arquivo php.ini à minha pasta wp-admin ESPECIFICAMENTE funcionou para mim também! Obrigado a todos! Levei quase 4 horas para encontrar uma página que tivesse as informações que funcionariam para mim – salvadores!
pete
encontrei o php.ini funcionou na rede wp-admin php.ini
Tabassum Javaid
O método htaccess funciona bem para mim. obrigado
Mike
com alguns hosts (godaddy), por exemplo, pode haver algumas etapas adicionais.
E para qual versão do php você está executando. Para godaddy com php5, renomeie php.ini para php5.ini e lembre-se que se você tiver processos em execução, terá que encerrá-los temporariamente antes que o arquivo seja aceito, ou espere um pouco.
Processos do Sistema / Encerrar todos
jaymz
Muito obrigado pelo artigo. Para auto-hospedagem, há outra maneira, pois os métodos 2 e 3 não funcionaram para mim, já que a alteração do .htaccess não teve efeito e nem a adição de um arquivo php.ini em /wp-admin. Foi simplesmente uma questão de encontrar o arquivo php.ini existente para o Apache. No Ubuntu, executei;
sudo find / -name php.ini
Este encontrou meu arquivo ini em /etc/php5/apache2/
Tudo o que foi necessário foi localizar os parâmetros e atualizar os valores para;
upload_max_filesize
post_max_size
max_execution_time
Obrigado por me levar até lá!
D Winzell
Obrigado por escrever isso. O php.ini precisa estar no diretório wp-admin para funcionar corretamente. Acabei de verificar meu host (Vaurent) e eles permitem uploads de até 105M, então vou encontrar algo desse tamanho e ver se ele chega ao meu blog.
Matt
Só quero adicionar, usando godaddy você não pode usar o método htaccess, ele te jogará em um erro de serviço interno 500.
Você deve usar o método php.ini. A única diferença é que você terá que ter um php.ini e um php5.ini e as linhas devem ser adicionadas a ambos. Os arquivos precisam estar no diretório raiz de onde a instalação do wordpress está, não na pasta wp-admin, fora dela.
Além disso, se você tiver várias instalações do wordpress, isso deve ser feito e colocado em cada diretório onde cada instalação do wordpress está localizada.
GSJha
Postagem muito boa.
sandeep
php_value upload_max_filesize 64M
php_value post_max_size 64M
php_value max_execution_time 1500
php_value max_input_time 1500
eu uso esses valores em .htaccess e funciona!
obrigado
Thyme
Então eu fiz tudo isso e mudei o php.ini na pasta /etc (meu site está no grid-service da mediatemple) e nada funcionava, mas então eu me lembrei vagamente que havia algo que eu tinha que mudar nas configurações de rede se minha instalação fosse multisite e lá estava. Ugh.
Então sim, se você tem uma rede Wordpress, vá para as configurações da sua rede e mude o tamanho máximo de upload de arquivo perto do final da página.
Alex
Esta é a única coisa que funcionou para mim, eu tentei todas as opções, estou no 1&1
memory_limit = 32M
upload_max_filesize = 32M
post_max_size = 32M
file_uploads = On
O tamanho pode ser qualquer um
A chave foi a linha “file_uploads”
Coloque isso na pasta /wp-admin/.
Kristina
Funcionou para mim! Estou na Bluehost.
Thanks for your post
Brandon
isso funcionou para mim depois que tudo mais não funcionou. Estou tão aliviado!
Eu também estou na 1&1. Assim que adicionei a linha “file_uploads = On” ao meu arquivo php.ini, funcionou como um encanto!!
obrigado!
Hafeez Ansari
Thank you Alex, This works for me in /wp-admin/ folder. Problem solved.
Jordan Miller
Muito obrigado
Mike
Incrível! obrigado Alex. Eu estava limitado a 2mb… muito útil.
Sam
Alex, você é o máximo! Sua solução funcionou para mim! Muito obrigado!
Johnny T
Genius! This worked for me! Just to clarify. Create a php.ini file in the wp-admin folder and only add the lines of code in Alex’s post. FTP this to your server and you’re good to go. Thanks Alex. You are a genius!
Luan
Obrigado Johnny e Alex! Foi muito útil.
vanniee
qual é o nome do arquivo?
Togi Tan
Mas não está funcionando em hospedagem gratuita. Todos os métodos que tentei. Acho que isso pode depender do servidor.
Duncan
Uau uau uau uau! Obrigado por esse comentário claro que me ajudou a fazer funcionar. Você é uma estrela.
Nomo
Alex – Seu post continua sendo útil. Muito apreciado!
Noor
Funcionou pelo método .htaccess. Salve, cara.
Bogdan
Ótimo conselho. Meu limite de upload era 8MB e eu só tentei o truque do htaccess e funcionou, aumentou para 64MB. Testei e está funcionando maravilhosamente! Muito obrigado pelo seu ótimo conselho!
VoidnessMD
Coisa importante a notar: Usar o método php.ini requer que o arquivo esteja localizado na pasta wp-admin, não na raiz da sua instalação do WP.
DJ
THANKS!! This sorted it out for me on my end
David Connolly
Excelente… claro e a solução final funcionou.
Um grande obrigado
Bongo
Este site é o mais legal para aprender WP! Continuem o bom trabalho, pessoal… mais por favor… mais! lol
Equipe Editorial
Thanks for the kind words
Admin
Ido Schacham
Finalmente, um post que explica claramente como alterar o limite de memória no WP. Obrigado!
mostafa
Oi.
Consegui fazer com o terceiro método. meu tamanho de upload era 8 M, mas agora é 64 M. para mim é mais do que suficiente.
Muito obrigado.
A propósito, sou do Irã.
Rowan Evenstar
Criar um arquivo php.ini e colocá-lo na rota resolveu imediatamente!
Obrigado, muito apreciado!
assassinateur
thnx, mas estou em uma hospedagem compartilhada, então nada funciona, coloquei o php.ini em wp-admin e na pasta do blog e na pasta principal e não funcionou também. .htaccess também não funcionou, mudei o tema e não funcionou
Arvind Kukreti
Adicionar código no arquivo .htaccess pode gerar um Erro Interno 500… a melhor maneira é criar um arquivo php.ini e fazer o upload dele na pasta wp-admin
Stephen Afije
Waooo, isso foi brilhante! Tudo o que fiz foi criar o php.ini e fazer o upload para a pasta wp-admin. Funcionou como nenhuma outra coisa. Obrigado.
leo
O método htaccess funciona bem para mim. obrigado
Andrew Lilly
Olá,
Fiz tudo o que foi dito acima e ainda assim não me deixa importar um arquivo xml de 11 MB. Preciso dele, pois tem 1500 produtos para importar.
Falei com meu provedor de servidor virtual, 1and1, e eles disseram que tudo o que preciso fazer é adicionar o código ao arquivo .htaccess, mas não parece funcionar.
Por favor, alguém ajude.
Equipe Editorial
Se nada do acima funcionar, a única pessoa que pode te ajudar é o seu host.
Admin
Ali Amer
Pode estar relacionado ao Tipo MIME. Nesse caso, resolva isso pelo cpanel.
Dominique
Nada disso funcionou para mim. Tentei todos. Estou usando WPEngine para hospedagem.
Alguma sugestão?
Equipe Editorial
Peça ao WPEngine para aumentar o limite para você.
Admin
Thad
O método htaccess funcionou para mim. Obrigado pela postagem. Boa informação, bem apresentada.
Richard
A opção php.ini funcionou para mim, mas no arquivo php.ini no diretório /wp-admin.
Mike
Perfeito – funcionou maravilhosamente – definido para 200MB e funciona bem.
Matheus M.
No localhost, o .htaccess funciona. Mas no host, apenas o php.ini. Obrigado pela ajuda.
dan
Sim, o php.ini funciona em /wp-admin. Obrigado.
marin
Obrigado, o htaccess funcionou para mim, agradeço.
Makarand Mane
Eu tenho hospedagem na mediatemple. Os dois primeiros métodos não funcionaram para mim. Apenas o método htaccess funcionou para mim.
Obrigado.
Gavin
Descobri que o php.ini estava oculto na pasta cgi-bin que alguns servidores compartilhados têm em seus diretórios raiz. Eu alterei isso como acima (E adicionei um php5.ini apenas por precaução), mas até que eu tivesse alterado isso, nada mais funcionou. Obrigado pelo tópico MUITO útil!
Cath
Obrigado Gavin, nenhum dos outros métodos funcionou para mim, então vi seu comentário, havia arquivos php.ini e php4.ini na pasta cgi-bin. Encontrei o código relevante em ambos os arquivos – post_max_size = , e upload_max_filesize = , alterei estes e agora tudo funciona bem.
Jarod Billingslea
Muito obrigado por este artigo!
Void lon iXaarii
muito obrigado! tentei tantas soluções e seu .htaccess finalmente funcionou
Anthony
A única coisa que funcionou para mim foi criar/editar um arquivo php.ini e adicionar o seguinte:
memory_limit = 100M upload_max_filesize = 100M post_max_size = 100M file_uploads = On
e fazer o upload dele para a pasta wp-admin.
Alan
A Opção 2 funcionou perfeitamente, embora eu tenha que colocar o arquivo php.ini na pasta wp-admin em vez do diretório raiz.
phpinfo estava detectando o arquivo php.ini na raiz, mas o WordPress não.
Atualmente tenho o WP 3.2 instalado…
RPaterson
Obrigado por essa dica extra, isso é o que finalmente funcionou para o meu
arun
obrigado anthony, seu método me salvou muito.
Quest The Wordsmith
Isso é exatamente o que funcionou para mim também.
RamiAlloush
Thx
Snowboard
obrigado por este post, mas qual é o limite padrão?
almb1111
64 MB
kat1111
Era 8MB, mas consegui aumentar para 192 MB @almb1111
kat1111
Obrigado por responder, finalmente consegui ajuda com isso, precisei mudar o PHP para PHP-5.
kat1111
Eu sou evidentemente mais novo que a maioria aqui, não entendo qual é o diretório "root", é Editor na aba Aparência? Também não entendo como chegar ao hcaccess. Qualquer ajuda é apreciada.
jameserie
o método htaccess funciona para mim. – Saúde!
nycxs
Se você estiver usando PHP5, o arquivo deve se chamar php5.ini e estar na raiz das pastas compartilhadas.
MyDreamDinZ
Qual é o limite mais alto para upload
posso definir para 1024M?
alexlee.cs
O método .htaccess funciona para mim. Obrigado.
rajkanuri
Obrigado pelo código.. é realmente útil para mim..
pranjalgupta2009
Sim! Colocar o php.ini também em wp-admin funciona para mim. obrigado
Snipsley
Obrigado, mas nenhum dos dois funcionou para mim.
Mas eu encontrei a solução!
Eu tive que colocar esse php.ini em /public_html E em /public_html/wp-admin e funcionou!
Biju Subhash
ya..a mesma coisa funciona para mim também..
Obrigado Snisley
Trond
Great! This worked for me as well I run Wordpress on an MS Server 2008 with IIS 7.5 from my host provider, btw
kenseneff
Funcionou para mim também. Obrigado!
Kiran
Obrigado, cara. Funcionou para mim.
Rollie Osayan
Sim. Também está funcionando aqui. obrigado
Kaushik Biswas
No final de um post, quero exibir posts recentes daquela categoria específica abaixo desse post – como posso fazer isso?