Você se pega alternando constantemente entre o WordPress e um editor de fotos apenas para colocar imagens em escala de cinza antes de carregá-las? É um processo tedioso e ineficiente editar cada foto individualmente com antecedência.
Felizmente, através de anos de experimentação com o WordPress, descobrimos uma maneira simples de colocar imagens em escala de cinza automaticamente durante o upload, economizando seu tempo valioso.
Neste artigo, mostraremos como colocar imagens em escala de cinza no WordPress enquanto você as carrega para o seu site, passo a passo.

Quando Usar Imagens em Escala de Cinza no WordPress?
Imagens em escala de cinza removem todas as informações de cor, deixando as cores da imagem para mostrar apenas tons de cinza, variando entre preto e branco.
Em certas situações, usar imagens em escala de cinza pode ser benéfico para o seu site WordPress. Por exemplo, você pode usá-lo para melhorar a legibilidade dos objetos mostrados na imagem.
Ou, você pode simplesmente querer usar imagens em escala de cinza para criar um visual clássico e atemporal para o seu site.
Por outro lado, imagens em escala de cinza também são comumente usadas para processamento de imagem devido ao seu tamanho pequeno. Isso permite que os desenvolvedores executem operações complexas em um tempo menor.
Dito isso, vamos ver como você pode transformar suas imagens em escala de cinza no WordPress ao carregá-las.
Colocando Imagens em Escala de Cinza no Upload no WordPress
Quando se trata de adicionar imagens no WordPress, você teria que editá-las antes de fazer o upload usando um software de edição de fotos como o Photoshop e converter imagens coloridas para tons de cinza.
Se você tem centenas ou milhares de imagens para fazer upload, pode levar muito tempo para editar cada imagem manualmente.
No entanto, você pode transformá-las automaticamente em imagens em tons de cinza ao fazer o upload. Para começar, tudo o que você precisa fazer é adicionar o seguinte código ao arquivo functions.php do seu tema:
add_filter('wp_generate_attachment_metadata','rb_bw_filter');

function rb_bw_filter($meta) {

    $path = wp_upload_dir(); // get upload directory
    $file = $path['basedir'].'/'.$meta['file']; // Get full size image

    $files[] = $file; // Set up an array of image size urls

    foreach ($meta['sizes'] as $size) {
        $files[] = $path['path'].'/'.$size['file'];
    }

    foreach ($files as $file) { // iterate through each image size

        // Convert image to grayscale credit to http://ottopress.com/2011/customizing-wordpress-images/

        list($orig_w, $orig_h, $orig_type) = @getimagesize($file);
        $image = wp_load_image($file);
        imagefilter($image, IMG_FILTER_GRAYSCALE);
        switch ($orig_type) {
            case IMAGETYPE_GIF:
                imagegif( $image, $file );
                break;
            case IMAGETYPE_PNG:
                imagepng( $image, $file );
                break;
            case IMAGETYPE_JPEG:
                imagejpeg( $image, $file );
                break;
        }
    }
    return $meta;
}
Uma maneira simples de adicionar código aos arquivos do tema é usando o plugin WPCode para WordPress.
É o melhor plugin de snippets de código que ajuda você a executar snippets de código sem a necessidade de editar manualmente o arquivo functions.php do seu tema. Dessa forma, você não precisa se preocupar em quebrar seu site.

Primeiro, você precisará baixar e instalar o plugin gratuito WPCode em seu site. Se precisar de ajuda, siga nosso guia sobre como instalar um plugin do WordPress.
Observação: A versão gratuita do WPCode oferece tudo o que você precisa para adicionar facilmente código personalizado no WordPress. Para recursos mais avançados, como uma biblioteca de snippets em nuvem privada, snippets agendados, pixels de conversão e muito mais, você pode fazer o upgrade para o WPCode Pro.
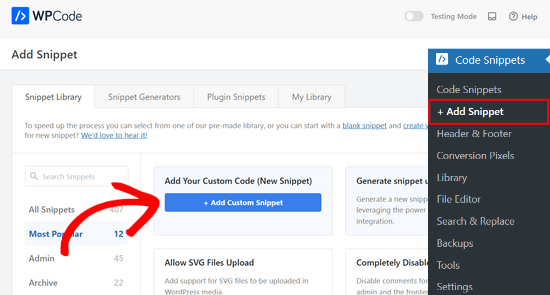
Após a ativação, você pode ir para Code Snippets » + Add New no seu painel do WordPress.
Em seguida, navegue até a opção ‘Add Your Custom Code (New Snippet)’ e clique no botão ‘+ Add Custom Snippet’.
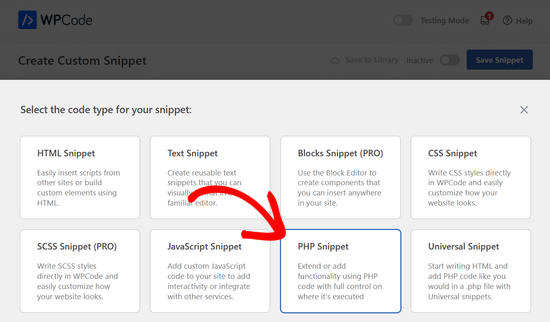
Em seguida, você precisa selecionar ‘PHP Snippet’ como o tipo de código nas opções que aparecem.
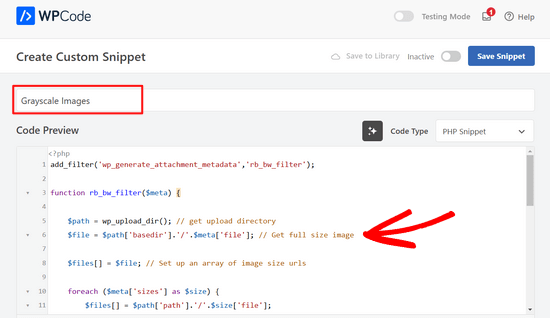
Agora, na página Create Custom Snippet, insira um nome para o seu snippet. Pode ser qualquer coisa para ajudá-lo a lembrar para que serve o código.
Em seguida, cole o código acima na área ‘Code Preview’.
Após inserir o código, você pode rolar para baixo até a seção ‘Inserção’.
Aqui, você pode deixar a opção ‘Inserção Automática’ selecionada. Isso inserirá e executará o código automaticamente para você.

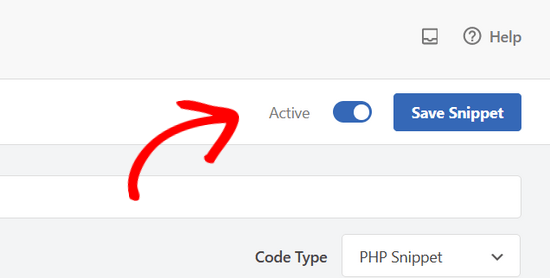
Por último, volte ao topo da tela e alterne o interruptor de ‘Inativo’ para ‘Ativo’ e clique no botão ‘Salvar Snippet’.
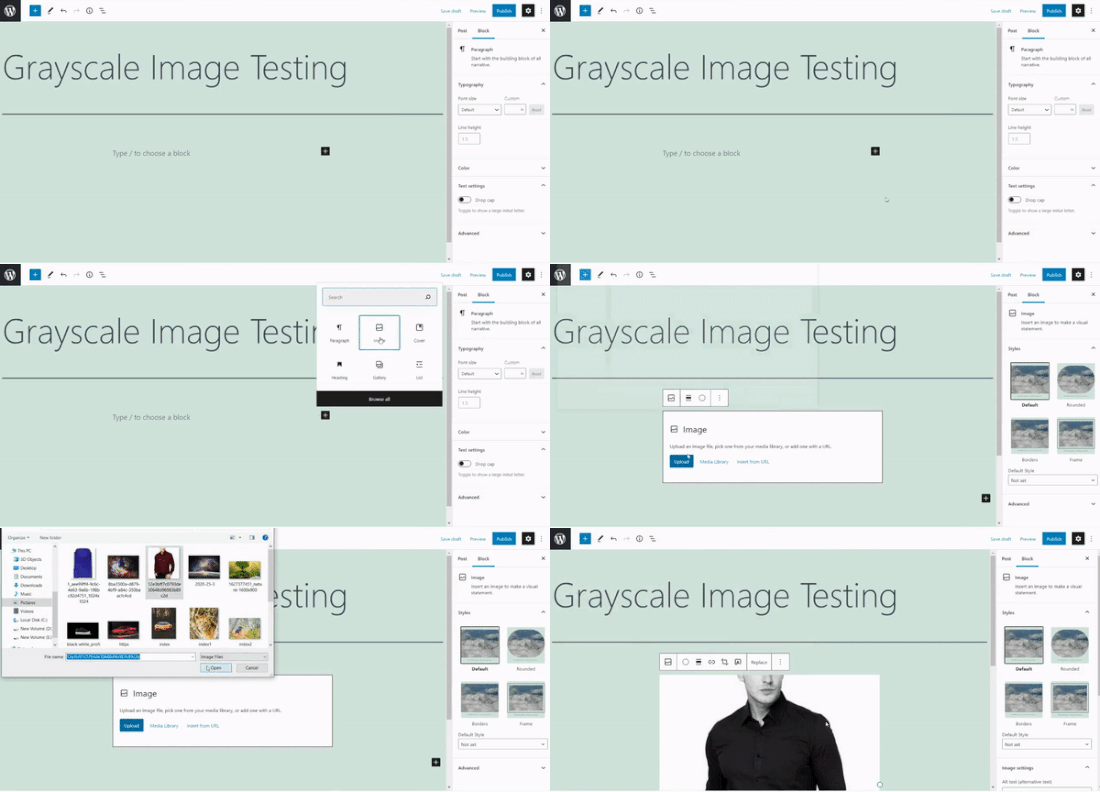
Em seguida, você pode testar o código editando ou adicionando uma nova página. Quando estiver no editor do WordPress, clique no botão ‘+’ e adicione um bloco de Imagem.
Agora você pode carregar qualquer imagem em seu blog WordPress, e ela será automaticamente convertida em uma imagem em tons de cinza.
Esperamos que este artigo tenha ajudado você a aprender como colocar imagens em tons de cinza no WordPress. Você também pode conferir nosso guia sobre como adicionar modo escuro ao seu site WordPress e nossas escolhas de especialistas do melhor software de design web.
Se você gostou deste artigo, por favor, inscreva-se em nosso Canal do YouTube para tutoriais em vídeo do WordPress. Você também pode nos encontrar no Twitter e no Facebook.


Tomas Kapler
Ótima dica, eu só gostaria de mencionar que, para muitos usos, pode ser melhor simplesmente fazer isso via filtro CSS, por exemplo:
img.bw {
filter: grayscale(1);
}
você pode até, por exemplo, mostrar em preto e branco por padrão e colorido ao passar o mouse, ou pode fazer animação de escala de cinza para cores completas e de volta, por exemplo:
img.bw {
filter: grayscale(0);
}
img.bw.grey {
filter: grayscale(1);
transition-property: filter;
transition-duration: 1s;
}
eu também não acho que o filtro wp_generate_attachment_metadata seja o apropriado, pois ele é chamado na criação de metadados e não apenas na criação de imagens, além de realizar uma segunda manipulação de imagem. A solução adequada seria muito mais longa, então entendo por que é feito dessa forma.
rok
Funciona bem, mas ao fazer o upload, o WP 4.3 gera um erro na biblioteca de mídia.
Acho que apliquei todas as correções escritas nos comentários, mas ainda assim ocorre o erro.
meu código se parece com isto:
add_filter(‘wp_generate_attachment_metadata’,’themename_bw_filter’);
function themename_bw_filter($meta) {
$time = substr( $meta[‘file’], 0, 7); // <- obtém a hora correta do upload
$file = wp_upload_dir( $time ); // <- localiza o diretório de upload correto
$file = trailingslashit($file[‘path’]).$meta['sizes']['slide-pic']['file'];
if( $file ) {
list($orig_w, $orig_h, $orig_type) = @getimagesize($file);
}
$image = wp_load_image($file);
imagefilter($image, IMG_FILTER_GRAYSCALE);
switch ($orig_type) {
case IMAGETYPE_GIF:
imagegif( $image, $file );
break;
case IMAGETYPE_PNG:
imagepng( $image, $file );
break;
case IMAGETYPE_JPEG:
imagejpeg( $image, $file );
break;
}
return $meta;
}
Kim
Isso mudará todas as imagens no WordPress para escala de cinza ou apenas as recém-atualizadas?
Tomaž Zaman
Sei que estou um pouco atrasado na discussão, mas acabei de ter o mesmo problema com um erro (que outros relataram):
imagefilter() espera que o parâmetro 1 seja um recurso, não uma stringIsso acontece quando você tenta fazer o upload de uma imagem através da modal de mídia enquanto edita uma postagem, mais antiga que o mês atual, o que aparentemente confunde o WordPress sobre qual diretório a imagem original está e em qual diretório a imagem em escala de cinza deve ser salva.
Esta é a solução:
<?php

add_filter('wp_generate_attachment_metadata','themename_bw_filter');

function themename_bw_filter($meta) {

  $time = substr( $meta['file'], 0, 7); // <- obtém a hora correta do upload

  $file = wp_upload_dir( $time ); // <- localiza o diretório de upload correto

  $file = trailingslashit($file['path']).$meta['sizes']['themename-bw-image']['file'];

  list($orig_w, $orig_h, $orig_type) = @getimagesize($file);

  $image = wp_load_image($file);

  imagefilter($image, IMG_FILTER_GRAYSCALE);

  switch ($orig_type) {

    case IMAGETYPE_GIF:

      imagegif( $image, $file );

      break;

    case IMAGETYPE_PNG:

      imagepng( $image, $file );

      break;

    case IMAGETYPE_JPEG:

      imagejpeg( $image, $file );

      break;

  }

  return $meta;

}
endul
como mudar, filtro de resultado de imagem para pasta/diretório específico
geertvdheide
Uma adição: Adicionei algumas linhas para contornar o problema de ter duas imagens com o mesmo nome de arquivo, causado por duas chamadas add_image_size com o mesmo tamanho. O código adicional foi encontrado aqui:
http://bavotasan.com/2011/create-black-white-thumbnail-wordpress/
mklemme
@geertvdheide
Se você quisesse adicionar suporte a múltiplos tamanhos, tente o que eu uso:
if ( function_exists( ‘add_theme_support’ ) ){
add_theme_support( ‘post-thumbnails’ );
set_post_thumbnail_size( 50, 50, true );
add_image_size( ‘medium-thumb’, 660, ”, true );
add_image_size( ‘large-thumb’, 960, ”, true );
add_image_size( ‘small-thumb’, 100, ”, true );
}
(A altura não é definida, apenas a largura.)
você teria que adicionar os diferentes nomes para fazer a função se aplicar a todos eles:
[‘medium-thumb’ , ‘large-thumb’ , ‘small-thumb’] no código do filtro.
Chamar a miniatura em seu tema é o mesmo listado no artigo:
Mike Logan
Excelente ideia, quase 10 anos depois isso ainda é útil.
geertvdheide
Obrigado por compartilhar este código! Exceto que estou encontrando um problema estranho ao tentar implementá-lo. Está relacionado ao tamanho da imagem carregada (tamanho em pixels, ou seja, suas dimensões). Copiei o código literalmente para o functions.php do meu tema, e funciona maravilhosamente com imagens maiores que o tamanho especificado na chamada add_image_size. Mas ao usar uma imagem menor ou igual ao tamanho especificado, o uploader do WordPress me dá erros e não processa o tamanho da imagem (seja da seção de mídia do ambiente de administração, ou de uma postagem ou página específica). O erro:
Warning: imagefilter() espera que o parâmetro 1 seja um recurso, string dado.
Algumas outras coisas no erro também, mas esta parece ser a causa principal. Os dados da imagem fornecidos à função imagefilter não são válidos ou não existem?
Alguma ideia do que está causando isso? A única diferença real entre a minha situação e uma instalação limpa é que eu também adicionei algumas outras chamadas add_image_size para outros propósitos no meu site. Eu também estou adicionando o mesmo tamanho duas vezes (um em preto e branco, um normal), mas isso não parece ser um problema com as imagens maiores.
Ed Nailor
@GEERTVDHEIDE
e para outros que precisam disso:
Quando o script está convertendo a imagem para escala de cinza e o arquivo carregado não atende ao tamanho do arquivo, isso faz com que o script falhe. Para evitar isso, basta adicionar uma condição if() rápida para garantir que você tenha o $file.
$file = trailingslashit($file[‘path’]).$meta[‘sizes’][‘themename-bw-image’][‘file’];
if( $file ) {
list($orig_w, $orig_h, $orig_type) = @getimagesize($file);
——– restante do código até ——–
return $meta;
}
Isso verificará se o tamanho do arquivo que você solicitou existe antes de tentar convertê-lo.
Espero que ajude!
frankiegershwin
@Otto42 Obrigado por oferecer. Eu vou.
Otto42
@frankiegershwin que pena! Sinta-se à vontade para me enviar um e-mail diretamente para ajuda com código. otto@wordpress.org
frankiegershwin
@Otto42 thank you! I had a bit of a hard time, actually and had to undoe it will pick it up tomorrow. It’s a good way to mix it up onsite
Otto42
@frankiegershwin Me diga se precisar de ajuda. Adicionei uma maneira de fazer tons sépia também nos meus comentários na postagem original: http://t.co/avDNNEX
rodhk
@rodriguezhernan vaya idiotez de truco…. madremua tocar el codigo para eso
wpbeginner
@Otto Thanks for the comment Otto. Updated the post as well
Otto
Observe que as pessoas devem alterar "themename" para o nome de seu tema.