Seu site WordPress não está conseguindo enviar e-mails. Os envios de formulários de contato estão desaparecendo e as notificações importantes nunca chegam. Parece familiar?
Você não está sozinho, e o problema não é o WordPress em si. É a forma como os sites normalmente lidam com a entrega de e-mails.
Já lidamos exatamente com esse problema no WPBeginner. É por isso que usamos e confiamos no WP Mail SMTP para lidar com todos os nossos e-mails do WordPress. Ele usa SMTP (o padrão do setor para entrega confiável de e-mails) para garantir que seus e-mails realmente cheguem ao destino.
Neste guia, mostraremos exatamente o que está causando seus problemas de e-mail e como corrigi-los usando SMTP, para que você nunca mais perca uma notificação importante.
Por que você não está recebendo e-mails do seu site WordPress?
O motivo mais comum para o desaparecimento de e-mails é que o servidor de hospedagem do WordPress não está configurado corretamente para usar a função PHP mail().
Mesmo que sua hospedagem esteja configurada para usá-la, muitos provedores de serviços de e-mail, como o Gmail e outros, usam uma variedade de ferramentas para reduzir o spam de e-mail. Essas ferramentas tentam detectar se um e-mail está vindo do local de onde ele afirma ser.
Os e-mails enviados por sites WordPress geralmente não passam nesse teste.
Isso significa que, quando um e-mail é enviado do seu site WordPress (de um plug-in de formulário de contato, notificação do administrador etc.), ele pode nem chegar à pasta de spam do destinatário, muito menos à caixa de entrada.
É por isso que recomendamos não usar o WordPress para enviar seu boletim informativo por e-mail.
Esse também é o motivo pelo qual recomendamos a todos que usem o SMTP para enviar e-mails no WordPress.
O que é SMTP?
O SMTP (Simple Mail Transfer Protocol) é o padrão do setor para o envio de e-mails.
Ao contrário da função mail() do PHP, o SMTP usa autenticação adequada, o que leva a uma alta capacidade de entrega de e-mail.
O WordPress tem um plug-in WP Mail SMTP que configura seu site WordPress para enviar e-mails usando SMTP em vez da função PHP mail().
Você pode usá-lo para se conectar a qualquer serviço SMTP popular, como SendLayer, Brevo (anteriormente Sendinblue), Gmail (Google Workspace), Amazon SES e outros.
Você pode ler nossa análise do WP Mail SMTP se precisar de mais detalhes sobre o plug-in.
Dito isso, vamos dar uma olhada em como corrigir o problema do WordPress que não envia e-mails. Você pode usar os links rápidos abaixo para navegar por este artigo:
Alternativa: Se você usa o WooCommerce e os e-mails dos seus pedidos não estão sendo entregues, leia nosso guia sobre como corrigir o problema do WooCommerce que não envia e-mails de pedidos.
Etapa 1: instalar o plug-in SMTP do WP Mail
Seja qual for o serviço de SMTP escolhido, você precisará ter o plug-in WP Mail SMTP instalado em seu site. Isso permite que você mude o WordPress do uso da função PHP mail() integrada para o uso do seu serviço SMTP.
Primeiro, instale e ative o plug-in WP Mail SMTP. Se não tiver certeza de como fazer isso, consulte nosso guia passo a passo sobre como instalar um plug-in do WordPress.
Em seguida, clique em “WP Mail SMTP” no painel do WordPress para definir as configurações do plug-in.
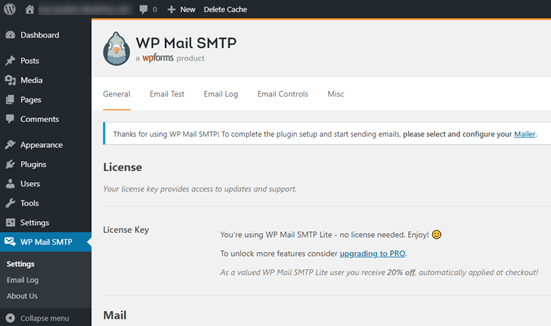
Você precisará começar inserindo o nome e o endereço de e-mail comercial de onde deseja que os e-mails do seu site sejam enviados.
Certifique-se de usar aqui o mesmo endereço de e-mail que usará para seu serviço de correspondência SMTP.
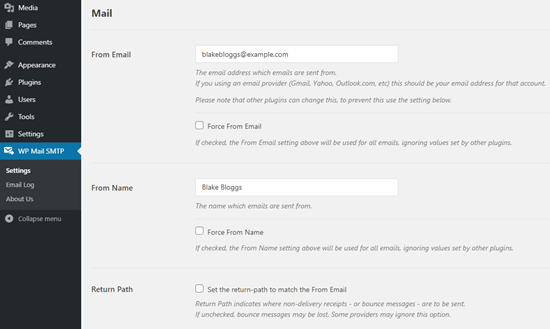
Você pode optar por forçar os e-mails a usar esse nome e endereço de e-mail, mesmo que outros plug-ins, como o WPForms, tenham configurações diferentes. O WP Mail SMTP substituirá as configurações de outros plug-ins.
Depois disso, você precisa escolher um serviço de correio SMTP para o seu site. Para este tutorial, vamos configurar o SMTP usando o SendLayer.
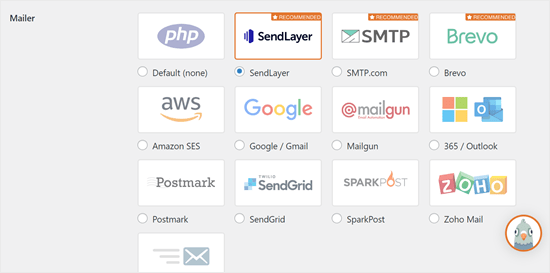
Para concluir a configuração do WP Mail SMTP, você precisará criar uma conta no SendLayer. Faremos isso a seguir e depois voltaremos para finalizar a configuração do WP Mail SMTP, portanto, mantenha essa guia aberta.
Etapa 2: Configure seu serviço de correio SMTP
O SendLayer é um provedor de serviços de e-mail confiável. Eles permitem que você envie um grande número de e-mails com alta capacidade de entrega.
Você pode usar o SendLayer para enviar até 200 e-mails gratuitamente, o que é mais do que suficiente para a maioria dos sites pequenos começarem.
Podem ser e-mails do seu formulário de contato, detalhes da nova conta de usuário, e-mails de recuperação de senha ou quaisquer outros e-mails enviados pelo seu site WordPress.
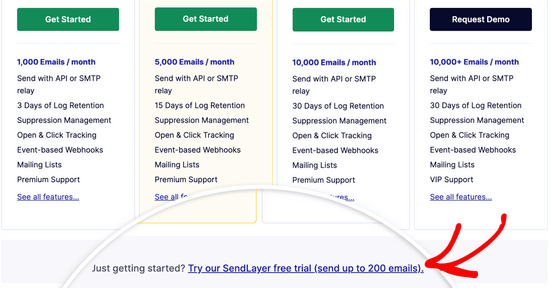
Primeiro, você precisará acessar o site do SendLayer para criar uma conta. Na página de preços, clique no link “Experimente nossa avaliação gratuita do SendLayer (envie até 200 e-mails)” para configurar sua conta.
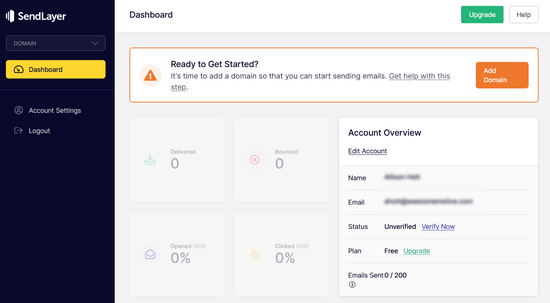
Depois de criar uma conta, você verá o painel de controle do SendLayer.
Agora que você tem uma conta SendLayer, vamos configurar seu provedor de e-mail com o WordPress.
Etapa 3: Conecte seu site WordPress ao SendLayer
Antes de poder enviar e-mails com o SendLayer, você precisa autorizar seu domínio.
Isso prova aos servidores de e-mail que você é o proprietário confirmado do seu domínio de envio e que seus e-mails são enviados de uma fonte legítima.
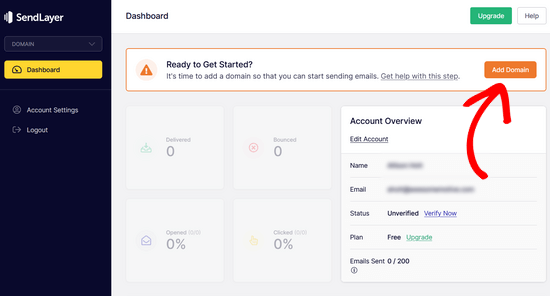
Para autorizar seu domínio, clique no botão laranja “Adicionar domínio” no painel de controle do SendLayer.
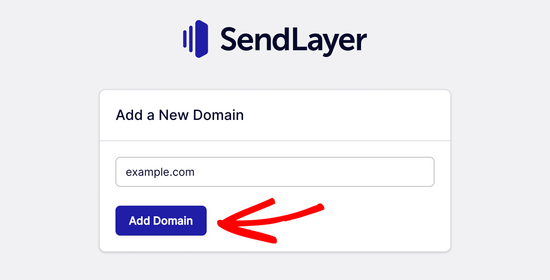
Na página seguinte, basta digitar seu nome de domínio no campo fornecido.
Em seguida, clique no botão “Add Domain” (Adicionar domínio).
Observação: Com outros serviços de correspondência, como o Brevo (antigo Sendinblue), você precisa primeiro configurar um subdomínio para o seu site. Mas o SendLayer adicionará automaticamente o subdomínio aos registros DNS do domínio do remetente.
Portanto, não é necessário adicionar um subdomínio extra ao registrar o domínio.
Depois de adicionar seu domínio, o SendLayer mostrará 5 registros DNS que você precisa adicionar às configurações de registro DNS do seu domínio.
Essas linhas de código permitem que o SendLayer autorize seu nome de domínio.
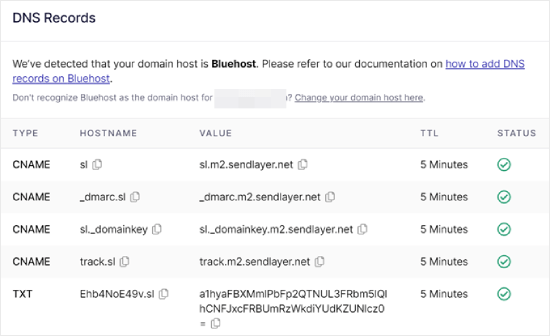
Você precisará adicionar esses registros DNS ao seu site WordPress. Isso pode parecer complicado, mas tudo o que você precisa fazer é copiar e colar os registros no lugar certo.
Para fins deste tutorial, demonstraremos nosso exemplo usando nossa conta de hospedagem na Bluehost.
Se estiver usando outras empresas de hospedagem ou se o seu DNS for gerenciado em um registrador de domínios, como Domain.com, Network Solutions ou GoDaddy, siga as respectivas instruções.
Você também pode ler nosso guia sobre como configurar o WP Mail SMTP com qualquer host.
Primeiro, abra uma nova guia do navegador e faça login na sua conta de hospedagem do WordPress. Em seguida, localize os registros DNS do seu domínio.
Na Bluehost, você faz isso acessando “Domínios”. Em seguida, clique em “Settings” (Configurações) ao lado do domínio que você deseja conectar ao SendLayer.
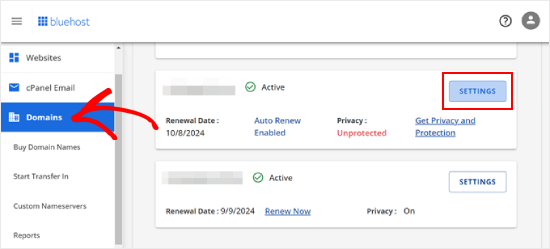
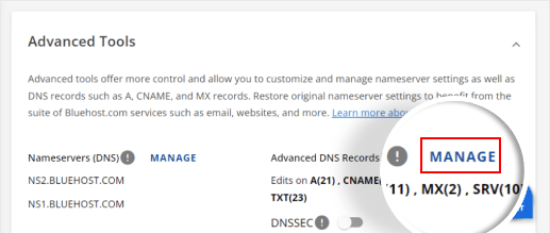
Na página seguinte, role para baixo até a seção “Advanced Tools” (Ferramentas avançadas).
Depois disso, clique no botão “Manage” (Gerenciar) ao lado de Advanced DNS Records (Registros DNS avançados).
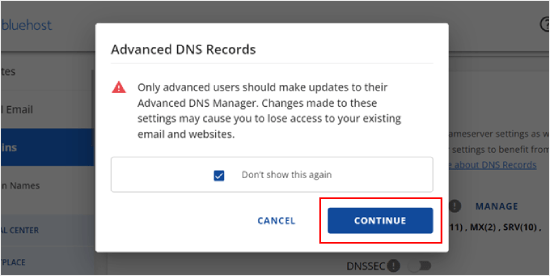
Você verá uma mensagem de aviso informando que os registros DNS devem ser editados por um usuário avançado. Não se preocupe com essa mensagem, pois o processo para isso é bastante fácil.
Vá em frente e clique em “Continue” para continuar.
Agora você chegará à página Manage Advanced DNS Records (Gerenciar registros DNS avançados).
Para começar, clique no botão “+ Add Record” (Adicionar registro).
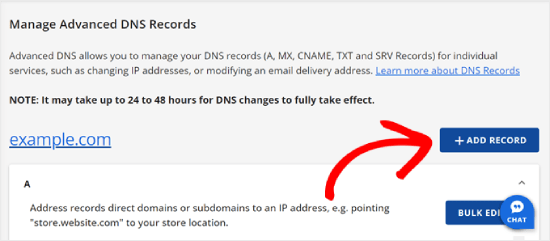
Agora, vamos começar a adicionar os registros DNS que o SendLayer forneceu.
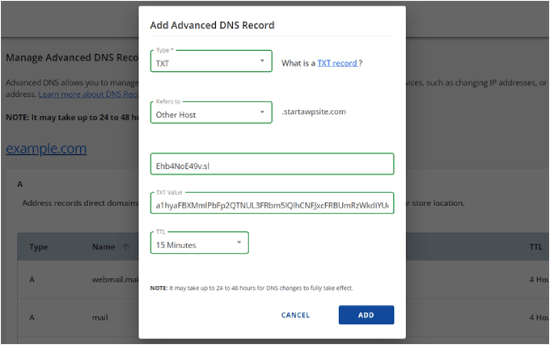
Primeiro, selecione o tipo de registro DNS. Nesse caso, usaremos CNAME para o primeiro registro.
Na seção “Refers to” (Refere-se a), clique em “Other Host” (Outro host). Você escolherá essa mesma opção para todos os seus registros DNS posteriormente.
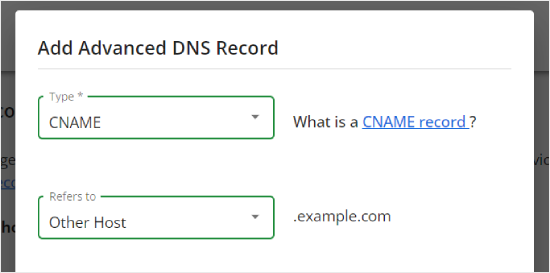
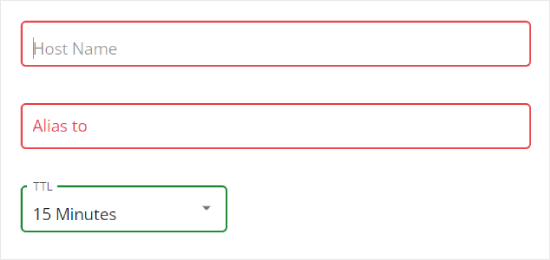
Ao rolar a tela para baixo, você verá três campos: Nome do host, Alias e TTL.
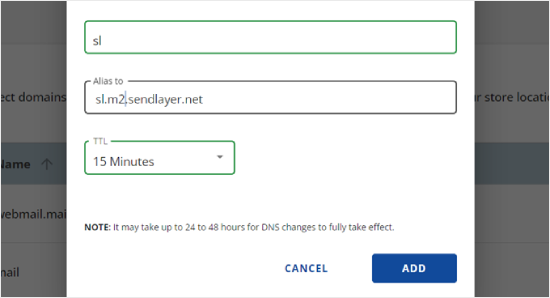
O nome do host deve ser preenchido com o valor em “Hostname” fornecido pelo SendLayer. O Alias deve ser preenchido com o valor em “Value”. Quanto ao TTL, você pode deixá-lo em 15 minutos.
A captura de tela abaixo mostra a aparência da nossa tela quando adicionamos nosso primeiro registro CNAME.
Quando terminar, basta clicar em “Add” (Adicionar).
É possível repetir essas etapas para todos os registros DNS (CNAME e TXT).
Ao adicionar o registro TXT, certifique-se de colar o valor do “Hostname” do SendLayer no campo “Host Name” e o valor do “Value” no campo “TXT Value”.
Veja como ele se parece:
Depois de adicionar os registros, volte ao SendLayer e marque a caixa ao lado de “Eu adicionei esses registros DNS e estou pronto para continuar”.
Em seguida, pressione o botão “Verify DNS Records” (Verificar registros DNS).
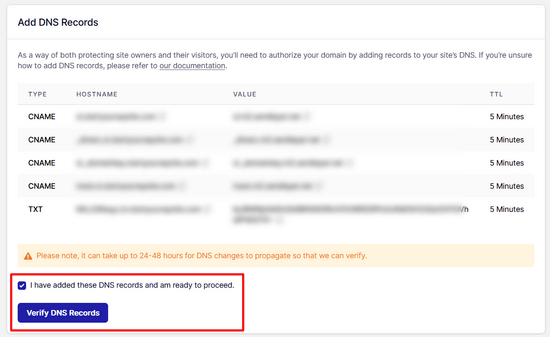
Pode levar de 24 a 48 horas para que o SendLayer possa verificar seus registros. Em nossa experiência, isso levou várias horas.
Se nada acontecer quando você clicar nesse botão, os registros ainda não podem ser verificados. Você pode verificar novamente mais tarde para ver se eles foram verificados acessando “Configurações” e navegando até a guia “Registros e configurações de DNS” no painel do SendLayer.
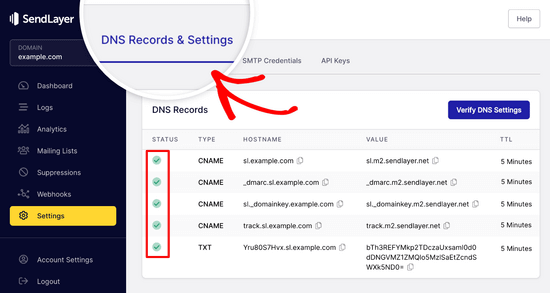
Aqui, você encontrará uma lista de todos os seus registros de DNS em um só lugar. Quando seu domínio tiver sido autorizado com êxito, você verá marcas de verificação verdes ao lado de cada registro DNS na coluna “Status”.
Você pode continuar com este tutorial enquanto aguarda a autorização.
Etapa 4: Concluir a configuração do WP Mail SMTP para usar o SendLayer
Vamos concluir a configuração. Primeiro, acesse sua conta do SendLayer para encontrar sua chave de API.
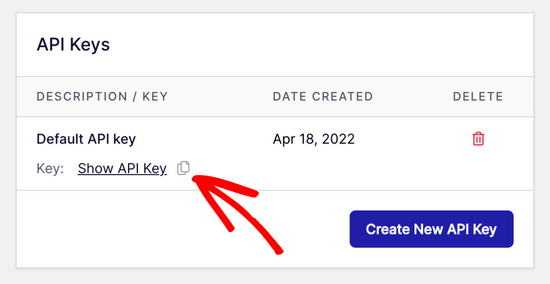
No painel de controle do SendLayer, basta acessar a página Configurações “ Chaves de API. Aqui, você verá uma chave de API padrão que foi gerada quando você autorizou seu domínio no SendLayer.
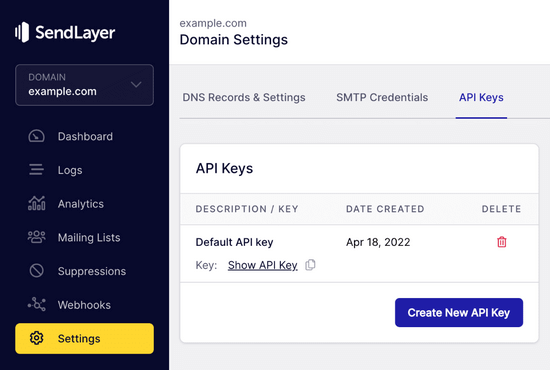
Você pode copiar a chave de API dessa página clicando no ícone de cópia.
Assim:
Feito isso, você pode voltar para a guia do assistente de configuração do WP Mail SMTP.
Em seguida, cole a chave de API onde for apropriado.

Parabéns. Você já configurou tudo. A etapa final é enviar um e-mail de teste para garantir que tudo esteja funcionando.
Vá para WP Mail SMTP “ Tools (Ferramentas). Na guia “Email Test” (Teste de e-mail), digite um endereço de e-mail para o qual enviar um e-mail. O padrão será o e-mail do administrador do site. Clique em “Send Email” (Enviar e-mail).
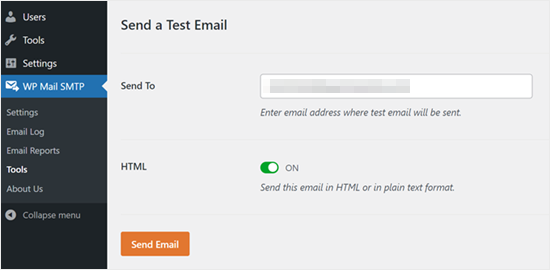
Você deverá ver a mensagem “Test HTML email was sent successfully!”.
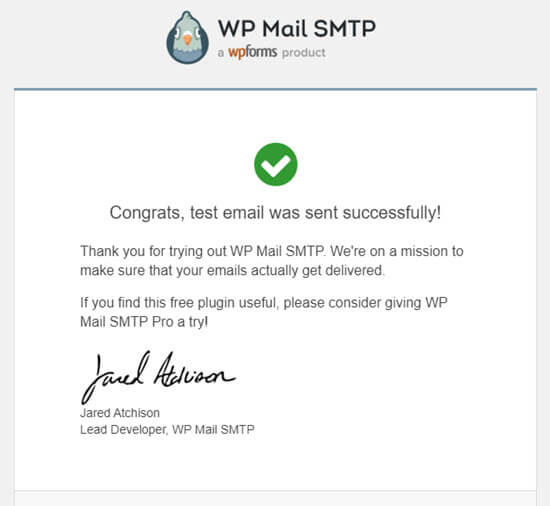
Verifique sua caixa de entrada para ver se ela chegou. Ela terá a seguinte aparência:
Observação: se sua conta do SendLayer ainda não estiver ativada, você receberá a mensagem: [permission_denied]: Não é possível enviar e-mail. Sua conta SMTP ainda não está ativada.
Maneiras alternativas de corrigir o problema do WordPress que não está enviando e-mails
Como você pode ver na lista de opções de correio do plugin WP Mail SMTP, você não precisa usar o SendLayer. Embora seja nossa principal recomendação gratuita, há outras opções que você pode usar, incluindo Microsoft 365, Gmail(Google Workspace), Amazon SES, etc.
Usando o Gmail ou o Google Workspace com o WP Mail SMTP para corrigir e-mails do WordPress
Se você tiver o Gmail, poderá usá-lo para enviar seus e-mails. Você não precisará inserir seus detalhes de login de e-mail no WordPress quando estiver usando o plug-in WP Mail SMTP.
Para usar o Gmail ou o Google Workspace, configure o WP Mail SMTP conforme mostrado acima e, em seguida, clique na opção “Google / Gmail” para o seu servidor de e-mail.
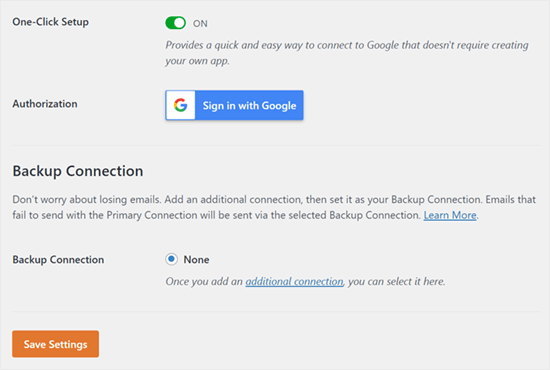
Em seguida, você pode definir as configurações do mailer usando a configuração de um clique do WP Mail SMTP.
Esse método não exige que você crie seu próprio aplicativo, o que é muito mais fácil. Você só precisa entrar na sua conta do Gmail e clicar em “Salvar configurações”.
No entanto, há algumas desvantagens importantes em usar seu Gmail profissional ou o Google Workspace.
Uma delas é que talvez seja necessário entrar em contato com o seu host da Web para que ele instale o certificado correto para que ele funcione.
Outro problema é que, se você alterar o endereço de e-mail no futuro, precisará passar por todo o processo novamente. Isso incluirá a criação de um novo aplicativo da Web.
Usando o Microsoft 365 com o WP Mail SMTP para corrigir e-mails do WordPress
Se você usa o Microsoft Office 365 ou o Outlook para sua conta de e-mail normal, também pode usá-lo para enviar e-mails pelo WordPress. No entanto, essa não é uma opção recomendada, pois é menos segura.
Você precisará configurar o WP Mail SMTP conforme descrito acima e, em seguida, clicar na opção “365 / Outlook” ao escolher o seu servidor de e-mail SMTP. Em seguida, é necessário registrar um aplicativo no Microsoft Azure para que você possa preencher os campos abaixo.
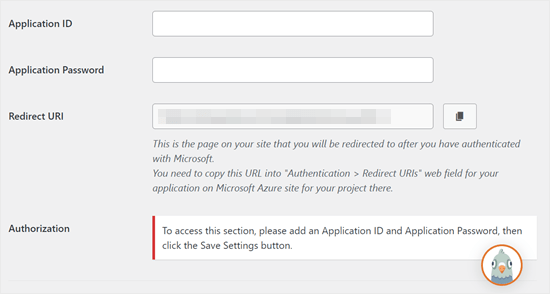
Para obter mais detalhes, consulte o guia detalhado sobre como configurar o Outlook com o WP Mail SMTP.
Usando o Amazon SES com o WP Mail SMTP para corrigir e-mails do WordPress
A plataforma Amazon AWS tem um Simple Email Service (SES) que você pode usar para corrigir o problema de e-mail do WordPress.
A melhor parte do Amazon é que ele permite que você envie até 62.000 e-mails por mês gratuitamente. A desvantagem é que a configuração é um pouco mais desafiadora para iniciantes, e é por isso que não a recomendamos como nossa opção preferida.
Mas, como você pode imaginar, muitos profissionais e especialistas usam o Amazon SES para seu serviço SMTP de e-mail do WordPress, portanto, não poderíamos escrever um artigo sem mencioná-lo.
Se você estiver interessado em configurar o Amazon SES com o WordPress, consulte as instruções completas sobre como configurar o Amazon SES com o WordPress.
Seja qual for o mailer que você decidir usar, lembre-se sempre de usar o recurso “Testar e-mail” para garantir que os e-mails sejam enviados com sucesso.
Você também deve verificar sua caixa de entrada e confirmar que recebeu o e-mail de teste.
Tutorial em vídeo
Se você preferir instruções visuais, dê uma olhada neste vídeo:
Está tendo outros erros no WordPress? Dê uma olhada nestes guias
O WordPress não é perfeito, e você pode encontrar alguns erros comuns de tempos em tempos. Aqui estão alguns tutoriais que você pode consultar para solucioná-los:
- Como corrigir o botão Adicionar mídia que não funciona no WordPress
- Como corrigir o problema de upload de imagens no WordPress (passo a passo)
- Como corrigir o erro de conteúdo misto no WordPress (passo a passo)
- Como corrigir o erro 404 dos posts do WordPress (passo a passo)
- Como corrigir o erro “WordPress Database Error Disk Full” (Erro de banco de dados do WordPress: disco cheio)
- Como corrigir o erro ao estabelecer uma conexão com o banco de dados no WordPress
- Como corrigir o erro “Sorry, This File Type Is Not Permitted for Security Reasons” (Desculpe, este tipo de arquivo não é permitido por motivos de segurança) no WordPress
- Como corrigir o erro 502 Bad Gateway no WordPress
- Como corrigir a pesquisa do WordPress que não está funcionando
- O formulário do WordPress não funciona: 7 dicas de solução de problemas
Esperamos que este artigo tenha ajudado você a saber como corrigir o problema do WordPress que não envia e-mails. Talvez você também queira ver nossa lista dos problemas mais comuns do editor de blocos do WordPress ou nossa seleção dos melhores plug-ins de personalização de e-mail do WooCommerce.
Se você gostou deste artigo, inscreva-se em nosso canal do YouTube para receber tutoriais em vídeo sobre o WordPress. Você também pode nos encontrar no Twitter e no Facebook.


Will
My problem is that wordpress won’t send emails to or from an address that is coming from my domain name. E.g. @domain.com. But it will send from any other email address type.
Md Sajid
i successfully setup my site, and it is working very well.
thanks for this nice and working tutorial..
i used gmail api first method..
SORRY FOR MY BAD ENGLISH
idayat
hello, please does anyone know how can stop WordPress from sending automatic emails to blog subscribers, i want to use MailChimp but it seems i have to first disable WordPress. thank you
Lyndsay
Great instructions! Clear, easy to follow and they work!
Iman
Thank you so much. You have tutorial helped me fix my email problem . this was one of the best tutorials I have ever seen. every step is very well explained.
alex
Hi, I have installed SMTP – I think right.. but I’m still not receiving emails from the contact form. I’m also not getting new order notifications. can someone please help me?
Sagar Awal
check spam mail.
Nifemi
I’ve completed all the steps using mailgun but when I try to send a test email to my other webmails in that same domain, they never get delivered. However it works pretty well with other emails such as gmail.
Any idea about what might be causing this issue?
WPBeginner Support
Hi Nifemi,
Please contact Mailgun support they would be able to help you troubleshoot this.
Admin
Ron
Is there a way to find the emails that were sent and you did not receive because of this issue?
WPBeginner Support
Hi Ron,
Default WordPress notification emails are not stored in the database. However, if you are using a plugin which stores entries in the database then you may be able to see them.
Admin
Daniel Koo
Instead of the Success! message, I get an error like this:
——–
Not Acceptable!
An appropriate representation of the requested resource could not be found on this server. This error was generated by Mod_Security.
——-
What is the problem?
Colin
I’m having the exact same problem. The answer appears to lie in complicated CSS maneuvers that I hate.
Abhishek Kumar
Thank you so much for useful tutorials.
Anthony
Thank a lot. i followed your method 1 and it worked perfectly!
Michael Zorko
So…this used to be my go to app. Found a similar help video from you guys a while back. Loved Mailgun – then they started changing their policy. Now, it only works for verified email addresses..unless…you put a credit card on file.
Jack Hernandez
I’ve been having problems with admin and users (and new users) not receiving automatic notifications.
Will this also solve that issue?
Thanks
WPBeginner Support
Hi Jack,
Yes, it would. Missing notifications are almost always caused by email issues in WordPress.
Admin
Chloe
Hi,
I’m confused in the step of opening the cPanel in the hosting account. What is the hosting account? Is it found in WordPress? Thanks
WPBeginner Support
Hi Chloe,
Seems like you are using WordPress.com. Please see our guide on the difference between self hosted WordPress.org vs free WordPress.com blog.
Admin
Owen
I was having the exact same problem with e-mails not sending and these instructions were v useful. I have now fully resolved the issue – thank you very much
WPBeginner Support
Hi Owen,
We are glad you found the instructions helpful You may also want to subscribe to our YouTube Channel for WordPress video tutorials.
Admin
Amol
Hello,
Thank you for the topic. It helped me a lot and fixed the issue I was struggling with for last 3 days.
Regards,
Amol
Fred
I started to use the video guide and the first step was to set up a mailgun account. I created a password and clicked the verification link in my email to complete the account. However they then wanted to text me a confirmation code to a cell phone as a second verification. I only own a landline not a cell phone and there was no workaround so it is impossible for me to use mailgun. I realize most people these days have cell phones but it seems stupid they would not allow signup via computer (or via a voice code over the phone).
Fernán
Thank you so much! I just had some changes regarding domain settings, and this pointed me in the right way.
Pankaj Kumar
Hi, If i am using Zoho mail for example.com for email.
Can i still use mail1.example.com and configure mx record?
Will it work or stops my email account created on zoho mail for example.com
Melinda Thome
This worked perfectly, and solved all my WordPress email sending issues. Thank you!!
Melinda
Leo
My wordpress send emails, but, this emails Go to Spam folder… I need a soluction. I try using codes from functions.php but does not work. My solution was install Mail Bank plugin but, I dont want this plugin. I want a simple soluction.
casey
hello! I am having issues with my Contact page, we are not receiving new contact information in our CRM site. Can you please guide me to fix the issue?
Doron
Hey
Thanks for the great tutorial. I’m getting
“Mailgun HTTP API Test Failure; status “Free accounts are for test purposes only. Please upgrade or add the address to authorized recipients in Account Settings.”
Do you know why or how to resolve?
(Added an “authorized user” to my acount)
Alex Cramer
I’m having the same problem. I also don’t understand how to get to the cPanel. What am I missing?
Lawrence Ip
Ah! When in doubt add this TXT Record. @ v=spf1 include:_spf.google.com ~all
That is, this works for Namecheap (and most likely others) when Gmail is enabled. Enjoy!
Aaron Williams
I am having the problem that the wp_mail() function is not showing up in our functions.php document. If I read the documentation correctly, that means Gmail SMTP plugin still won’t work because it uses that function still. Every time I have tried to add the wp_mail() function it has resulted in a fatal error that kills the website and I have to remote into our server to delete the code to get the page working again. Any ideas?
WPBeginner Support
Hey Aaron,
wp_mail function resides in the core WordPress files, so you will not find it in your theme’s functions.php file. Since it is already part of the core, you do not need to add it. Try installing Gmail SMTP plugin, and it should work.
Admin
Clare
Hi there, so happy to have found this tutorial! Can anyone tell me if you need to use a subdomain to setup Mailgun? We have set this up using our root domain and are having some issues and I am wondering if this could be why. Any advice would be appreciated! Thanks, Clare.
Michael Halbrook
It can cause problems if you set it up with out one from what I’ve been reading, because if you set up the MX records for MailGun with your current e-mail address it can be problematic.
Michael Tillman
Great tutorial. I have to say the narrator has a really nice voice, nice and pleasant.
Eric
Using Mailgun worked like a charm. Thanks!
John F
will this fix conformation email not sending?
Callan
Hi,
I think I found an easy workaround for this problem. When setting up form fields, instead of using the generic email field I just use a different type of field and mark it as a “required” field. That way people will know that it is a required field and still provide you with a valid email address.
I have just had the same problem with all of a sudden WordPress not sending me mail from anyone who has a gmail address. I’ve changed the field types and am again receiving emails from submitted forms.
I’d be interested to see if anyone else would try to see if this works.
Steve
First off…very informative article…including the YouTube video on setting up the Google Apps for Work. So thank you for that!
A couple questions:
I use Mad Mimi for my email marketing…and they sent the below article out a while ago telling Gmail users to not use Gmail addresses for sending out Mad Mimi email campaigns (which is what I used to do), but instead to use a custom domain. So that’s what I did. I set up a custom “name@domain.com” address and have been using that. If I want to use the exact same “name@domain.com” address for the Google Apps for Work setup to receive notifications from my WordPress site…will this mess up stuff with the Mad Mimi emails?
Additionally, I currently have my personal Gmail setup to be able to send and receive email from the “name@domain.com” address…so how is that effected as well? Do I need to delete that stuff out of there if I go with this Google Apps for Work option to fix my issue with not receiving my WordPress notification emails?
Thank you so much in advance for any clarification on this.
Sacha Doucet
The article and video were super helpful! Thank you!!
WPBeginner Support
Hey Sacha,
Glad you found it useful. You may also want to subscribe to our YouTube Channel for more WordPress video tutorials.
Admin
Amy
Just wanted to say – thank you so much for this article! Has helped me fix my forms not sure what the issue was before, if it was the server or what – but the mailgun solution worked perfectly for me.
Akinola King
Thanks for this article.
David
Great article! Thank you for sharing!
1) Why does the mailgun HTTP API not require a username and password like the SMTP solution does? Is it because mailgun is verifying at the DNS level (with its SPF and domain key records) and with the API — so this setup removed the need for the SMTP credentials?
2) Am I correct that these sending issues (being rejected by Google or Yahoo’s mail servers) are mostly because people are trying to send email from their WP installations but are using a personalAccount@aol.com to send email from a WP install at example.com?
3) Would mailgun allow someone to send email as personalAccount@aol.com even though the mail is coming from the WP install at example.com
Thanks for your help!
Shaun Lawson
Thank you so much for these great instructions.
Worked for me first time.
Shaun
Lucas Shepherd
Postman SMTP fixed my wordpress email after trying everything everyone told me to try.
Doug
Thanks for pointing me to Postman SMTP. I too had tried several setups to no avail.
Jerry
Thanks Lucas, Me too!
Postman SMTP solved all my email woes.. I’ve been trying to test mail function on WordPress installed on localhost under Xampp for a day or two.
I’m brand new to WordPress and I’m learning that the secret to a happy life is getting the right Plugin.. recommendations are invaluable.
meenakshi
My cpanel is not showing Advanced DNS Zone edittor in Domain section . Wha shoud I do?
WPBeginner Support
You can try DNS Zone Editor or ask your hosting provider for help.
Admin
Mabel
I need help. I have successfully installed mailgun using your videio How to Fix WordPress Not Sending Email Issue, but my email notifications still do not send. Do I have to enter some code into each email template? I have no idea what I am doing.
bobby
You should really warn people about changing the mx records. It ruined my incoming mail for 5 hours and i had to change them back.
Bobby
I set this all up and never got an activation email from Mailgun. Pretty pathetic that an email smtp service can’t even figure out their own account activation system through….ugh….email.
I sent a support ticket in. Now, because I changed the settings on my hosting, NONE OF MY EMAIL IS WORKING. I have tried three different emails to activate the account, and none have gotten the activation email.
Luke Cavanagh
SendGrid is the best option now, the free plan covers up to 12,000 emails a month.
https://wordpress.org/plugins/sendgrid-email-delivery-simplified/
Marco Floriano
Amazing video, amazing tutorial. Nice solution. Perfect! Mailgun is amazing, thanks a ton guys!
Ademide
Thank you for tutorials. I couldn’t proceed because I was having the following error “Your account is temporarily disabled. Business Verification Please contact support to resolve”. I have raised two tickets already, it doesn’t seem to be helping. Any idea what I need to do to get this resolved?
WPBeginner Support
Mailgun has internal checks in place which may sometimes flag an innocent account as suspicious. You simply need to contact their support, they will ask you a few questions about your email usage and will unlock your account.
Admin
Wout
Oh man thank you so much for this! You’re lifesavers! Mails from my wp-site used to end up in Spam, now they reach the inbox with no problems… One thing worth mentioning may be that the domain you set up in Mailgun doesn’t show up in WP mails to users/customers, so you don’t have to use a matching domain for your site. You can setup mail1.example.com in Mailgun for your WordPress site anotherexample.com and it works.
WPBeginner Support
It works, but to ensure maximum delivery in the long run, it is recommended to use the same domain as your website.
Admin
Wout
Actually I still had some issues after testing, and decided to install sendgrid plugin, and that was easier to setup and works like a charm…
Lavish
My domain name is attached to Google Apps emails, I don’t want to mess up things. Can I instead use .org version of my domain name. I have .org and it is just parked (redirecting to .com) unused.
Thanks
Luke Cavanagh
Just make it easy and use SendGrid. You just create a general API and then add it into the settings of the SendGrid plugin on the site you need to use it on.
Michael Story
Hi you mention needing the shortcode for later in the video, where do you use the shortcode? Does it replace gravity forms?
Bill Frankell
Oh man, where were you last week with this? I spent four days of vacation working all this out on my own.
However I do not see my problem listed, which was using Yahoo mail.
Been a yahoo user since 2000 so hated to give way but finally set up new gmail accounts on all my websites which changed everything. I now have those accounts all forwarding to Yahoo, each with a note in the from address telling me their source.
There may have been a way to make Yahoo work, but I didn’t find it and finally gave up. This is a better setup because it lets me set up separate mailing lists and work with mail chimp and sumo me. So far in the last week we have collected over a hundred new members on one site, the difference is that now I get to see each one as it comes in, can delete my yahoo notice and still have the record on Gmail archives.
Having said all this, this page is being bookmarked for future reference. Thanks, it was almost timely.
amit
Sending WordPress Emails Using Gmail SMTP Servers. is it free feature
WPBeginner Support
There are both free and paid options. The free option is less reliable than the paid option.
Admin