Quando se trata de fazer atualizações ou alterações significativas em seu site WordPress, fazer isso diretamente pode ser arriscado. É aí que entra um site de teste.
É um clone perfeito do seu site ativo, onde você pode testar com segurança as alterações, solucionar problemas e refinar as atualizações antes de implantá-las no site principal.
Na WPBeginner, usamos sites de preparação para testar as atualizações do site antes de publicá-las em nossos sites ativos. Isso nos poupa de possíveis períodos de inatividade, recursos quebrados e outras complicações.
Neste guia passo a passo, mostraremos como criar facilmente um ambiente de teste para seu site WordPress. Abordaremos vários métodos diferentes e a maioria deles requer apenas alguns cliques.
O que é um site de teste?
Um site de teste é um clone do seu site ativo usado para testar as alterações antes de colocá-las no ar. Os sites de teste ajudam a detectar erros, para que você não danifique o site ativo.
No passado, costumava ser muito difícil configurar um site de teste do WordPress, mas agora isso mudou e até mesmo uma pessoa não técnica pode fazer isso.
Muitos usuários instalam o WordPress localmente em seus computadores Windows ou Mac para testar as alterações. Quando terminam as atualizações, eles simplesmente carregam essas alterações do host local para o servidor ativo.
O maior problema dessa abordagem é o seguinte: e se algo que funcionou em seu host local não funcionar no servidor ativo?
Muitas vezes, os sites locais e os servidores de hospedagem WordPress ativos não são executados no mesmo ambiente.
Como o site de teste fica no seu servidor de hospedagem na Web, você pode evitar facilmente todos esses erros, pois ele executa a mesma configuração de servidor que o site ativo.
Dito isso, vamos dar uma olhada em como configurar um site de teste para o WordPress.
Como criar facilmente um site de teste do WordPress
Há várias maneiras de criar um site de teste para o WordPress. A mais fácil é usar o recurso de site de teste incorporado do seu provedor de hospedagem.
Algumas das melhores empresas de hospedagem WordPress já oferecem sites de teste com um clique. Se o seu site estiver hospedado em uma dessas empresas, você poderá criar facilmente um site de teste sem problemas.
Se você não tiver uma dessas soluções de hospedagem populares, também temos uma solução para ajudá-lo a criar um site de teste do WordPress usando um plug-in (e até mesmo manualmente).
Para uma navegação mais rápida, use a navegação abaixo para pular para a seção que mais se aplica a você:
Criação de um site de teste na Bluehost
A Bluehost é uma das melhores empresas de hospedagem para WordPress. Eles oferecem uma solução rápida de site de teste com um clique em todos os seus planos.
Primeiro, vá até o painel de controle da Bluehost e visite a seção “My Sites”.
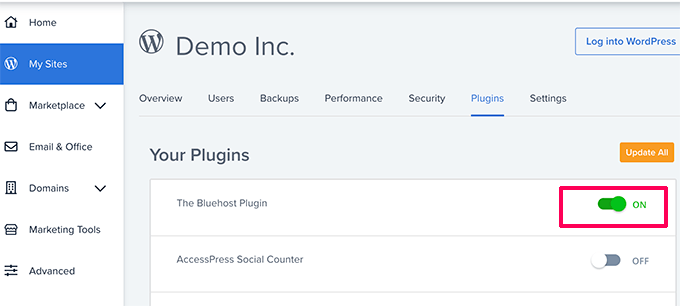
Em seguida, vá para a guia “Plugins” e ative a chave ao lado da opção “Bluehost Plugin”.
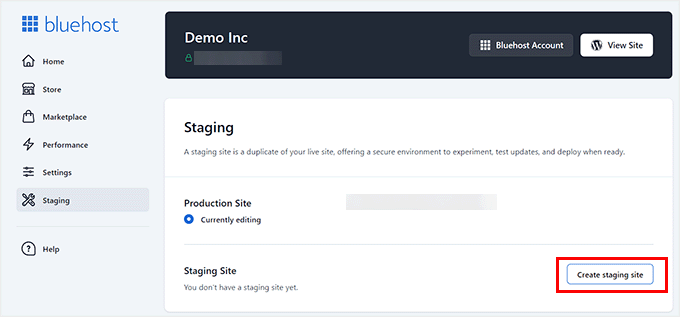
Depois disso, acesse o painel do site do WordPress e visite a página Bluehost ” Staging.
Agora, vá em frente e clique no botão “Create Staging Site” (Criar site de teste).
A Bluehost agora preparará o ambiente de teste para seu site.
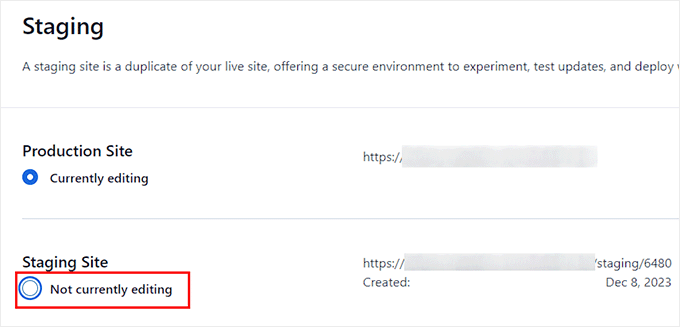
Feito isso, será exibida a seção “Staging Site”, na qual você deve marcar a caixa “Not currently editing”.
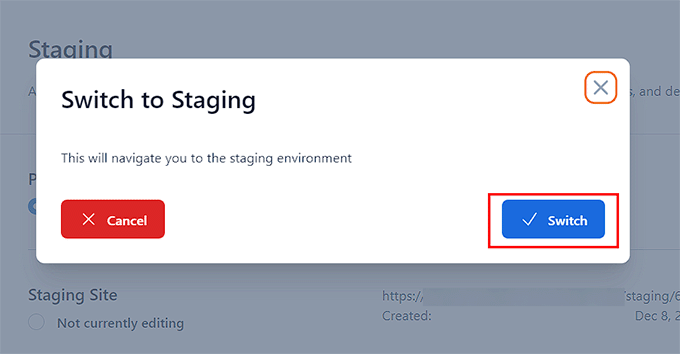
Um aviso será exibido na tela solicitando que você mude para o site de preparação.
A partir daí, clique no botão “Switch”.
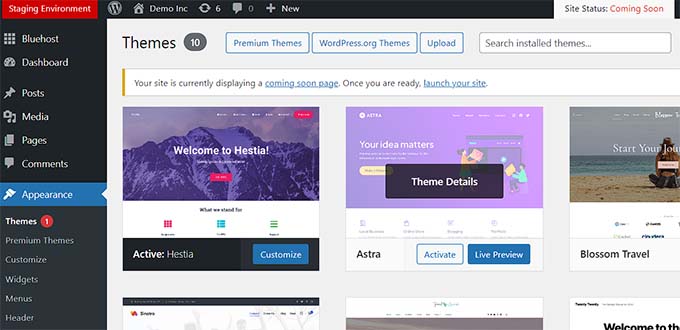
Depois de alternar, você verá um botão na tela indicando que está trabalhando no site de teste.
Você pode ir em frente e trabalhar em seu site sem se preocupar se isso afetará seu site ativo.
Implementação de alterações do site de teste para o site ativo na Bluehost
Quando você estiver pronto para transferir as alterações do site de teste para o site ativo, basta acessar a página Bluehost ” Staging na barra lateral de administração do WordPress.
A partir daqui, você verá o menu suspenso de opções de implementação ao lado do site de preparação. Você pode implementar apenas os arquivos, apenas o banco de dados ou implementar todas as alterações.
Se não tiver certeza, clique no botão “Deploy All Changes” (Implantar todas as alterações) para continuar.
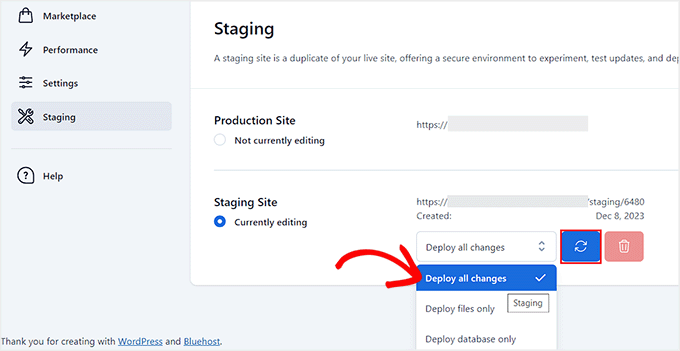
Depois disso, clique no botão “Deploy Site” (Implantar site) ao lado do menu suspenso.
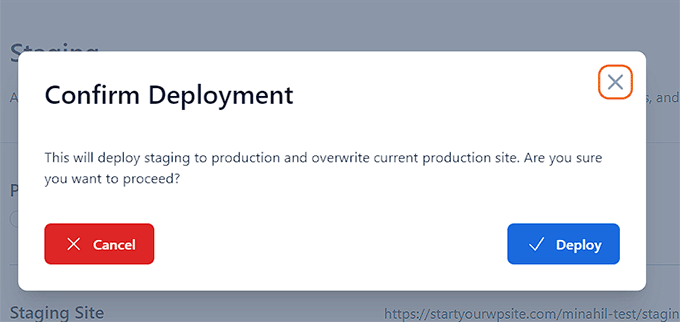
Isso abrirá uma janela pop-up na qual será solicitado que você confirme que deseja implantar o site de teste no site de produção. Clique no botão “Deploy” para continuar.
A Bluehost agora começará a implantar seu site de teste no site ativo. Dependendo do tamanho de seu site, isso pode demorar um pouco.
Agora você pode voltar ao site ativo para ver as alterações em ação, clicando no botão Radio na opção Production site (Site de produção).
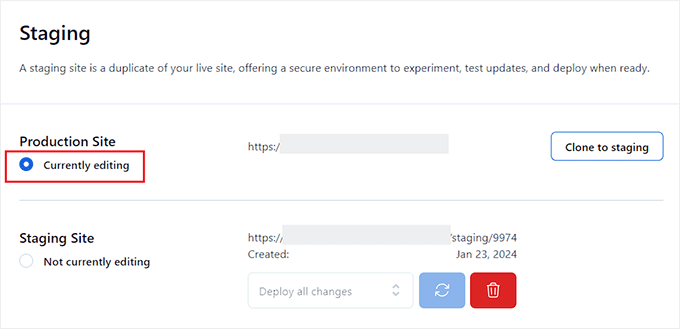
Clonagem do site de produção para o de preparação
Agora, ao voltar para o site de produção, todas as alterações que você fizer nele não serão sincronizadas automaticamente com o site de teste.
No futuro, se você quiser testar mais coisas no site de teste, precisará duplicar o site.
Para fazer isso, você deve visitar a página Bluehost ” Staging e clicar no botão “Clone to staging”.
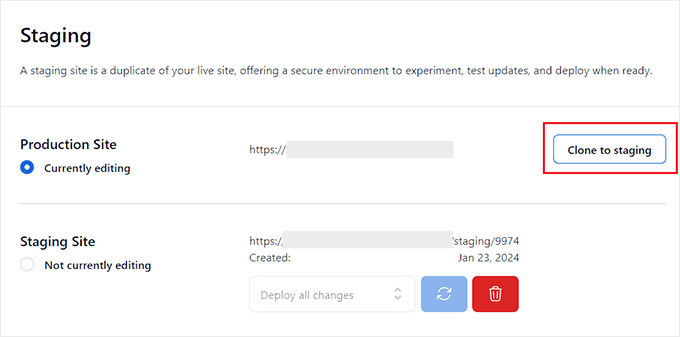
A Bluehost clonará as alterações mais recentes do seu site ativo no site de teste. Depois disso, você pode mudar para o site de teste para testar e desenvolver.
Criação de um site de teste na SiteGround
A SiteGround é outra das principais empresas de hospedagem WordPress que oferece um recurso de preparação com um clique em seus planos GrowBig e GoGeek.
Estamos usando essa hospedagem no WPBeginner e temos tido uma ótima experiência com ela. Ela tem sido confiável, rápida e fácil de gerenciar, o que a torna uma opção sólida para nosso site.
Para saber mais, consulte nossa análise do SiteGround.
Se o seu site estiver hospedado no SiteGround, é assim que você configuraria um site de teste.
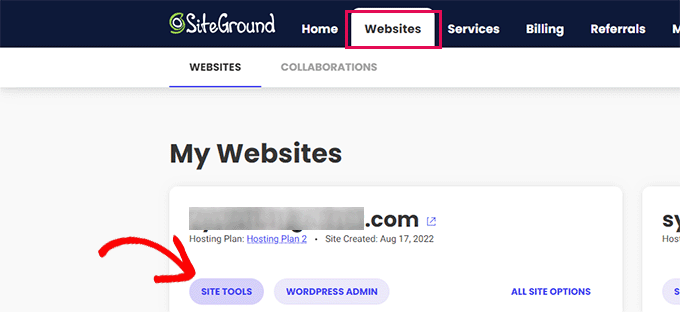
Primeiro, você precisa fazer login no painel do SiteGround e mudar para a guia Websites. A partir daí, você precisa selecionar as Ferramentas do site abaixo do seu site.
Na próxima tela, você precisa clicar no menu WordPress ” Staging na coluna da esquerda.
A partir daí, selecione seu site e forneça um nome para a cópia de teste.
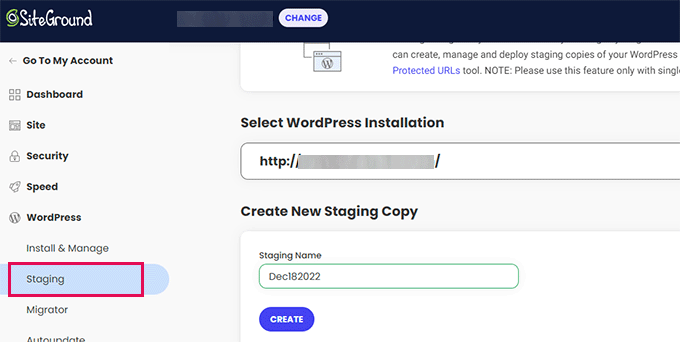
Clique no botão “Create” (Criar) para continuar e o Siteground criará uma cópia de teste de seu site.
Depois disso, você precisa clicar no botão “Go to protected URLs” (Ir para URLs protegidos) para que possa proteger seu site de teste com senha e mantê-lo privado.
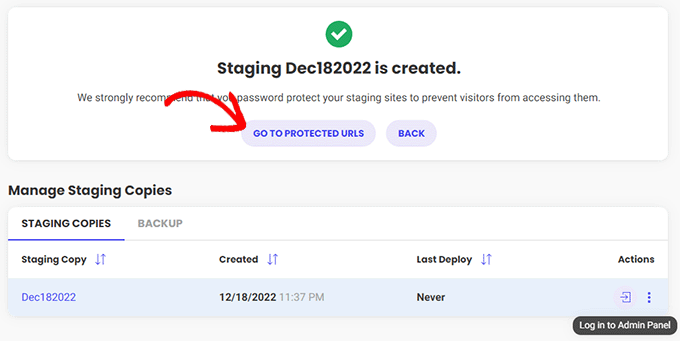
Na próxima tela, o Siteground preencherá automaticamente o URL e o caminho do seu site de teste.
É necessário inserir o nome de usuário e a senha que deseja usar para proteger o site de teste.
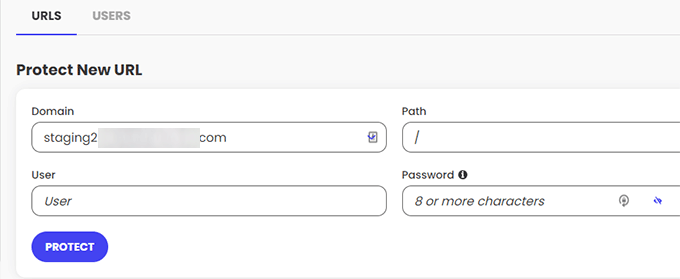
Clique no botão “Protect” (Proteger) para salvar suas configurações.
Agora você pode voltar para a página WordPress ” Staging e clicar no botão “Log in to Admin Panel” (Fazer login no painel de administração) ao lado do site de teste.

A SiteGround agora abrirá a área de administração do WordPress de seu site de teste. Você pode testar suas alterações nesse site de teste.
Implante as alterações de volta em seu site ativo
Depois de testar as alterações no site de teste, talvez você queira mesclá-las com o site ativo.
O SiteGround também facilita isso.
Basta clicar no menu WordPress ” Staging na coluna da esquerda. Em seguida, clique no menu de três pontos ao lado do seu site de teste na seção “Manage Staging Copies” (Gerenciar cópias de teste).

O menu mostrará duas opções de implementação. Você pode escolher a opção “Full Deploy” ou “Custom Deploy”.
A opção “Full Deploy” mescla tudo do site de teste com o site ativo. A opção “Custom deploy” permite que você selecione quais arquivos ou dados deseja mesclar.
Se você não tiver certeza, escolha a opção “Full Deploy”.
A SiteGround copiará o site de teste para o seu site ativo.
Incorporação do Live ao seu site de preparação
As alterações feitas em seu site ativo não são copiadas automaticamente para o site de teste.
Sempre que precisar trabalhar em seu site de teste, repita o processo acima para criar um novo site de teste.
Criação de um site de teste no WP Engine
AWP Engine é a melhor empresa de hospedagem gerenciada para WordPress do mundo. A hospedagem gerenciada do WordPress é um serviço de concierge para seu site WordPress, em que o provedor de hospedagem cuida das atualizações, dos backups, da segurança e do desempenho.
O WP Engine oferece uma solução de teste com um clique em todos os seus planos. Se estiver usando o WP Engine para hospedar seu site, é assim que você configuraria um ambiente de teste para o seu site.
Primeiro, é necessário fazer login no painel de controle do WP Engine. Em seguida, vá para a página “Sites” e selecione seu site clicando nele.
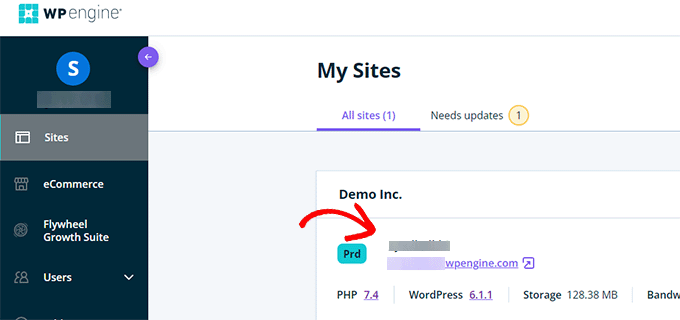
Isso o levará ao painel de controle do site.
Agora, você precisa clicar no link “Add Staging” (Adicionar teste) na coluna da esquerda ou selecioná-lo no nome do site na parte superior.
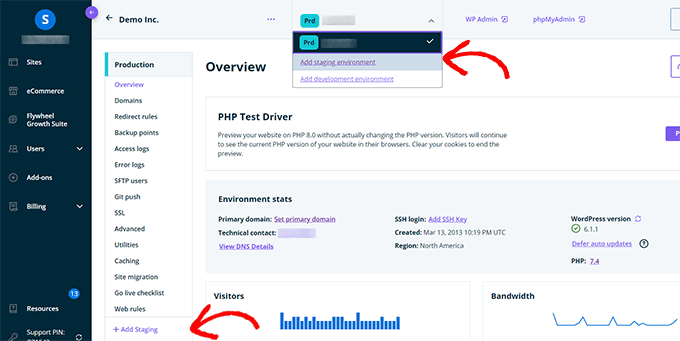
Isso o levará à tela “Add Environment” (Adicionar ambiente).
Você será solicitado a escolher como deseja proceder com o ambiente de preparação.
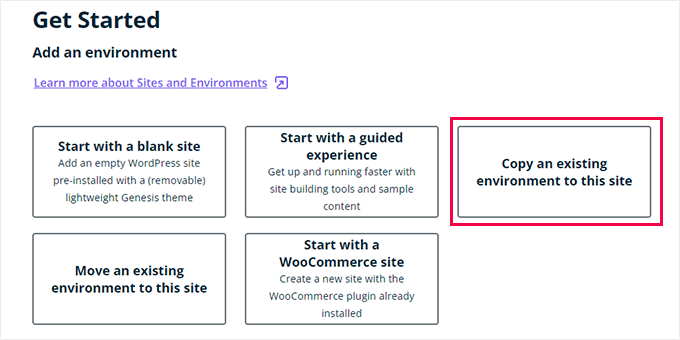
Veja a seguir o que cada uma dessas opções faz:
- “Iniciar com um novo site em branco” cria um novo site vazio.
- “Iniciar com uma experiência guiada” cria um novo site com uma experiência guiada e conteúdo de demonstração.
- “Copiar um ambiente existente para este site” copiará seu ambiente de produção ou desenvolvimento para este site (por exemplo, copiar seu site ativo para este ambiente).
- ‘Move an existing environment’ (Mover um ambiente existente) move um ambiente para esse site (por exemplo, mover o ambiente de desenvolvimento para o Staging)
- ‘Start with a WooCommerce site’ cria um novo site WordPress com o WooCommerce pré-instalado.
Como você deseja criar uma cópia de teste do nosso site ativo, será necessário clicar na opção “Copy an existing environment to this site” (Copiar um ambiente existente para este site).
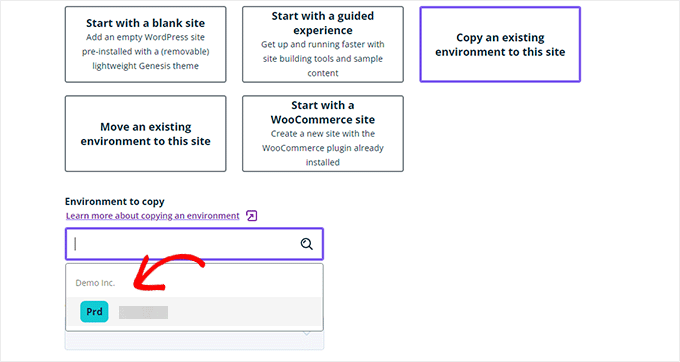
Depois de escolher um ambiente, selecione o backup mais recente do qual deseja copiar e clique no botão “Next” (Avançar) para continuar.
Agora, você precisará fornecer um nome para o seu site de teste. Esse nome será usado no URL do site de preparação. Depois disso, escolha STG (staging) como seu tipo de ambiente.
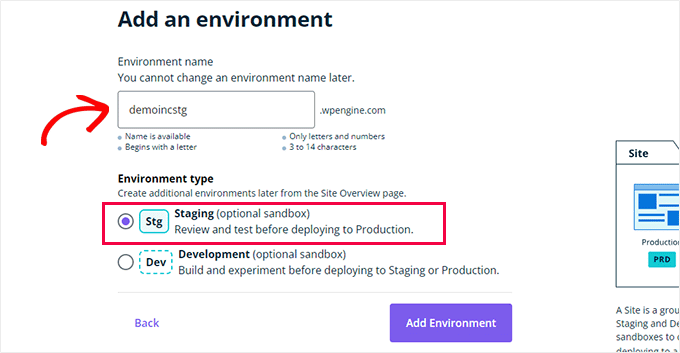
Clique no botão “Create Environment” para continuar.
O WP Engine criará um site de teste para você. Depois disso, você será redirecionado para o painel do ambiente de teste.
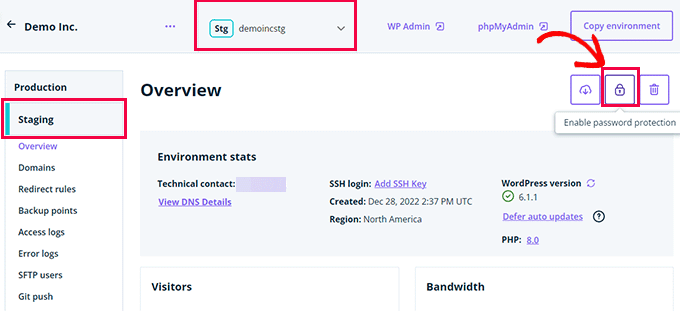
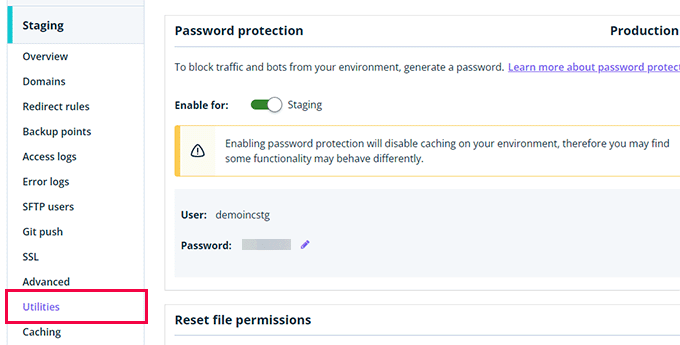
Em seguida, você precisa clicar no botão Padlock (cadeado) para ativar a proteção por senha para seu site de teste.
Depois disso, você precisa ir para a guia “Utilities” (Utilitários) para copiar o nome de usuário e a senha do site de teste.
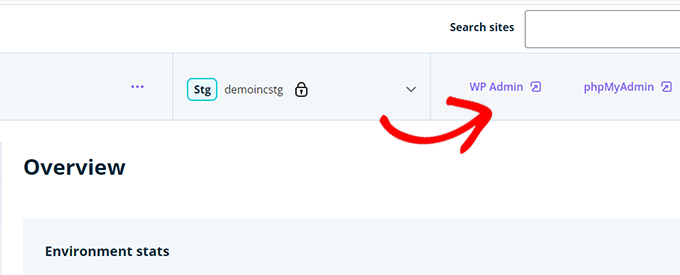
Agora você pode clicar no botão “WP Admin” na parte superior para fazer login no seu site de teste.
Sinta-se à vontade para fazer alterações e experimentar recursos no site de teste, da mesma forma que faria em um site WordPress comum que você instala em qualquer outro lugar.
Implantar alterações do site de teste para o site ativo no WP Engine
Deseja mesclar as alterações feitas no site de teste com o site ativo?
Basta clicar no botão “Copy Environment” para iniciar a implementação.
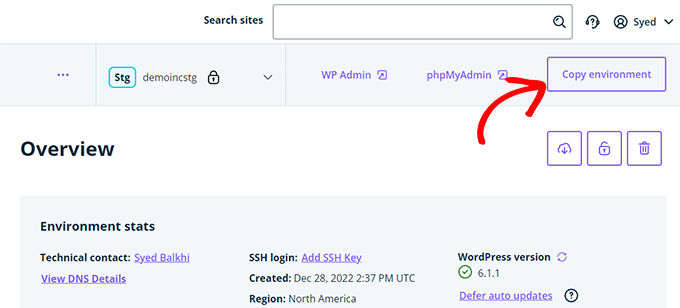
Isso o levará à página de opções. A partir daí, você precisa escolher os ambientes de origem e destino para a cópia.
Aqui, você selecionará o site de teste como o ambiente de origem e o site de produção ou ao vivo como o ambiente de destino.
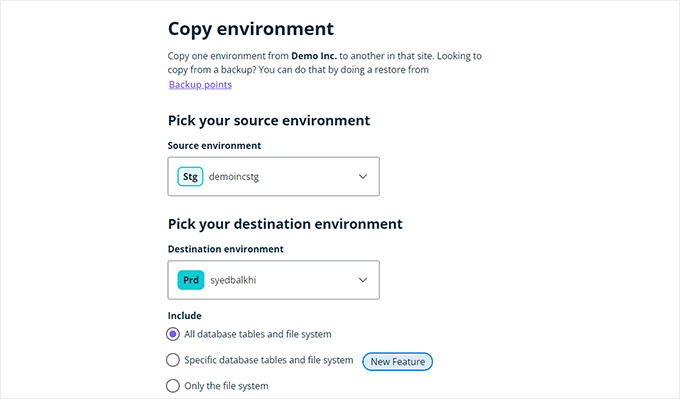
Você pode escolher o que deseja copiar. Por exemplo, você pode copiar todas as tabelas e arquivos do banco de dados, arquivos específicos e tabelas do banco de dados ou somente o sistema de arquivos.
Observação: se você copiar tudo, perderá todos os dados armazenados no site ativo depois de usá-lo para criar o ambiente de preparação. Isso pode incluir dados importantes, como novos posts, páginas, clientes e pedidos. Portanto, é uma boa ideia fazer um backup do site ativo antes de implementar a partir do ambiente de preparação.
Em seguida, clique no botão “Review and Confirm” (Revisar e confirmar) para iniciar a implantação. Levará algum tempo para copiar tudo para seu site ativo.
Você receberá uma notificação por e-mail quando o processo for concluído.
Criação de um site de teste usando o plug-in do WordPress
Se a sua empresa de hospedagem WordPress não fornecer um recurso de site de teste, você ainda poderá criar um site de teste usando um plug-in do WordPress.
Há algumas desvantagens em usar esse método.
Primeiro, um plug-in terá controle limitado sobre o seu servidor de hospedagem. É por isso que nem sempre ele pode fornecer os melhores resultados.
Em segundo lugar, o plug-in que usaremos armazenará seu site de teste em seus próprios servidores. Se você se preocupa com privacidade e proteção de dados, isso pode não ser o ideal para você.
Por fim, o plug-in tem várias incompatibilidades conhecidas. Verifique a página de incompatibilidades para ter certeza de que seu site é compatível.
Dito isso, vamos ver como criar um site de teste do WordPress usando um plug-in do WordPress.
A primeira coisa que você precisa fazer é instalar e ativar o plug-in WP Stagecoach. Para obter mais detalhes, consulte nosso guia passo a passo sobre como instalar um plug-in do WordPress.
Após a ativação, o plug-in adicionará um novo item de menu chamado WP Stagecoach à sua barra de administração. Ao clicar nele, você será levado à página de configurações do plug-in.
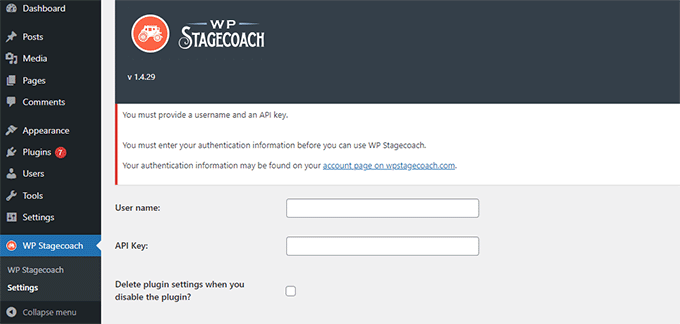
Será necessário inserir seu nome de usuário do WP Stagecoach e a chave de API, que pode ser encontrada em sua conta no site do plug-in.
Depois disso, você precisa visitar a página WP Stagecoach ” WP Stagecoach e escolher um nome para o seu site de teste. Esse nome também será usado como subdomínio de seu site de teste do WordPress.
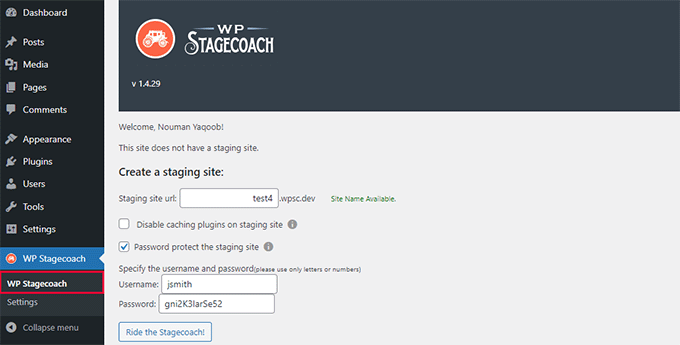
Não se esqueça de marcar a caixa ao lado da opção “Password protect the staging site” (Proteger o site de teste com senha). Isso protegerá seu site de teste da visualização pública e dos mecanismos de pesquisa.
Clique no botão “Ride the Stagecoach” para continuar.
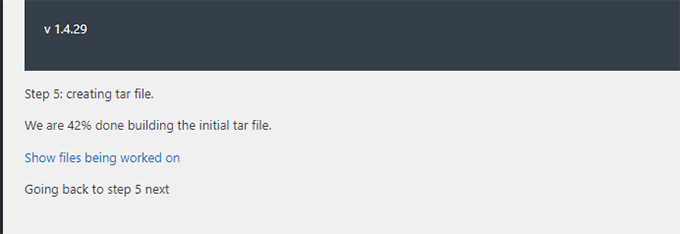
O plug-in agora criará um backup dos arquivos e do banco de dados do WordPress para exportá-los para o site de teste.
Isso pode demorar um pouco, dependendo do tamanho de seu site WordPress.
Quando terminar, você verá o link para o site de teste e sua área de administração.
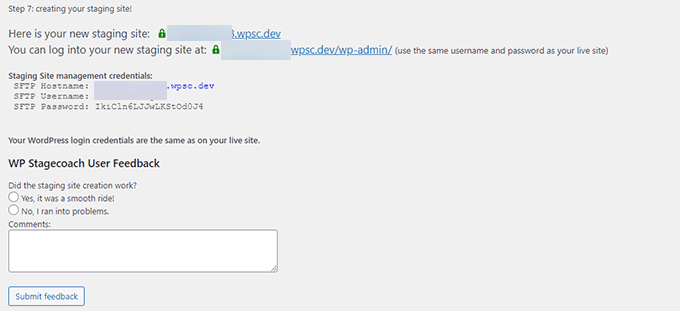
Você pode clicar no link para visitar seu site de teste e começar a trabalhar nele.
Você notará uma mensagem laranja brilhante na barra de administração na parte superior, indicando que está trabalhando no site de teste.
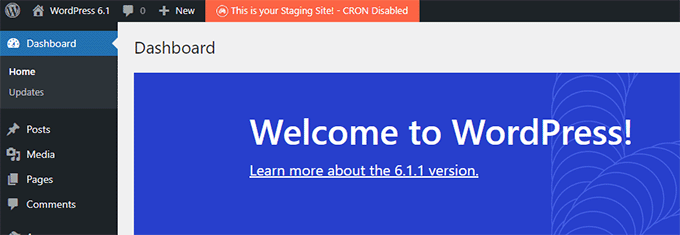
Implementação do site de preparação para o site ativo usando o WP Stagecoach
Quando estiver pronto para importar as alterações para seu site ativo, vá para a página WP Stagecoach ” Importar alterações e clique no botão verificar alterações.
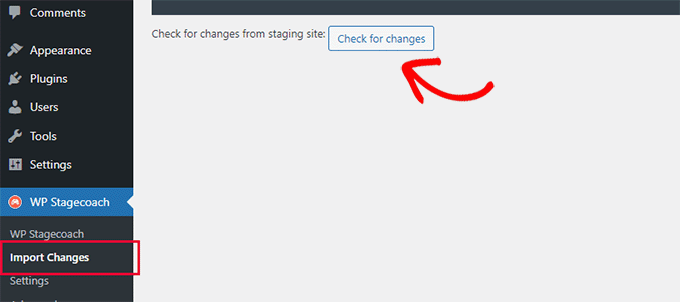
Agora, o plug-in verificará se há alterações em seu site de teste e mostrará opções para importá-las.
Você pode escolher entre todas as alterações, alterações de arquivo ou alterações de banco de dados.
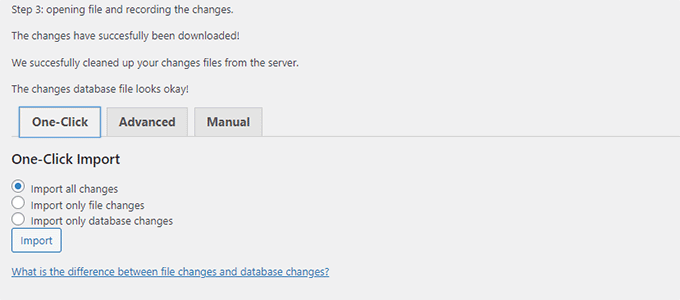
O plug-in mostrará o progresso da importação e o notificará quando ela for concluída.
Agora você pode testar seu site ativo para ver se todas as alterações foram importadas com êxito.
Criar um site de teste para o WordPress manualmente
Este método o ensinará a criar manualmente um site de teste para a instalação do WordPress. Ele é para usuários avançados e requer mais trabalho do que os outros métodos descritos acima.
Outra desvantagem desse método é que seu site ficará temporariamente indisponível ao implementar as alterações de volta do servidor de preparação para o servidor ativo.
Dito isso, vamos ver como criar manualmente um ambiente de teste para seu site WordPress.
Primeiro, você precisa criar um subdomínio para seu site de teste. Se você usa a Bluehost, acesse o painel de controle da sua conta de hospedagem e vá para a guia “Advanced” (Avançado).
Em seguida, clique no botão “Manage” (Gerenciar) ao lado da opção “cPanel”.
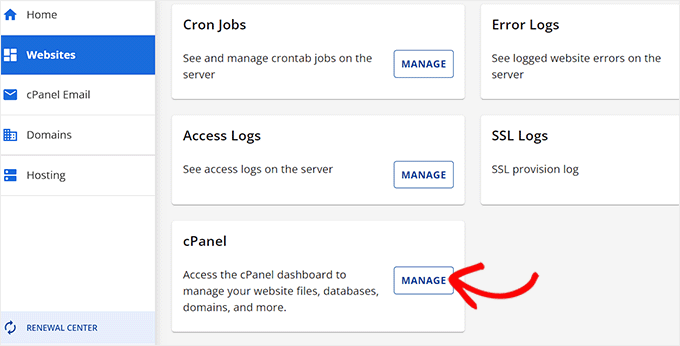
Isso abrirá o cPanel em uma nova guia, na qual você deve rolar para baixo até a seção “Domínio”.
A partir daí, clique na opção “Domains” (Domínios).
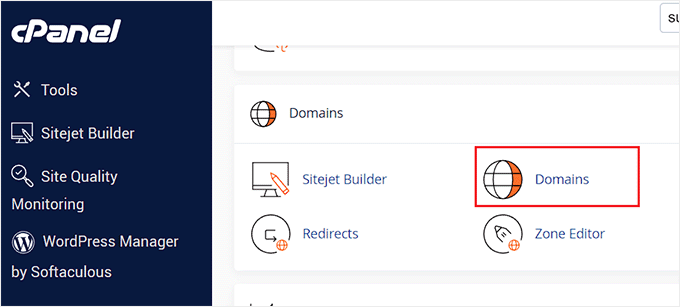
Isso abrirá uma lista de todos os domínios em sua conta de hospedagem. Aqui, você deve clicar no botão “Create a New Domain” (Criar um novo domínio).
Depois de fazer isso, uma nova página será aberta na tela, na qual você deverá escrever seu subdomínio seguido do nome do domínio no campo “Domain” (Domínio), assim:
subdomínio.exemplo.com
Depois disso, basta clicar no botão “Submit” (Enviar) para armazenar suas configurações.
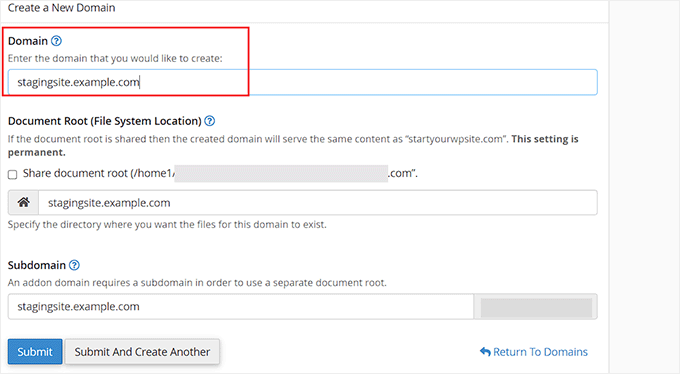
Observação: estamos usando o Bluehost em nossas capturas de tela de exemplo, portanto, sua tela pode ser diferente.
O painel de controle da hospedagem adicionará o subdomínio, que poderá ser usado para importar o site do WordPress ativo.
Em seguida, você precisa instalar e ativar o plug-in gratuito do Duplicator em seu site ativo. Se precisar de todos os recursos, você pode obter a versão premium do Duplicator aqui.
Várias de nossas marcas parceiras também usaram essa ferramenta para criar backups e obtiveram excelentes resultados. Para saber mais, consulte nossa análise do Duplicator.
Após a ativação, você precisa clicar no menu Duplicator na barra lateral de administração do WordPress e clicar no botão “Create New” (Criar novo) em Backups.
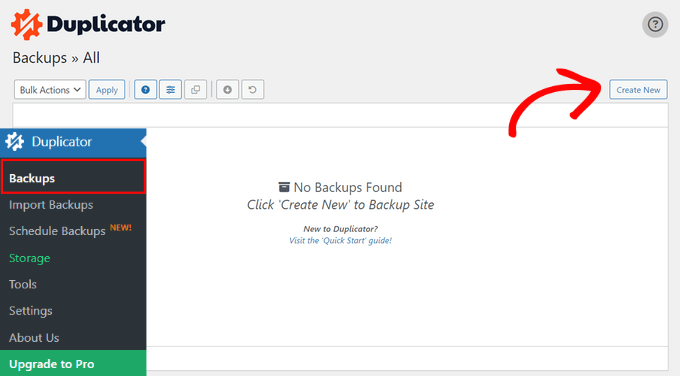
Em seguida, você pode digitar um nome para o backup e clicar no botão “Next” (Avançar) para continuar.
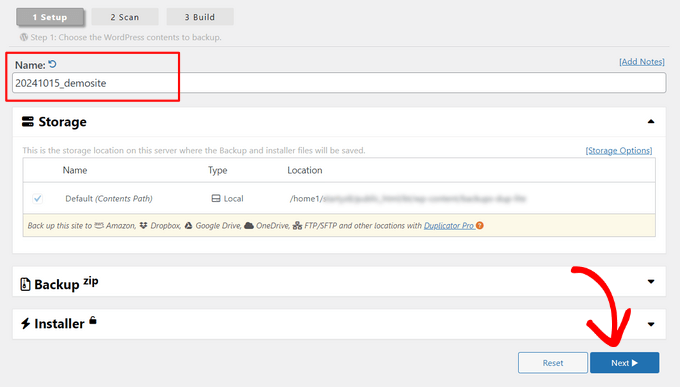
Depois disso, o Duplicator executará o assistente de duplicação de sites.
Primeiro, ele executará alguns testes para verificar se tudo está em ordem. Se todos os itens estiverem marcados como “Good” (Bom), clique no botão “Build” (Criar).
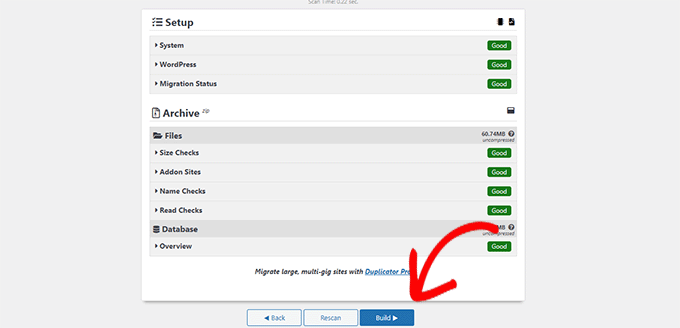
O plug-in começará a criar um pacote de backup do Duplicator para seu site WordPress. Esse processo pode levar alguns minutos, dependendo do tamanho de seu site.
Quando terminar, você verá opções de download para o instalador e o pacote Archive. Você precisa clicar no botão “Download Both Files” para baixar os dois arquivos em seu computador.
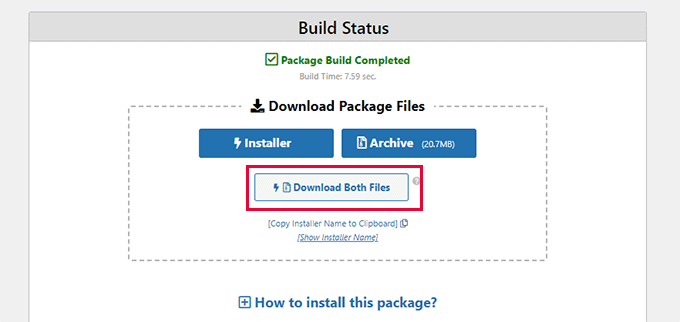
Você precisará fazer upload desses dois arquivos para o diretório de arquivos do subdomínio que acabou de criar. Para obter detalhes, consulte nosso guia sobre como usar o FTP para carregar arquivos em seu site WordPress.
Em seguida, seu novo site de teste do WordPress precisará de um novo banco de dados. Vamos criar um.
Acesse o painel de controle da sua conta de hospedagem do WordPress e vá para a guia “Advanced” (Avançado).
Depois disso, role para baixo até a seção “Databases” (Bancos de dados) e clique no botão “Manage” (Gerenciar) ao lado dela.
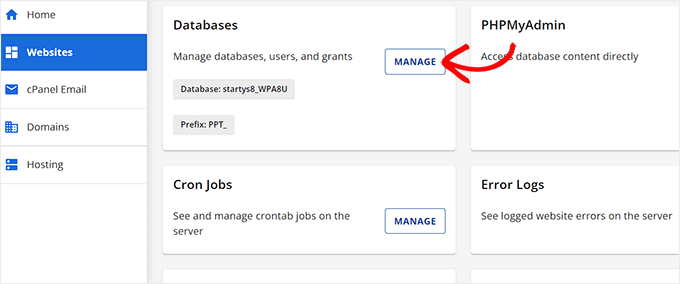
Se você não estiver usando a Bluehost, seu ambiente de hospedagem do WordPress pode parecer um pouco diferente. Não se preocupe, basta procurar a seção Bancos de dados.
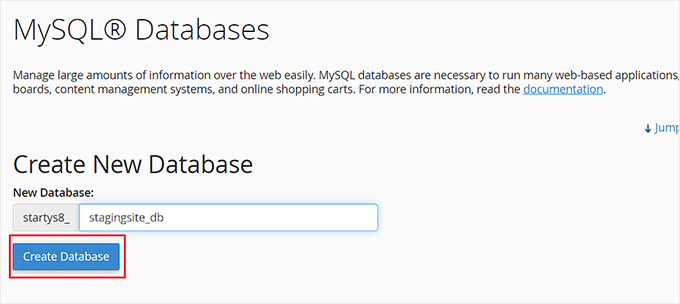
Isso o levará à página “MySQL Databases” (Bancos de dados MySQL), onde você pode começar fornecendo um nome para o seu banco de dados.
Em seguida, clique no botão “Create Database” (Criar banco de dados).
Em seguida, é necessário criar um usuário do MySQL para o seu banco de dados.
Role para baixo até a seção MySQL Users e forneça um nome de usuário e uma senha para o novo usuário do banco de dados.
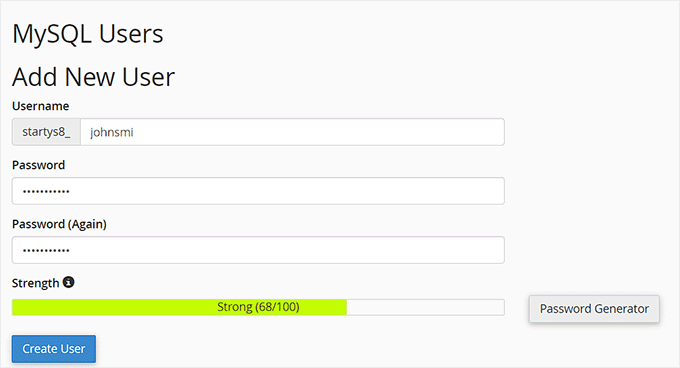
Agora, você deve dar a esse usuário permissão para acessar e modificar o banco de dados que criou anteriormente.
Basta rolar para baixo até a seção “Add user to database” (Adicionar usuário ao banco de dados) e selecionar seu banco de dados e o usuário que acabou de criar.
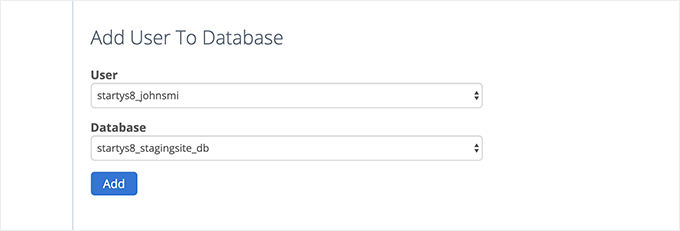
Depois disso, clique no botão “Add” (Adicionar) para continuar.
Você será solicitado a selecionar privilégios para o usuário. Vá em frente e marque a caixa de seleção “All Privileges” (Todos os privilégios) e clique no botão “Make changes” (Fazer alterações).
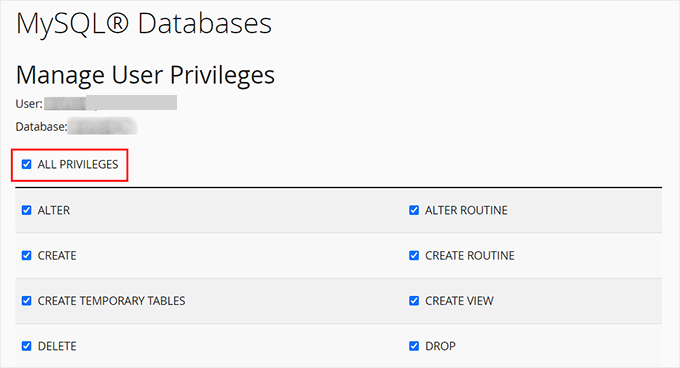
Agora seu banco de dados está pronto para ser usado no site de teste.
Em seguida, você precisa abrir uma nova guia do navegador e inserir o subdomínio do site de teste da seguinte forma:
https://yoursubdomain.example.com/installer.php
Não se esqueça de substituir yoursubdomain pelo subdomínio real e example.com pelo seu próprio nome de domínio.
Isso iniciará o assistente do instalador do Duplicator.
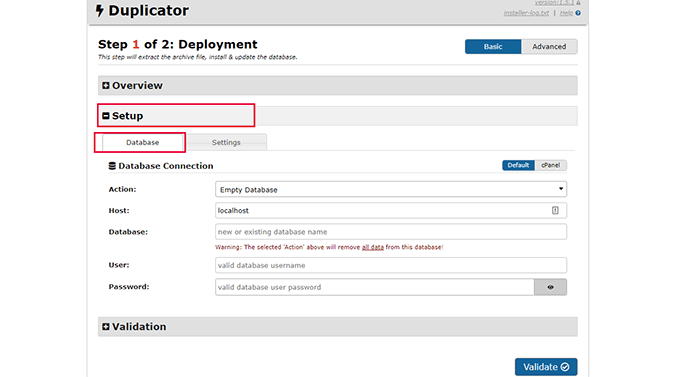
Na seção “Setup” (Configuração), o instalador solicitará que você insira as informações do banco de dados do WordPress.
Seu host provavelmente será localhost. Depois disso, você digitará os detalhes do banco de dados que criou para o novo nome de domínio na etapa anterior.
Clique no botão “Validate” (Validar) para garantir que o Duplicator possa se conectar ao seu banco de dados.
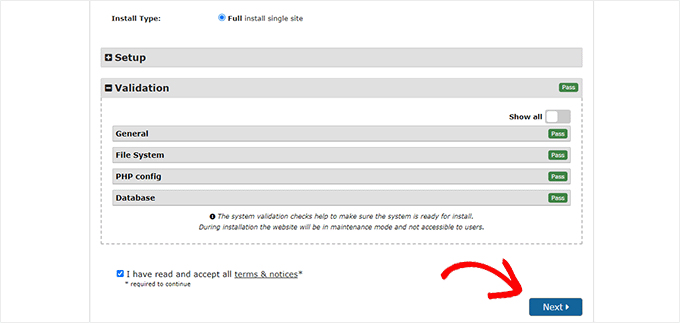
Depois disso, clique no botão “Next” (Avançar) para continuar.
O Duplicator agora descompactará o banco de dados e os arquivos do WordPress e os importará para o site de teste.
Quando terminar, você verá uma mensagem de sucesso.
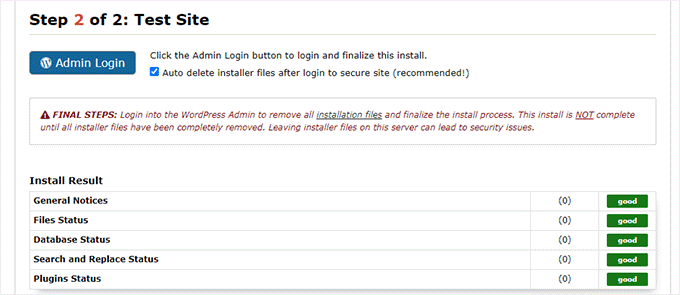
Você pode clicar no botão “Admin Login” para acessar a área de administração do WordPress do seu site no novo site de teste.
Agora você tem seu site de teste configurado. Você pode protegê-lo adicionando proteção por senha ao subdomínio.
Acesse o painel de controle da sua conta de hospedagem e vá para a guia “Advanced” (Avançado).
Depois disso, role para baixo até a seção “cPanel” e clique no botão “Manage” (Gerenciar) ao lado dela.
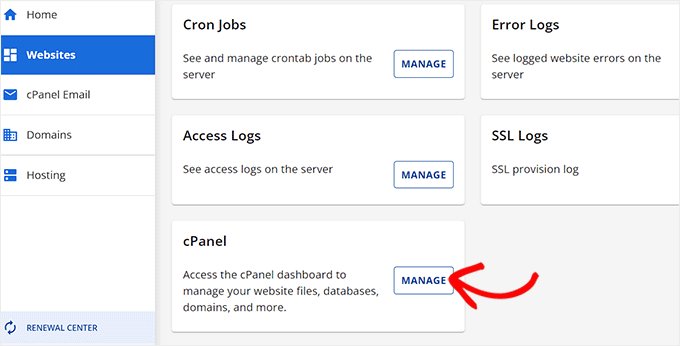
Isso abrirá o cPanel em uma nova janela, na qual você deverá rolar para baixo até a seção “Arquivos”.
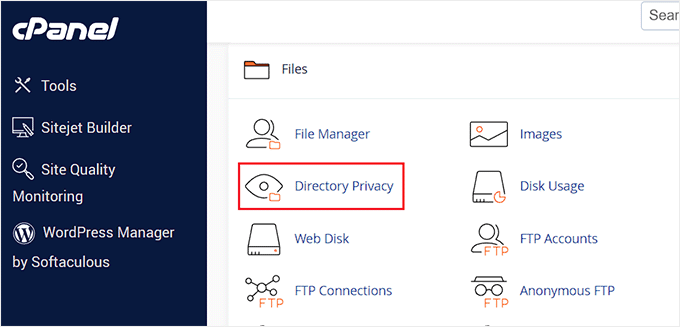
A partir daí, clique no ícone “Directory Privacy” (Privacidade do diretório).
Em seguida, você precisa selecionar a pasta do subdomínio e marcar a caixa de seleção da opção “proteger este diretório com senha”.
Será solicitado que você forneça um nome para essa configuração e, em seguida, clique no botão “Salvar”.
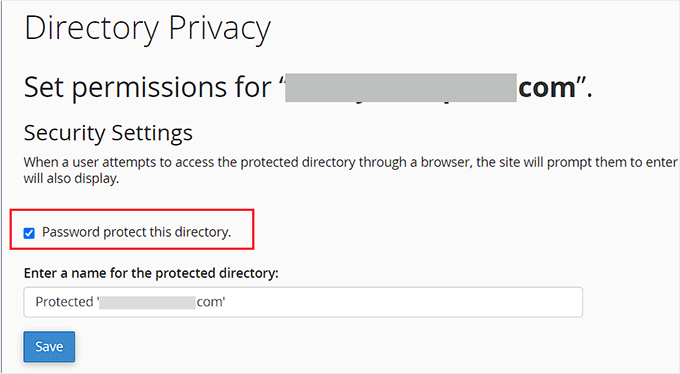
Seu site de teste agora estará oculto por trás de uma proteção por senha, mantendo-o longe das mãos dos mecanismos de pesquisa e dos olhos do público.
Agora você pode trabalhar em seu site de teste e fazer alterações nele.
Implantar manualmente o site de teste no site ativo
Quando estiver pronto para implementar as alterações do site de preparação para o servidor ativo, você seguirá as mesmas etapas descritas acima.
Basta criar um novo pacote do Duplicator em seu site de teste e fazer o download dos arquivos Installer e Archive em seu computador (consulte as instruções acima).
Em seguida, você precisa acessar seu site ativo e criar um backup completo do WordPress (você também pode usar o Duplicator para criar um backup completo).
Quando terminar, você precisará excluir todos os arquivos e pastas do WordPress do seu site ativo. Isso significa que seu site WordPress ficará fora do ar por algum tempo.
Por fim, siga as instruções acima para executar o assistente do instalador do Duplicator e importar o site de teste para o servidor ativo.
Como você pode ver, o último método não é o melhor. Há muitas coisas durante o processo que podem danificar seu site.
Sugerimos evitar esse método a todo custo, a menos que você não tenha outra opção. Recomendamos usar um provedor de hospedagem confiável, como Bluehost, SiteGround ou WP Engine, com recursos integrados de site de teste.
Esperamos que este artigo tenha ajudado você a aprender como criar facilmente um ambiente de teste para o seu site WordPress. Se você tiver algum problema, confira nosso guia sobre como testar seu site para atualizar para o Gutenberg. Você também pode querer aprender como usar o WordPress Playground em seu navegador para testes.
Se você gostou deste artigo, inscreva-se em nosso canal do YouTube para receber tutoriais em vídeo sobre o WordPress. Você também pode nos encontrar no Twitter e no Facebook.


Lynda Joy
Hi,
I just did the first five or so steps of this, and then got lost at “upload your WordPress content to. So now I have completely messed up my site and I would like to know how to undo what I have done.
Thanks.
– Lynda
Rachel
Thanks so much for this – I am very much a beginner but trying to figure out how to do these things myself so I can launch a new design by first using a test site in order to get it right. I have managed to follow your instructions perfectly until this part:
“After copying your database, you need to copy your WordPress files, plugins, themes, and uploads. First download a fresh copy of WordPress from WordPress.org. Upload the contents of WordPress to your staging site. Note, do not run the WordPress install yet”
Can you please advise as to how this is done or direct me to another instruction article? I can’t seem to find out how to do it otherwise. Many many thanks in advance
Sanket D.
So I’ve managed to create my staging environment successfully — I’ve all my media, themes, plugins, everything else properly transferred. However, I’d made some changes to my theme (not through any codes, but through the theme’s inbuilt settings — basic stuff like a custom logo (which I can see in my media library), theme color, homepage layout, etc. These changes are the only thing that for some reason are missing from my staging site. Anybody knows why this might be?
byberkan
I’m hoping you can find the solution. Same problem exists for me.
Joe
It seems we have to do the steps in here after we have our theme, plugin etc.
Mark Park
Great article! Just one thing that isn’t clear to me.
If I have the current non-wordpress website on a domain name example.com and I want to build a new website using WordPress and develop it on a staging environment on a sub-domain dev.example.com – is this possible?
Can I make a sub-domain dev.example.com and install WP on the same server used by the current non-WP website?
Later when the website is finished I want to connect my WP developed site with the domain name example.com.
Thank you for your help.
WPBeginner Support
Yes this is possible. Make sure you block search engines on your development subdomain.
Admin
Maria
Thanks for a Very helpful article! I am in a similar situation as Mark, however my current website is a WordPress site. Can I still develop the redesigned website on a staging site within a sub domain? And if so do I have to create a new database?
byberkan
You really didn’t read the article, do you?
Benito
Hello, great article, but what if I don’t want to use XAMPP, and I just want to use a subdomain as a staging site and then push changes to live? What would be the best way to deploy the changes?
Raj
Will this process create a Database User and add it to the database we created while copying giving it all privileges by itself? or do we need to create a database user at some point?
Raj
Okay I tried it.. both ways.
Once I created the database user before installing wordpress on the staging site and it worked. The other time around, I didn’t and got the issue “We were able to connect to the database server (which means your username and password is okay) but not able to select the a*******_ata_d2db database.”
That to me means that one has to create a user manually, only copying database won’t do. Right?
Sanny
Raj, I see the same error (“Can’t select database”). How did you fix it ?
Scott
Hopefully you guys figured this out, but just to leave this here for others to find, you do indeed need to create a database user (which is not clear in this article). While using Bluehost, I had to do about three steps. First step is to use the MySQL Database cPanel to get access to the list of MySQL databases. Once there, I could see that the new staging database that I had copied using phpMyAdmin per the article, did not have a privileged user assigned to it. So, I created a user, but then discovered that the user I created had too many characters (16 is the max). Once I got that straightened out, I then had to Add this user to a database using the same MySQL page. As part of this assignment step, I was able to select “ALL PRIVILEGES” to make this user a privileged user for this new staging database. Once that was all setup, I was able to configure WordPress to connect up to the staging database.
Gayle
Terrific resource! Reached a WP staging breaking point and then found this. Lifesaver! Thank you! Only things I’d add would be some meta information for newbies like me. : )
LizP
Yikes, too hard for me!
Deborah
Thanks for the tutorial. I seem to be stuck on one of the very first steps. When clicking go after changing the URL’s in SQL, I get a message of ‘# MySQL returned an empty result set (i.e. zero rows)’
This is how I’ve entered the data:
UPDATE wp_options SET option_value = REPLACE(option_value, ‘http://www.example.co.za/wp’, ‘http://staging.example.co.za’);
UPDATE wp_postmeta SET meta_value = REPLACE(meta_value, ‘http://www.example.co.za/wp’, ‘http://staging.example.co.za’);
UPDATE wp_posts SET guid = REPLACE(guid, ‘http://www.example.co.za/wp’, ‘http://staging.example.co.za’);
UPDATE wp_posts SET post_content = REPLACE(post_content, ‘http://www.example.co.za/wp’, ‘http://staging.example.co.za’);
Can anyone please help me with this?
Thanks
Andreas Kofoed
Hi,
First of all thanks for an amazing tut on this.
I’ve encountered one problem so far and that is when I try to enter my subdomain through
www.staging.example.com. I get this message: err_connection_timed_out ???Andreas Kofoed
Hi,
I figured this out as I was due to some table prefix.
Now my staging.mysite.com is up and running, but the styling and layout is totally different.
How do I do, so my files in my child theme applies to the current theme???
It seems like it is missing a lot of pictures, css and some basic settings?…
Patrick
Thanks for this great tutorial!
I’m finding that after setting everything up, comments on the live blog are now going to the sub-domain staging blog. I can’t find anything in the settings that explains this behavior. Do subdomains perhaps take precedence for some reason?
Any ideas?
Jennifer Filgate
Perhaps when you ran the operation to update the URLs in your database you performed it on your live site’s database instead of the new staging site’s database? You have to select the staging site’s database after you create it before you run the operation. Maybe you missed that selecting step.
Arjun Singhal
I got errors regarding SSL certificates. I am a newbie when it comes to using Git and the command prompt on my Mac. So I couldn’t get to syncing everything like I wanted.
Also, how it appears is that the steps are good to sync the local disks files to the server – changes in the theme folder etc.
However, there is no syncing mechanism highlighted for the MySQL server changes in the case of WordPress.
Evan
I don’t know. This just seems really confusing.
So, a Git Bucket is like an intermediary between your local computer and the hosted dev server? For example, if I have website.com then I create dev.website.com then I create an account and empty repository in Git Bucket then I create an empty folder on my local computer, and I edit files locally and sync them to the Git Bucket repository and then how do I commit to the live site? Is there any connection and control to the live site? It seems like from here, you sync your Git Bucket repository to the dev.website.com
Then what? I wish this article had a diagram to understand how this all works. It might make sense to you guys because you do it all day, but for the first time, this is a dizzying experience. Especially since multiple points in this setup failed and I had to go about custom fixing each one. At this point, I have created dev.website.com, copied all files from the live site to it, copied the database, connected it in, logged into the dev.website.com wordpress site, made sure all is cool, but now … I am lost as to what I do next.
In your article, you ask us to INIT a local directory on our computer. Well, I’m trying out Git Bucket’s SOURCE TREE, which by the way looks great. But now what? Any help on what is the procedure from here? What’s the logic to all this?
I create a folder on my local drive, it syncs to a Git Bucket Repository so that people can develop collaboratively. But who uploads the changes to the dev.website.com server? Don’t users need to be able to do that to see live changes on the server? So how does that all connect?
And how do you update the final changes to the live website once you’re ready? Man I’m confused. I spent 3 days getting this setup and I can’t figure out this next step, because I don’t understand how that all works.
Any help?
Oscar
Hi Evan, although I am sure you figured it out by now as its months later, I figured it may help others with the same question. After you have committed your code to version control, you would move your changes over to the server of your choice (dev/staging/production) using the deploy feature. This is described in the section above titled, “Deploying Changes From BitBucket to Staging Site”. Hope this helps clarify!
vjohnson
I am truly a beginner at this, and I have read the article a couple of times. I think my environment is almost set up, the piece that appears to be missing is in the install step. The directions say copy the files but do not install “yet”, when in this process do I run an install of wp? I am unsure if some of the issues that i ran into are due to my host which is hostgator or something that I’ve done wrong. Any input would be great.
What is happening at this point is no errors but nothing is rendered on at the url for my staging area.
Martin
Nice article. Although, the whole way, you’re talking about setting up a development site on the server as a subdomain. But at the end your using a local Xammp server.
How would you setup a test environment on the server where the doomain is hosted? Do you use bitbucket for it as well?
Thanks, cheers.
Alberto Serrano
Hello , I made a staging site successfully but my live site already had a little problem with a plug in , I contacted the developer and he asked for my admin credentials , following your advice on other article I gave him log in credentials to my staging site and he fixed the issue , to make the changes on the live site he told me to import the database from the staging site to the live site , my concern is the sql changes I made to the staging database , if I copy the database isn’t my live site going to redirect to the staging site now ? I can’t find the SQL queries to delete them
Thanks
WPBeginner Support
See our tutorial on how to update URLS when moving WordPress site.
Admin
isagani
hey,
nice article, i followed all instructions and gave me a clean view process on using git and staging environment. hope all experienced people do what you did so many can step forward from beginner to advance.
Thanks a lot.
Isagani
Kristof Bernaert
Just a perfect article that helped me to setup the whole thing.
My staging environment is on the same shared linux hosting, just in another directory.
I used this also as the repo for git.
With Coda, I’m working online in that staging. As I save changed files (mainly css), I see instantly the updates.
So I don’t need the local files on my laptop.
But how to checkout those remote files under the staging folder, without fetching a local copy?
Thx!
Kristof
bcall
Thanks for the article!
I have one problem, though: I have two databases and am not sure which one (or maybe both) is connected to my live site. I checked the wp-config.php file and it’s linking to a database with a different name, one that does not appear in my database list (in phpMyAdmin). Is it possible that the database was renamed?
Nick Jubrey
Look in your wp-config.php file that’s where wp is directed to that particular database, the db your using will be listed there.
Tiffany Johnson
I’m having some issues with the dev site recognizing my theme and content. I copied over the following files prior to running my installation of wordpress, however the pages and content are still not being recognized. I checked the files and my media is in the uploads file, my themes are present, as are my plugins, but none of them are recognized in the actual wordpress site.
/wp-content/uploads
/wp-content/themes
/wp-content/plugins
Any suggestions on what else I can try? Thanks!
Nicole
I’m having this same problem. Any suggestions of what to try? I followed the instructions to copy those files from one folder to the other, and it is in the right place.
Brad Scott
@WPBeginner,
For my case.
Create subdomain: staging.example.com
Create Document Root: public_html/staging
Need to run the following SQL queries:
The NEW_URL should be http://example.com/staging not http://staging.example.com
Login: http://example.com/staging/wp-login.php
Cheers & Thanks
byberkan
Brad, so that means you are not using the subdomain. You are just using it as a subdirectory which you didn’t have to create a subdomain to use that..
Paula Lay
Thank you so much for this tutorial! The step-by-step instructions are perfect for someone who hasn’t done this before. I encountered a snag where I was getting an error message after creating a subdomain (something like a problem configuring the DNS). For anyone that encounters this problem – clear your browser cache and cookies, and then you will see the correct screen. Took me days to figure this out (I gave it a few days because I thought it would take 24hrs or so for the domain to propogate).
Random Dev
Whoa. Wouldn’t it be simpler, cutting down on quite a few steps and reducing the technical nature of this process, to just use a backup plugin with a migrator (search/replace the database) function… instead of copying the databases manually, *and* instead of using Git/Bitbucket? Or am I not understanding something?
Cannonpult
For smaller sites, maybe. But plugins like Duplicator start to fail or have significant diminishing returns on larger sites. For example, if you were working on a site with a lot of media, Duplicator will never be able to transfer everything. You will get warning messages and have to leave media behind in the transfer.
Yes, this tutorial would be overkill for a small blog. But it’s absolutely the way you should go for say, a woocommerce site with 3,000 products (including images and custom data).
The other big consideration is frequency of changes. Some sites are fairly hands-off after they go live. Maybe you just update core + plugins and perform a few minor changes per year. Other sites might require weekly or even more frequent changes. If this were the case, it would become a pain to wait for backups and then drop a backup on the new site (crossing your fingers that it works each time). By using the method described in the tutorial, you can commit smaller changes at a time right after testing them.
mgiulio
Excellent article.I was looking for info about best practices for wordpress staging sites. The additional section on the git-bitbucket workflow is very much appreciated.
nwesource
Fantastic tutorial, thank you! I know WPEngine.com has a staging site built into their hosting options which seems fantastic although I haven’t tried it just yet. Are there any other easier options you know of to setup and operate a staging site, with more of a plugin functionality like WPEngine? They literally have a clone to staging button and a clone to live button that makes this seem like a process from the 80’s LOL…
Amazing tutorial, thank you for enterprise level content!
WPBeginner Staff
No you first need to extract the zip folder and then upload the contents of wordpress directory to your staging site.
Tony Leary
Can someone elaborate on this one step:
“First download a fresh copy of WordPress from WordPress.org. Upload the contents of WordPress to your staging site. Note, do not run the WordPress install yet.”
I read that as “1) download WordPress zip file from WordPress.org and 2) upload .zip file to /staging folder via File Manager.” However, I don’t think that’s correct.
bcall
You can upload the .zip file and then extract the contents within file manager.
WPBeginner Staff
Most probably your subdomain is not configured correctly.
Julius
I actually found out the problem..and it’s been resolved…however, I am unable to add images to my library….anyone else experienced this challenge.
Hans Lindgren
Is the wordpress install running on Windows?
(If so, you need to grant Modify NTFS permissions to IUSR on C:WindowsTemp)
Julius
Awesome tutorial…however, after I attempt to log into the staging site I am taking to the “Opps! Google Chrome could not find http”. What am I doing wrong?
Julius
This is really a great tutorial and something I been wanting to do for quite sometime. My problem is that when I visit the WP login screen it appears that the styling from my theme isn’t applied. Is this normal? Also, when I enter my credentials from the live site into the fields for the staging site, it doesn’t log me in. It’s taking me to the “Oops! Google Chrome could not find http”. Am I doing something wrong?
Sloan Stewart
Very helpful article. Only issue I have is that when it begins discussing version control, it switches from focusing on the alternate wordpress installation on the server to a local installation on one’s machine.
I am assuming one would build your site locally (I am using WAMP) and then use Git/Bitbucket & Ftploy to update your dev/staging wordpress install? That would mean one would have three versions of the wordpress site at all times [Production, Dev/Staging, Local].
How does one ensure your local wordpress install remains compatible with the database and other configuration on the server? Or is there a way to utilize Git/Bitbucket/Ftploy on the server without having to involve a local copy of your wordpress site.
Karlis
Do you need to create user for your freshly created phpmyadmin database?
WPBeginner Staff
No this tutorial is not written for WordPress multisite.
Aathi
Hi,
Will the above process works for wordpress multisite ?
Cheryl S.
Because I typically develop in a staging area on my server and then move it to the clients server to go live, rolling back to previous versions is nearly impossible. This article has made me seriously consider implementing version control with Git and Bitbucket. Thank you so much for this tutorial.
WPBeginner Staff
Yes this would be a better approach.
Mimi Bondi
Thank you. Is it safe to simply copy all the files from the ”test” site and paste them over the current ”live” files via FTP? Or is there more to it?
Mimi Bondi
Would this be the best way to duplicate a website, set it up with a new theme/content then copy it over to the current live website?
I want to change theme but it’s quite a big job so instead of activating it then frantically trying to fix things for days, I’m looking for a way to copy my current site, change it all ”in the background” then make the new one live. Please let me know if it’s even possible?
Mimi Bondi
Once i have my site exacty how i want it in the staging environment,
is there a safeway to copy those files to the real live site?
My goal is to change themes but because this would involve quite a bit of
setting up, i am looking for a way to do this safely and only replace my
current content with the new content when it’s ready (without changing
permalinks and SEO hopefully). Is that possible?
Larry
Excellent article….I was able to follow the instructions step-by-step and complete the creation of development site on my hosting server. Kudos to the writter.
Mike
I’m having some issues when I try to run the SQL queries to change the references to the staging site. I am receiving the following error:
”
#1064 – You have an error in your SQL syntax; check the manual that corresponds to your MySQL server version for the right syntax to use near ‘1
UPDATE wp_options SET option_value = REPLACE(option_value, ‘http://example’ at line 1
”
My SQL query is as follows:
”
1
UPDATE wp_options SET option_value = REPLACE(option_value, ‘http://example.com’, ‘http://dev.example.com’);
2
UPDATE wp_postmeta SET meta_value = REPLACE(meta_value, ‘http://example.com’, ‘http://dev.example.com’);
3
UPDATE wp_posts SET guid = REPLACE(guid, ‘http://example.com’, ‘http://dev.example.com’);
4
UPDATE wp_posts SET post_content = REPLACE(post_content, ‘http://example.com’, ‘http://dev.example.com’);
”
As I missing a step or do I have something incorrect in query? Thanks for your help.
Mike
Never mind, I figured out my issue. Feel free to delete this comment.
djramc
i have the same problem. could i ask how did you solve this issue?
thanks by advance
#1064 – You have an error in your SQL syntax; check the manual that corresponds to your MySQL server version for the right syntax to use near ‘)’ at line 1
WPBeginner Support
You need to remove numbers from lines, replace example.com with your live site url and dev.example.com with your development or staging site URL.
Admin
Bevis Larsen
This article is most useful for the user who want to make advance wordpress application
Brad E
I followed the directions and am able to get the staging site to work. However, every link, page and even login revert to the live site not the staging site. How do I fix this?
WPBeginner Support
you need to change site address and wordpress address. To do that you need to run this SQL query in phpmyadmin for the database of your staging site:
UPDATE wp_options SET option_value = REPLACE(option_value, ‘ORIGINAL_URL’, ‘NEW_URL’);
UPDATE wp_postmeta SET meta_value = REPLACE(meta_value, ‘ORIGINAL_URL’, ‘NEW_URL’);
UPDATE wp_posts SET guid = REPLACE(guid, ‘ORIGINAL_URL’, ‘NEW_URL’);
UPDATE wp_posts SET post_content = REPLACE(post_content, ‘ORIGINAL_URL’, ‘NEW_URL’);
Don’t forget to replace the original url with the url of your live site and new url with the URL of your staging site.
Admin
Brad E
OK – it works now. I had to run the query several times, but got it to work. The problem I am having now, is that all of the theme settings are missing. The header, widgets, background, etc. are set to the theme’s defaults. I am not sure how to update the settings to what the live site has. I copied the 3 files from the wp-content directory. Thanks for the outstanding article and support.
ROHIT
Hi,
As usual, just read you well written article on staging. I’ve got only question in mind right now and is that if there is any changes made in database while working on any project then do I need to upload it seperately on server from local environment whereas files would automatically get deployed via ftploy.
Cheers and Thanks.
Keep your good work up.
Clive
If I make changes on my local WP project, I understand files in my theme are changed, and those are uploaded to staging via BitBucket/Ftploy. What about the database/tables from my local project? I don’t understand why those aren’t also included? Or would the database/tables in staging be updated based on theme changes that are uploaded? Thanks!!
WPBeginner Support
Clive, in your BitBucket repository you can only store your WordPress files. FTPloy simply syncs those files to your staging site.
Admin
Paul Sweany
What do you recommend for when database changes are made? Let’s say I create a new page; should I just re-import the database on the dev server after I make changes to it on my local copy? Also, moving it from dev to live, any recommendations other than manually importing it and running a search and replace to fix the URL?
Glen Clay
As usual, great article and right when I need it. Keep up the great work! On another note, I am on my iPhone and that annoying floating black ‘Trending’ bar keeps getting in the way of me commenting. This article benefited me so much that I went through the several tries it took for me to comment.
WPBeginner Support
Glen, thanks for your feedback. We will look into it.
Admin
Eben
I wasn’t really mentioned on what to do with the staging database and how to transfer the changes to the live database, especially if your client has been making changes to the live site while you’ve been making changes to the staging site and there are changes in both databases.
This is one area of staging environments with wordpress that I haven’t been able to get my head around.
WPBeginner Support
Staging is basically for development, when working on themes or plugins. We imported the database only so that we have actual data to test with. It is not supposed to be a synchronized mirror of your live site.
Admin
Juliana Maggioli
I don’t know if is the same as Eben’s question, but everything is going fine till…: upload/transfer the staging content to the live site. supposing everything is perfect in the staging, how do i make all this perfect structure/content be the live site, without risks?
Damien Carbery
I have started using WP Migrate DB (http://wordpress.org/plugins/wp-migrate-db/) to convert urls and paths in the DB. It will also convert urls and paths that are in serialised data.
So I copy the files to the staging server and create a database and then export the live db via WP Migrate DB and import it to the new database via phpMyAdmin.
The biggest issue is when the live site is updated before I bring the staging server db back.
Zimbrul
If you have Softaculous is even easier to deploy a staging site to the live site: you can clone the site to a location within the same server.
It’s what I’m doing: I create the staging environment and when done I just go the the list of my WordPress installs in Softaculous control panel and “clone” the site to the live location. The live location must be empty by other files for this to work.
WPBeginner Support
Thats another way to do it.
Admin
Giacomo Ardesi
Hey Zimbrul, can you give some more details about Softaculous and how you used it please?
Giacomo Ardesi
Hey Zimbrul, could you please give some more details on how you use Softaculous to clone your WP staging site? Thank you!
M Asif Rahman
Thanks Syed & The Team, that’s one of the most complete and understandable for normal readers Staging Guide for WP. Nicely done.