Uma barra de rodapé flutuante e fixa permanece visível no seu site, mesmo quando os usuários rolam para baixo.
Ele pode ajudá-lo a promover ofertas de desconto, anúncios importantes ou identificadores de mídia social, o que pode reduzir as taxas de rejeição e obter mais conversões.
Usamos barras de rodapé flutuantes em nossas lojas e sites de comércio eletrônico para promover descontos e exibir boletins informativos. Isso nos ajudou a gerar mais leads e aumentar as vendas.
Neste artigo, mostraremos passo a passo como criar facilmente uma barra de rodapé flutuante e fixa no WordPress. Para este tutorial, usamos métodos amigáveis para iniciantes que não exigem codificação.
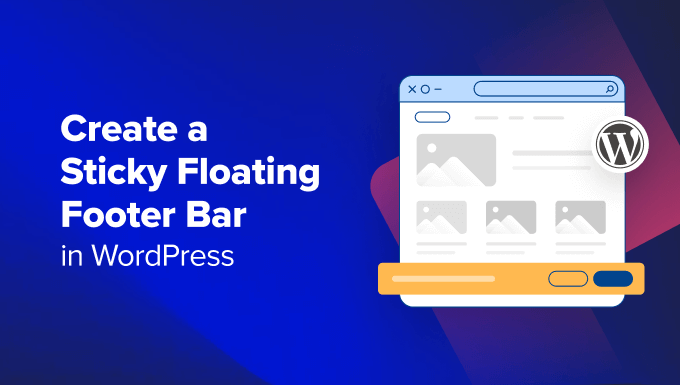
O que é uma barra de rodapé flutuante no WordPress?
Uma barra de rodapé flutuante e fixa permite que você exiba com destaque conteúdo e notícias importantes para os usuários.
Essa barra permanece visível para os visitantes o tempo todo, portanto, é mais provável que eles cliquem nela e descubram mais conteúdo útil.
Você pode usar a barra de rodapé flutuante para:
- Direcione mais cliques para outros posts do blog.
- Gere leads e crie sua lista de e-mails.
- Chame a atenção para cupons especiais ou ofertas/vendas com desconto.
- Promova suas contas de mídia social.
- Criar reconhecimento da marca.
- Forneça acesso a recursos importantes em seu site WordPress.
Dito isso, vamos ver como criar facilmente uma barra de rodapé flutuante e fixa no WordPress. Mostraremos dois métodos neste tutorial, e você pode usar os links abaixo para ir para o método de sua escolha:
Método 1: criar uma barra de rodapé flutuante e fixa com o OptinMonster (recomendado)
Você pode criar facilmente uma barra de rodapé flutuante e fixa com o OptinMonster. Essa é a melhor ferramenta de geração de leads e otimização de conversões do mercado e torna muito fácil converter os visitantes do seu site em assinantes.
No WPBeginner, nós o usamos para criar banners e pop-ups que promovem nossos serviços profissionais ou boletins informativos. Para saber mais, consulte nossa análise completa do OptinMonster.
O plug-in vem com um construtor de arrastar e soltar e modelos predefinidos que permitem criar uma barra de rodapé flutuante, pop-ups deslizantes e banners sem usar nenhum código.
Recomendamos esse método porque o OptinMonster é muito fácil de usar e oferece mais opções de personalização do que o método do plug-in gratuito.
Etapa 1: Instale o OptinMonster em seu site
Primeiro, você precisará se inscrever no site da OptinMonster clicando no botão “Get OptinMonster Now”.

Em seguida, você deve instalar e ativar o plug-in gratuito do conector OptinMonster em seu site. Para obter mais instruções, consulte nosso guia para iniciantes sobre como instalar um plug-in do WordPress.
Após a ativação, o assistente de configuração do OptinMonster será aberto na sua tela, onde você deverá clicar no botão “Conectar sua conta existente”. Isso conectará seu site WordPress à sua conta do OptinMonster.
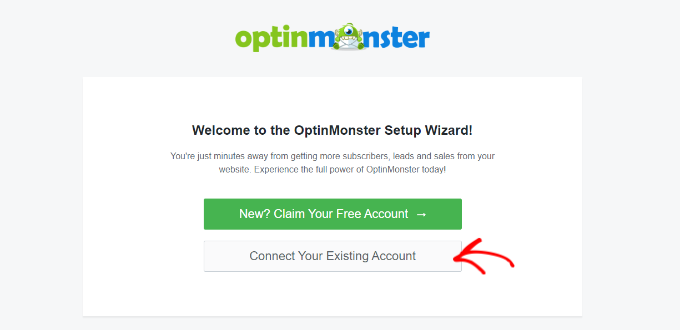
Depois de fazer isso, uma nova janela será aberta na tela.
Aqui, clique no botão “Connect To WordPress” (Conectar ao WordPress) para prosseguir.

Etapa 2: Criar e personalizar a barra de rodapé flutuante e fixa
Agora que você conectou o OptinMonster ao seu site, é hora de criar uma barra de rodapé flutuante e fixa.
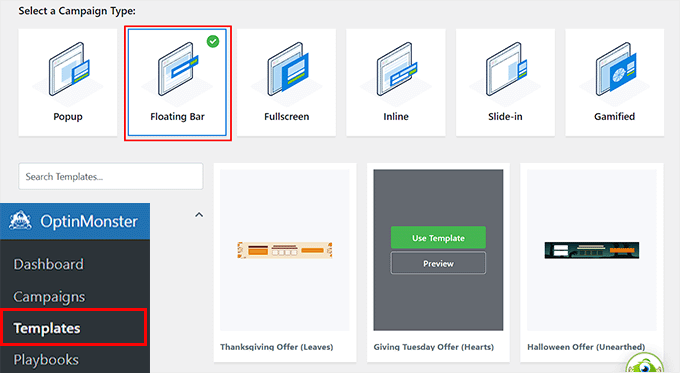
Para fazer isso, você precisa acessar a página OptinMonster ” Modelos na barra lateral de administração do WordPress e selecionar “Barra flutuante” como o tipo de campanha.
Depois de fazer isso, todos os modelos predefinidos para a barra flutuante serão carregados na tela. A partir daí, você pode clicar no botão “Usar modelo” no modelo que deseja usar.
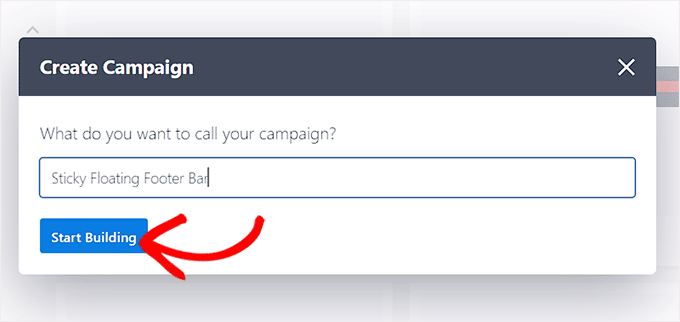
Isso abrirá o prompt “Criar campanha” na tela, onde você poderá adicionar um nome para a barra de rodapé flutuante que está prestes a criar. Pode ser qualquer coisa que você queira, pois o nome não será exibido para os visitantes.
Depois disso, basta clicar no botão “Start Building”.
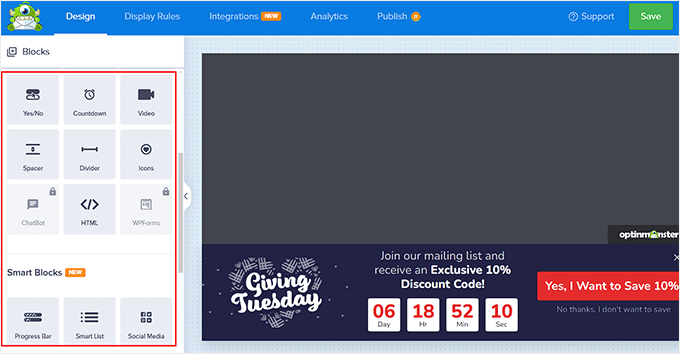
O construtor de arrastar e soltar do OptinMonster será iniciado em sua tela, onde você poderá começar a personalizar sua barra de rodapé flutuante. Aqui, você verá uma visualização da barra flutuante à direita com blocos na coluna da esquerda.
Por exemplo, você pode usar um bloco de cronômetro de contagem regressiva se a barra de rodapé flutuante estiver promovendo uma oferta de desconto. Isso ajudará a criar um senso de urgência entre os usuários e os incentivará a agir.
Você também pode adicionar um bloco de CTA, vídeo ou mídia social à barra de rodapé. Para obter instruções detalhadas, consulte nosso tutorial sobre como criar uma barra de alerta no WordPress.
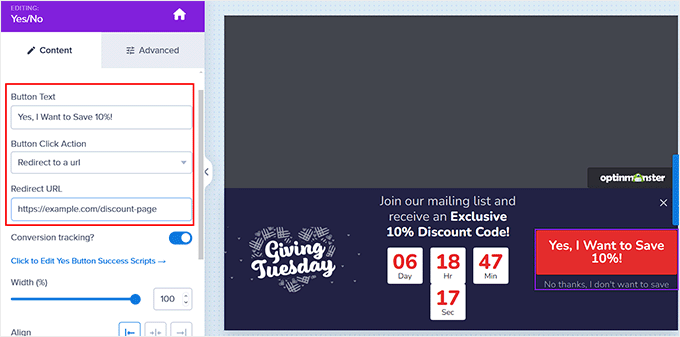
Você também pode editar o texto na barra de rodapé clicando nele. Isso abrirá as configurações do bloco na coluna da esquerda, onde você poderá ajustá-las de acordo com sua preferência.
Por exemplo, se você quiser alterar a oferta de desconto no modelo, poderá alterar o texto do botão. Depois disso, selecione a opção “Redirecionar para um URL” e adicione o link da página para a qual deseja que os usuários sejam direcionados ao clicar no botão.
Etapa 3: Configure as regras de exibição para sua barra de rodapé flutuante
Quando estiver satisfeito com a personalização da barra de rodapé, basta alternar para a guia “Regras de exibição” na parte superior.
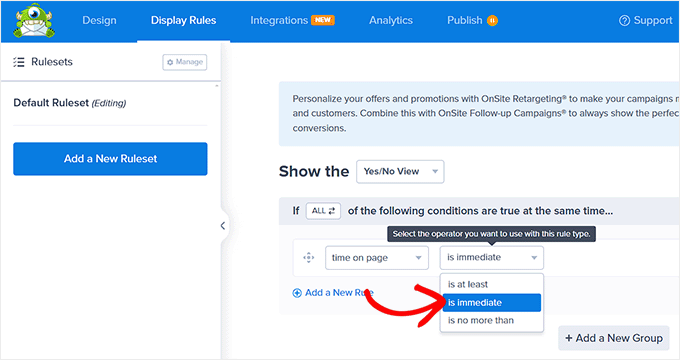
Aqui, você pode configurar quando exibir a barra na sua página. Se você quiser exibir a barra de rodapé flutuante o tempo todo, deverá selecionar a opção “tempo na página” no menu suspenso à esquerda.
Depois disso, escolha a opção “é imediato” no menu suspenso à direita.
No entanto, para exibir a barra de rodapé flutuante em uma página específica, é necessário selecionar a opção “Page Targeting” no menu suspenso à direita.
Depois disso, escolha a opção “exatamente igual” no menu suspenso no meio e adicione um URL de página. Depois de fazer isso, a barra de rodapé flutuante será exibida somente na página que você escolheu.
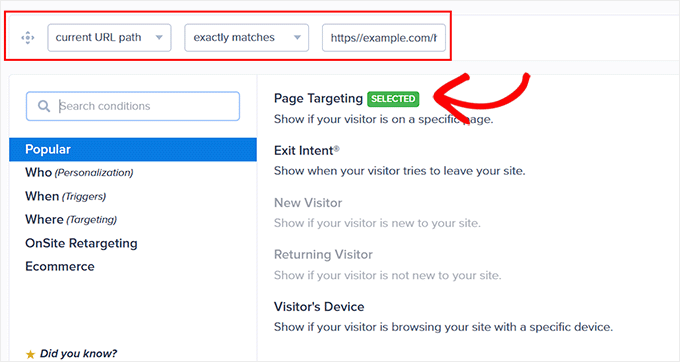
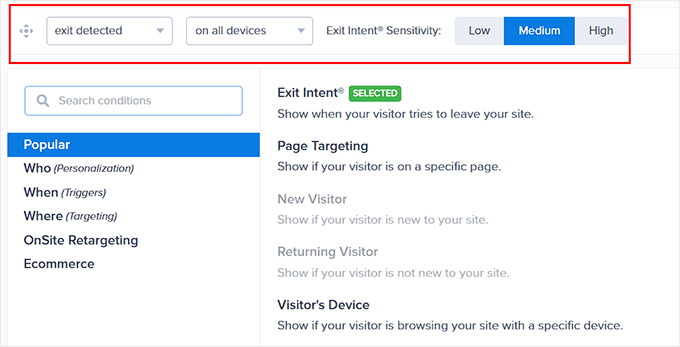
Além disso, você pode selecionar a opção “Exit Intent” para mostrar a barra de rodapé flutuante quando o usuário estiver prestes a sair do site. Em seguida, você pode configurar a sensibilidade da intenção de saída e escolher os dispositivos em que a barra de rodapé será exibida. Isso pode ser útil se você quiser reduzir sua taxa de rejeição.
Você pode até selecionar a opção “Visitor’s Device” (Dispositivo do visitante) se quiser exibir a barra de rodapé flutuante somente para visitantes de desktop.
Você também pode configurar as regras de exibição de acordo com a data, a hora ou a distância de rolagem, selecionando a opção “When” (Quando) na coluna da esquerda.
Para obter uma explicação de mais opções de regras de exibição, consulte nossa análise completa do OptinMonster.
Etapa 4: Publique sua barra de rodapé flutuante
Depois de definir as condições de exibição da barra de rodapé, vá para a guia “Publicar” na parte superior.
Aqui, basta clicar no botão “Publicar”.
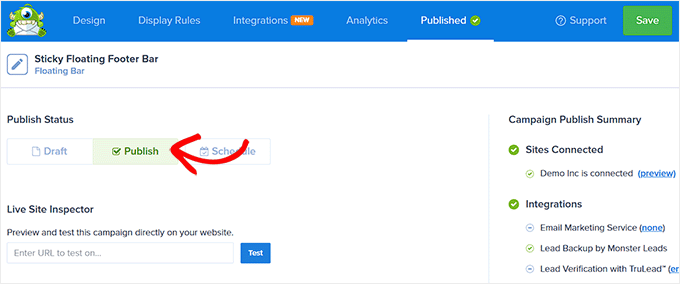
Depois disso, não se esqueça de clicar em “Save” (Salvar) para tornar suas alterações efetivas.
Agora, você pode visitar seu blog do WordPress para ver a barra de rodapé flutuante fixa em ação.
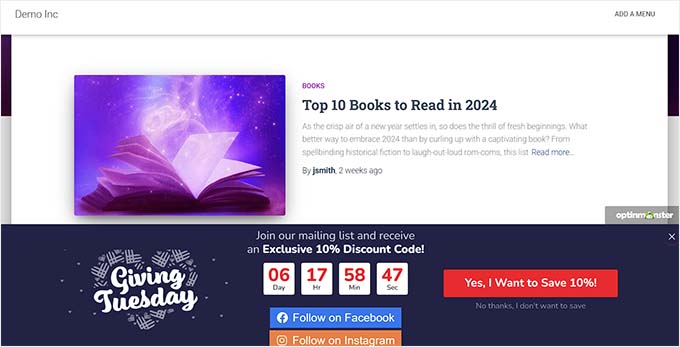
Alternativa: Você também pode usar o Thrive Ultimatum para exibir uma barra de rodapé flutuante com cronômetro de contagem regressiva em seu site. Para obter mais detalhes, consulte nossa análise completa do Thrive Themes Suite.
Método 2: Criar uma barra de rodapé flutuante fixa com um plug-in gratuito
Se estiver procurando uma maneira gratuita de criar uma barra de rodapé flutuante e fixa, esse método é para você. No entanto, lembre-se de que você terá opções de personalização limitadas em comparação com o uso do OptinMonster.
Primeiro, você precisa instalar e ativar o plug-in Firebox Popup Builder. Para obter instruções detalhadas, consulte nosso tutorial sobre como instalar um plug-in do WordPress.
Após a ativação, visite a página Firebox ” Campaigns no painel do WordPress e clique no botão “+ New Campaign”.
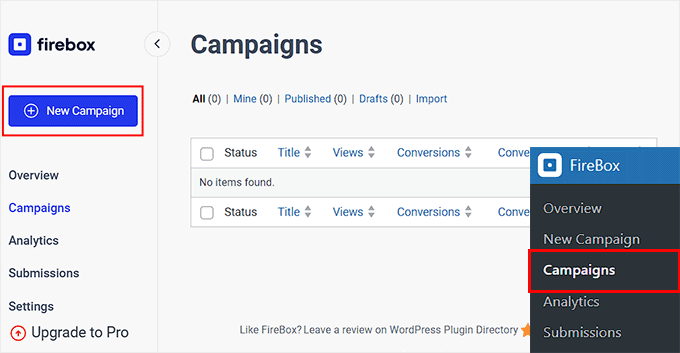
Isso abrirá a biblioteca de campanhas do Firebox, onde você pode procurar modelos pré-fabricados de barra flutuante fixa.
Em seguida, basta clicar no link “Inserir” abaixo da barra de rodapé flutuante de sua preferência. Lembre-se de que, se você selecionar uma barra de cabeçalho, não poderá alterar sua posição. Você deve garantir que o modelo selecionado seja para uma barra de rodapé.
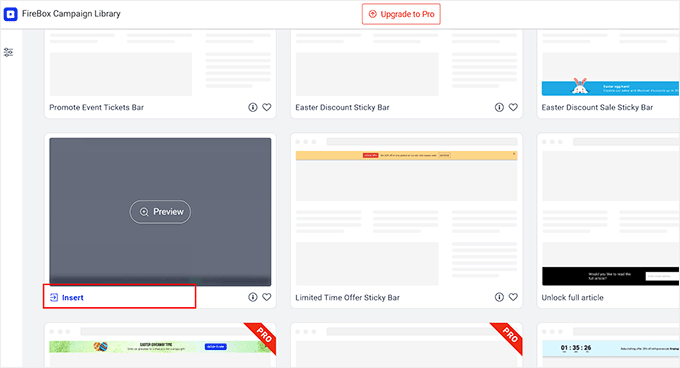
O editor de blocos será aberto na tela, onde você poderá começar adicionando um nome para a barra flutuante.
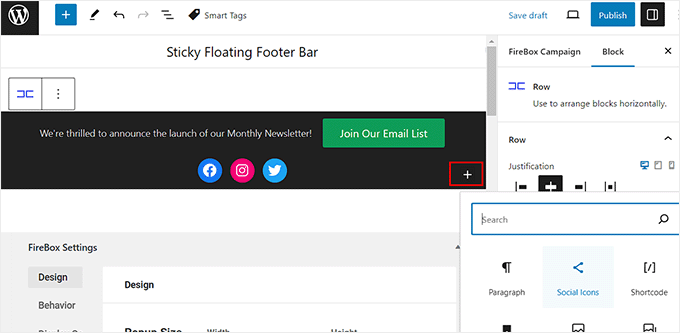
Depois disso, você pode editar o texto no rodapé clicando nele e adicionar novos blocos clicando no botão “+”. Isso abrirá o menu de blocos, onde você poderá adicionar imagens, títulos, parágrafos, vídeos, citações ou blocos de listas.
Por exemplo, se quiser adicionar identificadores de mídia social, poderá escolher o bloco Social Icons (Ícones sociais). Depois disso, você pode adicionar contas e links de mídia social usando o painel de blocos.
Para obter mais detalhes, consulte nosso tutorial sobre como adicionar ícones de mídia social nos menus do WordPress.
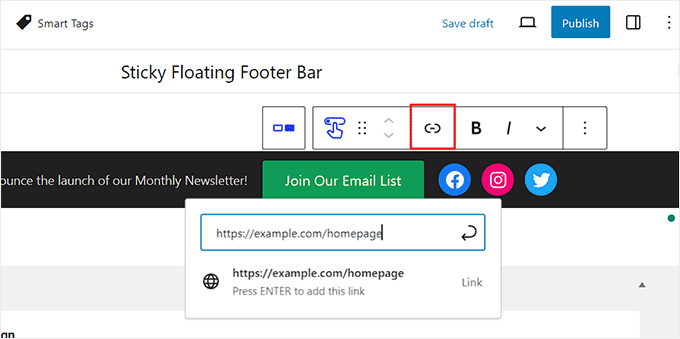
Você também pode alterar o texto no bloco de botões e adicionar um link para a página para a qual deseja direcionar os usuários clicando no ícone de link na barra de ferramentas do bloco.
Depois disso, digite o URL de sua escolha e pressione “Enter”.
Em seguida, role a tela para baixo até a seção “Firebox Settings”.
Aqui, você pode alterar a cor do plano de fundo, a cor do texto, o alinhamento, o tamanho, o preenchimento e a margem da barra de rodapé flutuante.
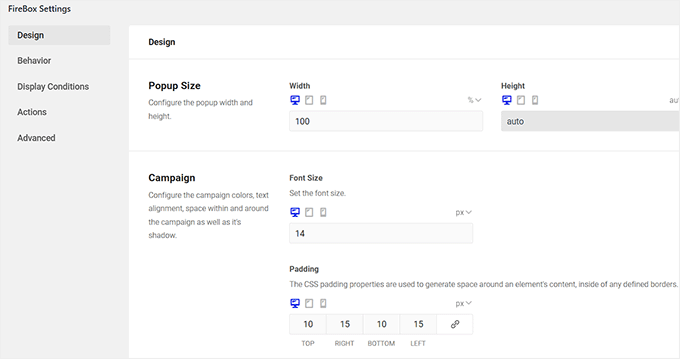
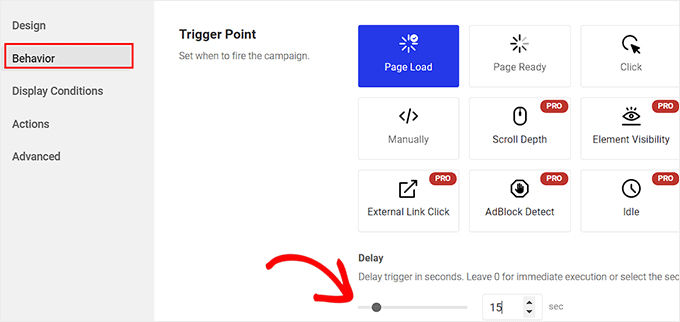
Depois disso, mude para a guia “Behavior” (Comportamento) na coluna da esquerda e selecione “Page Load” (Carregamento de página) como o ponto de acionamento da barra flutuante.
Em seguida, use o controle deslizante “Delay” (Atraso) para escolher um tempo de atraso para a barra flutuante. Por exemplo, se você arrastar o controle deslizante para 15 segundos, a barra de rodapé flutuante será exibida assim que o usuário passar 15 segundos no seu site.
Se quiser que a barra flutuante adesiva do rodapé seja exibida imediatamente, mantenha o controle deslizante em 0.
Em seguida, você pode deixar as outras configurações como estão ou configurá-las de acordo com sua preferência.
Quando terminar, não se esqueça de clicar no botão “Publicar” na parte superior.
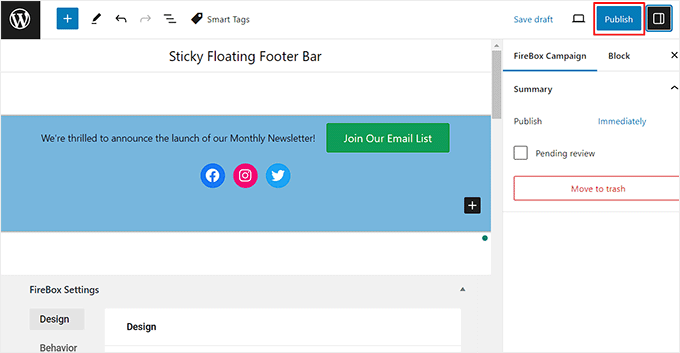
Agora, visite seu site do WordPress para ver a barra de rodapé flutuante e fixa em ação.
Esta é a aparência em nosso site de demonstração.

Bônus: Crie um menu de navegação flutuante fixo no WordPress
Além de adicionar uma barra de rodapé fixa, talvez você também queira criar um menu de navegação flutuante fixo em seu site WordPress.
Um menu de navegação contém links para as páginas mais importantes do seu blog WordPress e funciona como uma estrutura organizacional para o seu site.
Se você tornar esse menu fixo, ele permanecerá visível na sua página o tempo todo, mesmo quando o usuário rolar a tela para baixo. Isso pode aumentar o envolvimento e facilitar a navegação em seu site.

Para criar um menu de navegação flutuante fixo, basta instalar e ativar o plug-in Sticky Menu & Sticky Header. Para obter detalhes, consulte nosso tutorial sobre como instalar um plug-in do WordPress.
Após a ativação, acesse a página Settings ” Sticky Menu (Configurações ” Menu fixo ) no painel do WordPress e digite #main-navigation (navegação principal) ao lado da opção “Sticky Element (required)” (Elemento fixo (obrigatório)).
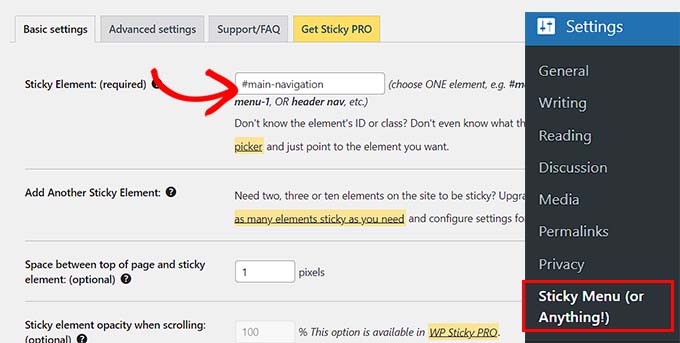
Depois disso, clique no botão “Save Changes” (Salvar alterações) para armazenar suas configurações. Agora você criou com êxito um menu de navegação flutuante fixo.
Para obter instruções detalhadas, consulte nosso tutorial sobre como criar um menu de navegação flutuante fixo no WordPress.
Esperamos que este artigo tenha ajudado você a aprender como criar facilmente uma barra de rodapé flutuante e fixa no WordPress. Talvez você também queira ver nosso guia para iniciantes sobre como adicionar código de cabeçalho e rodapé no WordPress e nossa lista de verificação de itens a serem adicionados ao rodapé em seu site WordPress.
Se você gostou deste artigo, inscreva-se em nosso canal do YouTube para receber tutoriais em vídeo sobre o WordPress. Você também pode nos encontrar no Twitter e no Facebook.


Ahmed Omar
An excellent tutorial on creating a “sticky” floating footer bar in WordPress
Your step-by-step guide, especially the first method is clear and effective.
I use the first method for this floating footer
Thanks for this practical solution
WPBeginner Support
You’re welcome!
Admin
Steve Alvi
Please I want a close button with this footer floating bar.
WPBeginner Support
OptinMonster would be the method that allows you to have a close button the easiest.
Admin
Trendy Avinash
Worked Like a Charm,Without any Plugins.
Thanks
WPBeginner Support
Glad our guide was helpful
Admin
Alejandro Ferguson
The floating footer code really works. Thank u
WPBeginner Support
Glad our guide could help set it up
Admin
John SMith
How to add a FB sharing button in a floating bar in the only mobile, not for desktop.
WPBeginner Support
You would want to take a look into option 2 in our social media plugins here: https://www.wpbeginner.com/plugins/best-social-media-plugins-for-wordpress/
Admin
wlepcha
How to add menus in the sticky footer instead of random ads.
WPBeginner Support
You would want to take a look at our article here: https://www.wpbeginner.com/wp-themes/how-to-create-a-sticky-floating-navigation-menu-in-wordpress/
Admin
Marius
Very nice tutorial. I implemented the manual code and worked like a charm. Only one more feature I need… can we also have a X or close button to close the floatingbar and remain like this for the rest of the visit? I know, cookies are involved, but maybe you can give us a simple solution. Thank you!
Greg Guz
Very clear and east to follow tutorial.
Floating bar seem to work absolutely fine, but I’m getting following error in chrome console:
Failed to load resource: the server responded with a status of 404 ()
Any ideas?
Ankush jain
Very helpful your website
thank you very much
Mark Rowles
Just a quick pointer CSS wont work for this.
You’ve got fixedBar in the html as a class name (capital B) and you’ve got fixedbar in the css (lowercase b) so the css doesn’t apply.
Can someone correct the code please to help others that discover this post?
WPBeginner Support
Hey Mark,
Thanks for pointing this out. We have updated the code.
Admin
Robi
Dear WPBeginner, and Friends
If I have specific section that I’ve created using Elementor Page Builder, How I can use it as a custom sticky footer? (It contains more than one column, some buttons and text). I want this type of sticky footer, Instead of simple text as explained in this tutorial.
Thanks..
Daniel
1) Added code just before the tag in the footer.php from my theme dir /wp-content/themes/mytheme/
2) Added code to my theme dir /wp-content/themes//mytheme/style.css not working deleted and then i try to added from the theme option to custom css menu same problem not working
3) Added floatingbar.js with the code inside in /wp-content/themes/mytheme/js
4) Added code to functions.php first not working.. tried with site-specific plugin also same thing
I tried on both website different theme same problem not working just sit there it`s not floating
Some help will be welcome… I really need this
WPBeginner Support
Hey Daniel, try using Inspect tool to troubleshoot any issue with CSS.
Admin
Daniel
Thanks for the replay but for me messing with css and js it`s like building a space ship… i will give a try to figure out whats rong
Regards
Daniel
Daniel
I used the inspector tools and i don`t see any read lines there….
Dueadla Framin
I have the same issue! The code you posted isn’t even working on default twenty sixteen theme. It’s not floating it’s just stuck on the bottom of the webpage after you scroll all the way to the bottom.
Igor
there is an error in the fixedBar reference in the css code (it is referencing as “.fixedbar” whereas it should be “.fixedBar”. Change that and see if it works.
henrykene
WpBeginner please i will like to use it for displaying my Adsense ads on mobile views. How will i go about it and what are the code to make it show Adsense stick footer for mobile viewers?
Nawaf
Awesome.
But there is a bug. When you open it in mobile. The ribbon gets cutted. And u can see only half of it
Tip
In my new theme, I have the option of using an infinite scroll feature. This is great except that the reader would have to scroll a long time to reach my old footer, which is where I put the legal disclosures, etc.
With this floating footer bar, I was able to nicely put the links there and now I can use the infinite scroll feature without having to reposition a bunch of required links.
Thanks for this tutorial. I learned a little bit more PHP and CSS too!
Sarah Noah
I have a client who wants to have a link to REQUEST A QUOTE on every page so when I saw this sticky footer it seemed perfect until I read that somer users are annoyed by it. Do you guys think REQUEST A QUOTE stuck on the bottom of every page is annoying? Of course it is the most important thing the company wants the user to do.
Roy E
Footer bar shows fine in FireFox but is not sticky in IE11 where I had to scroll down to see “About WPBeginner”, “Site Links”, and “Sites We Like” ??
Roy E
Of course, when I pressed Enter on the previous comment ( IE issue), the sticky footer bar appeared. Not sure what happened but the problem went away. Please disregard this comment and the previous one.
yugishtha
do we also have a floating top bar menu plugin for WP?
Hutzel
I tried all, but it does not Show me the fixed footer. Can somebody help or assist me please? thanks
Devendra Meena
Is there any plug in, which can have some scripts on a floating box, and with a x button to close it.
Khushal Rao
this can also be used to showing ads too..
Dick Sijtsma
Lowering the opacity to, for example 0.60 gives the visitor a glimps of the underlying content. I think that would be a nice effect. But changing the opacity of the bar, changes the opacity of the text too. And that ‘dilutes’ the message. Any trick to prevent that?
Thanks.
Jan dB
As mentioned earlier, this is a very easy tutorial and works like a charm on most computers.
However, I also have issues regarding the mobile browsers.
Have you already come up with a solution for that?
Thanks and keep up the good work!
Editorial Staff
For mobile browsers if you have a responsive design, then you can simply use media queries and display: none the entire footer bar.
Admin
Theresa @DearCreatives
Nice. I am actually looking for a tutorial for adding script to top of post that is there every time I post for disclosure purposes. If you have one like that or know of a plugin can you send me an @DearCreatives on twitter or email me thanks!!
Dick Sijtsma
Hi, looks good, but i do understand the reasons some people dislike these kinds of footers very much. Nevertheless i’m trying to accomplish this effect too.
In the source of this very page, i saw you externalized the javascript. You’ve put it in the main.js javascript file, and linked this main file to the page in the header.
So far so good, i can manage that. But, i can’t find the place where the ‘randomtip’ function is called.
In short my question is: how do i externalize the javascript? Hope to hear from you.
Matthew
Great tutorial. One issue that other might also run into – I only have one footer link (as opposed to having several in rotation) and this footer bar shows even on the page that I link to in the footer. Do you know of a quick way to not show this footer on particular pages? Or to, perhaps, only show it on the homepage?
Editorial Staff
Sure just wrap the text with the conditional statement is_front_page().
Admin
Antonio
Here a true beginner. How do I actually do that? I totally new to WP and PHP. As far as I understand I have to put somewhere in the footer.php but I really have no idea where. Great article though. It managed to add it to my blog as well
Caio
I like it, but it is a bit too distracting. Maybe make it nice and light by turning down the opacity, and then adding a style statement on hover to turn the opacity back up to .9
Sopheak
Wow! It was a great tutorial.
Pawan
Great, I was looking for same.
Sai Kumar
Hi, this sticky floating footer bar is really awesome! I am going to add it in my blog for sure. Thanks a lot for Sharing!!
Max Manroe
Wow nice tutorial and think this is great, I will try it to my blog. Thanks
Zseller Istvan
Guys, this is the only thing that I really hate about WpBeginner. When I read your articles on my tablet, with Opera this footer bar stays in the middle of the page for seconds when scrolling. It is a new tablet, and powerful enough. The footer bar covers the content, which is really annoying. After some time it moves to place.
Editorial Staff
We are working on a mobile/tablet version. This won’t be an issue soon enough.
Admin
Salman Ahmad
Wow ! This is Awesome ,Thanks for sharing
Peter
Thanks a lot for providing us this great tutorial. Definitely it will be helpful for me.
Amitabha Chakraborty
Hi
Nice tutorial. Was thinking a “X” button to close it if it annoys someone would have been great.
Regards
Amitabha
David
I like a footer bar. I think its a great place to put social sharing buttons. I made my own on a client’s site but it has the option of being able to close. It also holds the go to the top button. Pretty nifty. However, like the footer bar I made, on my HTC EVO 4G your footer bar doesn’t stick at the bottom as it should. It actually is stuck in the middle of an article and is really annoying because it covers up a bit of the text. The bar I made can be closed so it is only a quick annoyance. Your bar cannot so I can never read that text. Again this is on my phone. If you can figure out the workaround please let me know.
I came to this article through your newsletter which is great. Thanks for that.
Michael
Like or hate these types of bars, there is great value in seeing how the code is written to implement such a thing, at least. I use Hello Bar and the Wibya bar on several of my sites and although I think some people have become blind to them, including myself, and some hate them, they still work to help convert and share content a lot of the time.
I appreciate what I view as a helpful little code lesson. Great site!
Taryn Fox
I personally feel that the floating footer bar is an extremely user-hostile feature, especially one like yours which is a) unhideable, and b) expands to twice its intended size (or greater) when viewed while the font size is increased.
Speaking of which, even with nosquint magnifying the rest of the text on this site, the text in the comments field is tiny and hard to read if you have visual accessibility issues.
Speaking of other accessibility issues, asking for a person’s “Real Name” is hostile to anyone who uses a pseudonym. This includes trans women, people who are being stalked, people who are hiding their online activity from others who are capable of hurting them, and people who simply prefer and are better known by their pseudonyms than their legal or birth names (both of which are more inclusive and accurate terms for what you call a “real name”).
Also, you misspelled “meaningful” in the “Add a comment” notice.
I wasn’t going to leave a long rambling comment of criticism, but I feel most people have banner blindness to footer bars, and are ambivalent towards them at best and annoyed by them at worst. Most people who aren’t web designers, anyway. I thought maybe someone should speak up for the people who are actually affected by them. Then I ran into the other issues once I went to your site from Google Reader, and tried to leave a comment.
Thank you for your tutorials, and I hope things go well for you.
Editorial Staff
Hey Taryn,
We really appreciate your invaluable feedback. There are definitely pros and cons to having a floating footer bar like this ones. The cons you have already pointed out. We thought about doing a cookie tracking option where regular users can close the bar and never have it shown again. But even the regular users sometime miss out on great deals because of that. Also if they clear their browser’s cache or use a different computer, the bar shows up again. Yet another downside of cookie tracking. We’ve given extensive thoughts of having user registration and offer personalization on the site.
As for comments, the real name text in the field is there to serve one purpose, stop spammers. If you read the comments policy, it says “We do not allow Keywords stuffed in the name field. You must use your name or nick name for commenting.” Often folks use their nicknames, and we are completely ok with it. But if your nickname is “best insurance company” or something like that… then we mark it as spam.
Thanks for pointing out the typo. We have fixed that.
Admin
Partha Bhattacharya
This is with respect to Taryn’s comment above:
“…I feel most people have banner blindness to footer bars, and are ambivalent towards them at best and annoyed by them at worst.”
Since you continue using them there is no doubt you get benefits from them, and people do click on them to remain updated just as I did just now…coming here from another page.
Would you mind sharing some stats / lookins as to how effective is the footer bar for you, and also how effective it is as against using a header bar!
staion
Thanks for this easy and amazing small tutorials! I’ve already implemented it on my site, but without the jquery thing, just using it as announcements.
FreedomJackson
Awesome thanks for sharing this dude I’m doing some updating and I was trying to find a good way to add this footer bar.
mucho grande gracias senior