Uma das primeiras coisas que fazemos quando queremos reformular um site é cloná-lo para um ambiente de staging ou local. Dessa forma, podemos criar uma réplica exata do site em que estamos trabalhando sem afetar a versão ativa.
Se você é proprietário de um site com poucas ou nenhuma habilidade técnica, provavelmente está cansado de ver as alterações que faz levarem a erros inesperados. Você quer tentar clonar seu site WordPress para fins de teste, mas tem medo de que o processo seja muito difícil.
Na verdade, é exatamente o oposto. Com o plugin Duplicator, clonar um site WordPress é super fácil, e mostraremos como neste artigo.
O que é Clonagem de Site WordPress e Por Que Usá-la?
A ideia por trás da clonagem de um site WordPress é que você faz uma cópia exata de um site e a aplica a outro site.
Existem muitas razões pelas quais você pode precisar clonar um site. Por exemplo, você pode estar movendo um site para um novo host ou um novo nome de domínio. Ao clonar um site, você pode economizar muito tempo e esforço e concluir o processo de migração muito mais rapidamente.
Outro exemplo é desenvolver um site para um cliente em seu próprio localhost. Assim que o trabalho for concluído, você pode simplesmente clonar o site e movê-lo para o servidor ativo do cliente.
Você também pode clonar um site WordPress ativo e configurar um site de staging para testar as alterações antes de publicá-las.
Dito isso, vamos mostrar como você pode clonar um site WordPress em alguns passos fáceis. Você pode usar os links rápidos abaixo para navegar pelo tutorial:
- Passo 1: Configure o Plugin Duplicator do WordPress para Clonagem Fácil
- Passo 2: Crie um Pacote Duplicator do Seu Site WordPress
- Passo 3: Faça o Upload do Arquivo e do Instalador do Seu Site WordPress para um Novo Local
- Passo 4: Crie um Novo Banco de Dados WordPress para o Seu Site
- Passo 5: Execute o Script Importador do Site WordPress
- Step 6: Test Your Cloned Website and Delete Temporary Files
Passo 1: Configure o Plugin Duplicator do WordPress para Clonagem Fácil
A melhor maneira de clonar um site WordPress é usando o plugin Duplicator. É um poderoso plugin de clonagem e duplicação do WordPress que ainda é muito fácil de usar.
O plugin faz backup de tudo do seu site em um único arquivo, que você pode simplesmente mover para o novo local.
A primeira coisa que você precisa fazer é ativar e instalar o plugin no site que deseja clonar. Para mais detalhes, veja nosso guia passo a passo sobre como instalar um plugin do WordPress.
Observação: Existe uma versão pro do Duplicator que possui recursos adicionais como backups agendados, migração multisite e muito mais. No entanto, usaremos a versão gratuita para este guia, pois ela tem tudo o que você precisa para clonar um site WordPress.
Passo 2: Crie um Pacote Duplicator do Seu Site WordPress
Após a ativação, vá para Duplicator » Backups e clique no botão ‘Criar Novo’ no topo da página.
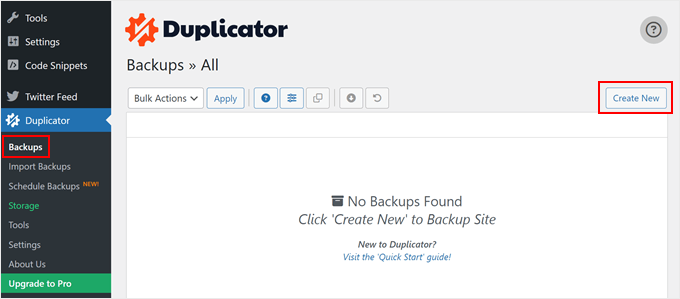
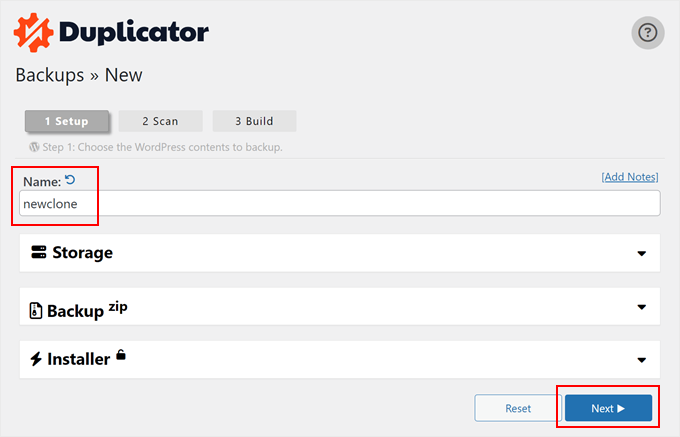
Depois disso, você será levado a uma tela onde poderá digitar um nome para o arquivo duplicado. Isso é apenas para sua referência, então você pode usar o que quiser.
Em seguida, clique no botão 'Continuar'.
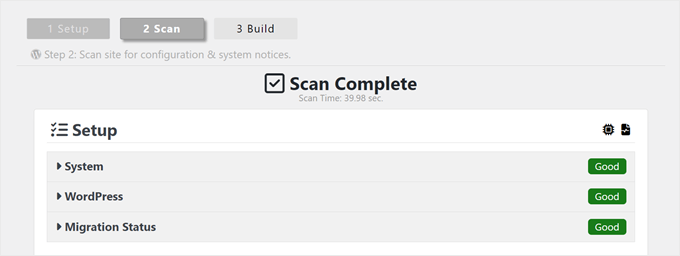
O Duplicator agora irá escanear seu site.
Se ele encontrar um problema em qualquer parte do seu site WordPress, você verá um aviso com informações sobre como corrigir o problema. Caso contrário, ele simplesmente dirá ‘Bom.’
Agora, role a página para baixo.
Em seguida, clique em ‘Build’ para criar o arquivo de backup.
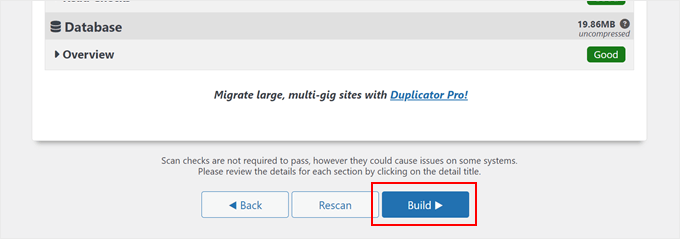
O plugin agora fará backup do seu banco de dados WordPress, imagens, temas, plugins e todos os outros arquivos em um único pacote para download.
Dependendo do tamanho do seu site, o processo pode levar alguns minutos.
Assim que o processo de backup for concluído, é hora de baixar seus arquivos.
Você precisa baixar tanto o arquivo de archive, que contém seu backup, quanto o instalador que descompactará o archive.
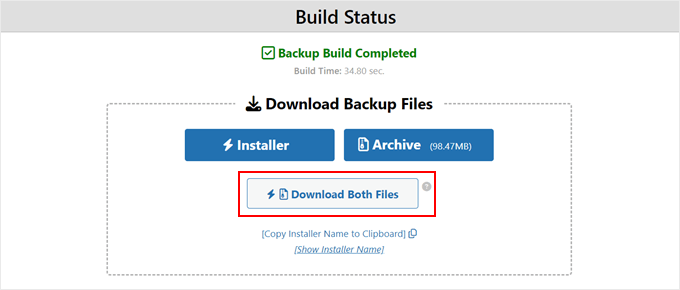
Para fazer isso, prossiga e clique no botão ‘Baixar Ambos os Arquivos’.
Dica Pro: Tecnicamente, você pode pular o restante destas etapas e apenas seguir nosso tutorial sobre como restaurar um backup de site WordPress, onde mostramos como importar seu arquivo de backup com o Duplicator.
Dito isso, sinta-se à vontade para seguir o restante destas etapas se quiser restaurar o site clonado em um ambiente vazio.
Passo 3: Faça o Upload do Arquivo e do Instalador do Seu Site WordPress para um Novo Local
Agora você tem um backup completo do seu site e o arquivo instalador, o próximo passo é carregá-los para o novo local.
Este novo local pode ser um blog WordPress ativo ou um site no seu servidor local. Se o site estiver em um servidor local, você precisará criar uma nova pasta na pasta raiz do seu servidor local. Este é o arquivo onde seu servidor local armazena todos os sites.
Por exemplo, se você estiver usando MAMP, então será a pasta ‘/Applications/MAMP/htdocs/’.
Alternativamente, se você estiver usando WAMP, então seria a pasta ‘C:\wamp\www \’.
Depois disso, você precisa abrir a pasta que criou para o seu site clonado e copiar o arquivo de arquivo e o instalador para essa pasta.

Se você quiser clonar seu site para uma plataforma de hospedagem WordPress diferente, então você pode criar um site vazio primeiro e fazer o upload dos arquivos para ele usando o gerenciador de arquivos do provedor.
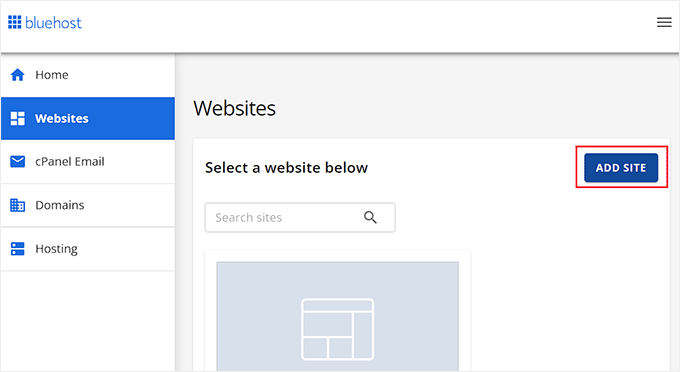
Se você usa Bluehost, basta fazer login no painel da sua conta de hospedagem e navegar até a aba ‘Websites’. Depois disso, clique em ‘Add Site’.
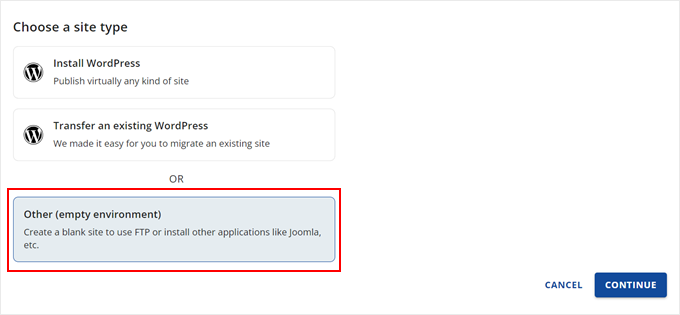
Na próxima tela, você verá algumas opções de tipo de site.
Basta selecionar ‘Other (empty environment)’ e clicar em ‘Continue’.
Em seguida, insira o título do seu site.
Você também pode pular esta etapa, se necessário, e apenas clicar em ‘Continue’.

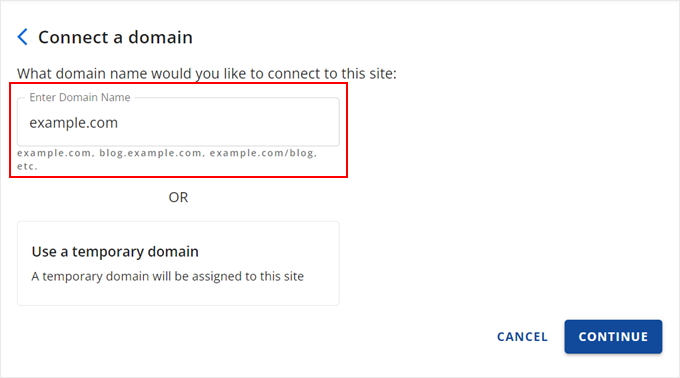
Nesta fase, você pode conectar seu site a um nome de domínio.
Ou, você pode usar um domínio temporário no ínterim se você ainda não tem um nome de domínio.
Clique em ‘Continuar’ para prosseguir.
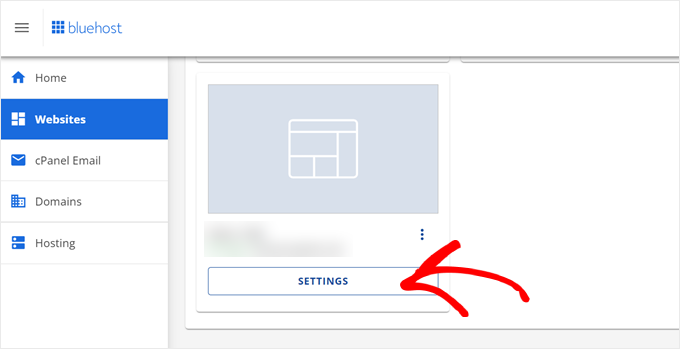
Assim que seu site vazio estiver pronto, você voltará para a aba ‘Websites’.
No seu site recém-criado, clique no botão ‘Settings’.
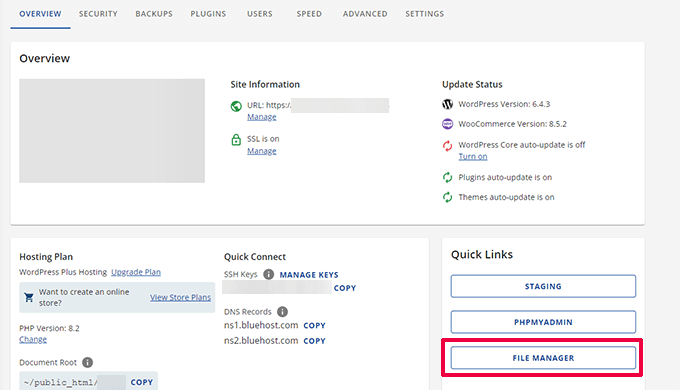
Agora, role para baixo até a seção ‘Quick Links’.
Uma vez lá, basta clicar no botão ‘File Manager’.
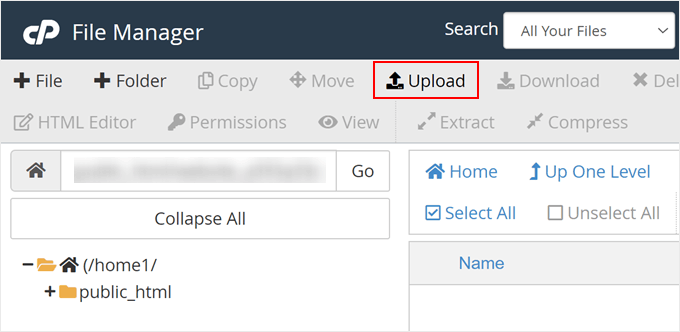
Bluehost agora o levará ao Gerenciador de Arquivos do seu site.
Clique no botão ‘Upload’ para enviar seus arquivos.
Agora, selecione os arquivos que você deseja enviar para o site vazio.
Quando terminar, clique em ‘Voltar para …’
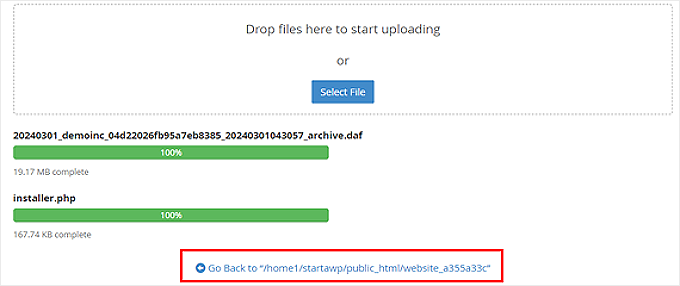
Agora você deve ver seus arquivos de arquivo e instalador no gerenciador de arquivos.
Prossiga e remova os outros arquivos que estão neste diretório para garantir que a instalação ocorra bem mais tarde.

Alternativamente, você pode fazer o upload do instalador e do arquivo para o diretório raiz usando um cliente FTP.
Se você nunca fez isso antes, consulte nosso guia para iniciantes sobre como usar FTP para fazer upload de arquivos para o WordPress.
Não importa onde você faça o upload dos arquivos, você precisa garantir que a pasta contenha apenas seus arquivos installer.php e archive zip.

Passo 4: Crie um Novo Banco de Dados WordPress para o Seu Site
Em seguida, você precisa criar um novo banco de dados WordPress para descompactar sua versão clonada do WordPress. Se você já criou um banco de dados, pode pular esta etapa.
Existem algumas maneiras de criar um banco de dados, dependendo se o novo local é um site ativo ou um site em seu servidor local.
Se você estiver usando um site ativo, basta fazer login no painel da sua conta de hospedagem WordPress.
Para usuários Bluehost, você precisa ir para a guia 'Configurações' do seu site vazio, como antes. Em seguida, mude para a guia 'Avançado' e clique em 'Gerenciar' ao lado de cPanel.
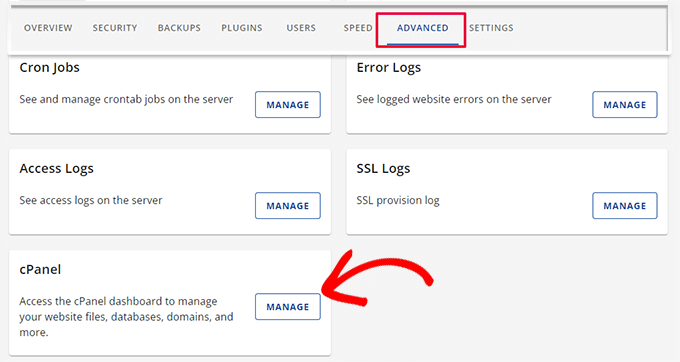
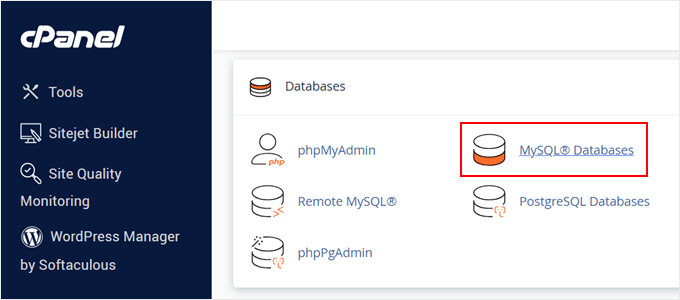
Dentro do cPanel, role até a seção 'Bancos de Dados'.
Depois disso, selecione 'Bancos de Dados MySQL'.
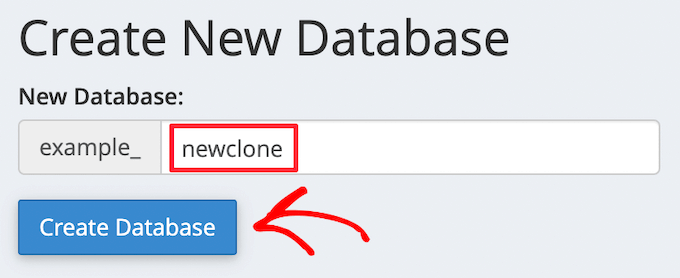
Isso o levará a uma tela onde você pode digitar um nome para o seu banco de dados.
Em seguida, clique no botão 'Criar Banco de Dados'.
Em seguida, você precisa adicionar um novo usuário ao banco de dados MySQL.
Simplesmente role até a seção 'Usuários MySQL'. Em seguida, digite um nome de usuário e senha para o novo usuário e clique no botão 'Criar um usuário'.
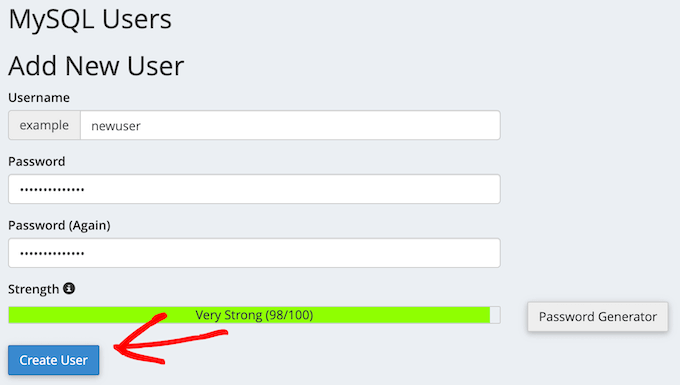
Depois de fazer isso, o próximo passo é adicionar o usuário ao seu banco de dados.
Simplesmente role até a seção 'Adicionar Usuário a um Banco de Dados' e abra o menu suspenso 'Usuário'. Aqui, selecione o usuário do banco de dados que você criou na etapa anterior.
Depois disso, abra o menu suspenso ‘Database’ e selecione o banco de dados que você criou anteriormente.
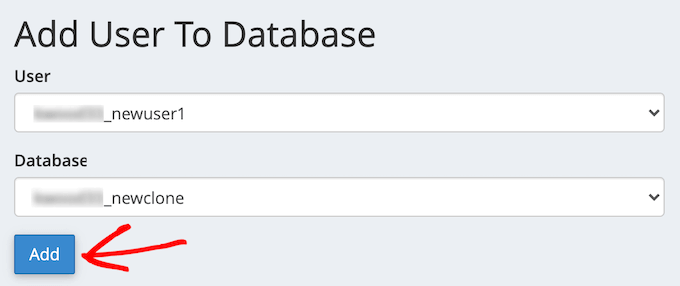
Certifique-se de anotar o nome do banco de dados, nome de usuário e senha, pois você precisará dessas informações na próxima etapa.
Com isso feito, clique no botão ‘Add’.
Se você estiver usando uma instalação localhost usando XAMPP ou outras ferramentas, basta visitar ‘http://localhost/phpmyadmin/’ ou ‘http://localhost:8080/phpmyadmin/’ em seu navegador da web para iniciar o phpMyAdmin.
Depois disso, clique na aba ‘Menu’ e, em seguida, selecione a opção ‘Database’.
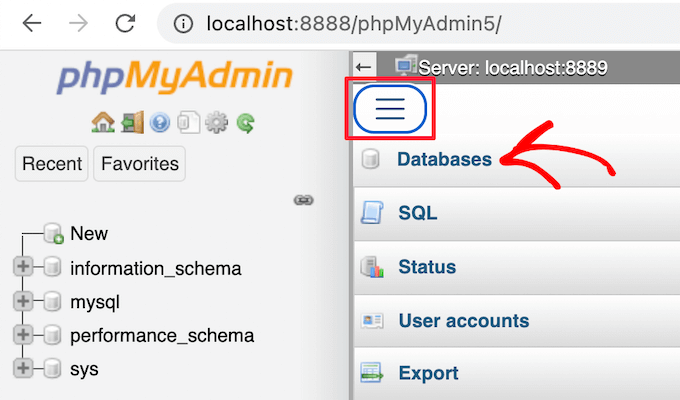
Em seguida, você precisa inserir um novo nome para o banco de dados.
Em seguida, basta clicar no botão ‘Create’.

Você usará o nome do banco de dados na próxima etapa. Para a maioria das instalações localhost, seu host será localhost, e o nome de usuário será root, com uma senha em branco.
Passo 5: Execute o Script Importador do Site WordPress
Agora que todos os seus arquivos estão no lugar, é hora de executar o script instalador do Duplicator. Este script descompacta seu arquivo de archive em poucos cliques.
Primeiro, digite a URL do seu site no navegador da web e adicione installer.php ao final dela. Isso ficará parecido com ‘https://example.com/installer.php.’ Certifique-se de substituir ‘example.com’ pelo seu próprio nome de domínio ou pelo endereço localhost do seu site.
Em seguida, o script instalador do Duplicator aparecerá na tela. Primeiro, você precisa inserir as informações do seu banco de dados WordPress.
Estas são as informações do banco de dados que você copiou acima.
Assim que terminar, clique em ‘Validate’.
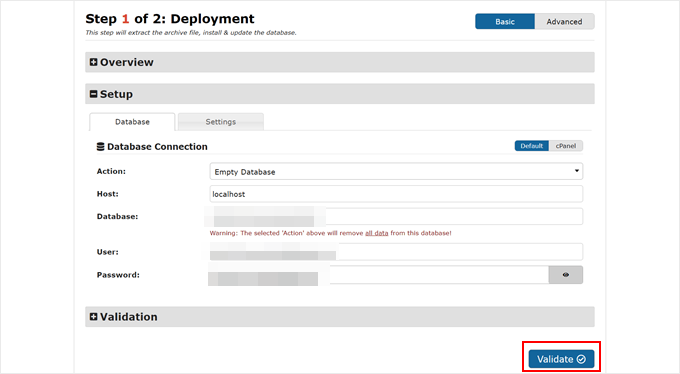
Se não houver erros, marque a caixa de seleção de termos e avisos na parte inferior.
Depois disso, clique em ‘Next’ para continuar.
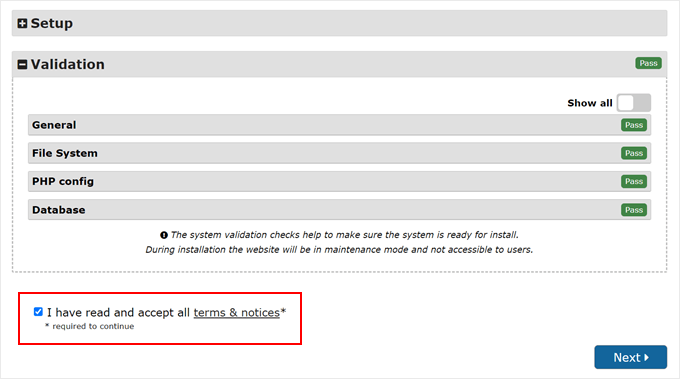
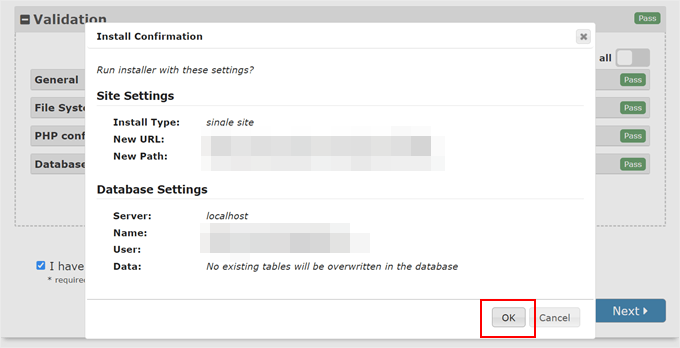
Em seguida, um pop-up aparecerá para confirmar a instalação.
Prossiga e clique no botão ‘OK’.
Se a instalação for bem-sucedida, você poderá fazer login imediatamente em seu novo site WordPress.
Para fazer isso, certifique-se de marcar a opção ‘Excluir automaticamente os arquivos do instalador após o login para proteger o site (recomendado!)’ e clique no botão ‘Login de Administrador’.
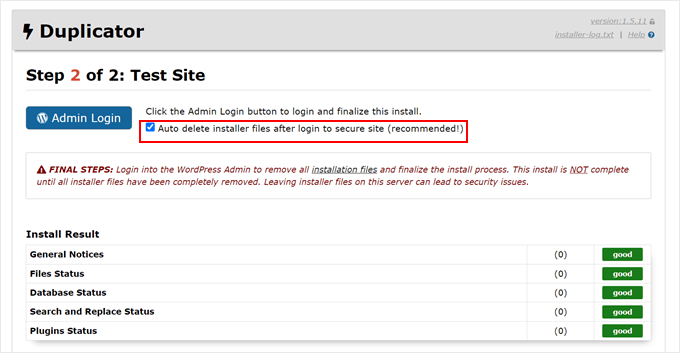
Marcar essa caixa removerá automaticamente os arquivos do instalador para eliminar possíveis problemas de segurança e finalizar a instalação.
Etapa 6: Teste seu site clonado e exclua arquivos temporários
Agora você pode prosseguir e testar seu site clonado.
Recomendamos testar tanto a área de administração do WordPress quanto a parte pública do seu site para garantir que todos os seus dados estejam lá e que o site esteja funcionando como esperado.
Se você encontrar quaisquer erros do WordPress, consulte nosso guia para iniciantes sobre como solucionar erros do WordPress.
Você também precisará verificar se seus arquivos do instalador ainda existem. Para garantir, recomendamos ir em Duplicator » Ferramentas e, em seguida, clicar no botão ‘Remover Arquivos de Instalação’.
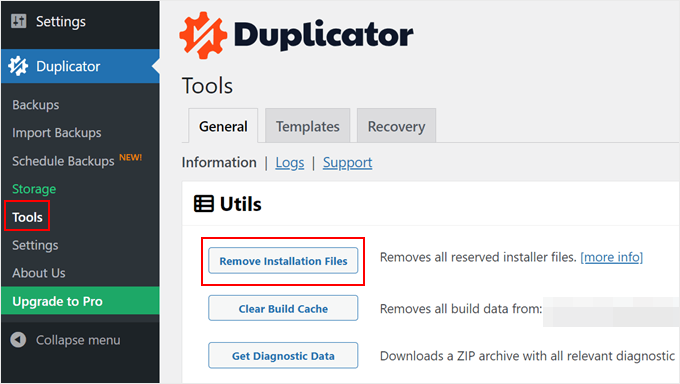
Pronto, você clonou um site WordPress com sucesso.
Clonei meu site WordPress, e agora?
Se você clonou seu site WordPress com sucesso, aqui estão algumas coisas que você pode querer fazer a seguir:
- Verifique se você migrou seu site corretamente usando esta lista de verificação definitiva de migração.
- Verifique as configurações de link permanente do seu site clonado.
- Instale plugins essenciais do WordPress para expandir seu site.
- Desative os recursos de blog se você planeja ter um site que não seja de blog.
- Consulte esta lista de verificação de lançamento de site antes de publicar seu site.
- Visualize seu site para ver se tudo está funcionando.
- Ative o modo de depuração do WordPress para resolver erros potenciais rapidamente.
- Aprenda como liberar espaço em disco e reduzir o uso de inodes para manter seu servidor web saudável.
- Execute um teste de velocidade do site para ver se o desempenho do seu site precisa de melhorias.
Esperamos que este artigo tenha ajudado você a aprender como clonar seu site WordPress facilmente. Você também pode querer ver nosso guia sobre como gerenciar vários sites WordPress de um único painel e nossas escolhas de especialistas dos melhores plugins de log de atividade e rastreamento do WordPress.
Se você gostou deste artigo, por favor, inscreva-se em nosso Canal do YouTube para tutoriais em vídeo do WordPress. Você também pode nos encontrar no Twitter e no Facebook.


Dario
Obrigado pelo tutorial detalhado. Economizou muito trabalho, que Deus te abençoe
WPBeginner Support
Glad our tutorial was able to help
Admin
Felicia Sandler
Eu tenho um site WordPress que está atualmente em um servidor dedicado com uma URL diferente que aponta para o domínio que desejamos usar. Se eu clonar o site para movê-lo para um serviço de hospedagem, é possível fazer isso com um novo endereço IP também? Agradeço qualquer suporte. Obrigado.
WPBeginner Support
Se você mudar para um novo provedor de hospedagem, o IP normalmente mudaria por padrão, sem a necessidade de etapas extras.
Admin
Jiří Vaněk
O Duplicator é um plugin absolutamente fantástico que eu pessoalmente gosto de usar para duplicar sites do ambiente de desenvolvimento para o servidor. O único problema que encontrei com ele é que ele cria um arquivo .htaccess na pasta de backup, onde nem todas as diretivas podem ser permitidas. Felizmente, esse comportamento pode ser resolvido nas configurações, e o .htaccess pode ser desativado. Caso contrário, o plugin sempre funciona muito bem e sem problemas. Além disso, com um guia como o seu, qualquer pessoa pode lidar com ele muito bem. E como bônus, ele funciona muito bem mesmo na versão gratuita.
Dennis Muthomi
Este guia passo a passo foi extremamente útil! Segui o tutorial para clonar meu site WordPress existente para um novo servidor com um host diferente. Tudo correu bem, exceto que tive um problema com SSL inicialmente no site clonado. No entanto, depois de entrar em contato com a equipe de suporte da minha nova hospedagem, eles conseguiram resolver o problema de SSL rapidamente. Muito obrigado por fornecer um guia tão claro e valioso.
WPBeginner Support
Glad our guide could help you
Admin
Dan
Olá, eu fiz isso, mas ao completar a instalação e clicar no botão de admin, ele me leva de volta à página do domínio original antes da instalação do WordPress. Eu verifiquei o processo novamente e não acho que perdi alguma etapa?
Parece que tudo foi apagado (apenas uma instalação original do WP), mas o arquivo duplicado não foi instalado?
WPBeginner Support
Seu domínio está apontando para sua hospedagem original. Você pode alterar seu arquivo hosts para ver o site clonado ou apontar seu domínio para o novo local de hospedagem. Para mover seu site para um novo domínio, recomendamos dar uma olhada em nosso artigo abaixo:
https://www.wpbeginner.com/wp-tutorials/how-to-properly-move-wordpress-to-a-new-domain-without-losing-seo/
Admin
Martin Page
Segui suas instruções e fiz o upload dos 2 arquivos para um arquivo vazio, mas quando acesso site/installer.php, recebo uma página 404.
Minha tela do FileZilla está exatamente como no seu exemplo.
Alguma sugestão?
Obrigado
WPBeginner Support
Você deve visitar a página de Perguntas Frequentes (FAQ) do plugin Duplicator, pois eles cobrem as diferentes etapas de solução de problemas para esse erro.
Admin
Rene Young
Obrigado. Fiz isso e concluí com sucesso a criação do clone. Tenho uma pergunta sobre a etapa de instalação do banco de dados no novo local (Etapa 2 de 4 – Instalar Banco de Dados): A captura de tela mostra uma escolha entre “Básico” e “cPanel”, mas você não discute isso.
WPBeginner Support
In this tutorial, we went with Basic
Admin
Rene Young
Não consegui completar o Passo 2. Recebo avisos no Duplicator, em Paths:
“Se o caminho raiz do WordPress não for gravável pelo PHP em alguns sistemas, isso pode causar problemas.
Se o Duplicator não tiver permissões suficientes, você precisará criar manualmente os caminhos acima.”
WPBeginner Support
Você deve seguir nosso guia abaixo para atualizar as permissões de seus arquivos:
https://www.wpbeginner.com/beginners-guide/how-to-fix-file-and-folder-permissions-error-in-wordpress/
Ou você pode entrar em contato com seu provedor de hospedagem para obter assistência com as permissões da pasta.
Admin
Sue
Estou tentando clonar um site de demonstração que estou criando para as pessoas usarem como modelo. Usando o Duplicator, criei o pacote, entrei no Gerenciador de Arquivos do CPanel e naveguei até o diretório raiz do subdomínio em que estou testando, e fiz o upload do arquivo zip e do arquivo instalador. Não há mais nada na pasta.
Quando sigo as instruções e vou para o endereço do site com installer.php adicionado ao final, não recebo as informações de importação do Duplicator. Recebo um Página Não Encontrada….embora tenha o cabeçalho, rodapé e menu superior do site que estou clonando. O que fiz de errado?
WPBeginner Support
Se você estiver usando o mesmo domínio, é provável que ainda esteja vendo o site antigo e não o novo. Se você entrar em contato com seu provedor de hospedagem, eles normalmente podem ajudar a configurar um domínio temporário que você pode usar.
Admin
Tarık Hacıalioğulları
Muito obrigado, isso me poupou muito tempo. Funcionou muito bem!!!
WPBeginner Support
You’re welcome
Admin
saad
Tudo está claro, obrigado, mas e quanto ao login e senha para o painel do WordPress, podemos duplicar?
WPBeginner Support
Ele copia sua tabela de usuários, então transferiria seu usuário e senha para você.
Admin
Kara
Estou tendo um pouco de dificuldade com a etapa 4. Com minha conta Hostgator, não tenho acesso ao meu painel do servidor, mas quando tento adicionar o arquivo via cliente FTP, não consigo encontrar a pasta que contém o installer.php. Estou perdendo alguma coisa? O nome do arquivo pode ser diferente ou alguém poderia me dizer exatamente onde colocar o arquivo zip?
WPBeginner Support
You would want to reach out to your hosting provider and they would be able to assist
Admin
ed
Olá, e se eu tiver plugins e temas pagos específicos para 1 site WordPress
Will it still work ? Thanks alot, your tutorial so far is the easiest to follow
WPBeginner Support
Você precisaria entrar em contato com o suporte dessas ferramentas para saber como eles lidam com isso.
Admin
Emma
O que você faz quando há um aviso de verificação de tamanho? O limite é 500 MB e meu site tem 1,32 GB descompactado. Não tenho certeza de como comprimir. Ele recomenda uma instalação manual de 2 partes pelo cPanel, o que infelizmente está além das minhas habilidades técnicas.
WPBeginner Support
You would want to reach out to your hosting provider’s support and they should be able to assist
Admin
Dominique
fiz upload do zip e do script instalador para a raiz e estou recebendo esta mensagem quando digito domain.com/installer.php
403 Proibido
Solicitação proibida por regras administrativas.
E agora?
WPBeginner Support
Existem algumas opções diferentes que você pode tentar. Para começar, você vai querer dar uma olhada em nosso artigo abaixo:
https://www.wpbeginner.com/wp-tutorials/how-to-fix-the-403-forbidden-error-in-wordpress/
Admin
Loz Bigrave
Ótimo artigo, funcionou perfeitamente.
WPBeginner Support
Thank you, glad our article was helpful
Admin
Derek
Copiei com sucesso para um novo URL e o site clonado parece estar funcionando. No entanto, quando entro no WordPress, é uma versão reduzida com várias abas faltando, como: usuários/plugins/configurações, para citar algumas. Como posso obter uma versão completa do WordPress igual ao site que copiei?
WPBeginner Support
Você pode querer garantir que está logado como um usuário administrador no seu site clonado, pois essa é a razão mais provável para esse problema.
Admin
Adi
Como alterar o nome do site, o URL e também o banco de dados ao instalar o site clonado usando o Duplicator?
WPBeginner Support
Para fazer isso, você vai querer dar uma olhada em nosso artigo aqui:
https://www.wpbeginner.com/wp-tutorials/how-to-properly-move-wordpress-to-a-new-domain-without-losing-seo/
Admin
diana
Olá, tenho uma pergunta, posso clonar meu site sem apagar o outro, quero dizer, o site original?
WPBeginner Support
Sim, clonar seu site não remove o original
Admin
Todd Murray
Este é um ótimo post. Apenas uma clarificação antes de executar a importação… na ETAPA 4, estas são as instruções:
Não importa onde você esteja copiando os arquivos, você precisa ter certeza de que a pasta está completamente vazia e não tem outros arquivos ou pastas dentro dela, exceto o arquivo installer.php e o seu arquivo zip de backup.
Se eu já tenho um tema e comecei a construir um site antes de encontrar este artigo, preciso deletar tudo do destino? “pasta completamente vazia” se refere a qual pasta?
Obrigado!
Todd
WPBeginner Support
Se você quiser duplicar um site de outro lugar, então você precisará remover o que está atualmente lá para o seu site.
Admin
Christie Bellah
Tenho usado este artigo por anos. Muito obrigado!
WPBeginner Support
You’re welcome, glad our guide has been so helpful
Admin
Alexandre
Você estava certo, eu não coloquei na pasta raiz :/
Então eu tentei de novo, mas no final, obtive um resultado de erro 404.
Corrigi o wp_config (nome, usuário, senha e host) e fiz as alterações no htaccess (copiei o NOVO .htaccess).
Todos os arquivos foram excluídos, exceto a pasta agora descompactada que contém todos os arquivos. *e a pasta __MACOSX? Tentei com e sem, mas o resultado é o mesmo.
Mesmo depois disso, na Etapa 4, ainda recebo os 2 avisos em Avisos Gerais:
wp-config não encontrado
wp-config.php não encontrado.
I found the wp-config.php, but seem like I don’t have the wp-config. Are they the same?
Algo mais faltando?
Obrigado
WPBeginner Support
O macosx você não precisa, os arquivos wp-config devem ser os mesmos. Para mover da subpasta se o site original ainda estiver disponível, você provavelmente desejará seguir as etapas em: https://www.wpbeginner.com/wp-tutorials/how-to-get-rid-of-wordpress-from-your-wordpress-site-url/
Admin
Alexandre
Acabo em uma página “Index of” mostrando o arquivo na minha subpasta. Alguém sabe por quê?
Obrigado
WPBeginner Support
Provavelmente você instalou seu site WordPress na subpasta em vez da pasta raiz do seu site.
Admin
Alexandre
Sorry, forgot to say. If I type in the full path on my web browser, I have a loading time, but end up on a white page.
Obrigado
WPBeginner Support
Se você está vendo essa tela branca, talvez queira tentar as recomendações em nosso artigo aqui: https://www.wpbeginner.com/wp-tutorials/how-to-fix-the-wordpress-white-screen-of-death/
JanysF
Alguém sabe por que a opção Pacotes em Duplicator » Pacotes não está aparecendo para mim? Eu só vejo em Duplicator: Ferramentas, Configurações e Ir para o Pro.
WPBeginner Support
Talvez você queira tentar reinstalar o plugin e, se isso não funcionar, você deve entrar em contato com o suporte do plugin e informá-los sobre isso não aparecer corretamente
Admin
ouiouiphoto
Clonagem funciona bem com duplicador, mas ter um site clonado online parece não ser apreciado pelo jetpack
Durante meus testes, o Jetpack entrou em falha no site original, mesmo que o Jetpack não estivesse ativo no site clonado, dizendo-me que o original era uma cópia do clone
Se o Google encontrar seu clone, você também terá alguns problemas possíveis
WPBeginner Support
Embora haja um problema em simplesmente clonar um site sem nenhum conteúdo novo, o objetivo principal normalmente seria usar isso ao transferir seu site de um local para outro e, em seguida, remover o site antigo ou usar o site copiado como modelo e adicionar conteúdo novo ao seu novo site.
Admin
Bidmead
Por alguma razão inexplicável, quando salvo esta página útil no Pocket, o que realmente chega lá é a versão antiga de 11 de maio de 2015, que discute um método completamente diferente baseado em um plugin chamado BackupBuddy, que custa US$ 52 para a versão de 1 site.
—
Chris
WPBeginner Support
Certamente daremos uma olhada se for algo da nossa parte. Você pode querer verificar com o Pocket se há um cache que precisa ser limpo do lado deles também.
Admin
Chris Bidmead
Entrei em contato com o Pocket. Eles sugerem que pode ser um problema com o Parser deles, que verifica o conteúdo e determina a melhor forma de exibi-lo. Eles conseguiram reproduzir o bug e estão investigando.
—
Chris
Gary Andrews
Quero atualizar meu site de produção para o WP 5 e mudar de tema. Pensei que seria uma boa ideia clonar meu site em minha máquina local Windows usando o Desktop Server.
Estou tentando clonar meu site há 2 dias.
Deixe-me apenas adicionar que seu tutorial é perfeitamente direto, desde que as coisas corram bem. Ele não entra em detalhes sobre o que pode não funcionar corretamente.
Primeiramente, a criação do pacote Duplicator expira (apesar de ter filtrado os arquivos grandes). Claro que minha empresa de hospedagem não suporta o Duplicator porque ele tenta mudar o limite de tempo, não posso culpar a empresa de hospedagem.
Também tentei a opção Duparchive, que não expira e gera um arquivo .daf em vez de um .zip.
No lado local do Desktop Server, tentei executar o installer.php pelo meu navegador, mas recebi mensagens dizendo que eu precisava habilitar ziparchive e/ou shell exec. Contatei o suporte do Desktop Server sobre isso e não obtive resposta.
Pensei em tentar extrair os dados do arquivo daf manualmente, mas o software necessário para fazer isso não parece mais estar disponível.
Imagino que a versão Duplicator Pro funcionaria melhor, mas não tenho orçamento (site de associação).
Oh, desgraça a mim, parece que terei que fazer tudo manualmente.
WPBeginner Support
Pelo que parece, infelizmente você pode precisar importar/exportar os dados manualmente, a outra opção seria se você tiver um backup do seu site que possa restaurar para sua instalação local.
Admin
Adam
Artigo incrível!!!
Segui seus passos e funcionou perfeitamente.
Eu cometi um erro, extraí o arquivo zip e fiz o upload dos arquivos via FTP, o que causou erros. É muito mais fácil simplesmente fazer o upload do zip.
Muito obrigado!
WPBeginner Support
You would likely need to extract the zip once it is on your hosting provider but glad you found a solution for your error
Admin
Donna Lutheran
Eu copio sites o tempo todo.
Os plugins parecem mais complicados do que fazer manualmente.
Basta baixar seus arquivos, fazer backup do seu banco de dados, fazer upload via FTP para o novo servidor, restaurar seu banco de dados para o seu novo banco de dados, editar o arquivo wp-config para apontar para o novo banco de dados, editar a URL no seu banco de dados para apontar para a nova URL.
Eu também baixo o velvet blue para corrigir quaisquer problemas de URL.
Tive um site que não passou na nossa verificação de segurança que usava o plugin. Além disso, o backup do banco de dados foi armazenado na raiz do seu site.
James Cook
Eu usei uma maneira muito mais simples. Minha instalação do WP é com a Godaddy… então fiz login no cPanel do site que eu queria clonar… fui para subdomínios e criei o domínio para o site de destino… então fui para aplicações e no topo do cPanel e cliquei na pequena caixa de seleção ao lado do site principal que eu queria clonar… então cliquei no botão clone… e pronto… uma cópia exata do nosso site foi criada em menos de 10 minutos…
Indusekar S K
Existe algum plugin ou outro software que possa clonar um site WordPress para outro WordPress no ar?
Mark C
O preço disso é ridículo. Mesmo a opção mais barata é $80 POR ANO! Que roubo absoluto!
É melhor ir ao Painel de Controle, compactar seus arquivos e baixá-los… depois ir ao PHPMyAdmin e baixar uma cópia do seu banco de dados. Em seguida, faça o upload dos seus arquivos compactados para o novo local… edite o arquivo de configuração e, em seguida, importe o banco de dados.
Se isso for muito difícil para retardados de websites… basta instalar a versão gratuita de “Duplicate” (semelhante ao Backup Buddy… mas GRÁTIS).
Carlos A. B. S.
Você tem razão, cara, não precisa gastar um centavo em uma tarefa tão simples...
Felisha
Algum de vocês tem um guia passo a passo? Estou tentando copiar meu site para um subdomínio para atingir uma cidade diferente do site principal.
A única coisa que entendi até agora é que eu tenho que:
1. criar um subdomínio
2. criar um novo banco de dados
3. copiar a pasta public_html do site principal para a pasta public_html do subdomínio
Depois disso, todos os tutoriais que vi na internet ficam muito confusos
Jerri
Do que você está falando? Duplicator é gratuito. Quero dizer, existe uma versão pro, mas eu uso a versão gratuita o tempo todo para duplicar sites.
A única coisa que essas instruções não adicionaram é que você precisa primeiro criar um novo banco de dados e adicionar um usuário a ele no novo site antes de executar o instalador.
Mas é tudo fácil e grátis.
Lipa
muito obrigado!!! ;]
Mack
Posso copiar a página do site de alguém para o meu site??
Allan Seabrook
Olá,
Eu realmente aprecio todos os posts que você compartilha conosco! Por favor, continue enviando!
Minha pergunta sobre este post é...
Esta técnica usando BackupBuddy funciona perfeitamente.
No entanto, agora tenho um problema:
Quando digito o URL do meu site original (de onde fiz o backup), sou redirecionado para o site que clonei desse backup. É como se meu site original agora tivesse um redirecionamento para o site clonado.
O que diabos eu quebrei?
Qualquer conselho seria muito apreciado!
Obrigado,
Allan
Stephen
Verifique seu registro DNS. Essa seria uma das únicas maneiras de isso acontecer.
Jonathan
Obrigado! Funcionou perfeitamente!
Mamun sarkar
Olá,
Gostaria de saber como clonar qualquer site do WordPress sem ter informações de acesso à hospedagem também. Quero dizer, suponha que um comprador peça seu site tipo wpbeginner. Então, como fazer isso, senhor. Você tem algum tutorial, por favor.
Hanna
não é mais possível usar o backup buddy a menos que você queira pagar. Existe um método diferente?
Nelson
Duplicator é perfeito.
sandeep
quero copiar o tema de um site em execução para outro site...
Moses
Olá Sandeep,
Você obteve uma solução para isso? Eu também quero copiar um tema para outro site (subdomínio).
Chris
Usei outro serviço para clonar sites WordPress e descobri um problema com tabelas residuais, e fiquei curioso se isso também era um problema com o BackupBuddy.
No cenário que encontrei recentemente, criei o Site WP A com o prefixo de tabela wp1_.
Em seguida, tenho que criar um novo ambiente para clonar, então instalo o WordPress no Site WP B com o prefixo de tabela wp2_.
Agora uso minha ferramenta [sem nome] para clonar o site A para o site B, o que parece bom no lado administrativo e público, mas quando olho no banco de dados, tenho ambos os conjuntos de tabelas wp1_ e wp2_, e todos os GUIDs nas tabelas funcionais para o novo site clonado têm o URL do Site WP A, não o do Site WP B, como eu esperaria.
Estes têm que ser limpos manualmente. Então eu me pergunto, o BackupBuddy faz a mesma coisa? Isso é esperado?
WPBeginner Support
A equipe de vendas/suporte do BackupBuddy provavelmente pode responder a isso melhor.
Admin
Andrew Lopez
Eu estaria curioso para saber como realizar essa tarefa manualmente sem um plugin ou se um plugin é recomendado para fazer backup e migrar para um novo site?
Dave Navarro
O BackupBuddy falha em grandes instalações do WordPress. Não consigo fazer backup do nosso site, que entre banco de dados e todos os arquivos tem mais de 400 GB de tamanho.
Tive que baixar manualmente todos os arquivos, depois reenviá-los para o novo site e usar o importbuddy apenas com o banco de dados. Mesmo isso falha se o banco de dados bruto for muito grande (falhou em torno de 200 MB de tamanho).
Nitin
técnica maravilhosa, mas há o uso de outro plugin
Gf
Recentemente migrei um blog pequeno e simples com o all-in-one wordpress migration e funcionou muito bem. Mas quando tentei um site maior no wp4.1, falhou. Acho que gostaria do backup buddy, mas o preço é estonteante. Seria minha maior despesa com o wordpress, quase o dobro da minha hospedagem!
Jean
Adoro usar o BackupBuddy para backups e migrações.
Tudo que você precisa é acesso para instalar o plugin e você está pronto para mover.
Ótimo artigo!
johnraf
Eu costumava ter problemas semelhantes também, mas depois de usar o "long path tool" você pode usá-lo para resolver este problema.
yaser
E se quisermos clonar um site para o qual não temos acesso ao backend? Existe uma maneira fácil?
fletch
Você tem acesso FTP? Você tem acesso ao banco de dados? Você precisaria dessas duas coisas para fazer backup de um site se você não tiver acesso ao wp-admin.