
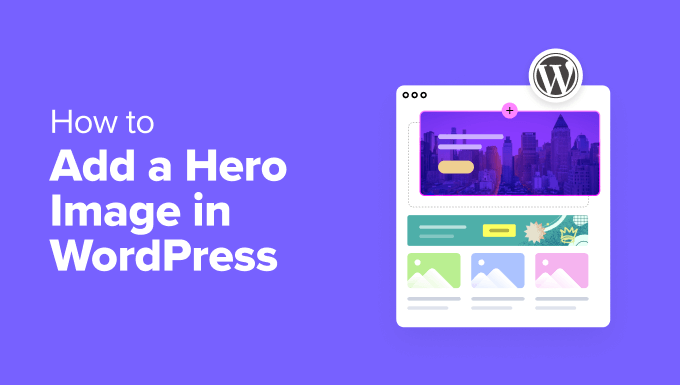
Deseja dar ao seu site WordPress uma aparência mais profissional? Uma imagem de herói é sua melhor aposta. É o que as pessoas veem primeiro quando chegam ao seu site. E, sejamos realistas, você só tem cerca de 3 segundos para chamar a atenção delas. É por isso que uma ótima seção de herói é tão importante.
Estamos criando sites WordPress há mais de uma década e nos lembramos de quando as imagens heroicas se tornaram uma grande novidade.
Naquela época, tínhamos dificuldades como todo mundo. As imagens ficavam estranhas: grandes demais no desktop, esmagadas no celular ou simplesmente quebradas. Mas e agora? Conseguimos fazer isso de forma científica.
Vamos mostrar a você as maneiras mais fáceis de adicionar uma imagem de herói ao seu site WordPress. Quer você goste de usar construtores de páginas ou prefira o editor de blocos, temos tudo o que você precisa.
Primeiros passos: Prepare sua imagem de herói do WordPress
Antes de adicionar uma imagem de herói ao seu site WordPress, você precisa criar uma que chame a atenção dos visitantes. Uma ótima seção de heróis começa com uma imagem impressionante que mostre do que se trata o seu site.
O Canva é uma ferramenta popular para projetar gráficos para sites. É fácil de usar e vem com vários modelos para criar sua imagem principal. Se você não é fã do Canva, temos uma lista de alternativas ao Canva que você pode conferir para encontrar uma que funcione para você.
Ao criar sua imagem de herói, você deve ter em mente alguns aspectos.
Primeiro, pense no tamanho. As imagens de herói normalmente não são muito altas e geralmente cobrem toda a largura de sua página inicial.
Um tamanho comum de imagem de herói do WordPress é de cerca de 1920 pixels de largura por 400-600 pixels de altura (ou às vezes mais). Mas isso pode mudar dependendo do seu tema do WordPress.
Em seguida, pense na mensagem que você deseja enviar. Sua imagem de herói deve mostrar rapidamente do que se trata seu site. Pode ser uma imagem de herói de produto, uma fotografia que represente a sua marca ou até mesmo um impressionante vídeo de fundo em tela cheia.
Por exemplo, decidimos apresentar nosso fundador Syed Balkhi na imagem de herói de nossa página inicial. Isso mostra que há uma pessoa real por trás de nossa marca que se dedica a ajudar os usuários do WordPress a ter sucesso, que é o objetivo da WPBeginner.

Além disso, deixe algum espaço para o texto. Muitas seções de heróis têm um título ou um botão. Certifique-se de que haja espaço para eles e que sejam fáceis de ler.
É uma boa ideia consultar outros sites da sua área para ver exemplos de seções de heróis. Isso pode lhe dar ideias para o seu próprio design. Algumas das entradas em nossos exemplos de sites do WordPress podem servir de grande inspiração.

Feito isso, vamos ver como realmente adicionar a imagem de herói.
Precisa de um site bonito sem todo o trabalho pesado? Nossos especialistas em design do WPBeginner Pro Services podem criar um site comercial de alta conversão, uma loja on-line, um blog e muito mais em quase nenhum momento!
Como adicionar uma imagem de herói do WordPress
Ao pesquisar para este tutorial, percebemos rapidamente que adicionar uma imagem de herói aos temas clássicos do WordPress nem sempre é simples. O processo pode variar muito dependendo do tema, pois alguns têm seções de heróis integradas e outros não.
Veja o tema Sydney, por exemplo. Ele vem com uma seção de herói pronta para uso, o que facilita muito as coisas.

Se estiver tentando adicionar um herói ao seu site existente, mas o tema não tiver um recurso integrado para isso, isso pode ser frustrante.
Para aqueles que estão apenas começando e não se importam em escolher um novo tema, recomendamos mudar para um com uma seção de herói integrada, pois isso pode economizar tempo a longo prazo.
Se estiver procurando recomendações de temas, confira nossas escolhas de especialistas dos melhores e mais populares temas do WordPress no mercado. Melhor ainda, você pode usar um construtor de páginas com um tema que tenha uma seção de herói, que mostraremos como no método 3.
Antes de fazer grandes alterações, sempre sugerimos o uso de um site de preparação para testar completamente os novos temas. Dessa forma, você pode ter certeza de que está fazendo a escolha certa para o seu site.
Se você não tiver certeza de como fazer isso, consulte nosso guia sobre como alterar corretamente um tema do WordPress.
Está satisfeito com seu tema clássico atual? Não tem problema. Passe para o método 4, no qual mostraremos como adicionar uma seção de herói usando um plug-in. Essa abordagem funciona com qualquer tema, de modo que você pode criar uma imagem heroica impressionante sem reformular todo o design do site.
Você pode usar os links rápidos abaixo para pular para o método de sua preferência:
Método 1: Usando o personalizador de temas (somente temas clássicos)
Se estiver usando um tema clássico que tenha uma seção de herói como o Sydney, você poderá personalizar a imagem de herói por meio do Personalizador de tema. Basta acessar Appearance ” Customize (Aparência ” Personalizar ) em seu painel do WordPress para começar.
Observação rápida: se o Theme Customizer não estiver presente em seu painel, provavelmente você está usando um tema de bloco e deve pular para o método 2.

A barra lateral deve ter várias opções para personalizar seu tema clássico.
Em Sydney, a configuração para personalizar a seção de herói é chamada de “Hero Area”, mas esse menu específico varia de acordo com o tema. Vá em frente e clique nele.

O tema Sydney tem 3 menus para criar sua seção de herói: Hero Type (Tipo de herói), Hero Slider (Controle deslizante de herói) e Hero Media (Mídia de herói).
Usaremos apenas os dois primeiros porque são suficientes para adicionar uma seção de herói para o nosso propósito.
Primeiro, selecione “Hero Type” (Tipo de herói).
Em Hero Type (Tipo de herói), você será solicitado a escolher o tipo de mídia que deseja adicionar à seção de herói.
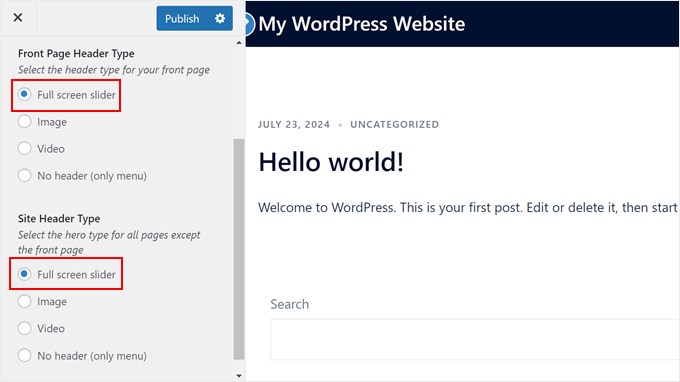
É possível escolher entre um controle deslizante de tela inteira, um vídeo, uma imagem ou nenhum cabeçalho.
Selecionaremos um controle deslizante de tela inteira para a seção de herói na página inicial e em todo o site. O motivo é que ele nos permite criar um controle deslizante com várias imagens para o herói e adicionar texto e um botão sobre as imagens.
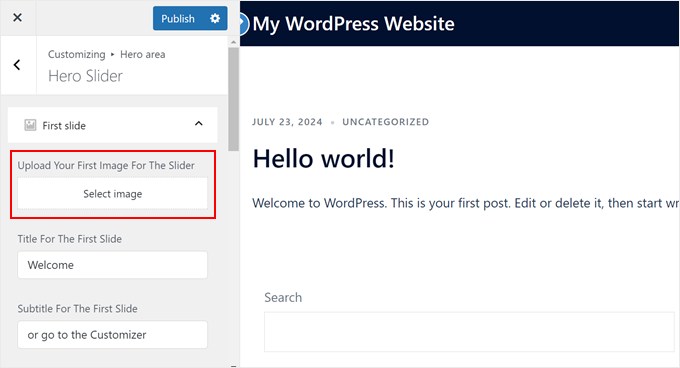
Agora, volte ao menu Hero Area e selecione “Hero Slider”.
Aqui, abra a guia “First Slide” (Primeiro slide) e clique no botão “Select image” (Selecionar imagem).
Isso abrirá a biblioteca de mídia do WordPress, onde é possível carregar uma nova imagem ou selecionar uma já existente para a seção hero.
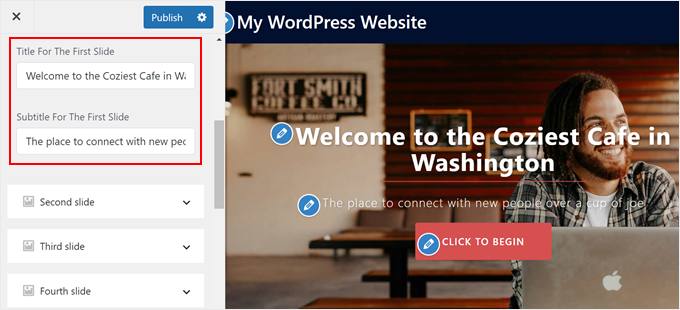
Depois de carregar uma imagem, você pode rolar para baixo e substituir o texto nos campos de título e legenda.
Você deverá ver as alterações feitas refletidas automaticamente na visualização da página.
Se quiser adicionar mais de uma imagem à seção hero, repita as mesmas etapas com o restante dos slides.
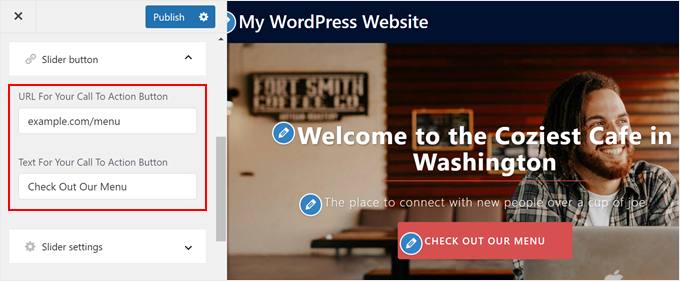
Caso contrário, você pode rolar para baixo até o menu “Slider button” (Botão deslizante).
Aqui, você pode alterar o URL e o texto do botão de call-to-action.
Depois disso, role para baixo novamente até a guia “Slider settings” (Configurações do controle deslizante).
É aqui que você pode ajustar a velocidade do controle deslizante, optar por exibir o mesmo texto em todos os slides e tornar o comportamento do controle deslizante responsivo.

Se você quiser alterar a cor do botão, volte ao menu principal do Theme Customizer.
Em seguida, clique em “General” (Geral).
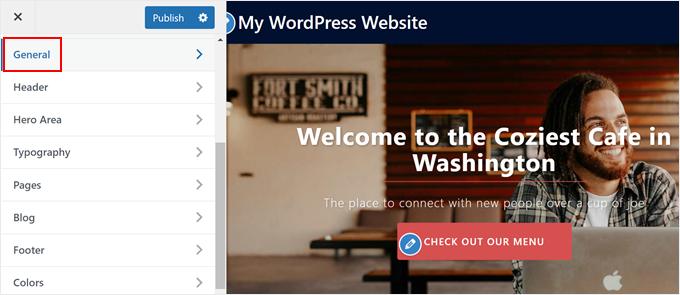
Agora você deve ver vários menus para personalizar as configurações gerais do tema.
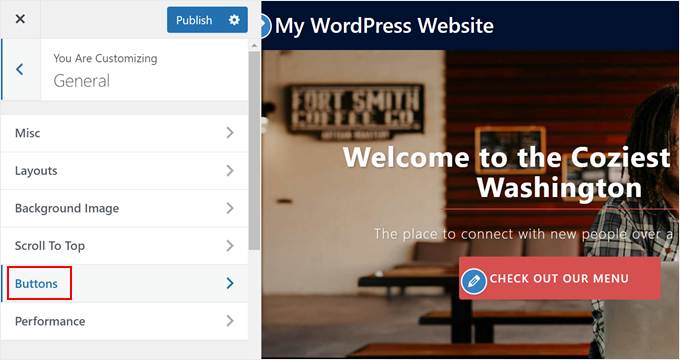
Aqui, basta clicar em “Buttons”.
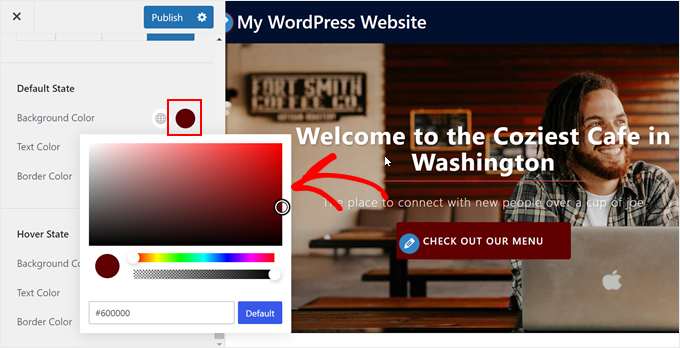
Agora, você pode rolar para baixo até as seções “Default State” (Estado padrão) e “Hover State” (Estado de foco), onde é possível alterar a cor do botão dependendo do estado.
Para modificar a cor, basta clicar na ferramenta de seleção de cores e escolher uma nova cor.
A maioria dos temas do WordPress também permite que você personalize as cores e a tipografia do seu design. No entanto, as alterações feitas geralmente se aplicam a todo o site, não apenas à seção de heróis, portanto, tenha isso em mente.
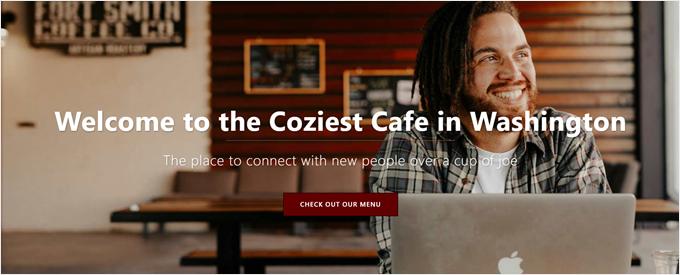
De qualquer forma, esta é a aparência de nossa imagem de herói, criada com o tema Sydney:
Método 2: Usar o Full Site Editor (somente temas de blocos)
Se você usa um tema de bloco, pode usar o bloco Cover do Full Site Editor para criar facilmente uma imagem de herói no WordPress. Não é necessário nenhum plug-in.
Etapa 1: Abra o Editor de site completo
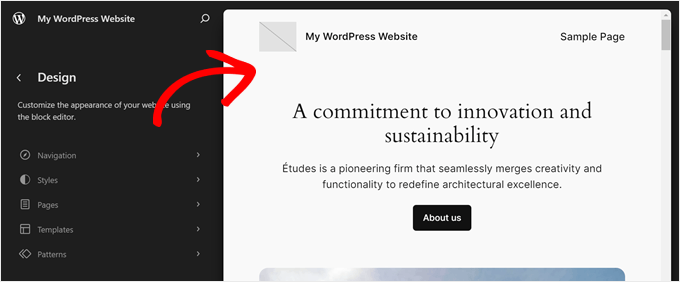
Primeiro, vá para Appearance ” Editor em seu administrador do WordPress.

Agora, você verá os menus principais do editor.
Digamos que você queira adicionar sua imagem de herói somente à sua página inicial.
Nesse caso, basta clicar na visualização do tema no lado direito da página.
Se quiser adicionar a imagem de herói a outra página, a um modelo de página personalizado ou a um padrão de bloco, leia nosso guia sobre Edição completa do site no WordPress para obter mais informações.
Etapa 2: Adicione o Cover Block à sua página/modelo
Como a seção de heróis geralmente é colocada acima da dobra (a parte superior da página que aparece quando os visitantes chegam ao site), você precisa ter certeza de que está no local certo. Normalmente, a seção de heróis fica logo abaixo do cabeçalho.
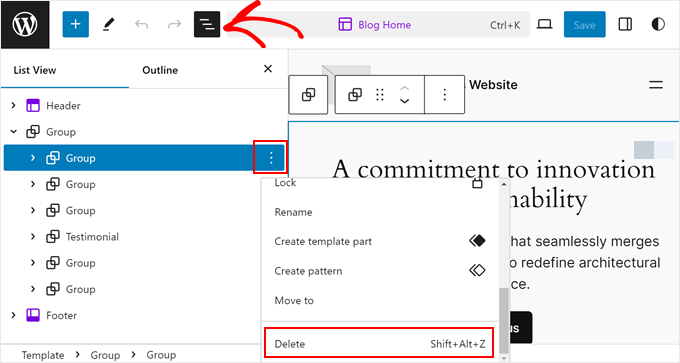
Depois de fazer isso, você precisa excluir os blocos existentes nesse local ou adicionar um novo bloco de grupo logo acima desses blocos existentes.
Em nosso caso, simplesmente removeremos os blocos que já estavam em nossa página inicial. Se quiser fazer o mesmo, você pode clicar no botão “List View” (Exibição de lista) no lado esquerdo da página.
Em seguida, localize o(s) bloco(s) que precisa(m) ser excluído(s) para abrir espaço para a seção do herói. Depois de localizá-lo, basta clicar no botão de três pontos e selecionar “Delete” (Excluir).
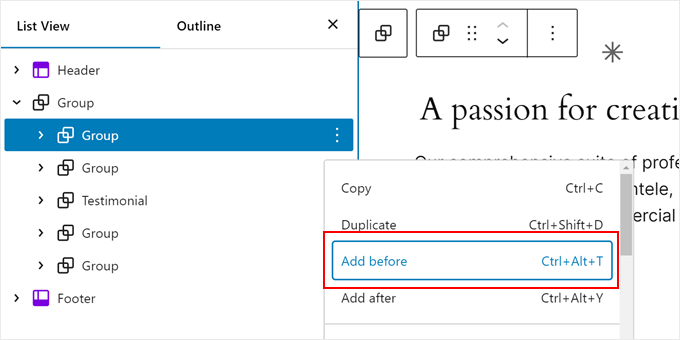
Agora, selecione o bloco que costumava ficar logo abaixo do(s) bloco(s) que você acabou de excluir.
Em seguida, clique no botão de três pontos e escolha “Adicionar antes”. Isso adicionará um bloco logo acima desse bloco e abaixo da seção de cabeçalho.
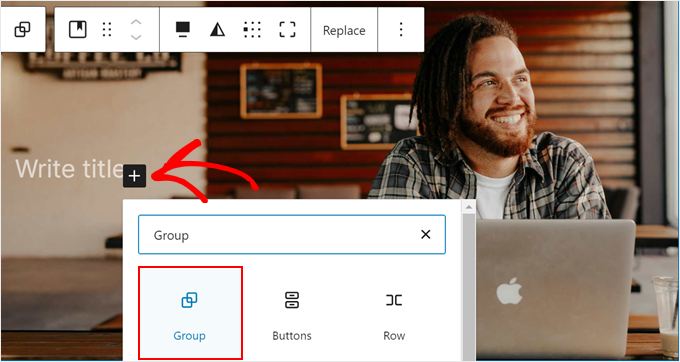
Nessa etapa, você pode clicar no botão “+” que aparece na seção do suposto herói.
Você precisa adicionar um bloco Group aqui, pois isso permitirá que você gerencie a imagem de herói, o texto, o botão e outros elementos como um único bloco, quando necessário.
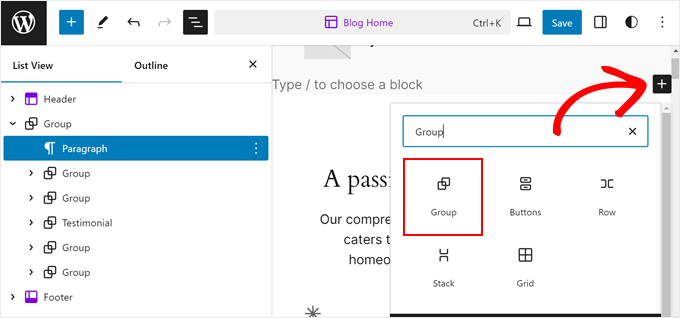
Agora você pode selecionar um contêiner para adicionar seus blocos.
Para demonstração, escolhemos o contêiner básico Group.

Em seguida, basta clicar no botão “+” dentro do bloco Group.
Aqui, vá em frente e selecione o bloco “Cover” (Capa).
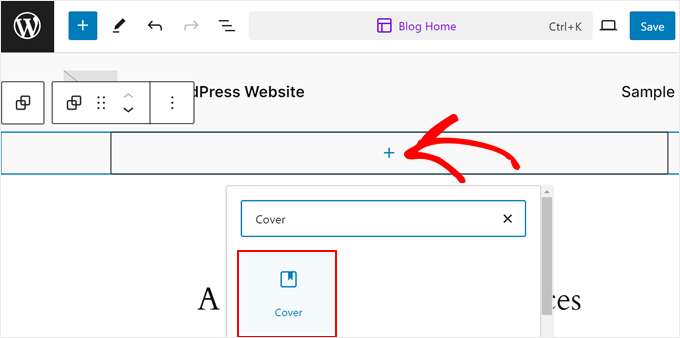
Depois disso, você verá três opções para adicionar a imagem de fundo do herói: carregá-la do seu computador, adicioná-la da biblioteca de mídia ou usar a imagem em destaque.
Em nosso exemplo, clicaremos em “Media Library” e selecionaremos uma imagem existente.
Se o upload da imagem for bem-sucedido, você verá sua imagem de herói imediatamente. No entanto, há alguns ajustes que você precisa fazer.
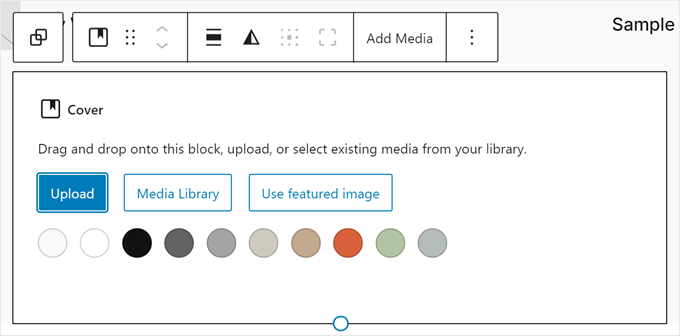
Etapa 3: Configure a imagem em seu Cover Block
Primeiro, selecione o bloco “Cover” para que sua barra de ferramentas apareça na parte superior.
Em seguida, clique no botão “Align” (Alinhar) e escolha “Full Width” (Largura total).
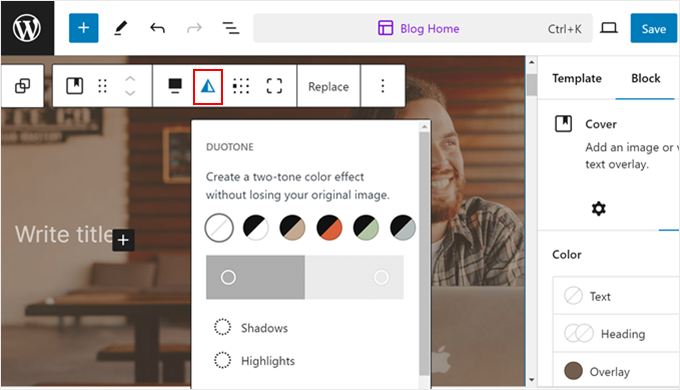
Em seguida, você pode clicar no ícone de duotom para alterar o filtro de duotom aplicado à sua imagem.
Se você não gostar dele, poderá desativá-lo posteriormente, o que mostraremos como fazer.
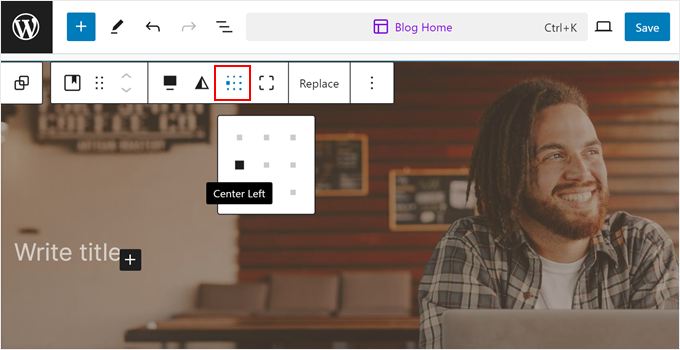
Depois disso, você pode clicar no ícone de posição do conteúdo para alterar onde o texto e o botão aparecerão na imagem.
Decidimos usar o lado centro-esquerdo, pois o ponto focal da imagem está à direita.
Agora, clique no ícone “Settings” (Configurações) e vá para a guia “Block” (Bloqueio).
Aqui, role para baixo até as Configurações. É aqui que você pode, opcionalmente, adicionar um efeito de paralaxe à sua imagem (“Fundo fixo”) ou usar um fundo repetido.

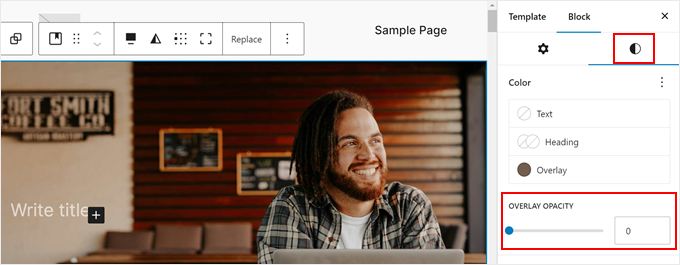
Você também pode rolar novamente para cima e alternar para o ícone de estilos.
É aqui que você pode definir a opacidade da sobreposição como 0 para que sua imagem não use nenhum filtro.
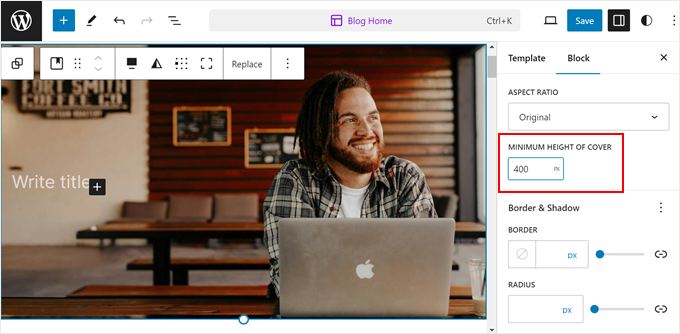
Se quiser alterar a altura da imagem, você pode inserir um número em pixels no campo “Minimum Height of Cover” (Altura mínima da capa).
Decidimos definir nossa imagem para 400 pixels.
Sinta-se à vontade para personalizar outras configurações, como borda e sombra, espaçamento entre blocos, preenchimento e margem, tipografia e assim por diante.
Etapa 4: Adicione blocos ao seu bloco de cobertura
Agora estamos prontos para adicionar mais elementos à sua imagem de herói.
Você já deve estar ciente de que há um texto “Write title” (Escrever título) na parte superior da imagem. Certifique-se de clicar no botão “+” próximo a ele e selecionar “Group” (Grupo).
Você deseja usar esse bloco para agrupar todos os elementos que adicionará posteriormente no bloco Cover. Dessa forma, eles podem ser personalizados como um único bloco quando necessário.
Em seguida, escolha o contêiner desejado, como na etapa anterior.
Depois de fazer isso, você pode clicar no botão “+” novamente para adicionar um bloco de título.
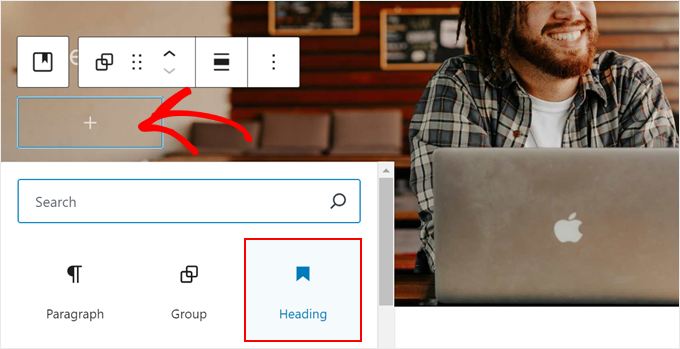
Agora, você pode inserir o título de sua página.
Sinta-se à vontade para alterar a cor, o tamanho e as dimensões do texto na barra lateral de configurações do bloco, se preferir.
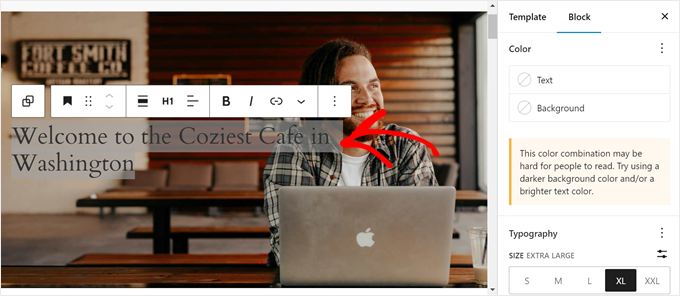
Depois de fazer isso, você pode pressionar a tecla “Enter”.
Nesse estágio, sinta-se à vontade para adicionar um subtítulo logo abaixo do título.
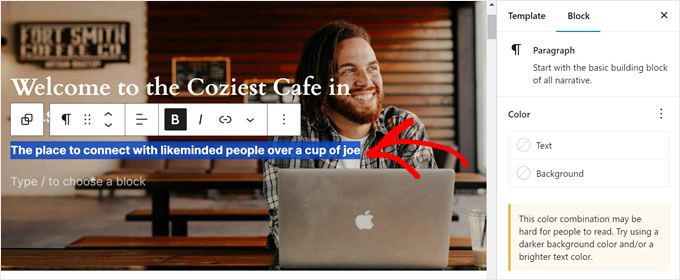
Por fim, você pode adicionar um botão de chamada para ação à sua imagem de herói.
Para fazer isso, basta pressionar a tecla “Enter” novamente, clicar no botão “+” e selecionar o bloco “Buttons”.
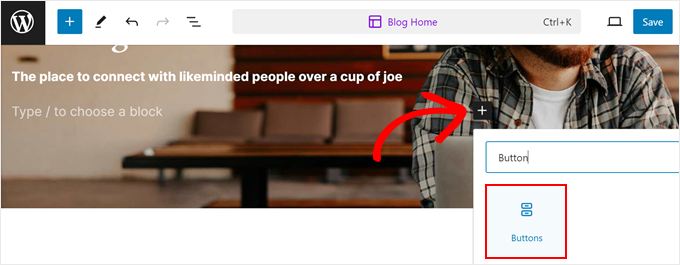
Em seguida, basta inserir a cópia do botão.
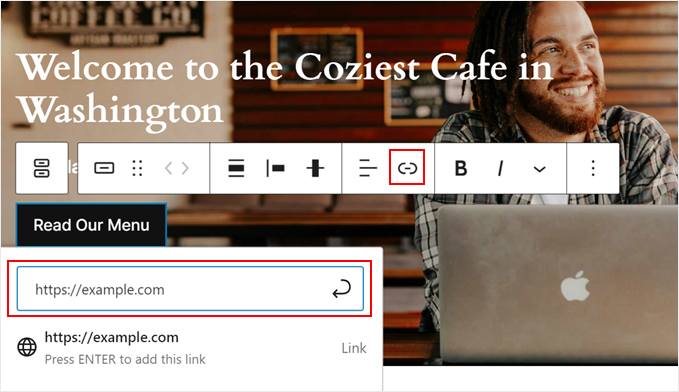
E para adicionar um link ao botão, basta clicar no ícone de link na barra de ferramentas e inserir seu URL no campo apropriado.
Em seguida, clique no botão de seta.
Se você precisar de dicas e truques para criar botões de alta conversão, consulte nosso guia sobre as práticas recomendadas de call-to-action.
E é basicamente isso. Você pode adicionar mais elementos à sua imagem de herói ou personalizá-la de acordo com suas preferências.
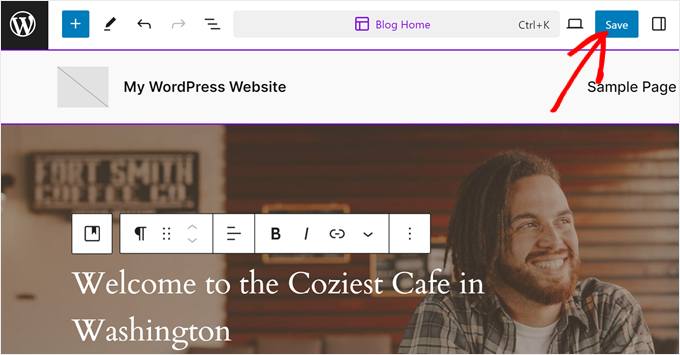
Quando estiver satisfeito com a aparência da seção de herói, clique em “Save” (Salvar).
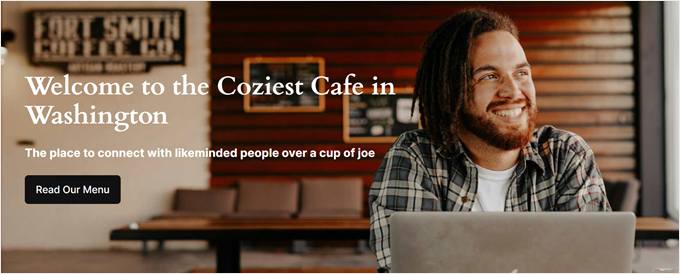
Esta é a aparência do nosso bloco Cover:
Método 3: usar um construtor de páginas (páginas de destino/temas personalizados)
Digamos que você esteja apenas nos estágios iniciais da configuração do seu site. Ou então, está querendo criar uma página de destino personalizada sem ficar confinado às limitações do seu tema. Nesse caso, recomendamos o uso de um construtor de páginas que venha com modelos com seções de heróis, como o SeedProd.
O SeedProd é um construtor de páginas do tipo arrastar e soltar que usamos com frequência para criar páginas personalizadas para o WPBeginner e nossos outros sites de marca, incluindo o Duplicator e o OptinMonster.
Embora seja fácil de usar, ele também oferece muitos recursos integrados de edição do WordPress que o Theme Customizer, o Full Site Editor e o Gutenberg não têm por padrão.
Por isso, conseguimos economizar tempo e dinheiro na instalação de plug-ins de terceiros apenas para adicionar recursos especiais aos nossos temas ou landing pages.
O SeedProd vem em uma versão gratuita e paga. Definitivamente, você pode usar a versão gratuita para criar uma página de destino personalizada, mas as opções de modelo e bloco são bastante limitadas. Por esse motivo, recomendamos fazer upgrade para um plano pago para obter mais recursos, inclusive o gerador de conteúdo de IA.
Para obter mais informações, confira nossa análise do SeedProd e nossa comparação entre Elementor vs. Divi vs. SeedProd, que são todos construtores de páginas populares.
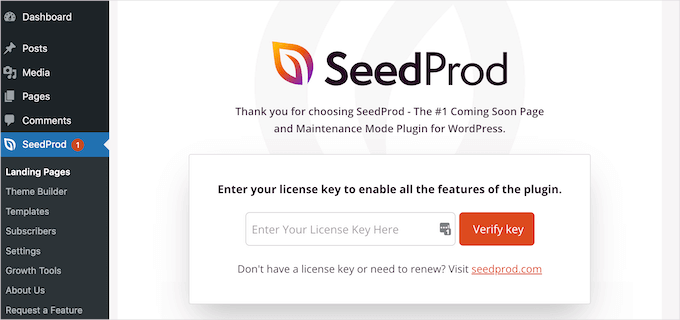
Etapa 1: Configurar o SeedProd
Para usar o SeedProd, você precisa instalar o plug-in do WordPress fornecido em sua conta do SeedProd na área de administração. Quando o plug-in estiver ativo, você será solicitado a inserir sua chave de licença, que pode ser obtida na página da sua conta do SeedProd.
Depois de inseri-la, basta clicar no botão “Verify key” (Verificar chave).
Com o SeedProd, você tem duas opções: pode adicionar uma seção de herói a uma página de destino ou a determinadas páginas dentro de um tema personalizado.
Para configurar sua página de destino ou tema, você pode ler estes guias:
- Como criar um tema WordPress personalizado sem código
- Como criar uma página de destino no WordPress
- Como criar uma Squeeze Page no WordPress que converte
- Como criar lindas páginas em breve no WordPress
No restante do tutorial, usaremos o modelo Menu Sales.

Etapa 2: Personalize sua seção de herói
Depois de escolher um modelo para seu tema ou página de destino, você chegará ao editor do SeedProd.
A interface de edição do SeedProd consiste em uma visualização da página no lado direito e uma barra lateral esquerda, onde é possível adicionar mais blocos, personalizar um bloco/seção, desfazer/refazer alterações, visualizar as camadas da página e visualizar o site em dispositivos móveis ou tablets.
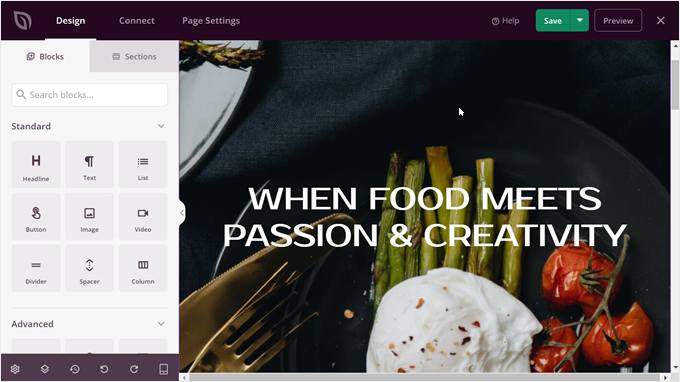
Como o tema SeedProd já inclui uma seção de herói, nosso trabalho já está na metade. O que precisamos fazer é apenas substituir a imagem, personalizá-la e adicionar mais blocos à seção de heróis, se necessário.
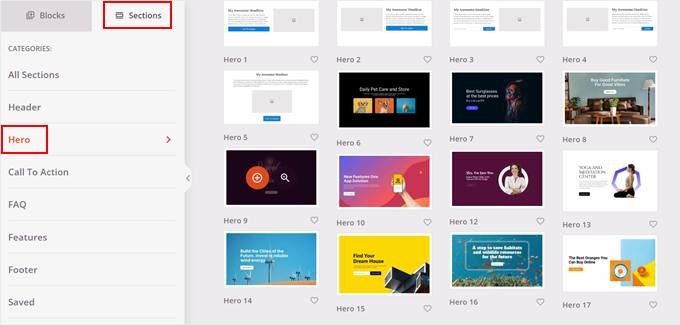
Como alternativa, você pode encontrar mais designs de seção de heróis alternando da barra lateral Blocks (Blocos) para a barra lateral Sections (Seções) no lado esquerdo. Em seguida, navegue até “Hero” e clique no botão “+” no modelo de seção de herói que deseja adicionar à sua página.
O SeedProd o inserirá em sua página.
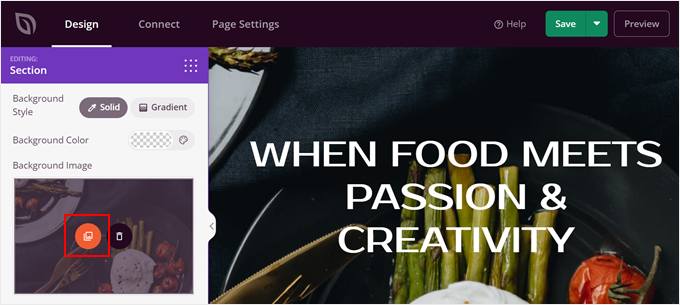
Primeiro, vamos alterar a imagem do herói.
Para fazer isso, clique na seção superior que inclui a imagem do herói. Você saberá que selecionou a coisa certa quando a caixa roxa “Editing: Seção” aparecer na barra lateral esquerda.
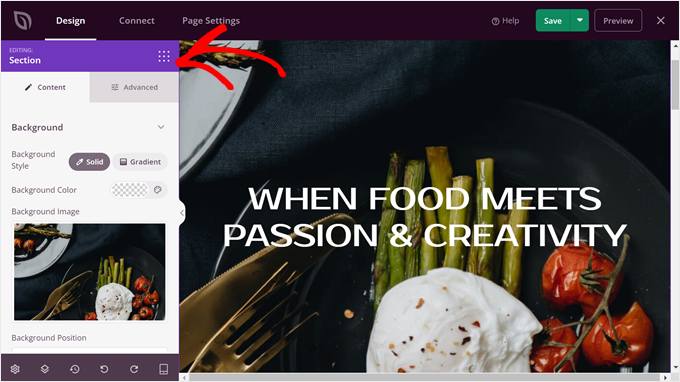
Agora, passe o mouse sobre a imagem de fundo na barra lateral.
Em seguida, clique no “Ícone de mídia”. Depois disso, você pode carregar sua imagem de herói do seu computador ou da biblioteca de mídia.
Em seguida, você precisa escolher a posição do plano de fundo que melhor se adapta à sua imagem.
Descobrimos que a opção “Custom Position” (Posição personalizada) nos dá o melhor controle sobre o posicionamento dos pontos focais, portanto, escolheremos essa opção.
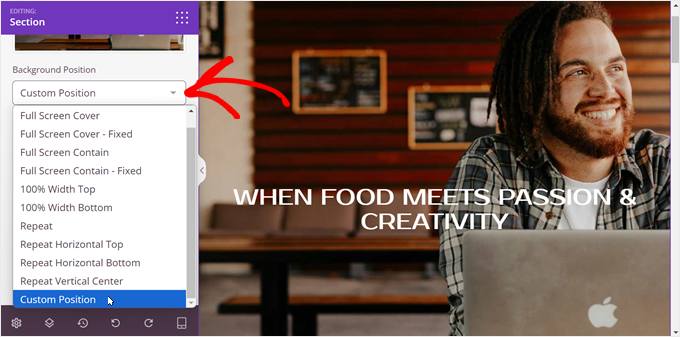
A opção Posição personalizada oferece várias maneiras de configurar o plano de fundo.
Para as posições X e Y, você pode alterar a forma como a imagem é posicionada vertical e horizontalmente.
A configuração Attachment tem duas opções: Scroll (sem paralaxe) e Fixed (paralaxe).
Se a sua imagem for menor do que a seção de herói, mas você quiser que toda a seção seja preenchida com a imagem, poderá repetir a imagem em toda a seção. Caso contrário, basta escolher “No-repeat” (Sem repetição).
Quanto ao tamanho da imagem de herói do WordPress, você pode escolher a opção “Auto” se quiser que a imagem se ajuste automaticamente à seção de herói.
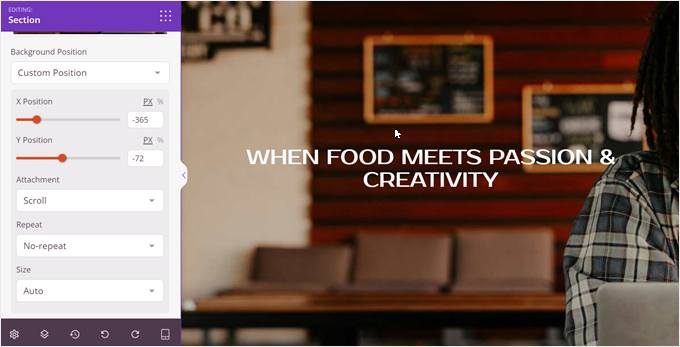
Sinta-se à vontade para experimentar essas configurações para ver o que funciona melhor para sua imagem.
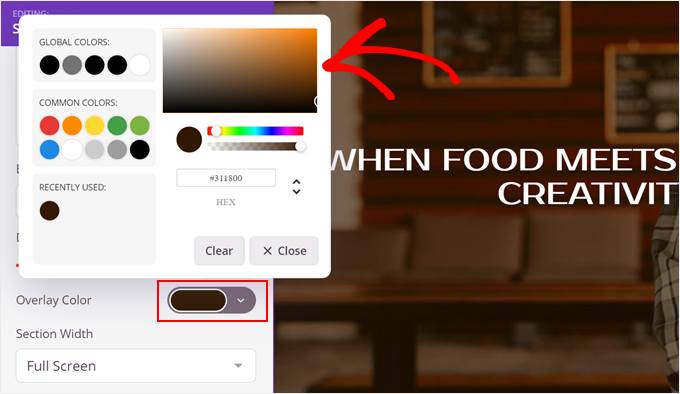
Outra coisa que você pode fazer é escurecer a imagem de fundo para que seu texto se destaque melhor.
Para isso, arraste o controle deslizante “Dim Background” até o nível de opacidade desejado.
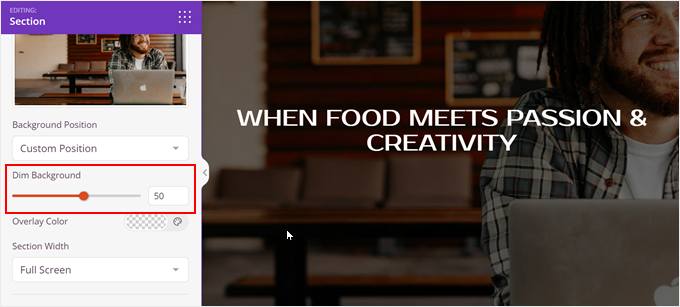
Se você quiser alterar a cor de fundo da sobreposição, basta clicar no botão do seletor de cores ‘Overlay Color’.
Em seguida, basta selecionar a cor de sua preferência.
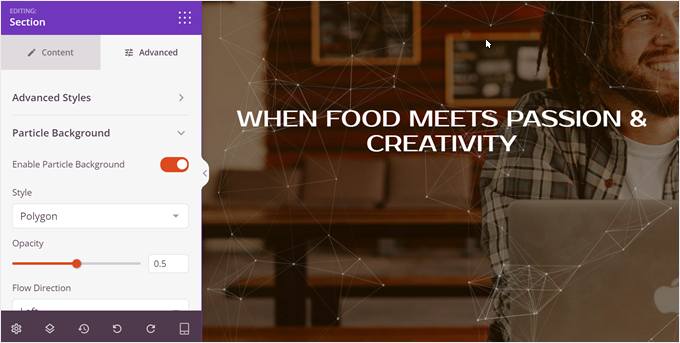
Agora, vamos rolar novamente para cima e mudar para as configurações “Avançadas”. É aqui que você pode adicionar todos os tipos de efeitos interessantes à sua seção de heróis.
Por exemplo, você pode abrir a guia “Particle Background” (Fundo de partículas) e adicionar um fundo de partículas animado à sua imagem. Isso pode tornar sua seção de heróis muito mais impressionante e exclusiva.
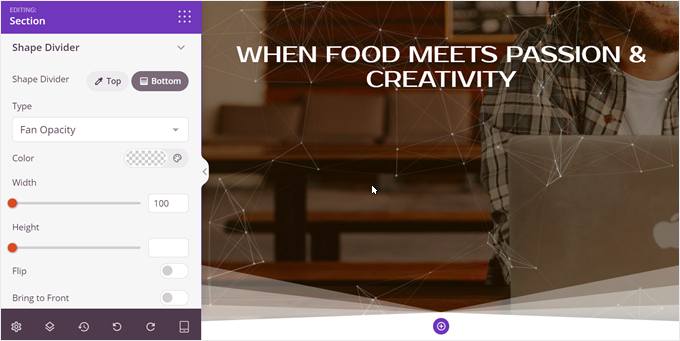
Em seguida, você pode adicionar um divisor de forma personalizado na parte superior e/ou inferior da seção de heróis, acessando o menu “Shape Divider” (Divisor de forma).
Isso pode adicionar mais interesse visual à sua seção de heróis. Além disso, se você adicionar um divisor de forma divertida na parte inferior, poderá incentivar os usuários a rolar a página de destino para baixo e saber mais sobre a sua oferta.
Etapa 3: Adicione e personalize mais blocos à sua seção Hero
Com a imagem de herói pronta, vamos adicionar mais blocos à seção de herói.
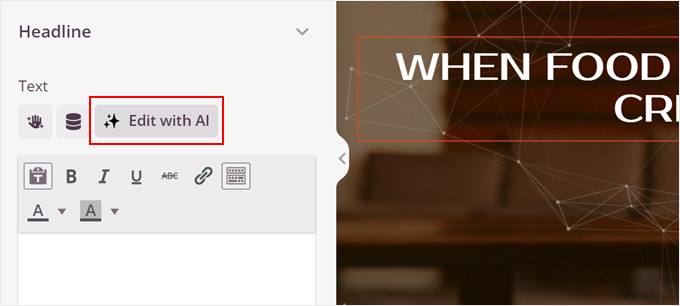
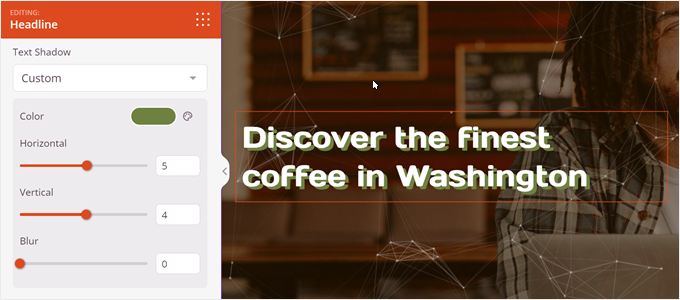
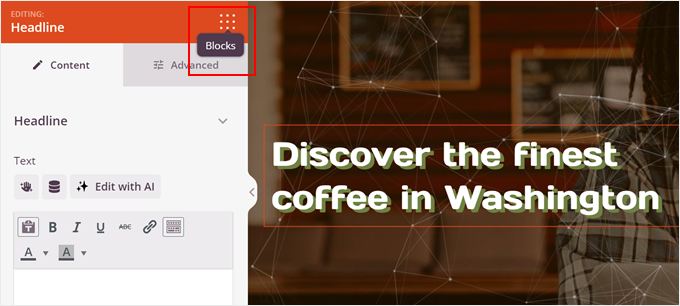
Como o nosso já tem um bloco de título, vamos clicar nele e personalizá-lo. Quando selecionado, você verá que a barra lateral esquerda agora tem um banner laranja que diz “Editing: Headline”.
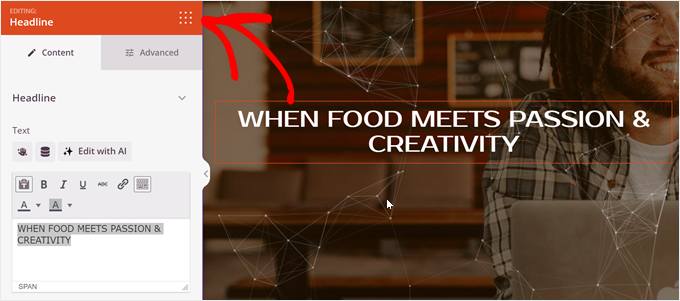
O interessante do SeedProd é que ele tem um gerador de conteúdo de IA integrado.
Portanto, se você não tiver certeza de qual título usar, poderá clicar no botão “Edit with AI” (Editar com IA) para ter algumas ideias.
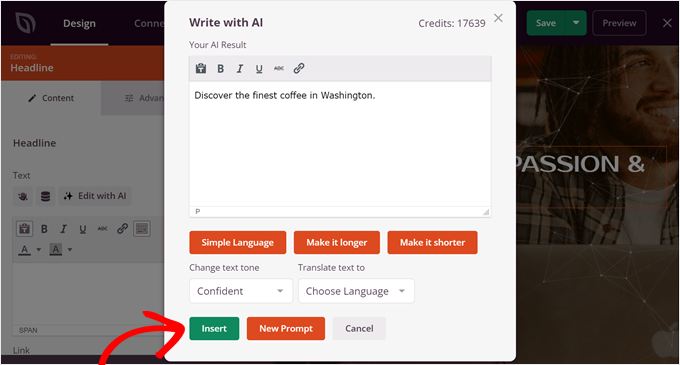
Agora você verá uma janela pop-up na qual poderá escrever seu conteúdo com IA.
Queremos gerar um título completamente novo, portanto, clicaremos no botão “New Prompt” para fazer isso.
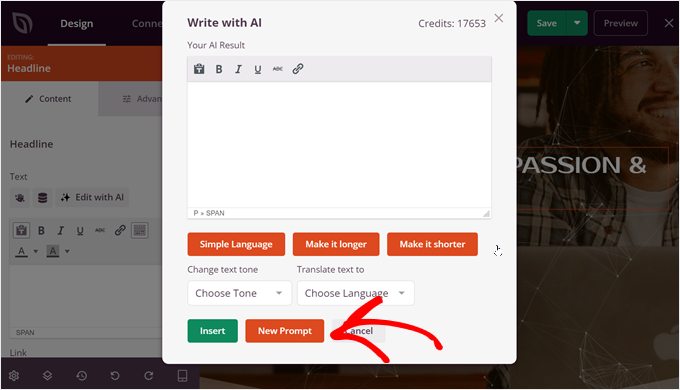
Em seguida, basta informar à IA que tipo de conteúdo ela deseja criar.
Em seguida, clique no botão “Generate Text” (Gerar texto).

A IA gerará o conteúdo para você.
Mas você ainda pode alterá-lo mudando o tom, simplificando o idioma, tornando o texto mais longo ou mais curto e até mesmo traduzindo-o para mais de 50 idiomas.
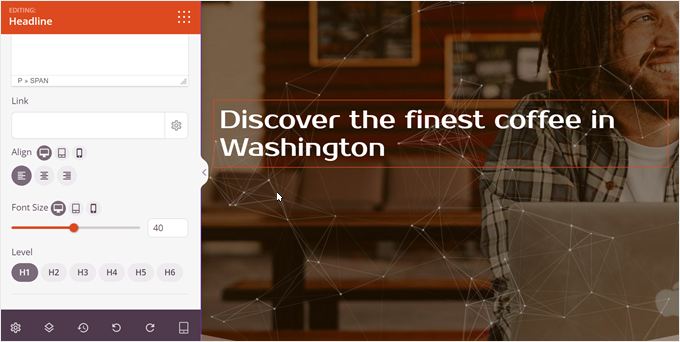
Quando estiver satisfeito com a aparência do título, basta clicar em “Insert” (Inserir).
Agora, você pode rolar a barra lateral esquerda para baixo.
É aqui que você pode alterar o alinhamento do texto, o tamanho da fonte e a tag de título para atender às suas preferências.
Se quiser que o texto se destaque ainda mais, você pode rolar novamente para cima e mudar para a guia “Advanced” (Avançado).
No menu Styles (Estilos), clique em “Edit” (Editar) nas configurações de Typography (Tipografia). Aqui, você pode alterar a família da fonte, a altura da linha, o espaçamento entre letras e as letras maiúsculas e minúsculas do texto.

Você também pode ir um pouco mais abaixo e adicionar uma sombra de texto ao título.
Aqui, decidimos criar uma sombra de cor personalizada para fazer com que o texto se destaque ainda mais.
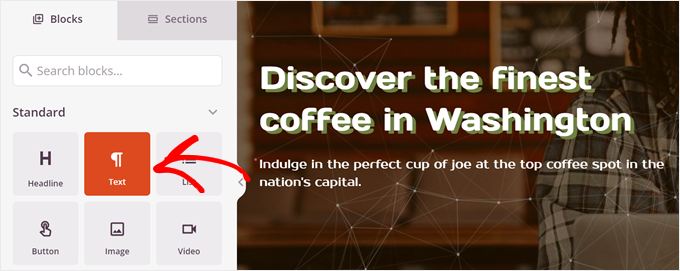
Para adicionar um subtítulo abaixo do título, basta clicar no botão “Blocos” na barra lateral esquerda.
Isso o levará à biblioteca de blocos.
Agora, basta arrastar e soltar o bloco “Text” logo abaixo do título.
As configurações do bloco Text são muito semelhantes às do bloco Headine, portanto, você pode repetir as mesmas etapas anteriores para criar o subtítulo.
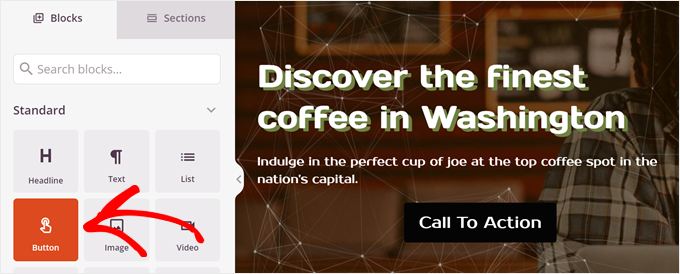
Para adicionar um botão de call-to-action, você precisa arrastar e soltar o bloco “Button” na página.
Geralmente é colocado logo abaixo do subtítulo.
Feito isso, vá em frente e insira a cópia do botão no campo apropriado.
Você também pode adicionar um subtexto logo abaixo da cópia do botão principal para obter mais contexto.
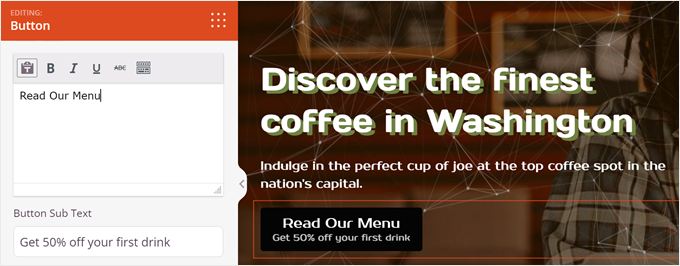
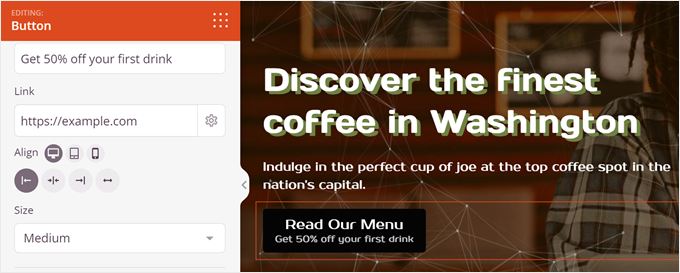
Em seguida, role a tela para baixo e adicione um link ao seu botão.
Sinta-se à vontade para alterar também o alinhamento e o tamanho do botão.
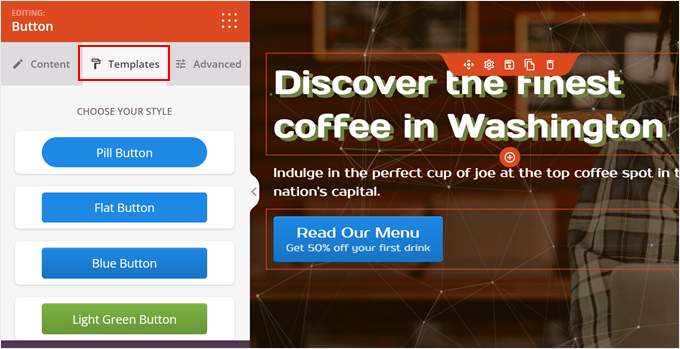
Agora, volte para a barra lateral e vá para a guia “Templates”.
É aqui que você pode alterar o estilo do botão para que ele combine melhor com o design do WordPress.
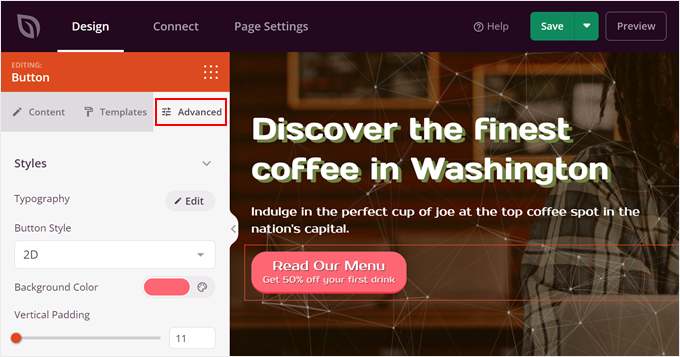
Se você não gostar dos designs de modelo padrão, mude para a guia “Advanced” (Avançado).
Aqui, você pode alterar a tipografia, o estilo, a cor, o preenchimento, o efeito de sombra e assim por diante do botão.
Sinta-se à vontade para continuar personalizando seu modelo até que ele fique bom.
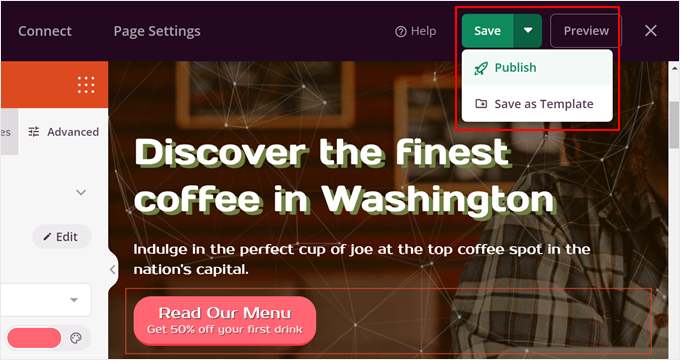
Quando estiver satisfeito, basta clicar no botão “Save” (Salvar) na parte superior e selecionar “Publish” (Publicar) para tornar a página ativa.
E isso é tudo para adicionar uma imagem de herói com um construtor de páginas.
Esta é a aparência da seção hero em nosso site de demonstração:

Método 4: Usando o plug-in Hero Banner + Shortcode (todos os temas)
Esse método final funciona tecnicamente com todos os temas, mas recomendamos mais para as pessoas que usam um tema clássico sem uma seção de herói integrada.
Para seguir esse método, você precisará instalar o plug-in Hero Banner Ultimate. Para obter instruções passo a passo, consulte nosso guia sobre como instalar um plug-in do WordPress para iniciantes.
Etapa 1: Configurar o plug-in Hero Banner
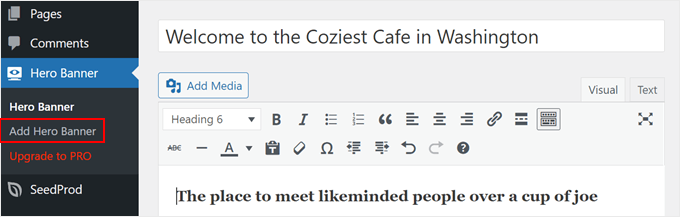
Quando o plug-in estiver ativo, vá para Hero Banner ” Add Hero Banner.
Depois disso, dê um título ao seu banner de herói. Ele funcionará como seu título.
Depois disso, insira algum texto no editor visual clássico que funcionará como seu subtítulo. Sinta-se à vontade para alterar a formatação e a cor aqui.
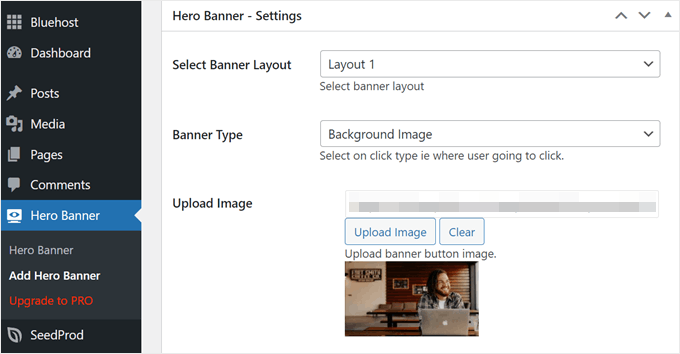
Agora, role para baixo até a seção “Hero Banner – Settings”.
Aqui, você pode escolher um layout de banner. Infelizmente, não é possível visualizar o layout em tempo real, mas você sempre pode alterá-lo posteriormente. Escolheremos o Layout 1 para nosso tutorial.
Quanto ao tipo de banner, você pode selecionar “Background Image” (Imagem de fundo) para uma imagem de herói, mas também pode escolher “Background Video” (Vídeo de fundo) se tiver um vídeo de largura total para usar como herói.
Em seguida, não se esqueça de clicar em “Upload Image” para adicionar sua imagem do computador ou da biblioteca de mídia.
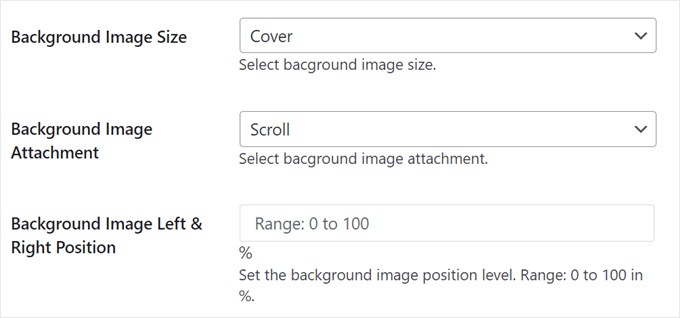
Nesse estágio, você pode definir o tamanho da imagem de fundo como “Cover” para que a imagem seja de largura total.
Você também deverá escolher “Scroll” para o anexo da imagem de fundo para desativar qualquer efeito de paralaxe.
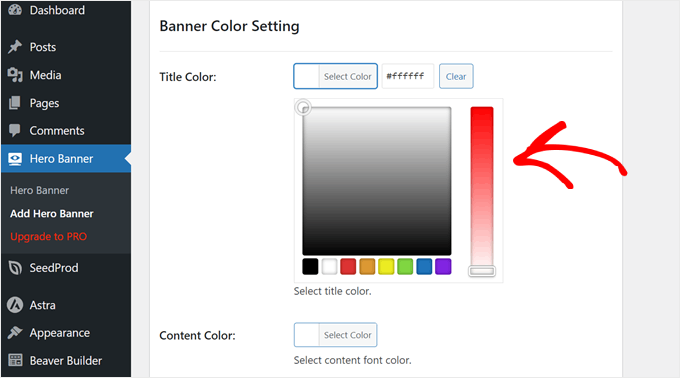
Desça até chegar à Banner Color Setting.
É aqui que você pode alterar a cor do título (Title Color) e do subtítulo (Content Color). Basta clicar na ferramenta de seleção de cores para fazer isso.
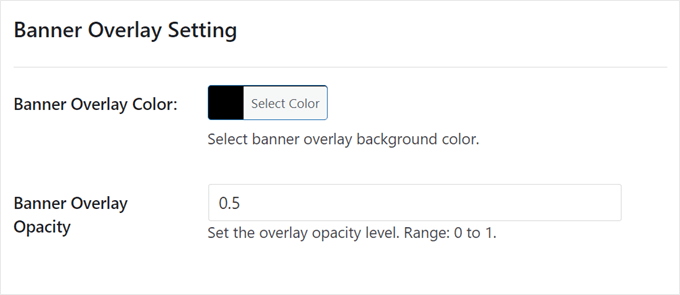
Além disso, talvez você queira adicionar uma cor de sobreposição sobre a imagem, o que pode ser útil para ajustar a legibilidade do texto em relação à imagem.
Decidimos usar a cor preta, com uma opacidade de 0,5.
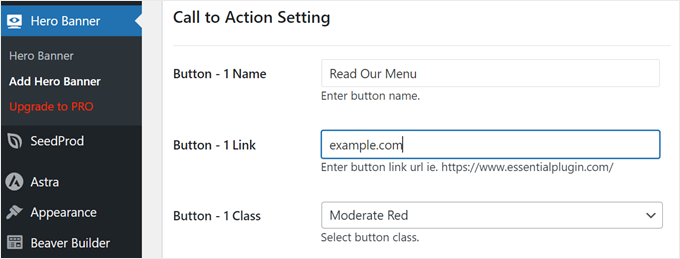
Vamos definir as configurações de call-to-action.
Aqui, você pode inserir a cópia e o link do seu botão. Você também pode alterar a cor em “Button – 1 Class”.
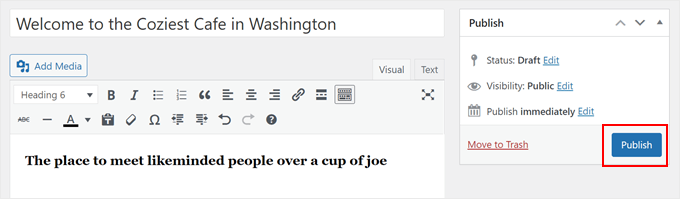
Tudo o que você precisa fazer a seguir é rolar novamente para cima.
Depois disso, clique em “Publicar”.
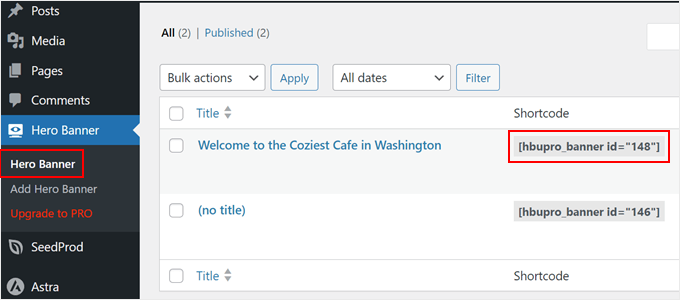
Vamos agora para Hero Banner ” Hero Banner. Agora você deve ver que sua imagem de herói foi criada e o plug-in gerou um shortcode para você exibi-la.
Anote esse shortcode, pois precisaremos dele mais tarde.
Etapa 2: Localize o seletor CSS da seção de cabeçalho do seu tema
Para exibir a imagem de herói, precisamos conhecer o seletor CSS correto para a seção de cabeçalho. Isso permitirá que você adicione a imagem logo abaixo do cabeçalho.
Para fazer isso, acesse seu site no front end. Em seguida, clique com o botão direito do mouse na seção do cabeçalho e selecione “Inspecionar”.
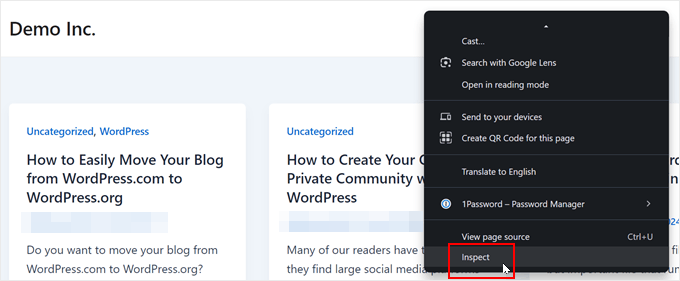
No lado direito, você precisa encontrar o seletor CSS que a seção de cabeçalho está usando. Passe o cursor sobre todos esses trechos de código até ver que a seção de cabeçalho está destacada no front-end.
Veja um exemplo:
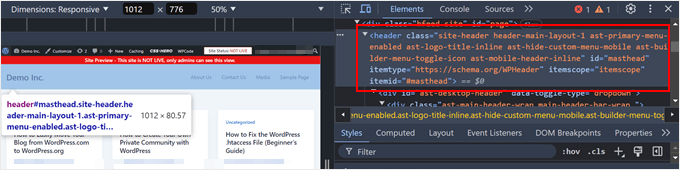
Se toda a seção do cabeçalho for destacada quando você passar o mouse sobre o código, você está no caminho certo.
Agora, clique com o botão direito do mouse nesse trecho de código e selecione Copiar ” Copiar seletor.
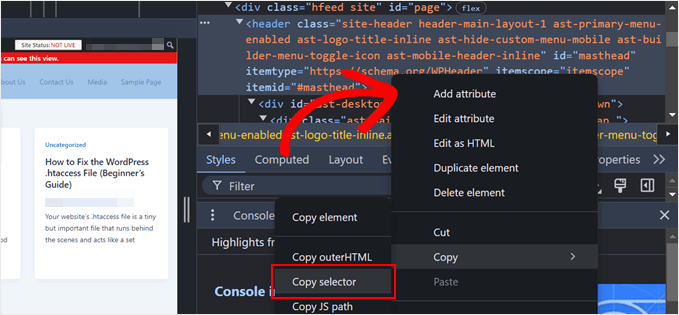
Depois de fazer isso, você pode colar o seletor em algum lugar seguro, como um editor de texto, ou simplesmente manter essa guia aberta.
Etapa 3: Adicione seu código curto ao WPCode
A próxima etapa é instalar o WPCode, que é um plug-in de snippet de código.
Tecnicamente, não é necessário usar um plug-in para inserir trechos de código personalizados nos arquivos do tema. Mas queríamos fazer isso para manter as coisas seguras, pois colar código em um arquivo de tema pode apresentar alguns erros inesperados.
Descobrimos que o WPCode é muito útil para gerenciar trechos de código personalizados sem danificar seu site.
Observação: há também uma versão gratuita do WPCode que pode ser usada para começar, mas você precisará do plug-in WPCode premium para inserir trechos de código após os elementos HTML neste tutorial.
Primeiro, instale o plug-in do WordPress em sua área de administração. Quando o plug-in estiver ativo, navegue até Code Snippets ” + Add Snippet, selecione ‘Add Your Custom Code (New Snippet)’ e clique no botão ‘+ Add Custom Snippet’.

Agora, vamos dar um nome ao seu novo snippet de código. Pode ser algo simples, como “Hero Banner Shortcode”.
Depois disso, altere o tipo de código para “PHP Snippet”.
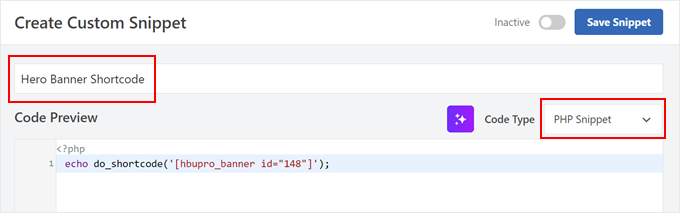
Na caixa Code Preview (Visualização de código), cole o seguinte trecho:
1 | echo do_shortcode('[hbupro_banner id="XXX"]'); // Replace with your own shortcode |
Certifique-se de alterar o [hbupro_banner id="XXX"] com seu próprio shortcode de Hero Banner que você viu anteriormente.
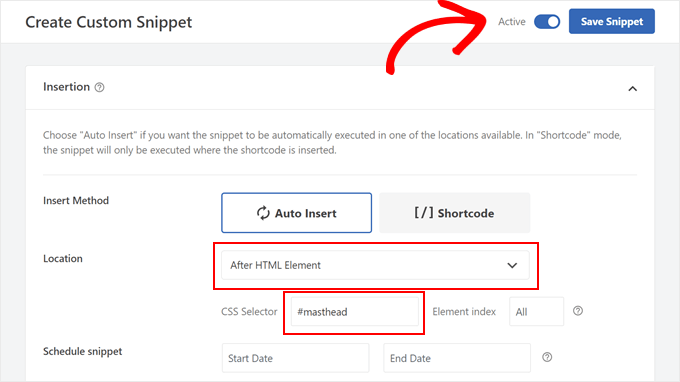
Em seguida, role para baixo até a seção “Inserção”.
Aqui, o método de inserção deve ser “Auto Insert” e o local deve ser “After HTML Element”.
Em seguida, cole o seletor que você copiou anteriormente no campo “CSS Selector”. No nosso caso, foi #masthead, mas isso varia de acordo com o tema.
Feito isso, você pode alternar o botão “Inactive” para que ele se torne “Active” e clicar no botão “Save Snippet”.
E é isso!
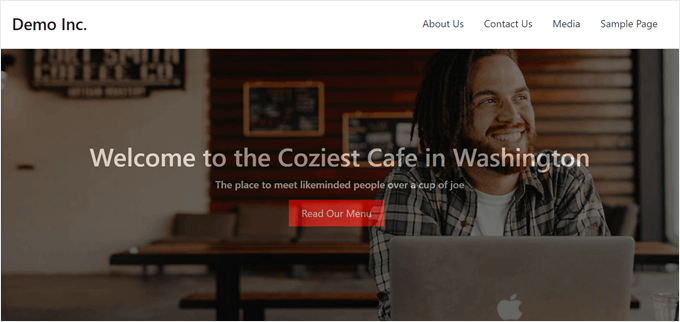
Se você visualizar seu site, deverá ver a imagem do Hero Banner logo abaixo do cabeçalho:
Esperamos que este artigo tenha ajudado você a aprender como adicionar uma imagem de herói no WordPress. Talvez você também queira dar uma olhada em nosso guia sobre como adicionar uma animação de pré-carregador ao WordPress e em nossas escolhas de especialistas das melhores ferramentas para criar e vender produtos digitais.
Se você gostou deste artigo, inscreva-se em nosso canal do YouTube para receber tutoriais em vídeo sobre o WordPress. Você também pode nos encontrar no Twitter e no Facebook.
")

 in 2024")

Have a question or suggestion? Please leave a comment to start the discussion.