Está se perguntando por que seus e-mails do WordPress não estão chegando às caixas de entrada? Você não está sozinho!
Muitos proprietários de sites enfrentam esse problema porque a maioria dos hosts da Web restringe a função de e-mail padrão do PHP, fazendo com que os e-mails se percam ou acabem em spam.
Você pode corrigir isso facilmente usando o servidor SMTP do Gmail, uma solução confiável e gratuita que garante que seus e-mails sejam entregues corretamente. Nós mesmos o usamos e descobrimos que é uma ótima opção para blogueiros, pequenas empresas e qualquer pessoa que queira enviar e-mails sem complicações.
Neste guia, mostraremos exatamente como configurar o SMTP do Gmail no WordPress para que seus e-mails cheguem sempre às caixas de entrada . ✅

Por que e quando você precisa do servidor SMTP do Gmail para e-mails do WordPress
Seu site WordPress envia e-mails para notificá-lo sobre o registro de novos usuários, redefinição de senha perdida, atualizações automáticas e notificações de seus formulários de contato.
Por padrão, o WordPress usa a função de correio do PHP para enviar notificações por e-mail. No entanto, essa função não funciona como esperado por vários motivos.
A maioria das empresas de hospedagem WordPress restringe o uso dessa função para evitar abusos e spam.
Os filtros de spam em provedores de serviços de e-mail populares verificam os e-mails recebidos para monitorar se eles são enviados de servidores de e-mail autênticos. Às vezes, os e-mails padrão do WordPress podem falhar nessa verificação e nem mesmo chegar à pasta de spam.
O SMTP (Simple Mail Transfer Protocol) é o padrão do setor para o envio de e-mails. Ao contrário da função de correio eletrônico do PHP, o SMTP usa autenticação adequada, o que aumenta a capacidade de entrega de e-mails.
O Gmail fornece um serviço SMTP que você pode usar para enviar e-mails do seu site WordPress. Seus servidores são a melhor opção se você quiser apenas enviar e-mails de notificação do WordPress para si mesmo e para alguns usuários do seu site.
No entanto, caso você queira enviar boletins informativos por e-mail ou ter uma loja on-line.
Então, você deve usar um provedor de serviços de e-mail em massa, como Constant Contact, Brevo (anteriormente Sendinblue) ou Mailgun.
Serviço SMTP do Gmail gratuito vs. pago para WordPress
Você pode usar sua conta gratuita do Gmail para enviar e-mails do WordPress. No entanto, para melhorar a capacidade de entrega, recomendamos usar o Google Workspace pago.
Com o Google Workspace, você obtém seu próprio endereço de e-mail com marca profissional, como name@yoursite.com.
O Google Workspace exige que você adicione registros MX ao seu nome de domínio. Isso significa que seus e-mails parecerão vir do seu nome de domínio, o que ajuda a aumentar a autenticidade e a garantir uma melhor capacidade de entrega.
Se você preferir instruções por escrito, continue lendo. Aqui está uma rápida visão geral de todos os métodos que abordaremos neste guia:
Pronto? Vamos começar.
Como enviar e-mails do WordPress usando o servidor SMTP do Gmail
Se você decidir usar o Google Workspace, primeiro precisará configurar seu domínio para trabalhar com o Google Apps. Temos um tutorial passo a passo sobre como configurar um endereço de e-mail profissional com o Google Workspace.
O restante das instruções é o mesmo, independentemente de você estar usando uma conta paga ou gratuita do Gmail.
Agora, o WP Mail SMTP é o melhor plugin de SMTP para WordPress do mercado. Ele permite que você use facilmente qualquer servidor SMTP para enviar e-mails do WordPress com maior capacidade de entrega.
Observação: Nós mesmos usamos o WP Mail SMTP em nosso site e vimos como ele ajuda a garantir que todos os nossos e-mails cheguem às caixas de entrada dos usuários – e não à pasta de spam. Consulte nossa análise completa do WP Mail SMTP para obter informações sobre seus recursos!
Então, vamos instalar e ativar o plugin WP Mail SMTP. Para obter mais detalhes, consulte nosso guia passo a passo sobre como instalar um plug-in do WordPress.
Embora exista uma versão gratuita, recomendamos comprar a versão paga, chamada WP Mail SMTP Pro, que lhe dá acesso ao suporte premium, a mais remetentes e a uma configuração de luva branca feita por um de seus especialistas.
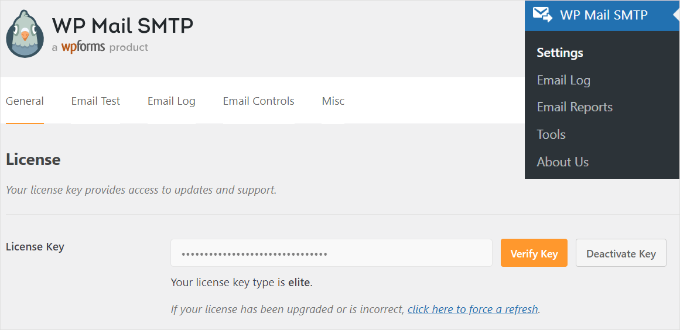
Após a ativação, você precisa visitar a seção Settings ” WP Mail SMTP para definir as configurações do plug-in. Em seguida, basta inserir sua chave de licença e clicar no botão “Verify Key” (Verificar chave). Você pode encontrar a chave na área da sua conta do WP Mail SMTP.
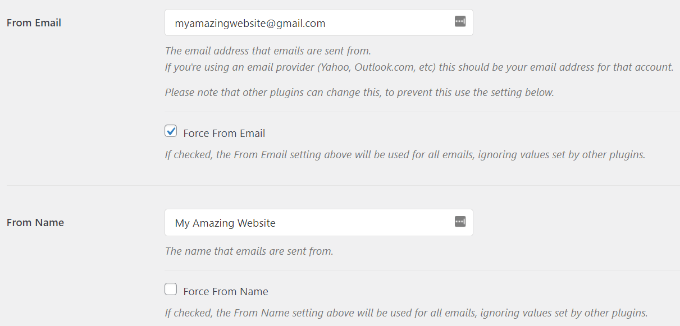
Na guia de configurações “General” (Geral), certifique-se de usar seu endereço de e-mail do Gmail no campo “From Email” (Do e-mail).
Em seguida, você precisa fornecer o nome do remetente.
O plugin WP Mail SMTP oferece três maneiras de conectar seu site WordPress aos servidores do Gmail:
- O primeiro método usa uma instalação com um clique, que é a mais fácil e mais amigável para iniciantes, mas só está disponível para usuários de plug-ins premium.
- O segundo método usa a autenticação OAuth. Esse método é seguro e não requer um plug-in premium.
- O terceiro método é configurar manualmente as definições de SMTP do Gmail. Em geral, não recomendamos esse método porque ele é menos seguro.
Com isso em mente, vamos configurar o WordPress para usar o SMTP do Gmail para enviar e-mails.
Método 1: Configurar o Gmail para enviar e-mails do WordPress usando a instalação com um clique
Esse método é o mais rápido e fácil para todos, o que significa que ele pode ajudá-lo a economizar tempo e confusão.
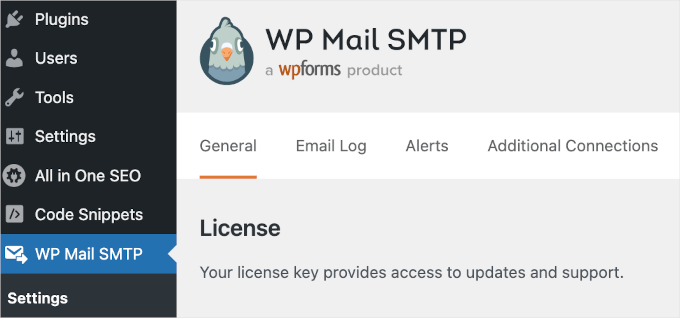
Depois de instalar e ativar o plugin WP Mail SMTP, vamos navegar até WP Mail SMTP ” Settings e verificar se você está na guia “General” (Geral).
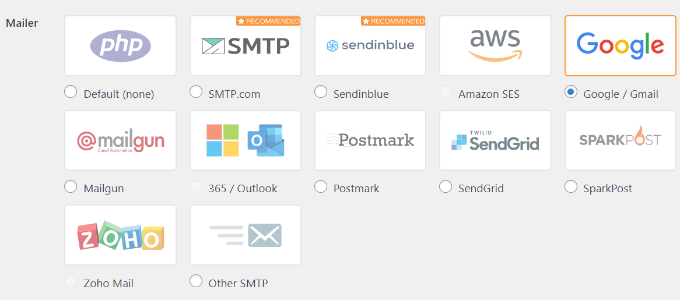
Em seguida, você precisará escolher “Google/Gmail” na seção “Mailer”.
Isso permitirá que você use a opção “One-Click Setup” (Configuração com um clique).
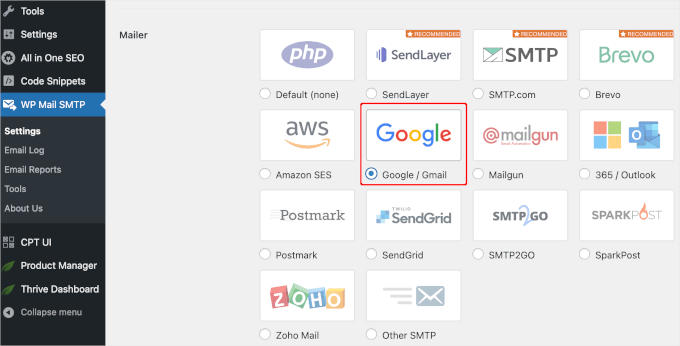
Feito isso, a próxima etapa é autorizar sua conta do Google.
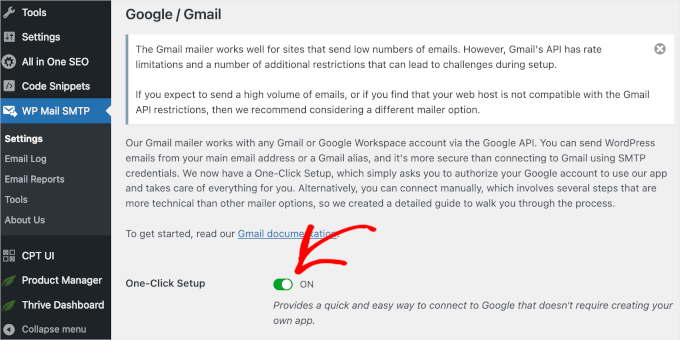
Você verá uma seção “Google / Gmail” abaixo de “Mailer” na tela. Vá em frente e clique no botão para ativar o recurso de instalação com um clique.
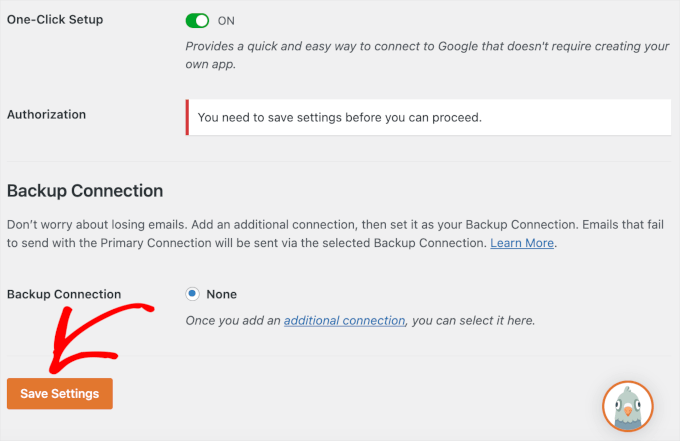
Em seguida, você poderá ver uma notificação informando que precisa salvar as alterações primeiro para continuar o processo de autorização.
Então, vamos clicar no botão “Save Settings” (Salvar configurações).
Depois disso, você poderá continuar o processo.
Será solicitado que você faça login na sua Conta do Google. Basta clicar no botão “Fazer login no Google” e escolher uma conta.
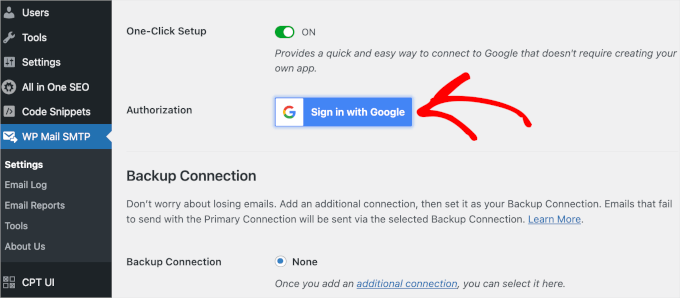
Em seguida, o Google solicitará sua permissão para que o WP Mail SMTP envie e-mails em seu nome.
Você pode clicar em “Permitir” para continuar.
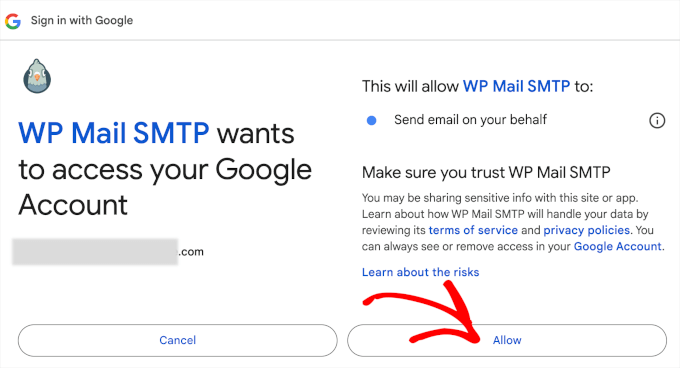
Depois de clicar no botão, você será redirecionado para a guia “General” (Geral) do WP Mail SMTP na área de administração do WordPress.
A partir daí, role para baixo até a seção “Authorization” (Autorização) para ver se a conta do Gmail que você configurou foi conectada com êxito.
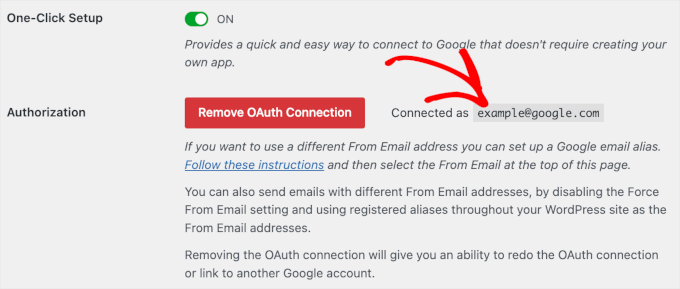
É isso aí! Você conectou com êxito sua conta do Gmail ao WP Mail SMTP usando o método One-Click Setup!
Método 2: Configurar o Gmail para enviar e-mails do WordPress usando o protocolo OAuth
Esse método é uma ótima opção se você estiver usando uma versão gratuita do plug-in WP Mail SMTP. Ele é seguro e, depois de configurado, você nunca mais precisará fazer isso novamente.
Você precisa começar selecionando “Google/ Gmail” como seu servidor de e-mail.
Em seguida, você verá três campos que precisam ser preenchidos ao rolar a tela para baixo.
Basta preencher os campos “Client ID”, “Client Secret” e“Authorized Redirect URI” quando você estiver lá.
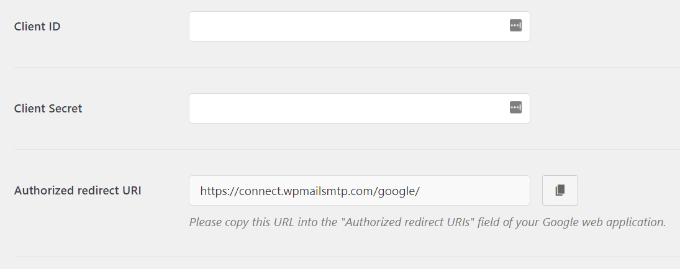
Vamos configurar esses campos.
Criação de um aplicativo e geração de chaves de API para o Gmail
Para começar, basta acessar o site do Google Cloud Platform e clicar em “My First Project” (Meu primeiro projeto) na parte superior.
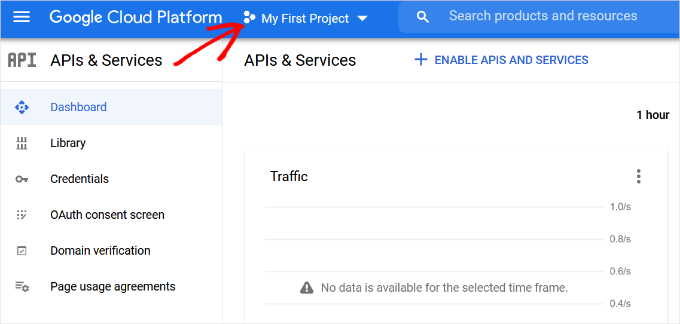
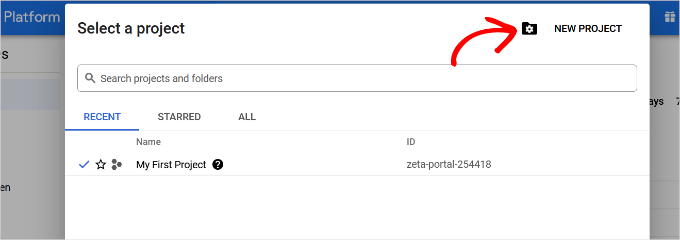
Uma pequena janela pop-up será aberta, na qual você poderá selecionar seus projetos.
Em seguida, clique na opção “New Project” (Novo projeto).
Na próxima tela, será solicitado que você forneça um nome para o seu projeto.
Recomendamos dar a ele um nome memorável para que você possa reconhecê-lo facilmente no futuro.
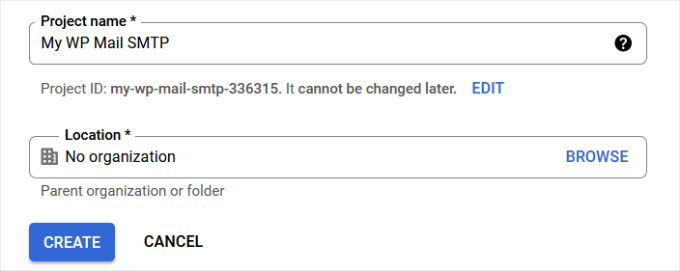
Depois disso, vamos clicar no botão “Create” para continuar.
O console do desenvolvedor criará o seu projeto e o levará ao painel de controle.
O Google oferece aos desenvolvedores acesso a muitas de suas APIs e serviços. Você precisa ativar as APIs de que precisará para este projeto.
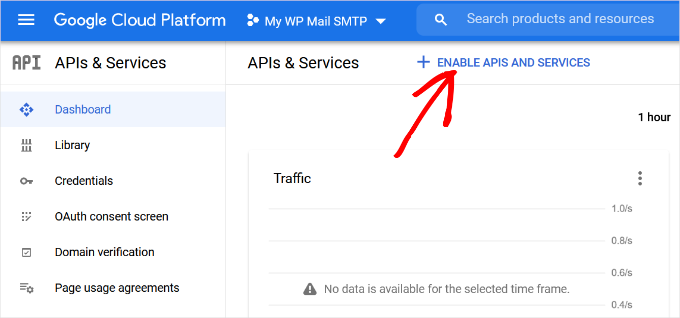
Basta clicar no botão “Enable APIs and Services” (Ativar APIs e serviços) para continuar.
Isso o levará à página da biblioteca de APIs.
A partir daí, você pode digitar Gmail na caixa de pesquisa para localizar rapidamente a API do Gmail e clicar para selecioná-la.

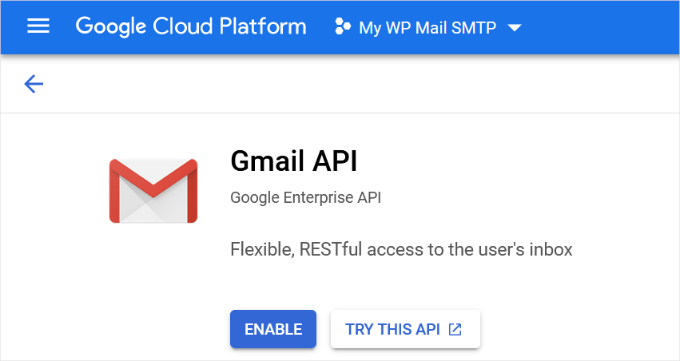
Agora você verá uma visão geral da API e o que ela pode fazer.
Basta clicar no botão “Enable” (Ativar) para continuar.
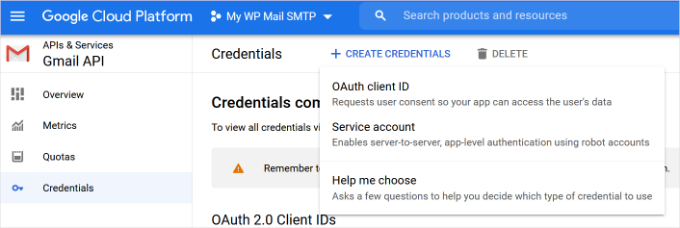
Agora que sua API está ativada, a próxima etapa é criar credenciais que possam ser usadas nas configurações do plug-in SMTP do WP Mail.
Clique no botão “+ Create Credentials” (+ Criar credenciais) para continuar e selecione a opção “Help me choose” (Ajude-me a escolher) no menu suspenso.
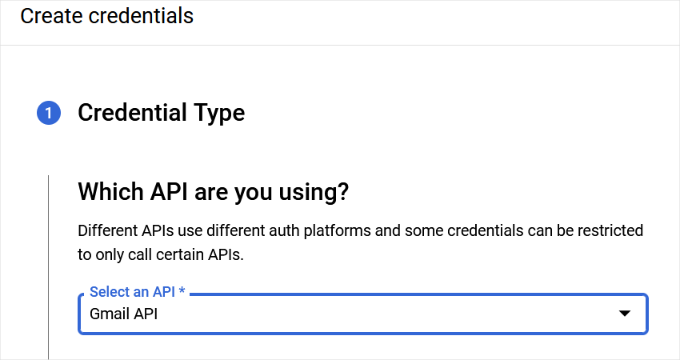
Na próxima tela, ele perguntará qual API você deseja usar.
Vá em frente e selecione “Gmail API” no menu suspenso de “Qual API você está usando?”.
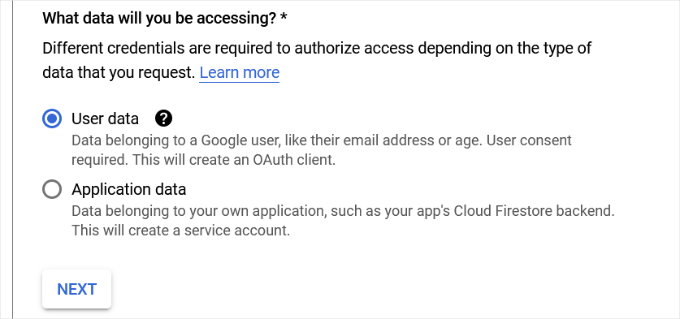
Depois disso, escolha “User data” (Dados do usuário) no campo “What data you will be accessing?” (Quais dados você acessará?).
Feito isso, clique no botão “Next” (Avançar).
Agora, você precisará inserir as informações do seu aplicativo.
Você pode começar dando um nome ao seu aplicativo, selecionando o endereço de e-mail que forneceu e adicionando um logotipo do aplicativo, se desejar.
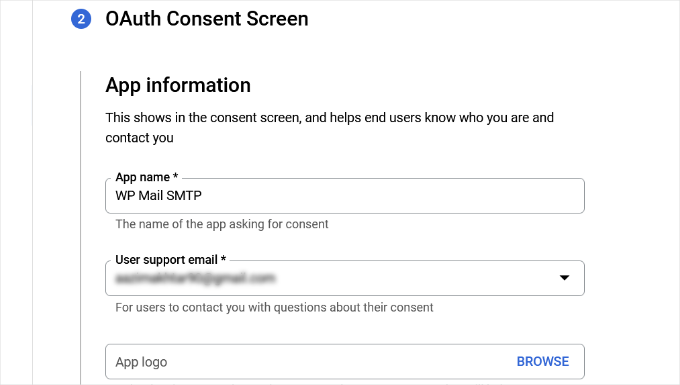
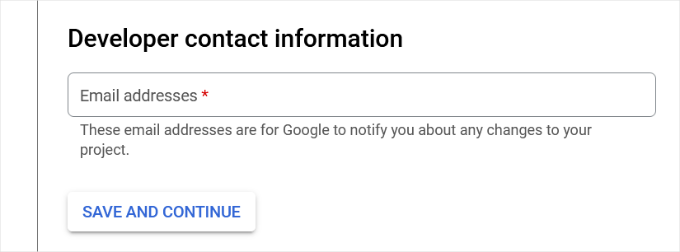
A partir daí, você precisará rolar para baixo e inserir as informações de contato de um desenvolvedor.
Depois de inserir o endereço de e-mail, basta clicar no botão “Save and Continue” (Salvar e continuar).
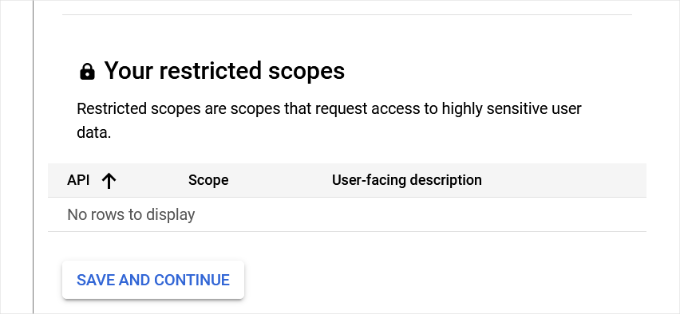
Na próxima tela, você pode configurar os “Escopos” da API do Gmail. Essa é uma etapa opcional e você pode ignorá-la por enquanto.
Basta rolar a tela até a parte inferior da página e clicar no botão “Save and Continue” (Salvar e continuar).
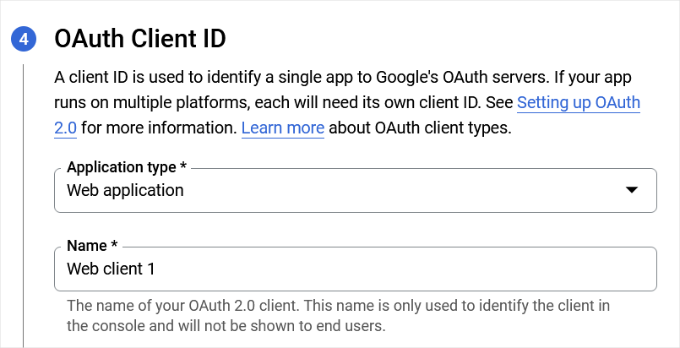
Em seguida, insira os detalhes da seção “OAuth Client ID”.
Você pode começar escolhendo “Aplicativo Web” como o “Tipo de aplicativo” no menu suspenso e, em seguida, inserir um nome.
Ao rolar a tela para baixo, você verá opções para origens de “JavaScript autorizado”. Você pode pular essa opção e ir para “URIs de redirecionamento autorizados”.
Clique no botão “+ Add URL” (Adicionar URL) em “Authorized redirect URIs” (URIs de redirecionamento autorizados) e digite https://connect.wpmailsmtp.com/google/ no campo “URIs”.
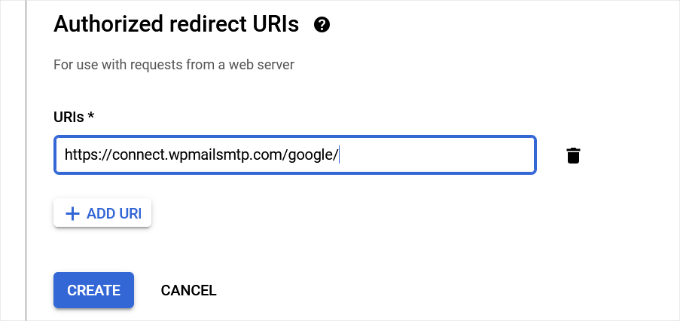
Depois de inserir o URL, basta clicar no botão “Create” (Criar).
Em seguida, você verá suas credenciais na área “Your Credentials” (Suas credenciais).
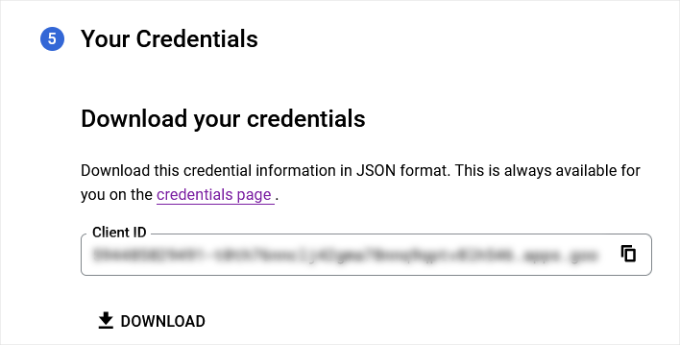
Clique no botão “Done” (Concluído) na parte inferior para prosseguir.
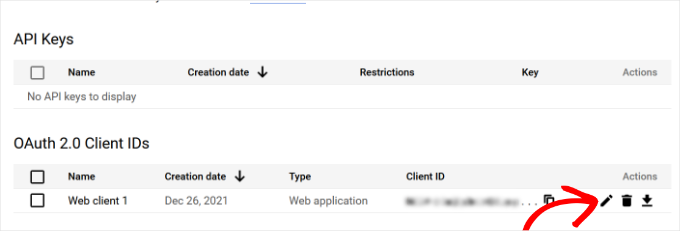
Agora você será levado à página de credenciais do seu projeto.
Nessa página, você pode ver suas credenciais criadas recentemente listadas aqui. Você precisa clicar no ícone de edição ao lado de suas credenciais para continuar.
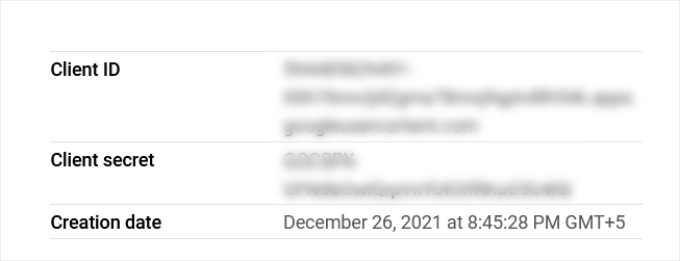
Isso o levará à página de edição de credenciais, onde você poderá ver o segredo e o ID do cliente.
Tudo o que você precisa fazer é copiar e colar a chave na página de configurações do plug-in.
Uma vez feito isso, você pode retornar à página de configurações do plug-in em sua área de administração do WordPress.
Agora que você tem o ID do cliente e as chaves secretas do cliente, é necessário clicar no botão “Save Settings” (Salvar configurações) para continuar.
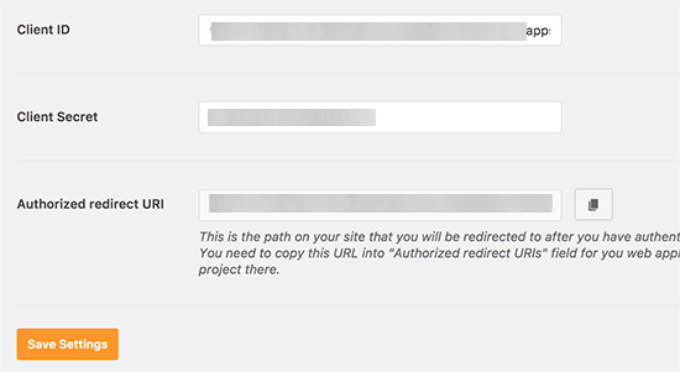
O plug-in agora armazenará suas configurações e recarregará a página.
Depois disso, você precisa rolar para baixo até a parte inferior da página de configurações e clicar no botão “Permitir que o plug-in envie e-mails usando sua conta do Google”.
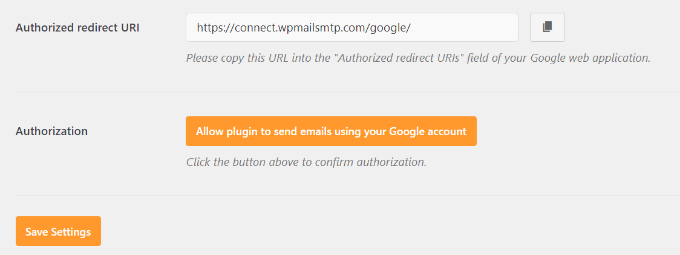
Isso o levará à sua conta do Google.
Em seguida, você será solicitado a dar permissão ao site para enviar e-mails em seu nome.
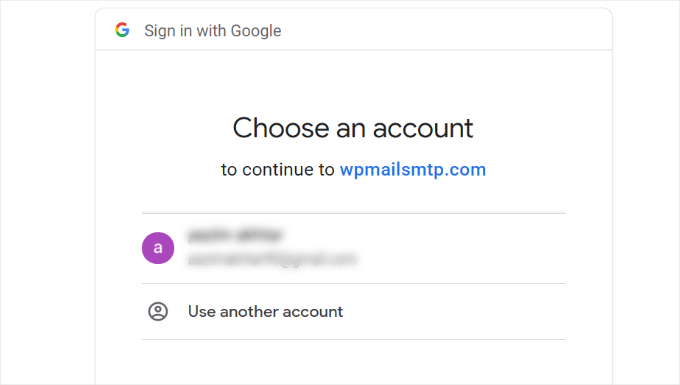
Basta selecionar sua conta do Gmail e dar permissão para vincular seu projeto de API do Google.
Depois disso, você será redirecionado de volta ao seu site, onde verá uma mensagem de sucesso.
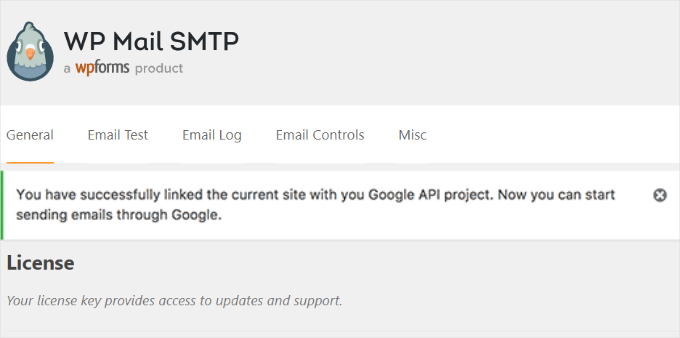
Método 3: Configurar o SMTP do Gmail como remetente SMTP
Esse método permite que você se conecte manualmente aos servidores SMTP do Gmail para enviar seus e-mails do WordPress.
Primeiro, vá para Settings ” WP Mail SMTP na área de administração do WordPress para definir as configurações do plug-in.
A partir daqui, você pode começar fornecendo o endereço do Gmail que deseja usar no campo “From Email” e seu nome no campo “From Name”.

Em seguida, vamos selecionar “Other SMTP” como seu servidor de e-mail.
Além disso, você deve marcar a caixa ao lado do caminho de retorno.
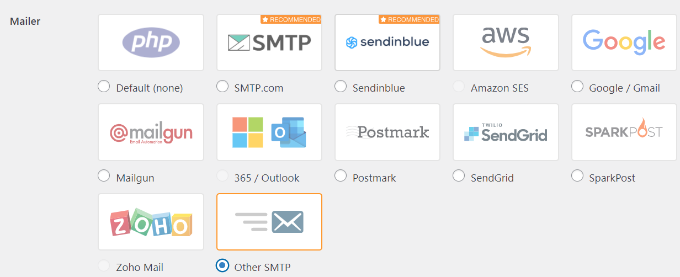
Depois disso, você pode rolar para baixo até a seção “Other SMTP”.
É aqui que você definirá mais configurações para se conectar aos servidores SMTP do Gmail.
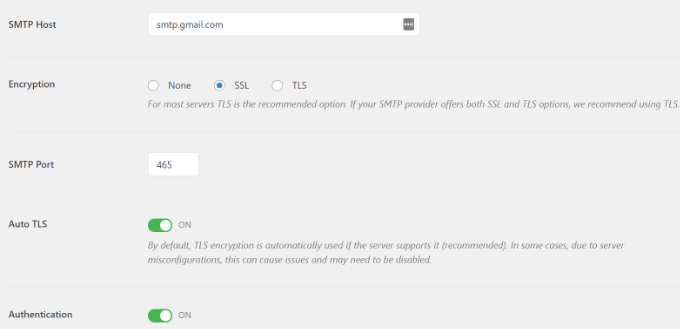
Aqui está a configuração exata que você precisa adicionar às configurações do plug-in:
- Host SMTP: smtp.gmail.com
- Criptografia: Use a criptografia SSL
- Porta SMTP: 465 (isso deve aparecer automaticamente quando você selecionar a criptografia SSL)
- Auto TLS: Desative o TLS
- Autenticação: Ativar a autenticação
- Nome de usuário SMTP: Seu endereço completo do Gmail, por exemplo, john.smith@yourdomain.com ou john.smith@gmail.com
- Senha SMTP: Senha de sua conta do Gmail
Quando terminar, clique no botão “Save Changes” (Salvar alterações) para armazenar suas configurações.
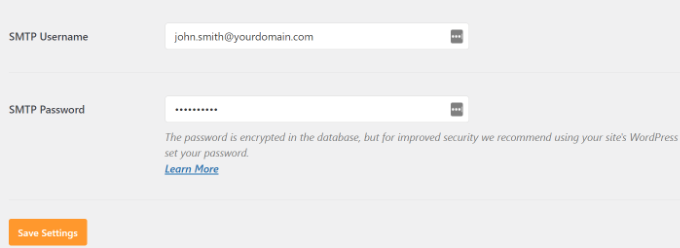
Isso é tudo; você configurou com êxito o WP Mail SMTP para usar os servidores SMTP do Gmail.
Testando suas configurações de SMTP do WP Mail
O plug-in WP Mail SMTP permite testar suas configurações de e-mail para que você possa ter certeza de que tudo está funcionando corretamente.
Você precisa navegar até Configurações ” WP Mail SMTP e clicar na guia “Teste de e-mail”.
Depois disso, basta fornecer um endereço de e-mail que você possa acessar no campo “Send To” (Enviar para) e clicar no botão “Send Email” (Enviar e-mail).
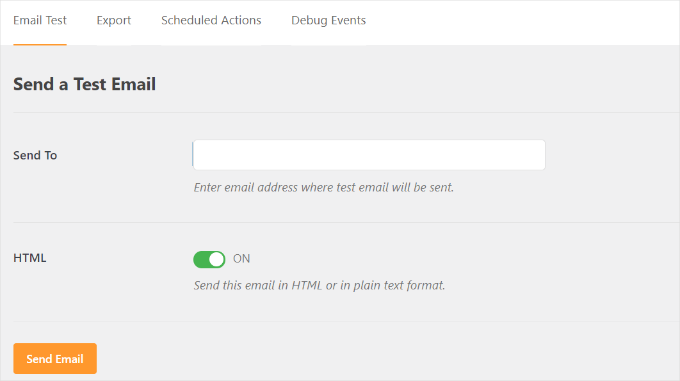
Em seguida, você verá uma mensagem de sucesso.
Para ter certeza, verifique sua caixa de entrada e veja uma mensagem com a linha de assunto “WP Mail SMTP: Testar e-mail para…”.
Isso é tudo; você configurou com êxito seu site WordPress para enviar e-mails usando os servidores SMTP do Gmail.
Obtenha mais com o WP Mail SMTP Pro
Se você quiser ainda mais funcionalidades, experimente o WP Mail SMTP Pro. Com a versão Pro do plug-in, você pode se conectar com:
- Espaço de trabalho do Google/Gmail
- Amazon SES
- Pistola de correio
- Office 365 / Outlook.com
- SendGrid
- E mais
Você também obtém recursos adicionais, como registros de e-mail, a capacidade de ajustar ou controlar a notificação que o seu site WordPress envia e muito mais.
Solução de problemas de SMTP do Gmail que não funciona
Observamos que os usuários encontraram alguns problemas ao usar o SMTP do Gmail com determinadas configurações de hospedagem compartilhada.
Você pode executar as seguintes etapas para corrigir o problema de SMTP do Gmail:
Primeiro, você precisará fazer login na sua conta cPanel. A partir daí, você encontrará o botão “+ Criar” na página de contas de e-mail.

Basta criar uma conta de e-mail que corresponda ao seu endereço de e-mail do Google Apps.
Ao criar a conta de e-mail, você está basicamente tornando o servidor de hospedagem ciente de um endereço de e-mail que deve enviar e-mails. Essa etapa é uma solução alternativa para convencer o servidor de que você está enviando e-mails por meio dele, mesmo que planeje usar o servidor SMTP do Gmail.
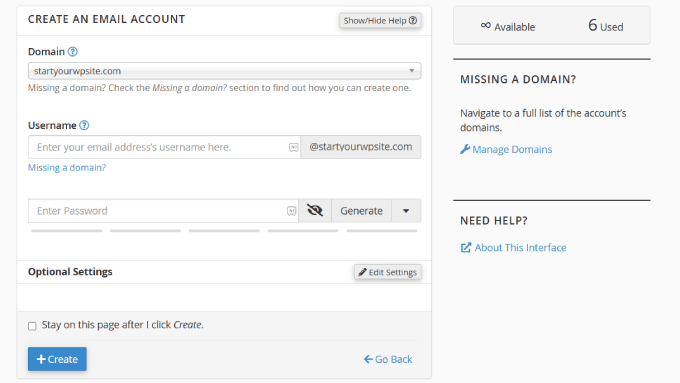
Isso pode parecer estranho porque você não está usando seu servidor para e-mails. Basicamente, ele engana o servidor, fazendo-o acreditar que você está enviando o e-mail pelo servidor.
Na sua conta do cPanel, vamos acessar os registros MX e alterar o roteamento MX de automático para remoto. Observe que isso pode ser um pouco difícil de encontrar, pois cada host agora tem uma interface cPanel personalizada.
Em seguida, você precisará procurar um pequeno link ao lado do MX que diz “Email Routing: Remote Mail Exchanger”.
Depois disso, você pode fazer login novamente no seu site WordPress e enviar um e-mail de teste. Para obter mais detalhes, siga nosso guia sobre como alterar os registros MX do seu site WordPress com base no seu serviço de hospedagem.
Tutorial em vídeo
Assista ao nosso tutorial em vídeo passo a passo abaixo para configurar rapidamente o SMTP do Gmail no WordPress e garantir que seus e-mails sejam entregues de forma confiável.
Basta apertar o play e acompanhar!
Esperamos que este artigo tenha ajudado você a aprender como enviar e-mails no WordPress usando o servidor SMTP do Gmail. Talvez você também queira ver nossas dicas especializadas de solução de problemas para quando o formulário do WordPress não funciona e nosso guia sobre como exportar entradas de formulário do WordPress para CSV e Excel.
Se você gostou deste artigo, inscreva-se em nosso canal do YouTube para receber tutoriais em vídeo sobre o WordPress. Você também pode nos encontrar no Twitter e no Facebook.


David
Hi, I used this tutorial last year to install and configure the Gmail SMTP plugin. Until very recently, the Gmail SMTP plugin in conjunction with my website’s contact form worked perfectly. But I tested my website’s contact form today, and I got the following fatal-error message:
Fatal error: Uncaught exception ‘Google_Auth_Exception’ with message ‘Error refreshing the OAuth2 token, message: ‘{ “error” : “invalid_grant” }”
I don’t have a clue what that means. I get the same fatal-error message when I use the plugin to send a test message at Gmail SMTP plugin>Settings>Test email.
I haven’t changed any of the plugin settings since I first installed it a year ago, and I haven’t done anything new with my Google Console account either. I’m using the most recent version of the Gmail SMTP plugin, and also the newest version of WordPress.
Any ideas or suggestions?
Thanks!
WPBeginner Support
Hey David,
It seems like your Oauth2 token has expired. Try following the tutorial again from the beginning to set it up again.
Admin
Ehsan
Thank U very much – one of my problem was this “my emails goes to spam folder”
with this service(Method 1) Now It’s great – of course after 14 days you must pay for that but still it’s prefect
I have question;
Can I send 100 Emails like newsletter for my customer is it OK for Google!?
I afraid my Emails after it goes to spam folder again
Sharon
I did everything as described, but the contact form on my website still does not work.
Adondriel
Hey, add a thing at the end for the troubleshooting thing: “Check with your website host and verify that they do not block outgoing requests by default.” I know 1. GoDaddy does this, and won’t let you unblock. and 2. Namecheap also blocks by default but you just gotta contact support, give em your info and ask em to unblock port 587 and boom, it’ll all work again.
Lucas
You save my life!
Tks!
adam
i keep getting a Error: redirect_uri_mismatch when i press ‘grant permission’. It’s driving me nuts as I can’t work out what is wrong? Everything seems to match.
Adam
Grzegorz
Same here. i get redirect_uri_mismatch
Macky
This video has been a fantastic help.
I’m a complete WordPress beginner.The step-by step instructions are very easy to follow. Now my emails are working perfectly!! Plus I also learnt how to insert headers & footers with ease.
Thanks once again!!
WPBeginner Support
Hi Macky,
We are glad you found the video helpful. You may also want to subscribe to our YouTube Channel for WordPress video tutorials.
Admin
Fabio
Your tutorial saved my site! Thank you very much mate!
Maggie Z
A follow-up question – because of the login conflict issue, I was also considering using WP Mail SMTP. However, many users on the support forum for that plugin express concern that the password for the email account is visible on the admin page in plain text.
I have a firewall set up that prevents non-admins from getting in to the back end, so is there any real security concern regarding the password showing in plain text? Any advice much appreciated!!!
Maggie Z
After troubleshooting quite a bit, I finally relented and went with WP Mail SMTP, which requires the “allow less secure apps” solution – a tech support person at G Suite told me that it was safe, and it seems like the only way to go for my particular setup. Appears to be working now. Thanks for the incredibly clear instructions!!! I am now a firm fan of this site.
Maggie Zellner
The video is fantastic, and the plugin installed perfectly. Unfortunately I didn’t realize until after I went through the whole process (because I didn’t read the documentation on the plugin carefully), the Gmail SMTP plugin eliminates the need for users to log in, and therefore it interfered with the login process that we have instituted for paid members on our website (which we manage through a plugin called PaidMembershipsPro).
Is there any way to disable that aspect of this plugin, so I can send all email via our Gmail account, but can still have users log in and out?
Eric
Great article! However, I am unclear on something when using WordPress for sending newsletters. What is the difference between those mass emailing service providers (mailgun & Sendgrid) and using Google Apps for work SMTP?
Can’t we use Google Apps for work to send newsletters just as well?
WPBeginner Support
with Google Apps for Work, you can only send an email to 500 recipients max (for paid business accounts). You cannot use it for newsletters.
Admin
Eric
Thanks so much for your response! With Google Apps for Work only limiting to 500 recipients, then I suppose it would work if we sent it to 500 or less people.
My next question, is it max to send all at one time or per day? If we throttle it to only send out a few per minute, do you know if it would allow it to send thousands within a few hours?
Heather
Thank you so much! This was so helpful!
zim ejin
Hi, this was very informative thank you for posting. however i have a website hosted on aws ec2, and route53 for dns. i tried the secure configuration. it didn’t work. Is there a special configuration for self hosted websites on aws ec2/route53. btw : i don’t have a cpanel installed.
Lanrz
After granting access and clicking on the allow button, I was not being redirected back to wordpress and the SMTP status is still not connected.
Any advice on how I should go about doing it?
Thanks!
Nathalie
Doesn’t work: test email retuens Connection: opening to smtp.gmail.com:587, timeout=300, options=array ( ‘ssl’ => array ( ‘verify_peer’ => false, ‘verify_peer_name’ => false, ‘allow_self_signed’ => true, ),)
I checked Email Routing -> Remote Mail Exchanger but it didn’t help
Raph Divine
Thanks for the write-up. It really helped me! 5stars!
Real Name
This guide worked wonderfully until my server stopped sending emails and I can’t get it to work again. The “Test Email” tab doesn’t make it clear if the email has successfully sent or not since it just spews out 52 lines that don’t mean much to me. :/
Boro
Amazing Tutorial !!!!
Thank you
peter
Ok, so I have followed the OAuth instructions and my SMPT status button has gone green. However, whether through test email or my site, I can not send an email through the contact us form (pluggin contact form builder by web Durado). The hanging message say waiting for and eventually I get a 405 error notice.
Any thoughts.
Thomas
Hoping you can help me?
I tried setting up method 1 using gmail and I got the ‘green light’ from wordpress however when testing the email I receive the following error message after waiting 1 minute for it to send:
Connection: opening to smtp.gmail.com:587, timeout=300, options=array ()
Any ideas on how to fix this?
Very best,
Tom
Fernando Santos
This tutorial is awesome!
I have one question, though. I directed the contact form messages to a gmail group email address, but, for some reason, the messages aren’t being delivered. When I direct to a “real” e-mail address like the messages are normally delivered.
I would really appreciate if someone could give me a hand figuring out why this happens.
Thank you!!!
Paul
+1 for this question. Have exactly the same question as wish to use our info@.. address
Andres
Thanks guys for such useful article. I followed all the steps and was able to configure the email correctly. However, when I receive the email from mydomain.com address (sent by wordpress after purchasing a product), the user avatar (gmail picture) doesn’t appear even though mydomain.com has a picture already.
In fact, if I send an email directly from mydomain.com account via google for work, the receiver is able to see the image right away, but it’s not the case if the email is sent via wordpress.
Do you have any suggestions? Thanks a lot, and keep rocking!
Sahar
Thanks for this helpful information. You really helped me out in setting this up, and I appreciate you taking the time to create this useful information!
WPBeginner Support
Glad you found it helpful.
Admin
lokesh kumar CL
What is origin URI of the client application. its not accepting website URL ….please help me out
Susan
Excellent instructions and thanks for walking me through setting this up. I did try the MX record change but no luck there either.
I get a 405 Not allowed message when I try to send an email.
I am hosted by Bluehost and am using the DIVI theme.
If anyone has any ideas I would be very grateful.
Leista
Hello, having a similar issue. Getting a 405 error, and also hosted on Bluehost. By any chance, were you able to fix the problem? Thanks.
JDC
I had the same problem with bluehost. But this gave me the solution.
I uninstalled any extra plugin for mail, including smtp mailer or gmail smtp plugin and just used a random address like mynewaddress@example.com (replace example.com with your own domain name) and it worked. I sent an email to my gmail account I it passes all the filters. It seems that BlueHost validates the address if it is comming from the server that hosts that domain. In gmail you usually get a warning that says that this email might not have being validated, but my email are comming fine with custom wordpress email functions. No extra plugin needed.
Prashant Bhandarkar
Thank you so much. This was of great help. God Bless you!
Karmen
Awesome tutorial!!!
Louise
I have this working brilliantly with a Google apps for work account for a woocommerce solution on wordpress, thank you.
Should this work if I use a Google group mail instead of an account?
Thanks very much.
Brian Treiber
I am not using Google apps for work, I have everything set up and connected. I tried to send a test email however I get a 405 not allowed error. I went into my cpanel and changed the mx records to the recommended” remote.” Still can’t send. Does this mean I need to use the less secure method?
Jason North
I’m getting this error when I try to activate the plugin:
Plugin could not be activated because it triggered a fatal error. Parse error: syntax error, unexpected T_FUNCTION, expecting ‘)’ in /home3/north23/public_html/forcebrain/wp-content/plugins/gmail-smtp/google-api-php-client/src/Google/autoload.php on line 19
genie
Hello, I use gmail-smtp plugin but it conflict with ultimate membership. Could you help me ?
I try another wp mail smtp but in the last feld: user account pass. Google app not allow to login from plugin. Pls help
Thank you
Leslie Andrews
Clearly I’m doing something wrong. When I get to “add credentials” I’m getting this error message and can’t move forward.
Invalid Redirect: must end with a public top-level domain (such as .com or .org)
Any help would be great
WPBeginner Support
If you look at the URL closely, you will notice that you are missing a . between domainname and the TLD, yours is examplecom when it should be example.com.
Admin
Graham
Thanks for the tutorial, but I get this error when I try to send a test email:
Connection: opening to ssl://smtp.gmail.com:587, timeout=300, options=array ()
SMTP ERROR: Failed to connect to server: Connection refused (111)
SMTP connect() failed.
Does it have something to with my site being secured with SSL?
Tony
I’m having the same issue. Did you figure it out?
Tom
Nice Article, I’m having a few issues to get this working. So I Deactivated the Plugin and tested a Contact Form to see if all was the same before setting up Gmail SMTP, unfotunately No Emails are being sent through now.
Even though the Gmail SMTP Plugin is NOT active, do we need to reset back to the default settings somehow?
WPBeginner Support
Nope simply deactivating it would turn it off.
Admin
Jenny
Hi,
I have this all set up properly and the test email worked…I just commented on my own blog to see if I would get an email when a comment was posted but I unfortunately didn’t. Can someone help me figure out where I went wrong?
Sachin
Hey thanks for the tutorial. Everything works fine in Setup, but when mail is being sent the site freezes for about 5 mins. site doesnt open at that time. It doesnt respond at that time. Any idea what might be causing this issue. But the point is mail is sent at last finally
WPBeginner Support
Please contact your WordPress hosting provider. They may be able to help you better.
Admin
crissy
Hi,
I’m having problem with the test email send
Fatal error: Cannot redeclare class phpmailer in /home/mywebsite/wp-includes/class-phpmailer.php on line 29
please help
David
Hi, I just installed this plugin, and everything went perfectly–thanks to your excellent tutorial! (I definitely couldn’t have done it without you.) My website’s outgoing email immediately started landing in people’s inboxes rather than in their spam folders.
But since I’m a novice at these matters and don’t know SMTP from RSVP, I did some reading on SMTP, and on one website I came across made this statement:
“Another strategy that hackers use: If your app sends email using SMTP, the IP address will be recorded in the Received header lines. Either scrub the original Received line [no explanation provided of how that’s done], or don’t use SMTP for email submission.”
Is this something I should be concerned about security-wise? Or does this plugin solve this problem somehow? And if not, how should I fix it?
Thanks!
WPBeginner Support
You shouldn’t be concerned about it. Most popular email service providers and their spam filters can check if an email is originating from the IP address it claims to be coming from.
Admin
Rob
Thank YOU so much for this!! I’ll keep coming back for more!!
Travis
Thanks so much for this tutorial.
Originally I had this all setup and working fine, but I moved my website and did some other fixes to it, and suddenly mailing stopped working.
Previously I spent some time trying to set it up and get it to work, but then it “stopped” working randomly.
Anyways, option #1 really saved me a major headache.
Christine Tabor
I configured, and got the green go to go button… THANKS FOR THE STEP BY STEP…
(doing this on a client test site)…
BUT REGARDING GRAVITY FORMS (or any form plug in)… do I also need to change up the notification emails that I’ve used for the Gravity Forms submissions?
Is it ok for the “from” email I used in the configuration to be different than the gmail used to set i up?
The issue that started all this was client not getting his Gravity Form notifications.
SO, before I install on their live site… (which is ecommerce and SSL)… can you reply to this … and should I still use the TSL for the configuration? I wasn’t sure if a certificate on the site made any difference in configuring this.
Thanks,
Christine
WPBeginner Support
No you don’t need to change notification emails.
It is OK, but to ensure maximum deliverability you should use the email address that is actually sending the email.
You should try with SSL first for the Gmail Configuration.
Admin
Christine
Thanks for reply…little bit more clarification please.
I set up an email…info@domain.com as a forwarder in cpanel, and I forward to their Verizon email.
I left the Verizon email in the GF notification list, added the info email, and another alternate email.
So the info email is the one in Gmail plugin set up that is sending the email…is it ok that it’s a forwarder?
Also, when I set up the plugin, I used a gmail I had created … CompanyName@gmail.com
But not using it as the sending email or anywhere else.
I sent a test and it appears all worked… Should I go back and change to SSL instead of the TSL or leave as is?
Thanks again…
Christine
WPBeginner Support
Sounds about right. However, if it was up to us we would use the Gmail address as the sender and add the forwarding email address as the Reply-to address.
Tribhuwan Bhatt
Thank You
Tim R
Doesn’t work for me on April 14, 2016.
Things I do rarely work.
Connection: opening to smtp.gmail.com:587, timeout=300, options=array ()
SMTP ERROR: Failed to connect to server: Network is unreachable (101)
SMTP connect() failed.
Mailer Error: SMTP connect() failed.
Any point in fussing with this ?
zse
Hi,
I have this same error.
Did you solved this problem?
Regards
Tim R
Here’s a follow up:
Settings of my web host’s server made this impossible.
Switched hosts and now it works easy as pie.
Don’t forget to change settings on gmail account to allow for unregistered apps (a search will discover many instructions to do that so I won’t add it here)
Monica
Hey i tried allowing access for unregistered apps it still doesnt work for me.
I am getting the error:
Connection: opening to smtp.gmail.com:587, timeout=300, options=array ()
SMTP ERROR: Failed to connect to server: Connection refused (111)
SMTP connect() failed.
Any ideas ?
Bclose
Hi ,
Thanks for this ticket ..i was fighting with my emial provider weblayer and nothing. it worked with your magic touch , one simple note .. by the end of Ouauth when explaining to create a fake local email you forgot to include that we must use MX record and what is is , i search on google and found ALT2.ASPMX.L.GOOGLE.COM, but this last simply thing could be a danwfault for all readers
Either way thank you..a lot!
Kay
Thank you soooooo much for this! Worked like a charm. The instructions are 100% on point!
Tyler
Anyone get this working with google apps email? I’ve created API credentials. SMTP status is green. But Test email says connection refused. Already set mx to remote on godaddy. Are there any security setting ls in google apps email that have to be configured?
TJ
Nice article, was able to install the plugin and it sent the email from the plugin test email.
Fails when using Contact Form 7, any recommendations for a contact form plugin that this might work with?
Thanks
WPBeginner Support
You can try it with WPForms.
Admin
Muhammad
thanks for the nice post.i was thinking to set up this for my site.
Ripul
Interesting, however I am getting this error : “Error: redirect_uri_mismatch”
Ripul
I forgot to mention I am testing this on Localhost.
Rashmirekha Moharana
Hi Syed.
Thanks a lot for such a wonderful solution. Let me implement and see.
Kudos to you.