Adicionar um cronômetro de contagem regressiva ao seu site WordPress pode torná-lo mais envolvente. Se você estiver destacando o lançamento de um produto, marcando uma data importante ou criando expectativa para um evento, um cronômetro de contagem regressiva faz o trabalho com eficiência.
Por exemplo, usamos contagens regressivas em nossos sites para destacar vendas de produtos, ofertas da Black Friday e muito mais.
Com apenas algumas etapas, você pode configurar esse widget atraente em seu site. Ele não apenas chama a atenção, mas também mantém seu público informado.
Neste artigo, você aprenderá três maneiras simples de adicionar um cronômetro de contagem regressiva ao seu site WordPress. Mesmo que você não seja especialista em tecnologia, nós o ajudamos.

Quando e por que usar um widget de cronômetro de contagem regressiva?
Os cronômetros de contagem regressiva são versáteis e podem ser usados em vários cenários. Eles acrescentam entusiasmo e urgência, incentivando os visitantes a agir.
Está lançando um novo site? Um cronômetro de contagem regressiva pode gerar expectativa e criar um burburinho. Exiba o cronômetro em uma bela página “Em breve” para incentivar os visitantes a conferir as últimas atualizações.
Outro ótimo momento para usar um cronômetro de contagem regressiva é para as próximas vendas ou promoções em sua loja on-line. Ao exibir um cronômetro, você informa seus clientes sobre ofertas por tempo limitado, aumentando as vendas e o envolvimento.

Os cronômetros de contagem regressiva também podem beneficiar os organizadores de eventos. Seja em um webinar, em uma conferência ou em uma reunião social, a definição de um cronômetro ajuda os participantes a saber exatamente quando o evento ocorrerá.
Durante a manutenção do site, os cronômetros de contagem regressiva também são úteis. Eles permitem que os visitantes saibam quando o site estará disponível novamente para que você possa mantê-los informados e reduzir a frustração.
Para usos em menor escala, como marcar um marco pessoal ou um aniversário, os cronômetros de contagem regressiva dão um toque especial ao seu site WordPress.
Agora, você pode exibir um cronômetro de contagem regressiva em seus posts, páginas e na área de widgets da barra lateral.
Os cronômetros de contagem regressiva também podem ser adicionados a pop-ups de lightbox, barras flutuantes, caixas de rolagem e outros elementos de design para envolver os visitantes do site e trazê-los de volta ao seu site.
Como há muitos casos de uso para um cronômetro de contagem regressiva, listamos três métodos diferentes para adicionar um widget de cronômetro de contagem regressiva no WordPress:
Tutorial em vídeo
Se você preferir instruções por escrito, continue lendo.
Método 1: Adicionar um widget de cronômetro de contagem regressiva usando o plug-in Countdown Timer Ultimate (gratuito)
O Countdown Timer Ultimate é um plug-in simples que permite adicionar um cronômetro de contagem regressiva básico ao seu site.
Neste tutorial, usaremos o plug-in gratuito, pois ele tem todas as ferramentas necessárias para criar um cronômetro de contagem regressiva.

Para começar, a primeira coisa que você precisa fazer é instalar e ativar o plug-in Countdown Timer Ultimate. Se precisar de ajuda, consulte nosso guia passo a passo sobre como instalar um plug-in do WordPress.
Após a ativação, você deverá acessar Countdown Timer ” Add Timer na área de administração do WordPress.
Na próxima tela, você pode dar um título ao seu timer. Basta digitar o título que desejar no campo “Add New Timer”.
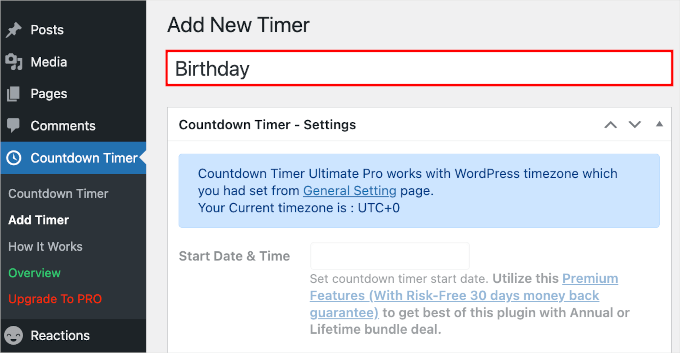
Observação: O cronômetro usa o fuso horário definido nas configurações do seu site WordPress. Se quiser alterar o fuso horário desse cronômetro de contagem regressiva, será necessário acessar Configurações ” Geral e atualizar as configurações de fuso horário do site do WordPress.
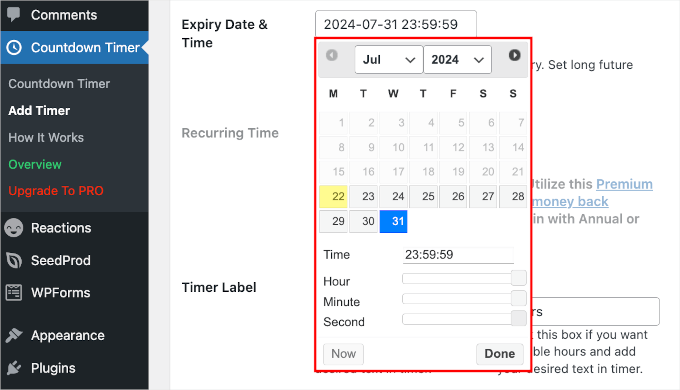
Depois disso, você pode rolar para baixo até a área “Countdown Timer – Settings” (Temporizador de contagem regressiva – Configurações) para definir a data e a hora de expiração do temporizador de contagem regressiva.
Depois de localizar o campo “Expiry Date & Time”, selecione a data no seletor de datas. Em seguida, você pode arrastar os controles deslizantes “Hour” (Hora), “Minute” (Minuto) e “Second” (Segundo) para ajustar o tempo de expiração.
Basta clicar em “Done” (Concluído) para prosseguir para a próxima etapa.
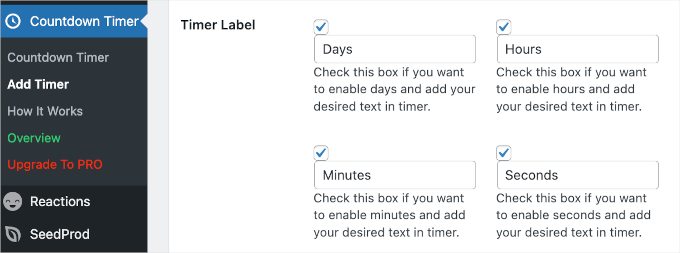
A próxima etapa é definir o rótulo do cronômetro.
Para mostrar os indicadores de dias, horas, minutos e segundos em seu cronômetro de contagem regressiva, marque todas as caixas no campo “Timer Label” (Rótulo do cronômetro).
Agora, vamos rolar a página para baixo e mudar para a guia “Design” para estilizar o cronômetro de contagem regressiva.
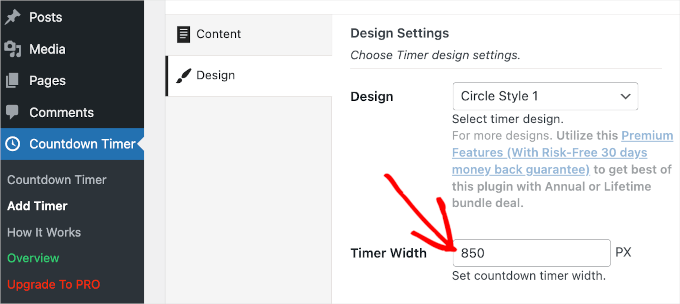
Na primeira seção, “Design Settings” (Configurações de design), é possível escolher um design e definir o tamanho do timer.
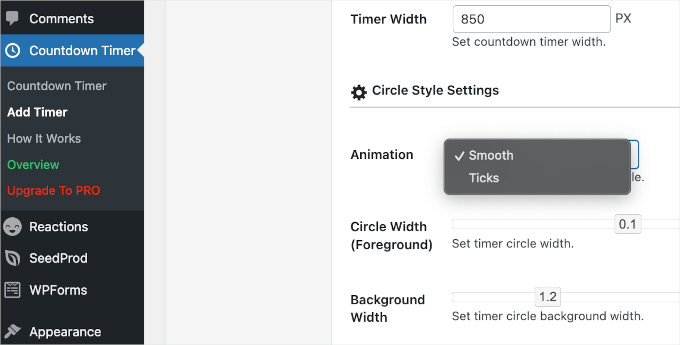
Infelizmente, os usuários gratuitos só podem escolher o design do timer “Circle Style 1”. Entretanto, em “Timer Width” (Largura do cronômetro), podemos definir a largura do cronômetro. Aqui, definimos 850 px.
Abaixo de “Timer Width” (Largura do temporizador), você encontrará a seção “Circle Style Settings” (Configurações de estilo do círculo).
A primeira coisa que você deve fazer é escolher uma animação. Você tem duas opções: ‘Smooth’ e ‘Ticks’.
Depois de escolher a animação do timer, você pode definir a largura do primeiro plano e do plano de fundo do círculo arrastando os controles deslizantes.
Depois disso, você pode personalizar as cores do cronômetro de contagem regressiva.
Em “Clock Background Colors Settings” (Configurações das cores de fundo do relógio), você pode ajustar a cor de fundo e alterar individualmente a cor dos dias, horas, minutos e segundos.
![WooCommerce Made Simple: Um tutorial passo a passo [+ Recursos] Countdown Timer Ultimate's clock background colors settings](https://www.wpbeginner.com/wp-content/uploads/2018/12/wpadminarea-countdowntimer-clockbackgroundcolors.png)
Quando estiver satisfeito com as configurações, clique no botão “Publish” (Publicar).
Exibição do widget do cronômetro de contagem regressiva no WordPress
Agora que você configurou o widget do cronômetro de contagem regressiva, é hora de adicioná-lo ao seu site.
Primeiro, clique no item de menu “Countdown Timer” (Contador regressivo) em seu site do WordPress. O cronômetro que você acabou de criar será listado na tabela “Countdown Timer”.
Ao lado do cronômetro de contagem regressiva, você verá um shortcode que precisa ser copiado.
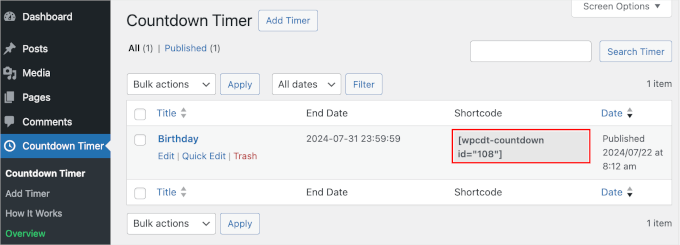
Depois de copiar o shortcode, abra o post ou a página em que deseja exibir o cronômetro de contagem regressiva.
A partir daí, você pode clicar no botão “+” para adicionar o bloco Shortcode. Em seguida, basta colar esse shortcode na área de conteúdo de seu post ou página do WordPress.
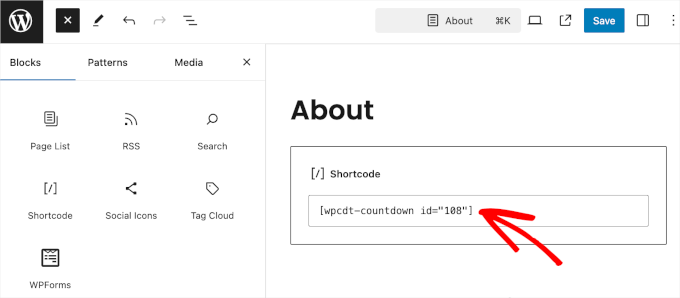
Em seguida, certifique-se de clicar no botão “Update” (Atualizar) ou “Publish” (Publicar) para salvar suas alterações.
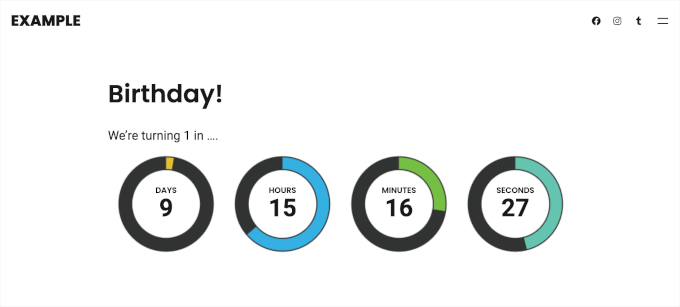
Agora você pode visitar seu site para ver o widget de contagem regressiva em ação.
Se você usar um tema clássico, também poderá adicionar esse cronômetro de contagem regressiva à barra lateral do seu site.
Observação: Nem todos os temas clássicos do WordPress têm o recurso de barra lateral. Portanto, é sempre uma boa ideia verificar novamente a documentação ou as configurações de um tema para ver como você pode personalizar ou ativar as barras laterais antes de escolher um. Neste exemplo, estamos usando o tema Neve.
Basta acessar a página Appearance ” Widgets. Em seguida, clique no botão “+” na seção “Main Sidebar” e procure o bloco Shortcode.
Basta clicar nele quando ele aparecer e colar o shortcode do cronômetro de contagem regressiva.
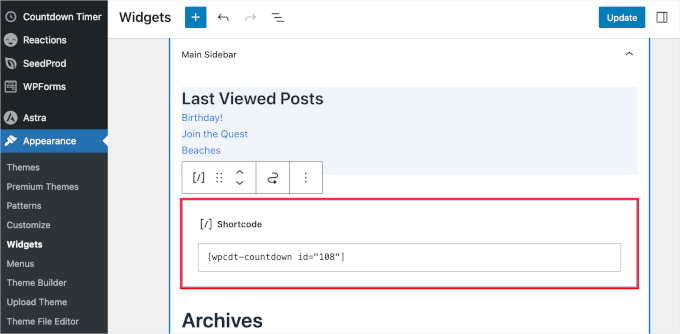
Quando terminar, não se esqueça de clicar no botão “Update” (Atualizar) para manter as configurações do widget.
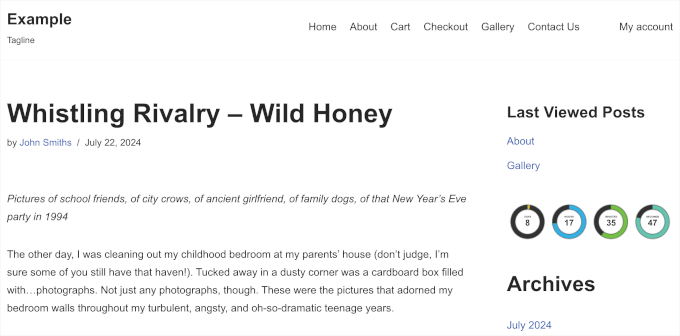
Agora você pode visitar seu site para ver o cronômetro de contagem regressiva na barra lateral ou na área pronta para widget.
Método 2: adicionar um widget de cronômetro de contagem regressiva usando o OptinMonster (recomendado)
O OptinMonster é o melhor plugin de popup para WordPress do mercado, mas ele faz muito mais do que apenas popups. Ele ajuda você a converter visitantes que abandonam o site em assinantes e clientes.
Usando o recurso de cronômetro de contagem regressiva do OptinMonster, você pode integrar o cronômetro de contagem regressiva em um pop-up de lightbox, widget de barra lateral, barra flutuante ou qualquer outro tipo de campanha do OptinMonster.
A ferramenta oferece uma maneira inteligente de exibir um cronômetro de contagem regressiva com um belo design. Ela ainda permite que você crie cronômetros de contagem regressiva perenes no WordPress.
Um cronômetro de contagem regressiva evergreen inicia uma contagem regressiva para cada visitante individual. Em seguida, o cronômetro começa quando a pessoa chega ao seu site. Ele também é chamado de cronômetro de contagem regressiva dinâmico.
Primeiro, vamos visitar o site da OptinMonster e nos inscrever em um plano que atenda às suas necessidades.

Uma vez feito isso, você pode instalar o plug-in OptinMonster em seu site WordPress. Para obter mais detalhes, consulte nosso guia passo a passo sobre como instalar um plug-in do WordPress.
Esse plug-in conectará seu site WordPress ao aplicativo OptinMonster. Após a ativação, você pode clicar no botão “Connect an Existing Account” (Conectar uma conta existente) e seguir o prompt para iniciar o processo de integração.
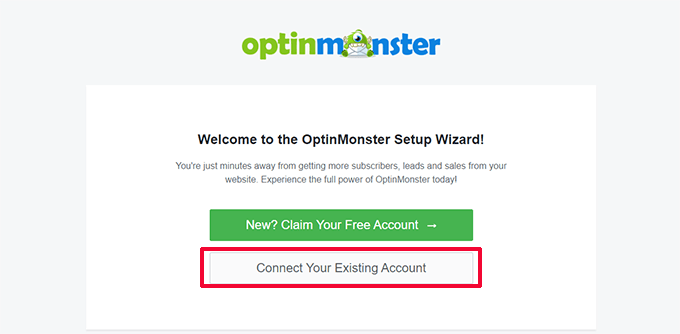
Depois disso, você verá uma janela pop-up. Basta selecionar o endereço de e-mail que você usou para se inscrever em uma conta do OptinMonster e clicar no botão “Connect to WordPress”.
O plug-in agora conectará seu site WordPress à sua conta do OptinMonster.
Depois de conectado, você pode começar a criar uma nova campanha no painel do OptinMonster. Basta ir até OptinMonster ” Campanhas e clicar no botão “Criar sua primeira campanha”.
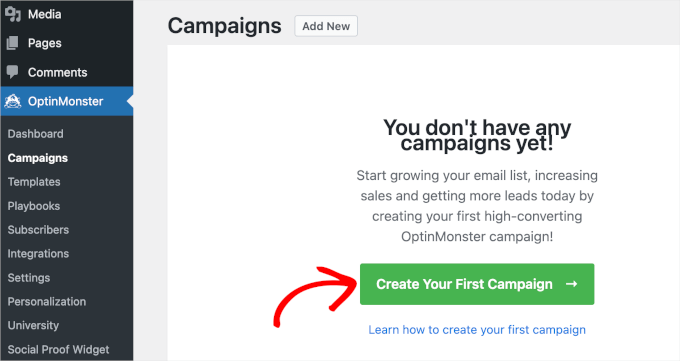
O plug-in oferece uma variedade de tipos e modelos de campanha para você escolher.
Você pode usar qualquer tipo de campanha e adicionar o cronômetro de contagem regressiva a ela. Para este tutorial, usaremos o tipo de campanha “Popup”. Em seguida, usaremos o modelo “Get a Discount Code”.
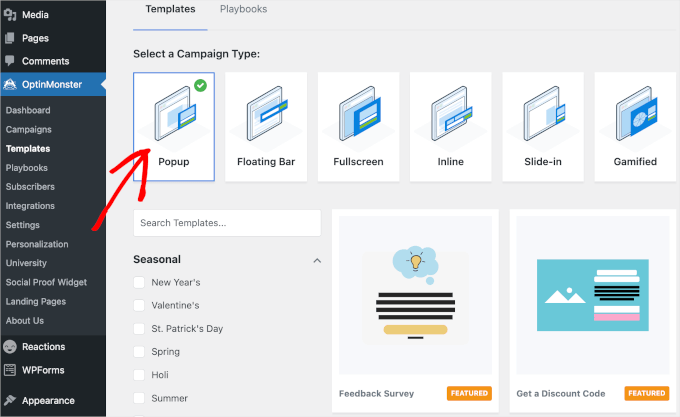
Será exibida uma janela pop-up na qual você deverá nomear o modelo. O nome é apenas para sua referência, portanto, você pode usar o que quiser.
Por exemplo, batizamos nossa campanha de “Countdown Timer”.
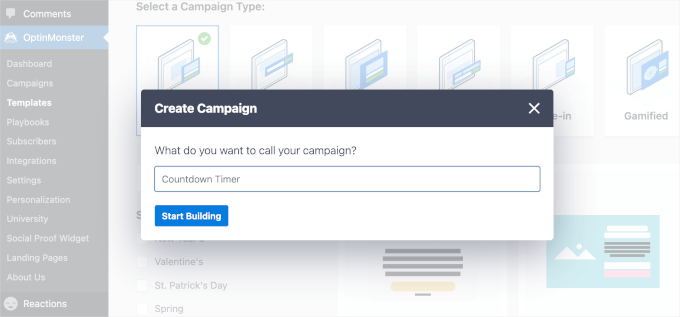
Depois de fazer isso, vá em frente e clique em ‘Start Building’. O OptinMonster o redirecionará para a interface do construtor.
A partir daqui, vamos explorar a seção “Block” (Bloco) no painel esquerdo. Em seguida, basta arrastar o bloco “Countdown” (Contagem regressiva) e soltá-lo na visualização no painel direito quando você o vir.

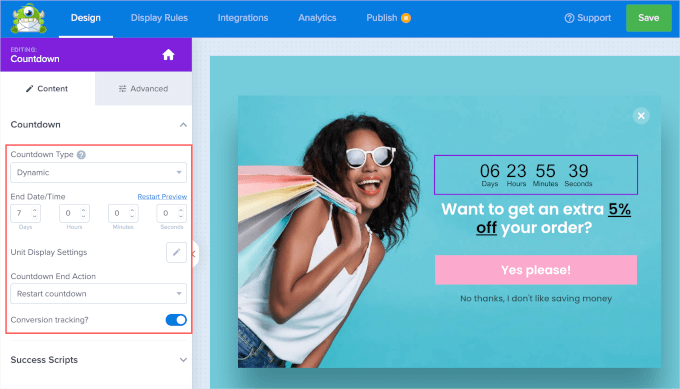
Em seguida, você pode selecionar o “Countdown Type” (Tipo de contagem regressiva) no campo suspenso no painel da barra lateral. Há duas opções, “Static” (Estático) e “Dynamic” (Dinâmico).
Agora, a escolha entre os dois tipos depende inteiramente de seu objetivo. Um timer estático, como o próprio nome sugere, permanece fixo em uma única data e hora de término, o que o torna ideal para eventos únicos, como o lançamento de um produto ou um webinar.
Mas e se você quiser criar um senso de urgência recorrente? É aí que o cronômetro dinâmico é útil.
Digamos que sua loja on-line faça uma venda relâmpago toda semana. Um cronômetro dinâmico será redefinido automaticamente após cada período de venda, o que pode ser de grande ajuda.
Para este guia, criaremos um cronômetro de contagem regressiva dinâmico para promover as vendas flash semanais.
Portanto, vamos escolher “Dynamic” (Dinâmico) no menu suspenso e definir a data e a hora de expiração. Em seguida, talvez você também queira ativar a opção “Conversion tracking?” (Rastreamento de conversões?) para coletar informações sobre a campanha.
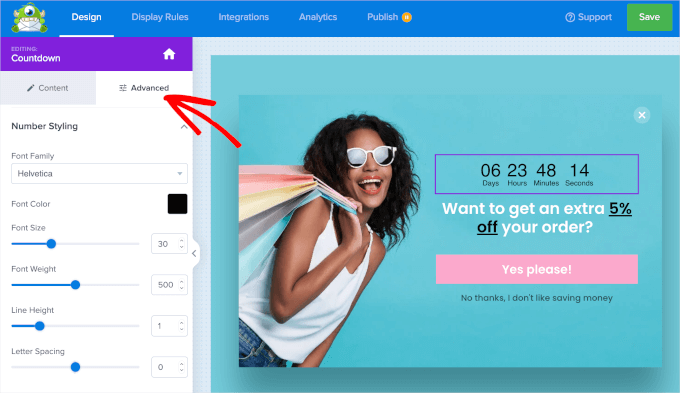
Se desejar, você pode personalizar a aparência do cronômetro de contagem regressiva.
Basta alternar para a guia “Advanced” (Avançado) e você encontrará opções de personalização para alterar a cor de fundo do timer, as fontes, as sombras e muito mais.
Quando tudo estiver definido, vá para a guia “Display Rules” (Regras de exibição).
É aqui que você controla exatamente quando e em quais páginas o pop-up será exibido. A configuração padrão é após 5 segundos em cada página, mas você pode personalizá-la facilmente para atender às suas necessidades.
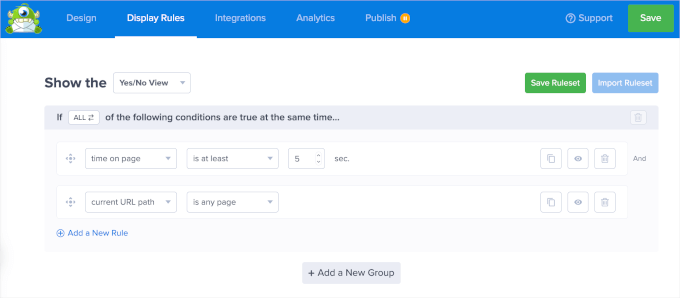
Como alternativa, você pode aproveitar as vantagens do MonsterLink do OptinMonster.
Esse recurso permite que você acione o pop-up para aparecer quando os usuários clicarem em um link ou botão no seu site. Assim, os visitantes têm controle direto sobre quando desejam ver sua oferta ou mensagem.
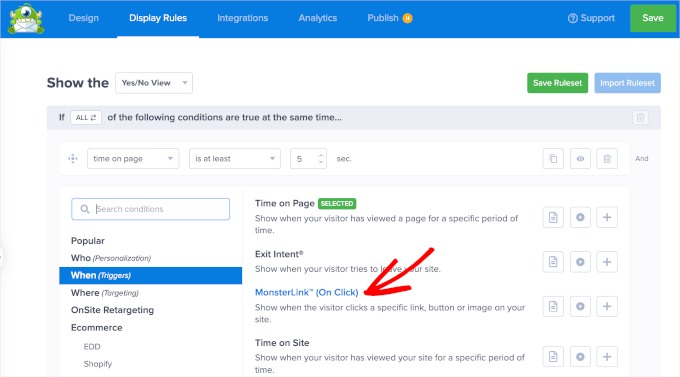
Para usar o MonsterLink, primeiro você precisa clicar no menu suspenso “tempo na página”. Em seguida, basta selecionar “When (Triggers)” (Quando (acionadores)) e, depois, “MonsterLink (On Click)” (MonsterLink (ao clicar)).
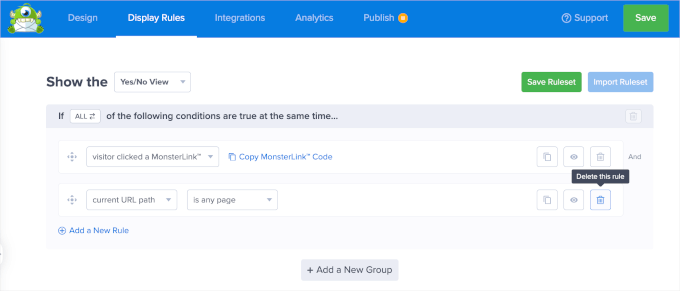
Depois de adicionado, você pode clicar em “Copiar código MonsterLink”. Você precisará dele no processo de incorporação.
Em seguida, você pode excluir a outra regra de exibição clicando no ícone da lixeira.
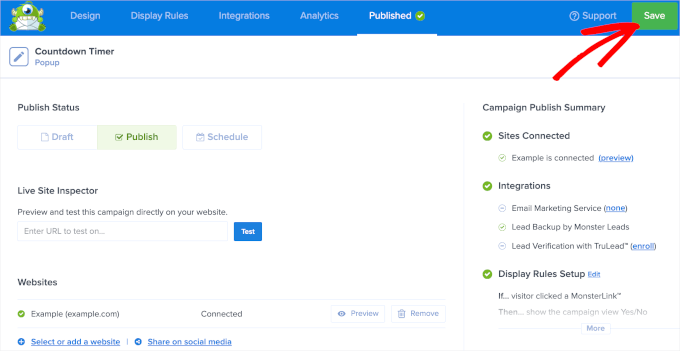
Agora, é hora de publicar a campanha com o cronômetro de contagem regressiva. Para fazer isso, vamos para a guia “Publish” (Publicar).
A partir daqui, você pode alterar o status de “Rascunho” para “Publicar”. Depois disso, basta clicar no botão “Salvar” e sair do editor.
Em seguida, você será redirecionado para a página do OptinMonster, onde deverá verificar o status da campanha.
Na seção “Visibility & Status” (Visibilidade e status), vá em frente e altere o status “Pending” (Pendente) para “Published” (Publicado).
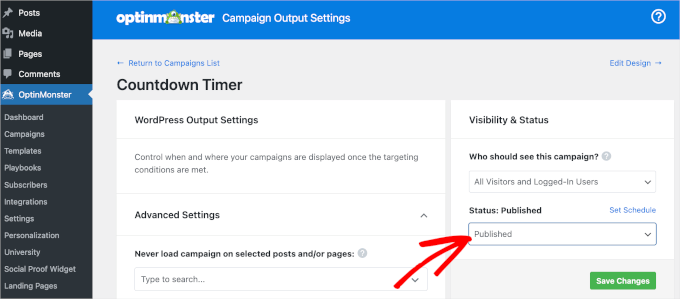
Não se esqueça de clicar no botão verde “Save Changes” (Salvar alterações) para garantir que suas alterações sejam salvas.
O que falta fazer agora é adicionar o código do MonsterLink ao seu site WordPress.
Em primeiro lugar, você deverá abrir o post ou a página em que deseja exibir a campanha com o cronômetro de contagem regressiva.
Por exemplo, adicionaremos a nossa à página “Gallery” em nosso site de demonstração de fotografia. Então, vamos navegar até Pages “ All Pages e clicar em “Edit” (Editar) na página “Gallery” (Galeria).
No editor de páginas, você pode clicar no botão “+” e procurar o bloco HTML personalizado. Basta clicar nele para adicionar à página.
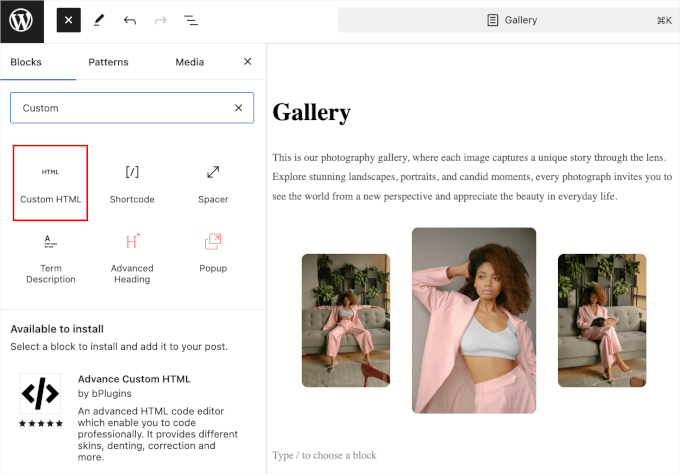
No bloco “HTML personalizado”, basta colar o código do MonsterLink que você copiou anteriormente.
Esta é a aparência no editor de blocos da página:
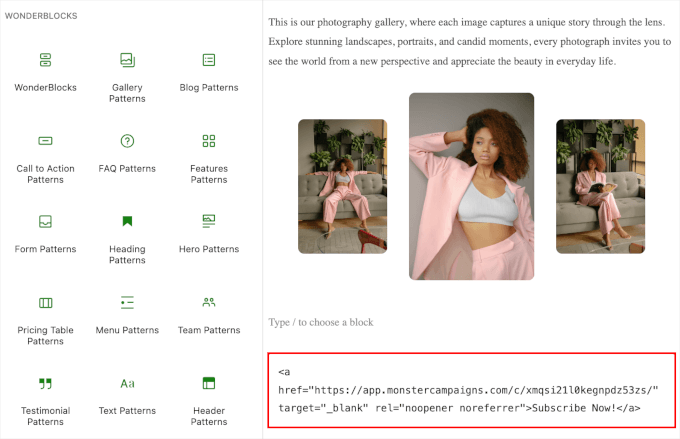
Agora, a chamada para ação “Assine agora!” pode não se adequar ao objetivo da campanha.
Portanto, vamos alterá-lo para “Get Our Limited Promo Code” (Obtenha nosso código promocional limitado), “Unlock Exclusive Discounts” (Desbloqueie descontos exclusivos) ou algo que se encaixe melhor no contexto. Uma vez feito isso, você pode ir em frente e “Atualizar” ou “Publicar” a página.
Agora, se você visitar a página, verá o MonsterLink em ação.

Basta tentar dar um clique e você verá o pop-up da campanha com o cronômetro de contagem regressiva.
Esta é a aparência em nossa página de demonstração “Gallery”:

Método 3: Adicionar um widget de cronômetro de contagem regressiva usando o SeedProd
O SeedProd é o melhor tema e construtor de páginas de destino para WordPress.
Seu construtor de arrastar e soltar permite que você crie páginas de destino incríveis e adicione um cronômetro de contagem regressiva para chamar a atenção do visitante.

Para usar o recurso de cronômetro de contagem regressiva, você precisará do SeedProd Pro. Com o plano Pro, você também pode ter acesso a diferentes modelos, blocos de páginas para personalização, integrações de marketing por e-mail e muito mais.
A primeira coisa que você precisa fazer é instalar e ativar o plug-in do SeedProd Pro em seu site do WordPress. Para obter mais detalhes, consulte nosso guia passo a passo sobre como instalar um plug-in do WordPress.
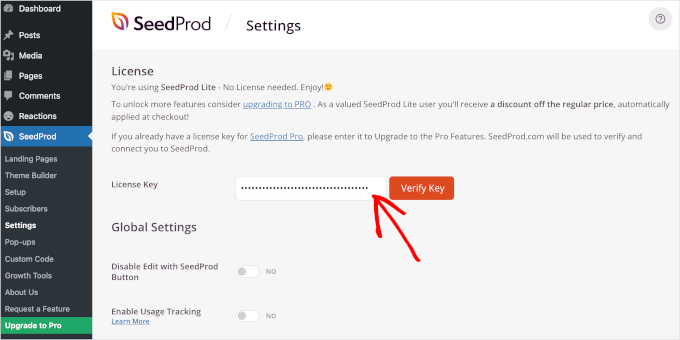
Após a ativação, você pode acessar SeedProd “ Settings (Configurações ) no painel do WordPress para adicionar e verificar sua chave de licença. Você pode obter essa chave em sua conta do SeedProd.
Depois de inserir a chave de licença, você pode clicar no botão “Verify key” (Verificar chave).
Você também pode instalar o SeedProd Pro manualmente. Antes de fazer isso, certifique-se de ter baixado o arquivo .zip do SeedProd Pro de sua conta do SeedProd.
Em seguida, você pode acessar Plugins “ Add New Plugin e clicar no botão “Upload Plugin” para que ele mostre a opção “Choose file”. Vá em frente e carregue o arquivo .zip do SeedProd Pro.
Depois disso, basta clicar no botão “Install Now” (Instalar agora).
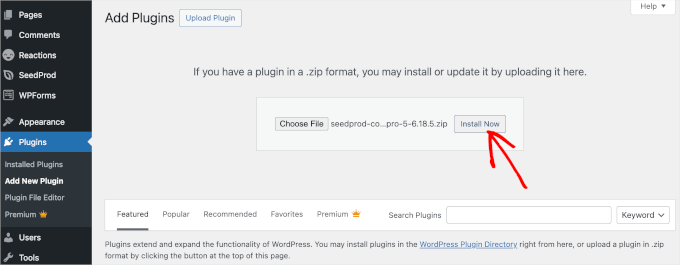
Agora, você está pronto para criar uma nova página de destino. Para começar, você deve navegar até SeedProd ” Landing Pages.
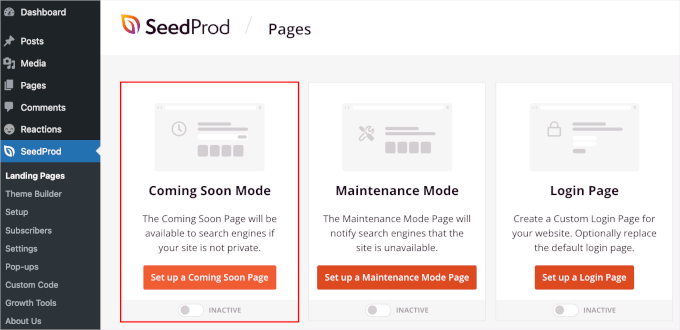
O SeedProd permite que você configure diferentes tipos de páginas, incluindo as páginas de lançamento em breve, páginas personalizadas de carrinho do WooCommerce, páginas de login e páginas 404. Você também pode criar outras páginas de destino clicando no botão “Add New Landing Page” (Adicionar nova página de destino), como uma página de agradecimento ou uma página para se inscrever em um webinar.
Para este tutorial, usaremos a página “Em breve”. Esse é um ótimo lugar para adicionar um cronômetro de contagem regressiva e lembrar seu público sobre um produto ou evento futuro.
Vamos clicar no botão “Set up a Coming Soon Page” (Configurar uma página em breve).
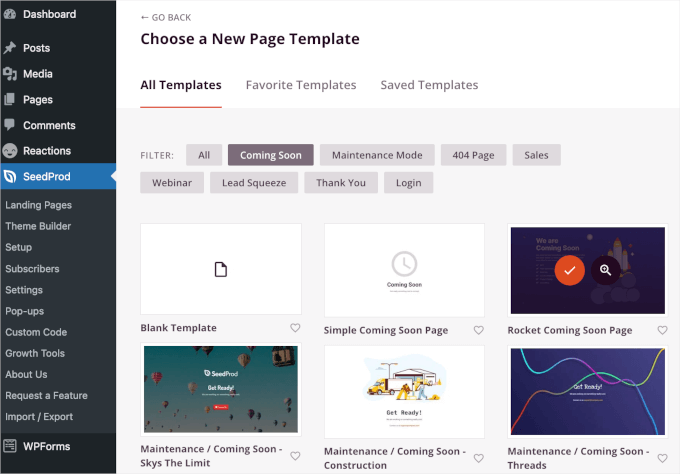
Em seguida, você selecionará um modelo para sua página de destino.
Embora exista a opção de criar uma página do zero usando um modelo em branco, recomendamos o uso de um modelo, pois isso economiza tempo e permite que você edite o design como quiser.
Depois de encontrar o modelo perfeito, você pode passar o mouse sobre ele e clicar no botão “verificar” para usá-lo.
Na próxima tela, você será levado ao construtor de páginas de arrastar e soltar do SeedProd na guia “Design”.
Aqui, você pode personalizar a página de destino adicionando ou removendo seções e blocos. Você também pode formatar o layout da página.
Para adicionar o cronômetro de contagem regressiva, basta rolar para baixo no painel esquerdo até a seção de blocos “Advanced”. Em seguida, arraste e solte o bloco “Countdown” (Contagem regressiva) em qualquer lugar de sua página de destino.

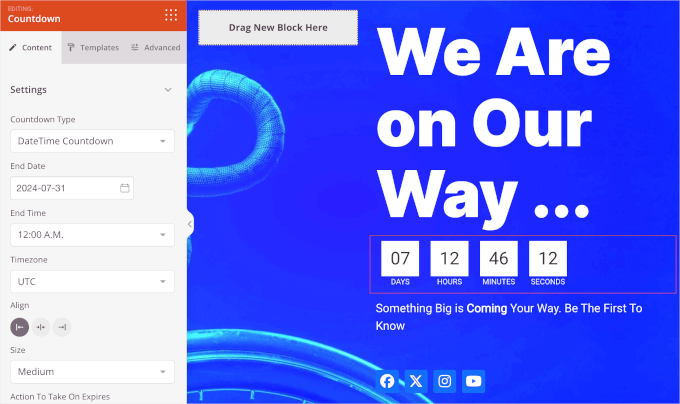
Depois de adicionar o bloco de contagem regressiva, vamos personalizá-lo. Basta clicar nele e você verá as opções de personalização no painel esquerdo.
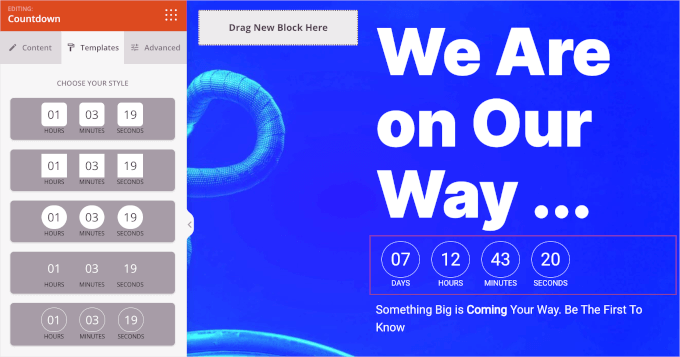
Há três guias que você pode verificar: “Content” (Conteúdo), “Templates” (Modelos) e “Advanced” (Avançado). Vamos verificá-las uma a uma.
Na guia “Content” (Conteúdo), você pode escolher um tipo de contagem regressiva, definir a data e a hora de término, selecionar um fuso horário, ajustar o alinhamento do cronômetro e muito mais.
Agora, vamos passar para os “Modelos”.
Aqui, o SeedProd permite que você escolha entre 5 estilos de cronômetro de contagem regressiva disponíveis.
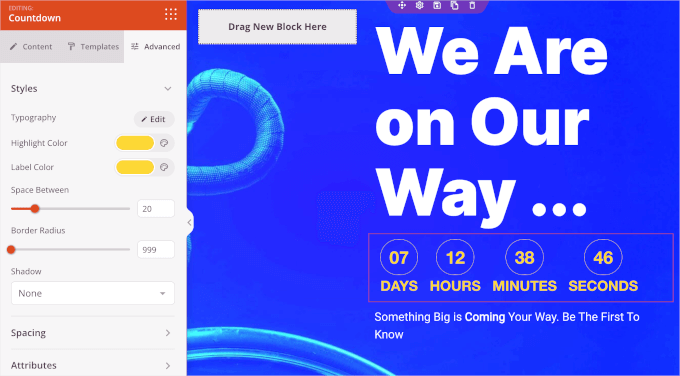
Por fim, a guia “Advanced” tem várias seções.
A seção “Styles” (Estilos) permite alterar as configurações de tipografia, cores e bordas do timer.
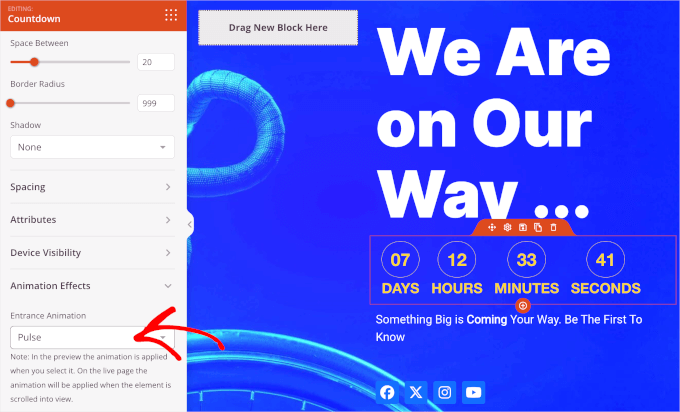
Em seguida, role a guia “Advanced” (Avançado) para baixo até a seção “Animation Effects” (Efeitos de animação).
Aqui, você pode aplicar animação para destacar o cronômetro de contagem regressiva quando os visitantes o virem. Basta clicar no menu suspenso e escolher entre os efeitos disponíveis, como “Flash”, “Pulse”, “Swing”, “Wobble” e outros.
Se quiser ajustar os outros elementos da página de destino, como os textos ou os botões de mídia social, clique neles. Em seguida, o SeedProd abrirá as opções de personalização.
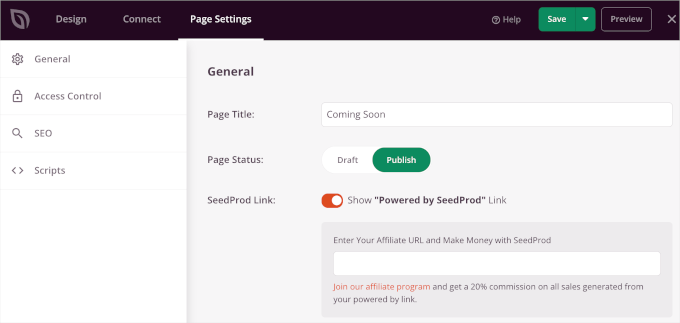
Quando tudo estiver definido, clique na guia “Configurações da página” para publicar sua página de destino com um cronômetro de contagem regressiva.
A primeira coisa que você deve fazer é dar um título à página de destino. Por exemplo, nomeamos nossa página de destino como “Em breve”.
Em seguida, você pode alterar o “Status da página” de “Rascunho” para “Publicar”. Você também tem a opção de mostrar ou ocultar o link “Powered by SeedProd”.
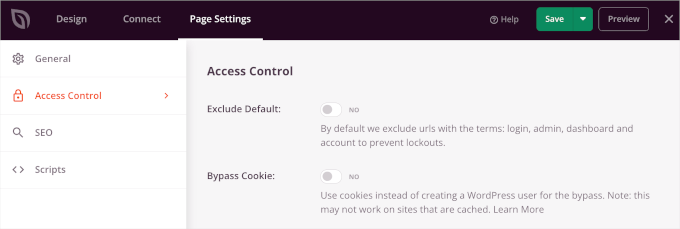
Em seguida, vamos marcar “Access Control” (Controle de acesso) na guia “Page Settings” (Configurações da página) e gerenciar quem pode visualizar sua página de destino.
Esse recurso é realmente útil se você quiser que determinadas pessoas possam ignorar a página “Coming Soon” e trabalhar no desenvolvimento do seu site. O SeedProd também permite que você inclua e exclua URLs nos quais a página “Coming Soon” será exibida.
Por padrão, a página ficará visível em todo o site. No entanto, você pode alterá-la para que seja exibida somente na página inicial ou em URLs específicos.
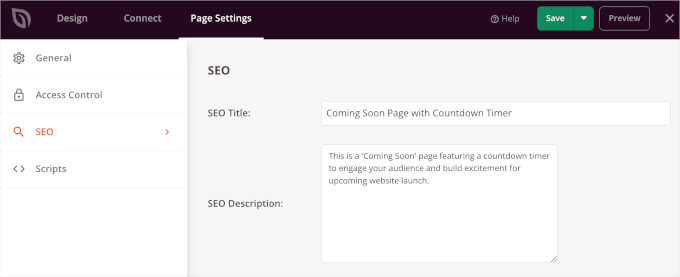
Depois disso, você pode otimizar sua página para os mecanismos de pesquisa acessando as configurações de SEO.
O SeedProd permite adicionar um título de SEO, uma descrição, um favicon e uma miniatura de mídia social.
Se quiser adicionar trechos de código à sua landing page, vá até a seção “Scripts” em Configurações da página. Aqui, você pode adicionar scripts ao cabeçalho, corpo e rodapé de sua página.
Por exemplo, você pode adicionar o código de rastreamento do Google Analytics no campo “Scripts de cabeçalho” para ver como as pessoas usam sua página de destino.

Quando terminar, certifique-se de clicar no botão “Salvar”. Você também pode visualizar sua página de destino para ter certeza de que tudo está configurado corretamente.
Depois disso, basta clicar no botão “X” para fechar o editor do SeedProd.
Agora, acesse SeedProd ” Landing Pages e altere o status de sua página “Coming Soon” (Em breve) para “Active” (Ativo).
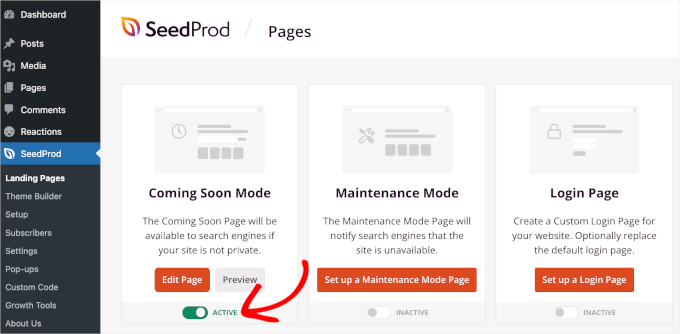
É isso aí. Sua página de destino com um cronômetro de contagem regressiva estará no ar.
Agora você pode visitar seu site para ver o cronômetro de contagem regressiva em breve em ação.

Esperamos que este artigo tenha ajudado você a aprender como adicionar um widget de cronômetro de contagem regressiva no WordPress. Em seguida, talvez você também queira conferir mais truques interessantes de design de sites sobre como adicionar um ticker de notícias com rolagem e como adicionar depoimentos rotativos no WordPress.
Se você gostou deste artigo, inscreva-se em nosso canal do YouTube para receber tutoriais em vídeo sobre o WordPress. Você também pode nos encontrar no Twitter e no Facebook.


Mrteesurez
Count down can also be use for FOMO to create fear of missing out or sense of emergency product sales especially when offering a huge discount for a product.
Thanks for the post.
Kate O'Neill
I would like to add a second count-down widget to our website. How do I do that? Thanks.
Keith Davis
Just what I’m looking for guys – I’ll give this one a try.
Gautam Doddamani
splendid ..this is extremely useful for announcing a giveaway or a hot deal