Ever notice how your WordPress site gets slower as you add more plugins? We’ve been there. After managing hundreds of WordPress sites over the past decade, we’ve learned that it’s not just about how many plugins you have, it’s about how you manage them.
The truth is, most WordPress users don’t realize that not every plugin needs to run on every page. This is where Plugin Organizer comes in, a tool we’ve used countless times to boost site speed without sacrificing functionality.
In this guide, we’ll walk you through exactly how to use Plugin Organizer to speed up your WordPress site. We’ve tested this approach on sites of all sizes, and the results are consistently impressive: faster loading times and happier visitors.
How Do WordPress Plugins Affect Your Website Speed?
WordPress plugins are like apps for your WordPress site. They let you add the features you need, such as contact forms, eCommerce functionality, social media integration, and improved security.
Whenever someone visits your site, WordPress will load its core files, followed by all your active plugins. You can learn more about this process in our guide about WordPress plugins and how they work.
We’ve found that well-coded plugins are designed to load only when needed and should not slow down your entire website all the time.
However, even the best plugin developers can’t anticipate exactly how you’ll use their plugin on your specific site. We’ve seen many cases where high-quality plugins load unnecessarily, simply because they don’t know which pages actually need their functionality.
Because of this, some plugins might load their code on all pages, even when it isn’t needed. If these plugins load extra files (like JavaScript and CSS), then your website may take longer to load. See our guide on how WordPress plugins affect your site’s load time.
This doesn’t mean plugins are bad. The key is to use plugins wisely and manage them well.
💡 Does your website have a lot of plugins installed?
If so, managing them by yourself can feel overwhelming. In that case, you may want to consider leaving page speed optimization to the professionals. That way, you can focus on growing your online business.
With WPBeginner’s Site Speed Optimization Service, our team of WordPress experts will audit and overhaul your site to improve performance and boost organic traffic.
Schedule a free call with our team today!
How Can Plugin Organizer Speed Up Your Site?
Depending on the plugins you are using, some may be necessary only on specific pages, posts, or post types.
For example, you may only need some plugins in the WordPress admin area, so they shouldn’t load on the front end of the website. Or, if you use a contact form plugin, then it only needs to run on pages where your form is displayed, such as your Contact page.
Plugin Organizer is a WordPress plugin that controls your plugins in many ways so you can fine-tune your website performance. In this tutorial, you will learn how to use it to do the following:
- Use Plugin Organizer to Manage Active WordPress Plugins
- Create an MU Plugin for Plugin Organizer
- Set Up Global Plugin Options
- Enable or Disable Plugins on the Search Results Page
- Selectively Enable or Disable Plugins for Certain Post Types
- Group Plugins and Change Plugin Load Order
- Enable or Disable a Plugin on a Single Post or Page
- Troubleshoot Plugin Organizer Issues
Let’s dive right in!
Use Plugin Organizer to Manage Active WordPress Plugins
First, make sure you have installed and activated all of the plugins you want to use on your WordPress website. Plugin Organizer is unable to activate or use inactive plugins.
For more details, see our step-by-step guide on how to install a WordPress plugin.
After that, you should also install and activate the Plugin Organizer plugin.
Important: This is a very powerful plugin. Reordering or disabling plugins can cause conflicts and unexpected behavior, which could make your site inaccessible. We strongly recommend that you create a complete WordPress backup before disabling or reordering any plugins.
Once you are ready, you need to head over to the Plugin Organizer » Settings page to configure your settings.
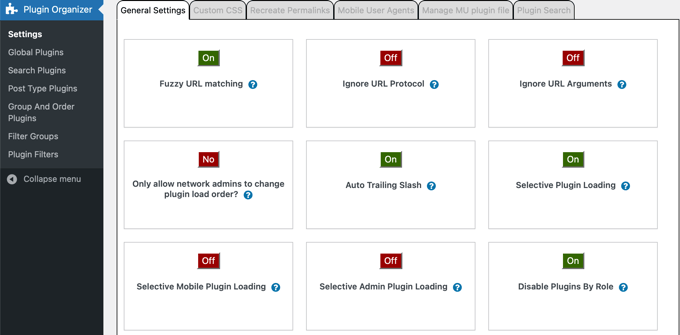
This page has several options, and we will examine each one, explaining what it does and which ones you should turn on.
- Fuzzy URL Matching allows you to enable or disable plugins for child URLs. This means that if the settings affect
http://example.com/sample-page/, then they will also affect child URLs likehttp://example.com/sample-page/child-page/. - Ignore URL Protocol allows Plugin Organizer to ignore the HTTP and HTTPS parts of plugin URLs. This option is turned off by default but is particularly helpful if SSL is enabled.
- Ignore URL Arguments allows you to ignore URL arguments like the characters after ‘?’ in
http://example.com/page/?foo=1&bar=2. You should normally leave this setting OFF. - Only Allow Network Admins to Change Plugin Load Order? allows only network administrators to rearrange plugin order on a WordPress multisite network. We highly recommend that you turn this setting on if you have a WordPress multisite network.
- Auto Trailing Slash adds or removes the trailing slash at the end of plugin filter URLs based on your WordPress permalink settings.
- Selective Plugin Loading allows you to selectively load plugins even if they are disabled in plugin settings. Leave this feature on to enable or disable plugins for individual content types. To use this option, you need to create an MU plugin (next section).
- Selective Mobile Plugin Loading allows you to selectively enable or disable plugins on mobile browsers.
- Selective Admin Plugin Loading forces certain plugins to load only inside the WordPress admin area and not on your website’s front end.
- Disable Plugins By Role allows you to disable plugins by user roles. You need to click the checkboxes for these roles in the ‘Role Support’ box near the bottom of the page.
Once you have toggled your desired settings on and offer, don’t forget to click the ‘Save Settings’ button at the bottom of the page to store your changes.
Create an MU Plugin for Plugin Organizer
Plugin Organizer needs a must-use (MU) plugin to work properly. The plugin will try to automatically add it to your website, but if it fails then you will have to create it yourself.
You can easily find out whether the plugin has successfully created the MU plugin.
Simply visit the Plugins » Installed Plugins page and look for the ‘Must-Use’ link above the list of plugins. Clicking this link will show you the installed MU plugins on your site.
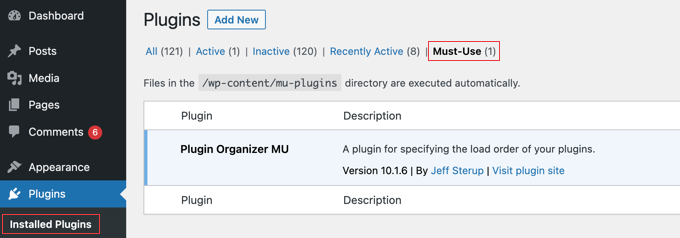
If you don’t see the ‘Must-Use’ plugins link, then Plugin Organizer failed to create it automatically, and you will need to create it manually.
First, you need to connect to your website using an FTP client or the File Manager app in cPanel.
You should navigate to the /wp-content/plugins/plugin-organizer/lib/ folder and download the file called PluginOrganizerMU.class.php to your computer.
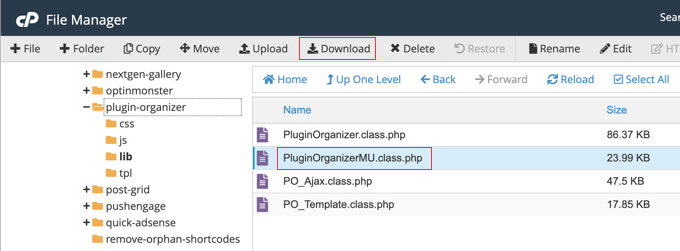
Next, go to the /wp-content/mu-plugins/ folder. If you don’t have a mu-plugins folder in your /wp-content/ folder, then you need to create one.
Finally, you need to upload the PluginOrganizerMU.class.php file from your computer.

Plugin Organizer can now use this file to properly manage your plugins.
Set Up Global Plugin Options
Plugin Organizer allows you to disable certain plugins, even if they are active. These plugins will not load on any page unless they are specifically allowed in the post or page. In the sections below, we will show you how to allow them.
To set up which plugins remain active and which are disabled, you need to go to the Plugin Organizer » Global Plugins page.
The plugins listed on this page are color-coded. Plugins highlighted in green are enabled and active, while plugins highlighted in gray are enabled and inactive.
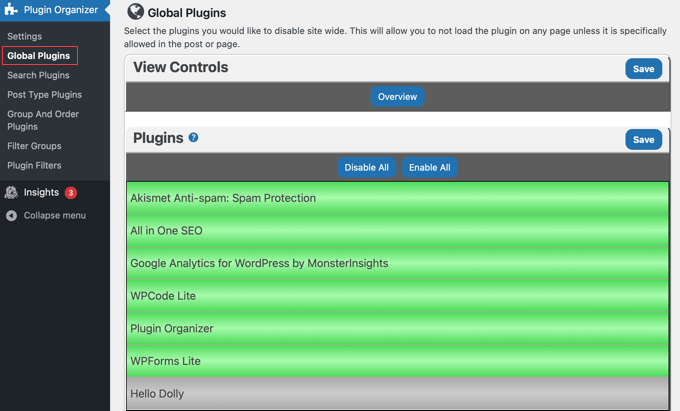
You can disable a plugin globally or sitewide simply by clicking it so that it turns red. This will disable the plugin without deactivating it.
On most pages in Plugin Organizer, you can also disable or enable all plugins at once using the ‘Disable All’ and ‘Enable All’ buttons at the top of the list.
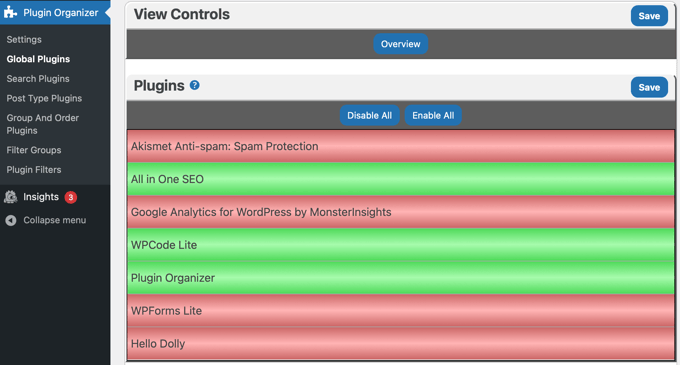
If you make a mistake, then just keep clicking it until it is the right color. Don’t forget to click the ‘Save’ button to store your settings once you are finished.
Now, as we said, you can re-enable the plugin you disabled wherever it is needed, such as for individual post types, single posts or pages, and individual URLs from different pages in the plugin settings. We will walk you through each of them later in this article.
Enable or Disable Plugins on the Search Results Page
You may be able to improve performance and user experience by enabling or disabling plugins on the WordPress search results page. For example, you could disable your popup plugin on that page so you don’t interrupt users during their search.
To disable or enable certain plugins on search results, you will need to visit the Plugin Organizer » Search Results page.
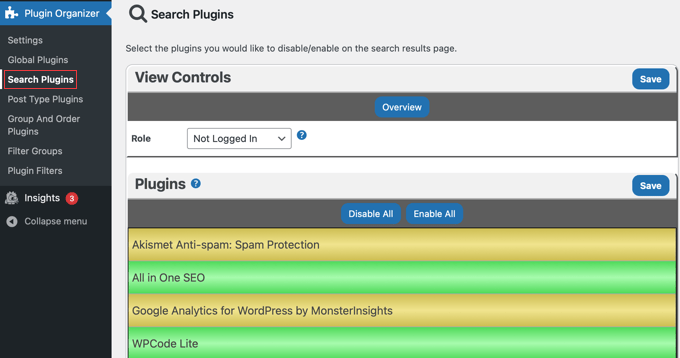
On this screen, simply click a plugin so that it turns red. This will disable it on the WordPress search results page. You can also make a plugin green to enable it on the search page.
By default, these settings will affect users who are not logged in.
To configure the plugins for logged-in users, you need to click the ‘Role’ drop-down at the top of the screen and select ‘Not Logged In’ from the menu.
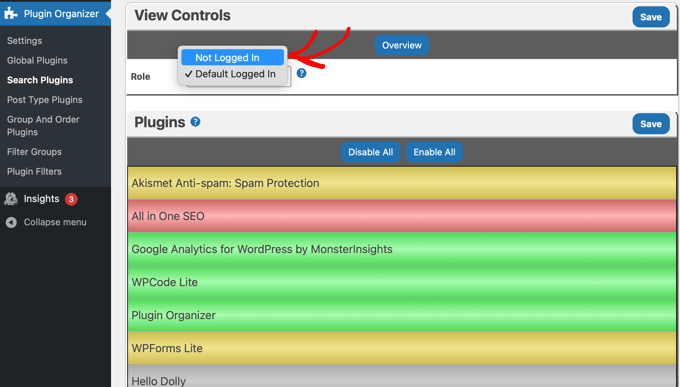
Notice that the plugins we disabled globally are highlighted in yellow.
You can enable these plugins so they are loaded on the search results page by clicking them so they appear green, as we did with the MonsterInsights plugin in the screenshot above.
Make sure you click the ‘Save’ button to store your changes.
Selectively Enable or Disable Plugins for Certain Post Types
WordPress lets you create your content using post types such as posts and pages. You can also create custom post types in WordPress. Plugin Organizer lets you selectively enable or disable plugins for certain post types.
For example, you can enable a plugin on pages but disable it on posts. This might be useful if you display forms only on pages and want to disable the plugin on posts.
To control which plugins work on certain post types, you need to visit the Plugin Organizer » Post Type Plugins page.
First, choose a post type by clicking the ‘Post Type’ drop-down at the top of the page. You should see options for ‘post’ and ‘page’, and if you have created custom post types they will be listed too.
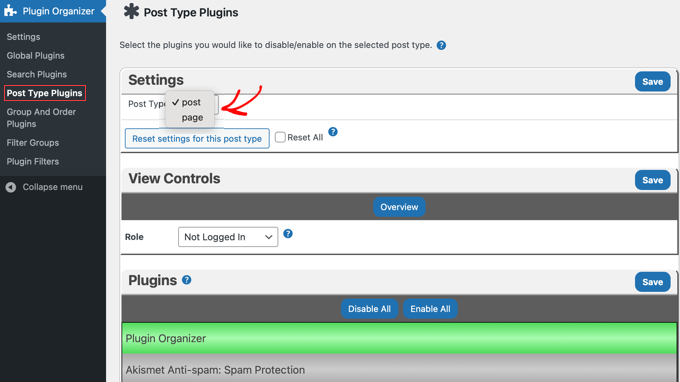
To disable a plugin for that post type, simply click it so it appears red.
You can enable a plugin that you disabled on the Global Plugins page by clicking it so it no longer appears yellow.
Like the Search Plugins page above, there are different settings for logged-in users and non-logged-in users.
Don’t forget to click the ‘Save’ button to store your changes.
Group Plugins and Change Plugin Load Order
By default, WordPress loads your current active plugin files alphabetically. This alphabetical order may sometimes cause conflicts if you have one plugin that depends on another’s code.
For example, you might have a plugin file apple.php that relies on functions in the zebra.php plugin. In that case, you may need to load zebra.php first so that apple.php works properly.
You can learn more in our guide about how to check for WordPress plugin conflicts.
Plugin Organizer allows you to manually change the plugin order and group plugins. However, you must be very careful when doing this because you could accidentally trigger new conflicts that break your site.
Note: If you haven’t already, now would be a good time to create a backup of your site. The easiest way to do this is using a backup plugin. Just make sure you also know how to restore your backup in case of an emergency.
To rearrange the plugin load order, visit the Plugin Organizer » Group and Order Plugins page.
Plugin Organizer will display your plugins in default alphabetical order, and you can rearrange the order by simple drag and drop.
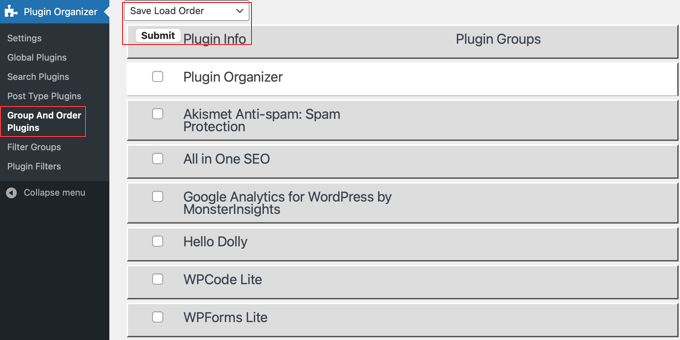
To save the new plugin load order, make sure that ‘Save Load Order’ is selected from the drop-down at the top of the page. It is by default. After that, simply click the ‘Submit’ button.
You can also group plugins by selecting ‘Create New Group’ from the drop-down menu at the top. Next, you need to enter a name for the group and select the plugins you want to add to it.
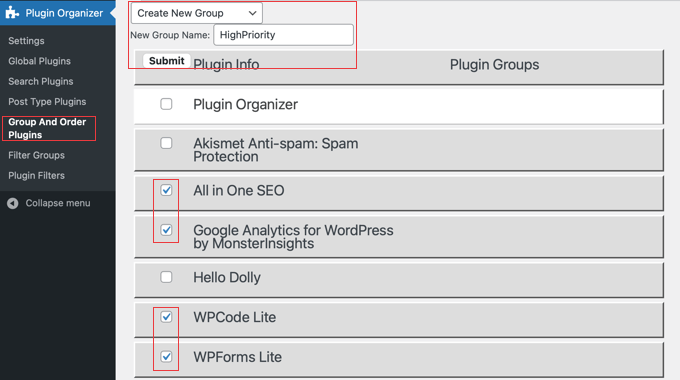
Once you are done with the group, click the ‘Submit’ button to continue. Plugin Organizer will now create the plugin group for you and add the checked plugins.
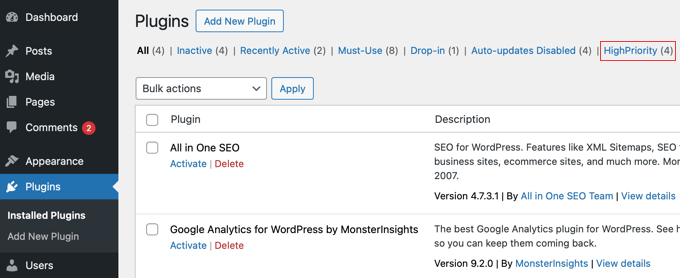
Now, if you go to the Plugins page, then you will see a new link named after your group name. When you click on it, you will see all the plugins inside that group.
Enable or Disable a Plugin on a Single Post or Page
There may be times when you wish to load or disable plugins on a specific post, page, or custom post type. Plugin Organizer lets you do this as well.
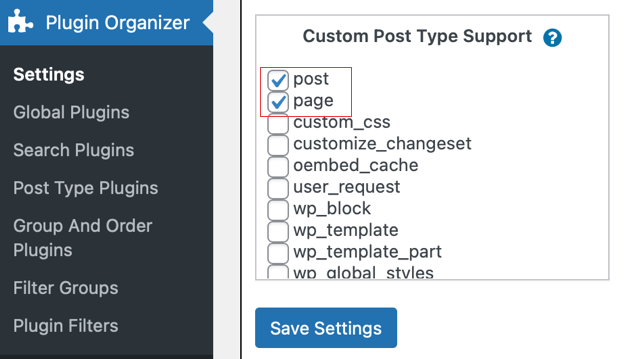
First, make sure that you have enabled support for the correct post type on the Plugin Organizer » Settings page. Make sure you click the ‘Save Settings’ button if you make any changes.
Next, go to the specific post, page, or custom post type you want to change and open the WordPress content editor.
Then, scroll down below the content editor until you come to the ‘Plugin Organizer’ section.
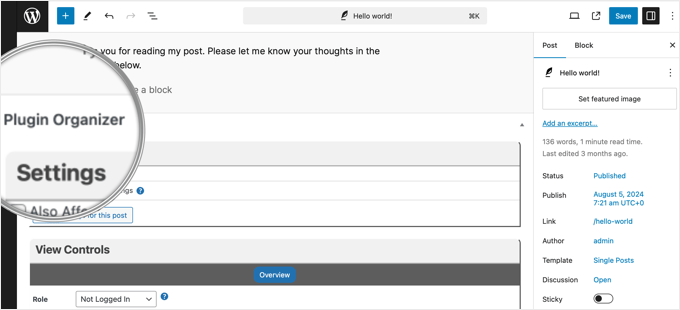
You will see the Plugin Organizer settings with your plugins. You can now enable or disable specific plugins as you did earlier:
- Enable a specific plugin by clicking it until it is green.
- Disable a plugin by clicking it until it is red.
- You can also enable a plugin you disabled globally by making it green.
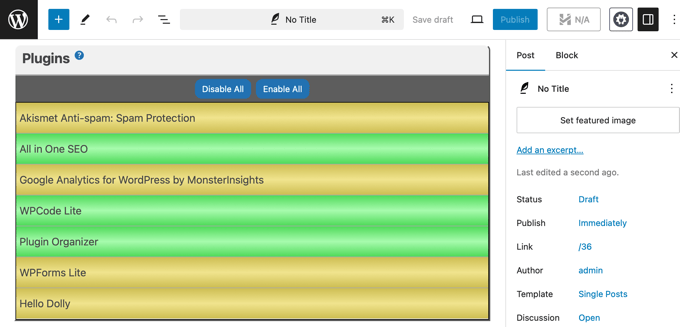
Don’t forget to click on the ‘Save changes’ or ‘Update’ button to store your changes.
Troubleshoot Plugin Organizer Issues
Based on our extensive testing, we’ve learned that Plugin Organizer’s power to modify plugin behavior comes with responsibility. We’ve encountered (and resolved) various issues while optimizing client sites, from minor conflicts to the dreaded white screen of death.
A quick way to resolve those issues is by deactivating all your WordPress plugins via FTP. This will deactivate Plugin Organizer as well.
To uninstall Plugin Organizer, simply delete the plugin from the Plugins page in WordPress admin. This will delete the plugin and all of its settings. You can then reinstall the plugin if you want.
If you need additional guidance, check out our comprehensive list of the most common WordPress errors and how to fix them.
If you don’t see your error listed, then try our step-by-step WordPress troubleshooting guide to find the cause of the error and possible solutions.
We hope this article helped you use Plugin Organizer to speed up your WordPress site. You may also want to check out some other guides on how plugins affect WordPress performance:
- How WordPress Plugins Affect Your Site’s Load Time (Revealed)
- How Many WordPress Plugins Should You Install? What’s too many?
- How to Disable Specific WordPress Plugins for Mobile Users
- Do Inactive Plugins Slow Down WordPress? Should You Delete Them?
- Best WordPress Caching Plugins to Speed Up Your Website
If you liked this article, then please subscribe to our YouTube Channel for WordPress video tutorials. You can also find us on Twitter and Facebook.


Stergios Gogos
WOW guys – just wow!!! My website’s homepage just gained 2.19 seconds load time. Thanks!!!
Michael Zorko
This may be the greatest READ for any newcomer to WP. When I first started as a Wordpress Designer/Planner I would use tons of plugins – some of them overlapped in what they could do, but you needed yet another because one would do what another wouldn’t (did that make sense?). Over time – I started to learn to develop my own plugins (yes, this takes time…but worth it). So I could make my own functionality… this plugin is awesome because it takes the old me…and makes him likable again