Do you want to set an expire date for widgets in WordPress?
By automatically removing a widget after a certain date and time, you can easily run time-sensitive campaigns and promotions with a firm ending date.
In this article, we’ll show you how to set an expiration date for any type of widget on your WordPress site, step by step.

Why Set an Expiry Date for Widgets in WordPress?
Usually when you’re running a promotional campaign, it’s only going to be live for a certain amount of time. Running time-sensitive campaigns is a great way to use FOMO to increase conversions and make more sales.
You can save time by setting your widgets to expire automatically instead of removing your sales widgets manually when the campaign is up.
For example, if you’re running a holiday or Black Friday promotion, then you can have your promotional widget expire the moment the sale is over.
This saves you time, so you can focus on other parts of growing your WordPress business. It also prevents people from claiming any sales or promotions after they’ve already ended.
Some other ways to use time-sensitive offers to increase sales include scheduling coupons and using countdown timer widgets to promote events.
With that said, let’s show you how to set an expire date for widgets in WordPress easily.
Setting an Expire Date for Widgets in WordPress
The easiest way to set an expiration date on your widgets is by using a WordPress plugin. We recommend using the Dynamic Widgets plugin since it lets you add expire dates to your widgets with a couple of clicks.
Note: We’ve tested the plugin as of this post’s last updated date, and it works with WordPress 5.7.2 with no issues.
First thing you need to do is install and activate the plugin. For more details, see our beginner’s guide on how to install a WordPress plugin.
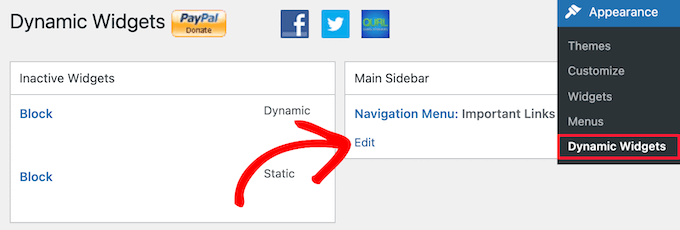
Upon activation, go to Appearance » Dynamic Widgets. This brings you to a screen where you can see your active and inactive widget areas.
If you don’t have any widget areas live on your WordPress website, then you need to create them now. For more details, see our guide on how to create a custom WordPress widget.
After that, simply hover over the widget area you want to set to expire and click the ‘Edit’ button.

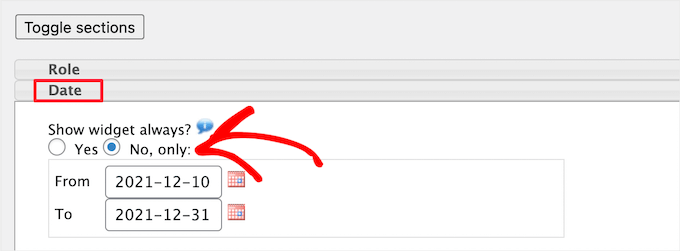
Next, click the ‘Date’ menu drop down, and select the ‘No, only’ button option.
Then, you can enter your ‘From’ date and ‘To’ date into the boxes. Once the date passes, the widget will expire and no longer display on your website.

Once you’re finished making changes, click the ‘Save’ button, and your widget will now be live. Upon expiration, your widget will still be available in your widget admin panel, but it won’t be displayed publicly on your website.
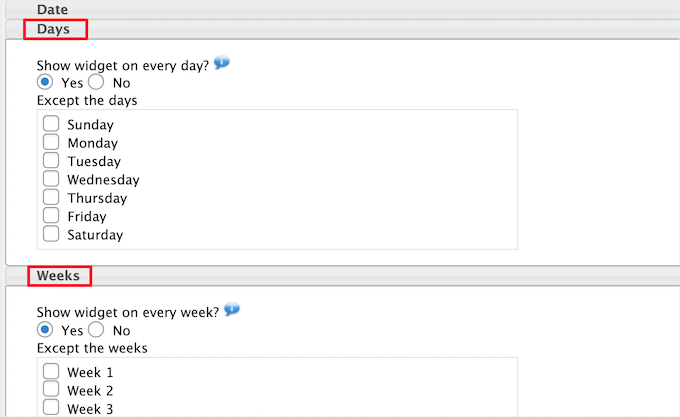
You can also hide and show widgets based on other time factors. For example, you can choose to hide widgets on certain days of the week or hide widgets on certain weeks of the year.
Simply click on the drop down for the time expiration elements you want to add. If you make any more changes, then make sure to click the ‘Save’ button.

We hope this article helped you learn how to set expire date for widgets in WordPress. You may also want to see our guide on how to create an email newsletter and our expert picks of the best payroll software for small businesses.
If you liked this article, then please subscribe to our YouTube Channel for WordPress video tutorials. You can also find us on Twitter and Facebook.


Osmel
Does the date option work in a local enviroment?. I had been using other options of dynamic widget and worked perfectly but date option did´t work, at least in my testing local site
Laurent
Thanks for this tip! Very very useful, probably for a lots of people. More than 300,000 downloads for this plugin!
adolf witzeling
Great tip. Perfect for running time-sensitive promos.
Lois Dupre
Well that was just too easy! Just what I needed for my affiliate links that only run for a certain length of time.
Thanks
Lois