Images can really make a blog post pop. We came across a recent study that found that articles with images get 94% more views compared to those without. That’s huge!
We always add a featured image to our articles on WPBeginner. Not only does this make our content more appealing, but it also encourages people to share it on social media.
Now, most WordPress themes use featured images (or post thumbnails). But let’s be honest, finding the perfect image for every post can take up a lot of time.
You might like to try setting a default image to save time and keep your site visually consistent.
In this article, we will show you how to optimize your WordPress site’s visual strategy by setting a default featured image.

Why Set a Default Featured Image in WordPress?
Featured images, sometimes known as thumbnail images, are the primary images for your WordPress posts and pages.
All popular WordPress themes come with built-in support for featured images.
However, you may sometimes forget to upload a featured image to your posts. If you have other authors posting on your site, then they may not realize the importance and skip over adding a featured image.
WordPress themes typically use featured images in multiple different areas. If you forget to add a featured image, then you may end up with lots of gaps in your website’s design, including in important places like your blog archive or homepage.
For example, in the following image, you can see that OptinMonster shows featured images on their blog index.
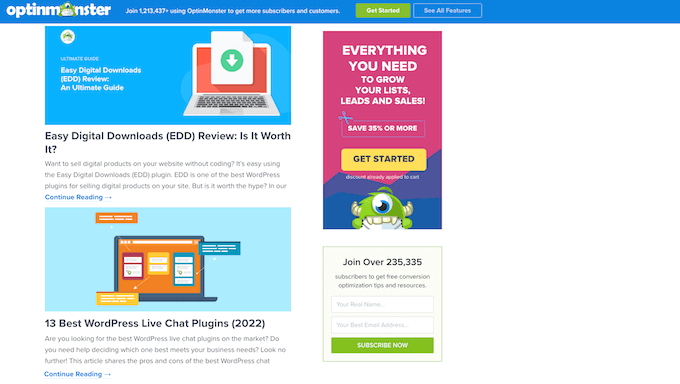
People also find images more engaging than plain text. Posts that don’t have a featured image may get less traffic and lower conversion rates.
With that in mind, it’s a good idea to set a default featured image in WordPress. This gives your site something to show when no featured image is available.
To make it easy for you, we have created quick jump links for the sections:
How to Set a Default Featured Image in WordPress
The easiest way to set a default featured image is by using the Default Featured Image plugin. This plugin adds a new setting to the WordPress Media page where you can upload a fallback featured image.
First, you’ll need to install and activate the Default Featured Image plugin. If you need help, then please see our step-by-step guide on how to install a WordPress plugin.
Upon activation, head over to Settings » Media. Once you’ve done that, just click on the ‘Select default featured image’ button.

You can now either choose an image from the WordPress Media Library or upload a new file.
After choosing your fallback, scroll to the bottom of the screen and click on ‘Save Changes.’
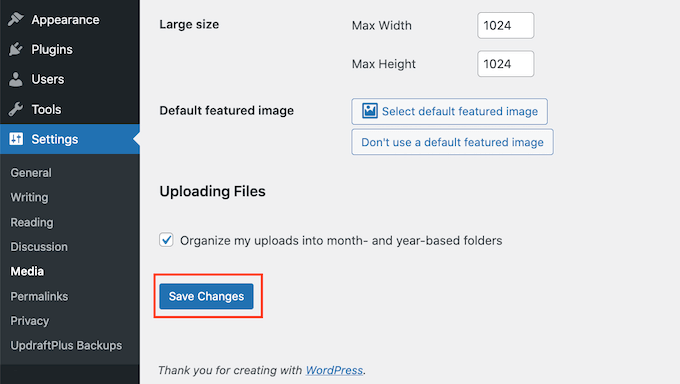
WordPress will now use the image that you selected as your default thumbnail for any posts or pages where you don’t provide a featured image.
You can change the default image at any point by repeating the same process above.
If you no longer want to use a default featured image, then simply go to Settings » Media. Then just click on the ‘Don’t use a default featured image’ button.
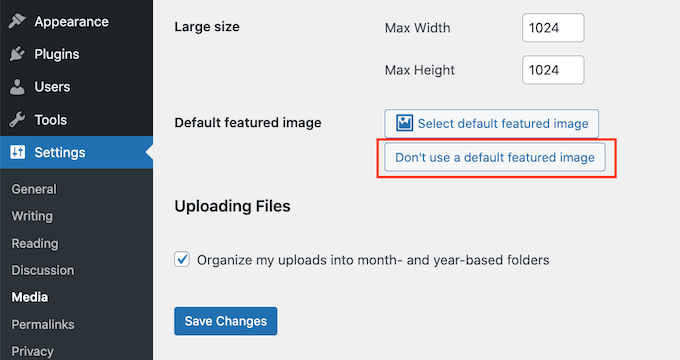
Don’t forget to click on ‘Save Changes’ when you are done.
How to Set a Default Featured Image for Social Media
Social media platforms are a great place to reach new readers, build a following, and get more people to visit your site. To do this, you’ll need to post interesting and engaging content to your social media accounts.
The featured image that’s shared alongside your post can also encourage more people to visit your site.
However, social media sites don’t automatically display your featured image when you share your content. Sometimes they’ll even show the wrong thumbnail. Here’s how to fix the incorrect thumbnail issue in WordPress.
With that in mind, you may also want to set a default featured image for the different social media platforms. These platforms will then use this fallback for any posts that are shared without a unique featured image.
To do this, we recommend using All in One SEO (AIOSEO) plugin.

AIOSEO is the best SEO plugin for WordPress on the market, used by over 3 million websites, including WPBeginner. It offers the most beginner-friendly and comprehensive SEO toolkit to help you fine-tune your WordPress blog or website for search engines.
For this post, we will be using the free version of AIOSEO.
First, you’ll need to install and activate the AIOSEO plugin in WordPress. For more details, please see our tutorial on how to install a WordPress plugin.
Upon activation, the plugin will launch the setup wizard. To configure the plugin, simply click the ‘Let’s Get Started’ button and follow the onscreen instructions. If you need help, then please refer to our guide on how to properly set up All in One SEO in WordPress.
Once you’ve done that, go to All in One SEO » Social Networks.
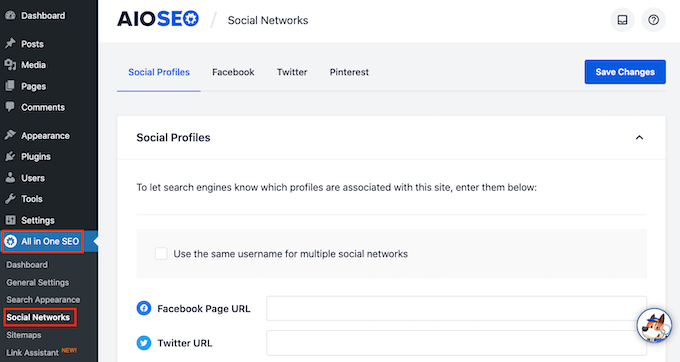
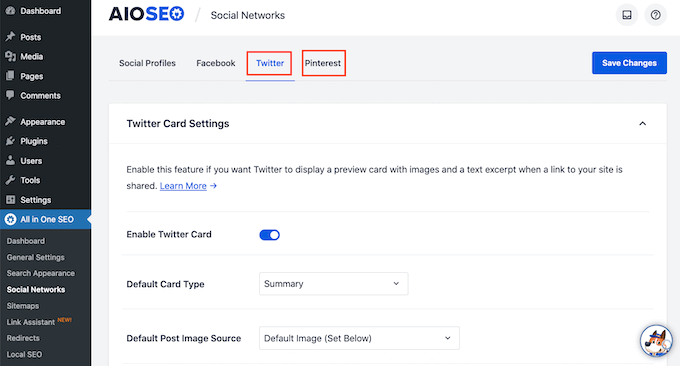
You will now see tabs for Facebook, Twitter, and Pinterest. You can use these tabs to set a unique default image for these different platforms.
As an example, let’s see how you can set a default featured image for Facebook. To get started, click on the ‘Facebook’ tab.

After that, open the ‘Default Post Image Source’ dropdown.
You can then choose ‘Default Image (Set Below).’
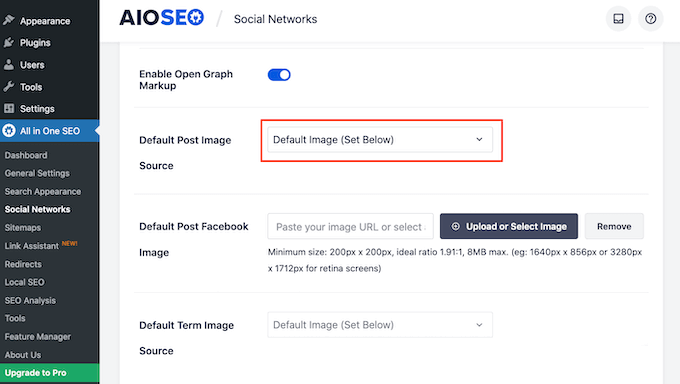
Next, find the ‘Default Post Facebook Image’ section.
Here you’ll see some tips on how to make sure your image looks great when people share it on Facebook.
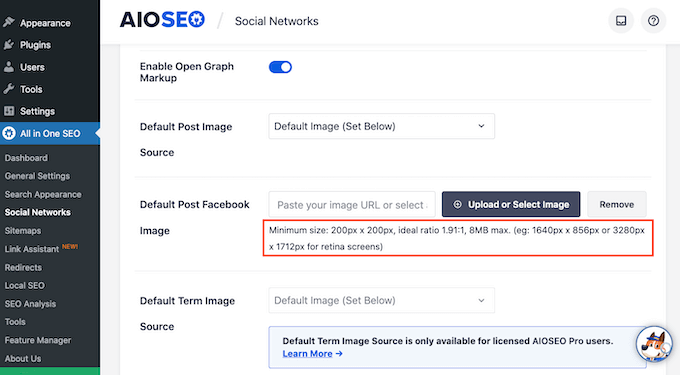
For more information, please see our complete social media cheat sheet for WordPress.
To set your default featured image, click on the ‘Upload or Select Image’ button.
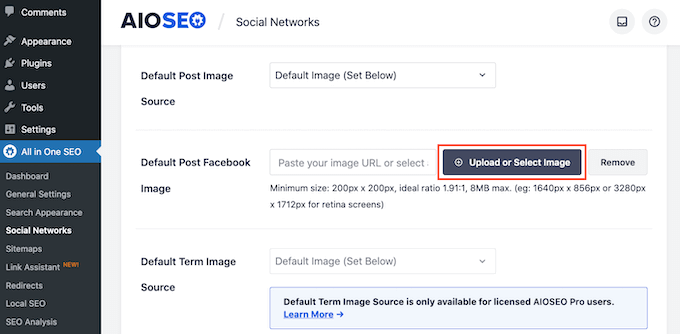
This opens the WordPress Media Library. You can now either choose an image from your media library or upload a new file.
Finally, click on the ‘Save Changes’ button. After completing this step, Facebook will use this image whenever there’s no featured image available.
To set a default image for Twitter or Pinterest, simply click on the ‘Twitter’ or ‘Pinterest’ tab. You can then choose a fallback image following the same process described above.
Expert Guides on Featured Images in WordPress
We hope this article helped you learn how to set a default featured image in WordPress using a plugin. You may also want to see some other guides related to featured images in WordPress:
- Glossary: Featured Image
- How to Add Featured Images or Post Thumbnails in WordPress
- Cover Image vs. Featured Image in WordPress Block Editor (Beginner’s Guide)
- How to Fix Featured Image Not Showing in WordPress
- How to Set A Fallback Featured Image Based on Post Category in WordPress
- How to Automatically Link Featured Images to Posts in WordPress
- How to Add Multiple Post Thumbnails / Featured Images in WordPress
- How to Fix Featured Images Appearing Twice in WordPress Posts
- How to Bulk Edit Featured Images in WordPress
- How to Require Featured Images for Posts in WordPress
- Best Featured Image Plugins and Tutorials for WordPress
If you liked this article, then please subscribe to our YouTube Channel for WordPress video tutorials. You can also find us on Twitter and Facebook.


Lesley
It solved my problem of not being able to show my podcast image on all my podcast episodes. BUT it over-rode the thumbnail of all my past blog posts with the featured image too. I did not want it to do that
Mohsin Alam
I used this plugin and worked fine but when themes related plugin pulled post then seeing this message Warning: Illegal string offset “class” in ……… on line 221 []
Please suggest me another plugin or help me to fix this error.
WPBeginner Support
Take a look at this tutorial to set default featured image without a plugin.
Admin
Deepa Govind
Is it possible to set up default feature image for each category?
WPBeginner Support
Yes, and we have a handy guide on how to set default featured image for categories in WordPress.
Admin
Dexxe
I want the default image to appear on the home slider but not on the blog page. How can I do that?
Samedi Amba
I tried the technique on my blog, but does not work. The plugin does not add an option to Settings>>Media as mentioned in this article. What could be the problem? Could it be a plugin conflict?
Editorial Staff
It could be a plugin conflict.
Admin