Wondering why your WordPress emails aren’t reaching inboxes? You’re not alone!
Many website owners face this issue because most web hosts restrict the default PHP mail function, causing emails to get lost or end up in spam.
You can fix this easily by using the Gmail SMTP server – a reliable, free solution that ensures your emails are delivered properly. We’ve used it ourselves and found it to be a great choice for bloggers, small businesses, and anyone who wants hassle-free email sending.
In this guide, we’ll show you exactly how to set up Gmail SMTP in WordPress so your emails reach inboxes every time. ✅

Why and When You Need Gmail SMTP Server for WordPress Emails
Your WordPress site sends emails to notify you of new user registration, lost password reset, automatic updates, and notifications from your contact forms.
By default, WordPress uses the PHP mail function to send out email notifications. However, this function doesn’t work as expected for several reasons.
Most WordPress hosting companies restrict usage of this function to prevent abuse and spam.
Spam filters on popular email service providers check incoming emails to monitor if they are sent from authentic mail servers. Sometimes, the default WordPress emails might fail this check and not even make it to the spam folder.
SMTP (Simple Mail Transfer Protocol) is the industry standard for sending emails. Unlike the PHP mail function, SMTP uses proper authentication, which increases email deliverability.
Gmail provides an SMTP service that you can use to send out emails from your WordPress site. Their servers are the best option if you just want to send WordPress notification emails to yourself and a few users on your site.
However, in case you want to send newsletter emails or have an online store.
Then you should use a mass emailing service provider, like Constant Contact, Brevo (formerly Sendinblue), or Mailgun.
Free vs. Paid Gmail SMTP Service for WordPress
You can use your free Gmail account to send out WordPress emails. However, for better deliverability, we recommend using the paid Google Workspace.
With Google Workspace, you get your own professional branded email address, such as name@yoursite.com.
Google Workspace requires you to add MX records to your domain name. This means that your emails will appear to be coming from your domain name, which helps boost authenticity and ensure better deliverability.
If you’d prefer written instructions, just keep reading. Here’s a quick overview of all the methods we’ll cover in this guide:
Ready? Let’s get started.
How to Send WordPress Emails Using Gmail SMTP Server
If you decide to use Google Workspace, then you first need to set up your domain to work with Google Apps. We have a step-by-step tutorial on how to set up a professional email address with Google Workspace.
The rest of the instructions are the same whether you are using a paid or free Gmail account.
Now, WP Mail SMTP is the best WordPress SMTP plugin on the market. It allows you to easily use any SMTP server to send WordPress emails with higher deliverability.
📌 Note: We use WP Mail SMTP ourselves on our site, and we’ve seen how it helps make sure all of our emails reach users’ inboxes – not the spam folder. See our full WP Mail SMTP review for insights into its features!
So, let’s install and activate the WP Mail SMTP plugin. For more details, see our step-by-step guide on how to install a WordPress plugin.
While there is a free version, we recommend buying the paid version called WP Mail SMTP Pro, which gives you access to premium support, more mailers, and a white glove set up by one of their experts.
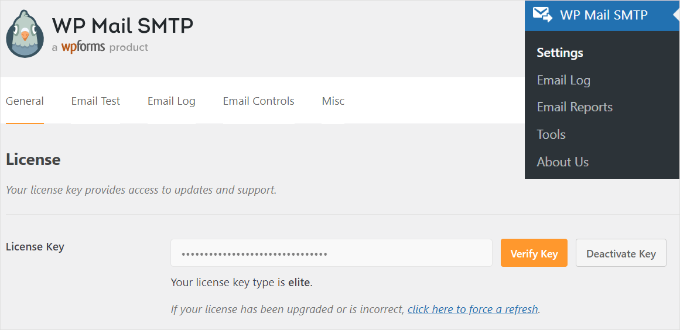
Upon activation, you need to visit the Settings » WP Mail SMTP section to configure the plugin settings. Then, simply enter your license key and click the ‘Verify Key’ button. You can find the key in your WP Mail SMTP account area.
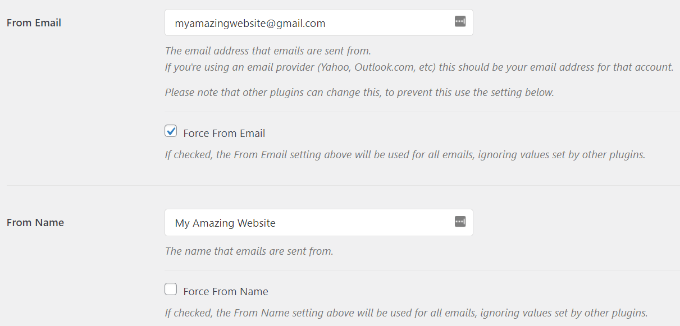
Under the ‘General’ settings tab, you need to make sure that you use your Gmail email address in the ‘From Email’ field.
Next, you need to provide the sender’s name.
WP Mail SMTP plugin offers 3 ways to connect your WordPress site to the Gmail servers:
- The first method uses a one-click install, which is the easiest and most beginner-friendly, but is only available for premium plugin users.
- The second method uses OAuth Authentication. This method is secure and doesn’t require a premium plugin.
- The third method is to manually configure the Gmail SMTP settings. In general, we don’t recommend this method because it’s less secure.
With that in mind, let’s set up WordPress to use Gmail SMTP for sending emails.
Method 1: Setting Up Gmail to Send WordPress Emails Using One-Click Install
This method is the quickest and easiest for everyone, meaning it can help you save time and confusion.
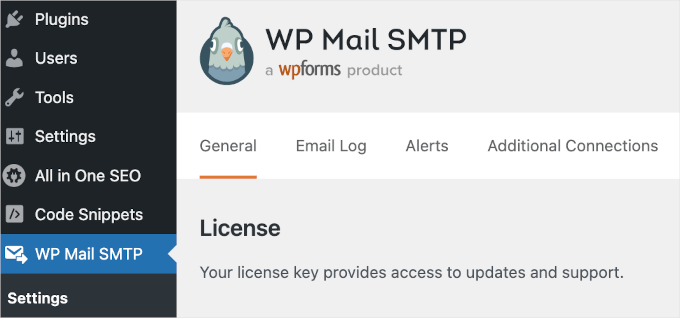
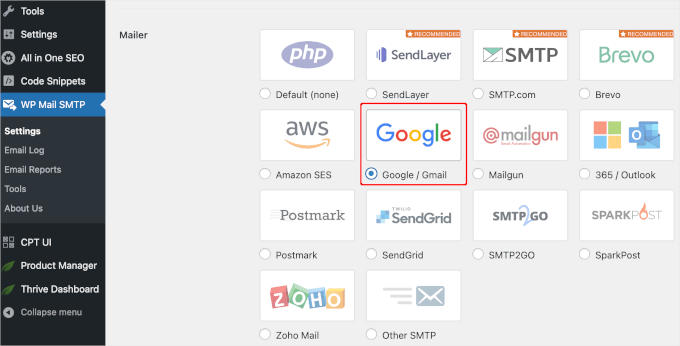
After installing and activating the WP Mail SMTP plugin, let’s navigate to WP Mail SMTP » Settings and make sure you’re in the ‘General’ tab.
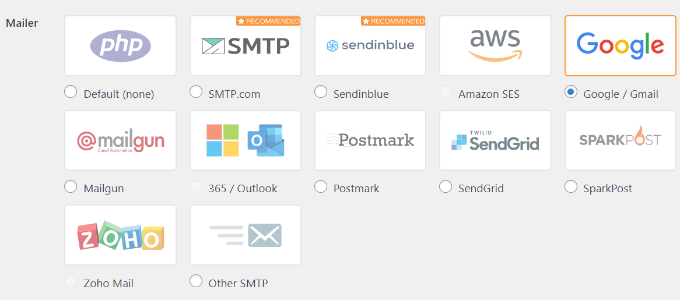
Then, you’ll need to choose ‘Google / Gmail’ under the ‘Mailer’ section.
This will let you use the ‘One-Click Setup’ option.
With that done, the next step is to authorize your Google account.
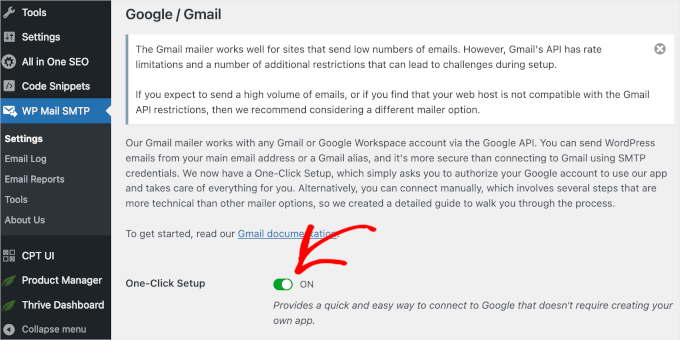
You’ll see a ‘Google / Gmail’ section below ‘Mailer’ on your screen. Go ahead and click the switch to turn on the one-click install feature.
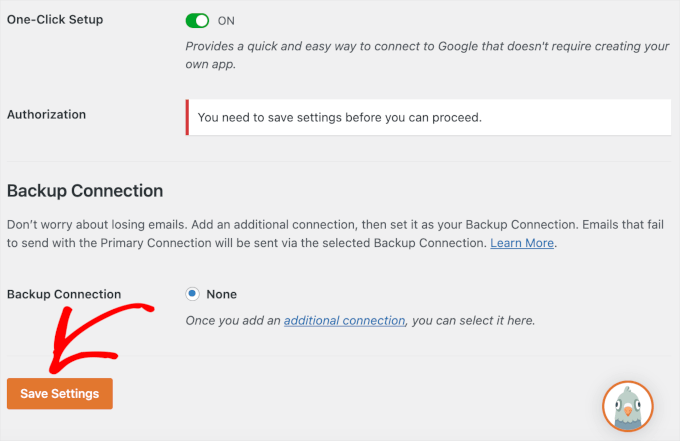
Then, you might see a notification that says you need to save the changes first to continue the authorization process.
So, let’s click the ‘Save Settings’ button.
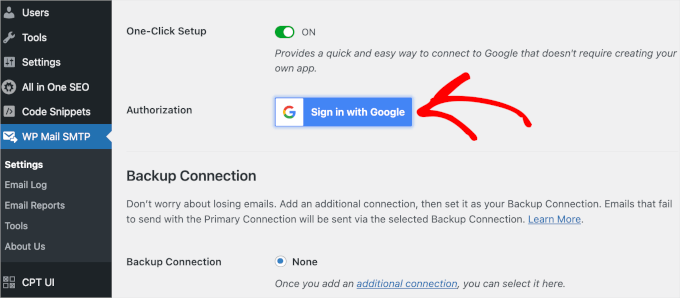
After that, you should be able to continue the process.
You’ll be prompted to sign in to your Google Account. Simply click the ‘Sign in to Google’ button and choose an account.
Then, Google will ask your permission for WP Mail SMTP to send emails on your behalf.
You can click ‘Allow’ to continue.
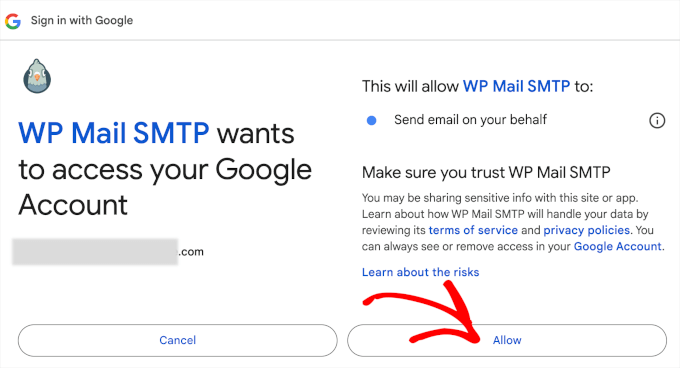
After clicking the button, you’ll be redirected back to the WP Mail SMTP’s ‘General’ tab in your WordPress admin area.
From here, you’ll want to scroll down to the ‘Authorization’ section to see the Gmail account you set up is successfully connected.
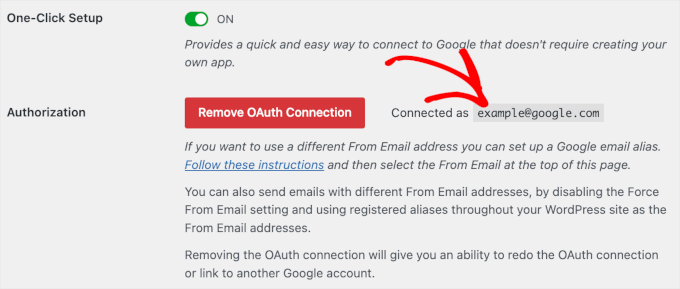
That’s it! You’ve successfully connected your Gmail account to WP Mail SMTP using the One-Click Setup method!
Method 2: Setting Up Gmail to Send WordPress Emails Using OAuth Protocol
This method is a great option if you’re using a free version of the WP Mail SMTP plugin. It’s secure, and once you set it up, you’ll never have to do it again.
You need to start by selecting ‘Google/ Gmail’ as your mailer.
Next, you will see three fields you need to fill in when you scroll down.
Just fill out the ‘Client ID,’ ‘Client Secret,’ and ‘Authorized Redirect URI‘ fields when you’re there.
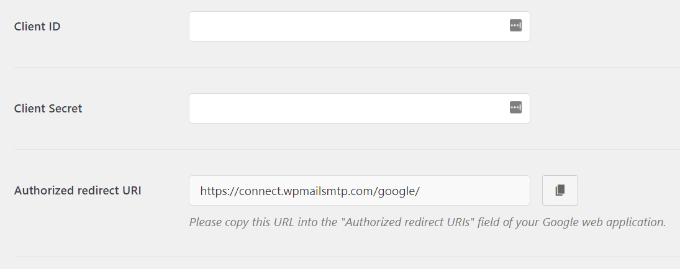
Let’s set up these fields.
Creating an App and Generate API Keys for Gmail
To start, simply visit the Google Cloud Platform website and then click on ‘My First Project’ at the top.
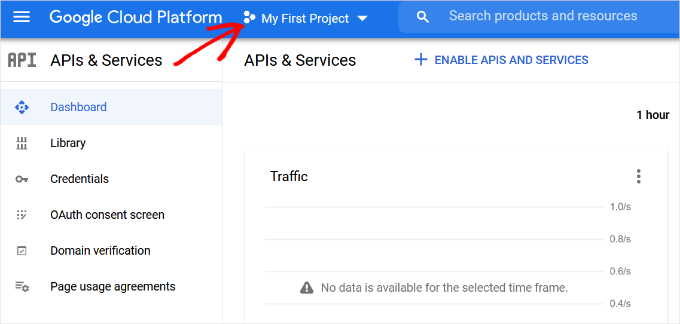
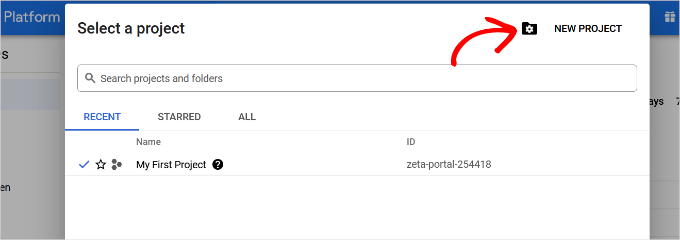
A small popup window will open where you can select your projects.
Go ahead and click on the ‘New Project’ option.
On the next screen, you’ll be asked to provide a name for your project.
We recommend giving it a memorable name so that you can easily recognize it in the future.
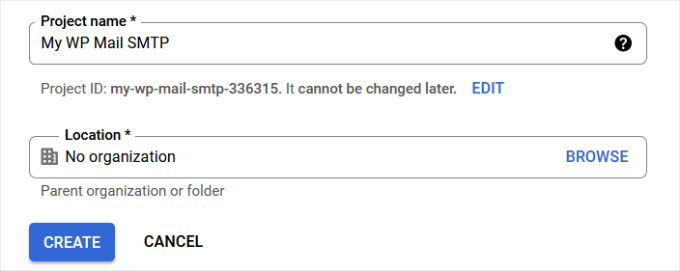
After that, let’s click the ‘Create’ button to continue.
The developer console will now create your project and take you to its dashboard.
Google offers developers access to many of their APIs and services. You need to enable the APIs that you will need for this project.
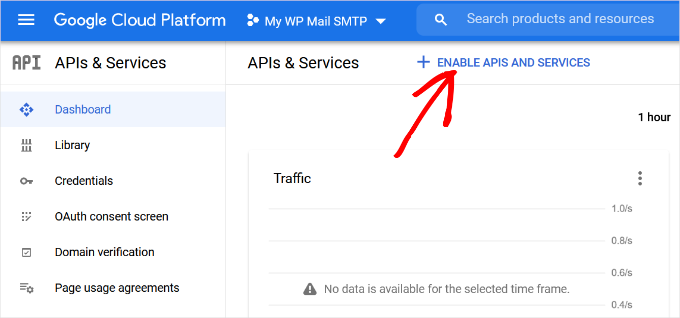
Simply click the ‘Enable APIs and Services’ button to continue.
This will bring you to the APIs library page.
From here, you can type Gmail in the search box to quickly find the Gmail API and click to select it.

You will now see an overview of the API and what it can do.
Simply click on the ‘Enable’ button to continue.
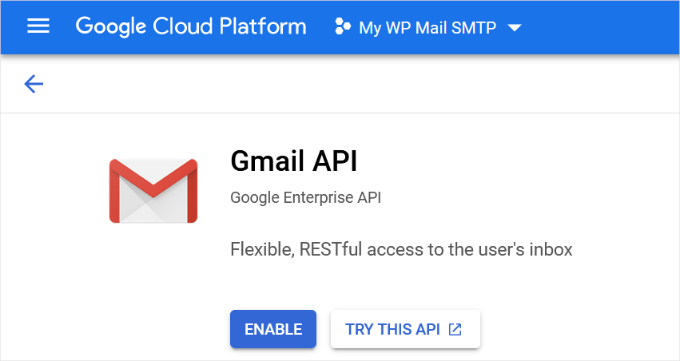
Now that your API is enabled, the next step is to create credentials that you can use in your WP Mail SMTP plugin settings.
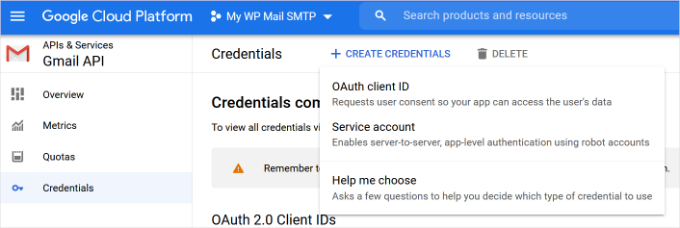
You’ll want to click the ‘+ Create Credentials’ button to continue and select the ‘Help me choose’ option from the dropdown menu.
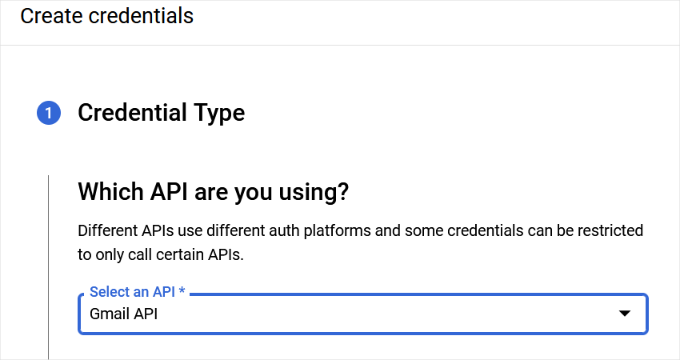
On the next screen, it’ll ask you which API you want to use.
Go ahead and select ‘Gmail API’ from the dropdown menu for ‘Which API you are using?’
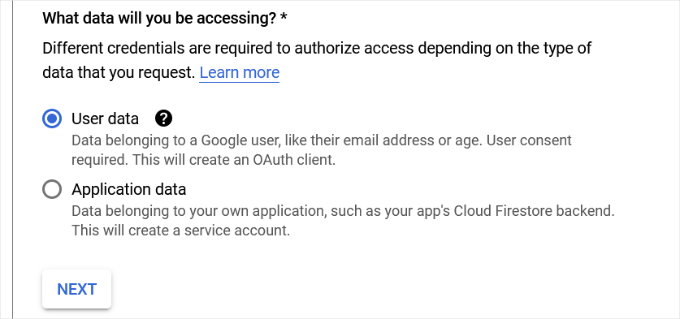
After that, you’ll choose ‘User data’ for the ‘What data you will be accessing?’ field.
With that done, go ahead and click the ‘Next’ button.
Now, you’ll need to enter your app’s information.
You can start by giving a name for your app, selecting the email address you provided, and adding an app logo if you want.
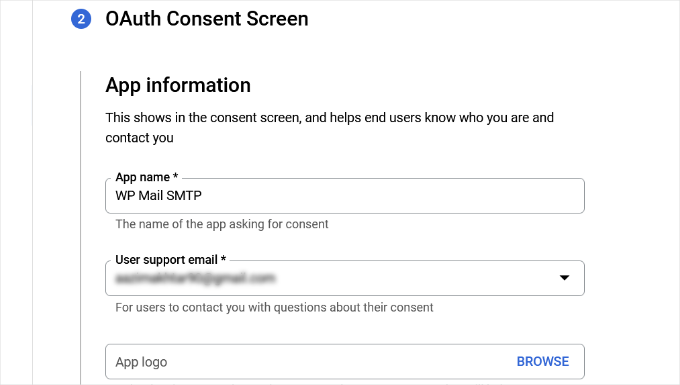
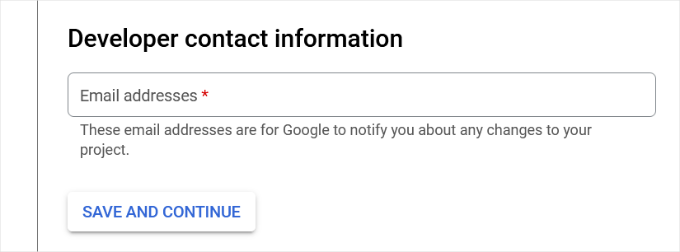
From there, you’ll need to scroll down and enter a developer’s contact information.
Once you’ve entered the email address, simply click the ‘Save and Continue’ button.
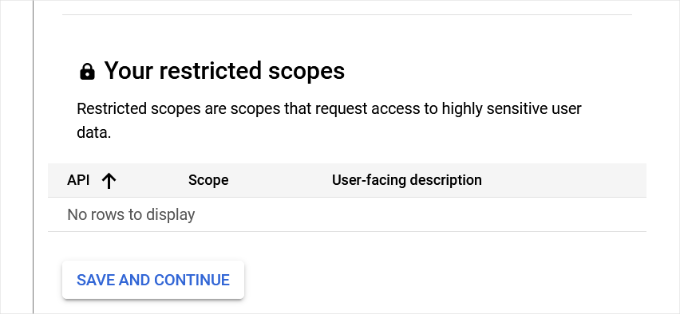
On the next screen, you can configure the ‘Scopes’ for Gmail API. This is an optional step, and you can skip this for now.
Simply scroll down to the bottom of the page and click the ‘Save and Continue’ button.
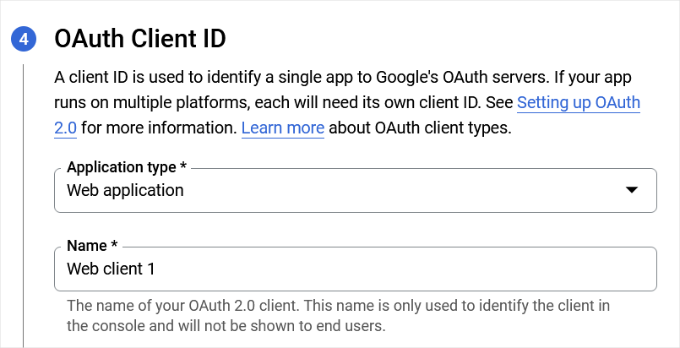
Next, go ahead and enter details for the ‘OAuth Client ID’ section.
You can start by choosing ‘Web Application’ as the ‘Application type’ from the dropdown menu and then enter a name.
When you scroll down, you’ll see options for ‘Authorized JavaScript’ origins. You can skip this and head over to ‘Authorized redirect URIs.’
Go ahead and click the ‘+ Add URL’ button under ‘Authorized redirect URIs’ and enter https://connect.wpmailsmtp.com/google/ under the ‘URIs’ field.
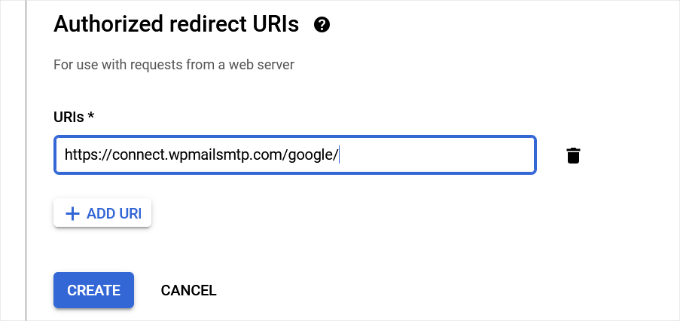
Once you’ve entered the URL, simply click the ‘Create’ button.
Next, you’ll see your credentials under the ‘Your Credentials’ area.
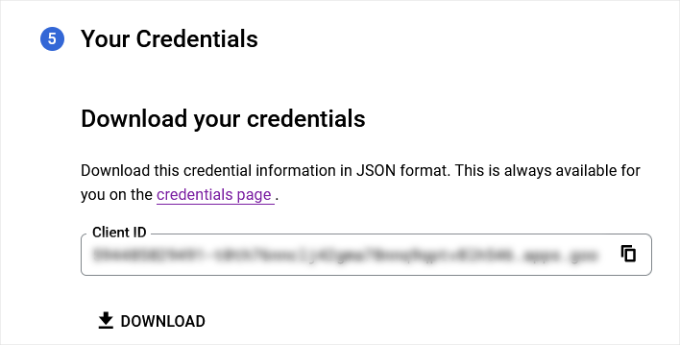
Go ahead and click the ‘Done’ button at the bottom to move on.
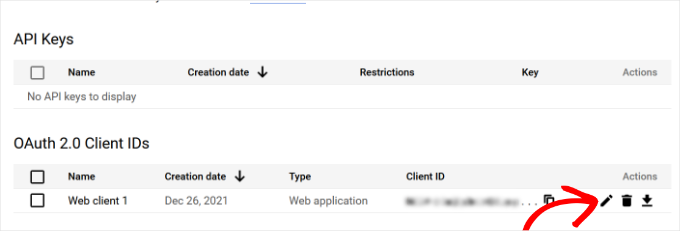
You will now be taken to your project’s credentials page.
On this page, you can see your recently created credentials listed here. You need to click on the edit icon next to your credentials to continue.
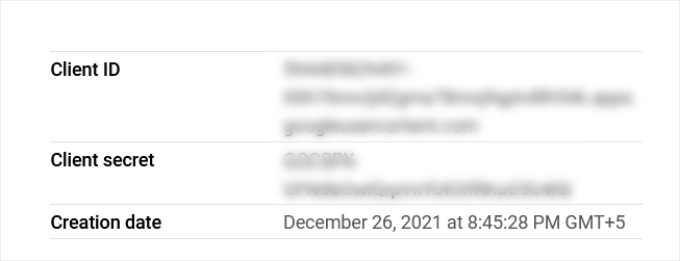
This will bring you to the edit credentials page, where you will be able to see your client secret and client ID.
All you have to do is copy and paste the key into your plugin’s settings page.
Once done, you can return to the plugin’s settings page in your WordPress admin area.
Now that you have both client ID and client secret keys, you need to click on the ‘Save Settings’ button to continue.
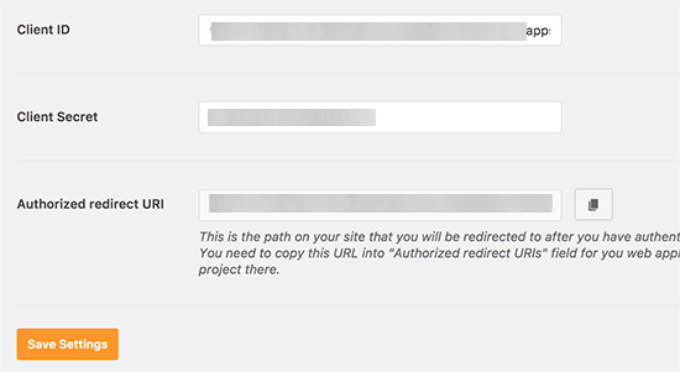
The plugin will now store your settings and reload the page.
After that, you need to scroll down to the bottom of the settings page and click on the ‘Allow plugin to send emails using your Google account’ button.
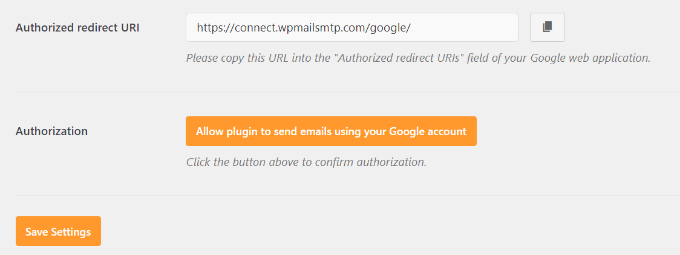
This will take you to your Google account.
Then, you will be asked to give the website permission to send emails on your behalf.
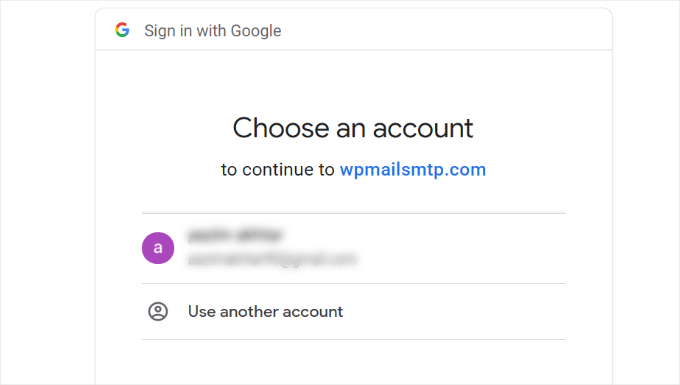
Simply select your Gmail account and give permission to link your Google API project.
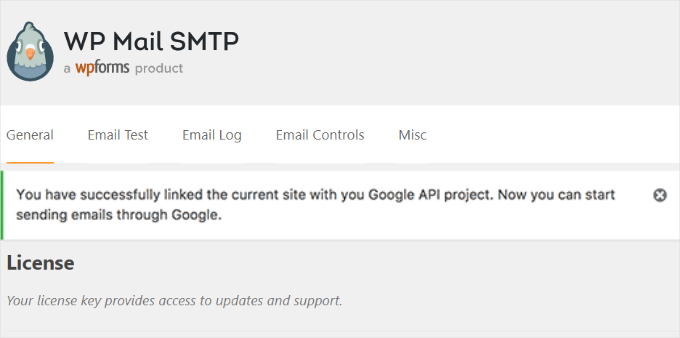
After that, you will be redirected back to your website, where you will see a success message.
Method 3: Setting Up Gmail SMTP as SMTP Sender
This method allows you to manually connect to Gmail’s SMTP servers to send your WordPress emails.
First, you’ll want to head over to Settings » WP Mail SMTP from your WordPress admin area to configure the plugin settings.
From here, you can start by providing the Gmail address you want to use in the ‘From Email’ field and your name in the ‘From Name’ field.

Next, let’s select ‘Other SMTP’ as your mailer.
Also, you’ll want to check the box next to the return path.
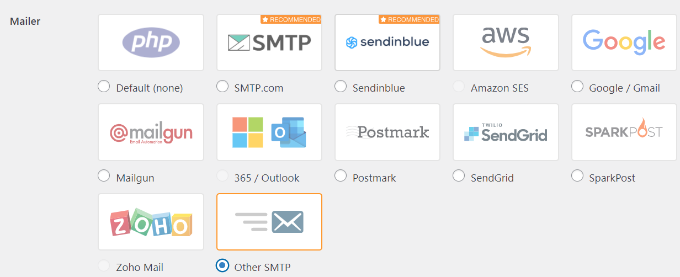
After that, you can scroll down to the ‘Other SMTP’ section.
This is where you’ll configure more settings to connect to Gmail’s SMTP servers.
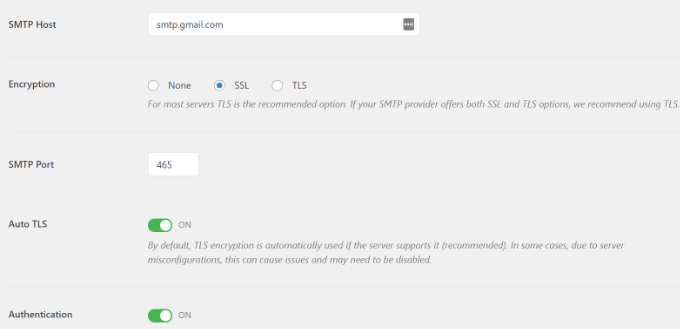
Here is the exact configuration you need to add to the plugin settings:
- SMTP Host: smtp.gmail.com
- Encryption: Use SSL encryption
- SMTP Port: 465 (this should automatically appear when you select SSL encryption)
- Auto TLS: Turn off TLS
- Authentication: Turn on authentication
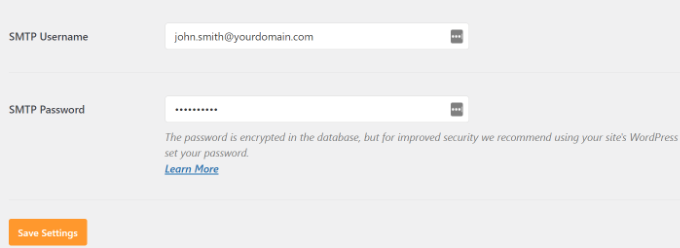
- SMTP Username: Your complete Gmail address, e.g. john.smith@yourdomain.com or john.smith@gmail.com
- SMTP Password: Password of your Gmail account
Once you are done, go ahead and click the ‘Save Changes’ button to store your settings.
That’s all; you have successfully set up WP Mail SMTP to use Gmail SMTP servers.
Testing Your WP Mail SMTP Settings
WP Mail SMTP plugin allows you to test your email settings so you can make sure that everything is working properly.
You need to navigate to Settings » WP Mail SMTP and click on the ‘Email Test’ tab.
After that, simply provide an email address you can access in the ‘Send To’ field and then click the ‘Send Email’ button.
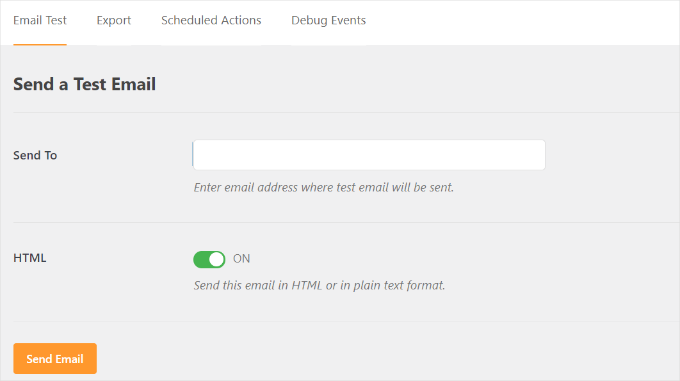
You should then see a success message.
To make sure, you can check your inbox to see a message with the subject line ‘WP Mail SMTP: Test Email to…’.
That’s all; you have successfully set up your WordPress site to send emails using Gmail SMTP servers.
Get More With WP Mail SMTP Pro
If you want even more functionality, you should try WP Mail SMTP Pro. With the Pro version of the plugin, you can connect with:
- Google Workspace/Gmail
- Amazon SES
- Mailgun
- Office 365 / Outlook.com
- SendGrid
- And more
You also get additional features like email logs, the ability to fine-tune or control which notification your WordPress site sends, and more.
Troubleshooting Gmail SMTP Not Working Issues
We have seen users encounter a few issues when using Gmail SMTP with certain shared hosting configurations.
You can take the following steps to fix the Gmail SMTP issue:
First, you’ll need to log in to your cPanel account. From here, you’ll want to find the ‘+ Create’ button on the email accounts page.

Simply create an email account that matches your Google Apps email address.
By creating the email account, you’re essentially making your hosting server aware of an email address that should be sending emails. This step is a workaround to convince the server that you’re sending emails through it, even though you plan to use Gmail’s SMTP server.
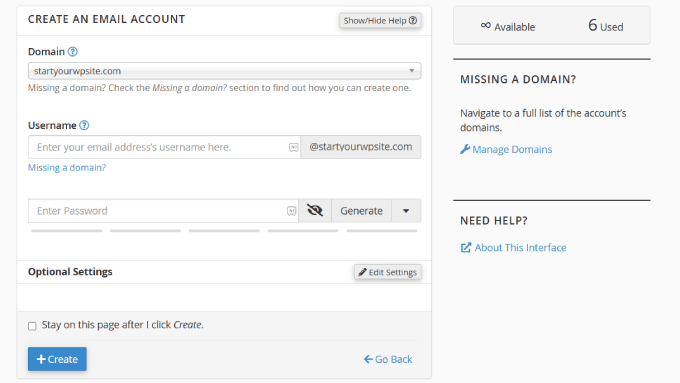
This might seem strange because you’re not using your server for emails. It basically tricks your server into believing you’re sending the email through the server.
From your cPanel account, let’s go to the MX Records and change the MX routing from automatic to remote. Do note that this might be a little tricky to find since each host now has a custom cPanel interface.
Then, you’ll need to look for a small link next to MX that says ‘Email Routing: Remote Mail Exchanger.’
After that, you can log back into your WordPress site and send a test email. For more details, you can follow our guide on how to change MX records for your WordPress site based on your hosting service.
Video Tutorial
🎥 Watch our step-by-step video tutorial below to quickly set up Gmail SMTP in WordPress and ensure your emails are delivered reliably.
Just hit play and follow along!
We hope this article helped you learn how to send email in WordPress using the Gmail SMTP server. You may also want to see our expert troubleshooting tips for when WordPress form does not work and our guide on how to export WordPress form entries to CSV and Excel.
If you liked this article, then please subscribe to our YouTube Channel for WordPress video tutorials. You can also find us on Twitter and Facebook.


David
Hi, I used this tutorial last year to install and configure the Gmail SMTP plugin. Until very recently, the Gmail SMTP plugin in conjunction with my website’s contact form worked perfectly. But I tested my website’s contact form today, and I got the following fatal-error message:
Fatal error: Uncaught exception ‘Google_Auth_Exception’ with message ‘Error refreshing the OAuth2 token, message: ‘{ “error” : “invalid_grant” }”
I don’t have a clue what that means. I get the same fatal-error message when I use the plugin to send a test message at Gmail SMTP plugin>Settings>Test email.
I haven’t changed any of the plugin settings since I first installed it a year ago, and I haven’t done anything new with my Google Console account either. I’m using the most recent version of the Gmail SMTP plugin, and also the newest version of Wordpress.
Any ideas or suggestions?
Thanks!
WPBeginner Support
Hey David,
It seems like your Oauth2 token has expired. Try following the tutorial again from the beginning to set it up again.
Admin
Ehsan
Thank U very much – one of my problem was this “my emails goes to spam folder”
with this service(Method 1) Now It’s great – of course after 14 days you must pay for that but still it’s prefect
I have question;
Can I send 100 Emails like newsletter for my customer is it OK for Google!?
I afraid my Emails after it goes to spam folder again
Sharon
I did everything as described, but the contact form on my website still does not work.
Adondriel
Hey, add a thing at the end for the troubleshooting thing: “Check with your website host and verify that they do not block outgoing requests by default.” I know 1. GoDaddy does this, and won’t let you unblock. and 2. Namecheap also blocks by default but you just gotta contact support, give em your info and ask em to unblock port 587 and boom, it’ll all work again.
Lucas
You save my life!
Tks!
adam
i keep getting a Error: redirect_uri_mismatch when i press ‘grant permission’. It’s driving me nuts as I can’t work out what is wrong? Everything seems to match.
Adam
Grzegorz
Same here. i get redirect_uri_mismatch
Macky
This video has been a fantastic help.
I’m a complete Wordpress beginner.The step-by step instructions are very easy to follow. Now my emails are working perfectly!! Plus I also learnt how to insert headers & footers with ease.
Thanks once again!!
WPBeginner Support
Hi Macky,
We are glad you found the video helpful. You may also want to subscribe to our YouTube Channel for WordPress video tutorials.
Admin
Fabio
Your tutorial saved my site! Thank you very much mate!
Maggie Z
A follow-up question – because of the login conflict issue, I was also considering using WP Mail SMTP. However, many users on the support forum for that plugin express concern that the password for the email account is visible on the admin page in plain text.
I have a firewall set up that prevents non-admins from getting in to the back end, so is there any real security concern regarding the password showing in plain text? Any advice much appreciated!!!
Maggie Z
After troubleshooting quite a bit, I finally relented and went with WP Mail SMTP, which requires the “allow less secure apps” solution – a tech support person at G Suite told me that it was safe, and it seems like the only way to go for my particular setup. Appears to be working now. Thanks for the incredibly clear instructions!!! I am now a firm fan of this site.
Maggie Zellner
The video is fantastic, and the plugin installed perfectly. Unfortunately I didn’t realize until after I went through the whole process (because I didn’t read the documentation on the plugin carefully), the Gmail SMTP plugin eliminates the need for users to log in, and therefore it interfered with the login process that we have instituted for paid members on our website (which we manage through a plugin called PaidMembershipsPro).
Is there any way to disable that aspect of this plugin, so I can send all email via our Gmail account, but can still have users log in and out?
Eric
Great article! However, I am unclear on something when using Wordpress for sending newsletters. What is the difference between those mass emailing service providers (mailgun & Sendgrid) and using Google Apps for work SMTP?
Can’t we use Google Apps for work to send newsletters just as well?
WPBeginner Support
with Google Apps for Work, you can only send an email to 500 recipients max (for paid business accounts). You cannot use it for newsletters.
Admin
Eric
Thanks so much for your response! With Google Apps for Work only limiting to 500 recipients, then I suppose it would work if we sent it to 500 or less people.
My next question, is it max to send all at one time or per day? If we throttle it to only send out a few per minute, do you know if it would allow it to send thousands within a few hours?
Heather
Thank you so much! This was so helpful!
zim ejin
Hi, this was very informative thank you for posting. however i have a website hosted on aws ec2, and route53 for dns. i tried the secure configuration. it didn’t work. Is there a special configuration for self hosted websites on aws ec2/route53. btw : i don’t have a cpanel installed.
Lanrz
After granting access and clicking on the allow button, I was not being redirected back to wordpress and the SMTP status is still not connected.
Any advice on how I should go about doing it?
Thanks!
Nathalie
Doesn’t work: test email retuens Connection: opening to smtp.gmail.com:587, timeout=300, options=array ( ‘ssl’ => array ( ‘verify_peer’ => false, ‘verify_peer_name’ => false, ‘allow_self_signed’ => true, ),)
I checked Email Routing -> Remote Mail Exchanger but it didn’t help
Raph Divine
Thanks for the write-up. It really helped me! 5stars!
Real Name
This guide worked wonderfully until my server stopped sending emails and I can’t get it to work again. The “Test Email” tab doesn’t make it clear if the email has successfully sent or not since it just spews out 52 lines that don’t mean much to me. :/
Boro
Amazing Tutorial !!!!
Thank you
peter
Ok, so I have followed the OAuth instructions and my SMPT status button has gone green. However, whether through test email or my site, I can not send an email through the contact us form (pluggin contact form builder by web Durado). The hanging message say waiting for and eventually I get a 405 error notice.
Any thoughts.
Thomas
Hoping you can help me?
I tried setting up method 1 using gmail and I got the ‘green light’ from wordpress however when testing the email I receive the following error message after waiting 1 minute for it to send:
Connection: opening to smtp.gmail.com:587, timeout=300, options=array ()
Any ideas on how to fix this?
Very best,
Tom
Fernando Santos
This tutorial is awesome!
I have one question, though. I directed the contact form messages to a gmail group email address, but, for some reason, the messages aren’t being delivered. When I direct to a “real” e-mail address like the messages are normally delivered.
I would really appreciate if someone could give me a hand figuring out why this happens.
Thank you!!!
Paul
+1 for this question. Have exactly the same question as wish to use our info@.. address
Andres
Thanks guys for such useful article. I followed all the steps and was able to configure the email correctly. However, when I receive the email from mydomain.com address (sent by wordpress after purchasing a product), the user avatar (gmail picture) doesn’t appear even though mydomain.com has a picture already.
In fact, if I send an email directly from mydomain.com account via google for work, the receiver is able to see the image right away, but it’s not the case if the email is sent via wordpress.
Do you have any suggestions? Thanks a lot, and keep rocking!
Sahar
Thanks for this helpful information. You really helped me out in setting this up, and I appreciate you taking the time to create this useful information!
WPBeginner Support
Glad you found it helpful.
Admin
lokesh kumar CL
What is origin URI of the client application. its not accepting website URL ….please help me out
Susan
Excellent instructions and thanks for walking me through setting this up. I did try the MX record change but no luck there either.
I get a 405 Not allowed message when I try to send an email.
I am hosted by Bluehost and am using the DIVI theme.
If anyone has any ideas I would be very grateful.
Leista
Hello, having a similar issue. Getting a 405 error, and also hosted on Bluehost. By any chance, were you able to fix the problem? Thanks.
JDC
I had the same problem with bluehost. But this gave me the solution.
I uninstalled any extra plugin for mail, including smtp mailer or gmail smtp plugin and just used a random address like mynewaddress@example.com (replace example.com with your own domain name) and it worked. I sent an email to my gmail account I it passes all the filters. It seems that BlueHost validates the address if it is comming from the server that hosts that domain. In gmail you usually get a warning that says that this email might not have being validated, but my email are comming fine with custom wordpress email functions. No extra plugin needed.
Prashant Bhandarkar
Thank you so much. This was of great help. God Bless you!
Karmen
Awesome tutorial!!!
Louise
I have this working brilliantly with a Google apps for work account for a woocommerce solution on wordpress, thank you.
Should this work if I use a Google group mail instead of an account?
Thanks very much.
Brian Treiber
I am not using Google apps for work, I have everything set up and connected. I tried to send a test email however I get a 405 not allowed error. I went into my cpanel and changed the mx records to the recommended” remote.” Still can’t send. Does this mean I need to use the less secure method?
Jason North
I’m getting this error when I try to activate the plugin:
Plugin could not be activated because it triggered a fatal error. Parse error: syntax error, unexpected T_FUNCTION, expecting ‘)’ in /home3/north23/public_html/forcebrain/wp-content/plugins/gmail-smtp/google-api-php-client/src/Google/autoload.php on line 19
genie
Hello, I use gmail-smtp plugin but it conflict with ultimate membership. Could you help me ?
I try another wp mail smtp but in the last feld: user account pass. Google app not allow to login from plugin. Pls help
Thank you
Leslie Andrews
Clearly I’m doing something wrong. When I get to “add credentials” I’m getting this error message and can’t move forward.
Invalid Redirect: must end with a public top-level domain (such as .com or .org)
Any help would be great
WPBeginner Support
If you look at the URL closely, you will notice that you are missing a . between domainname and the TLD, yours is examplecom when it should be example.com.
Admin
Graham
Thanks for the tutorial, but I get this error when I try to send a test email:
Connection: opening to ssl://smtp.gmail.com:587, timeout=300, options=array ()
SMTP ERROR: Failed to connect to server: Connection refused (111)
SMTP connect() failed.
Does it have something to with my site being secured with SSL?
Tony
I’m having the same issue. Did you figure it out?
Tom
Nice Article, I’m having a few issues to get this working. So I Deactivated the Plugin and tested a Contact Form to see if all was the same before setting up Gmail SMTP, unfotunately No Emails are being sent through now.
Even though the Gmail SMTP Plugin is NOT active, do we need to reset back to the default settings somehow?
WPBeginner Support
Nope simply deactivating it would turn it off.
Admin
Jenny
Hi,
I have this all set up properly and the test email worked…I just commented on my own blog to see if I would get an email when a comment was posted but I unfortunately didn’t. Can someone help me figure out where I went wrong?
Sachin
Hey thanks for the tutorial. Everything works fine in Setup, but when mail is being sent the site freezes for about 5 mins. site doesnt open at that time. It doesnt respond at that time. Any idea what might be causing this issue. But the point is mail is sent at last finally
WPBeginner Support
Please contact your WordPress hosting provider. They may be able to help you better.
Admin
crissy
Hi,
I’m having problem with the test email send
Fatal error: Cannot redeclare class phpmailer in /home/mywebsite/wp-includes/class-phpmailer.php on line 29
please help
David
Hi, I just installed this plugin, and everything went perfectly–thanks to your excellent tutorial! (I definitely couldn’t have done it without you.) My website’s outgoing email immediately started landing in people’s inboxes rather than in their spam folders.
But since I’m a novice at these matters and don’t know SMTP from RSVP, I did some reading on SMTP, and on one website I came across made this statement:
“Another strategy that hackers use: If your app sends email using SMTP, the IP address will be recorded in the Received header lines. Either scrub the original Received line [no explanation provided of how that’s done], or don’t use SMTP for email submission.”
Is this something I should be concerned about security-wise? Or does this plugin solve this problem somehow? And if not, how should I fix it?
Thanks!
WPBeginner Support
You shouldn’t be concerned about it. Most popular email service providers and their spam filters can check if an email is originating from the IP address it claims to be coming from.
Admin
Rob
Thank YOU so much for this!! I’ll keep coming back for more!!
Travis
Thanks so much for this tutorial.
Originally I had this all setup and working fine, but I moved my website and did some other fixes to it, and suddenly mailing stopped working.
Previously I spent some time trying to set it up and get it to work, but then it “stopped” working randomly.
Anyways, option #1 really saved me a major headache.
Christine Tabor
I configured, and got the green go to go button… THANKS FOR THE STEP BY STEP…
(doing this on a client test site)…
BUT REGARDING GRAVITY FORMS (or any form plug in)… do I also need to change up the notification emails that I’ve used for the Gravity Forms submissions?
Is it ok for the “from” email I used in the configuration to be different than the gmail used to set i up?
The issue that started all this was client not getting his Gravity Form notifications.
SO, before I install on their live site… (which is ecommerce and SSL)… can you reply to this … and should I still use the TSL for the configuration? I wasn’t sure if a certificate on the site made any difference in configuring this.
Thanks,
Christine
WPBeginner Support
No you don’t need to change notification emails.
It is OK, but to ensure maximum deliverability you should use the email address that is actually sending the email.
You should try with SSL first for the Gmail Configuration.
Admin
Christine
Thanks for reply…little bit more clarification please.
I set up an email…info@domain.com as a forwarder in cpanel, and I forward to their Verizon email.
I left the Verizon email in the GF notification list, added the info email, and another alternate email.
So the info email is the one in Gmail plugin set up that is sending the email…is it ok that it’s a forwarder?
Also, when I set up the plugin, I used a gmail I had created … CompanyName@gmail.com
But not using it as the sending email or anywhere else.
I sent a test and it appears all worked… Should I go back and change to SSL instead of the TSL or leave as is?
Thanks again…
Christine
WPBeginner Support
Sounds about right. However, if it was up to us we would use the Gmail address as the sender and add the forwarding email address as the Reply-to address.
Tribhuwan Bhatt
Thank You
Tim R
Doesn’t work for me on April 14, 2016.
Things I do rarely work.
Connection: opening to smtp.gmail.com:587, timeout=300, options=array ()
SMTP ERROR: Failed to connect to server: Network is unreachable (101)
SMTP connect() failed.
Mailer Error: SMTP connect() failed.
Any point in fussing with this ?
zse
Hi,
I have this same error.
Did you solved this problem?
Regards
Tim R
Here’s a follow up:
Settings of my web host’s server made this impossible.
Switched hosts and now it works easy as pie.
Don’t forget to change settings on gmail account to allow for unregistered apps (a search will discover many instructions to do that so I won’t add it here)
Monica
Hey i tried allowing access for unregistered apps it still doesnt work for me.
I am getting the error:
Connection: opening to smtp.gmail.com:587, timeout=300, options=array ()
SMTP ERROR: Failed to connect to server: Connection refused (111)
SMTP connect() failed.
Any ideas ?
Bclose
Hi ,
Thanks for this ticket ..i was fighting with my emial provider weblayer and nothing. it worked with your magic touch , one simple note .. by the end of Ouauth when explaining to create a fake local email you forgot to include that we must use MX record and what is is , i search on google and found ALT2.ASPMX.L.GOOGLE.COM, but this last simply thing could be a danwfault for all readers
Either way thank you..a lot!
Kay
Thank you soooooo much for this! Worked like a charm. The instructions are 100% on point!
Tyler
Anyone get this working with google apps email? I’ve created API credentials. SMTP status is green. But Test email says connection refused. Already set mx to remote on godaddy. Are there any security setting ls in google apps email that have to be configured?
TJ
Nice article, was able to install the plugin and it sent the email from the plugin test email.
Fails when using Contact Form 7, any recommendations for a contact form plugin that this might work with?
Thanks
WPBeginner Support
You can try it with WPForms.
Admin
Muhammad
thanks for the nice post.i was thinking to set up this for my site.
Ripul
Interesting, however I am getting this error : “Error: redirect_uri_mismatch”
Ripul
I forgot to mention I am testing this on Localhost.
Rashmirekha Moharana
Hi Syed.
Thanks a lot for such a wonderful solution. Let me implement and see.
Kudos to you.