Back in the early days of running my blog, every comment felt like a small victory. I wanted to thank each commenter personally, but as the blog grew, keeping up became impossible. Sound familiar?
Through managing multiple WordPress sites and helping countless bloggers, I’ve discovered that automated thank you messages can be just as effective as personal responses when done right. The key is setting them up properly to feel genuine and engaging.
Let me show you exactly how to add thank you messages to your WordPress comments section.
Whether you’re running a small blog or managing a busy website, these methods will help you keep your community engaged without spending hours responding to comments.

Why Sending a Thank You Message Is a Good Idea
When someone takes the time to leave a comment on your WordPress blog, it’s a clear sign they’re engaged, and that moment is the perfect opportunity to acknowledge them.
A thank-you message quickly confirms that their comment was received. It also shows that you appreciate their input and encourages them to stay.
This small gesture can go a long way in making your blog feel more welcoming.
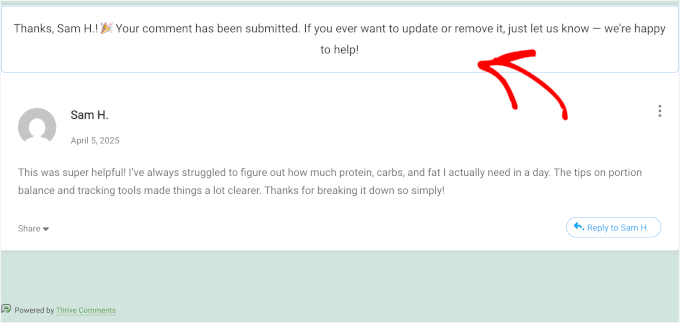
You can even use the message to guide readers to their next step — whether it’s checking out a related post, subscribing to your newsletter, or exploring your products.
It’s a simple way to boost user engagement right when readers are most interested.
With that in mind, I’ll show you how to easily send a thank you email to blog commenters in WordPress in 2 simple steps:
Let’s get started!
Step 1: Install and Activate a WordPress Comment Optimization Plugin
A WordPress comment optimization plugin is a tool for managing and improving your blog’s comment section. You can use it to highlight comments, filter out spam, and increase engagement from your commenters.
Out of all the plugins I tried, I recommend using Thrive Comments for sending thank-you messages to your commenters. It’s super easy to use, and it comes with plenty of extra features for improving the comments section on your WordPress blog.
You can see more details about my experience with using it in this detailed Thrive Themes Suite review.
To use the platform, you will first need to go to the Thrive Themes website and sign up for an account.

After signing up for an account, you’ll see a Thrive Themes account dashboard.
From there, just click on the link that says ‘Download and install the Thrive Product Manager plugin.’
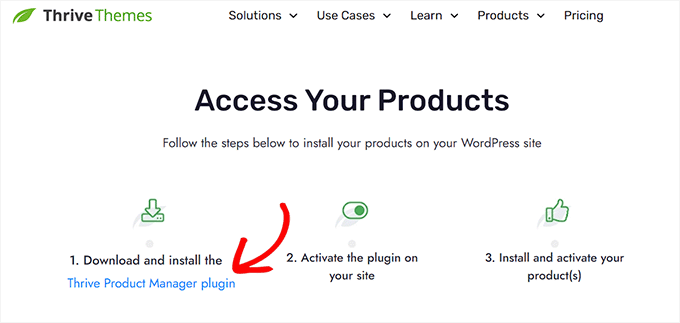
Once the download is complete, you can upload the Thrive Product Manager plugin to your WordPress site to install it. If you need help, then you can see our guide on how to install a WordPress plugin.
After you activate the plugin, you’ll want to head over to ‘Product Manager’ from your WordPress dashboard.
Then, simply click the ‘Log into my account’ button and enter your Thrive Themes account credentials.
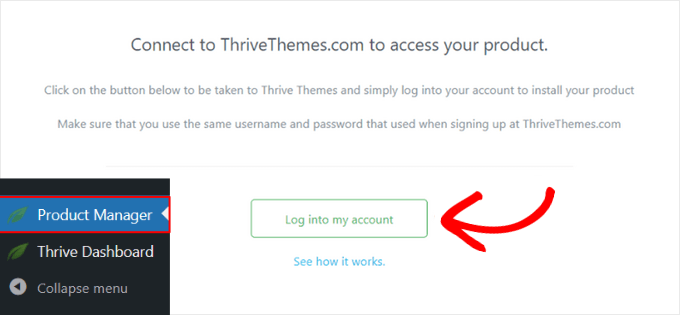
You should now see the Thrive Product Manager dashboard.
From here, you’ll want to locate ‘Thrive Comments’ and check its ‘Install Product’ box.
Then, you can click the ‘Install selected products (1)’ button a the bottom of your screen.
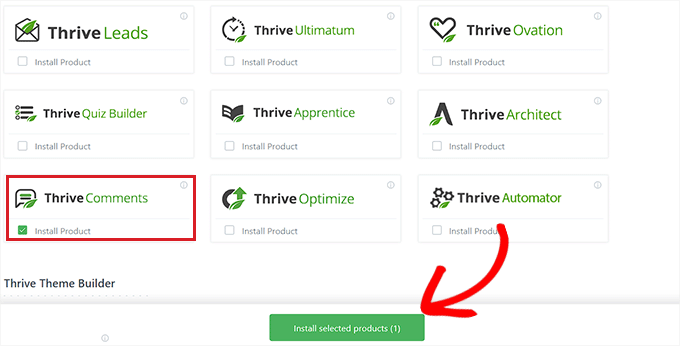
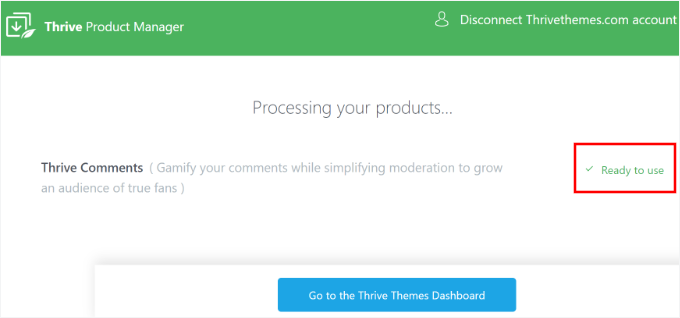
Upon installing Thrive Comments, you will see a success message that says ‘Ready to use.’
Go ahead and click the ‘Go to the Thrive Themes Dashboard’ button.
Step 2: Set Up an Engaging Thank You Message for Blog Commenters
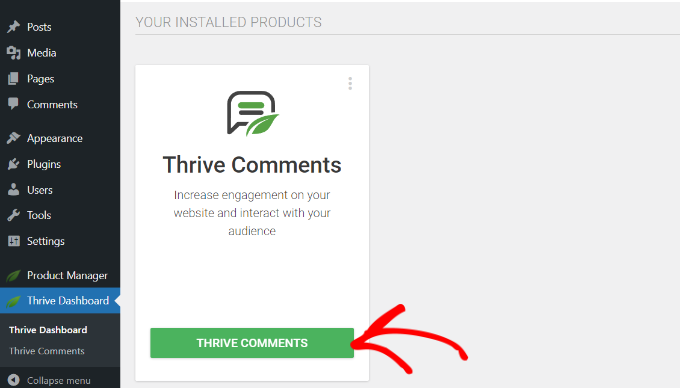
In your Thrive Themes dashboard, you should now see that Thrive Comments has been successfully installed on your site.
Before you create a thank-you message for blog commenters, it’s a good idea to turn off comment moderation. That way, your thank-you message will appear right after someone leaves a comment, without being replaced by a moderation notice.
Simply click on the ‘Thrive Comments’ button from your ‘Thrive Dashboard.’
This will take you to the Thrive Comments configuration page.
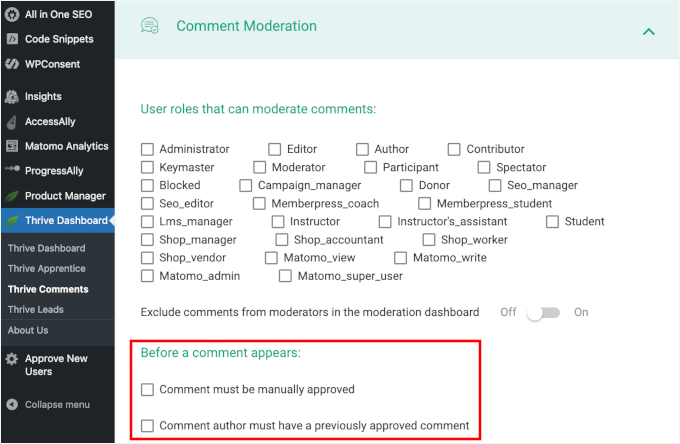
Let’s expand to the ‘Comment Moderation’ section.
After that, you’ll want to make sure that the 2 checkboxes aren’t ticked in the ‘Before a comment appears:’ section.
With that done, you can switch to the ‘Comment Conversion’ section, where you’ll see two areas you can customize:
- Choose what happens after a visitor leaves a comment for the first time.
- Choose what happens after a visitor returns with another comment.
Let’s start with the first-time commenters.
Thrive Comments gives you 5 options for what to show after someone leaves their first comment:
- Message – Show a custom thank-you message to confirm their comment.
- Social Share – Encourage users to share your post on social media.
- Related Posts – Suggest similar articles they might like, keeping them on your site longer and helping increase pageviews.
- Redirect – Send commenters to a specific page, like a thank-you page or a special offer.
- Opt-In Form – Invite them to subscribe to your newsletter or download a freebie.
To set up a thank-you message, you can just click on the ‘Message’ box.
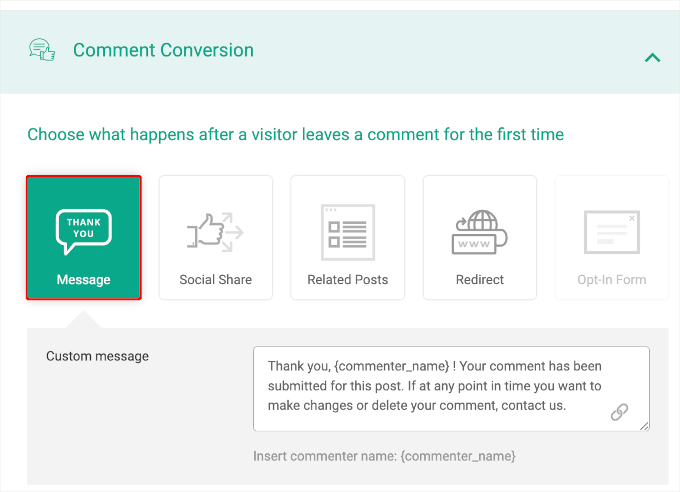
Here, you’ll find the ‘Custom Message’ field, where Thrive Comments has already set up a default thank-you message for you.
You can easily tweak this message to better match your brand’s voice.
For example, you might want to make it a bit more friendly, like this:
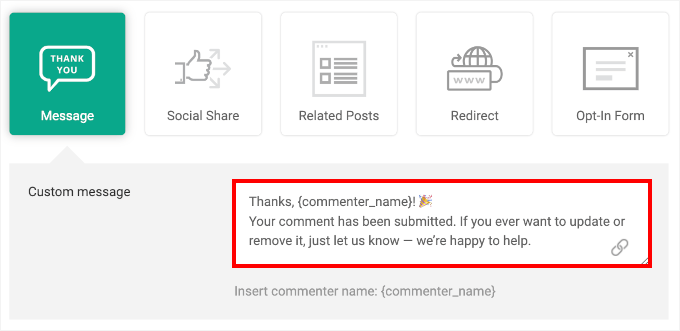
Don’t worry about personalizing every message manually. Thrive Comments includes smart tags that automatically insert details, such as the commenter’s name.
After making your edits, you’ll see a ‘Settings saved successfully’ notification. Thrive Comments saves your changes automatically, so you don’t need to hit a separate save button.
Now, you can try sending a test comment and see if it works. Here’s what it looks like on my demo WordPress website:

And that’s it! You’ve successfully set up an automatic thank-you message to your blog commenters.
Bonus Step: Invite Readers to Subscribe to Your Email Newsletter
In this bonus step, we’ll set up what happens when a blog commenter returns and leaves another comment.
While the available options are the same as before, this time, we’ll show you how to invite returning commenters to subscribe to your email newsletter using an opt-in form.

💡 Why? Returning commenters are already engaged — they’ve interacted with your content more than once. This makes them much more likely to join your email list.
By placing an opt-in form right after they comment, you’re catching them at a good moment of interest. This way, you give your email list a better chance of growing with readers who genuinely care about what you share.
To do this, you’ll need the Thrive Leads plugin. The lead generation plugin makes it easy to grow your email list with eye-catching opt-ins and powerful form types—all with a simple drag-and-drop builder.
✋ For more information about it, don’t miss our complete Thrive Themes Suite review!
Install the Thrive Leads Plugin
First, let’s install and activate Thrive Leads to design and manage your opt-in forms.
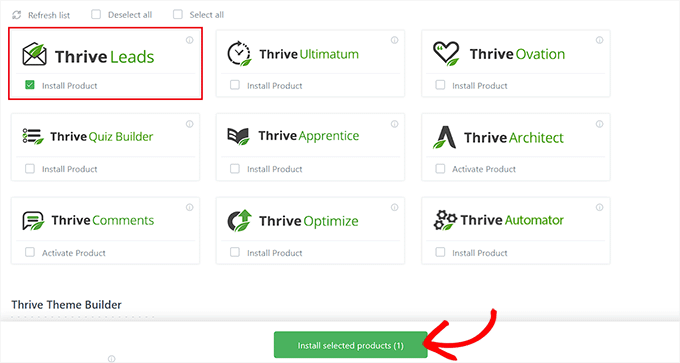
In Thrive’s Product Manager, you can click the ‘Install Product’ checkbox for ‘Thrive Leads.’
Then, simply click on the ‘Install selected products (1)’ button.
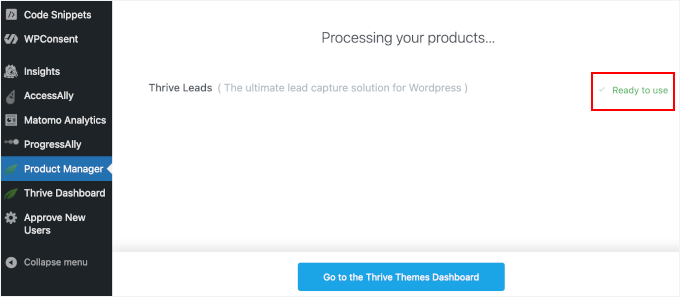
After a few minutes, you should see a notification that says ‘Ready to Use.’
From here, you just need to click on the ‘Go to the Thrive Themes Dashboard’ button.
Integrate Thrive with Constant Contact to Manage Your Email List
Before building your Thrive Leads opt-in, you’ll want to connect your email marketing service. This lets you automatically send new leads to your email list, so you can follow up, tag, or segment them however you like.
For this tutorial, we’ll use Constant Contact. It’s the best email marketing service that makes it easy to send emails, manage your contacts, and create newsletters.
✋ For an in-depth look at the email marketing app, you can read our complete Constant Contact review.
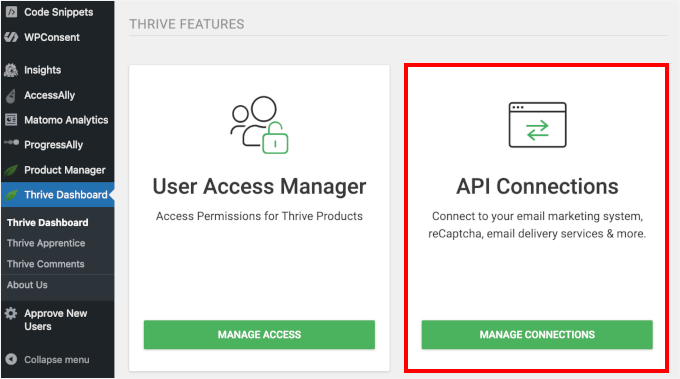
First, let’s open the API connections settings in Thrive.
From Thrive Dashboard, you can click ‘Manage Connections’ in the ‘API Connection’ box.
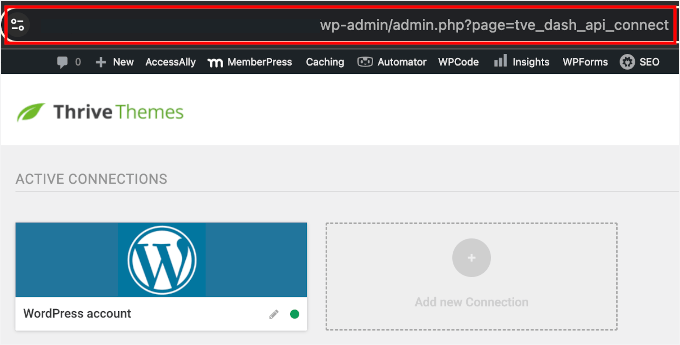
On the next screen, you’ll see a menu to add third-party connections.
Here, you’ll want to copy the page’s URL. You’ll need it later when connecting Constant Contact with Thrive.
After that, you can open a new tab to create a Constant Contact account on their website and click ‘Start Trial.’
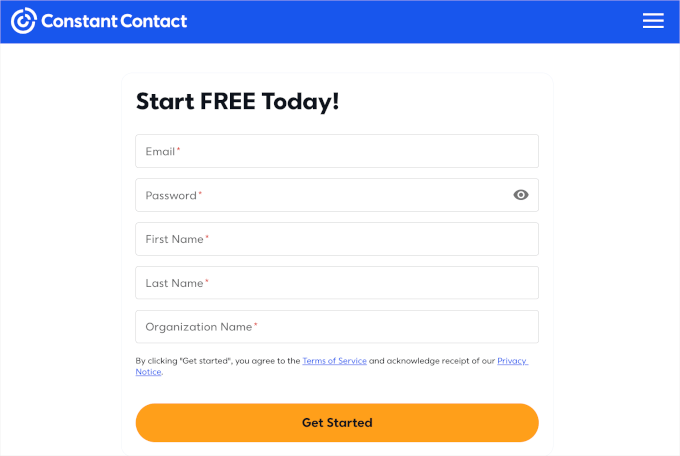
This will redirect you to the Constant Contact sign-up page, where you can enter your new account details.
After completing the sign-up process, you can generate your API key. To do this, you’ll need to open a new tab and visit the V3 API Developer Portal.
In the ‘My Application’ tab, you can click ‘Log In.’
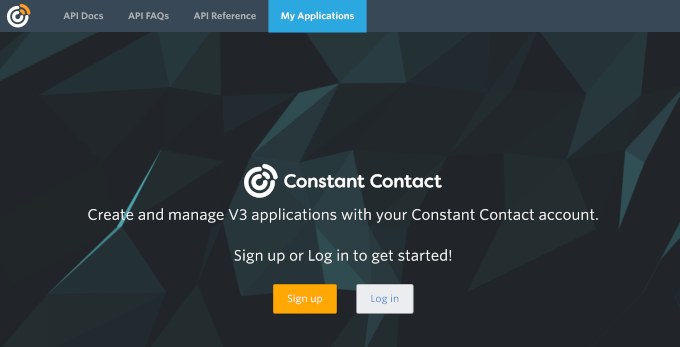
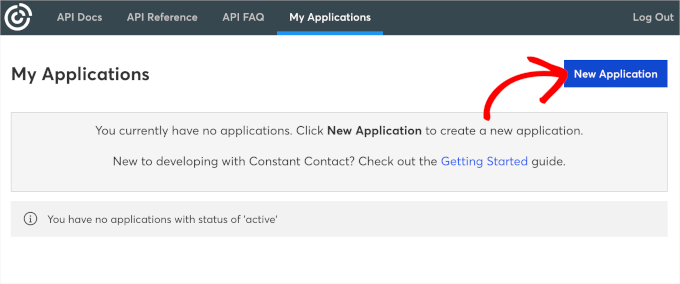
Constant Contact will then redirect you to the portal’s dashboard, where you’ll be prompted to create a new application.
Go ahead and click the ‘New Application’ button.
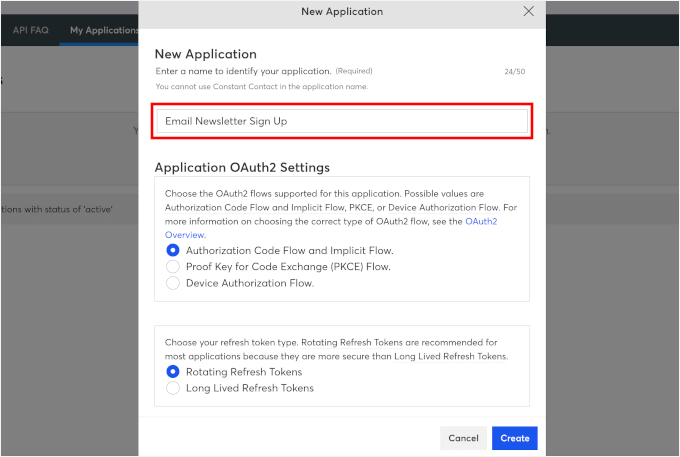
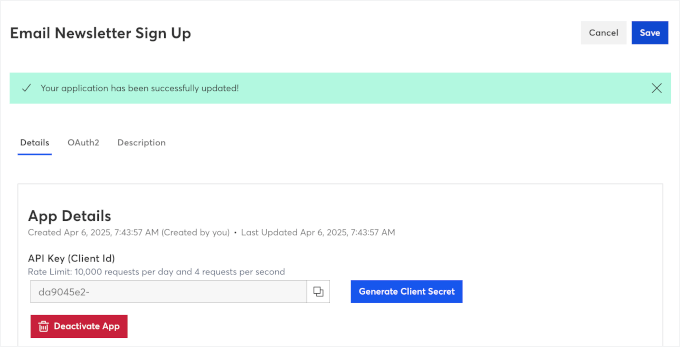
In the pop-up that appears, you’ll first need to name your new application. For example, I am using the ‘Email Newsletter Sign Up’ as my app name.
The next section asks for your OAuth2 application and refresh token type. You can leave these settings as is and click ‘Create’ to generate your API key.
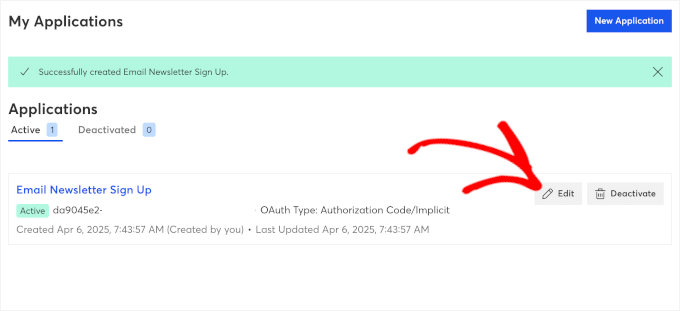
You’ll then be redirected to your ‘My Application’ dashboard, where you can see the app you just created.
Simply click ‘Edit’ to access the app’s information, including the API key.
This will open the app’s details.
You can go ahead and click the ‘Copy’ icon under the ‘API Key (Client Id) section.
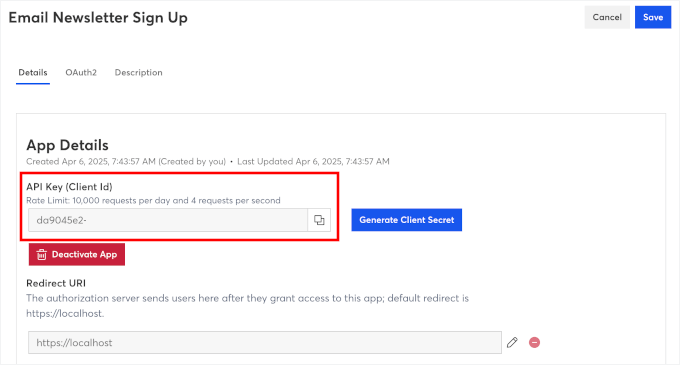
In the ‘Redirect URI’ field, let’s click on the pencil icon to edit it.
Then, in the ‘Edit this redirect URI’ popup, paste the URL from your Thrive Themes API connection page into the field. It should look something like this:
https://your-domain.com/wp-admin/admin.php?page=tve_dash_api_connect
After that, just click ‘Confirm.’
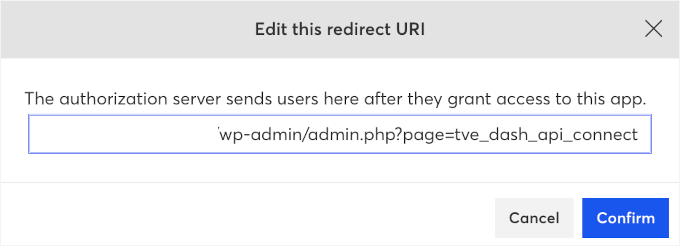
This will close the popup and take you back to the ‘App Details’ page.
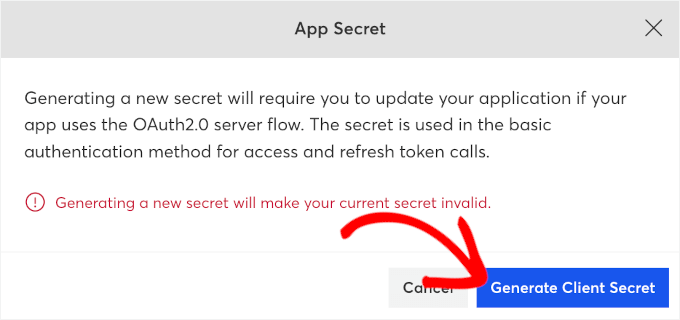
Now, let’s generate your Client Secret. You’ll need this, along with the Client ID, to complete the integration.
In the popup that appears, simply click on the ‘Generate Client Secret’ button.
The next step is to just copy the code and store it somewhere safe.
🚨 Quick heads-up! Make sure to copy and save your Client Secret now – you won’t be able to see it again later when setting things up in the Thrive Themes dashboard.
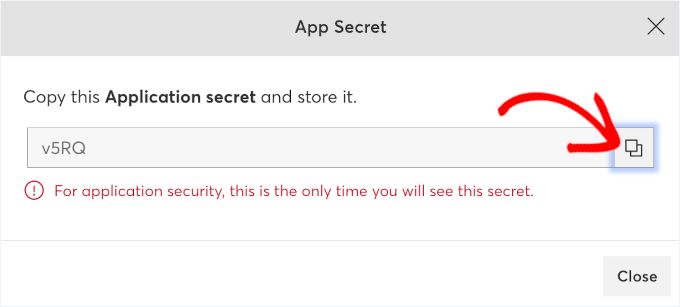
You can click the ‘Close’ button when you’re done, and you’ll be back to the app details page.
With that done, you can click the ‘Save’ button.
You should then see a notification that your application has been successfully updated.
Now it’s time to connect Constant Contact with Thrive.
You can head back to the ‘Manage Connections’ page in your Thrive Dashboard. Then, you’ll want to click ‘+ Add new Connection’ to get started.
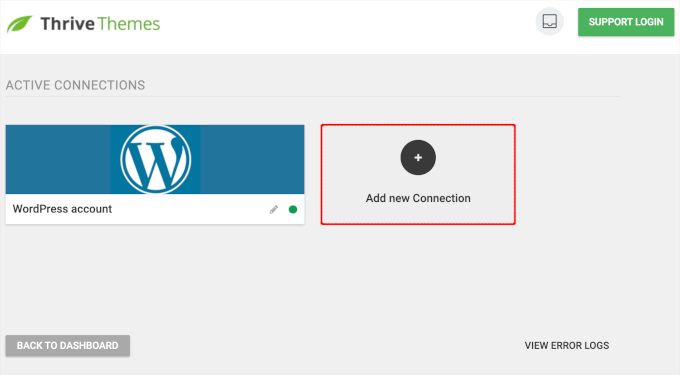
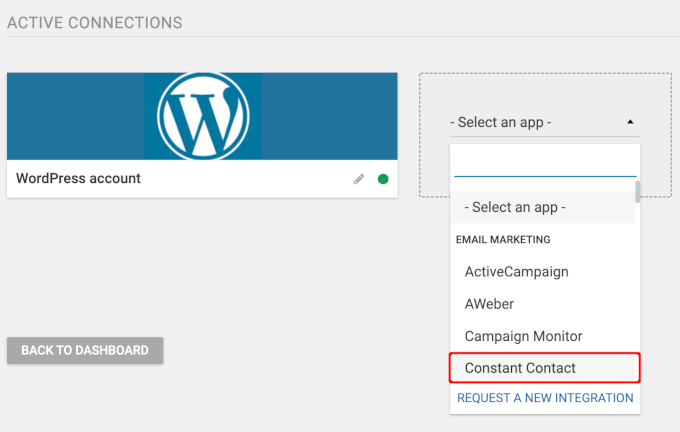
This will show you a dropdown to select an app.
If you open the dropdown, you can see that Thrive Themes offers dozens of email marketing apps you can integrate.
Go ahead and select ‘Constant Contact.’
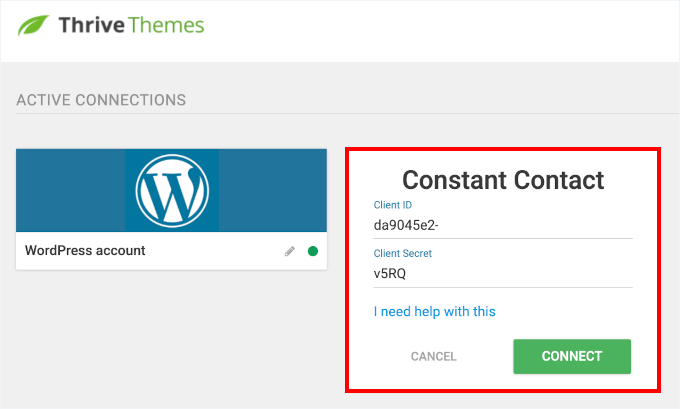
You should now see Constant Contact’s ‘Client ID’ and ‘Client Secret’ fields.
Simply copy and paste the information into the respective fields. After that, you can just click the ‘Connect’ button.
Thrive will then process the integration.
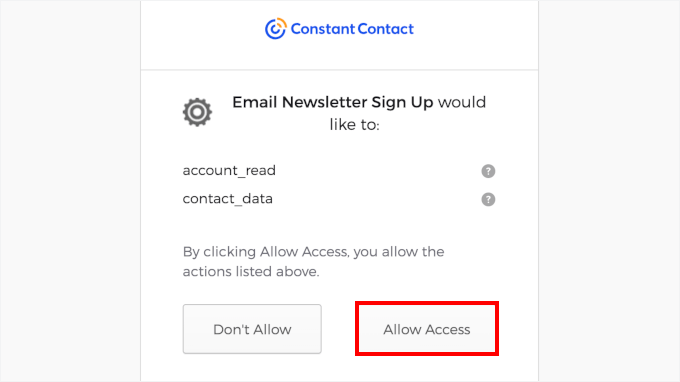
On the next screen, you’ll see an access permission box, where you can click the ‘Allow Access’ button.
And that’s it!
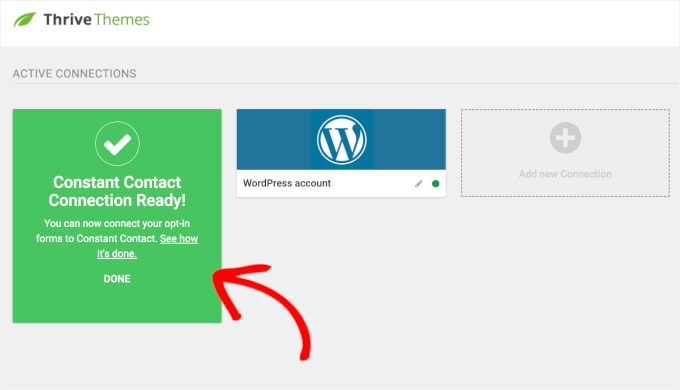
You should now see a success message like this:
Now, you’re ready to create your email subscription popup.
Create a ThriveBox Pop-Up Opt-In Form
A ThriveBox is a pop-up opt-in form by Thrive Leads. It appears when a user takes a specific action, like submitting a comment on your WordPress blog.
This makes it a great tool for capturing attention at just the right moment.
To create a ThriveBox, you can first navigate to Thrive Dashboard » Thrive Leads Dashboard.
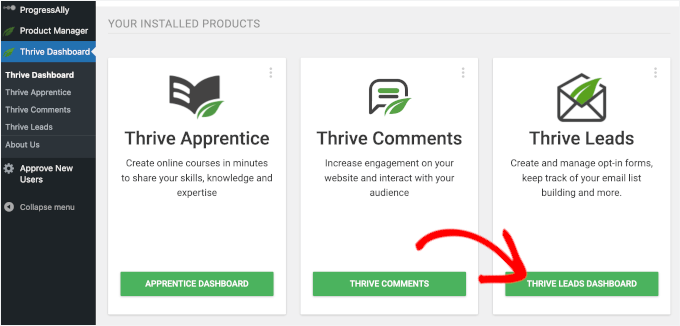
On the next screen, you’ll see four main options:
- Lead Groups – A set of opt-in forms (like ribbons, slide-ins, or post footers) that work together as one campaign. You can control where they appear on your WordPress site and who sees them using targeting rules.
- Lead Shortcodes – These are opt-in forms you create and then insert directly into a post or page using a shortcode. They’re great when you want a form to appear inside your content, exactly where you place it.
- ThriveBoxes – These are pop-up forms that appear after a user takes action, like clicking a link or, in this case, submitting a comment.
- Signup Segue – Create one-click signup links for existing subscribers, ideal for things like webinars or bonus downloads.
For this tutorial, I will focus on ThriveBoxes since I want the optin form to appear after someone leaves a comment.
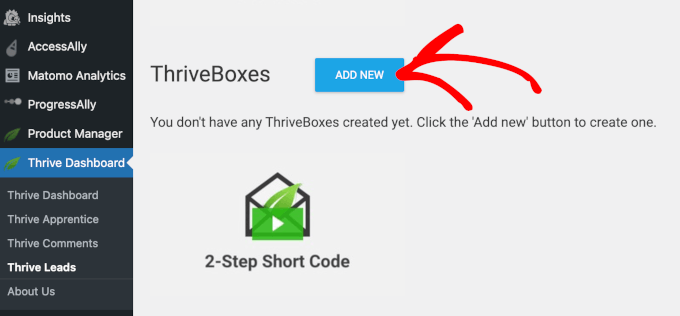
So, let’s click the ‘Add New’ button in the ‘ThriveBoxes’ section.
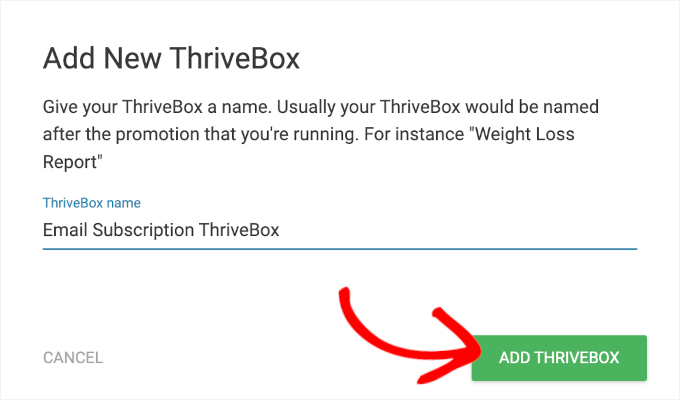
A popup will then appear, and it will ask you to name your ThriveBox.
Go ahead and type a name in the available field. This is just for your reference, so it won’t be visible to visitors. But it’s a good idea to choose something descriptive to help you recognize it later.
Once done, you can click the ‘Add ThriveBox’ button.
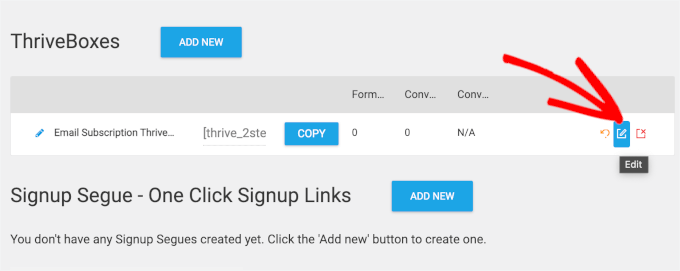
Next, you’ll see that your ThriveBox has been added to the list in the ‘ThriveBoxes’ section.
From here, you can click on the ‘Edit’ button to customize your opt-in form.
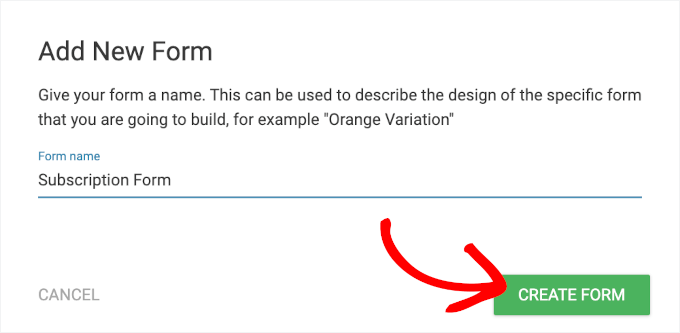
On the next screen, let’s click ‘Add New Form.’
📌 Note: With ThriveBox, you can create a multi-step form that first asks a simple question, like “Are you a beginner or advanced user?” — and then shows a tailored optin message based on their answer.
That’s why each ThriveBox can include multiple form variations or steps — all within the same popup.

Then, you’ll be prompted to name your optin form.
You can use any name you want, for example, Subscription Form.
Once added, you can go ahead and click on the ‘Edit’ button.
This will open a new tab for the Thrive Leads editor, where you can build your optin form.
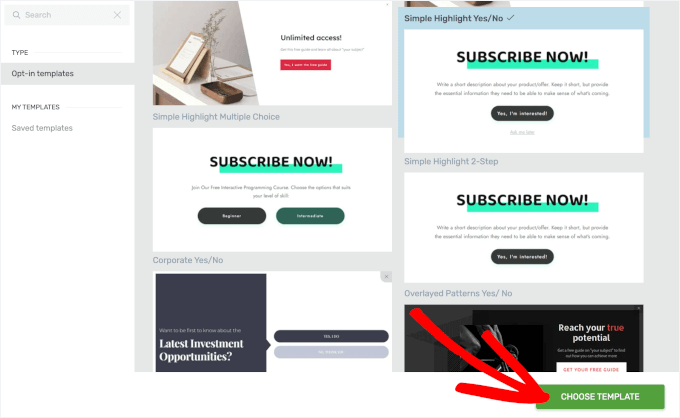
The first thing to do here is to choose a template. Just click on the template and once again on the ‘Choose Template’ button.
You will now be redirected to the Thrive Leads editor.
In the live preview, you can drag and drop elements to move them around, as well as edit and delete existing ones. You can find customization options in the left-hand panel and more options on the right.
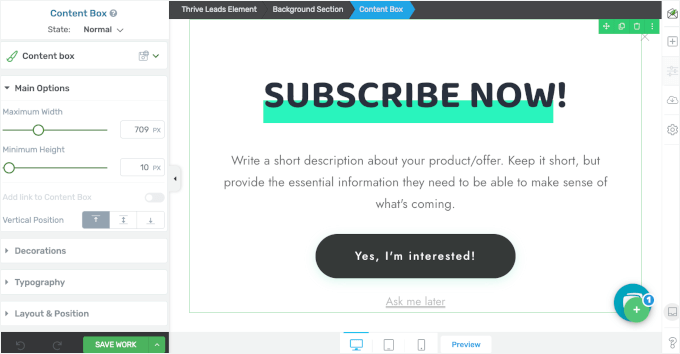
Since we’re connecting this opt-in to Constant Contact, let’s replace the ‘Yes, I’m interested!’ button with a ‘Lead Generation’ element.
This will give you access to API connection options so you can link the form directly to your email service.
To do this, let’s click on the ‘Yes, I’m Interested!’ button to open its options. After that, you can simply click on the trash icon to delete it.
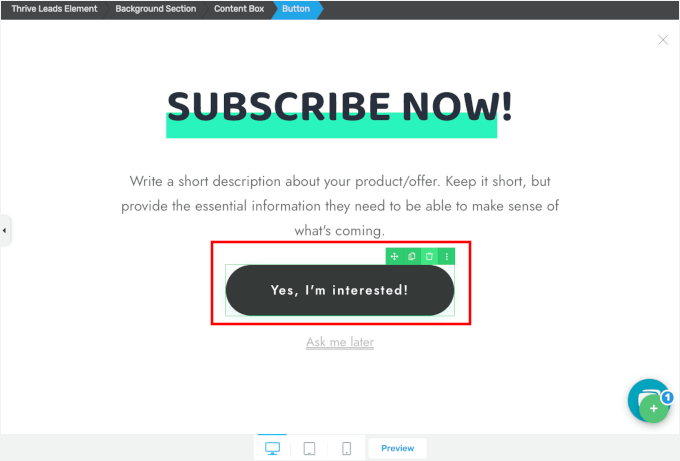
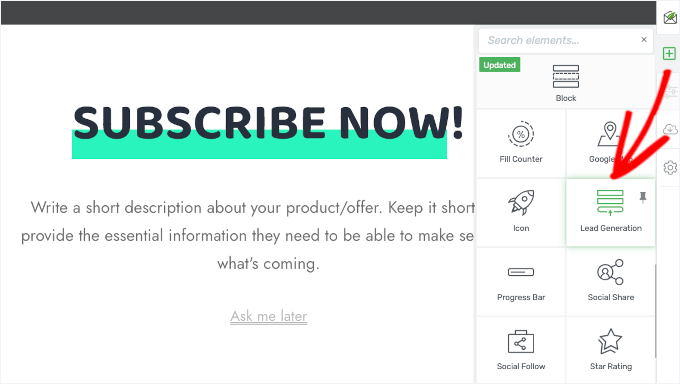
To add a new element, you can click the ‘+’ button on the right panel.
Then, you can go ahead and select the Lead Generation option.
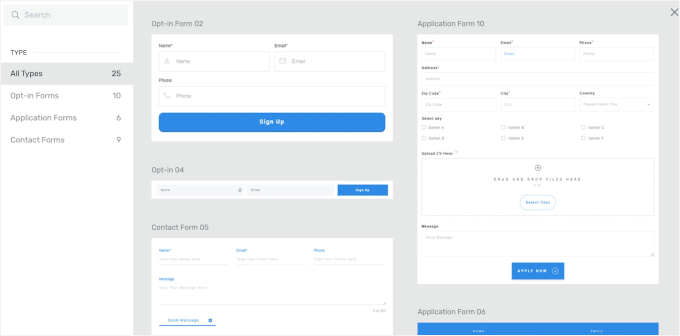
This will open a pop-up where you can choose a Lead Generation element template.
You can explore this popup for a bit and just click on the template you want to use. Once you click on a template, you’ll see it in your live editor.
Now, it’s time to configure the connection.
Let’s first make sure the Lead Generation element is active by clicking on it. This will open its customization options on the left panel.
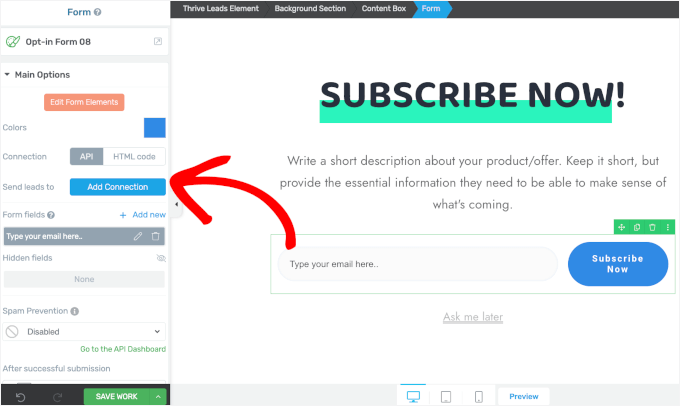
In the ‘Main Options’ section, you should see the API connection menu. Go ahead and click the ‘Add Connection’ button.
The next step is to open the drop-down menu and select ‘Constant Contact.’
With that done, you can click the ‘Apply’ button.
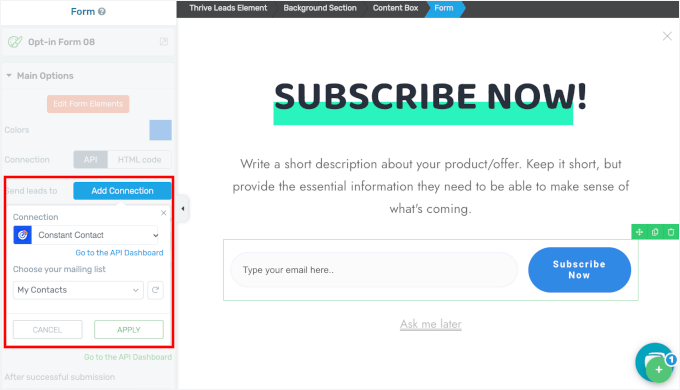
With this setup, any blog commenter who signs up for your newsletter will be automatically added to your Constant Contact email list.
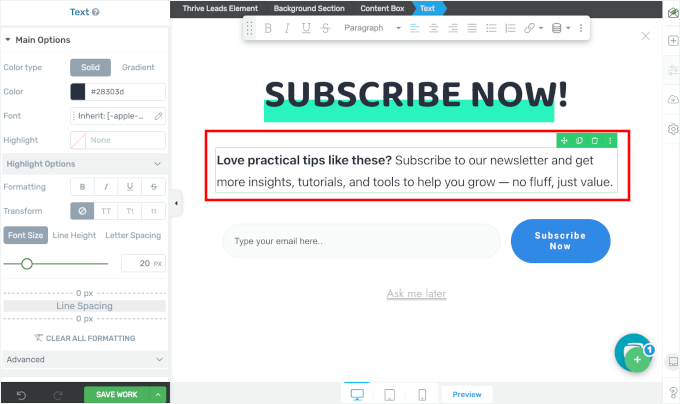
Next, you might want to edit the text element.
You can click on it and edit it right away.
When you’re happy with everything, don’t forget to click ‘Save Work’ to store your settings.
Once saved, you can close the editor and go back to the Thrive Leads page in your WordPress admin area.
The last thing to do here is to customize the form animation.
The default animation style is ‘Instant,’ but you can go ahead and click on its link to see more options.
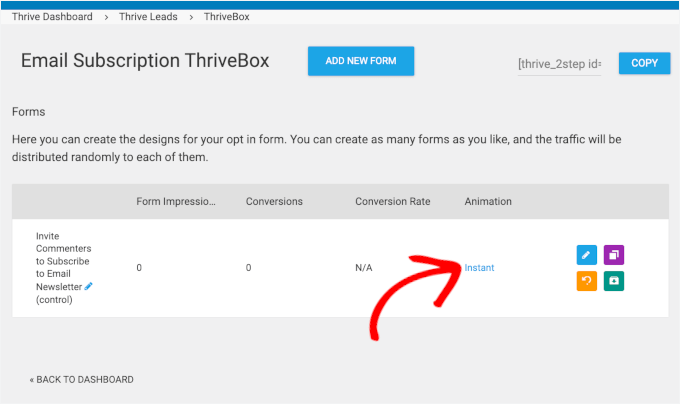
This will open a popup window where you can choose a new animation.
For this tutorial, we’re going to choose ‘Zoom In.’
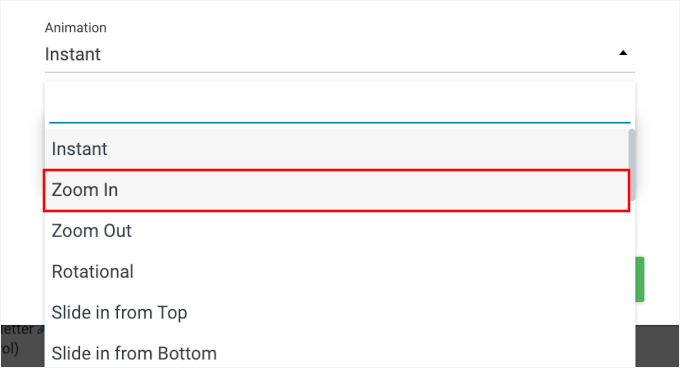
After choosing the animation for your optin form, you can just close the pop-up window.
Set Up Thrive Comments Opt-In Form
Now that your email marketing service and opt-in form are ready, let’s connect them all inside Thrive Comments.
From your WordPress admin area, you can navigate to Thrive Dashboard » Thrive Comments.
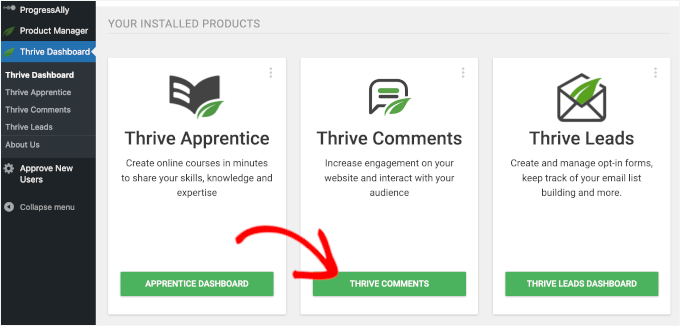
Then, click the ‘Comment Conversion’ section to expand it and select ‘Opt-In Form.’
After that, simply expand the drop-down menu and click on the ThriveBox you just created.
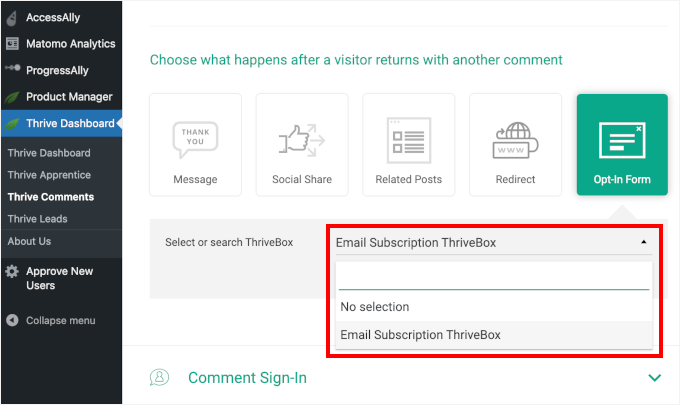
Thrive Comments will automatically save your settings, so you’re all set to start turning engaged readers into newsletter subscribers.
Now, you can send another test comment using the same name and email, and you should see the opt-in form in action:

As you can see from the screenshot above, the email address is added automatically to the form field, making everything smooth.
And that’s it! You’ve learned how to invite returning commenters to subscribe to your newsletter.
Bonus Resources 🔗: Improve Your WordPress Comments
Want to take your comments section even further? Just check out these helpful tutorials:
- How to Allow Users to Like or Dislike Comments in WordPress
- How to Allow Users to Upload Images in WordPress Comments
- How to Highlight Authors’ Comments in WordPress
- How to Display the Total Number of Comments in WordPress
- How to Allow Users to Edit Their Comments in WordPress
- How to Make Blog Post Comments Searchable in WordPress
- How to Redirect Your User’s Attention With Comment Redirect
- Best Plugins to Improve WordPress Comments
If you liked this article, then please subscribe to our YouTube Channel for WordPress video tutorials. You can also find us on Twitter and Facebook.


Rashmirekha Moharana
Hi Syed,
Nice post but i have a small queries. Will it work if if my hosting provider is Blue host and i had installed/configured google apps email.
Is any special setting is required.
Thanks a lot in advance.
Mohammad Farooq
Syed,
This looks good. Lemme try it out .
Thanks.
Mahesh
Thank you Syed for this, I was looking for this option. I have installed the plugin and tested it. It works fine.
CleverK
That’s a new concept for audience engagement. Putting that in the new sites I’m building right now.
I’m one of those people who has begun to think of the Thank You Note as an antiquated concept best put behind us – but it’s all about the context and delivery. If you’re not wasting paper and ink, and the note is meant to be short and serve a function beyond some arbitrary social custom, I can see the benefit. Thanks for sharing this.
Mukesh
Awesome I have added this plugin now in my blog.
Lets see the response now.
Thanks