Do you want to send a custom welcome email to people who sign up as users on your WordPress website? This is something we recommend, as it allows you to provide a personalized experience for your new users.
By default, if you allow user registration on your WordPress site, then each new user receives an email to set up their WordPress password. However, they don’t receive a proper welcome email specific to your website.
In this article, we’ll show you how to easily send a custom welcome to your new WordPress users, step by step, so you can give them a more engaging introduction to your site.
Why Send a Custom Welcome Email to New Users in WordPress?
By default, WordPress sends an email to new users when they sign up. However, this email is not customized to fit each individual website or blog.
Here are some common scenarios when a welcome email can help you set up a proper onboarding process for your new users:
- If you run a WordPress membership website, then you may want to educate users about where they can find all the benefits of their membership plan.
- In an eCommerce store, you can direct users to products they might like, their account settings, or their shopping cart page.
- On a multi-author website, you can point new authors to your style guide, ask them to fill in their bio and social links, or show them how to get started.
A custom welcome email can improve user experience and ensure that users don’t forget about your website after creating an account.
That being said, let’s look at how to easily set up a custom welcome email for new users in WordPress. For this tutorial, we will cover two methods, and you can use the links below to jump to the one of your choice:
Method 1: Setting Up a Custom Welcome Email Using a Plugin
If you are looking for an easy and free way to send a custom welcome email, then this method is for you. However, keep in mind that you will only be able to send just one welcome email to new users when they register on your website.
First, you need to install and activate the Better Notifications for WP plugin. For details, see our beginner’s guide on how to install a WordPress plugin.
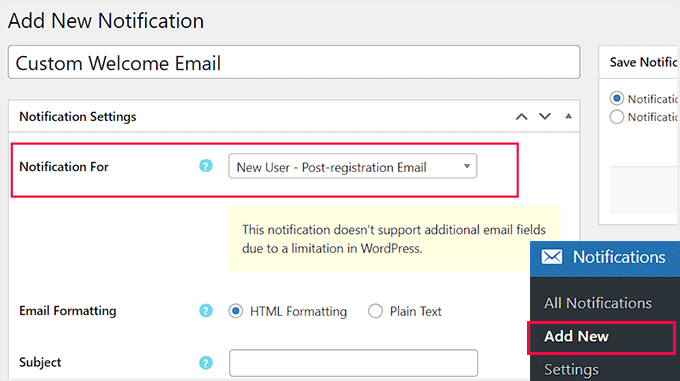
Upon activation, visit the Notifications » Add New page to create your custom welcome email. Here, you can start by adding a title for the notification.
Once you do that, select the ‘New user – Post Registration Email’ option from the ‘Notification’ dropdown menu. Now the email that you create will be sent to users once they register on your website.
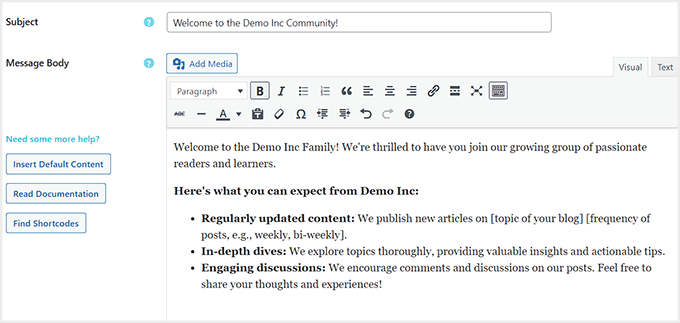
Then, you can scroll down to add a subject for the welcome email. After that, you can start drafting a welcome message in the ‘Message Body’ section.
You can also click the ‘Find Shortcodes’ button to see a list of shortcodes that you can use in your email message.
For example, to display the user’s name, you can use the shortcode [email_user_display_name].
Once you are done, make sure that the ‘Notification Enabled’ option is checked in the ‘Save Notification’ section. Then, click the ‘Save’ button to store your settings.
On doing that, the plugin will also allow you to send a test notification.
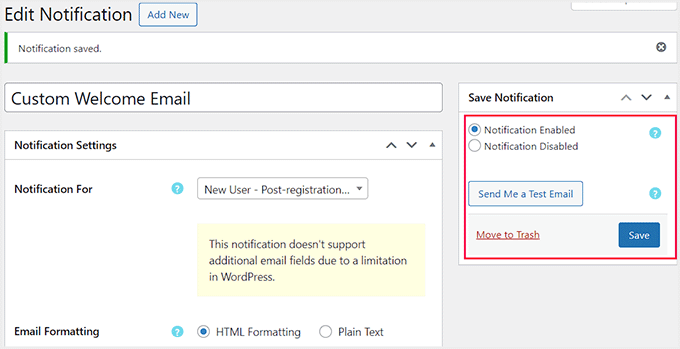
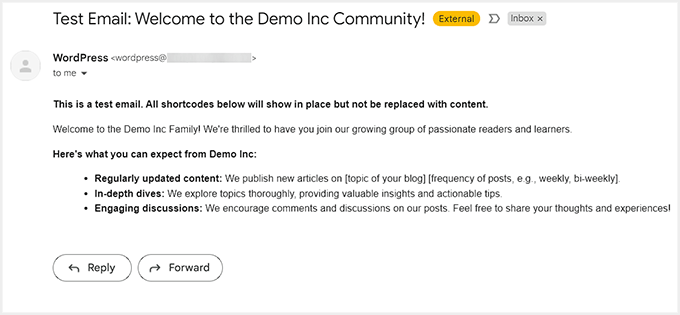
All you have to do is click the ‘Send Me a Test Email’ button, and you will be sent a welcome email to your business email address.
Here is how your custom welcome email will look to new users.
Method 2: Send Custom Welcome Email to New Users With Constant Contact
The first method only allows you to send one email when users perform an action on your website. This is somewhat limited and does not give you full control.
This second method lets you customize the welcome email using different templates and send it to users who join your email list. For this tutorial, we will use Constant Contact, which is one of the best email marketing services for small businesses.
First, you need to visit the Constant Contact website and sign up for an account by entering your email address.
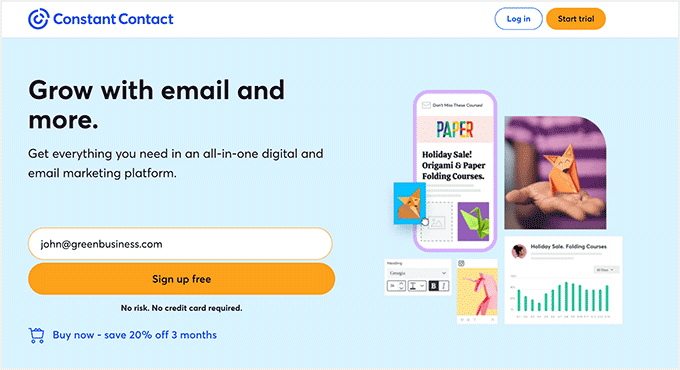
Once that is done, your Constant Contact dashboard will be launched on the screen.
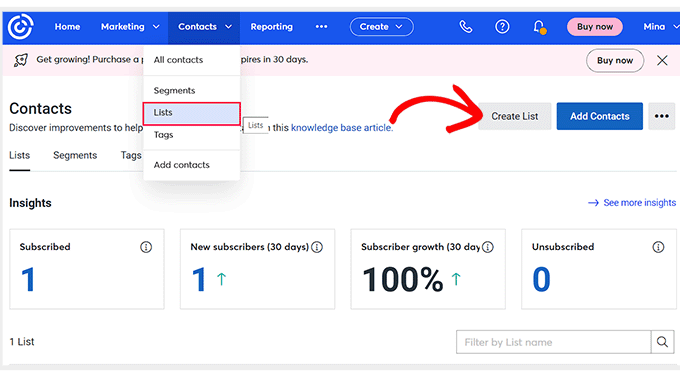
From here, you must switch to the Contacts » Lists page from the top and click the ‘Create List’ button on the right side of the screen.
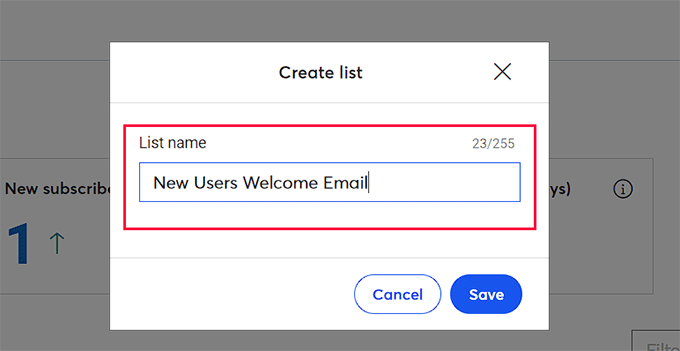
This will open a prompt where you can add a name for the email list that you are creating. This will be the list where you store all the email addresses of your contacts.
Simply enter a name for the list and click the ‘Save’ button.
We recommend following this step before creating a welcome email to build an email list and generate leads.
Next, visit your WordPress dashboard to install and activate the Constant Contact Forms plugin. For details, see our step-by-step guide on how to install a WordPress plugin.
This plugin acts as a connector between your website and Constant Contact.
Upon activation, just visit the Contact Form » Connect Now page and click on the ‘Get Code’ button.
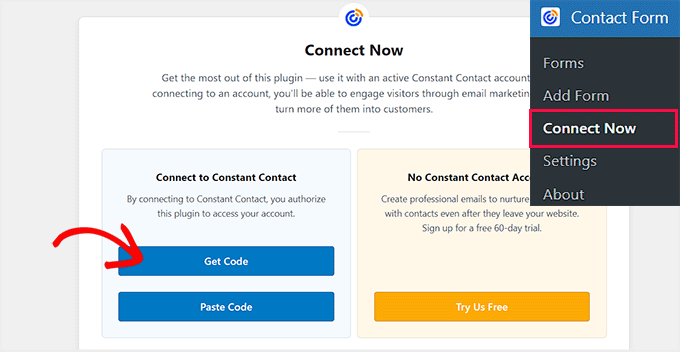
This will open the ‘Application Authorization’ page in a new tab, where you must copy the code given to connect Constant Contact with your website.
To do this, click the ‘Copy Code’ button.

Then, head back to the WordPress dashboard and click the ‘Paste Code’ option.
You will be taken to another page where you must paste the copied code and click the ‘Save Changes’ button.
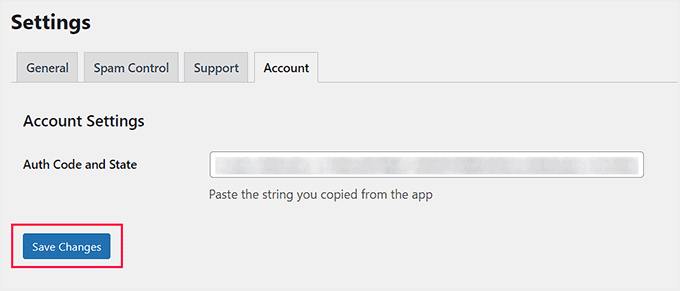
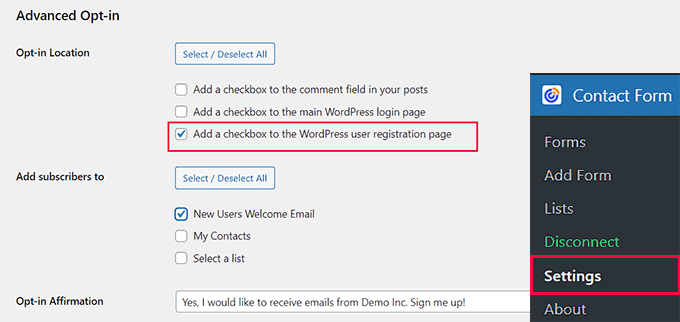
Now that Constant Contact has been connected, head to the Contact Form » Settings page.
Here, scroll down to the ‘Advanced Optin’ section and check the box next to the ‘Add a checkbox to the WordPress user registration page’ option.
After that, select the email list you created earlier from the list displayed next to the ‘Add subscribers to’ option.
Once that is done, you can also add a message that users will see on the screen. Then, click the ‘Save Changes’ button to store your settings.
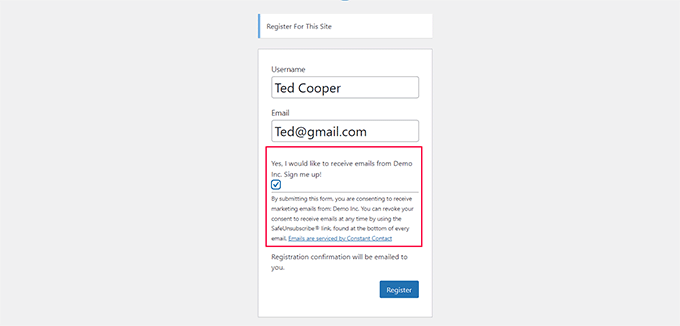
You can then visit your WordPress registration page to see it in action.
You will now see a checkbox for users to sign up for your email list when they register for an account on your website.
Pro tip: You can create a completely custom WordPress user registration form that also seamlessly integrates with Constant Contact.
Now that you have started building an email list, it is time for you to create a custom welcome email. To do this, visit the Constant Contact dashboard and switch to the ‘Home’ tab. Then, click the ‘Create’ button.
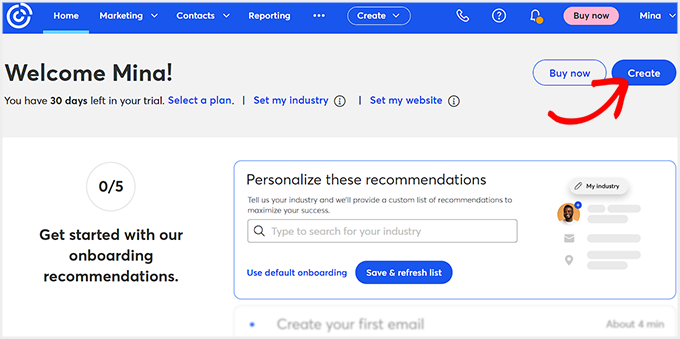
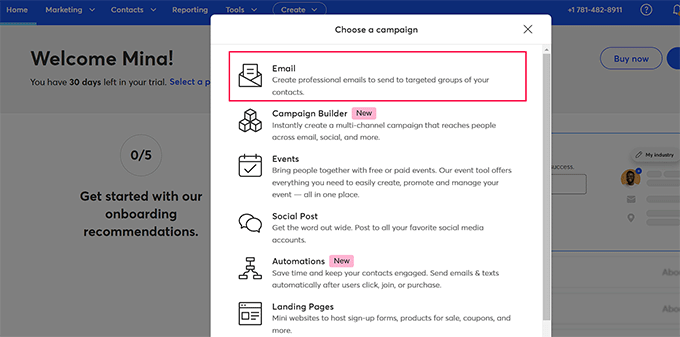
This will open a prompt on the screen from where you can choose a campaign type.
Since we want to send an automated welcome email to new users, we will be selecting the ‘Email’ option.
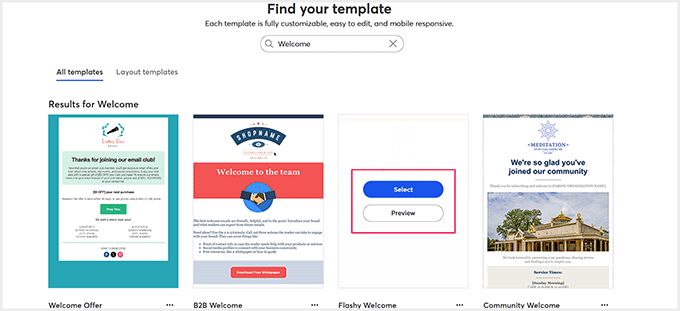
You will now see a list of premade templates by Constant Contact for all kinds of events, announcements, and sales.
From here, click the ‘Select’ button for the welcome email template that you like.
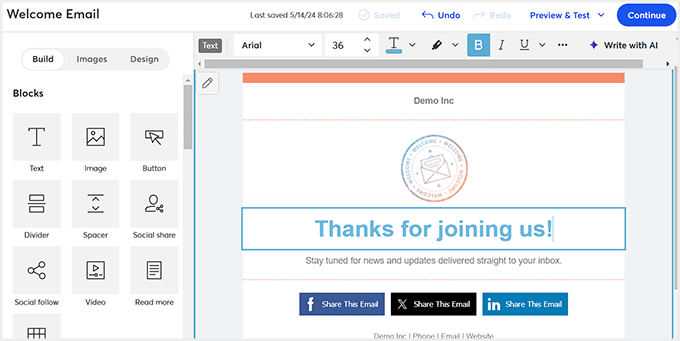
This will open the Constant Contact drag-and-drop builder, where you can start by adding a name for the template.
After that, you can delete, rearrange, or add different blocks to the template from the left column. You can also edit the text according to your liking by just clicking on it in the preview.
Once you are done, click the ‘Continue’ button at the top.
This will take you to another screen, where you can choose who to send this email to. From here, you must select the email list that you just created from the ‘Select Recipients’ section.
You can click ‘Save’ to store your settings or ‘Send Now’ if you are ready to use the custom welcome email for your users.
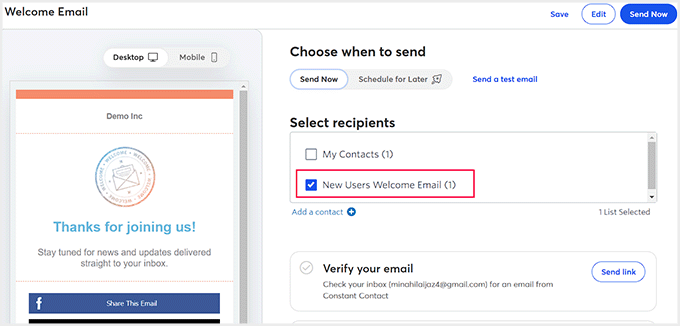
Now users who register on your website and agree to be a part of your email list will automatically be sent this email upon successful registration.
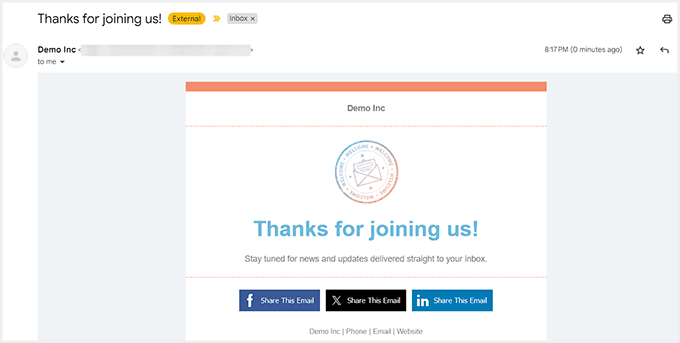
Here is a preview of the welcome email that we created with the tool.
With Constant Contact, you can also create a drip camapaign where a sequence of emails will be sent to users over time. However, you will need the pro version of the software.
For more information, you can see our tutorial on how to set up automated drip notifications in WordPress.
Bonus: Ensure Email Deliverability in WordPress
Now that you have created a custom welcome email for new users, you will want to make sure that none of your emails end up in the spam folder. The default WordPress settings use the PHP mail () function to send emails, which can get them sent straight to spam.
Plus, most WordPress hosting companies do not have this mail function configured properly. To prevent their servers from being abused, many hosting companies even turn them off completely.
However, you can easily ensure your emails get delivered by using WP Mail SMTP, which is the best WordPress SMTP plugin on the market.
It uses SMTP (Simple Mail Transfer Protocol) to send emails to your users and can connect with any popular SMTP service providers like SendLayer, Brevo, and more.
The tool also comes with powerful features like email logs, email controls, and priority support. For details, you can see our tutorial on how to fix the WordPress not sending emails issue.
We hope this article helped you learn how to easily send a custom welcome email to new users in WordPress. You may also like to see our beginner’s guide to WordPress email marketing automation and our tips on how to use a contact form to grow your email list in WordPress.
If you liked this article, then please subscribe to our YouTube Channel for WordPress video tutorials. You can also find us on Twitter and Facebook.


Jiří Vaněk
After implementing the MemberPress plugin on my site, this is another feature that allows me to surprise users with a personalized welcome email tailored specifically to my website. It may seem like a small detail, but I think it’s very nice and personal to welcome a new user. Thank you for the detailed guide. The Better Notifications for WP plugin is a great addition to MemberPress.
Edis Duhan
So general Question,
does Costumers recieve this kind of email, when he is signing up with Google login ?
And my other Question is, is it possible with this plugin to create a Link, that he must click on it, only if it is clicked Profile is active, like on most platforms.
WPBeginner Support
It would depend on what tool you are using for the Google login for your first question. For the second question, you would need a membership plugin or similar plugin to add that functionality.
Admin
Angel Chacon
Good afternoon, would it be possible to send the welcome email to different types of users? I have different types of users and I would like to send an email according to the type of user. Thank you
WPBeginner Support
The plugin from the first method currently has a paid upgrade to allow that functionality.
Admin
Adam Smith
Nice article. The problem with method 2 is that if users don’t check the box, they don’t get the custom email…
WPBeginner Support
That is correct, you would require the user’s consent to send them an email.
Admin
Riccardo
Hi! Thank you for this tutorial, it really helped me. I have a question about the Method 1: when I use Better Notifications to set a custom post-registration email, the plugin overrides the original one containing the set-password link for the new user. How can I get this link in order to insert it in the new email?
WPBeginner Support
You would want to check the plugin’s shortcodes for what is able to be included in the email.
Admin
Mujahid Aftab
Nice tutorial. You are doing a fantastic job. Can you Please tell me what should I do so that every time customer receive my customized email like my name and address at the end of each email?
Thanks.
WPBeginner Support
Depending on what you’re using you would want to see if there’s an option to add a signature. If you’re using the plugin from this article, you should be able to manually add that information.
Admin