You’ve just hit ‘Publish’ on your latest WordPress masterpiece. Now comes the familiar dance of hopping from platform to platform to share your content manually. Exhausting, right?
At WPBeginner, we recommend using ClickSocial to automate social media sharing on your WordPress site. But we know every business has different needs and budgets, which is why we also often recommend Buffer to our readers who are just getting started.
Buffer is a popular freemium tool that lets you schedule and manage social media posts across multiple platforms from one dashboard. When integrated with WordPress, it automatically shares your new posts on your social accounts.
In this guide, we’ll show you how to schedule WordPress posts for social media using either of these tools. We’ll start with Buffer since it’s more widely used, and then we’ll share how we use ClickSocial for some of our websites.

Why Schedule WordPress Posts for Social Media?
Social media is an important source of traffic for many websites, including WPBeginner.
An easy way to encourage visitors to share your content is by adding social sharing buttons in WordPress.
However, social media platforms require you to be actively engaged. One way to do that is to regularly post updates to your social media accounts.
It can become time-consuming to post several times a day and spend time on each social platform.
Wouldn’t it be nice if you could automate and schedule some of that work so that you can focus on growing your business?
This is what Buffer does. It allows you to schedule your social media posts and even automatically schedule blog posts to be shared on social media from WordPress.
What Is Buffer?
Buffer is a web-based app that allows you to post across various social networks.
In their own words, Buffer is a smarter way to share things. It allows you to integrate your Facebook, X/Twitter, and LinkedIn into one Buffer account.

You can use a single dashboard to share things on all your networks. It also offers analytics, easy scheduling of posts, and URL shortening.
You can also add team members, which is great for dividing up social media activities.
With that said, let’s take a look at how to schedule and auto-post WordPress posts for social media profiles with Buffer. You can use the quick clicks below to navigate the tutorial:
How to Schedule WordPress Posts for Social Media with Buffer
Step 1: Set Up a Buffer Account
The first thing you need to do is go to the Buffer homepage and click the ‘Get started now’ button in the top right corner.
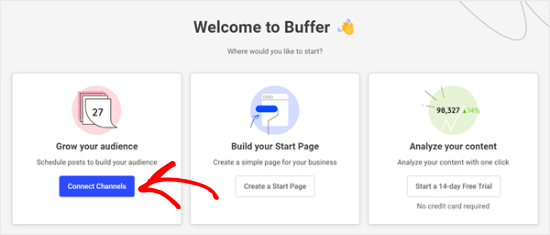
Then, follow the Buffer onboarding wizard. Click ‘Connect Channels’ in the Grow your audience section to get started.
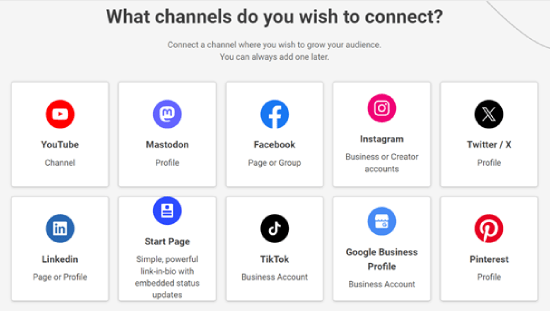
Once you are done, you will see some social media channel options that you can connect to Buffer.
In this example, we will use Facebook.
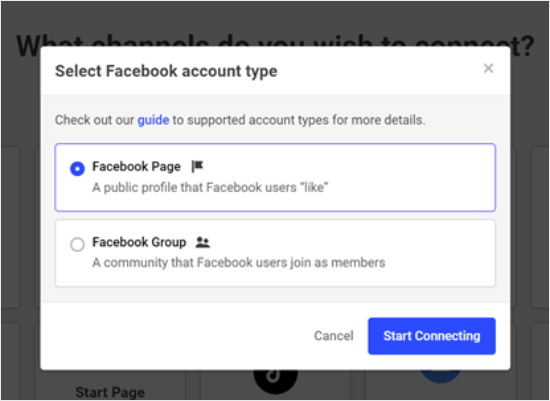
Now, you will select what kind of Facebook account to connect to Buffer. We have chosen the Facebook Page option for the sake of demonstration.
Once done, just click ‘Start Connecting.’
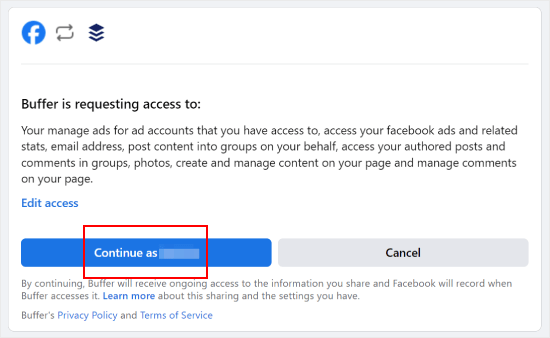
The next step is to allow Buffer to access your Facebook account.
Go ahead and click the ‘Continue as …’ to proceed.
Once done, you will arrive at the Buffer dashboard.
Here, just select the Facebook page you’ve connected to Buffer earlier, like below.
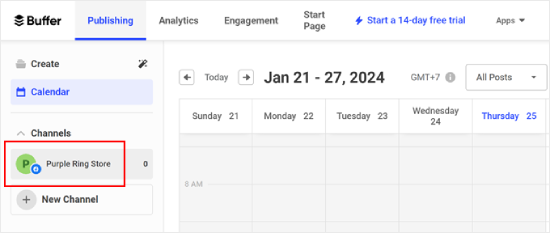
The next thing you will want to make sure of is that you have created specific times to post to your social accounts in the Buffer dashboard.
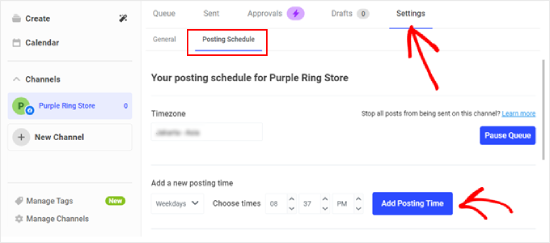
Simply switch to the ‘Settings’ tab and then click ‘Posting Schedule’. From here, you can set up your posting time. You can add as many as you like.
Once that’s done, just click ‘Add Posting Time.’
Step 2: Connect WordPress to Buffer With WP to Buffer
Now that you have created a Buffer account, the next thing is to connect it to your WordPress website.
To do that, you need to install and activate WP to Buffer plugin on your site. For more details, please see our ultimate guide on how to install a WordPress plugin.
After activating the plugin, go to WP to Buffer » Settings and click the ‘Authorize Plugin’ button.
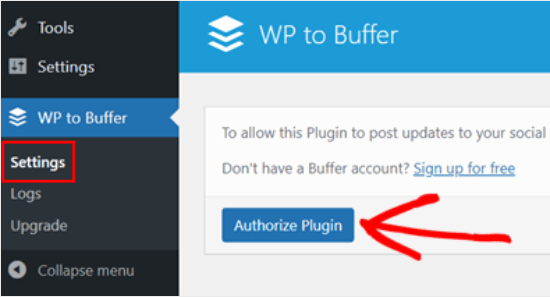
You should now see this screen below.
You will need to click on the ‘Allow access’ button, and that will connect your WordPress site to your Buffer account.
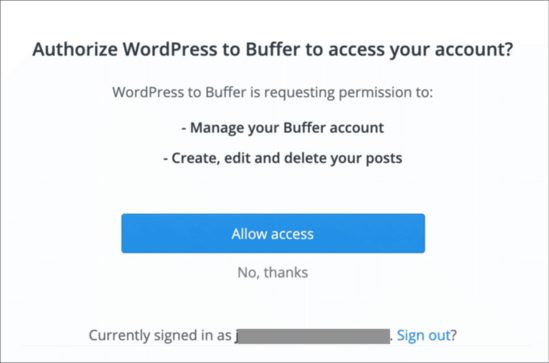
Now that your Buffer account is connected to your WordPress admin area, you will see the WP to Buffer plugin option there.
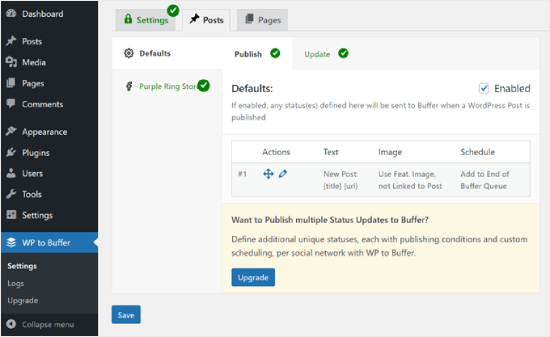
Here is what the plugin page looks like:
Step 3: Publish a Blog Post to Test the Posting Schedule
To automatically share WordPress posts to Buffer when they are published, you need to go to WP to Buffer » Settings and go to the Posts tab.
Then, switch to the social media channel tab you have added in Buffer. In this case, that would be the Facebook page we added earlier.
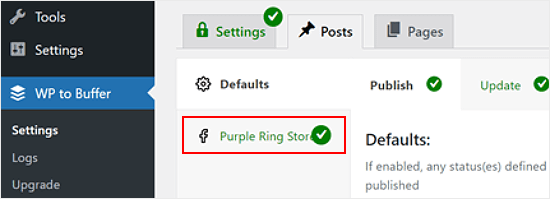
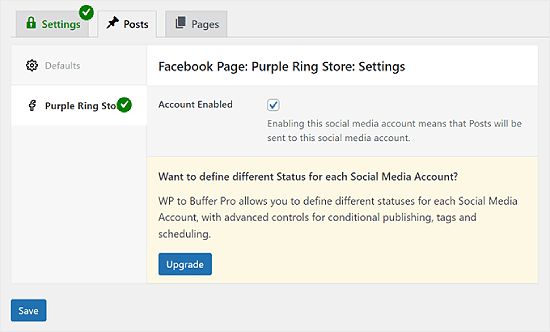
After that, tick the ‘Account Enabled’ box.
Then, click ‘Save.’
Now, every time you publish a new post on your WordPress blog, Buffer will auto-publish it based on your chosen schedule.
You can test this out on the local version of your website or your staging site. This way, you won’t accidentally publish a test blog post to your live WordPress blog.
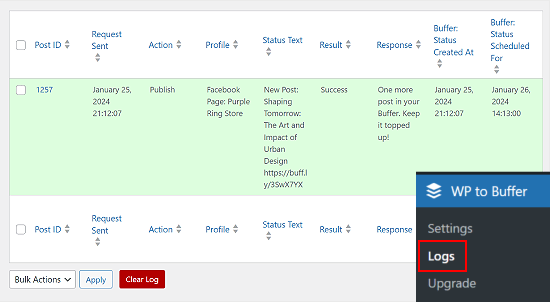
Once the WordPress post is published, you can go to WP to Buffer » Logs. You should see what posts are being queued up for publishing in the future.
Video Tutorial
If you don’t enjoy written instructions, you can follow along with our video tutorial instead:
Alternative Method: Schedule WordPress Posts for Social Media with ClickSocial
If you’re looking for a Buffer alternative, we recommend ClickSocial. It’s a powerful social media scheduling tool that we use on WPBeginner partner websites like SeedProd.
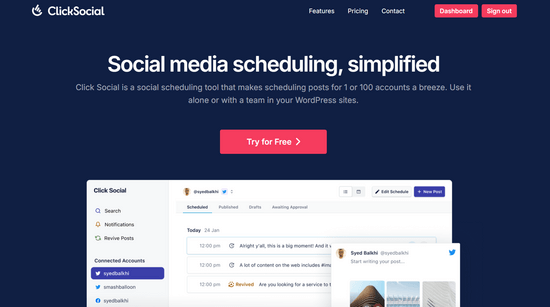
With ClickSocial, you can create and schedule social media posts for Instagram, Facebook, and Twitter, right from your WordPress dashboard.
You can also set up revival campaigns to automatically share your blog posts on a regular basis. To learn more, you can see our detailed ClickSocial review.
Step 1: Set up ClickSocial
To get started, you need to visit the ClickSocial website and click the ‘Try for Free’ button to sign up for an account.
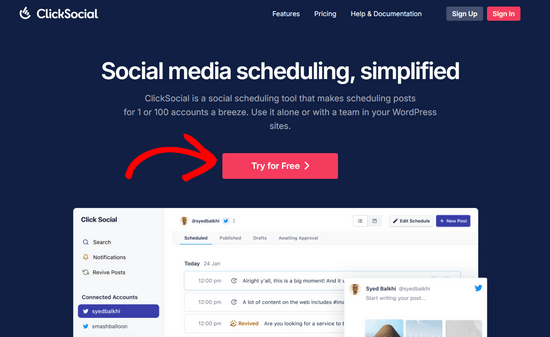
After signing up for an account, you need to install and activate the free ClickSocial plugin. If you need help, see our guide on how to install a WordPress plugin.
Once the plugin is activated, return to your account on the ClickSocial website to generate an API key. This enables you to connect ClickSocial with your WordPress site.
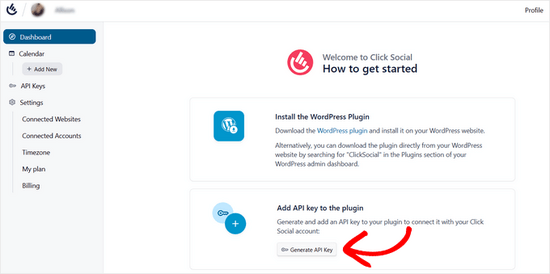
From the ClickSocial dashboard, simply click the ‘Generate API Key’ button.
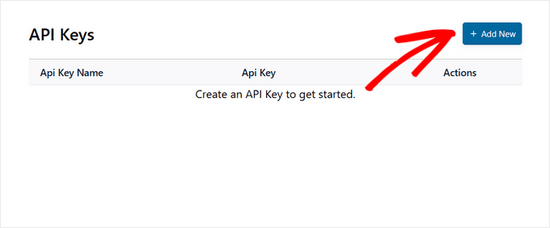
Then, on the following page, you need to click the ‘Add New’ button.
In the popup that appears, you can add a name for your API key, like the name of your website, for example. Next, click ‘Generate API Key.’
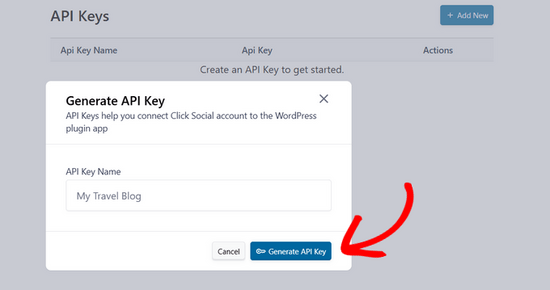
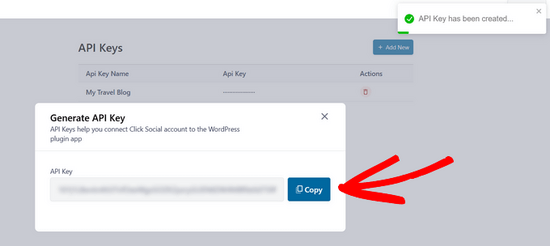
Now your API key will be generated. Click the ‘Copy’ button to copy the API key and then return to your WordPress site.
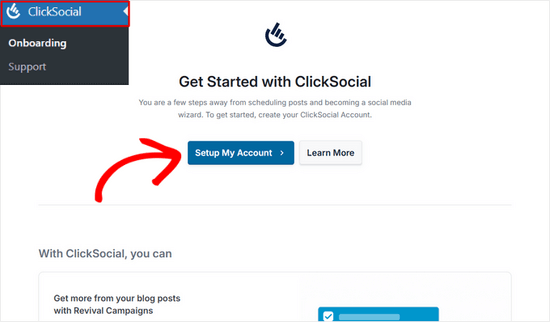
From the WordPress dashboard, navigate to the ClickSocial menu item and then click the ‘Setup My Account’ button.
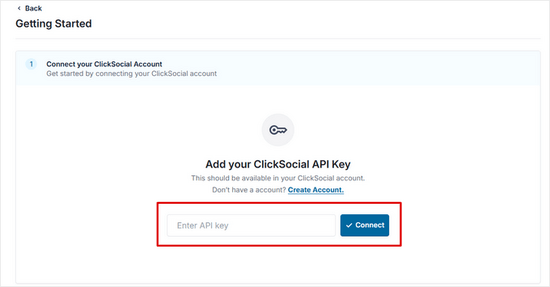
Then, paste the API key that you copied earlier into the field and click on the ‘Connect’ button.
Step 2: Connect Your Social Accounts
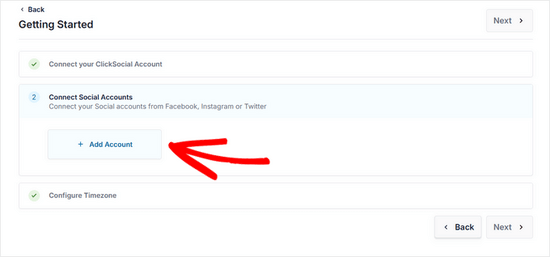
Next, you can start connecting your social media accounts by clicking the ‘Add Account’ button.
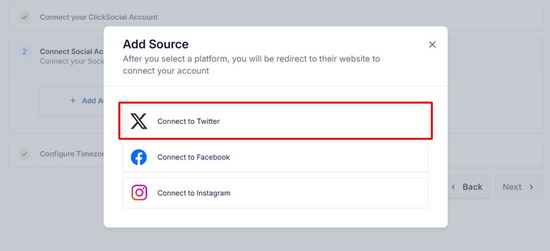
With ClickSocial, you can connect to Facebook, Instagram, and Twitter. For this tutorial, we’ll choose the ‘Connect to Twitter’ option.
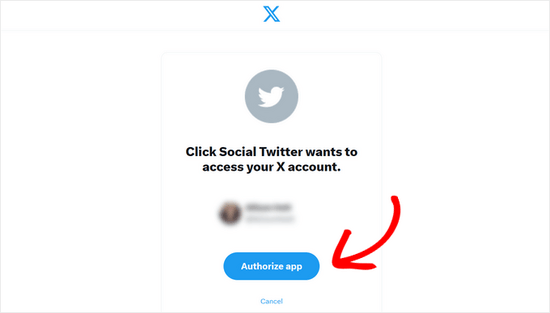
You’ll then be redirected to the Twitter website, where you need to log in to your account and click the ‘Authorize App’ button.
After that, you’ll be redirected back to your website. If you want to connect to Instagram and Facebook as well, simply click ‘Add Account’ again and follow the prompts on the screen.
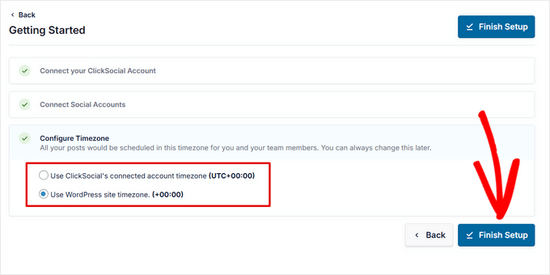
When you’re done connecting your social media accounts, you can choose the timezone that your posts will be scheduled in. We’ll use our WordPress site’s timezone for this tutorial.
Then, click the ‘Finish Setup’ button.
Step 3: Create a Revival Campaign in ClickSocial
Once you’ve set up ClickSocial and connected your social media accounts, you can create a revival campaign to automatically share your WordPress posts.
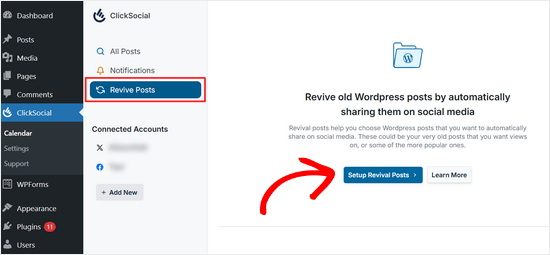
To do that, go to ClickSocial » Calendar from the WordPress admin dashboard.
From there, navigate to the ‘Revive Posts’ tab and click on the ‘Setup Revival Posts’ button.
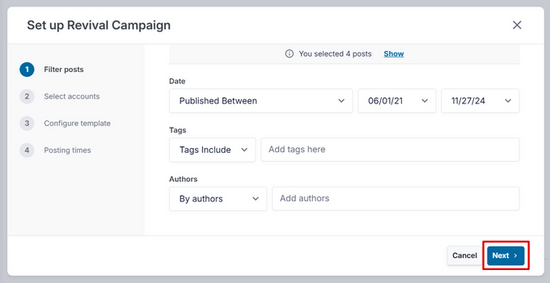
Then, you can configure filters to decide which WordPress posts you want to automatically share on social media.
You can filter posts by publish date, tags, and authors. After setting up your filters, click the ‘Next’ button.
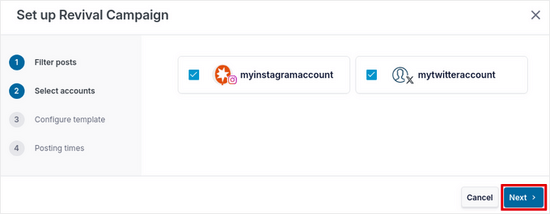
After that, select the social media accounts that you want to share posts on and click ‘Next’ to continue.
In this step, you can create a social media post template.
You can manually type the text you want to display when your posts are shared, as well as add dynamic content like post title, excerpt, short post link, and categories as hashtags.
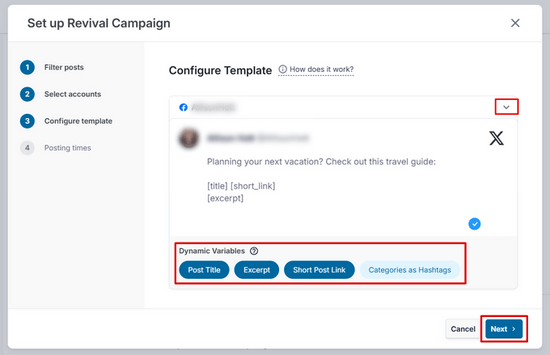
Note: If you selected multiple accounts to post to, you need to create a separate template for each platform by clicking the down arrow next to the account name.
Finally, you can schedule when your social media posts will be shared. You can select the days and times of your posts. You can also add multiple posting times per day by clicking the ‘+’ icon.
![]Choose schedule for social media posting Choose schedule for social media posting](https://www.wpbeginner.com/wp-content/uploads/2013/06/choose-posting-times-min.png)
When you’re happy with your posting schedule, click the ‘Next’ button.
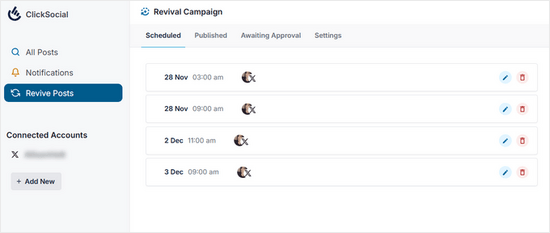
That’s it! You can now see from the ‘Scheduled’ tab that your WordPress posts will be automatically shared on your chosen days.
More Ways to Automate Your WordPress Social Media Strategy
Besides auto-publishing and scheduling your WordPress posts, there are many ways to take your WordPress social media automation to the next level. Check out these smart social media guides for starters:
- How to Automatically Share Old WordPress Blog Posts (Step by Step) – Keep your evergreen content in circulation by automatically resharing older posts on social media.
- How to Automatically Publish from WordPress to Instagram – Learn how to streamline your Instagram strategy by automatically sharing your WordPress content.
- How to Automatically Post to Facebook From WordPress – Discover methods to keep your Facebook page active with your latest WordPress posts without manual effort.
- How to Automatically Tweet New Posts in WordPress – Ensure your Twitter followers always see your latest content by setting up automatic tweets for new posts.
- How to Automatically Post New Instagram Photos to WordPress – Showcase your Instagram content on your WordPress site automatically to create a cohesive online presence.
- How to Automatically Create WordPress Post from YouTube Video – Streamline your content creation process by turning your YouTube videos into WordPress posts automatically.
We hope this article helped you learn how to schedule WordPress posts for social media with Buffer. You may also want to see our guide on how to create a custom Instagram photo feed in WordPress and our expert picks for the best social media plugins for WordPress.
If you liked this article, then please subscribe to our YouTube Channel for WordPress video tutorials. You can also find us on Twitter and Facebook.


Dennis Muthomi
Thanks for this.
One tip I would add from my experience: it’s helpful to create content categories in Buffer that match your WordPress categories.
This way you can schedule more targeted and keep a balanced content mix across your social channels.
Yadian
Can I change this ?: “Published by Buffer”
for this: “Published by site_name”
WPBeginner Support
Sadly not at the moment, that is a limitation set by the social media platform rather than buffer itself.
Admin
Tayo
Can buffer auto publish articles from blogspot blogs?
WPBeginner Support
Hi Tayo,
We are not sure it can do that. You can try using it with IFTTT that may work.
Admin
Dave
For Some reason the Buffer plugin, brings my Google Chrome to a standstill whenever I try to load a post or page in the admin, anyone else had this?
Davide Corizzo
Hey guys, thanks for writing this interesting article!
It’s been a while I wanted to automatize publishing my blog articles as the way you made it and was successful.
Just an issue with WP to Buffer plugin… I’d like to get the same result when I copy & paste manually the URL of the article using Facebook Open Graph and Twitter Cards features.
At the moment, the plugin just publish a very basic {title} {url} #{category} plus the image of the article. How could I fix it and get your same result?
Thanks for your attention.
Cheers,
Davide
Sach
If I schedule a post within WordPress, will it still be scheduled to go to Buffer when it was scheduled to be posted within WordPress? Thanks.
WPBeginner Support
Yes.
Admin
Mike
Hi guys, I’m wondering if we can have our Buffer posts or IFTTT or Pocket post updates directly to our Wordpress blog page (not home page)? So not WP -> Buffer but reverse and have things auto posted to my blog page on my WP site through Buffer or IFTTT or Pocket.
This would be extremely useful for posting important articles from the web to my website and then my Get Response feed that is already set up.
Any help is much appreciated!
Thanks
Mike
Cristian O. Balan
Work also for Facebook page (and not the profile page)?
David Pappas
What’s the use case? If I can schedule posts within Wordpress and publish directly to different social media sites, under what circumstance is this a useful service?
Editorial Staff
Buffer allows you to space your tweets out. If the only thing you do is tweet links for your site, then you don’t need buffer. It is also great for sharing in general aside from WordPress.
Admin
François
Thanks for your tuto, I followed all the steps to successfully set my buffer account.
It’s a pitty that google+ is not supported by buffer, do you know a solutions to deal with it please ?
Thanks for your answer !
Editorial Staff
Google+ doesn’t have the API to allow for that, so we don’t know of any solutions just yet.
Admin
Abdul Rahim
Very nice post, WordPress have already schedule post option, but BufferApp provide more option for publishing post and share on social network automatically.
I like this app
Gurjit Singh Khehra
Nice Service for Wordpress Users. Do you know something similar for Blogger Users? That would be much helpful.
Thanks and Regards.
Editorial Staff
Buffer is a third party service and it works for blogger as well. You have to jump through an extra hoop by using IFTTT with combination of Buffer.
Admin