Have you ever created a form just for your members, only to realize anyone could access it?
Maybe it’s a feedback survey, a contact form, or a registration page meant only for members. But instead, it’s open to everyone, even spam bots and competitors.
That can be frustrating. However, it’s actually a common issue we’ve seen on many WordPress sites.
At WPBeginner, we’ve helped many different WordPress site owners solve this exact problem.
Through testing, we also discovered that restricting form access to logged-in users isn’t just about blocking the wrong people. It also creates a smoother experience for your members and keeps submissions more organized.
In this guide, we’ll show you how to easily restrict WordPress forms to logged-in users only. With these methods, you can create secure, members-only forms without the extra hassle. 🙌
When and Why Do You Need to Restrict Access for WordPress Forms?
There could be a number of scenarios when you would need to restrict access to certain WordPress forms to logged-in users only.
For example:
- You may be hosting a private members’ event and only want registered users on your site to RSVP.
- You might restrict access to support for members only, and by limiting it to logged-in users only, you can dynamically populate certain information from their profiles.
- You might want to run an employee survey or poll, and you want to restrict access to your internal team only.
- You are running a customer NPS survey that you only want to be submitted by logged-in users.
- You might have a special prize claim form that you want to be accessed by only certain logged-in users.
These are just some examples, but there are literally hundreds of other use cases where you want to restrict form access to registered users only.
With that said, let’s take a look at how to restrict your WordPress form access to logged-in users only. We will cover 3 easy ways, so you can click the links below to jump ahead to any section.
- Method 1: Restrict Form Access With WPForms Form Locker Addon
- Method 2: Restrict Form Access With Password-Protected or Private Pages
- Method 3: Use Advanced Membership Plugins to Restrict Form Access
- Bonus Tip: Force Users to Change Passwords in WordPress
- FAQs: Restrict Your WordPress Forms to Logged-In Users Only
- More Tips to Improve Your WordPress Forms
Ready? Let’s jump right in!
Method 1: Restrict Form Access With WPForms Form Locker Addon
This method is the easiest and most powerful, so we recommend it for all beginner users. We will use the WPForms plugin and their Form Locker addon to completely lock down WordPress form access.
WPForms is the best WordPress form plugin used by over 6 million websites. It was created by WPBeginner’s founder, Syed Balkhi, to have all the features we needed to run our business.
We actually use WPForms to create and display forms across our website and our partner brands. We’re big fans of it, and you can find out everything about it in our complete WPForms review.
The first thing you need to do is install and activate the WPForms plugin. For more details, see this step-by-step guide on how to install a plugin in WordPress.
📝 Note: While there’s a free WPForms version, you’ll need a WPForms Pro license or higher to use the Form Locker addon.
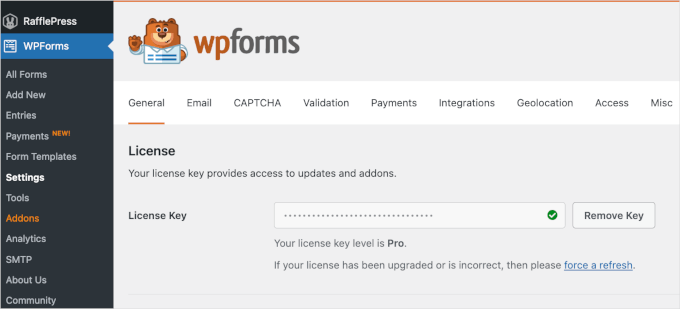
Upon activation, you can head over to WPForms » Settings from your WordPress dashboard and enter your license key. You can find the key in your WPForms account area.
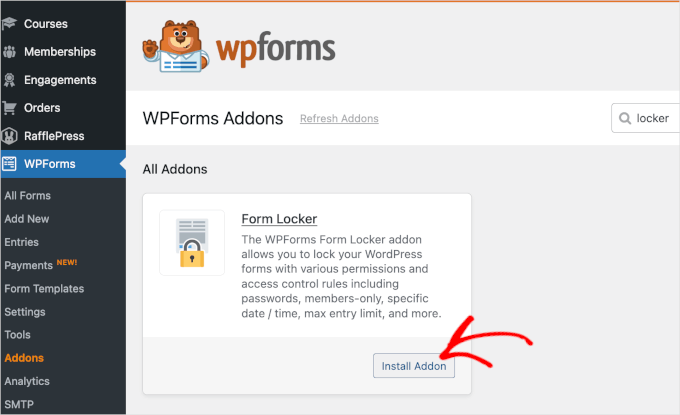
After that, you will need to activate the Form Locker addon.
Simply head over to the WPForms » Addons page to install the Form Locker Addon.
Now, you are ready to create a new form with restricted access for logged-in users.
To do this, go ahead and create a new form by going to WPForms » Add New.
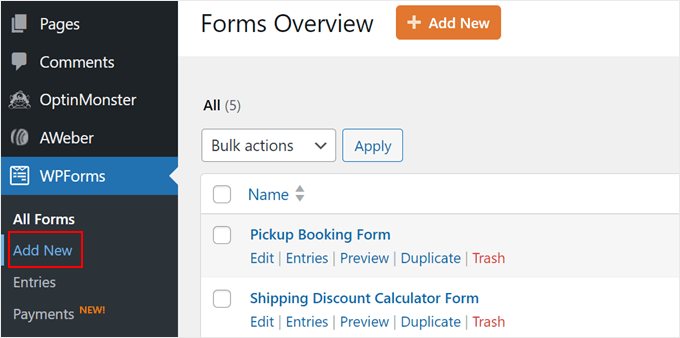
This will take you to the ‘Setup’ page.
From here, you can start by entering a name for your form at the top. After that, you’ll select how you’ll build your form: choose a form template, start with a blank canvas, or use the AI form builder.
🤖 Pro Tip: With WPForms AI, you can build your forms in one simple step. All you have to do is write a simple prompt, and the AI will generate the form for you in an instant.
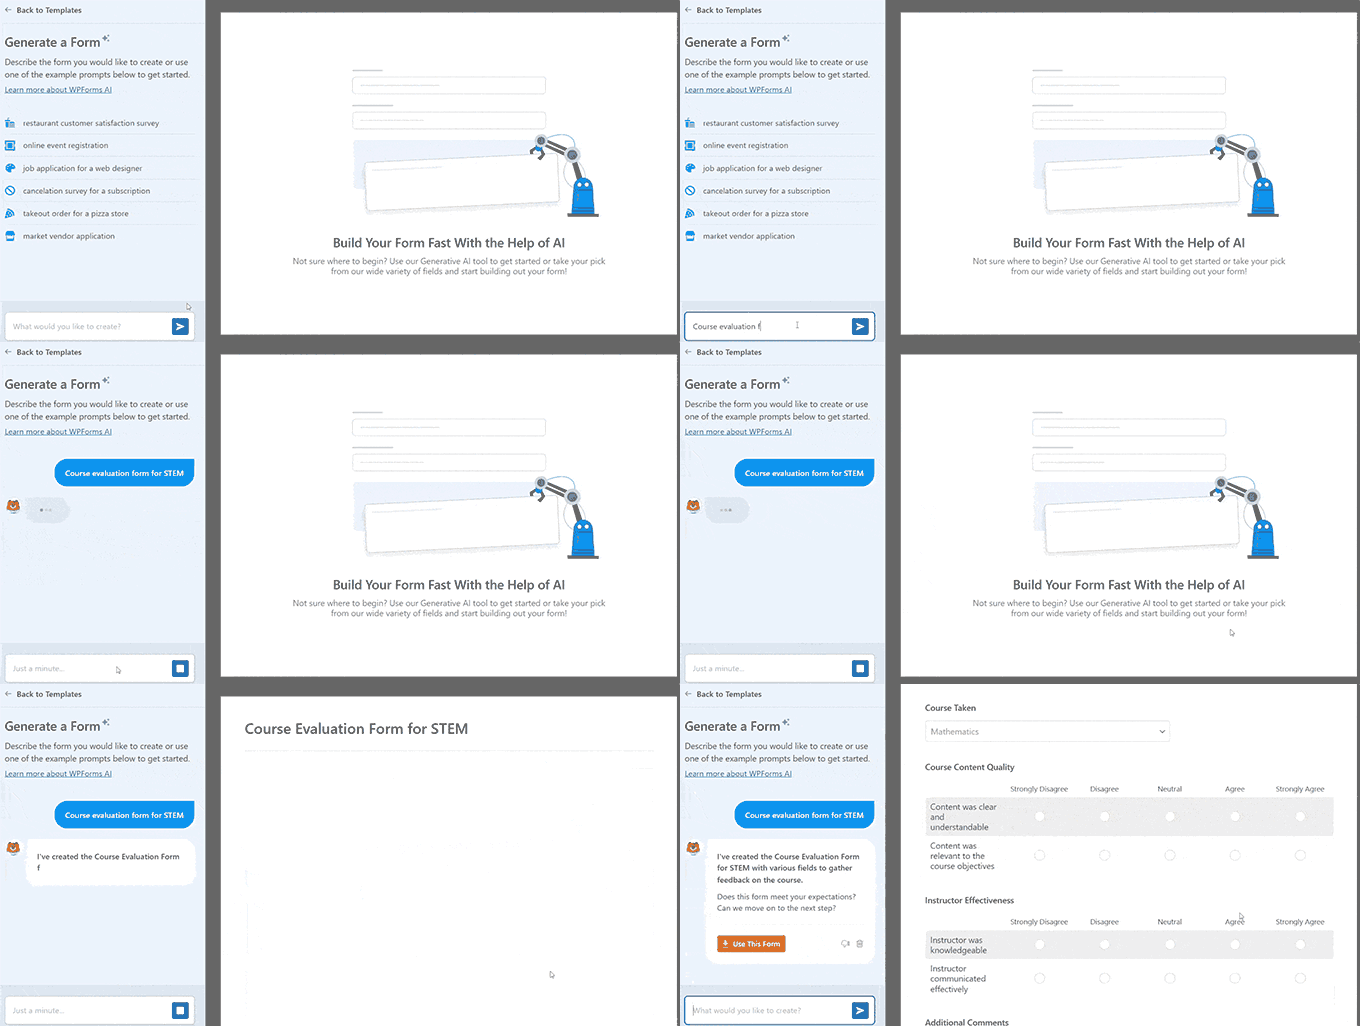
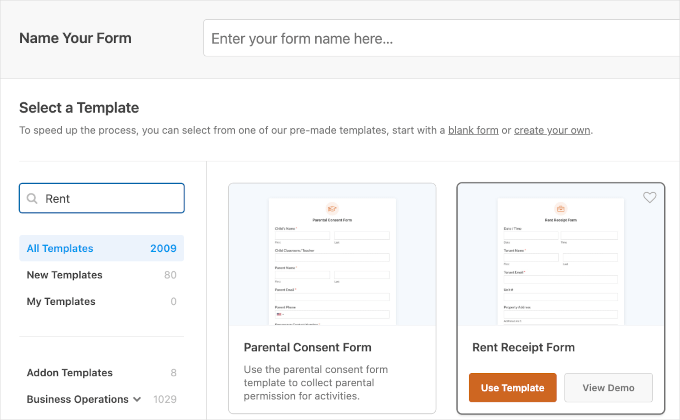
For this tutorial, we’ll use a pre-made template.
Since WPForms has more than 2,000 templates, feel free to use the search bar to narrow down your options. Once you’ve found the template you want to use, you can hover over it and click ‘Use Template.’
On the next screen, you’ll see WPForms’s drag-and-drop form builder. It’s extremely easy to use, so you can add or remove fields and customize the form to your liking.
Plus, there are further options to customize each form field in the template.
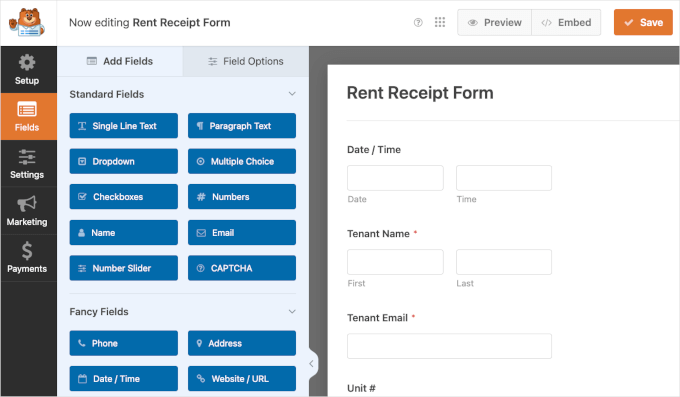
Once you have added all the necessary fields, you need to go to the ‘Settings’ tab.
From here, just click on the ‘Form Locker’ settings.
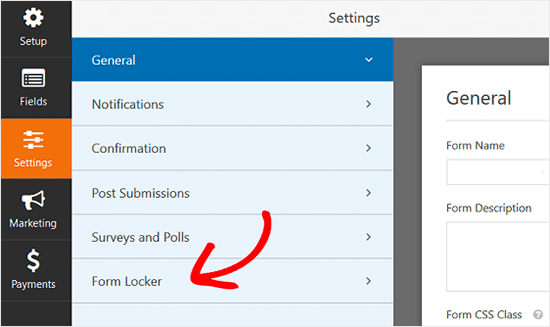
In this tab, you will see the option to enable password protection for your WordPress forms, set total entry limits, enable form scheduling, and enable restricting entries to logged-in users only.
Go ahead and click the toggle for ‘Logged in users only.’
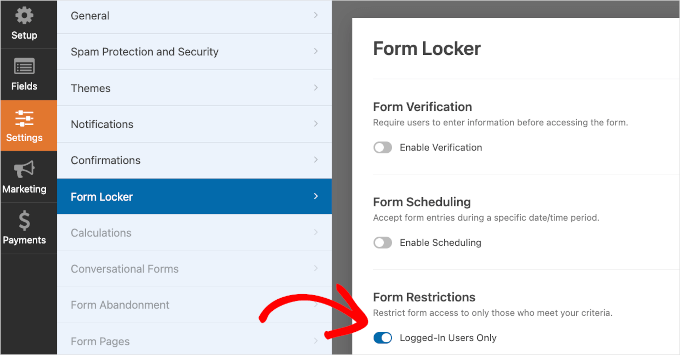
Once you check the box, you will see a new Message field.
This is where you will need to draft a message that will appear to all users who are not logged in to your site.
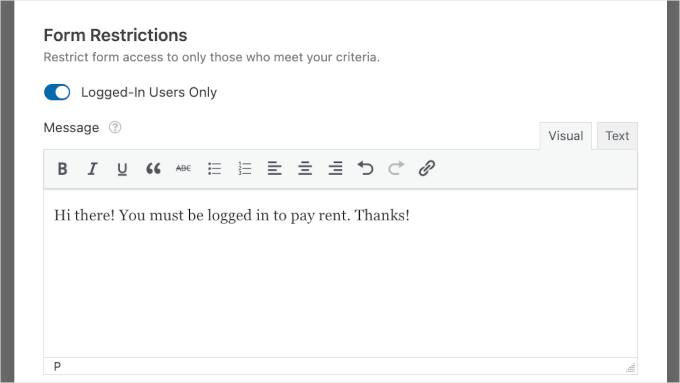
Once done, you can tweak other form settings that you might need and then save your settings.
Now, you can embed this form on any WordPress post or page on your site using the WPForms block or a shortcode in the WordPress block editor.
Simply edit or add a new post or page. Then click on the ‘+’ icon to add a WPForms block.
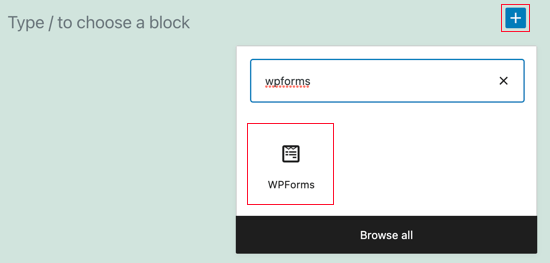
Once the WPForms block is added, select your form to embed from the dropdown menu, and you’re done.
And that’s it! You have successfully created a WordPress form that’s restricted to logged-in users only.
Method 2: Restrict Form Access With Password-Protected or Private Pages
Another way to restrict form access in WordPress is by using the default WordPress visibility settings. You can use this method with the free version of WPForms or any other contact form plugin.
Simply create a page or post where you want to embed the form. After that, you need to click on the ‘Status & visibility’ settings in the right panel.
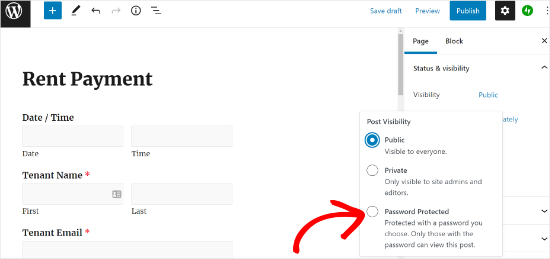
You have two options: make the entire page private or protect it with a password.
A private page is only visible to users with the Administrator or Editor role.
On the other hand, a password-protected page requires you to share a password with everyone who needs access. While this method can work, it has some major drawbacks. First, it hides the entire page, not just the form.
You also lose control over form visibility and can’t track which logged-in user submitted it.
Method 3: Use Advanced Membership Plugins to Restrict Form Access
If you’re using a powerful WordPress membership plugin like MemberPress, you’re in luck. It comes with built-in access control features that make it easy to restrict who can view or submit your forms.
At WPBeginner, we use MemberPress to power our video website. It’s been working really well for us, and you can check out our detailed MemberPress review to explore all of its features.
And if you want to learn how it works, we have a complete guide on how to create a membership site
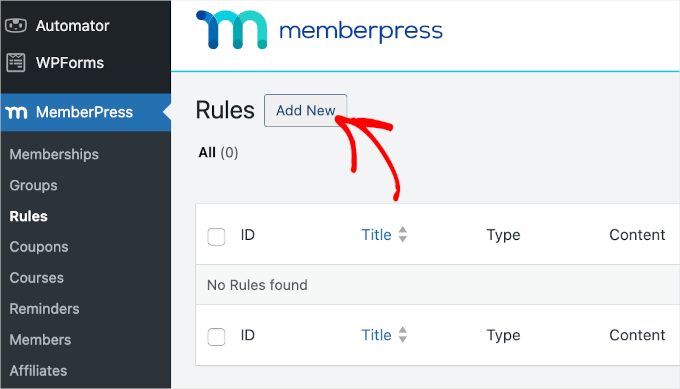
To restrict access, you can simply go to MemberPress » Rules and click ‘Add New’ to create a new permissions rule.
The rule edit page allows you to select different conditions and associate them with a membership plan.
For example, you can select all content that matches a particular tag or category and make it available only to members with the silver subscription plan.
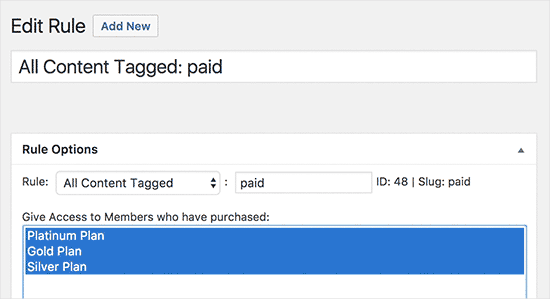
You can also create more specific rules. For example, you can restrict a single post, page, child page, or URL.
Once you have set the rules, you can use them in combination with any WordPress contact form plugin to restrict form access to logged-in users only.
Bonus Tip: Force Users to Change Passwords in WordPress
Regular password updates are essential for keeping your WordPress site secure. In fact, weak or stolen passwords are a factor in 80% of data breaches.
New users often choose weak or reused passwords, which puts your site and its users at risk if a hacker gains access.
Forcing regular password updates isn’t just for admins; it’s important for membership users, returning customers, and multi-user sites, too.
For example, clients or customers who receive passwords via email are especially vulnerable to phishing attempts.
For step-by-step instructions, you can refer to our guide on how to force users to change passwords in WordPress.
Additionally, you might be interested in how to force strong passwords on users to further reinforce your site’s security.
FAQs: Restrict Your WordPress Forms to Logged-In Users Only
Before we wrap things up, let’s answer some common questions we get about restricting form access in WordPress.
Can I restrict form access without a plugin?
Yes, you can use WordPress’s built-in visibility settings to make pages private or password-protected. However, using a plugin gives you more flexibility and control, especially if you want to track form submissions and reduce abandonment.
Will restricting forms to logged-in users affect my SEO?
The form itself won’t impact your WordPress SEO. But if the entire page is hidden from search engines due to privacy settings, it could affect how that page ranks.
Can I switch back to unrestricted forms if needed?
Absolutely! You can change the access settings at any time, whether you’re using WPForms, a membership plugin, or another tool. It’s a flexible setup that adapts to your needs.
What if a user has trouble logging in to submit a form?
If a user runs into login issues, you’ll want to make sure their account is active and not locked. You can also add a support contact or a password reset link on your login page to help them regain access quickly.
More Tips to Improve Your WordPress Forms
We hope this article helped you learn how to restrict your WordPress forms to logged-in users only. If you found this helpful, you may also want to see our guides on:
- How to Use the Contact Forms to Grow Your Email List in WordPress
- How to Create Multilingual Forms in WordPress
- How to Easily Add a Client Feedback Form in WordPress
- How to Easily Add a Coupon Code Field to Your WordPress Forms
- How to Style and Customize Your WordPress Forms
- Ways to Use Conditional Logic in WordPress Forms
- Tips to Create More Interactive Forms in WordPress
- How to Block Contact Form Spam in WordPress
If you liked this article, then please subscribe to our YouTube Channel for WordPress video tutorials. You can also find us on Twitter and Facebook.


Jiří Vaněk
A great yet very simple method for a customer support form that limits questions to registered users only. At the same time, it immediately occurs to me that I can create a form on the website for users who send a donation as a certain bonus for priority communication (or as an motivation to send a donation). Thanks for the inspiration.