Managing a WordPress site with multiple authors comes with its own set of challenges, one of which is making sure that valuable content isn’t accidentally deleted.
However, by default, WordPress allows authors to delete their own posts, even when these posts have already been published.
At WPBeginner, we understand the risk of accidental deletions. That’s why we have disabled the delete feature for our authors. This prevents accidental content loss and keeps everything safe.
In this article, we will show you how to easily prevent authors from deleting their own posts in WordPress. This will improve your site’s security and help you control your content.
Why Prevent Authors From Deleting Their Posts in WordPress?
WordPress comes with a powerful user role management system. Each registered user on your website is assigned a user role with different permissions.
Users with the ‘author’ role can write posts and publish them on your website. This role is generally used by multi-author WordPress blogs.
Authors can also delete their own posts, including those already published.
However, as a website owner, you may want to prevent authors from doing that to prevent accidental post-deletion or to control the content that is published or removed on your WordPress blog.
The easiest way to do that is by modifying the author user role and changing its permissions in WordPress.
Let’s take a look at how to easily prevent authors from deleting their own posts.
In this article, we will show you two methods, and you can use the links below to jump to the method of your choice:
Method 1: Prevent Authors From Deleting Posts Using a Plugin
If you are looking for an easy way to prevent authors from deleting posts, then this method is for you.
First, you need to install and activate the PublishPress Capabilities plugin. For more details, see our step-by-step guide on how to install a WordPress plugin.
📒 Note: You can also use the premium version in the PublishPress Pro bundle for the plugin to control more permission settings. However, the free plan will also work for this tutorial.
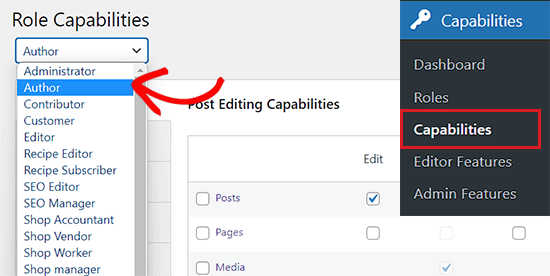
Upon activation, head over to the Capabilities » Capabilities page from the WordPress admin sidebar.
Once you are there, choose the ‘Author’ option from the role capabilities dropdown menu in the left corner of the screen.
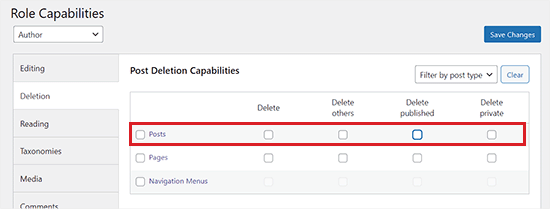
Next, you need to switch to the ‘Deletion’ tab in the left column on the screen.
After that, simply uncheck the ‘Delete’ and ‘Delete Published’ options from the ‘Posts’ row.
Finally, click the ‘Save Changes’ button to store your settings.
Now, the authors on your WordPress site won’t be able to delete their posts, even those that are already published.
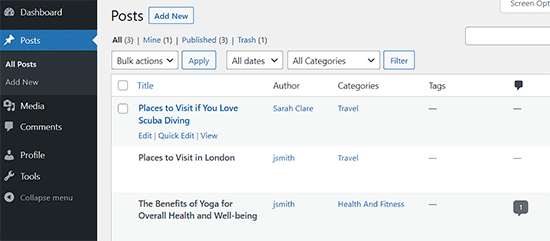
This is how the Posts page in the WordPress dashboard will look for your authors:
Giving Back Permissions
User role capabilities are defined explicitly. This means that once you remove a capability from a user role, it will not come back unless you explicitly define it again. Even if you uninstalled the plugin, the capability changes you made will not revert automatically.
If you want to give back authors permission to delete, then you will have to repeat the process and check the boxes next to the delete and delete published posts options.
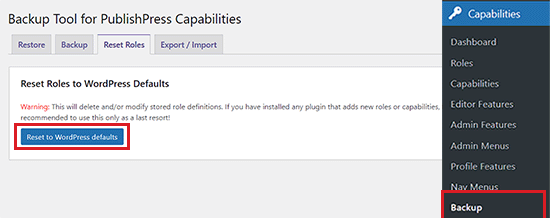
If you want to uninstall the plugin and revert to default WordPress capabilities, you must first visit the Capabilities » Backup page from the WordPress admin dashboard.
From here, switch to the ‘Reset Roles’ tab and then click the ‘Reset to WordPress defaults’ button.
Now, all the modified role definitions will be deleted, and your WordPress user roles will revert to their original capabilities.
Method 2: Prevent Authors From Deleting Their Posts Using WPCode
If you want to prevent authors from deleting posts using custom code, then this method is for you.
You can easily add custom code to your theme’s functions.php file. However, keep in mind that the smallest error can break your website.
That is why we recommend using WPCode to add custom code to your WordPress site.
After thorough testing, we have concluded that it is the best WordPress code snippets plugin on the market. It makes it super safe and easy to add custom code. To learn more about our experience with the tool, see our WPCode review.
First, you need to install and activate the WPCode plugin. For detailed instructions, please see our beginner’s guide on how to install a WordPress plugin.
📒 Note: WPCode has a free version that you can use for this tutorial. However, upgrading to the pro version will give you access to features like the cloud library of code snippets, conditional logic, and more.
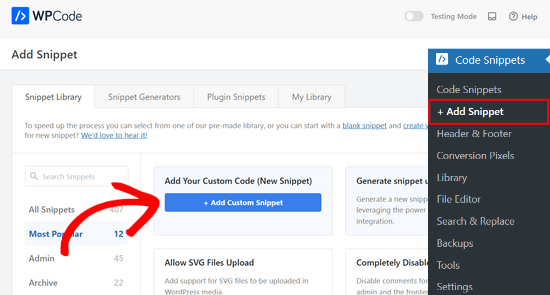
Upon activation, head over to the Code Snippets » + Add Snippet page from the WordPress admin sidebar.
Once you are there, just click the ‘+ Add Custom Snippet’ button under the ‘Add Your Custom Code (New Snippet)’ option.
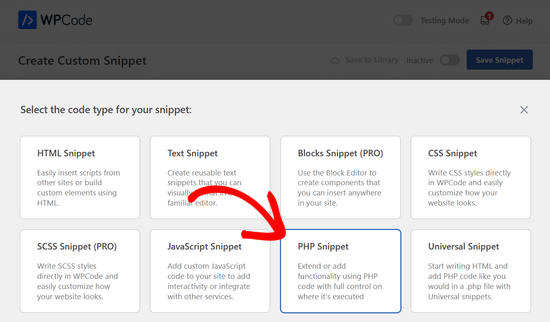
Then, you need to choose ‘PHP Snippet’ as the code type from the list of options that appear on the screen.
This will open the ‘Create Custom Snippet’ page, where you can start by typing a name for your code snippet.
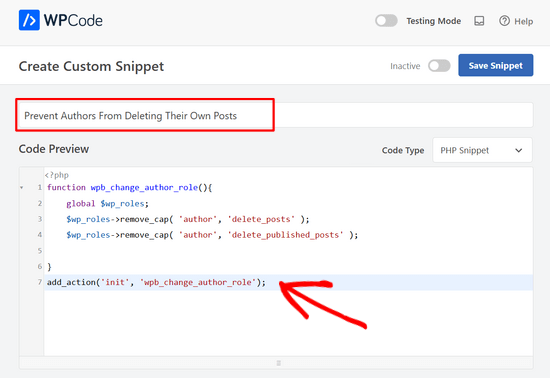
Next, simply copy and paste the following code into the ‘Code Preview’ box:
function wpb_change_author_role(){
    global $wp_roles;
    $wp_roles->remove_cap( 'author', 'delete_posts' );
    $wp_roles->remove_cap( 'author', 'delete_published_posts' );

}
add_action('init', 'wpb_change_author_role');
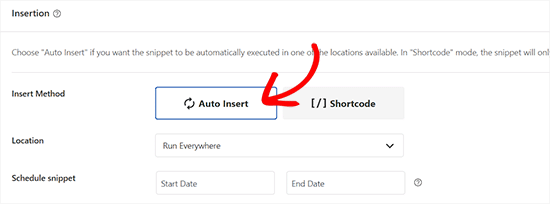
After that, scroll down to the ‘Insertion’ section and choose the ‘Auto Insert’ mode.
Your code will be automatically executed once you activate it.
Next, scroll back to the top of the page and toggle the switch to ‘Active’.
Finally, click the ‘Save Snippet’ button to save and execute your code on your WordPress site.
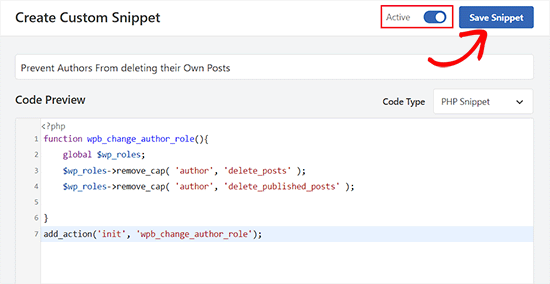
This code changes the author user role and removes their capability to delete their own posts.
This is how the Posts page in the WordPress dashboard will look for authors:

Revert Permissions with WPCode
If, for some reason, you want to provide authors with the capability to delete their own posts again, then you can also do that with WPCode.
First, you’ll need to visit the Code Snippets page from the WordPress dashboard and toggle the switch next to the code snippet you created to ‘Inactive’.
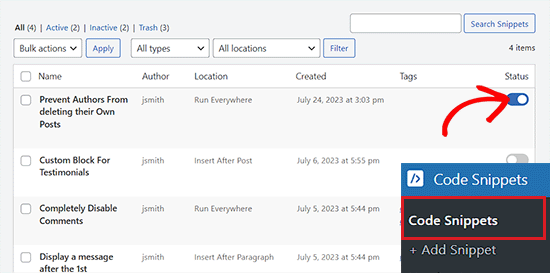
However, simply deactivating the code will not make any changes. You will now need to add a new code snippet on your website.
To do this, visit the Code Snippets » + Add Snippet page from the WordPress dashboard.
Then, click the ‘+ Add Custom Snippet’ button underneath the ‘Add Your Custom Code (New Snippet)’ option.

Next, select ‘PHP Snippet’ as the code type from the list of options.
You will now be taken to the ‘Create Custom Snippet’ page, where you have to type a name for the snippet.
After that, simply copy and paste the following code into the ‘Code Preview’ box:
function wpb_change_author_role(){
    global $wp_roles;
    $wp_roles->add_cap( 'author', 'delete_posts' );
    $wp_roles->add_cap( 'author', 'delete_published_posts' );

}
add_action('init', 'wpb_change_author_role');
Once you’ve pasted the code, scroll down to the ‘Insertion’ section and choose the ‘Auto Insert’ mode.
The code will automatically add the deletion capabilities for authors upon activation.

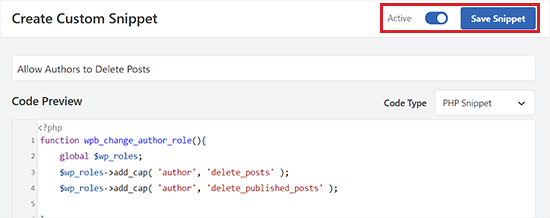
Finally, toggle the switch in the top right corner of the screen to Active and click the ‘Save Snippet’ button.
Your authors will now be able to delete their own posts in WordPress like before.
Bonus: Limit Authors to Their Posts in WordPress
Apart from preventing authors from deleting posts, you can also limit them to their posts in WordPress. This way, authors will only be able to edit, preview, and publish the posts they have written themselves.
If you run a multi-author blog or allow guest posts, this can be super helpful. It encourages writers to focus on their work and improves organizational clarity.
To restrict authors to their posts, you can use PublishPress Permissions.
Upon activation, the plugin will automatically limit authors and editors so that they see only their own posts in the WordPress admin area.
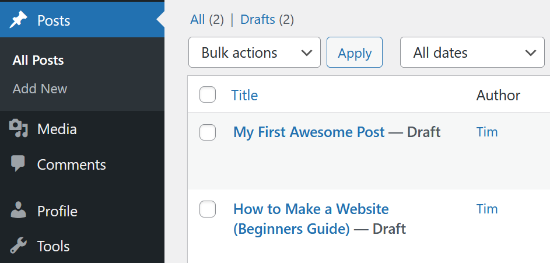
However, if you want to allow editors to review posts from different authors, then you will need to use PublishPress Capabilities.
For detailed instructions, see our tutorial on how to limit authors to their own posts in WordPress admin.
We hope this article helped you learn how to prevent authors from deleting their own posts in WordPress. You may also want to see our ultimate step-by-step guide on how to show personalized content to different users in WordPress and our expert picks for the best WordPress user management plugins.
If you liked this article, then please subscribe to our YouTube Channel for WordPress video tutorials. You can also find us on Twitter and Facebook.


kzain
I’ve had issues with authors accidentally deleting posts on my multi-author blog, and it’s caused headaches for me and my team. I didn’t know about the ‘delete_posts’ capability, so thank you for sharing that tip. I’ve already implemented the solution using the Role Editor plugin, and it’s given me peace of mind. One suggestion it might be helpful to add a note about how to restore a post if it’s accidentally deleted, just in case. Thanks again for the helpful tutorial
WPBeginner Support
Thank you for the suggestion!
Admin
Mohsin Uddin
Hi i am very greatful on all the content you create on this site, i have always found it extremely useful and a go to point for any problems i face…i am little stuck with my wp site at the moment and really hope you can shed some light on the matter.
I want to create a site where there are buyers and sellers.
Firstly i wanted buyers to register and be allowed to see content after they have paid..also theh need to be able to upload a few pictures.
Secondly i wanted sellers to register and also be able to post after they paid. And have access to restricted content.
For both users they can register or on seperate pages or select from a drop down menu that a person is a seller or buyer.
Once selected as a buyer, buyer should be able to select a category of interest.
I wanted the sellers account to automatically be have a certain user role and same for buyers.
Is this possible or would i need to handle every user role manually.
I would like users to have their own dashboard where they can upload items for sale etc..
I really hope you can help thanks in advance.