Are you looking for little tweaks to boost your WordPress website’s speed? Well, have you ever thought about limiting the WordPress Heartbeat API? It might sound a bit techy, but stick with us!
The WordPress Heartbeat API is a helpful system that works behind the scenes. It handles tasks like autosaving posts while you’re writing and sending dashboard notifications.
By default, it constantly checks for updates every 15 seconds when you’re editing a post and every minute when you’re just browsing your dashboard. This frequent activity can place a strain on your server’s CPU and slow down your site.
The good news is that some of our readers have discovered that adjusting the frequency of the Heartbeat API has significantly improved their WordPress performance.
In this article, we will show you how to manage the Heartbeat API in WordPress to optimize your site’s speed. Don’t worry, it’s simpler than it sounds, and you can do it without messing up any of the important features you rely on!
What Is the Heartbeat API?
The Heartbeat API is one of the main application programming interfaces (APIs) that WordPress provides to help developers interact with the platform and add new features.
It was introduced in WordPress 3.6 to enable real-time communication between the browser and the server while a user is logged into the WordPress dashboard. In technical terms, this communication is handled using AJAX calls.
To put it simply, AJAX calls are like messages between your browser and server. Instead of reloading the page, your browser asks the server for just the information it needs. The server sends back the update without refreshing the whole page, making things feel faster.
The Heartbeat API makes a few important WordPress features possible, such as:
- Real-Time Updates: It enables almost real-time updates without needing to refresh the page. For example, if someone else is editing a post, then you will be notified, and the post will be locked so you don’t accidentally change their work.
- Autosaving Work: When you are writing a blog post or page, the Heartbeat API helps save your work automatically every 60 seconds. This way, if something goes wrong, then you won’t lose your recent changes.
- User Sessions: It helps WordPress keep track of who is currently using the site and how long they have been logged in. This works together with WordPress’s security system to help manage user logins safely.
- WordPress Plugins: Many WordPress plugins also use the Heartbeat API to add real-time features. These include advanced form processing, version control for content, live notifications, user session management, security monitoring, and much more. Plugins can use Heartbeat to create more interactive and dynamic user experiences.
These features are incredibly helpful. The problem is that if you have too many requests, then your server will slow down.
But don’t worry, it’s easy to manage. You can simply set a longer time interval for the Heartbeat API. By making it check every, say, two minutes instead of every few seconds, you can help speed up your website.
When you make it check less often, the instant updates will still happen, just not as quickly. It’s all about finding the perfect balance for your website, making sure it’s fast and still has all those helpful real-time features.
Is It Better to Limit or Disable the Heartbeat API?
Now, you may be tempted to turn off the Heartbeat API completely to get even better WordPress performance. We strongly advise against disabling it entirely in most cases!
Completely disabling the Heartbeat API can lead to unexpected issues, even if you’re working solo and don’t need super-fast updates. You risk losing unsaved work, missing important security updates, and causing login problems. Think twice before turning it off.
Instead of outright disabling it, simply adjusting its frequency is usually a much safer and more effective way to optimize your site’s performance.
With that being said, let’s take a look at how to limit (and even disable) the WordPress Heartbeat API. Here are the topics we will cover in this tutorial:
Limiting the Heartbeat API With a Plugin (Quick and Easy)
The first thing you need to do is install and activate the free Dynamic Front-End Heartbeat Control plugin. For detailed instructions, you can refer to our step-by-step guide on how to install a WordPress plugin.
Upon activation, this plugin will automatically start to improve your website’s performance without any additional setup. It adjusts the Heartbeat interval in real time, adapting to the changing demands of your website.
For many websites, this automatic setting is perfect! However, if you want to have more control, then you can also change the Heartbeat settings yourself using the plugin’s settings.
Tip: Many WordPress performance plugins, such as WP Rocket and Perfmatters, can also limit the Heartbeat API. To avoid conflicts, you should make sure you only use one plugin for this purpose.
Optional: Manually Limiting or Disabling the Heartbeat API
To manually control the Heartbeat API, you need to navigate to Settings » DFEHC in your WordPress dashboard.
On this settings page, you’ll see a checkbox that says ‘Disable Heartbeat’. If you really want to turn off the Heartbeat API completely, then you can check this box.
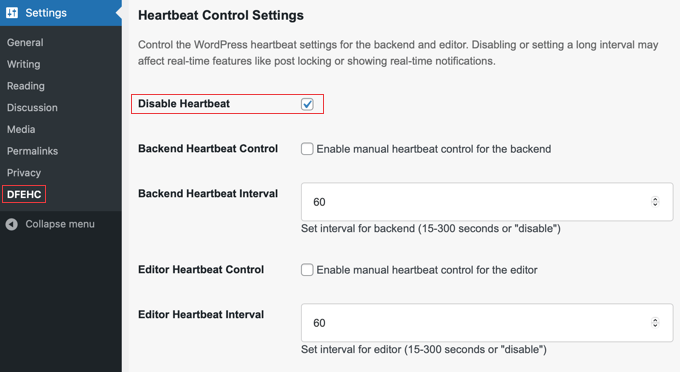
However, remember that this will stop the real-time features we talked about earlier. Usually, it’s better to just limit the Heartbeat, not disable it completely.
You can change how often the Heartbeat API checks for tasks when you are working in your WordPress dashboard, which is also called the backend.
To do this, look for the option ‘Backend Heartbeat Control’ and check the box next to it.
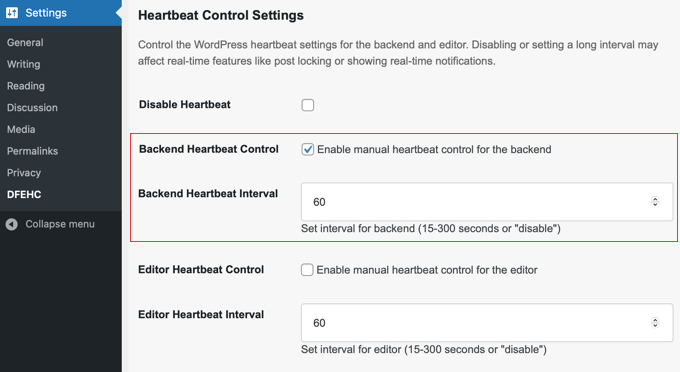
Then, you can enter a number in the box to set the new interval in seconds. Remember, the default is 60 seconds (once a minute). If you want the Heartbeat to check less often, then you can enter a higher number, like 90 or 120 seconds.
Similarly, you can change the Heartbeat interval specifically for when you are writing posts or pages in the content editor. Find the ‘Editor Heartbeat Control’ box and check it.
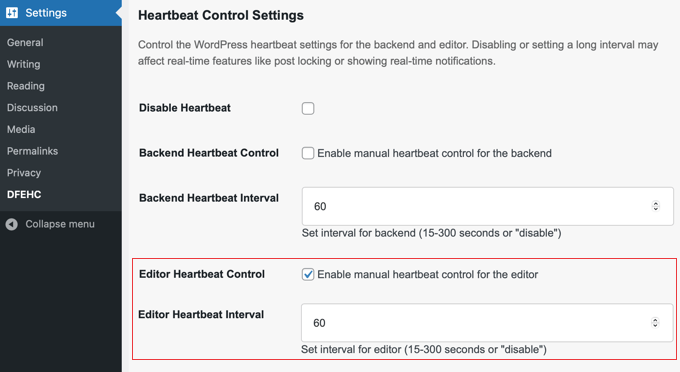
Then, enter your desired interval in seconds. The default here is 15 seconds, which is quite often.
If you want to reduce how often it checks while you are writing, then you can increase this number. You can type the number directly into the box or use the small up and down arrows to change the number one second at a time.
The plugin also includes a ‘Priority Settings’ slider that lets you balance between server performance and visitor needs.
Sliding towards ‘Increase server priority’ reduces server load by decreasing how often updates happen. Sliding towards ‘Increase visitor priority’ allows for more frequent updates but requires more server resources.
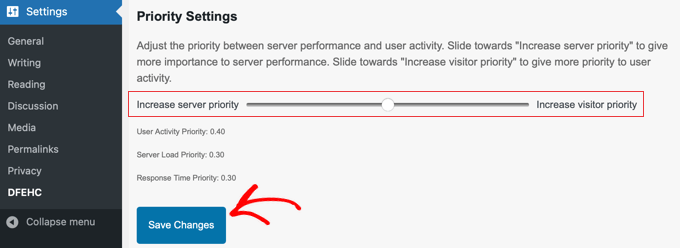
After you have made all the changes you want, make sure to scroll down to the bottom of the page and click the ‘Save Changes’ button. This is important to make sure your new settings are saved and start working.
Limiting the Heartbeat API With Code
You can also limit the Heartbeat API in WordPress by adding a code snippet to your website.
Now, adding code might sound a bit scary, and you do need to be a little careful. If you make a mistake when adding code directly, then it could cause problems with your website.
We have a helpful guide that explains how to paste code snippets safely into WordPress, so you can check that out first to feel more comfortable.
The safest and easiest way to add the code is using the WPCode plugin because it already has the code snippet in its library. All you need to do is activate it.
There is a premium version, but for this tutorial, we will use the WPCode Free Plugin because it includes the ‘Heartbeat Setting’ snippet. If you need help adding it to your site, just see our guide on how to install a WordPress plugin.
After the plugin is activated, you can create a new snippet by navigating to WPCode » + Add Snippet. On that page, you can use the search feature to find the ‘Heartbeat Setting’ snippet.
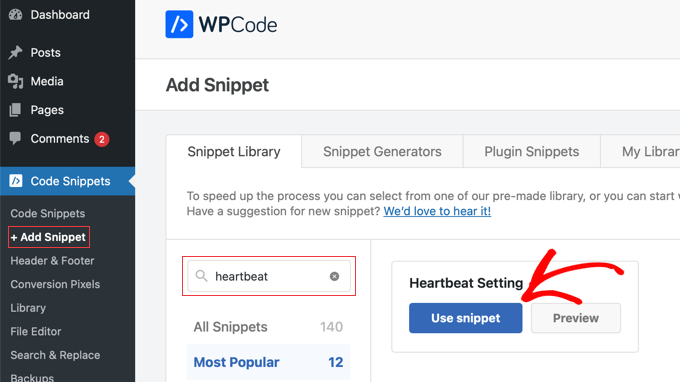
Now, simply hover your mouse over the snippet and then click the ‘Use snippet’ button.
This will open the Edit Snippet page. Don’t worry. Everything is already set up for you. All you need to do is make the snippet active.
Look for the ‘Activate’ switch at the top right of the page and toggle it to the On position. After that, click the ‘Update’ button.
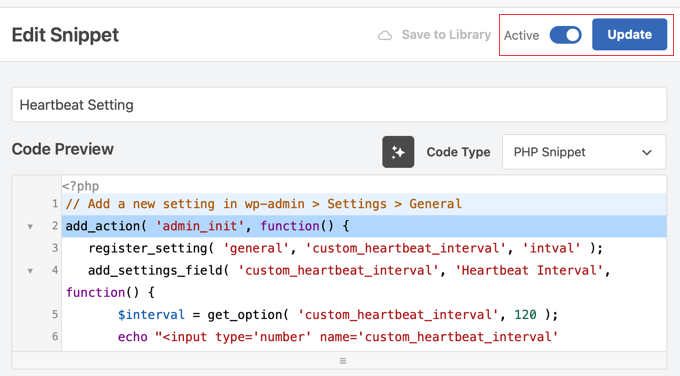
This snippet adds a new entry to the General Settings page, where you can configure how you limit the Heartbeat API in WordPress. Simply navigate to Settings » General and scroll to the bottom of the page.
By default, the snippet changes the Heartbeat interval to 120 seconds, which is a good starting point for improving performance. But you can change this number to anything you like.
Just type a new number in the field or use the small up and down arrows next to the field to adjust the seconds.

Remember, after you change the number, you need to scroll down again and click the ‘Save Changes’ button at the bottom of the General Settings page. This will make sure your new Heartbeat interval setting is saved and starts working.
Pro Tip: Are you curious about how much your WordPress performance has improved by limiting the Heartbeat API? Simply perform a speed test before and after you do it. You can learn how in our guide on how to properly run a website speed test.
For those who are more comfortable with code, there is also another way to add this code snippet directly into your website’s files.
You can add the code directly to your theme’s functions.php file. However, this is a bit more advanced, and using the WPCode plugin is generally easier and safer for most users.
If you are interested in this more advanced method, you can find the code below:
// Add a new setting in wp-admin > Settings > General
add_action( 'admin_init', function() {
   register_setting( 'general', 'custom_heartbeat_interval', 'intval' );
   add_settings_field( 'custom_heartbeat_interval', 'Heartbeat Interval', function() {
       $interval = get_option( 'custom_heartbeat_interval', 120 );
       echo "<input type='number' name='custom_heartbeat_interval' value='".absint($interval)."' min='15' max='120' /> seconds";
   }, 'general' );
});

add_filter( 'heartbeat_settings', function( $settings ) {
   $settings['interval'] = get_option( 'custom_heartbeat_interval', 120 );
   return $settings;
});
But for most people, using the WPCode plugin is the recommended way to limit the Heartbeat API.
For more details, see our guide on how to easily add custom code in WordPress.
Disabling the Heartbeat API Without a Plugin
If you have decided to completely disable the Heartbeat API on your website, then you can also do that by adding a code snippet to your theme’s functions.php file or the WPCode plugin.
This time, the code to disable Heartbeat isn’t already in the WPCode library, so we will copy and paste it into WPCode ourselves. Don’t worry, it’s still easy to do!
First, make sure you have the WPCode plugin installed and activated, as we talked about in the previous section. Once WPCode is ready, go to WPCode » + Add Snippet in your WordPress admin menu.
Next, you need to choose the option to add your own custom code. Look for the snippet called ‘Add Your Own Custom Code (New Snippet)’. When you move your mouse over this entry, you can click the ‘Use snippet’ button.
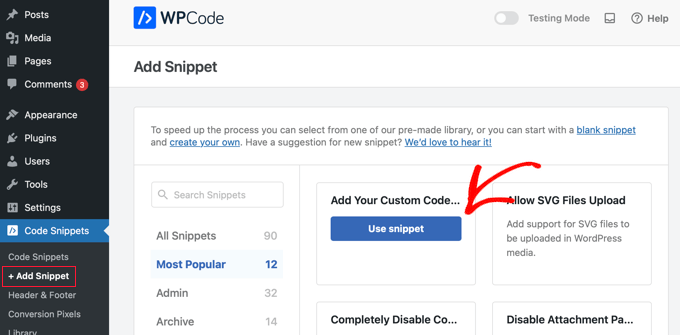
On the next screen, WPCode will ask you to choose the type of code you are adding.
Since the code we need is in PHP, you need to click the ‘PHP Snippet’ option.
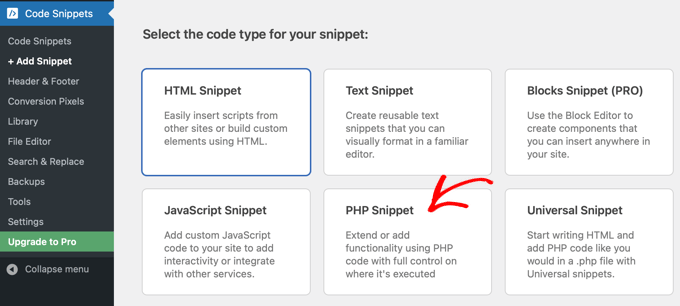
This will take you to the Create Custom Snippet page.
First, you should give your snippet a title so you know what it is for. A good title is something like ‘Disable Heartbeat API’.
Then, in the section called ‘Code Preview’, you need to paste the code that disables the Heartbeat API.
Here is the code you need to copy and paste:
add_action( 'init', 'stop_heartbeat', 1 );
function stop_heartbeat() {
wp_deregister_script('heartbeat');
}
Just copy all of that code.
Then, paste it into the ‘Code Preview’ box in WPCode.
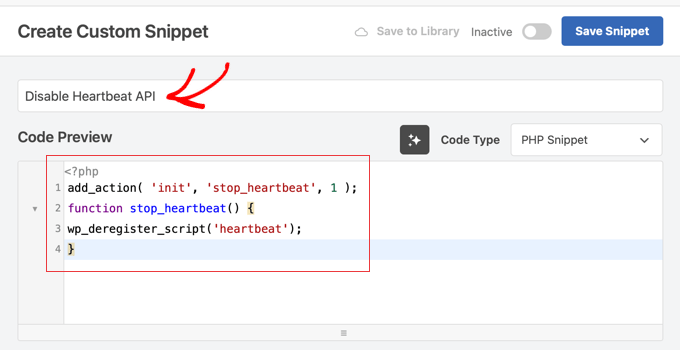
You can leave all the other settings on the page as they are.
Now, to make the code work and disable the Heartbeat API, you need to activate the snippet. Find the ‘Active’ switch, toggle it to the On position, and then click the ‘Save Snippet’ button.
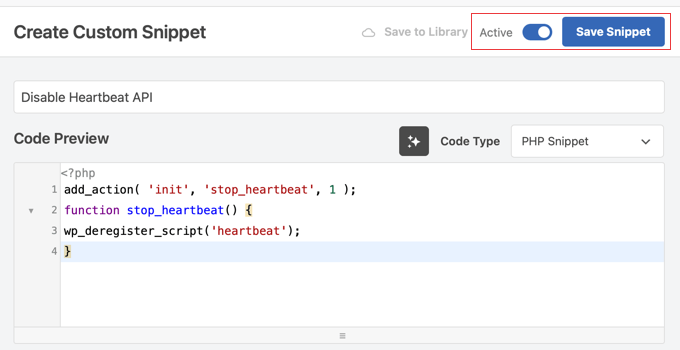
That’s it! You have now successfully disabled the Heartbeat API on your website using WPCode.
If you ever want to turn the Heartbeat API back on again, then you can easily do that by simply deactivating this code snippet in WPCode. Just go back to your WPCode snippets and turn this one off. It’s a very easy way to control the Heartbeat API.
We hope this article helped you learn how to limit heartbeat API in WordPress. You may also want to learn how to properly run a website speed test or see our expert pick of the best WordPress caching plugins to speed up your website.
If you liked this article, then please subscribe to our YouTube Channel for WordPress video tutorials. You can also find us on Twitter and Facebook.


Jarry
Thanks for the detailed article. I find it easy to follow and also goes more in-depth for people who want to venture further. For me, it’s important that I stopped having console errors after replacing the old plugin and installing the Dynamic Front-end Heartbeat plugin! The website loads instantly now.
WPBeginner Support
Glad to hear our recommendation was helpful!
Admin
Jiří Vaněk
Can the heart beat have an impact on generating URLs in WordPress? I disabled the heart beat on my website using the WP Rocket plugin. Unfortunately, I then started experiencing that WordPress would “forget” the URLs of pages, and it began returning a 404 error for every existing page. I always had to regenerate the permalinks. However, the error reappeared after some time. In the end, turning the heart beat back on helped. After that, the issues stopped.
WPBeginner Support
It should not unless there is something specific to your site that is using the Heartbeat API to generate the post URL.
Admin
Jiří Vaněk
Yes, I do. I use Polylang for language mutations on the website. The issues occurred only in one language mutation, not in the other. I think the problem was in the URL because the English language mutation had “/en” in the URL, while the Czech mutation did not have this suffix at the end. Therefore, disabling the heart beat may have had such an effect. However, thank you for the response; at least I will know that I can disable the heart beat on another website without necessarily encountering such issues again.
Arize
Also i am running a membership site and so many people will be logged in at the same time. Is it OK to disable it?
Jaswinder Kaur
Nice article with good information!!
I want to use it for my site, but the plugin suggested by you, is not activated for a year. Please can you suggest something else.
Dave Kessler
Is there any possibility of this impacting SEO results?
O. Live
Yes!
Thank you so much. My site crashed last night, and after a couple of hours on support with HostGator told me that I needed to solve this issue.
Adding the plugin shaved two full seconds off homepage load time (4sec -> 1.9sec), and about 200kb off of total page size, and a 2-point bump in PageSpeed score.
THANK YOU.
WPBeginner Support
You are welcome
Don’t forget to join us on Facebook for more WordPress tips and tutorials.
Admin
Kien
I use the plugin kk star ratings follow your instructions are not removed admin-ajax.php
Blair2004
WPBeginner is not only about beginners tutorials…
Kate_H
This article, whilst informative, seems to be a little misplaced on a website named WPbeginner…