Letting users filter posts and pages on your WordPress site can make it easier for them to find the content they’re looking for. Whether they’re searching for your latest tutorials, product reviews, or specific topics, a filter feature improves their browsing experience.
However, WordPress doesn’t offer an easy way to add filtering options by default. This means users may have to sift through countless posts to find what they want, which can lead to frustration.
We did some research and tested different methods to solve this problem. After trying several tools, we found that the SearchWP, WPCode, and Search & Filter plugins make adding filters to your posts and pages quick and simple.
In this article, we’ll show you how to easily let users filter posts and pages in WordPress using 3 different methods.

Why Add a Filtering Feature for Your WordPress Posts and Pages?
Have you ever visited a WordPress website overflowing with content, only to struggle to find what you need? This can be a frustrating experience for users and cause them to abandon your site altogether.
Ultimately, this can negatively impact SEO since search engines consider user experience a ranking factor. A website with high bounce rates and low engagement might be seen as less valuable by search engines.
Fortunately, there’s a simple solution: implementing a search and filter feature on your WordPress website. This powerful tool allows users to narrow down content based on specific criteria, making it a breeze to find what they’re looking for.
A search and filter feature isn’t just good for WordPress blogs. It’s also ideal for sites like forums with thousands of threads. That way, users can search for the right discussion by topic, date, or author.
Or, if you have a podcast site, listeners can look for their preferred episode using the feature.
With that in mind, we’ll show you 3 easy methods to let users filter posts and pages on your WordPress site. You can use the quick links below to skip to your preferred method:
Ready? Let’s jump right in!
Method 1: Filter Posts and Pages With SearchWP (Recommended)
SearchWP is a powerful WordPress search plugin and is our top recommendation for adding filtering functionality to your website. It’s very user-friendly, making it a great choice for beginners.
Note: SearchWP doesn’t offer a free version, so you’ll need to purchase a premium plan. You can learn more about the plugin in our comprehensive SearchWP review.
Here’s a step-by-step guide on how to use SearchWP to create a custom search form with filtering options.
Step 1: Install and Set Up SearchWP
First, you’ll need to install and activate the SearchWP plugin. If you’re new to this, we have a helpful guide on how to install a WordPress plugin.
Once activated, you can go to SearchWP » Settings. Then, in the ‘General’ tab, go ahead and enter your license key to activate it.
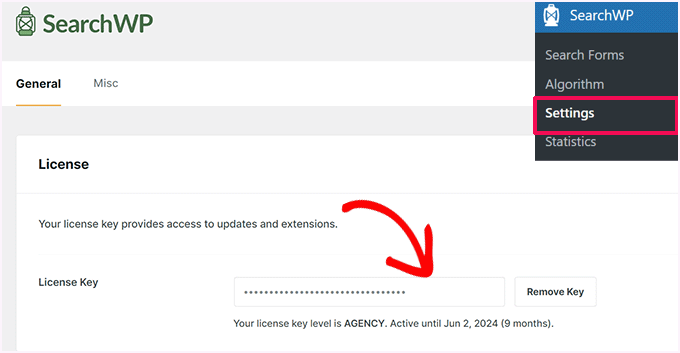
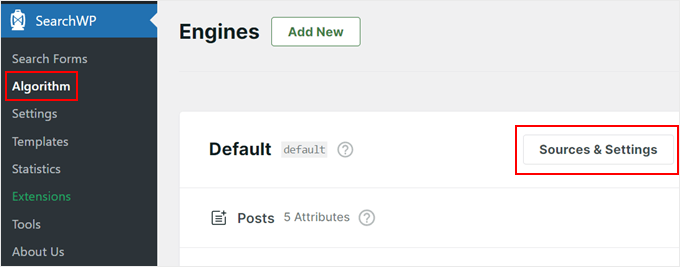
Now, let’s head over to SearchWP » Algorithm. Here, you can either edit the default search engine or create an additional one.
The default engine allows users to search through pages, posts, media files, and comments, which is good for a typical WordPress blog.
On the other hand, the additional search engine can use other sources like categories, tags, custom post types, and custom taxonomies. This may be useful for creating a non-blog content search and filter form, like an eCommerce product filter for WooCommerce websites.
For this tutorial, we will stick with the default engine and simply adjust its settings. To do so, you can click on ‘Sources & Settings.’
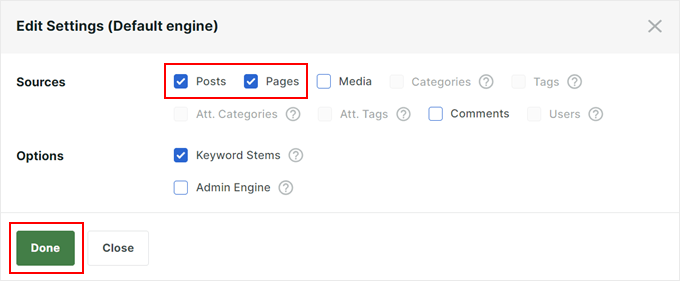
Since we’re creating a search and filter function to filter posts and pages, we will just include pages and posts as the sources for the WordPress search engine.
We’ve also enabled the ‘Keyword Stems’ feature, which allows SearchWP to show results even if the keyword isn’t a perfect match.
Once you’re happy with the settings, you can just click ‘Done.’
Step 2: Fine-Tune Your Search Engine
Now, you’ll see a section for all the sources you selected (in our case, just posts and pages).
Each source has sliders for ‘Applicable Attribute Relevance.’ These sliders determine how much weight SearchWP gives to each attribute when ranking search results.
In simpler terms, content that closely matches a high-weighted attribute will appear higher in the search results.
For example, if you give the ‘Post Content’ attribute more weight than the ‘Post Title’ attribute, SearchWP will prioritize results where the search term appears within the content itself.
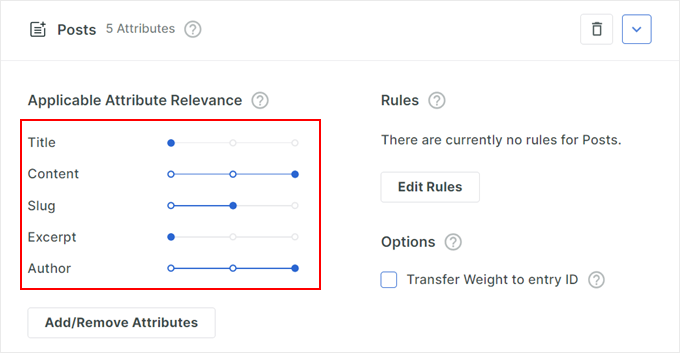
You can adjust these sliders based on your preference.
You can also click ‘Add/Remove Attributes.’
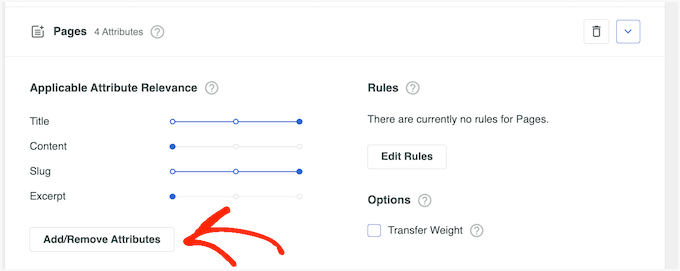
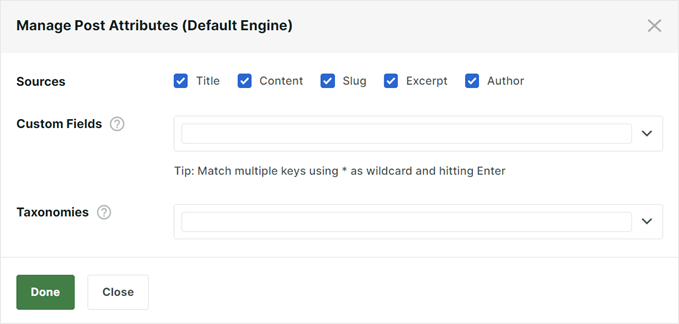
This will make a popup appear for you to include or delete more attributes.
For example, you could include custom taxonomies or custom fields to make them searchable.
Another powerful feature is the ability to create rules that include or exclude specific content from search results.
To do this, just click the ‘Edit Rules’ button.
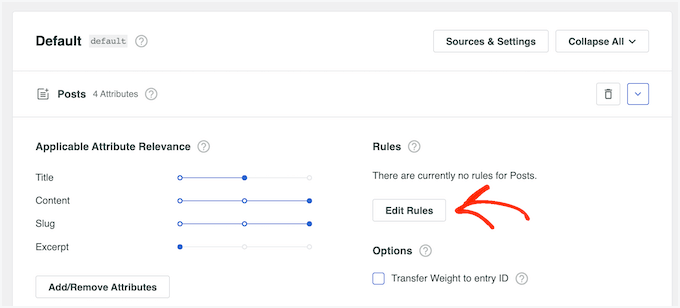
This setting allows you to filter out irrelevant content or highlight specific categories.
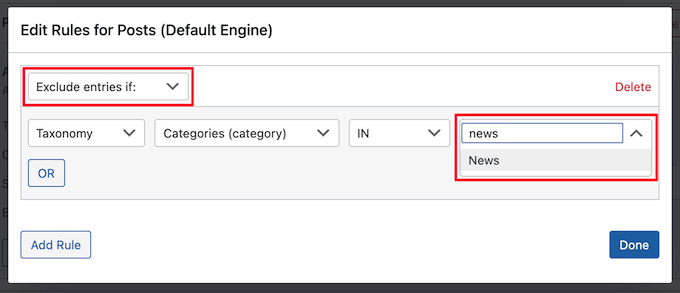
In the next popup, you can click ‘Add Rule.’

Now, simply click on the dropdown menu and pick ‘Only show entries if’ or ‘Exclude entries if.’
Then, you can choose whether to exclude or include the content if it is part of a specific taxonomy, was published within a certain date range, or has a certain ID.
To add another rule, simply click the ‘Add Rule’ button and repeat the same process described above. When you’re happy with how the rules are set up, go ahead and click ‘Done.’
You can repeat the same process for the other search entry sources, if needed.
When you’re happy with the search engine, you can go back to the top of the page and click ‘Save.’
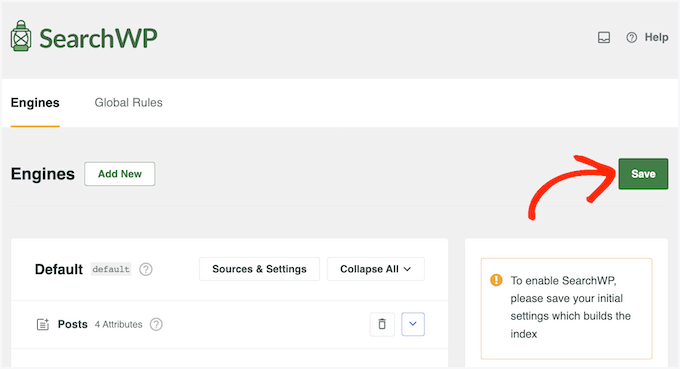
SearchWP will now rebuild the index, which may take a few minutes.
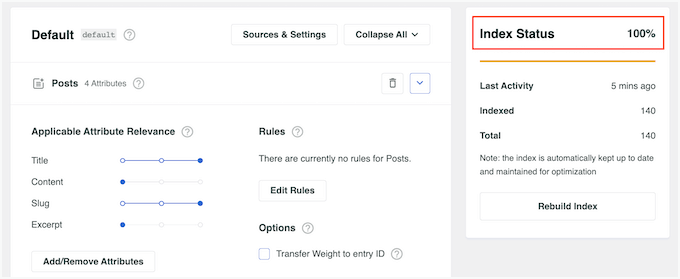
Once you see ‘Index Status 100%,’ that means SearchWP has indexed all your content and rules for the search engine.
Step 3: Build a Custom Search Form
Now that the search engine is configured, let’s create a user-friendly search form with filtering options.
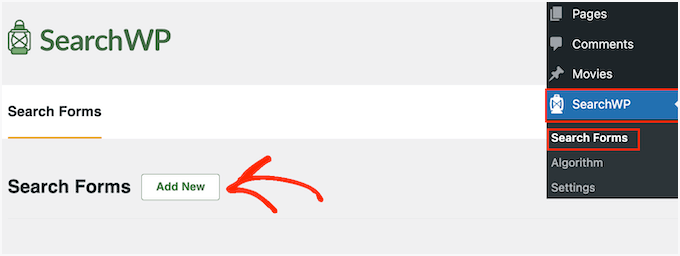
To start, let’s head over to SearchWP » Search Forms, and then click ‘Add New.’
On the next screen, the first thing you’ll do is to give your form a recognizable name.
This is just for your internal reference, so the name can be anything that’s easy for you to remember.
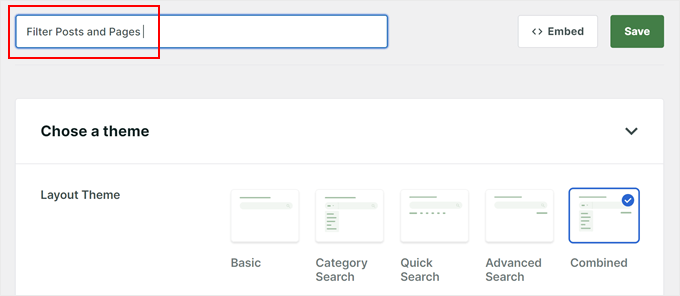
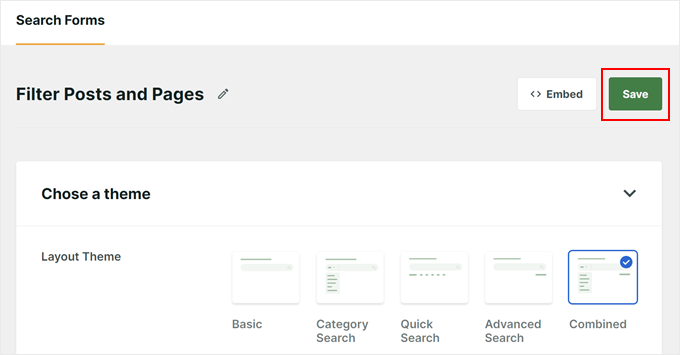
Then, you’ll choose a layout.
For this tutorial, we will use the ‘Combined’ option, as it provides the most filtering menus.
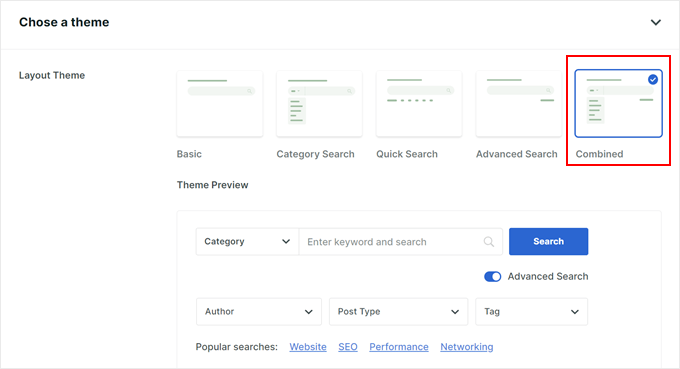
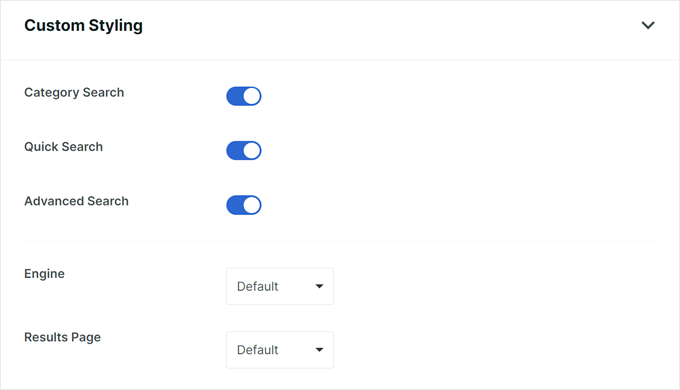
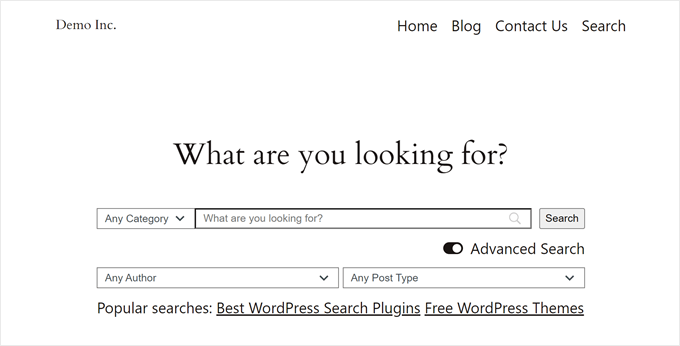
Now, you can scroll down to the ‘Custom Styling’ section and select both the ‘Category Search’ and ‘Advanced Search’ options. This ensures your form includes all the filtering features.
You can optionally choose ‘Quick Search’ if you want to add some suggested search terms below the search bar.
Then, in the ‘Engine’ menu, you’ll select the search engine you created earlier.
As for ‘Results,’ you can choose which search results page to use: the default WordPress results or SearchWP’s version.
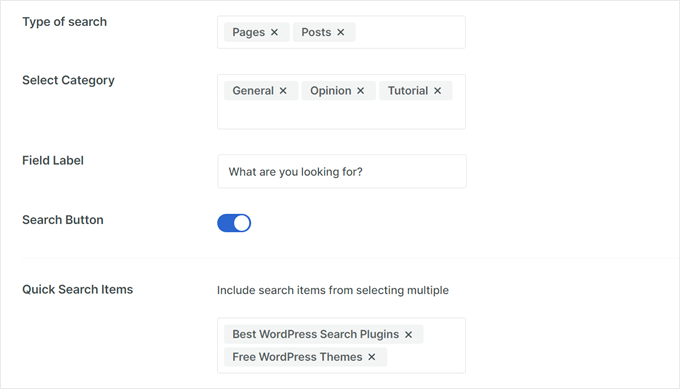
In the ‘Type of Search,’ let’s select ‘Posts’ and ‘Pages.’
Below that, you can add the category names you want to include in the filter menu.
For the ‘Field Label,’ go ahead and enter a placeholder text that appears in the search field, like ‘What are you looking for?’
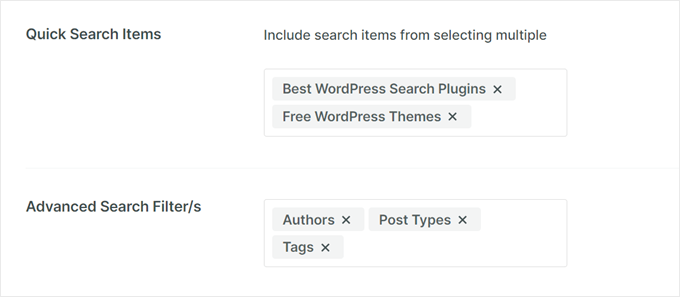
If you selected ‘Quick Search’ earlier, then you can include terms users might commonly search for in the ‘Quick Search Items.’
In the ‘Advanced Search Filter/s,’ simply choose which filtering options you want to offer users, such as ‘Authors,’ ‘Post Types,’ or ‘Tags.’
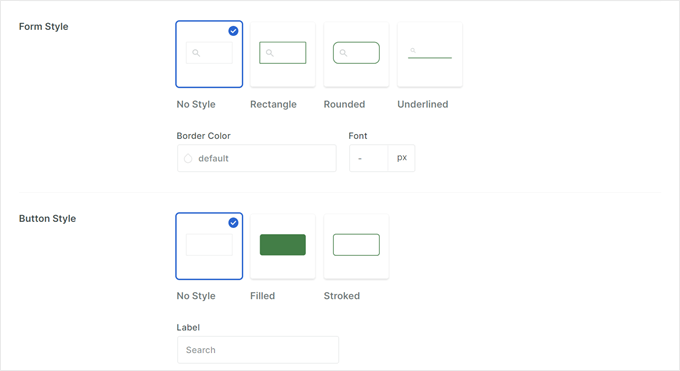
Finally, in the ‘Form Style’ and ‘Button Style,’ go ahead and customize the appearance of the search form to match your website’s design.
You can change the colors, fonts, and shapes of the search form.
Once everything is set up, you can scroll back up.
Then, it’s time to click ‘Save’ to create your search form.
Step 4: Embed the Search and Filter Form
The SearchWP plugin allows you to easily embed the search form on the front end of your website, like on your homepage or widget-ready areas. Here, we will demonstrate adding it to a page using the WordPress block editor and the Search Form block.
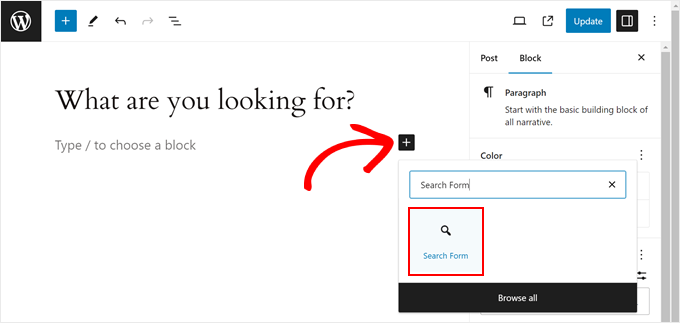
First, you can open the page or post you want to add the form to. Then, let’s click the ‘+ Add Block’ icon and search for ‘Search Form.’
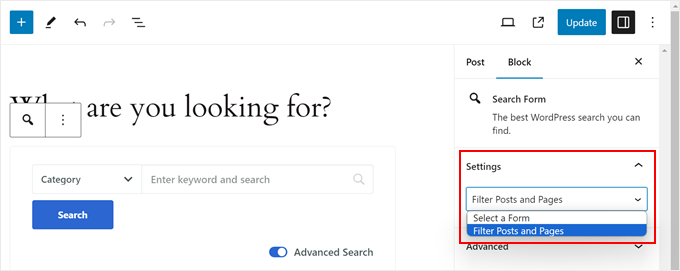
In the ‘Block Settings’ sidebar, you’ll go ahead and choose the form you created from the dropdown menu.
Finally, simply click on ‘Publish’ or ‘Update’ to see the search form live.
For more information, you can check out these step-by-step guides:
Alternatively, you can display the form using a shortcode.
To do this, you’ll need to find the shortcode for your specific form by going to SearchWP » Search Forms and copying the code in the ‘Shortcode’ column.
We have a guide on how to add shortcodes in WordPress if you need help.

With the search form and filtering options in place, your visitors can now easily find the content they’re looking for on your website.
This not only improves user experience but can also encourage them to explore different categories and discover more of your valuable content.
Method 2: Filter Posts and Pages With Custom Code (Advanced)
The next method will use custom code. For beginners, this process may seem intimidating, but we’ve tried and tested the code to make sure it works smoothly with your website.
Plus, we will be using WPCode, which is the best code snippet plugin on the market. This plugin makes it safe to insert custom code without directly dealing with your website files, so you’re less likely to break your site.
The first step is to install and activate WPCode. For more information, you can check out our guide on how to install a WordPress plugin.
Note: You can also use the free WPCode plugin for this tutorial, but upgrading to the premium plugin will get you access to a cloud-based code snippet library, WooCommerce integrations, and more.
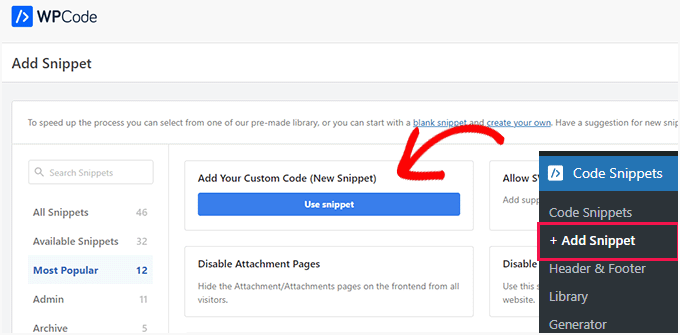
Once that’s done, you can go to Code Snippets » + Add Snippet in your WordPress admin area.
Then, let’s select ‘Add Your Custom Code (New Snippet’ and click the ‘Use snippet’ button.
Now, there are 2 types of code snippets you have to add. Let’s go through them one by one:
Adding a WordPress Filter Code
This code tells WordPress to filter the user’s search results based on the options they’ve selected in the search form. It will work with another code snippet that creates the search form, which we will discuss later.
First, you need to give your new snippet a name. It can be something as simple as ‘WordPress Search Filter.’
Then, you’ll need to change the ‘Code Type’ to ‘PHP Snippet.’
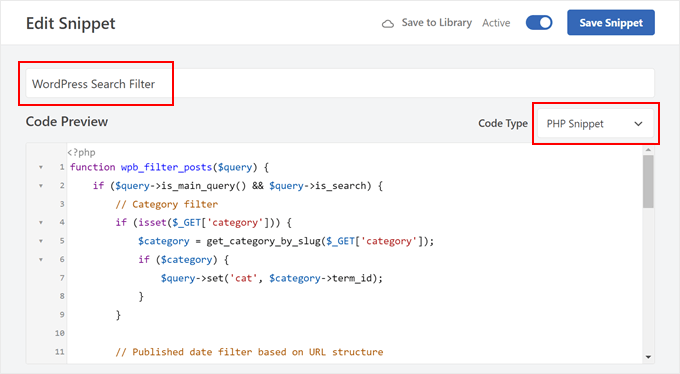
Next, simply copy the following code and paste it into the ‘Code Preview’ box:
function wpb_filter_posts($query) {
if ($query->is_main_query() && $query->is_search) {

// Category filter
if (isset($_GET['category'])) {
$category = get_category_by_slug($_GET['category']);
if ($category) {
$query->set('cat', $category->term_id);
}
}

// Published date filter based on URL structure
$url_path = parse_url($_SERVER['REQUEST_URI'], PHP_URL_PATH);
$url_parts = explode('/', trim($url_path, '/'));
if (count($url_parts) >= 4 && is_numeric($url_parts[0]) && is_numeric($url_parts[1]) && is_numeric($url_parts[2])) {
$year = $url_parts[0];
$month = $url_parts[1];
$day = $url_parts[2];
$query->set('date_query', array(
array(
'year' => $year,
'month' => $month,
'day' => $day,
),
));
}

// Include posts without categories or tags
$query->set('post_status', 'publish');
$query->set('post_type', 'post');
$query->set('posts_per_page', -1);

// Include post types
if (isset($_GET['post_type']) && $_GET['post_type'] == 'page') {
$query->set('post_type', array('page'));
} else {
$query->set('post_type', array('post', 'page', 'custom_post_type'));
}
}
}

add_action('pre_get_posts', 'wpb_filter_posts');
This code snippet checks if the user has chosen any filters in the search form. For example, if a category filter is selected, then the code can identify that category and only show posts belonging to it.
It can also filter the results by date by looking for the specific year, month, and day the user has chosen.
Finally, the code checks and filters the results based on whether the user wants to see just posts, pages, or all post types (including custom post types).
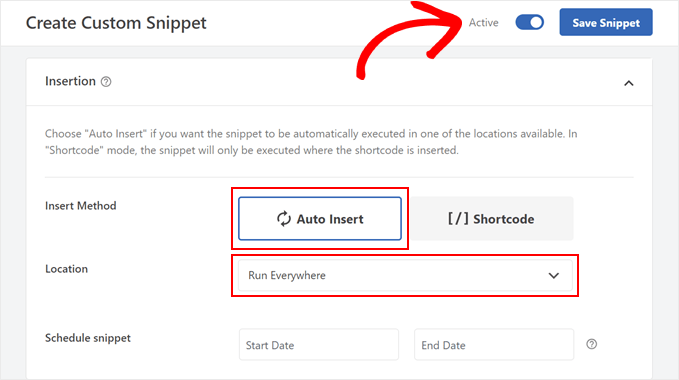
With the code pasted, go ahead and scroll down to the ‘Insert Location’ section. By default, the ‘Insert Method’ will be ‘Auto Insert’ and the Location will be ‘Run Everywhere.’
You can leave these settings as they are so that the code can be added to your WordPress theme’s functions.php file and work properly.
Then, just activate the code snippet and click ‘Save Snippet.’
Adding a WordPress Search Form Code
This next code will create a custom search form, which you can embed using a shortcode later on.
You can add custom code using WPCode by repeating the same steps. Then, you can name this code ‘WordPress Search Form’ and change the code type to ‘PHP Snippet.’
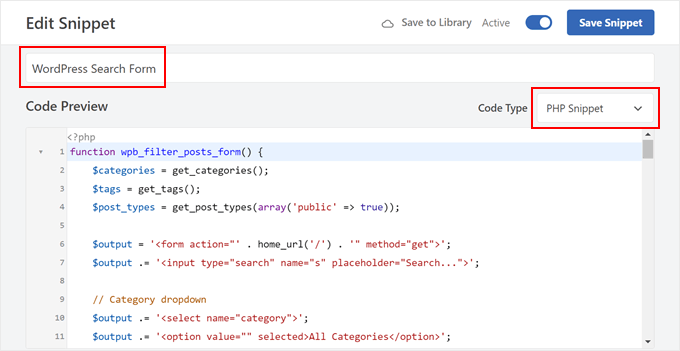
Now, you can paste the code snippet below into the ‘Code Preview’ box:
function wpb_filter_posts_form() {
$categories = get_categories();
$tags = get_tags();
$post_types = get_post_types(array('public' => true));
$output = '<form action="' . home_url('/') . '" method="get">';
$output .= '<input type="search" name="s" placeholder="Search...">';

// Category dropdown
$output .= '<select name="category">';
$output .= '<option value="" selected>All Categories</option>';
foreach ($categories as $category) {
$output .= '<option value="' . $category->slug . '">' . $category->name . '</option>';
}
$output .= '</select>';

// Tag dropdown
$output .= '<select name="tag">';
$output .= '<option value="" selected>All Tags</option>';
foreach ($tags as $tag) {
$output .= '<option value="' . $tag->slug . '">' . $tag->name . '</option>';
}
$output .= '</select>';

// Post type dropdown
$output .= '<select name="post_type">';
$output .= '<option value="all" selected>All Post Types</option>';
foreach ($post_types as $post_type) {
$post_type_object = get_post_type_object($post_type);
$output .= '<option value="' . $post_type . '">' . $post_type_object->label . '</option>';
}
$output .= '</select>';

// Year dropdown
$output .= '<select name="year">';
$output .= '<option value="">Select Year</option>';
for ($year = date('Y'); $year >= 2000; $year--) {
$output .= '<option value="' . $year . '">' . $year . '</option>';
}

$output .= '</select>';
// Month dropdown
$output .= '<select name="month">';
$output .= '<option value="">Select Month</option>';
for ($month = 1; $month <= 12; $month++) {
$output .= '<option value="' . sprintf('%02d', $month) . '">' . date('F', mktime(0, 0, 0, $month, 1)) . '</option>';
}
$output .= '</select>';

// Day dropdown
$output .= '<select name="day">';
$output .= '<option value="">Select Day</option>';
for ($day = 1; $day <= 31; $day++) {
$output .= '<option value="' . sprintf('%02d', $day) . '">' . $day . '</option>';
}
$output .= '</select>';
$output .= '<input type="submit" value="Search">';
$output .= '</form>';
return $output;
}

add_shortcode('wpb_filter_posts_form', 'wpb_filter_posts_form');
This code creates a shortcode called [wpb_filter_posts_form], which will add a form that allows users to search your site. The form includes a search bar for keywords and several dropdown menus for filtering.
The code retrieves categories, tags, and available post types from your site for the search bar’s dropdown menus. Users can choose specific categories, tags, or post types to narrow down their search results.
Additionally, the code includes year, month, and day dropdowns for even more precise filtering by date. Finally, it adds a submit button to initiate the search with the chosen filters.
Like in the previous code, you can leave the ‘Insert Method’ settings as they are. Then, simply activate the code and save it.

Embedding the Search Form Shortcode
At this stage, you can add the [wpb_filter_posts_form] shortcode to a post, page, theme template, or widget-ready area. For more information, you can check out our guide on how to add shortcodes in WordPress.
In this case, we will add the shortcode to a custom search page. If you want to do the same, go ahead and create a new page in WordPress.
Then, customize the search page using any type of blocks you need. For example, you can add images or text to instruct readers on how to use the search bar.
After that, you can just click the ‘+ Add Block’ button and select the ‘Shortcode’ block.
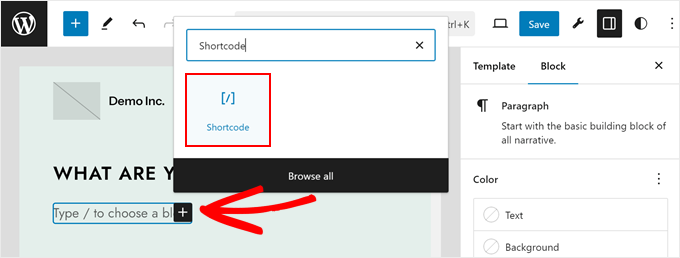
Once done, simply insert the [wpb_filter_posts_form] shortcode in the appropriate field.
The next step is to hit the ‘Publish,’ ‘Update,’ or ‘Save’ button to make your changes live.
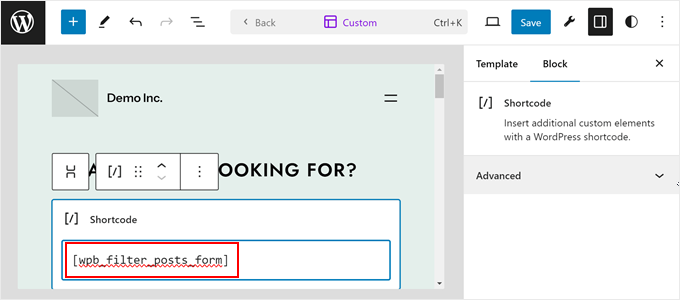
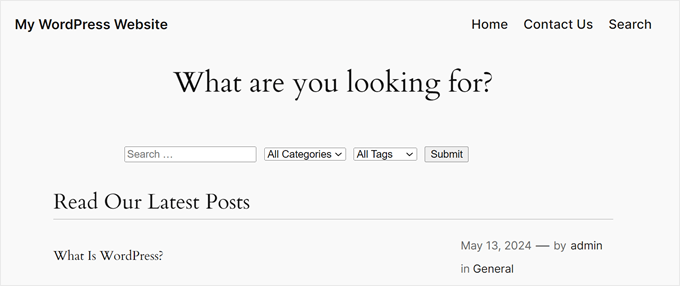
You should now see your new custom search form.
Here’s what it looks like on our demo website:

Method 3: Filter Posts and Pages With Search & Filter Plugin (Free)
The last method is to use the Search & Filter plugin, which is available for free. It’s a great option if you’re looking for a quick and easy way to enable the search and filter feature on your WordPress blog page.
What you want to do is install and activate the Search & Filter plugin. For more details, see our step-by-step guide on how to install a WordPress plugin.
Upon activation, the plugin will add a new menu item labeled ‘Search & Filter’ to your WordPress admin area. Clicking on it will take you to the plugin’s usage page with detailed documentation on how to use it.
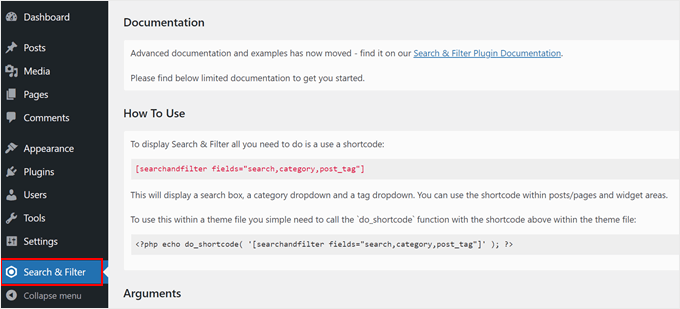
Search & Filter plugin comes with a shortcode that accepts different parameters to display the filtering options. You can use this shortcode in a post, page, or inside a text widget:
[searchandfilter fields="search,category,post_tag"]
This will display the filtering options with search, category, and tag fields:
The cool thing about the plugin is you can customize which filtering options are available by editing the shortcode tags.
For example, if you want to include category, tag, post type, and date fields in the search bar, then you will need to use this shortcode:
[searchandfilter fields="search,category,post_tag,post_types,post_date"]
This is what it looks like:

If you don’t want to use dropdown menus, then you can also use checkboxes and add labels for each field.
In the shortcode below, we’re telling the plugin to display the search bar with checkboxes for category options:
[searchandfilter headings="Select categories:" types="checkbox" fields="category"]
Please check out the example below:

Additionally, you can tell the plugin to use checkboxes for some filter options and dropdown menus for others in one shortcode.
This is the shortcode we used to include post types, categories, and tags in the search bar. We asked the plugin to use checkboxes for the post types option:
[searchandfilter headings="Post type, Category, Tag" types="checkbox, select, select" fields="post_types,category,post_tag"]
Feel free to refer to the plugin’s documentation for more ways to use the shortcode.

Bonus Tip: Add Live Ajax Search to Your WordPress Site
Now that you know how to let users filter posts and pages, you can take things a step further and improve the search experience with live Ajax search.
Live Ajax search uses real-time technology to display search results as users are typing their queries. This means no more waiting for a page to refresh. Results will appear instantly, making the search process much faster and more convenient for your visitors.

A faster search experience means you can keep users on your site longer, increasing pageviews and reducing the bounce rate.
The good news is that you can easily add this functionality to your site with a free plugin called SearchWP Live Ajax Search. You can read our WordPress tutorial on how to add live Ajax search to your website for more information.
We hope this article helped you learn how to let users filter posts and pages in WordPress. You may also want to check out our guide on how to create a web directory and our expert picks of WordPress search plugins to improve your site search.
If you liked this article, then please subscribe to our YouTube Channel for WordPress video tutorials. You can also find us on Twitter and Facebook.


kzain
I’ve been wanting to improve website navigation for my users, and adding filters seems like a great solution. The breakdown of different methods is perfect, especially for beginners like me. I’ll definitely try out the SearchWP plugin. Thanks for sharing!
Himanshu Gautam
hi
I am using this plugin
is there any option to select a category without hitting the submit button?
Marwan Nour
Hello there,
I am trying to implement Search & Filter in a website that’s both in Arabic and in English. The English version of the Search & Filter is working well however in the Arabic Version, after hitting search, I am redirected to the English Version of the search page with the results in English. Can anyone help me with that issue please? Thank you
WPBeginner Support
You would want to reach out to the plugin’s support to see if this could be a conflict with the plugin and the translation plugin you’re using.
Admin
Tom Ale
Hi, I am using Wordpress with Gantry.
I installed this plugin and used a shortcode. It appears where it suppose to be. When clicking the button to filter content, nothing happens. Did anyone face this problem? Help, please.
Sébastien Albert
Hi,
Search & Filter looks great. But could you tell me if it can do that :
I would have a filter on tags but only on one category which I could define…
Thanks a lot
Sebastien
Soumik Sadman Anwar
How can I create filter options in a single post?
For example, If I am interested in writing a post “Necessary Tools to Build A Website” and want to include filter options like Purpose Based Tools (like SEO, Design etc.) and the Price option (Free or Paid), how do I do it?
Pavel
Great plugin, but have some limitations and bugs.
1. No Reset button.
2. When I uncheck all checkboxes and press Submit, it transfers to the front page.
Maybe there’s an option Show all?
Wolney Mamede
First of all, thanks for the post.
I would like to know if it is possible to filter the search from the group of fields, created from the “Advanced Custom Fields – v. 4.4.12” plugin.
Also by default, the search would be restricted to a custom post type from the “Custom Post Type UI – v. 1.5.8” plugin.
Sultan Haider
Hi, I had created employ database on tablepress and i want to filter in front end employ according to year wise for example if i select 2013 this shows only those employ which join in 2013.
i have perform lot of research but i cant find free pluggin according to my need.
please help me for suggestion.
thanks
Christine
Thanks a lot for the comprehensive article. Do you know if it is also possible to have only certain tags in the dropdowns?
Pawan
Great Job. just one last question. Instead of searching the post, is it possible to search category using the search string? I would like to show all the possible post in search page and then the category if it matches the search string (partially or fully).
Maz
Hi,
Great as always.
I just wonder would the use of this plugin be recommended on a site with many posts? Will it not lead to slower load time?
Thanks
Matus
Could you please give us a little bit deeper look to your behind the scenes? (in Blueprint post you write only what you’re using – you can also write if you want, how to properly set up plugins, themes…)
For example tutorial on 10 tips and trick to masterize or customize Genesis Framework would be really really helpful.
Patxi
Hi WPBeginner!
In relation to the filters of new taxonomies, a question of initiation, how I can visualize in the post a new taxonomy for a second type of labels that later I can filter with this plugin?
It would be an interesting topic.
Thanks for you post!
Omer Causey
Your suggestions for allowing users to filter posts are welcome, but the explanation of how and where to insert the required shortcode is beyond this beginner’s understanding.
WPBeginner Support
Hi Omer,
You can add the shortcode in a post or page. If you want to display the filter site-wide then you will need to edit your WordPress theme files and use the template tag instead.
Admin