Over the past decade of running WordPress sites, we’ve tested pretty much every SEO plugin out there. Yoast SEO was my go-to choice for years, and it’s still what I recommend to WordPress beginners who want to improve their search rankings without getting overwhelmed.
These days, we use All in One SEO here on WPBeginner because it offers more advanced features. But with over 5 million active installations, Yoast SEO remains one of the most trusted ways to optimize your WordPress site for search engines.
In this guide, we’ll walk you through exactly how to install and set up Yoast SEO the right way. We’ve helped countless WordPress users with this process, and we’ve broken everything down into simple steps that anyone can follow – even if you’re completely new to SEO.
🔈 Important Note: We have switched from Yoast SEO to All in One SEO for the WPBeginner website because it has far more powerful features. The plugin is used by over 3 million websites. You can follow our guide on how to install and set up AIOSEO for more details.
What is Yoast SEO and What Are its Features?
Yoast SEO is one of the most popular WordPress SEO plugins, with many built-in tools and features. Here is a quick overview of some of those features:
- Change the post’s SEO title and meta description on a per-post basis.
- Title and meta description support for taxonomies, such as categories and tags.
- Google search result snippet previews.
- Focus keyword testing.
- Meta robots configuration:
- Easily add noodp and nodir meta tags.
- Easily noindex or nofollow pages, taxonomies, or archives.
- RSS footer/header configuration.
- Breadcrumbs support, with configurable breadcrumbs titles.
- Advanced XML sitemaps.
- The
.htaccessandrobots.txteditors. - Ability to verify Google Search Console, Yahoo Site Explorer, and Bing Webmaster Tools.
- Schema markup support.
The premium version of Yoast SEO comes with even more features.
It includes a redirect manager for easily setting up redirects, the ability to use multiple focus keywords, and internal linking suggestions to improve site navigation.
You can also export focus keywords for analysis, access video tutorials that explain various features, and enjoy priority support for any issues or questions you may have.
For the plugin’s pros and cons and detailed analysis, you may want to see our comparison of Yoast SEO vs. All in One SEO.
How to Install the Yoast SEO Plugin
The first thing you need to do is install and activate the Yoast SEO plugin. For more details, see our step-by-step guide on how to install a WordPress plugin.
Upon activation, you’ll notice a new menu item labeled Yoast SEO.
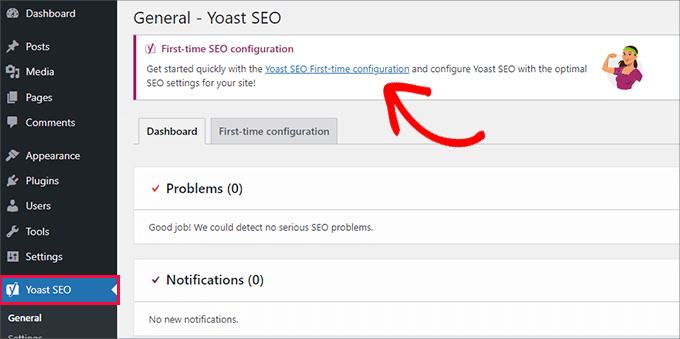
Upon clicking on it, you’ll be prompted to run the ‘First-time configuration’ wizard.
Simply click on the link to run the first-time configuration wizard.
How to Set Up the WordPress SEO Plugin by Yoast
Yoast SEO comes with a basic setup wizard that will guide you through the initial setup.
If you are setting it up on a new WordPress website, then you can skip Step 1 and directly run Step 2 in the first-time configuration wizard.
However, if you are setting up Yoast SEO on an existing website where you have previously used some other WordPress SEO plugin, then you need to import your existing SEO data first.
In the following sections, we’ll share the instructions on how to set up Yoast SEO. Here’s a quick overview of all the steps we’ll cover:
- Importing Your SEO Data
- Running the First-Time Configuration Wizard
- Configuring the Yoast SEO Settings – Site Basics
- Making Site Connections to Search Engines
- Setting Up Content Types Display for Search Results
- Adjusting Category & Tag Search Settings
- Fine-Tuning the Advanced Settings
- Exploring Advanced Task Settings in Tools
- Integrating Yoast SEO With Third-Party Platforms
- Optimizing Your Posts and Pages With Yoast SEO
- Optimizing Taxonomies for SEO (Categories and Tags)
- Optimizing eCommerce Products
- Monitoring and Tracking SEO Performance
Let’s get started.
Step 1: Importing Your SEO Data
You can skip this step if you are setting up Yoast SEO on a new WordPress website or blog.
Other users who are installing the plugin on an existing website may have been using some other WordPress plugin for SEO, like All in One SEO for WordPress, RankMath, or a theme framework like Genesis to deal with their SEO data.
If you want to use Yoast SEO properly, then you need to make sure that all of your previous SEO data has been transported across before you deactivate the other plugin.
Luckily, Yoast SEO comes with a built-in SEO data import/export functionality.
Head over to the Yoast SEO » Tools page and click on the ‘Import and Export’ link.

This will bring you to the import/export tool.
From here, you need to switch to the ‘Import from other SEO plugins’ tab.
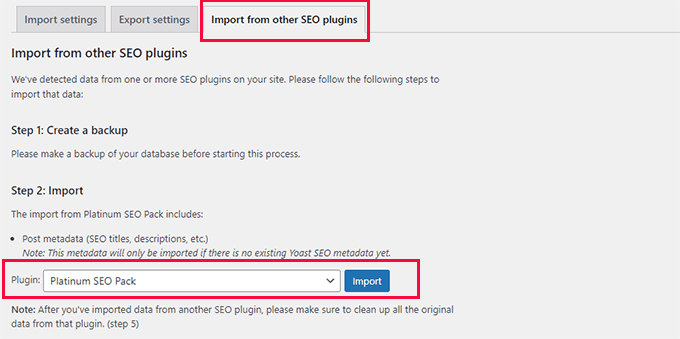
First, you will be advised to create a full database backup. We recommend using the Duplicator plugin, which is the quickest way to do this.
Note: There is also a free version of Duplicator, which will get the job done. But for automatic backups, secure cloud storage, and other features, we recommend upgrading to a paid plan.
Under ‘Step 2: Import’, you’ll want to choose the SEO plugin you used before from the dropdown menu.
After that, just click on the ‘Import’ button to fetch SEO data.
Next, you can edit a blog post or page and scroll down to the Yoast SEO section. There, you can see if the plugin correctly imported SEO data, such as the SEO title and meta description.
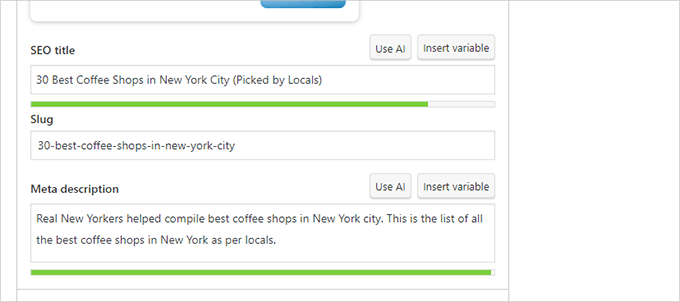
If everything looks good, then you can switch back to the ‘Import’ tab.
Step 4 will ask you to run the first-time configuration wizard now. We will show you how to do this in the next step of this tutorial.
After that, you can switch back again to the ‘Import’ tab.
You’ll need to select your previous SEO plugin under ‘Step 5: Clean up’ and then click the ‘Clean up’ button.
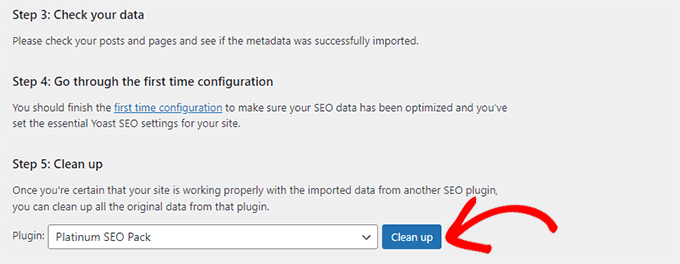
This will clean up the database and delete the old plugin’s data. After that, you can safely deactivate and delete your old SEO plugin.
Step 2: Running the First-Time Configuration Wizard
Yoast SEO comes with a first-time configuration wizard. To run it, let’s go to the Yoast SEO » General page and switch to the ‘First-time configuration’ tab.
Launching the configuration wizard will allow you to set up some basic SEO settings for your website.
The first step in the wizard is ‘SEO Data Optimization.’ Go ahead and click the ‘Start SEO data optimization’ button to run the analysis.
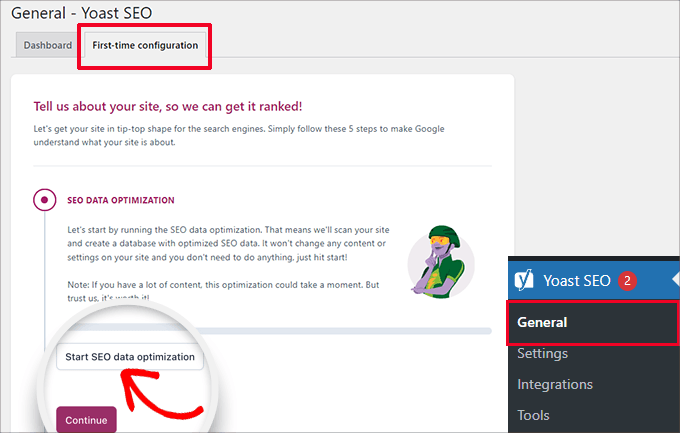
Don’t worry, because the optimization process will not change any content on your website.
Once the data optimization process is finished, simply click the ‘Continue’ button to proceed.
Next, you will be asked to provide information about your website. This includes whether it is an organization or a person, your website name, organization name, and organization logo.
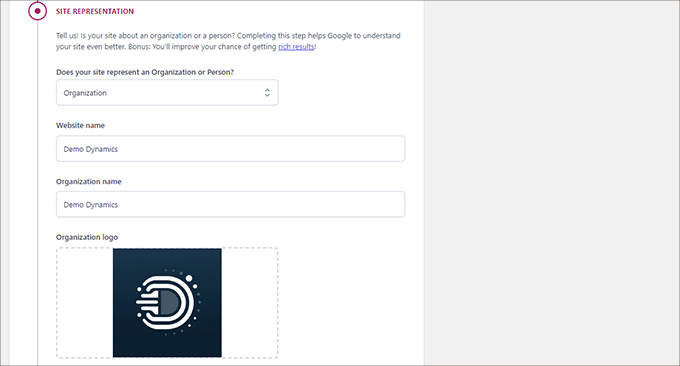
After entering this information, you need to click the ‘Save and continue’ button.
This will bring you to the next step.
Here, you’ll need to enter social profiles associated with the organization or business behind the website.
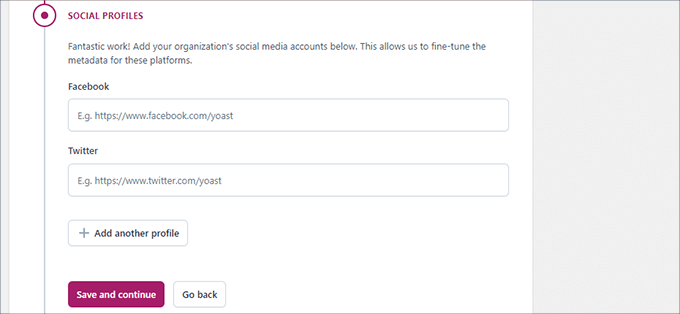
After entering your social profiles, you can click the ‘Save and continue’ button.
Next, you will be asked to enter your email address for the weekly Yoast SEO newsletter.
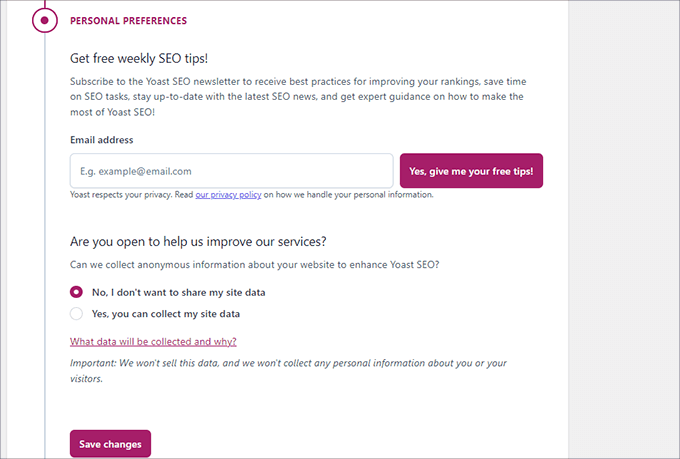
You will also be asked to opt in or out of usage data tracking.
You can select ‘No’ if you are uncomfortable sharing your usage data with the company behind Yoast SEO.
Now, go ahead and click on ‘Save and continue.’
That’s all. You have successfully run the setup wizard.

Next, we will walk you through the rest of the plugin settings. This will help you set up the plugin properly for optimal SEO benefits.
Step 3: Configuring the Yoast SEO Settings – Site Basics
First, you need to set up basic SEO appearance settings.
To do this, you’ll want to go to the Yoast SEO » Settings page and switch to the ‘Site Basics’ tab.
Here, you can change your site title, add an alternate title (optional), provide a tagline, and choose a title separator.
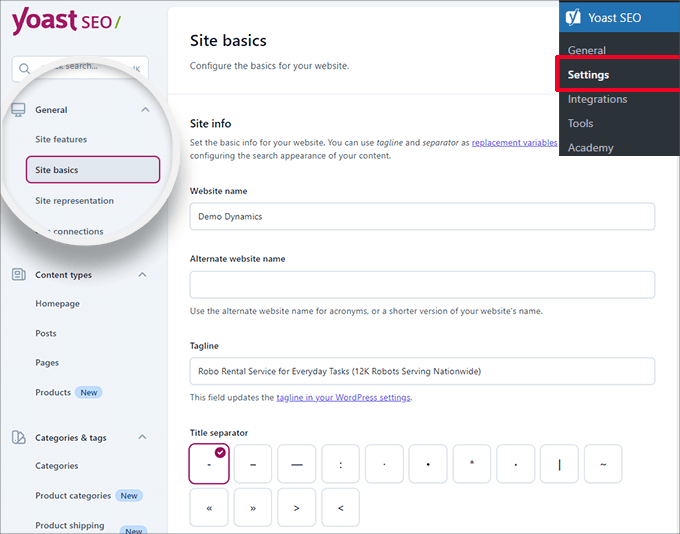
The title separator appears in the browser’s title bar. You can choose any of them, but the dash symbol is the most commonly used.
Below, you can provide a site image. The recommended size for this image is 1200 x 674 pixels.
This image will be used when your website is shared on the internet (not the individual articles, as they can have their own social sharing images).
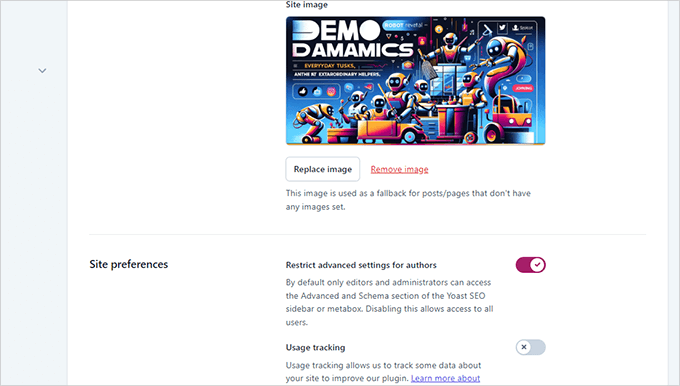
Under ‘Site preferences,’ let’s make sure that the option next to ‘Restrict advanced settings for authors’ is turned on.
This ensures that authors cannot set up redirects or block search engines when working on an article (editors and site administrators can still access those options).
Don’t forget to save your changes when you have finished making changes.
Step 4: Making Site Connections to Search Engines
The next step is to add your website to search engines. All top search engines allow users to submit their websites and track their search indexing and performance.
For more details, see our complete Google Search Console guide to learn more about these tools.
Yoast SEO makes verifying your website with all top search engines easy.
First, you need to sign up for the Webmaster Tools program for each search engine. After that, you will be asked to add a meta tag to verify your website ownership.
Now, you’ll want to head over to Yoast SEO » Settings.
Then, in the ‘General’ section, you can open the ‘Site Connections’ panel.
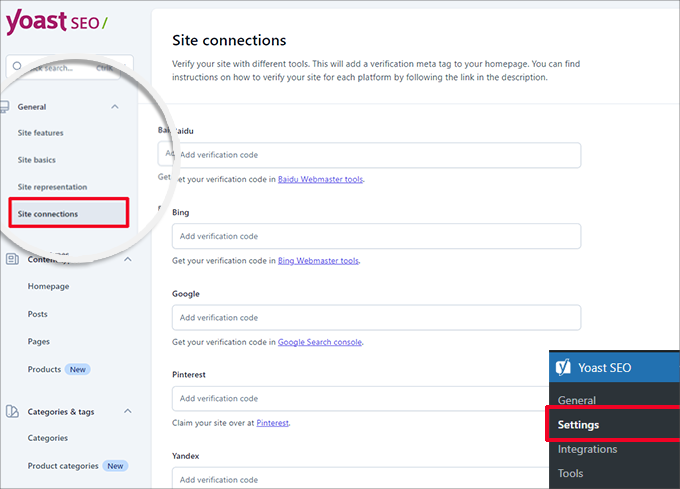
Simply add the meta code you received from the different search engines in the respective fields, and don’t forget to save your changes.
Step 5: Setting Up Content Types Display for Search Results
Next, you need to switch to the ‘Content types’ tab in the Yoast SEO settings.
From here, you can set the default options for how different content types will appear in search results.
1. Homepage
First, you need to enter an SEO title and description for your home page.
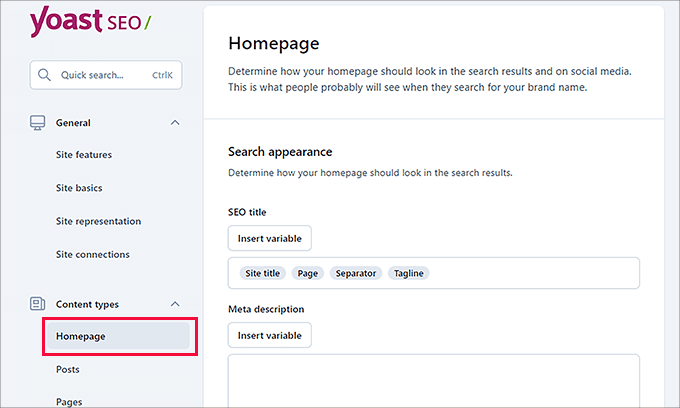
If you are using a custom homepage in WordPress, then Yoast SEO will use the SEO title and description from the custom homepage.
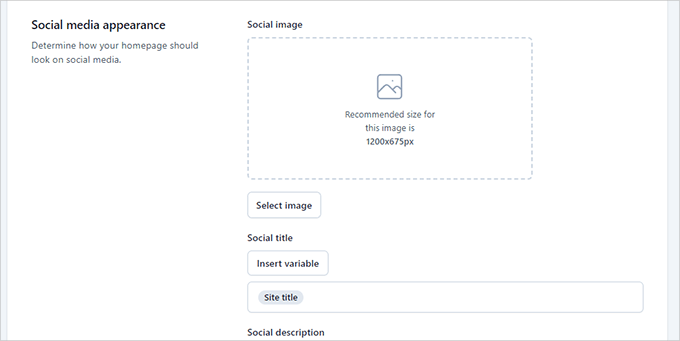
Below that, you can provide a social media image. Optionally, you can also provide a separate description and title for social sharing.
2. Posts
Next, switch to the ‘Posts’ tab under ‘Content types.’
From here, you’ll want to make sure that the toggle next to the ‘Show posts in search results’ option is turned on.
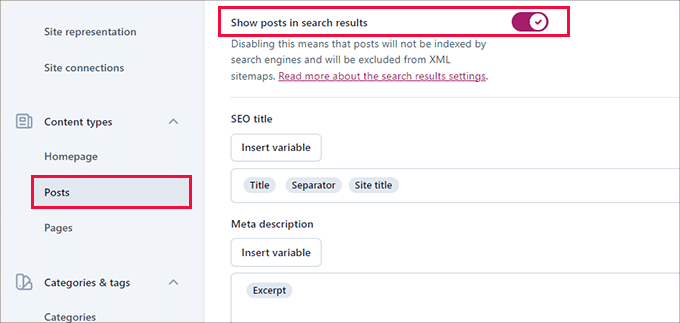
Below that, you can use variables to set a default format for SEO titles in your posts. This comes in handy if you have older posts without an SEO title or forget to manually write an SEO title for a post.
In the ‘Meta description’ field, you should add %excerpt as the default variable.
3. Pages
After that, you can switch to the ‘Pages’ tab and ensure that the toggle next to the ‘Show pages in search results’ option is turned on.
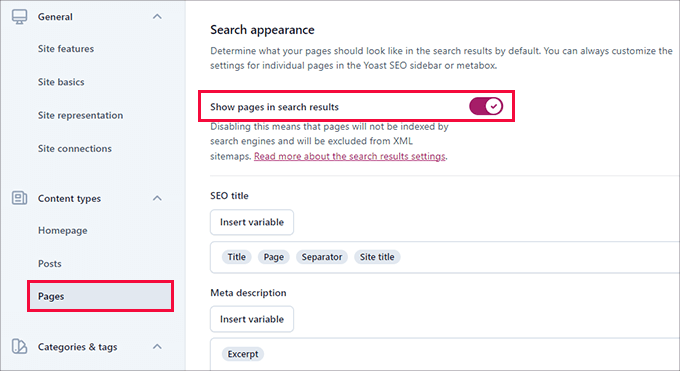
Then, you can scroll down and use the ‘Insert variable’ button to set up a default SEO title scheme for your pages.
In the meta description field, you will need to use %excerpt to select ‘Excerpt’ as the default meta description.
Step 6: Adjusting Category & Tag Search Settings
Next, you need to configure the default search appearance option for categories and tags.
So, let’s switch to the ‘Categories’ tab and then make sure the option ‘Show categories in search results’ is turned on.
Below that, you need to provide a default meta title for your categories using the variables.
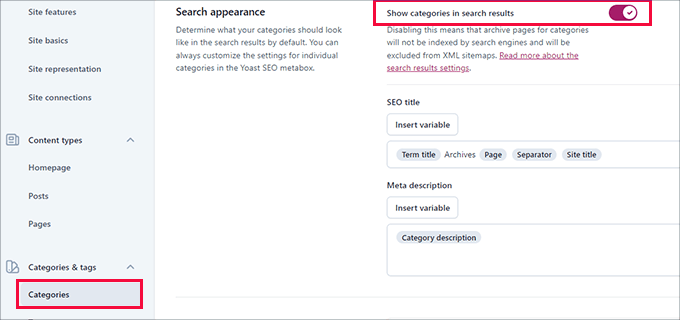
For the meta description, you can use %category description as the default meta description for categories.
Next up, you’ll switch to the ‘Tags’ tab and repeat the same steps.
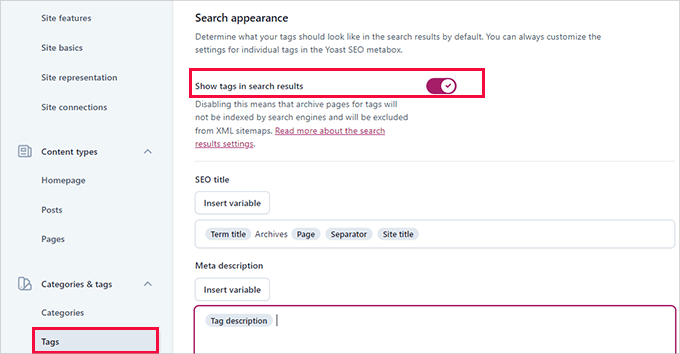
For the meta description, you’ll want to use %tag description as the default meta description for categories.
Step 7: Fine-Tuning the Advanced Settings
This part of the Yoast SEO settings offers advanced, technical SEO features.
They allow you to further optimize your website by cleaning up unwanted options and making it easier for search engines to crawl more of your content.
1. Crawl Optimization
As a website owner, you want Google to crawl more of your pages. However, WordPress generates several pages and RSS feeds that are not important for your website but consume a lot of the crawl budget.
Crawl optimization allows you to fix that. For more details on this topic, you can see our guide on fixing the SEO crawl budget issue in WordPress.
The first option is to ‘Remove unwanted metadata.’ This refers to data WordPress adds to each page on your site, and search engines crawl some of it.
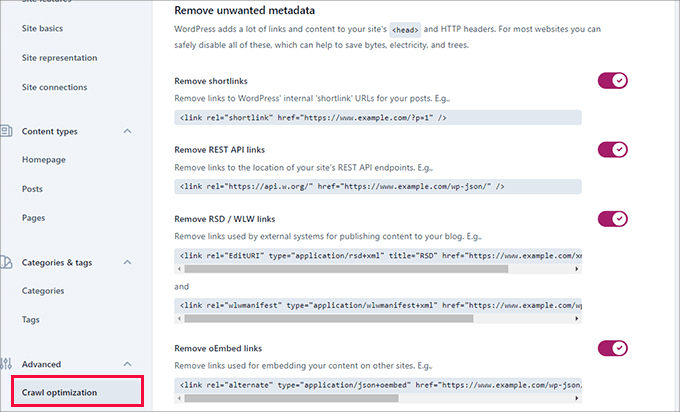
The plugin provides a description next to each option. You can turn the toggle on to remove each item.
After that, you can scroll down to the ‘Disable unwanted content formats’ section.
From here, you can disable unwanted RSS feeds generated by WordPress.
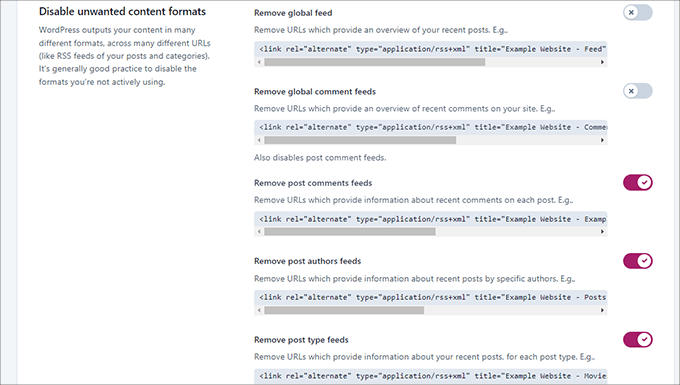
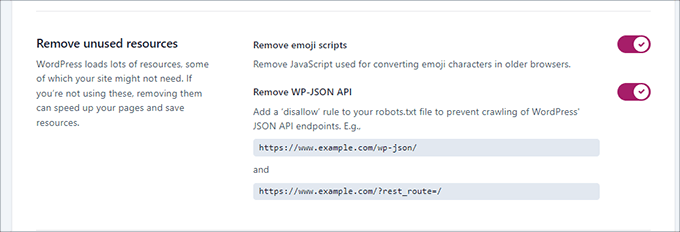
Lastly, you can disable unused resources, such as the emoji script, which is only used by very old browsers.
You can also disallow end-points for the WP-JSON API.
2. Breadcrumbs
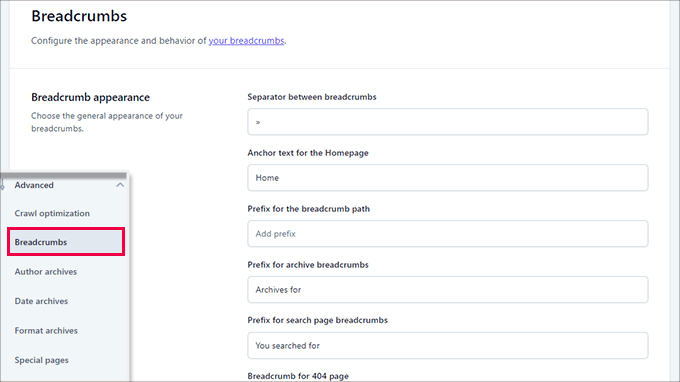
Breadcrumbs are great for internal linking because they define a clear path or trail to the page you are on.
These breadcrumbs also appear in search results, giving your site an extra advantage. Here’s an example:

The default settings for Yoast SEO are highly optimized and should work for most websites.
However, if you want to change something, then go ahead and make your changes.
Next, you’ll want to scroll down to the ‘How to insert breadcrumbs in your theme’ section.
Here, you can turn on the toggle next to ‘Enable breadcrumbs for your theme.’

Expert Tip: For better breadcrumb navigation, you may want to look at All in One SEO for WordPress. You will have full control over how your breadcrumbs are displayed and can create custom breadcrumb templates for your specific needs.
For more details, you can check out our tutorial on how to display breadcrumb navigation links in WordPress.
3. Author Archives
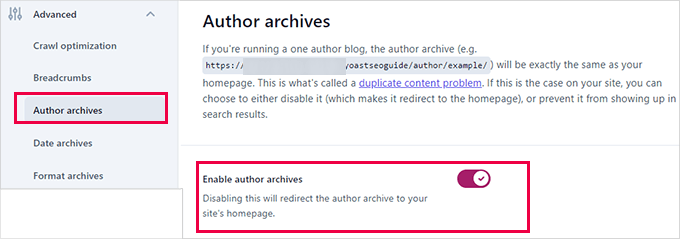
The next option in the ‘Advanced Settings’ is ‘Author archives.’
If you run a single-author blog, then you need to disable the author archives. This is important because your blog and author archives will have the same content.
So, if ou don’t disable these archives, search engines may penalize your website for duplicate or low-quality content.
4. Date Archives
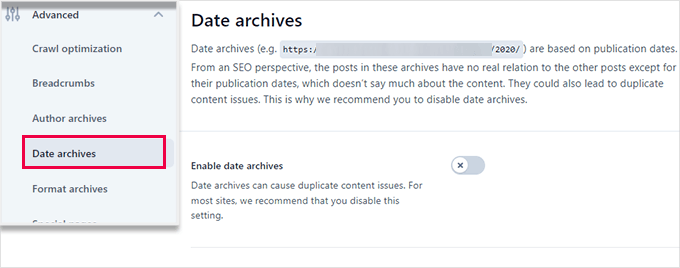
WordPress also creates archives based on dates. This may create more duplicate content issues.
Under ‘Date archives,’ you can turn off the switch next to the ‘Enable date archives’ option. This will disable those archives, improve the crawl budget, and avoid duplicate content.
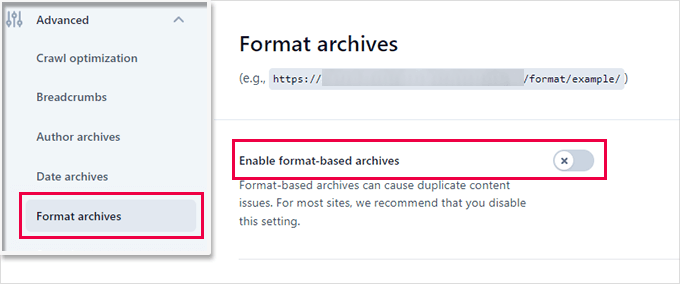
5. Format Archives
Post formats are WordPress theme features that allow developers to add support for different formats. A post type can then use these for styling and appearance purposes.
However, this feature didn’t catch on, and many modern WordPress themes don’t add post format support.
These post formats have separate URLs in WordPress, which search engines can crawl.
You can safely disable those URLs by going to the Advanced » Format Archives tab.
6. Special Pages
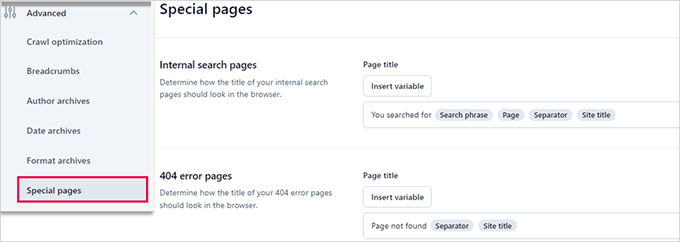
Next up, you’ll want to take a look at the ‘Special pages’ tab.
This is where you can provide an SEO title for the internal pages, like the WordPress search result page or the 404 error page.
7. Media Pages
WordPress creates an attachment page when you upload an image or media file to a post or page.
This page only displays that particular image or media file with little to no information. It wastes your crawl budget, adds low-content pages to your site, and negatively impacts SEO.
So, you might need to disable these pages. To do this, you can navigate to the Advanced » Media Pages tab.
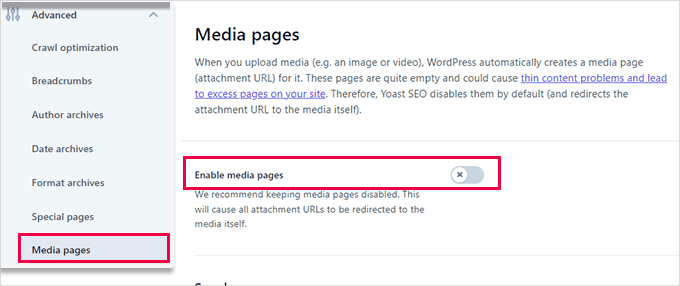
When you disable media pages, Yoast SEO automatically redirects users to the media file instead of the attachment page.
8. RSS
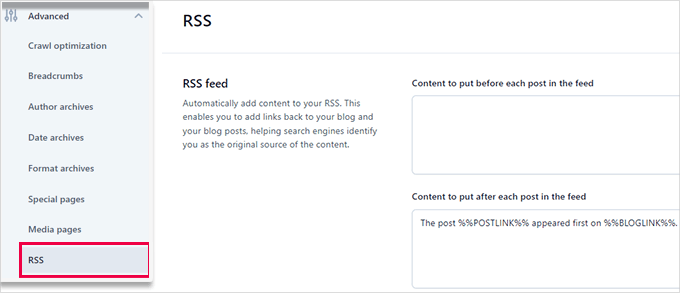
Yoast SEO allows you to add content to RSS feed items. By default, it adds a link to your website at the end of each RSS feed item.
You can leave it as is or add anything you want, and it will appear in your RSS feed.
Expert Tip: RSS feeds let readers subscribe to your blog and read posts in apps like Feedly without visiting your site manually. Plus, optimizing your RSS feed can help prevent content scraping and improve engagement.
For a detailed guide, you can see our expert tips for optimizing your WordPress RSS feed.
Step 8: Exploring Advanced Task Settings in Tools
Yoast SEO comes with built-in tools that allow you to perform advanced tasks. Most beginners may not need to use these tools. However, we will show you each tool and what it does.
First, you need to go to Yoast SEO » Tools to see the available tools.
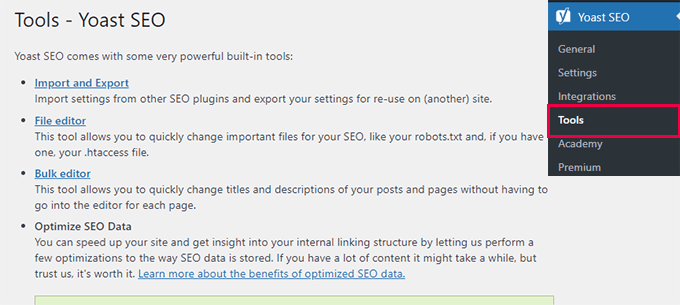
1. Import and Export
We have shown you how to use this tool to import SEO data from other SEO plugins in step 1 of this guide.
However, this tool can also be used in other ways. For instance, you can import and export the Yoast SEO plugin’s settings and use them on a different WordPress blog or website.
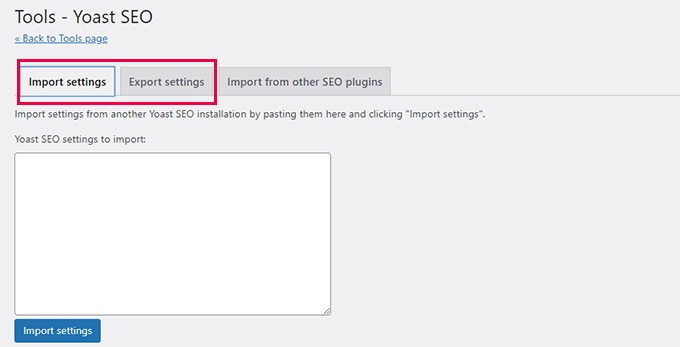
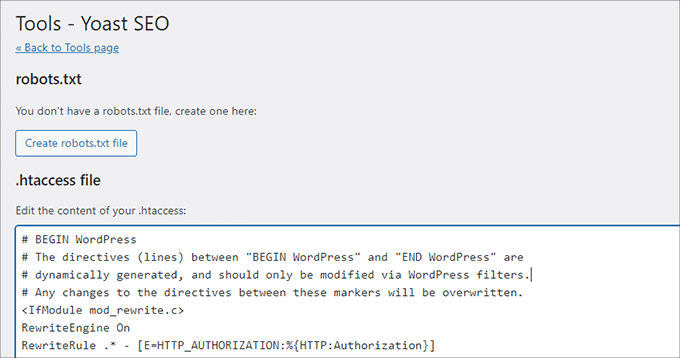
2. File editor
As your WordPress site grows, you may often come across tutorials asking you to add some code to your website’s .htaccess file or robots.txt file.
Both are configuration files and have a huge impact on your website’s SEO. Yoast SEO allows you to edit both files directly from the WordPress admin area.
3. Bulk editor
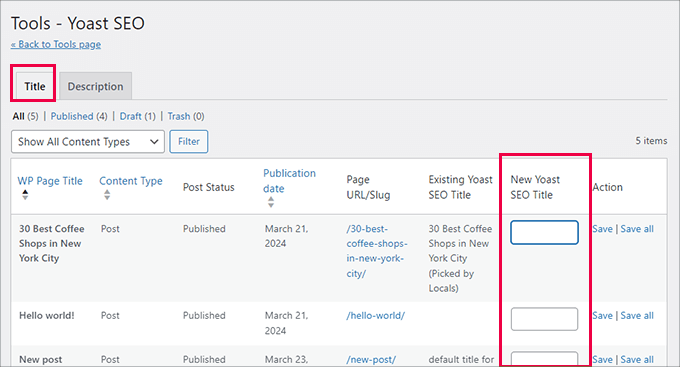
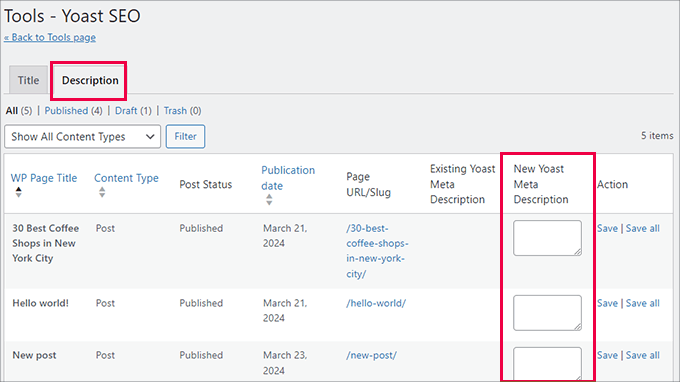
The bulk editor tool in Yoast SEO allows you to quickly add SEO titles and descriptions for all your blog posts and pages.
In the ‘Title’ tab, you will find a blank field in the ‘New Yoast SEO Title’ column where you can add your new SEO title for that blog post.
After that, go ahead and click on the ‘Save’ link to store your changes.
To add descriptions, you must switch to the ‘Description’ tab.
Once again, you can add a description for each blog post or page and save it.
Step 9: Integrating Yoast SEO With Third-Party Platforms
Yoast SEO has partnered up with a couple of premium SEO platforms to provide more features. It includes two free integrations: Semrush and Wincher.
These integrations are turned on by default on the Yoast SEO » Integrations page.
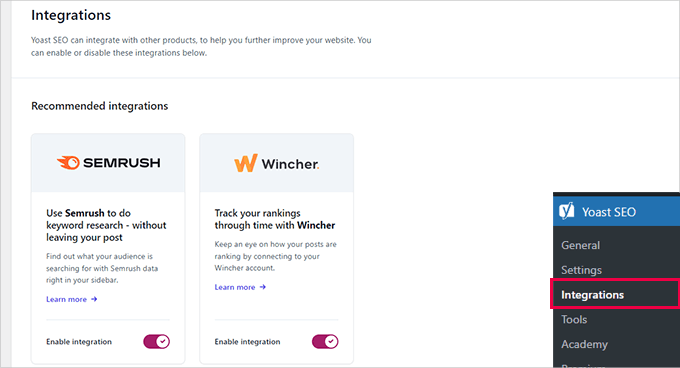
Keep in mind that you will need to create free accounts for both services to use them, and you will only get limited features with a free account.
Below that, you will find integrations with other premium WordPress plugins.
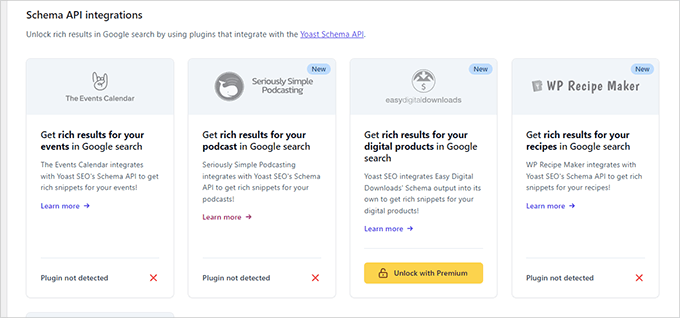
For instance, if you are using Easy Digital Downloads, then you can unlock that integration by upgrading to Yoast SEO Premium.
Step 10: Optimizing Your Posts and Pages With Yoast SEO
Just installing and setting up this plugin is not enough. To maximize the benefits of Yoast SEO, you will need to customize the settings per post.
Let’s look at maximizing the benefits by optimizing each post/page in WordPress.
Simply edit any post or page, and you will notice a new Yoast SEO meta box below the post editor.
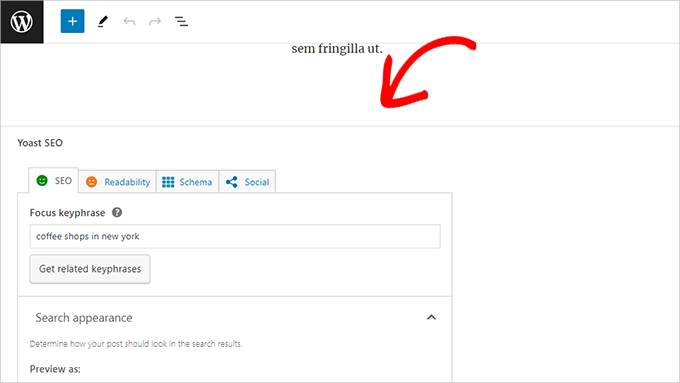
You can start by adding a ‘Focus keyphrase’ or keyword. This is the main keyword that you think your users will type into search engines to find this post.
After that, Yoast SEO will check your post content for SEO and a readability analysis. You can view the analysis to improve your article further.
Sometimes, your post title and your SEO title might not be the same. Every time, you should write a custom SEO description because the excerpt generator only picks up the first paragraph, which might not be the most important one.
Expert Tip: The SEO and readability analysis report in Yoast SEO is quite helpful for improving your content. However, don’t stress yourself out over it, or you might spend more time following the analysis instead of creating better content for your users.
To learn more about on-page optimization, see our article on how to optimize blog posts for SEO.
Step 11: Optimizing Taxonomies for SEO (Categories and Tags)
Just like your post and pages, you can also override the SEO title and meta descriptions for category, tag, and author archive pages.
Simply navigate to Posts » Categories and click the ‘Edit’ link below any category.
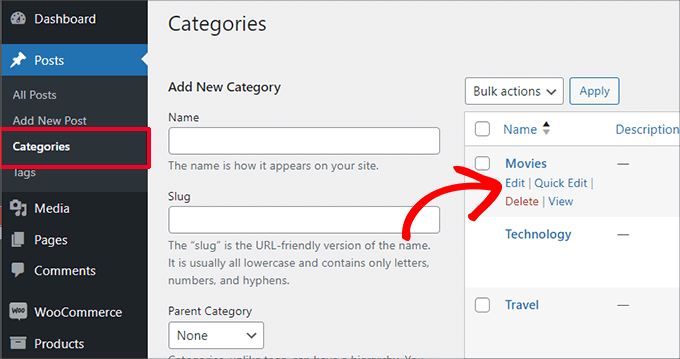
On the category edit page, scroll down to the bottom, and you will see the Yoast SEO meta box.
From here, you can provide an SEO title and meta description for your category.
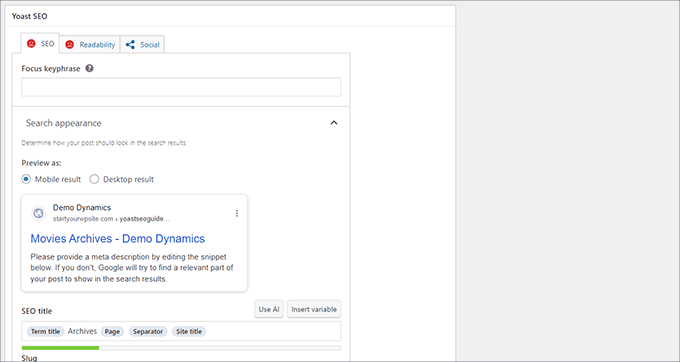
You can do that for all your categories, tags, and custom taxonomy archives.
Related: See our guide on taxonomy SEO to learn more about how to optimize your WordPress category pages.
Step 12: Optimizing eCommerce Products
Yoast SEO provides basic support for online stores and eCommerce websites using WooCommerce.
This allows you to optimize your product pages, just like blog posts and pages.
You will find all eCommerce SEO options when adding a new product to your website. You can also edit and optimize an old product by entering a focus keyword, SEO title, SEO description, and more.
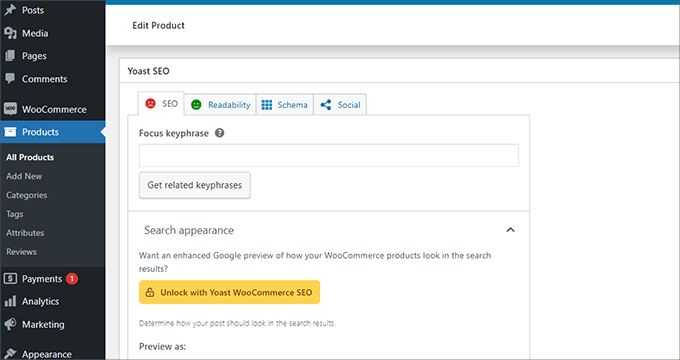
If you are using WooCommerce, then you will need to purchase the Yoast WooCommerce SEO add-on for extended eCommerce features.
Alternative: All in One SEO for WordPress has full eCommerce support even with the basic plan, which starts at $49.
Step 13: Monitoring and Tracking SEO Performance
Now that you have successfully set up Yoast SEO, it is important to start tracking your performance.
First, you need to add your WordPress site to Google Search Console.
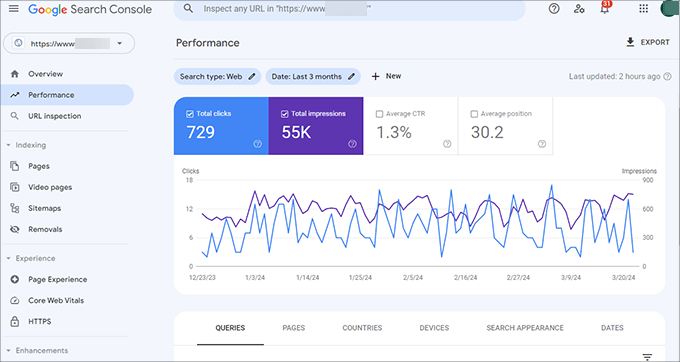
This shows you how your website is doing in search, which keywords you are ranking for, and which pages are not doing so well.
Next, you need to install Google Analytics in WordPress so that you can see your website data from your WordPress dashboard.
The easiest way to do this is by using MonsterInsights. It connects your WordPress site to Google Analytics and shows you how much traffic you are getting, as well as what your users do when they are on your website.
Most importantly, it shows Google Analytics reports inside WordPress in a more user-friendly, intuitive format.
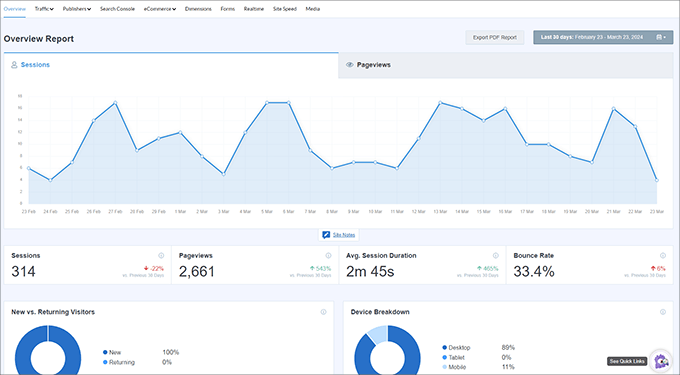
This helps you understand your target audience and make smart decisions to grow your business and improve SEO.
That’s all there is to it!
Yoast SEO is a great WordPress SEO plugin. However, it lacks certain features that could truly help you improve your SEO.
That’s why we recommend using All in One SEO for WordPress instead. We use it on all our brand websites, including WPBeginner. It comes packed with features, including a link assistant, SEO statistics, advanced XML sitemaps, and more.
For more details, you can take a look at our detailed All in One SEO review with pros and cons. You may also be interested in our post about why we switched from Yoast to AIOSEO.
We hope this article helped you set up Yoast SEO properly. You may also want to see our guide on whether premium WordPress SEO plugins are worth it, or see our expert picks of the best WordPress SEO plugins and tools.
If you liked this article, then please subscribe to our YouTube Channel for WordPress video tutorials. You can also find us on Twitter and Facebook.


WPBeginner Staff
No you don’t.
Yongshuo Wang
Very helpful article, I have one question, I linked the XML sitemap to Google webmaster. Do I need to resubmit xml file in Google webmaster once there is new post ?
Ted Lienhart
This is the best guide to setting up a WP plug-in that I have yet seen. Thanks so much!
Shamim Gypsy
Is there any problem, If I set google analytic or webmaster tool with two email address? Because My boss has set google webmaster with his email address, but now I install Yoast SEO tool and I want to set an analytic. Is there any problem, If I do that ?
pramod baviskar
nice post.
my question is breadcrumbs really help in seo and there are tag/categories and had noindex status?
Bryan Richards
Awesome resource! I do have a question though. I followed the steps to adding Breadcrumbs and they don’t show up. Do I need to also plug in the code mentioned on that screen? If so, where? Thanks!
kristl
I’ve followed your tutorial and Yoast is up & running on my site. Quick question…is there a quick and easy way to add a focus keyword, or do I have to manually go through 1100+ posts?
Tennille
Thanks so much for writing this up, it was very helpful for a blogging newbi like me! I was totally lost on the back end of this plugin but you helped get me straightened out!
nicole
This was very helpful! thank you so much!
Amit Tripathi
Thank you so much for this important information really its very imp for wp users
WPBeginner Staff
Deactivate WordPress SEO and Then Reactivate the plugin. See how to fix WordPress SEO Sitemap 404 Error
MArika
Hello, I’ve used the plugin and now just created and added site map to my webmaster tools on google. It created 4 site maps where 3 out of them giving errors
Missing XML tag
This required tag is missing. Please add it and resubmit.
I’m not sure what to do here?
Thank you
Keith Davis
As ever you guys have the best info available.
I’ve started to notice that most of the sites ranking above me are using Yoast SEO so if you can’t beat them..
Thanks for a great step by step setuip guide.
Don Ninh
WordPress SEO does a good job with SEO, but is a little slim on its support for Open Graph and Twitter Cards.
Tony Paull
Hi there
Very helpful article. I have one question. I am trying to verify my site through the XML sitemap section but when I click on the sitemap button I get a Error 404 – page not found. This appears on the home page of the web site.
Any ideas as to what is causing this problem? Many thanks.
Laila
You will find answer here.
https://www.wpbeginner.com/wp-tutorials/how-to-fix-yoasts-wordpress-seo-sitemap-404-error/
WPBeginner Staff
You only need to use % sign once like this:
/%category%/%postname%
hassan1488
ok thanks i can use %title% ? thanks
hassan1488
Hello thanks for this article
can you help me to configur my seo plugin?
i have wordpress premalien like this /%category%/%postname%/
and i configured my plugin like this :
article and page title : %%title%%
taxonomies title : %%term_title%%
auder : %%name%%
and a was used all in one seo
is this right??
Frederick Owen
Thank you so much for writing this, you guys rock. SEO is one of the biggest headaches in the world and your help rocks!
Edmond
Hi,
Thanks for the helpful article. I’ve one question though. On my main website so far I have been using the All In One SEO Pack and I’m thinking of changing it with the Yoast plugin. I used to run meta keywords for the All In One SEO Pack and the Yoast plugin recommends using focus keyword. I wonder what changes I should make now after the transport. When I check out my old articles, I see none of them has keywords now with the new plugin. I have more than 2500 posts published and I wonder what solution could there be (I just an’t imagine going back and changing the keywords for each post).
Thanks a lot in advance for your reply!
WPBeginner Support
Edmond you can use SEO Data Importer plugin.
Admin
Edmond
Thanks a lot for the reply.
I have one more question please. What do you recommend, shall I go back to the old posts and add focus keywords for them too, or there is no point? The matter is that my old posts show only meta keywords now and they have no focus keywords set.
Thanks
Correen
Ahh! Accomplished a biggie today on my website by installing Yoast SEO and ticking through the steps to setting it up via this post. Thank you…again (and again :)) WPBeginner.
Karan Singh
before reading your article, i am using ALL IN ONE SEO plugin but, now its time to change it into yoast plugin. I Hope it will help me to make more money.
Phil
Hi great article, could you confirm i am doing correctly, when i search on google for my site the snippet preview is wrong, when i go into my sites homepage( via wordpress) click home page the snippet preview is correct, so when i type in a search for my site /home it displays correctly.
Any ideas?
WPBeginner Support
Phil, Yes seems like you are doing it correct. Google generates snippets dynamically depending on the user query and positioning of keywords in your articles. So the snippet shown in actual search results on Google could be way different than what you see snippet preview tools.
Admin
Jagdish Kashyap
Thanks..!!
This is really helpful for me
dimitris
Hi. I setup the plugin as you said but i have problem with the RSS. It writes the name of the page twice.
Ashutosh
Wow man, great article. I was using All in One SEO for long time and this time I decided to use Yoast plugin. In order to understand it i searched and found your article. Detailed explanation i must say. Kudos to you. and Thanks for explaining it so wisely.
Mirza Arsal
I have problem with my website ( http://www.enstructive.com ) meta description. I have recently added meta description in Wordpress SEO plugin. But i have checked my website through some meta tag analyzer, they says that your website is missing meta description. Kindly suggest me whats the problem. Or should i add meta description manually?
Advance thanks and appreciation for help.
E.S. Ivy
This was exactly what I needed. I was attempting to go through Yoast’s own post on this and I was totally lost.
I especially loved the statement “…but we will not cover that. Most beginners or even intermediates should not get close to that section.” I need to know what not to touch and mess up!
Thank you!
Bogdan I
Thanks for the tutorial.
It’s very good.
Andrew
Hi and thanks for the great guide!
I had a question that I hope you don’t mind me asking.
When I click on an author’s name, it’s going to a 404 page. Is this something affected by SEO?
As an example: http://talkingbit.com/author/andrew-shemo/
I would of thought it showed all posts authored by me, Andrew Shemo…
WPBeginner Support
Yes it is supposed to display posts written by that particular author. Here are some tips on troubleshooting this issue.
1. If you have WordPress SEO plugin installed and activated go to Seo » Titles & Metas and click on the Others tab. Uncheck the box ‘Disable Author Archives’ if it is checked. Check your site to see if every thing is working fine?
2. Update your permalinks.
Admin
Tina
Hey guys love this and all the other wonderful posts. I have a question though.
I read that the no-index subpages and the force rewrite under titles & metas should be checked and you guys say no. I’m just wondering why the difference and how do I figure out which to do? I’m doing an informal site on weight loss if this helps
Please keep posting all the wonderful informative post. You guys rock!!!
Kailash
Thank you.. Useful settings
DHRUV
Hey i have been working the same instructions but still my website is not visible on even 10th page ,please help
WPBeginner Support
Dhruv WordPress SEO plugin does not guarantee to land your site in the top results. Search engines have their own algorithms to determine which pages they will display in their top results. If you have unique content that offers value to the users and if you build authority by regularly creating great content and spread it around social media. Then you will start noticing improvement in your site’s position in search results. This might take some time, but you will get there.
Admin
Adrian Tawfik
Thanks for the update on this post! I have some work to do. Yoast is amazing and I really recommend their website review. Check out my website and let me know if you think it is setup right:
anand om sharma
thanks for writing this post. this post clarify my doubts about various plugins of seo. thanks alot again
Ahmed
Thank you very much for the useful information, but I don`t understand when editing under Focus Keyword:(Led Light Bulbs) I get red for the URL even though the keyword is in the URL. How do I correct this please?
I look forward to your answer.
Thank you again
kishor
Did u face any problem regarding focus keyword??. whenever i tried to put focused keywords,its shows some result and circle is moving round.any it shows that focused keyword not found in meta,content and page Url,even it was ..i mean that that circle never stooped.Is it prob because of my other plugin ?focused keyword not found ..please replay
Bonny
I just have a question. I just switched from blogger to wordpress and I was just wondering if you should only have one SEO Plugin?
WPBeginner Support
Yes, other wise there could be plugin conflicts
Admin
ravinder singh
Thanks, A very useful information .
Vivek Moyal
I am using the genesis child theme and i dont find that where i have to use the breadcrump by yoast. I am using the genesis breadcrump now. But i want to use the yoast for this. How i can use it over my blog. You can check it here and plz let me know. When i open the editor for page and post i see only a function genesis().
WPBeginner Support
You can ask in the Genesis support forums or WordPress SEO support forum.
Admin
Nishant Thakur
Best tutorial website over the internet so far for Wordpress and it’s plugin.Keep up the good work guys,You Rock!
Pamela Hopkinson
I have just noticed that on the advanced tab in the Yoast plug in it now asks for a Breadcrumb title.
Do I need to complete this? Or will the system automatically use the default settings I used when going through your guide?
Also, as a jobsite http://www.jobsinfoodmanufacturing.co.uk posts / jobs expire on a daily basis, should I go in to the advanced tab and enter our home page url into the 301 redirect field? The posts that have expired are sent to the trash on a very regular basis so I am not sure if the 301 redirect field is required – we are currently setting up a 404 Error message page that will again direct individuals to the Home Page.
Hope the above makes sense,…….this is all very new to me!
Thanks
WPBeginner Support
If breadcrumbs are working fine on your site then you don’t need to update those settings. A 404 error page will result as an error in your Google site crawl. A regular number of pages appearing as 404 could affect your site’s SEO in the long run.
Admin
Pamela Hopkinson
How can I find out if the breadcrums are working okay?
Also due to the nature of the site (it is a jobsite). Is a 301 redirect preferable to a 404 message (in terms of a google crawl and SEO) and if so would I need to not delete expired vacancies? Although would this not lead to the site content being too large?
I really appreciate your help on this.
WPBeginner Support
Why 301 or 404 are your only considerations? Why not just let users land on expired vacancies showing them a notice that this job is expired? You can also choose to display similar jobs on the page which users can then look at?
Pamela Hopkinson
I think I need to clear out the expired jobs on a regular basis, otherwise site content will be too great? Therefore it is not always possible to land on the expired vacancies.
However, when searched for expired vacancies should show a page that details that the vacancy has expired and give the individual a link to our Homepage – this should be available in the next few days.
Kevin
I recently installed WordPress SEO Plugin by Yoast and I have a 100 some old blog posts on a website. Is important to go back and SEO your old blog posts or just do it moving forward?
WPBeginner Support
If you do not have title, meta description for your old posts, we would recommend going back to your posts and edit them. However, if your site is already doing well on search results then you may decide to skip this step.
Admin
Pamela Hopkinson
Thank you for your informative and very weasy to follow post.
I have not been using many of the enhanced Yoast SEO plugin features on the website as I had no idea how to use them.
I have just followed your step by step guide and feel a lot more confident and I have tailored the sections to our site and hope to see an improved ranking on category searches in the near future.
Thank you once again.
Joseph Nirmal
I started a news niche blog. I need meta keywords. Yoast SEO is not recommended meta keywords. If I use meta keywords in yoast it affects my organic traffic and page ranking in google or not?
Connal Vickers
Awesome site – thank you. Your guide to Yoast SEO made a lot of things clear that a lot of late nights had not.
Deidre
Thank you so much for informative post.
I can not located this step in Yoast or in Page or Post edit screens?
Step 11: Customizing and Maximizing the Benefit
Where do I find this?
WPBeginner Support
You will find this not on the plugin’s settings screen but in WordPress post editor while writing or editing a post.
Admin
Pat Fortino
BTW: when I said wp-engine does not allow plugin, I meant google xml sitemaps.
Jeff Guynn
Thanks for your post on proper Yoast plugin settings. An update was needed, as most posts on this topic are pretty old, and many updates have happened in the interim. I have some questions about some difficulties people experience with Yoast.
For starters, I’m aware that you address fixing the sitemap 404 errors here:
https://www.wpbeginner.com/wp-tutorials/how-to-fix-yoasts-wordpress-seo-sitemap-404-error/
I’m hearing current rubmblings of dissatisfaction with Yoast along the lines found at this reputable source (a Genesis theme user):
http://wpsites.net/seo/genesis-seo-settings-guide/
In particular, he points out the following reasons for preferring Genesis native SEO over Yoast (and this from a long standing Yoast fan):
> Google Web Master Tools displayed hundreds of URL errors which i have been told where caused by the sitemap.
> There are also posts written about sitemap errors experienced when using Yoast’s sitemap which i read about on the forum and other blogs about WordPress.
Curious if you could speak to these issues and offer some additional guidance if necessary.
Thanks, Jeff.
WPBeginner Support
Jeff, the ability to choose or write your own solutions is what makes open source software so wonderful in the first place. We are using WordPress SEO on our websites without any issues for years now. Her is why we think that WordPress themes should not have SEO options.
Admin
Zimbrul
Do you recommend using the sitemap feature within the plugin or use a dedicated plugin like Google XML Sitemaps?
Pat Fortino
RE google xml sitemaps. Since it requires installing another plugin, I’d recommend using Yoast’s sitemaps. Also, wp-engine does not allow this plugin on their servers due to performance issues.
WPBeginner Support
We recommend sitemaps feature in WordPress SEO.
Admin
James McWhorter
Nice post, Syed.
One question – why check the meta keywords option when meta keywords are no longer recognized by Google? Even Yoast does not recommend it.
WPBeginner Support
Even though they are not recognized and not recommended, but there is no harm in adding meta keywords. Apart from Google, there are other search engines and web crawlers that could benefit meta keywords.
Admin
Chinmay Rajyaguru
I am agree with ‘WPBeginner Support’ reply and want to remind you, ‘Mr.Matt cutts said Google will not udpate Page Rank and End of year – Google updated.’ No-one know, what will happen in future thus, follow -> WPBeginner Support.
Really very useful. Thank you man!