Securing your WordPress website is essential in today’s digital world. One of the best ways to protect your site from hackers is by using the Wordfence security plugin.
Wordfence is a widely used plugin that offers robust security features to keep your site safe. It helps block malicious traffic and provides tools for monitoring your website’s security status.
While we use Cloudflare to protect our site, we’ve conducted thorough research to review Wordfence for this article. In the following sections, we’ll walk you through the simple steps to install and set up the Wordfence security plugin.

What Is Wordfence? How Does It Protect Your WordPress Site?
WordPress security is one of the biggest concerns for website owners since one hack can lead to your entire site shutting down or even potentially stealing customer data.
That’s where Wordfence comes in.
Wordfence is a WordPress security plugin that helps you protect your website against security threats like hacking, malware, DDOS, and brute force attacks.
It comes with a website application firewall, which filters all traffic to your website and blocks suspicious requests.
This plugin also has a malware scanner that scans all your WordPress core files, themes, plugins, and upload folders for changes and suspicious code. This helps you clean a hacked WordPress site.
The basic Wordfence plugin is free, but a premium version is available. This version gives you access to more advanced features, such as country blocking, firewall rules updated in real-time, scheduled scanning, etc.
With that in mind, let’s see how to install and easily set up Wordfence for maximum security.
💡 Has your WordPress site been hacked? Our experienced security experts can help you restore it quickly and safely. We’ll clean up malicious code and files, ensuring your sensitive data stays protected. With over a decade of experience, we know exactly how to do this. Get started with our reliable Hacked Site Repair service today!
How to Install and Set Up Wordfence in WordPress
The first thing you need to do is install and activate the Wordfence Security plugin. For more details, see our step-by-step guide on how to install a WordPress plugin.
Upon activation, the plugin will add a new menu item labeled Wordfence to your WordPress admin bar. Clicking on it will take you to the plugin’s settings dashboard.
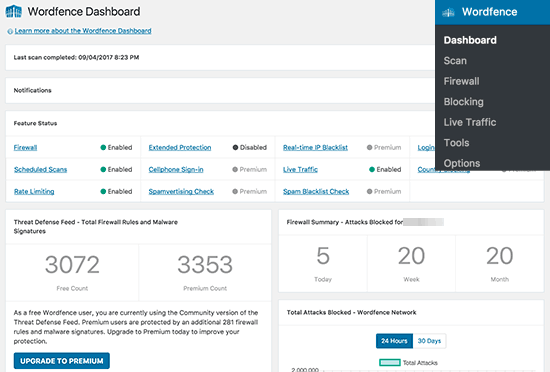
This page shows an overview of the plugin’s security settings on your website. You will also see security notifications and stats like recent IP blocking, failed login attempts, total attacks blocked, etc.
Wordfence settings are divided into different sections. The default settings will work for most websites, but you still need to review and change them if needed.
Here’s an overview of all the steps we’ll cover in this guide:
Ready? Let’s start by running a scan first.
Scanning Your WordPress Site Using Wordfence
To get started, let’s head over to Wordfence » Scan and then click the ‘Start New Scan’ button.
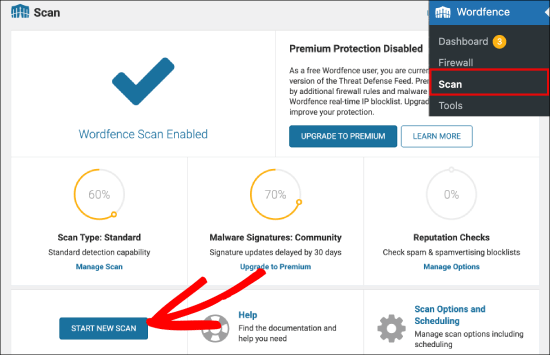
Wordfence will now start scanning your WordPress files.
This scan will look for changes in file sizes in the official WordPress core and plugin files. It will also look inside the files to check for suspicious code, backdoors, malicious URLs, and known patterns of infections.
Typically, these scans need a lot of server resources to run.
The good news is that Wordfence does an excellent job of running the scans as efficiently as possible. The time it takes to complete a scan will depend on how much data you have and the server resources available.
Also, the progress of the scan will be shown in the yellow boxes on the scan page. Most of this information will be technical, but you don’t need to worry about it.
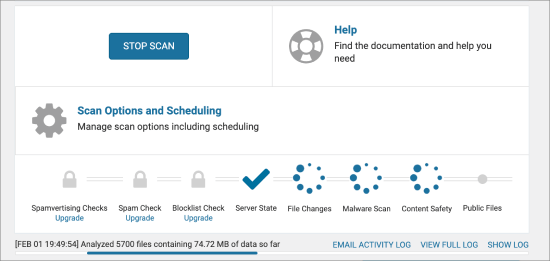
Once the scan is finished, Wordfence will show you the results.
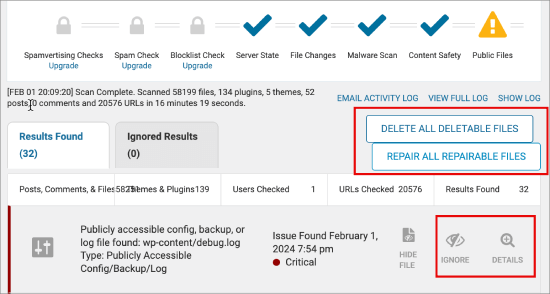
It will notify you if it finds any suspicious code, infections, malware, or corrupted files on your website. It will also recommend actions you can take to fix those issues.
In this example, you can see that it found 32 critical errors on the site.
Wordfence has ‘Delete All Deletable Files’ and ‘Repair All Repairable Files’ buttons. These buttons let you either delete all the files or repair all the files, causing the errors in one fell swoop.
Next to each error, you can click ‘Details’ to learn more or ‘Ignore’ to disregard it.
Note: The free Wordfence plugin automatically runs full scans on your WordPress site once every 24 hours. Meanwhile, the premium version of Wordfence allows you to set up your own scan schedules.
Setting Up Wordfence Firewall
Wordfence comes with a website application firewall or a PHP-based application-level firewall.
The Wordfence firewall offers two levels of protection. The basic level, which is enabled by default, allows the Wordfence firewall to run as a WordPress plugin.
This means that the firewall will load with the rest of your WordPress plugins. This can protect you from several threats, but it will miss out on threats that are designed to trigger before WordPress themes and plugins are loaded.
The second level of protection is called extended protection. It allows Wordfence to run before WordPress core, plugins, and themes. This offers much better protection against more advanced security threats.
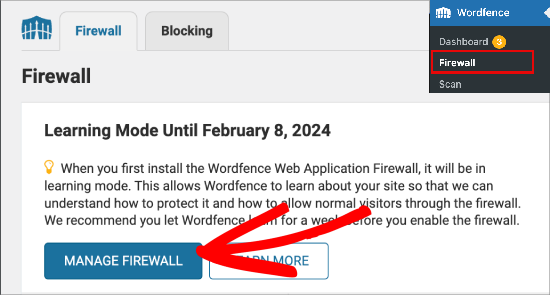
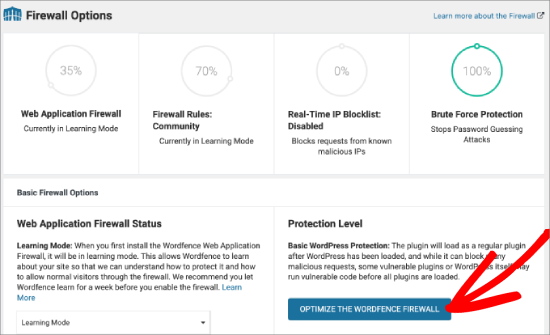
To set up the extended protection, you’ll first need to navigate to Wordfence » Firewall page and click ‘Manage Firewall.’
Under ‘Protection Level,’ let’s select ‘Optimize The Wordfence Firewall.’
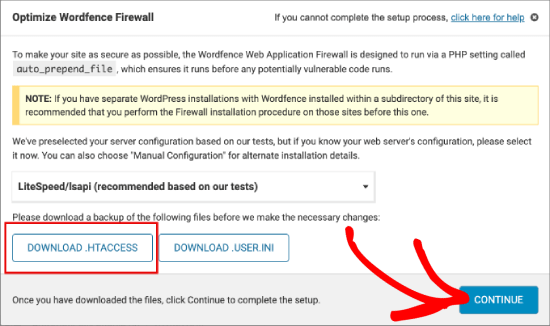
Wordfence will now run some tests in the background to detect your server configuration. If you know that your server configuration is different from what Wordfence has selected, then you can select a different one.
Next, Wordfence will ask you to download your current .htaccess file as a backup.
You can click on the ‘Download .htaccess‘ button. After downloading the backup file, go ahead and click the ‘Continue’ button.
Wordfence will now update your .htaccess file, allowing it to run before WordPress.
You will then be redirected to the firewall page, where you will see your protection level as ‘Extended protection.’
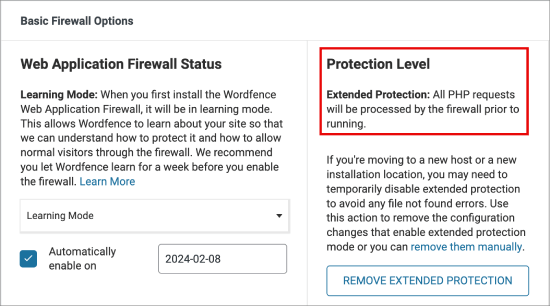
You will also notice a ‘Learning Mode’ button.
When you first install Wordfence, it attempts to learn how you and your users interact with the website to make sure that it doesn’t block legitimate visitors.
After a week, it will automatically switch to ‘Enabled and Protecting’ mode.
Monitoring and Blocking Suspicious Activity Using Wordfence
Wordfence shows a very useful log of all requests made to your website. You can view it by heading over to Wordfence » Tools. Then, you’ll want to make sure you’re in the ‘Live Traffic’ tab.
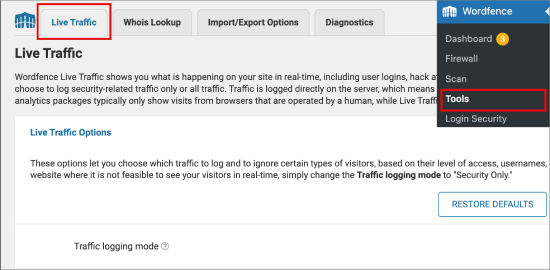
Here, you can see the list of IPs requesting different pages on your website.
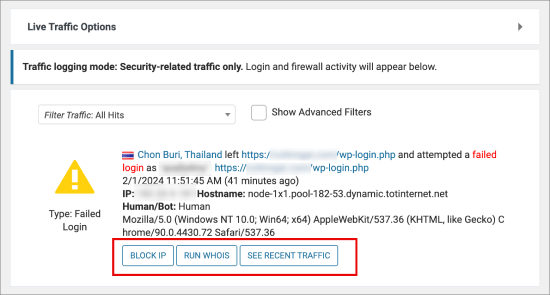
For example, you’ll spot any suspicious activity, like failed login attempts from unknown users. Under each item, you can automatically:
- Block IP to restrict them from your site.
- Run WHOIS lookup on them.
- Find out more information about the activity using the ‘See Recent Traffic’ option.
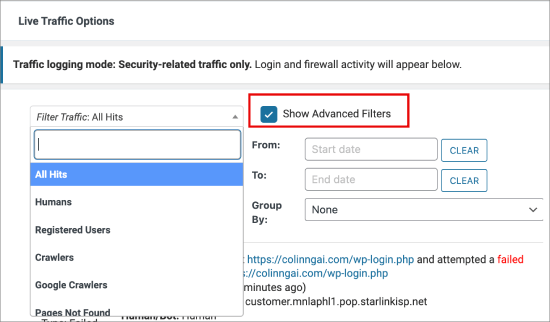
If you want to filter activity by date and type of traffic, you can check the ‘Show Advanced Filter’ option.
You can filter traffic, including humans, registered users, crawlers, Google crawlers, logins and logouts, locked-out traffic, traffic blocked by firewalls, and so on.
You can block individual IPs and even full networks on this page.
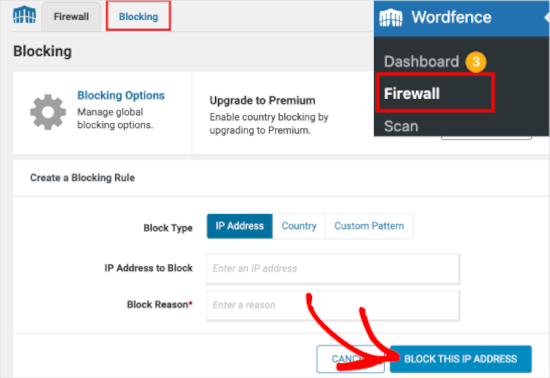
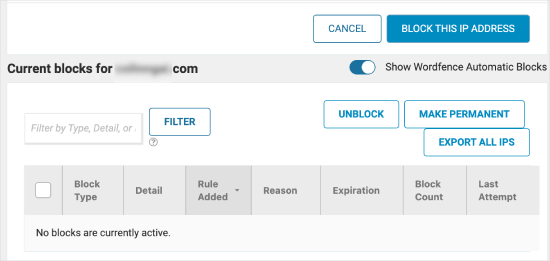
You can also manually block suspicious IPs by going to Wordfence » Firewall and clicking the ‘Blocking’ tab. Here is where you can create blocking rules based on IP address, country, or custom pattern.
Then click ‘Block This IP Address’ so the rule takes effect.
Below that, you’ll see an entire list of people you’ve blocked.
It’ll also show the rules, reasons, and other details about each ban.
Advanced Settings and Tools in Wordfence
Wordfence is a powerful plugin with lots of useful options. You can visit the Wordfence » All Options page to review them.
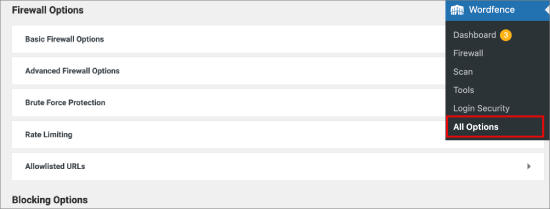
Here, you can selectively turn features on and off. You can also enable or disable email notifications, scans, and other advanced settings.
Wordfence vs Sucuri – Which One Is Better?
Now, some of you will probably be wondering, how does Wordfence stack up against Sucuri? Sucuri is another popular website security suite that comes with a website application firewall, malware scanner, and removal.
Both Wordfence and Sucuri are great choices to improve your WordPress security. However, we believe that Sucuri has some features that give it a slight edge over Wordfence.
One of them is the firewall.
Wordfence WAF is an application-level firewall, which means it is initiated on your server. On the other hand, the Sucuri website firewall is a DNS-level firewall. This means all traffic to your website goes to their cloud proxy before reaching your website.
For a complete review, you can check out our comparison article on Wordfence vs Sucuri – Which One is Better?
Note: At WPBeginner, we switched from Sucuri to Cloudflare to better meet our growing needs. One of the reasons was that Cloudflare offers a faster and larger CDN network, which improves page load times for our global audience. We also needed more control over firewall rules to defend against sophisticated attacks. To learn more, you can read our Sucuri vs CloudFlare (Pros and Cons) – Which One is Better?
We hope this article helped you learn how to install and properly set up Wordfence on your website. You may also want to check out our expert list of top reasons why WordPress sites get hacked or our guide on how to stop and prevent a DDoS attack on WordPress.
If you liked this article, then please subscribe to our YouTube Channel for WordPress video tutorials. You can also find us on Twitter and Facebook.


Shaxid Rahman
Thanks for your great explanation. It’s really easy to understand the process! I really appreciated.
WPBeginner Support
You’re welcome, glad our guide was helpful
Admin
Dilshad
can i use maxcdn and wordfence? does wordfence application level firewall disturb maxcdn?
Achmad
Can I block blog traffic from unwanted boots using wordfence?
Anondi
Hello,
I have used wordfence in my wordpress site (version 4.5.9),but it’s firewall maybe blocking google bot for crawling because after submitting sitemap it’s showing that error(Network unreachable:http error 503).what can be settings for this issue?
Anand Kumar
Thanks for guiding us
Sue
I am confused as to why the you would even compare the paid Sucrui firewall to the free Wordfence firewall. Going one step farther why even compare them at all, when the main focus according to the title of the article is how to set up and install Wordfence in WordPress.
It is sad as the only reason I can think of is that you make a referral few with Sucrui as your review article plainly states. I think you would need to add this here too to be in compliance with proof of affiliation.
Editorial Staff
Hey Sue,
Sucuri and WordFence are both security solutions and rather popular ones. We have gotten several emails through our contact form asking how to use Wordfence and how does it compare to Sucuri (the product that we use and recommend). Like all articles on WPBeginner, this one was also user suggested.
We only recommend products that we use ourselves (Sucuri is one of them). A lot of WordPress companies have an affiliate / referral program. As a WordPress publisher, we use those referral links instead of naked regular links, so we can avoid having to sell ads on the website with tons of tracking scripts. The revenue earned allows us to continue providing free WordPress resources for the community.
Having that said, we only recommend products that we use ourselves or would use if needed for a specific use-case. At WPBeginner there are thousands of pages, and there is a FTC disclosure link at the bottom of every page.
Admin
Sue
Thanks for your explanation. Make sense now why the comparison even though the Sucuri firewall is a paid feature.