Getting constructive feedback on your articles is important for improving quality and engagement.
Whether you are a seasoned WordPress user or just starting, the ability to collect and learn from feedback can boost your content strategy by helping you identify any areas of improvement for your articles.
Over the past couple of years, several of our partner brands have been using the UserFeedback plugin to gather insights from their customers and site visitors. They have shared that this feedback has helped them improve their content and design, making their sites more user-friendly.
In this article, we will show you how to get quick feedback on your articles in WordPress.
Why Ask For Quick Feedback on Your WordPress Posts And Pages?
Most WordPress websites encourage users to leave comments and provide feedback on blog posts and articles.
However, fear of judgment, lack of time, or preferring to use social media prevents many users from doing this. Readers may also not know what exactly to say in their comments.
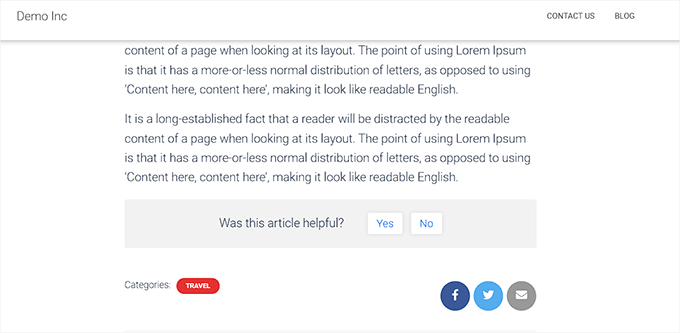
By using ‘was this helpful’ WordPress plugins, you allow users to easily give their feedback on whether your content was useful to them.
These plugins usually display a thumbs-up/thumbs-down or a Yes/No button at the end of your WordPress post or pages that visitors can use to rate your content.
You can even use WordPress survey plugins to create a quick survey so that visitors can provide feedback.
This helps increase user engagement on your WordPress blog and shows the users that their feedback is valued. It also shows that you, as the website owner, are actively working to enhance the user experience.
Using feedback plugins can also improve your website’s SEO rankings by reducing bounce rates, as users are more likely to stay on a website that has useful content.
Having said that, let’s see how you can easily get quick feedback for your WordPress articles.
We will cover two methods in this post, and you can use the quick links below to jump to the method you want to use:
Method 1: Add Quick Feedback Using a Plugin (Easy)
If you are looking for an easy way to add quick feedback to your WordPress posts and pages, then this method is for you.
First, you need to install and activate the Was This Helpful? WordPress plugin. For detailed instructions, see our beginner’s guide on how to install a WordPress plugin.
Upon activation, the plugin will automatically start working out of the box and add a ‘Yes’ and ‘No’ option next to the ‘Was this article helpful?’ question at the end of your posts and pages.
Users visiting your site can now easily rate your content using these buttons.

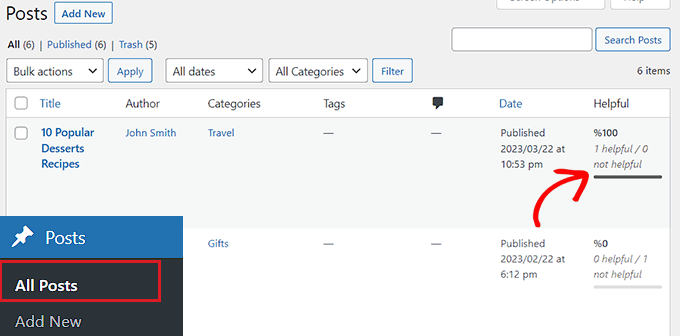
To view the feedback on your WordPress posts, you will need to visit the Posts » All Posts page from the WordPress admin sidebar.
Once there, you will see the ‘Helpful’ column added to the right side of the screen.
From here, you will be able to monitor the ratings for your content and find out the number of people who have clicked the Yes and No buttons on your posts.
Method 2: Add a Survey for Quick Feedback Using UserFeedback (Recommended)
If you want to add a quick survey to your pages and posts to collect user feedback, then this method is for you.
For this, you can use the UserFeedback plugin. Before recommending it to you, we tested the tool on our demo website and found it to be super intuitive, making it easy to add visually appealing feedback prompts. To learn more, see our UserFeedback review.
First, you need to install and activate the UserFeedback plugin. For more instructions, you may want to see our step-by-step guide on how to install a WordPress plugin.
Note: The UserFeedback plugin also has a free version that you can install. However, we will be using the Pro plan for this tutorial to unlock more features.
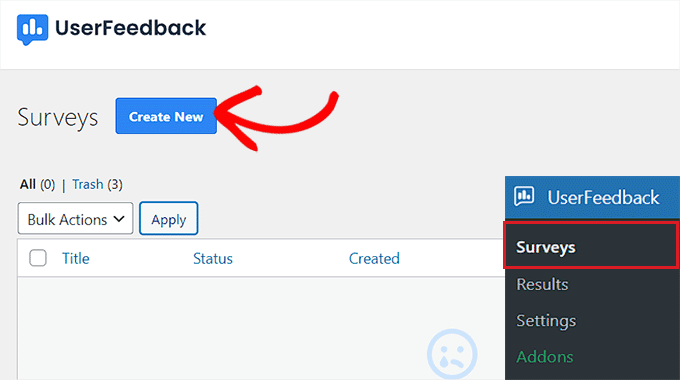
Upon activation, head over to the UserFeedback » Surveys page from the WordPress admin sidebar and click the ‘Create New’ button.
This will take you to the ‘Select a Template’ page.
From here, you can use any of the pre-made templates as surveys on your website, including restaurant menu surveys, WooCommerce store surveys, phone lead forms, post-purchase reviews, and more. You can also ‘Start From Scratch’ and design your own survey.
For this tutorial, we will be using the Content Engagement template because we want to add a quick feedback survey on our site, asking visitors how we can improve our content.
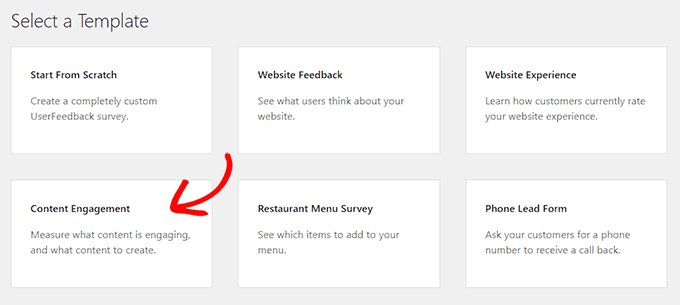
Just click on the survey template. This will direct you to a new page where you can start creating your survey.
By default, the Content Engagement template already comes with a question asking users if they found the content engaging.
However, you can easily change this by typing a question of your choice, like ‘Did you like this article?’ into the ‘Question Title’ field.
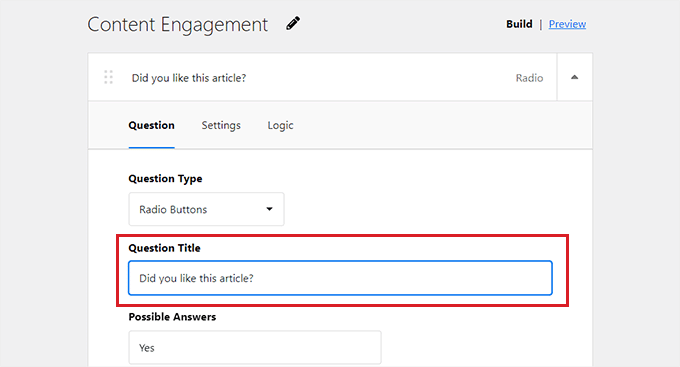
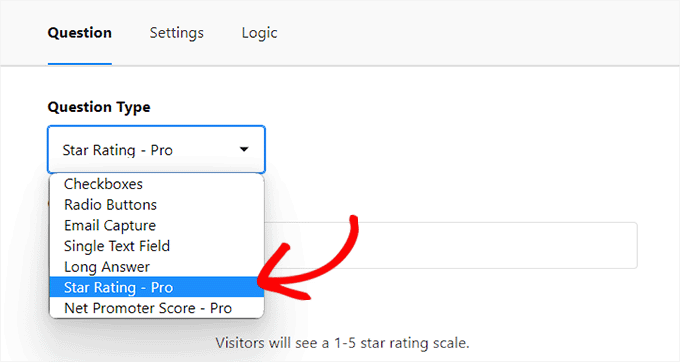
Once you have done that, you need to choose an answer mode for users from the ‘Question Type’ dropdown menu.
For instance, if you want users to provide a star rating for your article, then you can choose the ‘Star-Rating’ option.
You can also display checkboxes, radio buttons, email capture options, single text fields, long answers, and Net Promoter Scores as modes of answers.
If you choose the radio button or checkbox, you will have to provide the different answers for the survey question under the ‘Possible Answers’ option.
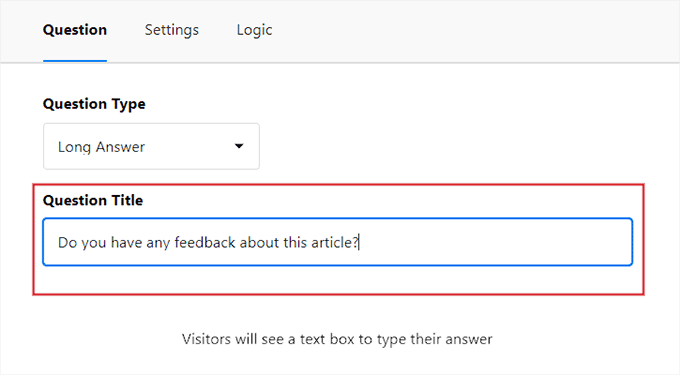
After that, scroll down to the next question that already comes in the Content Engagement template, asking users the kind of content they’d like to see created.
You can change that question to ask users to provide their feedback on the article they just read. This way, users will first get to rate your content, and then they can provide any feedback that they may have for the article.
For this question, make sure to choose the ‘Long Answer’ option from the ‘Question Type’ dropdown menu so that users can easily provide descriptive feedback on your website.
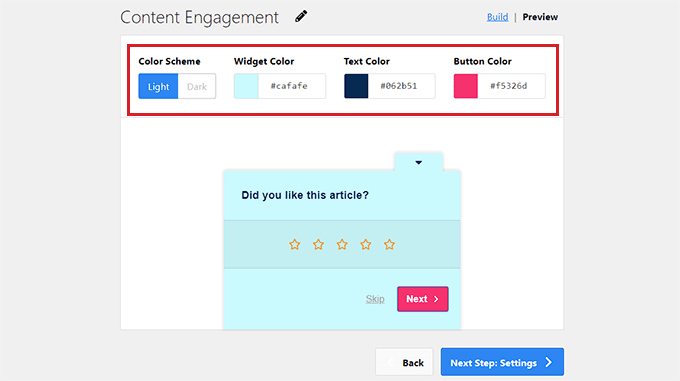
Once you have done that, just click the ‘Preview’ button at the top to customize the survey widget. From here, you can select the background color, text color, and button color.
Once you are done, click the ‘Next Step: Settings’ button to move forward.
This will take you to the ‘Settings’ page, where you can start by scrolling down to the ‘Targeting’ section.
From here, you can select the device types where the survey will be displayed, including desktop, mobile, and tablet.
After that, you must choose the pages where the survey will be displayed. If you select the ‘All Pages’ option, then the quick feedback survey will be shown across all the posts and pages on your website.
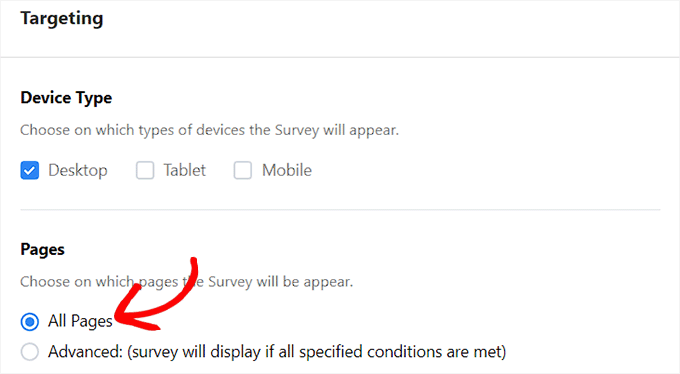
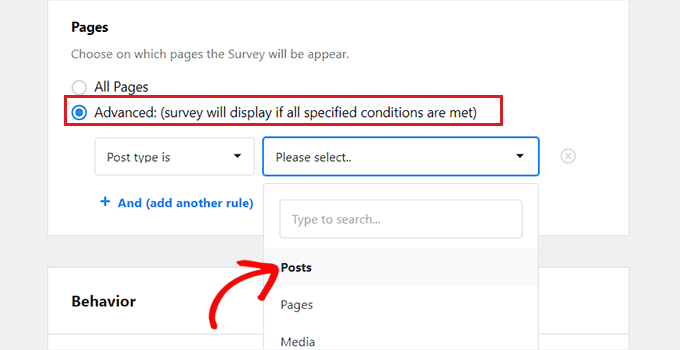
However, if you want to limit the survey to certain pages, then you can select the ‘Advanced’ option.
Once you do that, you must specify the conditions for the survey display from the dropdown menu.
For instance, if you want to only display the survey on posts, then you can select the ‘Post type is’ option from the dropdown menu on the left. After that, pick the ‘Post’ option from the dropdown menu on the right.
Now, your quick feedback survey will only be displayed on WordPress posts.
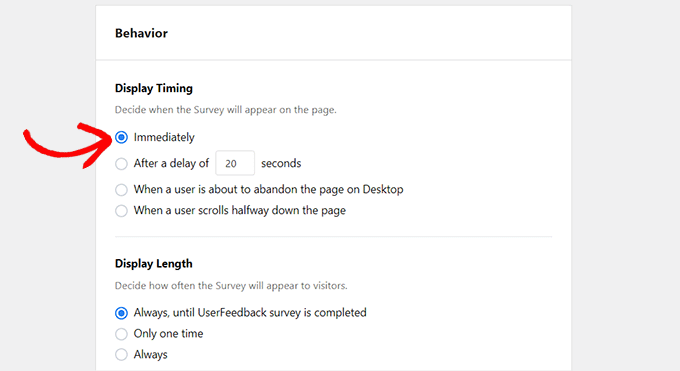
Next, scroll down to the ‘Behavior’ section. Here, you can configure the display timing and length of your survey.
You can even schedule a run time for your survey by selecting the month and date you want the survey to end.
After you are done, simply click the ‘Next Step: Notifications’ button to move ahead.
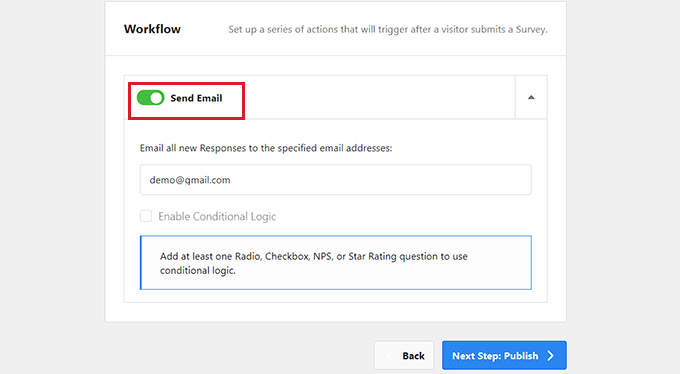
On the next screen, you can start by toggling the ‘Send Email’ switch to active if you want to receive an email notification every time a user provides feedback on your website.
Next, provide the email address where you want to receive the notifications and click the ‘Next Step: Publish’ button.
On the new screen, scroll down to the ‘Publish’ section and switch the ‘Survey Status’ to ‘Publish’.
If you want, you can also schedule your survey for later by toggling the ‘Schedule for Later’ switch to active and providing a publication date and time.
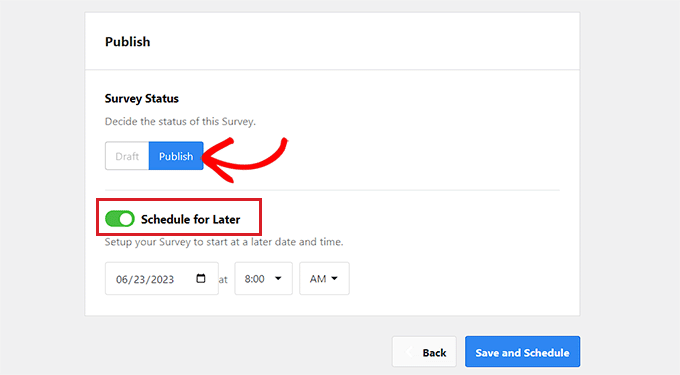
Finally, click the ‘Save and Schedule’ or ‘Save and Publish’ button to store your changes.
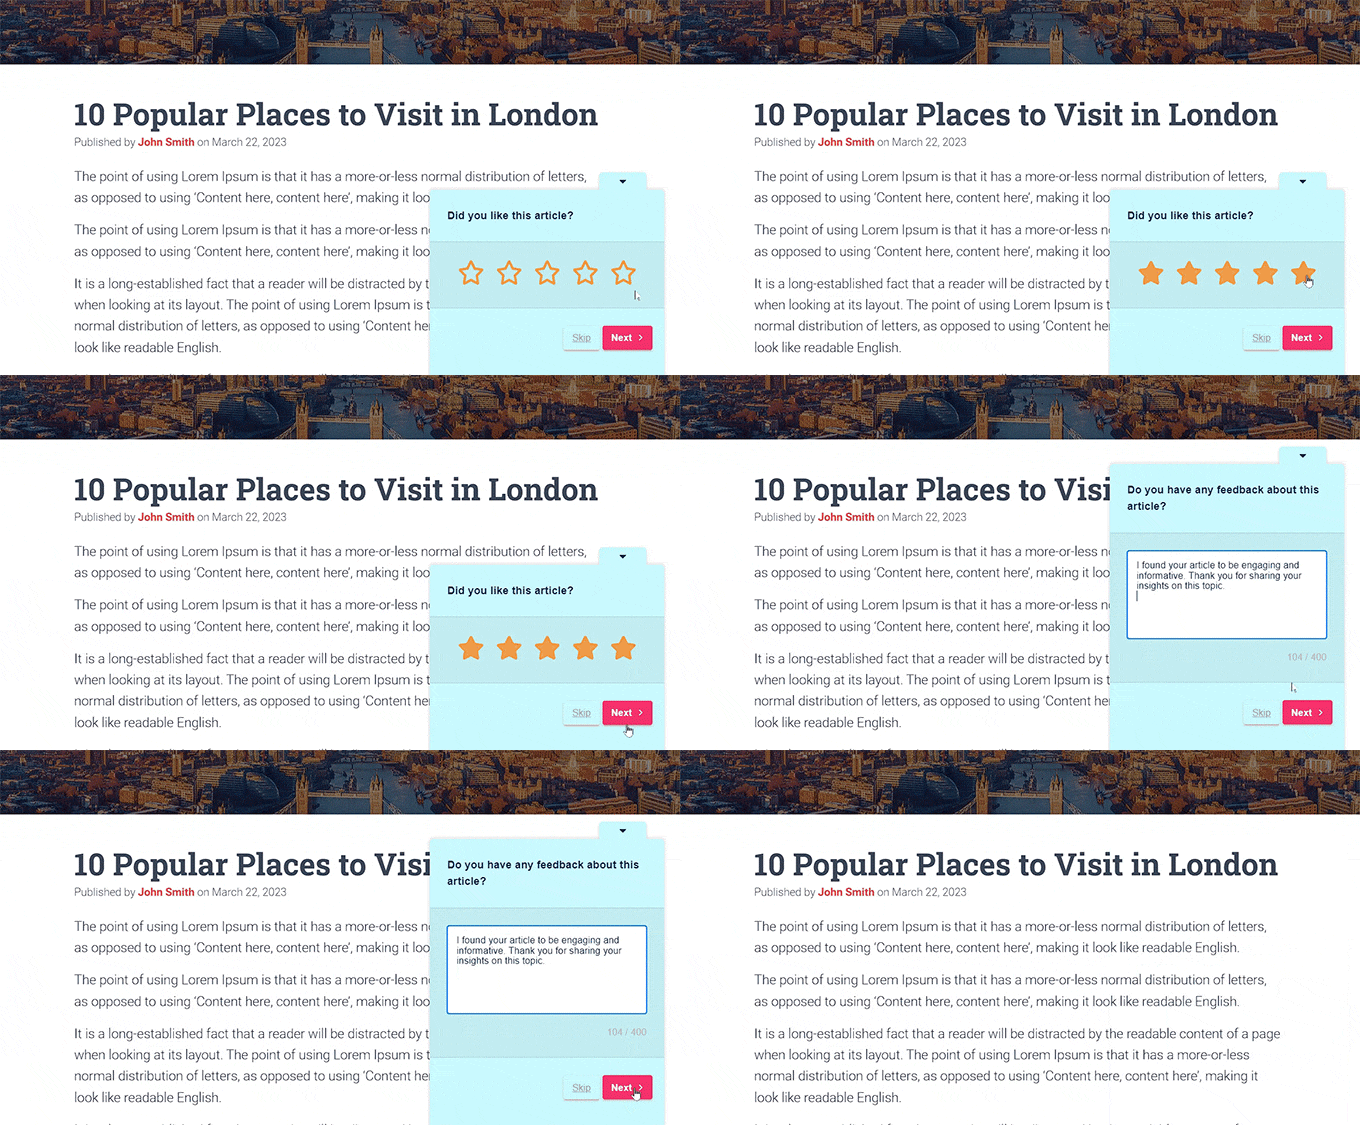
Now, you can visit your website to check out the quick customer feedback popup in action.
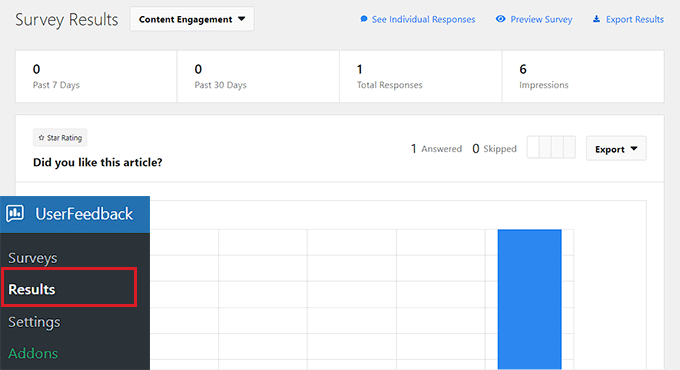
Once your survey has been published, you can see the user submissions by visiting the UserFeedback » Results page from the WordPress dashboard.
From here, you will be able to check out the number of responses, impressions, and all the answers provided by your visitors.
This can help you improve the overall content of your WordPress website.
Bonus: Add Interactive Polls on Your Website
Apart from using a survey, you can also create interactive polls on your WordPress site to gather feedback from users. By asking targeted questions, you can gain valuable insights into customer preferences and identify areas for improvement in a user-friendly way.
Other than that, polls can also help you measure user satisfaction, gather input for new ideas, and build a community around your brand.
You can easily create polls on your website using WPForms. It is the best WordPress contact form plugin on the market that comes with a drag-and-drop builder, premade templates, and amazing spam protection.
For more information, see our complete WPForms review.

The plugin also has a Survey and Polls addon that adds a poll form template.
You can then easily configure this template in the form builder with blocks in the left column. Once you do that, you can embed it to your website using the WPForms block.
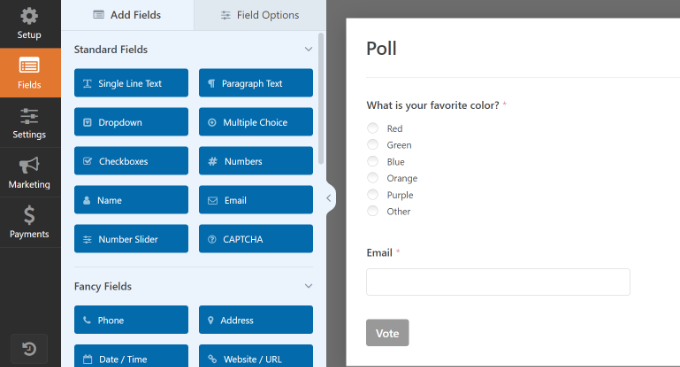
This poll can then help you gather information about user preferences and improve engagement on your website.
For detailed instructions, see our tutorial on how to create an interactive poll in WordPress.
We hope this article helped you learn how to get quick feedback on your articles in WordPress. You may also want to see our tutorial on how to easily add a client feedback form in WordPress and our top picks for the best WordPress form builder plugins.
If you liked this article, then please subscribe to our YouTube Channel for WordPress video tutorials. You can also find us on Twitter and Facebook.


Dennis Muthomi
I have tried using “Was This Helpful?” type feedback prompts on my blog posts in the past, but found that engagement was very low and did not provide much useful information.
On my experience running an online store as well, I’ve found user feedback works much better when placed after the checkout process rather than inline. This avoids disrupting the user flow.
Jiří Vaněk
I have a very similar experience where placing feedback at the end of an article in the form of stars and ratings seemed very unsuccessful. Out of 100 users, only about one would provide feedback. What worked for me was asking for feedback when the user was about to leave the site, just as they were really about to exit. This increased my “conversions” by about 500%, which still isn’t a lot compared to the original number, but it’s still a success for me.
Ralph
Socres like helpful or not / 1-5 stars and similars are good to have as they can help us, but it is hard to get these votes. I feel blogging is not what it is used to be and people are more and more on the side of just lurking in and going out. That’s what internet evolved into and we have to adapt.
Other than that method I set trigger in google analytics that activate when someone scroll 25 / 50 / 75 /100% of article. This also helps to find what is a problem, and why people leave after only half. Maybe I used bad H2? Or maybe answear is there and rest is not so important? For me it is importnat to have more than 1 indicator.
Jiří Vaněk
After using Optin Monster for some time, I found it useful to create a campaign. When the reader reaches 90% of the content of the article, a small pop-up window will be shown asking them to rate it. This method greatly increased the number of feedback from readers.
Jiří Vaněk
The problem with these plugins is that despite being time-consuming for users, just requiring a single click, people don’t use them. On my website, there’s a rating under each article, and approximately every 500 users will actually rate it. It’s not very effective, unfortunately.
WPBeginner Support
While you can’t always expect a high number of submissions you can still learn from what feedback is given and you may want to also consider adding requests to review your content to try to increase the number of users who offer feedback.
Admin
Jiří Vaněk
In the end, I solved it with a campaign in Optin Monster, where users who reach the end of the article are asked in a popup window for a rating. This form has worked a lot better for me and I’ve gotten a lot more feedback because of it.
RoXXie SiXX
Your article needs an update. The “Was this helpful?” plugin wasn’t updated for over a year.
So yeah… No, your article wasn’t helpful. Seems like you even can’t follow the simple rules for re-posting, checking if all links are even up-to-date.
*shakingmyhead*
WPBeginner Support
For your concern with how recently the plugin was updated, we would recommend taking a look at our article below!
https://www.wpbeginner.com/opinion/should-you-install-plugins-not-tested-with-your-wordpress-version/
Admin
Angad
Article needs an update. Article Feedback Plugin hasn’t been tested with the latest 3 major releases of WordPress.
WPBeginner Support
Thank you for your feedback but for that specific warning, you would want to take a look at our recommendations in our article below:
https://www.wpbeginner.com/opinion/should-you-install-plugins-not-tested-with-your-wordpress-version/
Admin
Nakida
Coolbeanz! Thanks for so much needed info! You are appreciated!! After real!
Rob
I love this… I’m going to use it on the site I’m building now
Ray Hopkins
I was unable to load the Article Feedback plugin. It does not have a “.zip” file ending. In attempting to upload, WP treats it as a file folder.
Ray
Ray Hopkins
Was finally able to get it loaded after all.
Liew CheonFong
That’s a brilliant idea! Thanks for sharing!