Getting 404 errors can be a nightmare for WordPress website owners. They can also annoy visitors and hurt your site’s search engine rankings.
So, when 404 errors happen, taking action quickly is essential. ⚠️
Email alerts about these errors can help you react as fast as possible. And if you can swiftly address problems, you can reduce any negative impact on your site and its users.
In this article, we’ll explain how to set up email alerts for 404 errors in WordPress.

What Is a 404 Error, and Why Is It Important to Fix It?
A 404 error means a page on your site cannot be found. It happens when someone tries to visit a page that doesn’t exist, such as if a page is deleted or the URL contains a typo.
Additionally, these errors are especially common when moving from WordPress.com to self-hosted WordPress.org or switching domains.
These errors can frustrate your visitors. When they hit a 404 error, they might think your site is broken and leave, reducing its traffic.

Search engines don’t like 404 errors, either.
Frequent 404 errors can signal to search engines that your site is not well-maintained. They can hurt your site’s rankings, making it harder for potential visitors to find you.
By solving 404 errors, you can maintain an excellent user experience and search engine optimization (SEO). As a result, you can keep conversions steady, and even improve them!
How to Get Email Alerts for 404 Errors in WordPress
Setting up 404 email alerts can be a huge help in solving errors quickly. These alerts notify you immediately when a 404 error occurs, allowing you to address the issue before it impacts your visitors and search engine rankings.
Now, we will share how to set up email alerts for 404 errors in WordPress, along with a bonus tip and resources. Here’s a quick overview of all the things we’ll share in this guide:
Let’s jump right in!
Set Up Email Alerts for 404 Errors in WordPress
The first thing you need to do is install and activate the 404 to 301 plugin. If you need help, you can refer to our step-by-step guide on installing a WordPress plugin.
Upon activation, you’ll need to go to 404 to 301 » 404 Settings to configure the plugin.
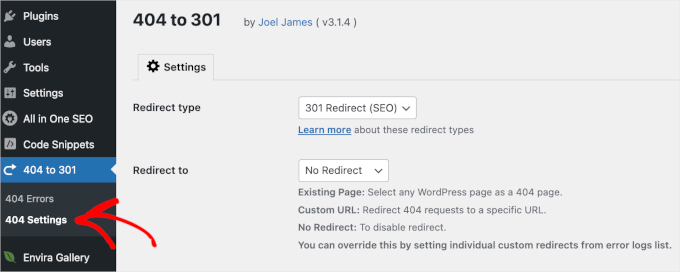
From here, let’s select ‘301 Redirect’ as the redirect type. Then, you can select a page or insert a custom URL in the redirect to field. You can also select not to redirect users to any page.
Below it, you should check the email notifications checkbox and provide your email address. Finally, remember to click the ‘Save Changes’ button to store your settings.
To test the plugin, you can visit any non-existent page on your site. For example, just type inyoursite.com/page404. You should then get an email notification of the 404 error in your inbox.
Troubleshooting 404 Email Alerts
The most common issue you may run into when using this plugin is that it might not always deliver emails to your Gmail account. This is because the 404 to 301 plugin uses the same email address in both the ‘To’ and ‘From’ fields.
Since the email does not originate from Gmail servers, Gmail might consider this email spoofing and automatically discard the message.
To solve this issue, you can use a Gmail SMTP server to send WordPress emails.
Another solution is to create an email account with your own domain name, like wordpress@example.com. Most WordPress hosting providers allow you to create unlimited email accounts with your own domain name.
After creating the email account, you’ll need to find out its SMTP settings. Contact your web host to find out these settings. Bluehost users can find their email settings here on the Help page.
Once you have your details, it’s time to install and activate the WP Mail SMTP plugin. If you need help, then you can go to our guide on how to install a WordPress plugin.
✋ Note: WP Mail SMTP is the best WordPress plugin for making sure that your emails are reliably delivered and don’t end up in users’ spam folders. We’re a big fan of it ourselves here at WPBeginner, and you can learn more about it in our WP Mail SMTP review.
Then, simply follow the setup wizard to connect your SMTP mailer. Luckily, WP Mail SMTP also offers a one-click installation for Gmail SMTP.
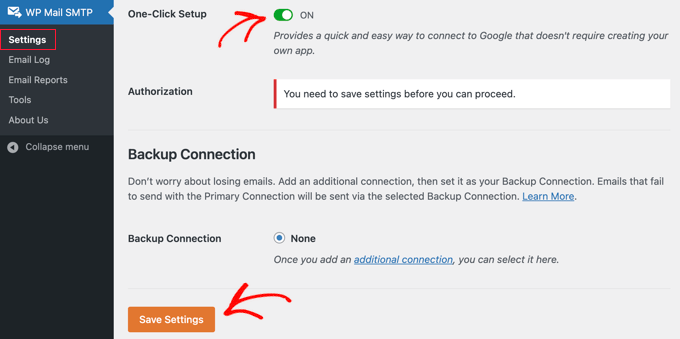
When you finish the setup wizard, you should be all set to receive your 404 email alerts.
Bonus: Fix Broken Links and Enable 404 Logs Using AIOSEO
Understanding the cause of 404 errors is very important for fixing the problem. Often, these errors occur due to broken links on your site. These can include:
- Broken internal links that point to deleted pages
- Broken external links that lead to moved or removed content
- Broken backlinks from other sites that no longer work
A great tool to help with this is the Broken Link Checker by AIOSEO. It scans your website for broken links, making it easier to identify and fix them
In addition, AIOSEO offers a feature to enable 404 logs. This allows you to track 404 errors as they happen, giving valuable insights into where users are running into issues.

Get more information about the platforms in our Broken Link Checker review and our complete AIOSEO review.
Now, let’s see how you can check broken links and track 404 errors on your WordPress website.
Scan Broken Links Using Broken Link Checker by AIOSEO
First, let’s install Broken Link Checker by AIOSEO. If you need help, you can refer to our guide on how to install a WordPress plugin.
Upon activation, you’ll need to connect to your AIOSEO account to use the broken link checker. Simply go to Broken Links » Broken Links and switch to the ‘Settings’ tab.
From here, you can click the ‘Connect to an Existing Account’ button and select the account you signed up for upon purchase.
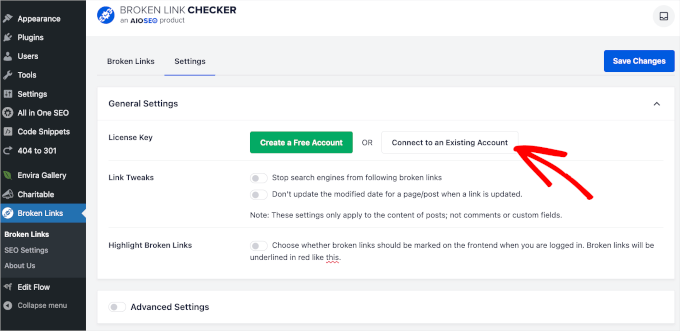
After connecting the account, you can switch back to the ‘Broken Links’ tab.
You’ll then be able to access the list of your site’s link issues and fix them.
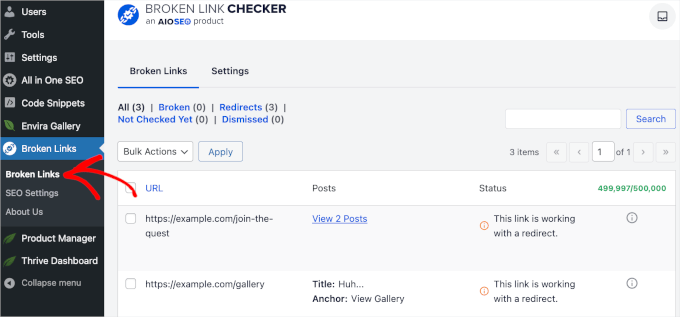
To fix broken links, you’ll first want to hover over the link to find 5 available options.
You can choose ‘Edit URL’ and type in the correct URL.
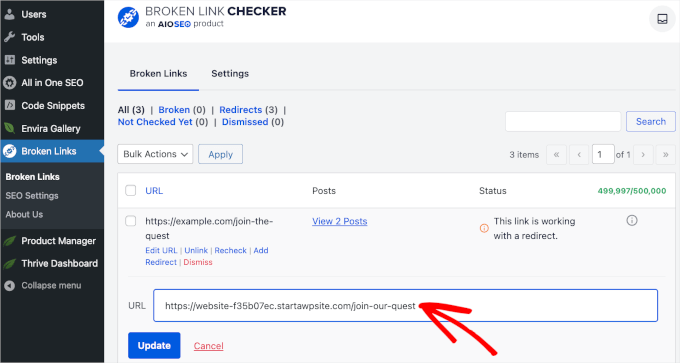
The ‘Unlink’ option lets you remove the link. You can also click ‘Add Redirect’ and use AIOSEO’s Redirection Manager to set up the redirect.
After fixing the links, don’t forget to click ‘Update’ to save your changes.
Enable 404 Logs Using AIOSEO
First, you’ll need to install and activate the AIOSEO Pro plugin on your WordPress site. If you need help, you can always refer to our step-by-step guide on installing a WordPress plugin for detailed instructions.
Upon activation, you’ll want to head over to All in One SEO » General Settings.
Then, simply enter your license key to unlock all the premium features of your AIOSEO pro plan. You can find your key in your AIOSEO account.

Once the plugin is up and running, the next step is to activate and configure redirects.
To do this, head over to the All in One SEO section in your WordPress dashboard and click on the ‘Redirects’ option.
After that, you can click the ‘Activate Redirects’ button to get things started.
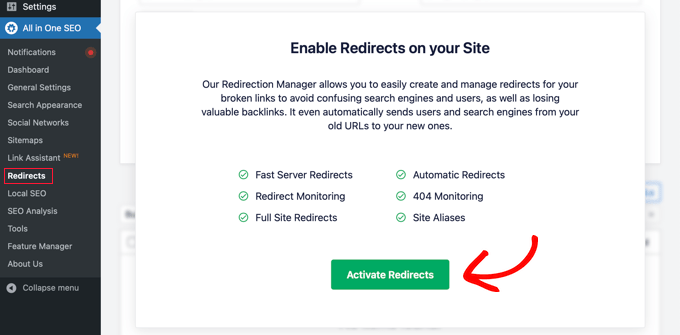
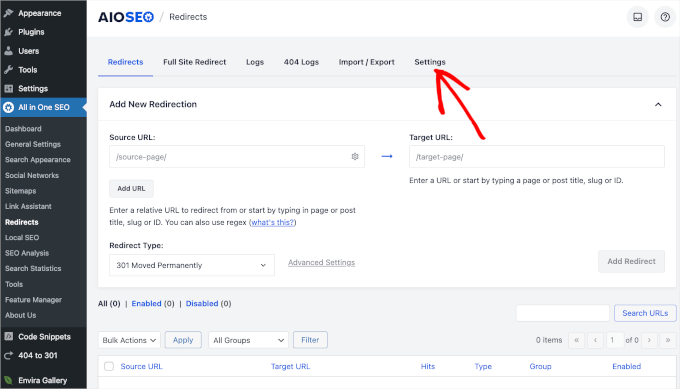
You’ll then be able to access the ‘Redirects’ panel.
From here, you’ll want to switch to the ‘Settings’ tab.
Once you’re inside, you’ll need to enable’ 404 Logs’ so the plugin can monitor your site’s broken links.
You’ll also want to set the logging duration. To keep your server running smoothly, we recommend choosing no longer than one month. For example, we set our logging duration to every week.
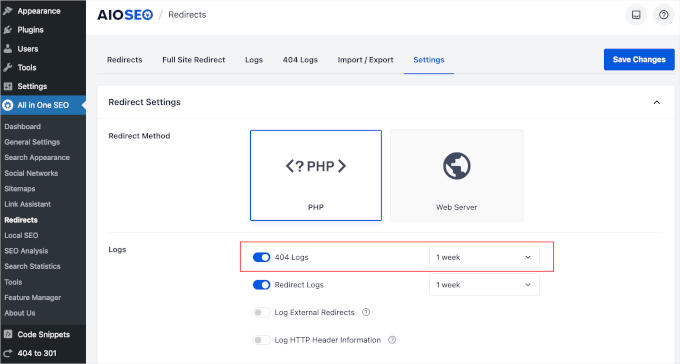
Don’t forget to click ‘Save Changes’ to lock in your settings.
And that’s all there is to it!
You’ve successfully learned how to enable 404 logs in AIOSEO. Now, if you can go to the ‘404 Logs’ tab, you might find URLs that are generating 404 errors.
For each broken link, you can use the ‘Add Redirect’ button to enter a new target URL and choose a redirection type, such as ‘301 Moved Permanently.’
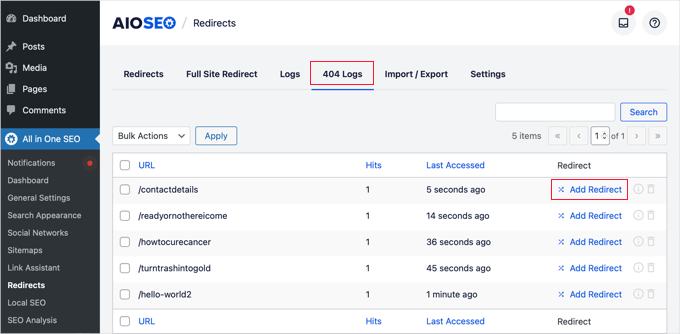
Once you’ve filled in the details, click the ‘Add Redirect’ button to save the changes. This will ensure that visitors and search engines are directed to the correct page, improving the overall experience on your site.
For more details, you can read our guide on how to easily track 404 pages and redirect them in WordPress.
Further Reading for WordPress Errors
If you’re looking to dive deeper into solving common WordPress errors, we’ve got you covered. Check out these helpful articles:
- How to Fix the 500 Internal Server Error in WordPress
- How to Fix the 413 Request Entity Too Large Error in WordPress
- How to Fix the WordPress 429 Too Many Requests Error
- How to Fix Error Too Many Redirects Issue in WordPress
- How to Fix ’ERR_SSL_VERSION_OR _CIPHER_MISMATCH’ in WordPress
- How to Fix Error 521 with WordPress and Cloudflare
- How to Fix the ERR_CONNECTION_REFUSED Error in Chrome
🛠️ Facing issues with your WordPress site?
Get our Emergency WordPress Support for quick, one-time solutions! Say goodbye to stress over WordPress errors, broken plugins, or theme problems.
For continuous peace of mind, explore our WordPress Maintenance Services. Our expert team takes care of updates, backups, security checks, and more, so you can focus on growing your site.
Contact us today, and let WPBeginner Pro Services keep your site running smoothly!
We hope this article helped you set up email alerts for 404 errors on your WordPress site. Next, you might also want to check out our guides on how to fix WordPress search not working or our expert picks of the most common WordPress errors and how to fix them.
If you liked this article, then please subscribe to our YouTube Channel for WordPress video tutorials. You can also find us on Twitter and Facebook.


Mrteesurez
Nice one. So it is possible to receive an email notification whenever someone visits a 404 error page. I don’t know of this great feature. Thanks for sharing it. I will definitely check out the plugin and experience it.
Chynell
I have dozens of 404 email notifications per day and no clue how to fix them all. Is it something that HAS to be fixed? Is it worth paying someone to fix?
WPBeginner Staff
Noted your feedback, we will try to write about it soon.
KK
Are there easy ways to remove 404 or not found pages from wp sites?
Justin Robinson
404 errors are a much talked about point @ present & webmasters seem to be making lots of effort to jazz their 404 pages up.
This is a good area to touch & i notice that from hitting one on your site you have gone to town with relevant info to guide the user to other & relevant topics which is good.
What I would like to see if I may ask is a good tutorial guiding us through a good 404 error page setup.
Covering good to do’s & the ugly avoids.
Have you guys tackled this area yet?
Cheers,
Justin