Have you ever visited a plugin or theme website where information like download numbers or ratings is prominently displayed?
Showcasing facts such as ratings, download counts, and update dates can help users make informed choices, build trust, and even boost your installation rates.
We have built several eCommerce plugins, and we like to display download counts and user ratings on their official sites. That way, customers can quickly see that our software is reliable.
In this article, we will show you how to easily display plugin and theme information on your WordPress site, step by step.
Why Display Plugin and Theme Information in WordPress?
Displaying plugin and theme information in WordPress can enhance the user experience and provide several important benefits.
You can use info cards to present key details about plugins and themes in a visually appealing way, making it easier for visitors to quickly grasp important information without having to leave your site.
For example, if you run an eCommerce store that sells premium plugins, then displaying an info card with ratings, download counts, and update dates for the free version can help convince users to upgrade to the pro plan.
Seeing that a plugin is popular and frequently updated can provide the nudge they need to make a purchase.
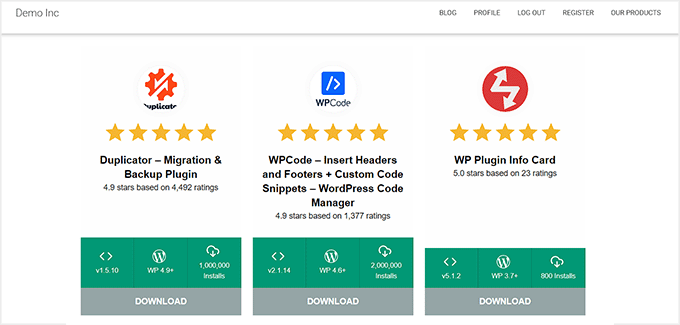
On the other hand, if you’re a blogger, then you might create a dedicated page to showcase the plugins and themes you use on your website. Sharing the tools that power your site can engage your audience and even prompt them to try these tools themselves.
Plus, as a WordPress developer, showcasing info cards for all the plugins and themes you have contributed to can be an excellent way to highlight your technical skills.
It’s a practical portfolio that demonstrates your expertise and the impact of your work, which can be appealing to potential clients or collaborators.
Additionally, you can leverage plugin and theme information to promote affiliate products. By displaying detailed info cards, you can provide your audience with valuable insights while earning some extra money online.
Having said that, let’s take a look at how to easily display plugin and theme information in WordPress.
How to Display Plugin And Theme Information in WordPress
First, you need to install and activate the WP Plugin Info Card plugin. For details, see our beginner’s guide on how to install a WordPress plugin.
Upon activation, open a page or post in the block editor and click the ‘Add Block’ (+) button in the top left corner.
From here, you need to find and add the WP Info Card block to the page.
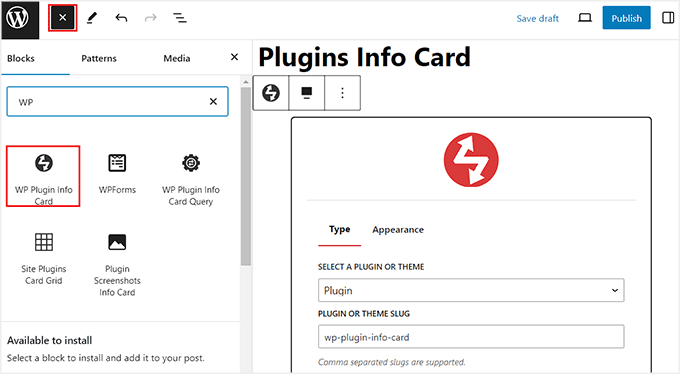
After that, choose the ‘Plugin’ option from the dropdown menu within the block to add an info card. If you want to add a theme info card, then choose the ‘Theme’ option instead.
Next, you must add the URL slug for the theme or plugin in the ‘Plugin or Theme Slug’ option. You can also add multiple slugs by separating them with a comma.
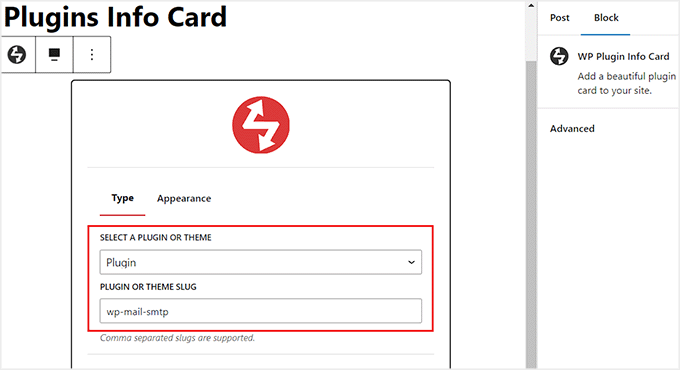
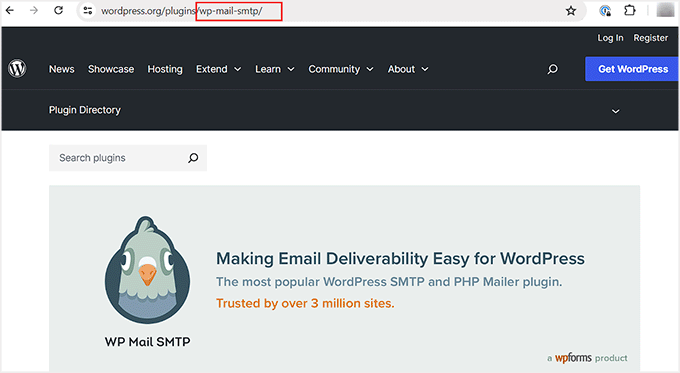
To get this information, just visit the plugin or theme page in the WordPress.org directory.
Once you are there, simply copy the text after https://wordpress.org/plugins in the URL. This will be the plugin or theme’s slug.
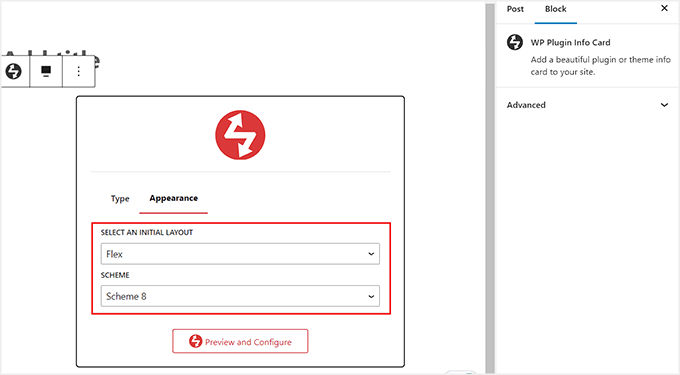
Next, switch to the ‘Appearance’ tab within the WP Plugin Info Card block.
From here, you can choose a layout and color scheme for your info card. Then, go ahead and click the ‘Preview and Configure’ button.
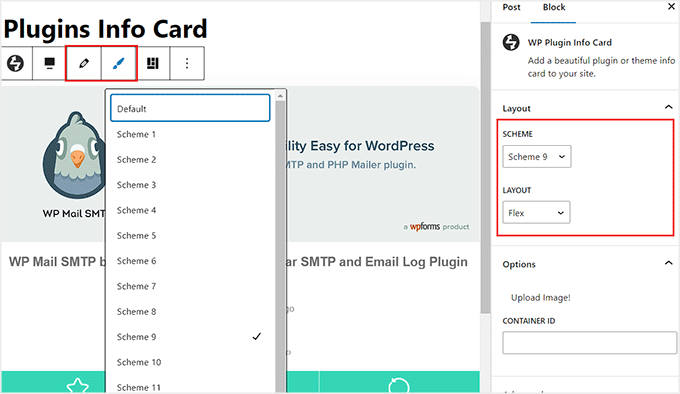
You will now be able to see a preview of your plugin or theme info card in the block editor.
If, for some reason, you don’t like the layout or color scheme, then you can change it by clicking the ‘Select Color Scheme’ icon in the toolbar.
This will open a dropdown menu where you can choose another color scheme or layout. You can also change either of the settings from the block panel on the right.
Once you are satisfied, just click the ‘Update’ or ‘Publish’ button to store your settings.
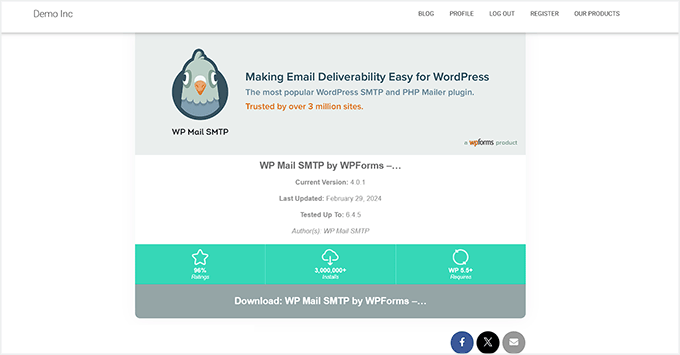
Now, simply visit your WordPress site to view the plugin info card in action.
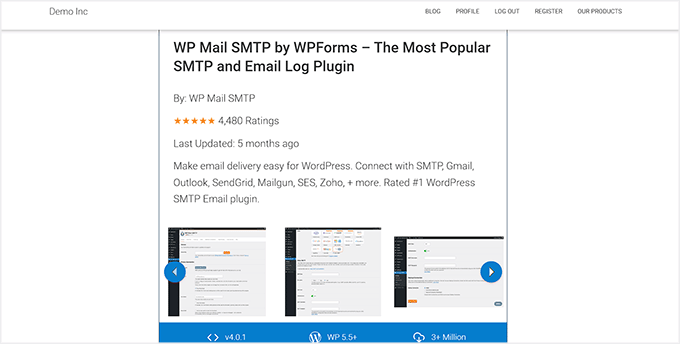
Most WordPress plugins usually also show screenshots on their WordPress.org directory page. This makes it easier for users to understand the plugin’s interface and features.
If you want to display those screenshots in the info card, then you must add the Plugin Screenshots Info Card block to the page.
Keep in mind that this block is only for plugins and won’t work for WordPress themes.
Once you have added the block, just type in the plugin slug and click the ‘Preview and Configure’ button.
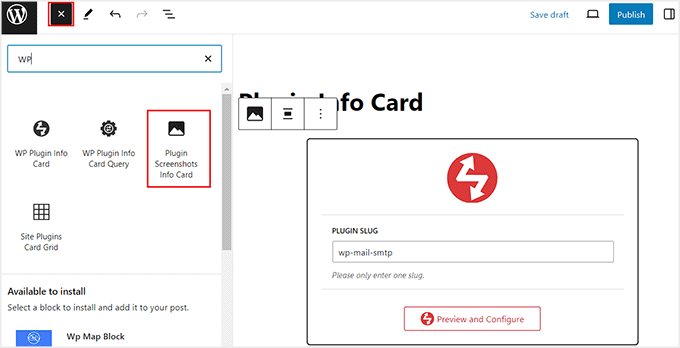
Next, click the ‘Update’ or ‘Publish’ button to store your settings.
Then, you can visit your website to see the plugin info card with screenshots.
How to Display Popular Plugin and Theme Information in WordPress
If you don’t have any specific themes or plugins in mind and only want to display the most popular ones on your website, then this method is for you. It can also work if you are a developer who wants to show the tools you have contributed to.
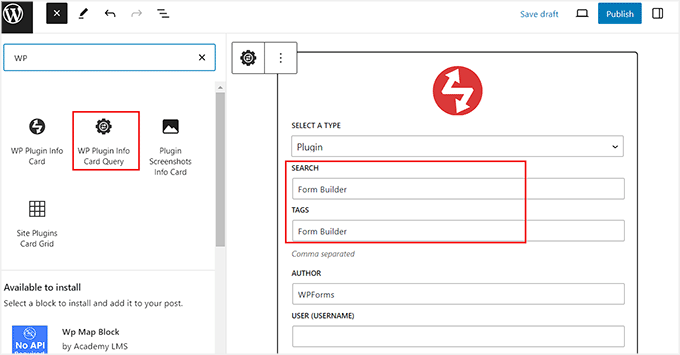
First, open the block editor and click the ‘Add Block’ (+) button. Once the block menu opens up, locate and add the WP Plugin Info Card Query block.
Here, you can start by selecting a plugin or theme as the type. After that, you can use the ‘Search’ and ‘Tags’ fields to display some specific plugins/themes from the WordPress directory.
For example, if you want to display all the form builders available in the WordPress directory, then you can type ‘Form Builder’ into both fields.
The plugin will now automatically eliminate all the tools that are not related to this query and only display the relevant ones.
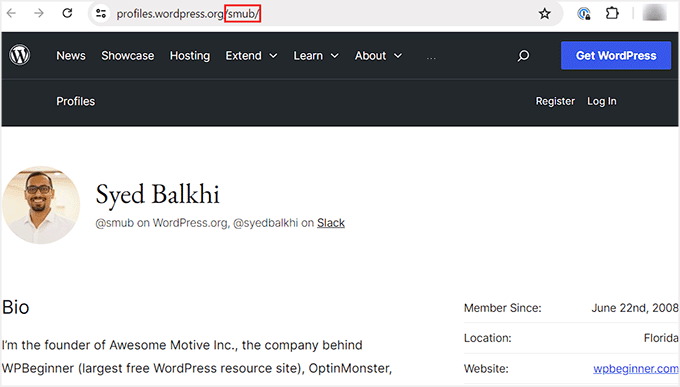
However, if you are a developer or contributor who wants to showcase their work, then you can leave these fields unfilled. After that, just add your WordPress directory’s slug under the ‘Author’ option.
This will be the text that comes after https://profiles.wordpress.org in the URL.
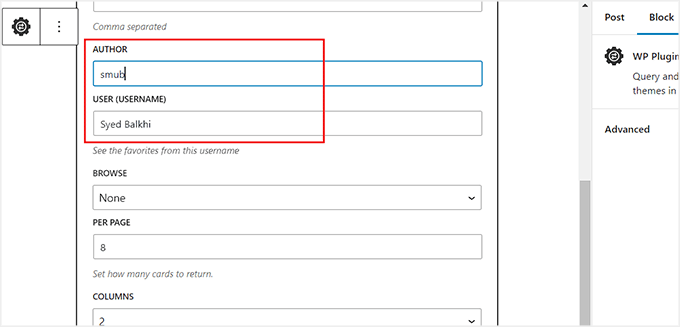
To get this information, just visit your profile page on WordPress.org.
Next, copy the slug from the URL and paste it into the block editor.
Once you are done, just click the ‘Query and Configure’ button.
Note: If you leave all the settings as they are and just click the ‘Query and Configure’ button, then the tool will show info cards for the most popular plugins or themes in the WordPress directory.
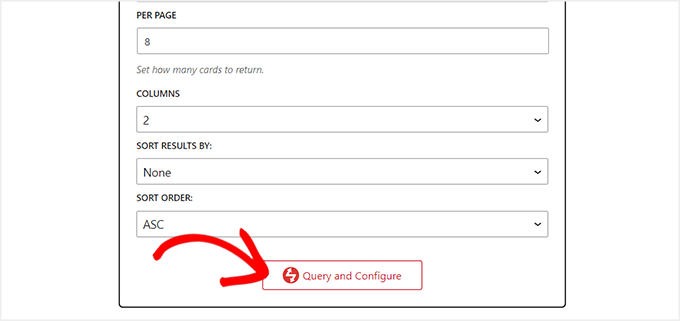
Doing this will show a preview of all the WordPress plugins that match the data you provided. For instance, if you are a developer who entered your own name, then you will see all the plugins that you have contributed to in the list.
You can now use the block panel to configure the layout and color scheme for your info card.
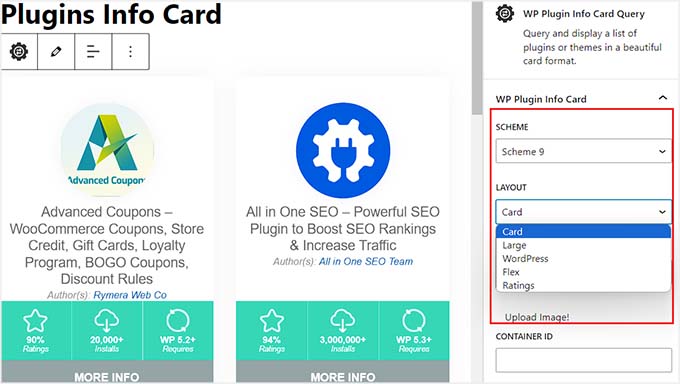
Once you are done, just click the ‘Publish’ or ‘Update’ button to store your settings.
Now, visit your WordPress site to view the plugin info cards in action.
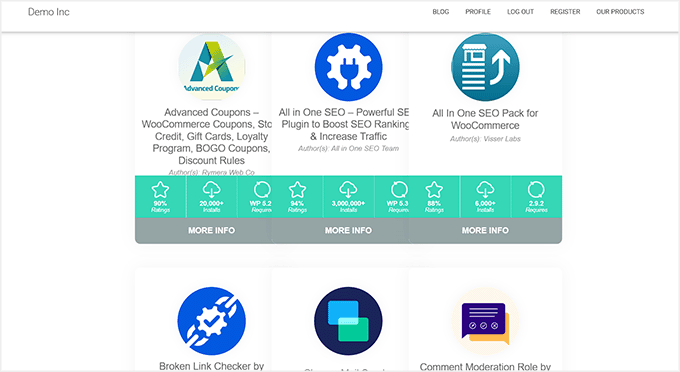
You can also add info cards for themes by following the same process. However, this time, you will need to select ‘Theme’ as the card type in the ‘WP Plugin Info Card Query’ block.
Then, you can use the ‘Search’ and ‘Tags’ fields to sort through the themes or leave all the settings unfilled to display the popular ones from the directory.
Once you are satisfied, click the ‘Query and Configure’ button.
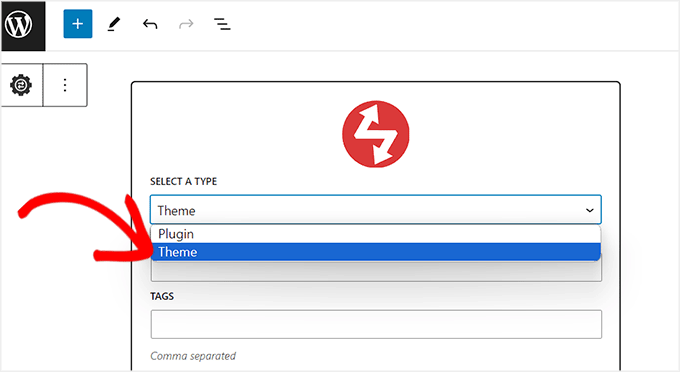
You will now be shown a preview of some popular WordPress themes in the directory. Here, you can change the layout and add a color scheme from the block panel.
Finally, click the ‘Update’ or ‘Publish’ button to store your settings.
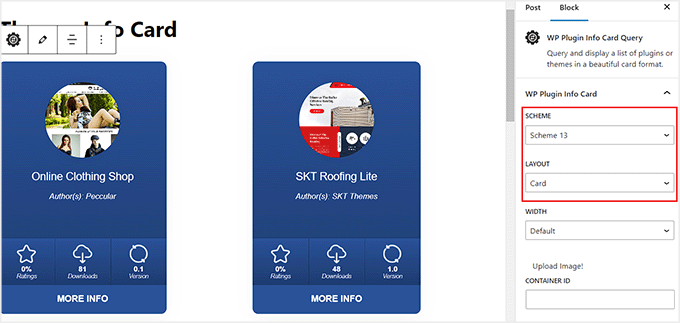
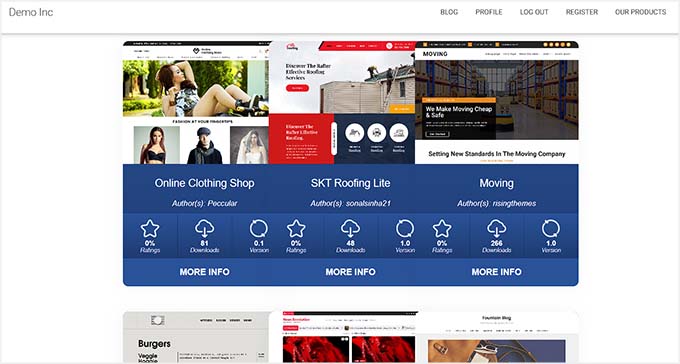
Now, visit your site to view the theme info cards.
This is what they look like on our demo website.
How to Display Activated Plugin Information in WordPress
If you just want to display the WordPress plugins currently activated on your website, then you can follow this method.
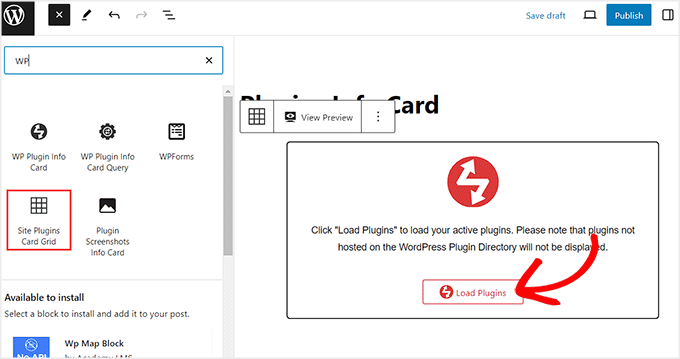
You can start by opening a page from the WordPress dashboard and clicking the ‘+’ button. Here, find and add the Site Plugins Card Grid block.
After that, just click the ‘Load Plugins’ button to display the plugins on your site.
Note: A plugin not hosted on the WordPress.org directory will not be shown in the list even if it is in use on your site. Similarly, this block won’t display the theme currently activated on your website.
The tools will now be displayed in the block editor. From the block panel on the right, you can change the layout, color scheme, column numbers, and gap.
Upon doing that, just click the ‘Update’ or ‘Publish’ button at the top to store your changes.
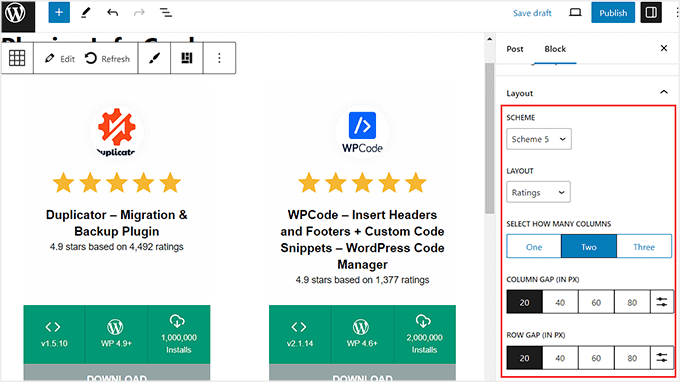
Now, visit your WordPress site to see the info cards for activated plugins live.
This is what they look like on our demo site.

Bonus: Enable Automatic Updates for WordPress Plugins And Themes
Once you have displayed information for the plugins and themes on your website, it is a good idea to enable automatic updates for these tools.
This will reduce the risk of hackers and make your site more secure. Plus, you won’t have to manually perform updates every time a new plugin or theme version is released, saving you a lot of time.
To enable auto-updates for WordPress themes, visit the Appearance » Themes page from the WordPress dashboard and click the ‘Theme Details’ button.
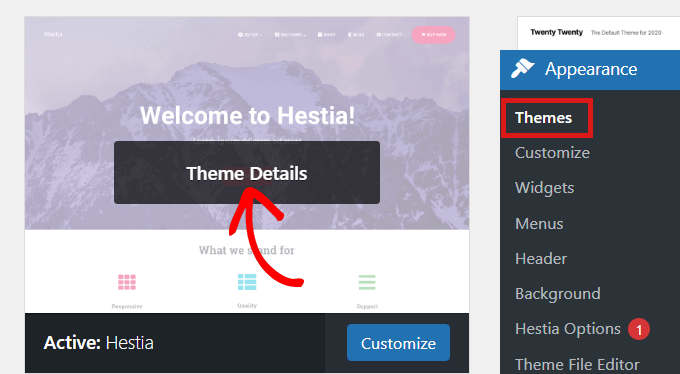
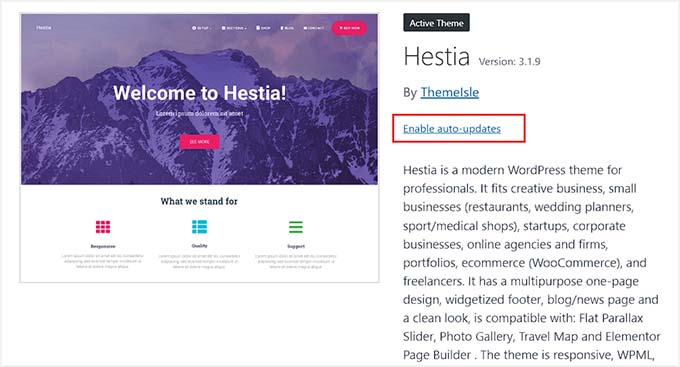
This will open a prompt where you must click the ‘Enable auto-updates’ link.
Once you do that, the theme will automatically be updated every time it launches a new version.
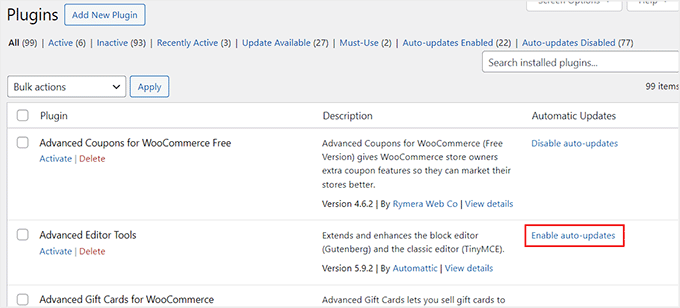
Next, head over to the Plugins » Installed Plugins page from the WordPress admin sidebar.
Now click the ‘Enable auto-updates’ link for the plugins that you want to be updated automatically.
For more information, see our tutorial on how to enable automatic updates for WordPress plugins and themes.
We hope this article helped you learn how to display plugin and theme information in WordPress. You may also like to see our beginner’s guide on how to properly change a WordPress theme and our top picks for the best tips and plugins to improve WordPress admin.
If you liked this article, then please subscribe to our YouTube Channel for WordPress video tutorials. You can also find us on Twitter and Facebook.


Hemang Rindani
Nice article. WordPress is a great enterprise content management system that can design powerful websites. With rich set of functionalities, WP can deliver expected results for any complex business scenarios. Developers can choose from unlimited built-in modules, themes and plugin to design a website. The highlight of WordPress is its ease of use and effortless admin dashboard that even a non-technical person can use to create, publish and optimize web content. WordPress being open-source platform allows developers to play around the modules and themes and can provide the expected results. The only concern with modification of modules is to make sure that there are no loopholes left that pose a security threat.