Ever sent out an ‘exclusive’ coupon code only to find it posted all over the internet the next day? 😨
We love using coupon codes for seasonal sales and customer appreciation campaigns, but one thing we’ve learned is that standard coupons can quickly spread beyond your intended audience.
The good news is that creating one-time personalized codes is simpler than you might think.
In this easy-to-follow guide, we’ll show you exactly how to set up unique coupon codes in WooCommerce that work perfectly for individual customers and special promotions.
Why Your Store Needs WooCommerce One-Time Use Coupons 🎯
Want to make your online store more successful? One-time-use coupons are a great way to boost sales and keep customers coming back to your online store. They help prevent shoppers from leaving items in their carts and abandoning their purchases.
Here’s when these special coupons come in handy:
- Giving new customers a special first-purchase discount
- Sending customers a birthday treat they’ll love
- Saying “thanks” when someone leaves a helpful review
- Creating special codes for social media promotions
- Making customers feel special with exclusive deals
The best part? These coupons can only be used once, so you won’t have to worry about the same code being shared all over the internet. This means you can be more generous with your discounts while keeping your promotions special and your profits healthy.
Ready to start creating these smart coupons for one-time use? We’ll show you exactly how to set them up to get more sales and happy customers.
How to Create Smart Coupons for WooCommerce (One-Time Use)
After testing dozens of coupon plugins, we’ve found that Advanced Coupons stands out as the best WooCommerce coupon code plugin. We’ll show you how to use the free version, though Advanced Coupons Premium offers neat extras like automatic coupon reset timers.
You can check out our Advanced Coupons review for more information.
Let’s start with the basics. First, you’ll need to install and activate the Advanced Coupons for WooCommerce plugin. Not sure how? Check out our easy guide on installing WordPress plugins.
Once it’s installed, just head over to Marketing » Coupons in your dashboard and click ‘Add Coupon’ to get started.
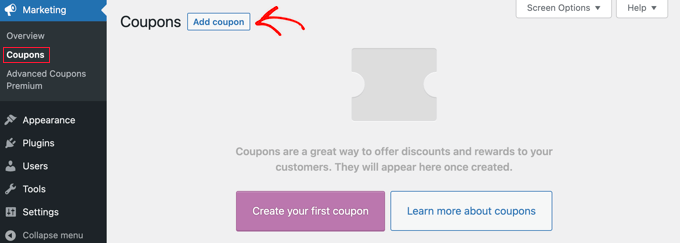
👉 Quick tip: Using an older version of WooCommerce? You’ll find coupons under WooCommerce » Coupons instead.
Next, you’ll need to create your coupon in WooCommerce. You can either type one yourself or let the system generate one for you by clicking the ‘Generate coupon code’ button.
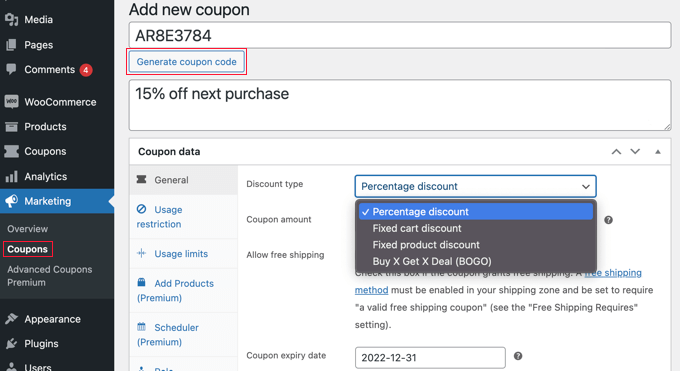
Don’t forget to add a clear description. This will help you remember what the coupon was for when you look back later.
Now comes the fun part: setting up your coupon usage details. You can choose any of the following methods below:
Option 1: Creating a Single-Use or Limited Use Coupon
This method is the best way to limit the coupon to a single use per visitor or a limited number of uses in total.
While still on the ‘Add new coupon’ page, you need to look at the ‘Coupon data’ section and then click on the ‘Usage limits’ tab.
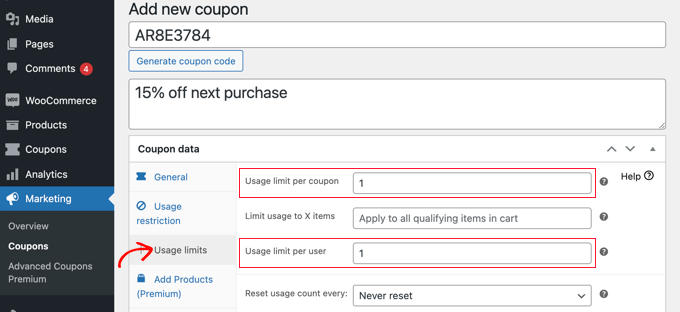
Here, you should now enter the number 1 in the ‘Usage limit per user’ field. This will make sure that each customer who receives the coupon code can only use it once.
Alternatively, you might prefer to enter a number in the ‘Usage limit per coupon’ field instead. This will place a limit on the number of times the code can be used in total by all users.
You can even enter a number in both fields. Let’s say you type 100 in the ‘Usage limit per coupon’ field and 1 in the ‘Usage limit per user field’. Then, the first 100 customers will be able to use the code a single time.
Premium users can also reset the code so that it works again after a period of time, say monthly or yearly.
Option 2: Creating a Personalized Coupon
This method lets you personalize a coupon so it’s only available to certain customers.
You should still be on the ‘Add new coupon’ page. In the ‘Coupon data’ section, simply switch to the ‘Usage restriction’ tab. Now, you need to scroll down to the ‘Allowed emails’ field.
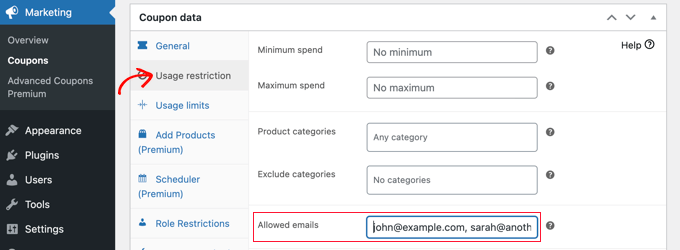
Here, you can enter a single email address, or multiple email addresses separated by commas. Only those customers will be able to use the coupon.
You can match multiple email addresses by using an asterisk as a wildcard. For example, if you enter *@gmail.com, then anyone with a Gmail address will be able to use the coupon.
However, these users will be able to use the coupon more than once. If you need to create a coupon that is both one-time and personalized, then you can combine Methods 1 and 2.
You first need to enter the number 1 in the ‘Usage limit per user’ field we covered in Method 1. After that, you enter the email addresses of allowed users as covered in Method 2.
Now, only the users that you listed will get a single use of the coupon.
Option 3: Creating a Role-Restricted Coupon
This method restricts the use of the coupon to customers with a certain WordPress user role. In some cases, this can be simpler than typing a long list of email addresses, as in Method 2.
💡 Pro Tip: This method can also be combined with Method 1 to make sure that each customer with that user role can use the coupon only once.
While on the ‘Add new coupon’ page, look at the ‘Coupon data’ section and then click on the ‘Role Restrictions’ tab.
You can now check the box to ‘Enable role restrictions.’ Then, select one or more user roles. A list of roles will pop up when you click inside the ‘User Roles’ box.
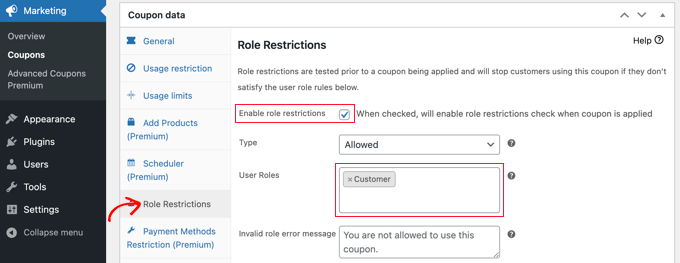
We recommend that you customize the ‘Invalid role error message’ to make it clear why users with other roles can’t access the promotion.
There are a few ways you might like to use this method. For example, you could simply set the user role to ‘Customer’ so that your users need to log in before they can use the code. This will let you keep better track of your customers.
Another idea is to assign your most loyal customers a special WordPress role so that you can offer them exclusive coupon codes.
You can also use this method to create members-only coupons for your membership site.
How to Publish Your One-Time Personalized Coupon
Whichever method you use, once you have finished setting up the coupon, you will need to click the ‘Publish’ button at the top right of the page.
Your coupon is now ready for use, and you can start to let your customers know about it. How you do that depends on the type of coupon you have created and who you want to use it.

For example, you might offer the coupon to new members in your welcome email, or reward customers who leave a product review. You could create a coupon popup on your online store, or include a special offer in your email newsletter.
Also, you can make the coupon shareable via a coupon URL, so that your customers can just click once to apply their discount. No more copying and pasting codes. Read our guide on how to make auto-apply coupons in WooCommerce for more details.
Bonus Tip: Add Coupon Fields in WordPress Forms
If you do not have a WooCommerce store but still want to offer discount coupons to users, then you can add coupon fields to your WordPress forms with WPForms.
It is the best WordPress contact form plugin on the market that comes with 2,000+ premade templates, a drag-and-drop builder, and complete spam protection.
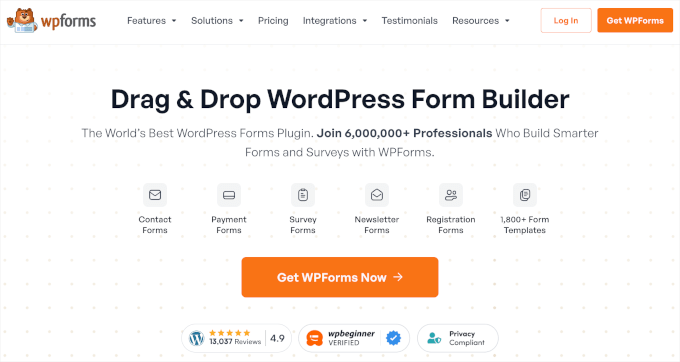
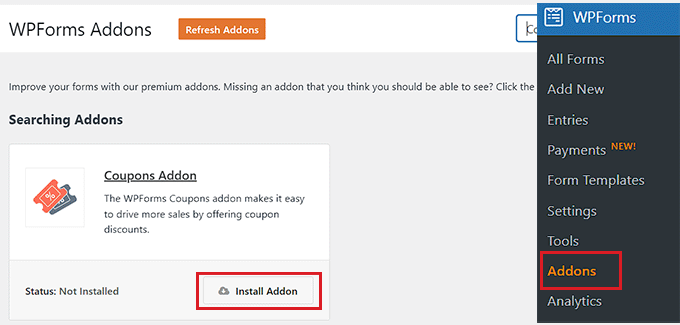
Upon plugin activation, all you have to do is install and activate the Coupons addon.
To do this, you must visit the WPForms » Addons page from the WordPress dashboard.
Once you do that, head over to the WPForms » Payments page and switch to the ‘Coupons’ tab. Next, click the ‘+ Add Coupon’ button to continue.
This will open a new screen where you can add a name, discount amount, and start and expiration date for your coupon code. You can then scroll down the screen and choose the forms where you want to add coupon fields on your website.
Finally, don’t forget to click the ‘Save Coupon’ button to store your settings.
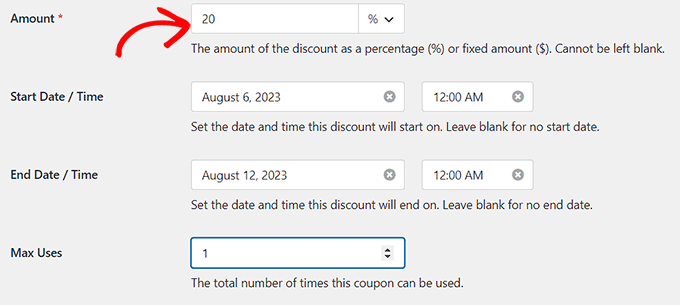
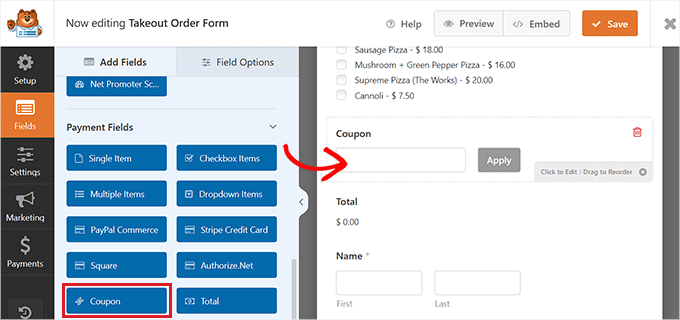
Now, you’ll need to visit the WPForms drag-and-drop builder to add the coupon field from the left column to the form preview of your choice. After that, don’t forget to click the ‘Save’ button to store your changes.
For detailed instructions, see our tutorial on how to easily add a coupon code field to your WordPress forms.
We hope this tutorial helped you learn how to create one-time personalized coupon codes in WooCommerce. You may also want to learn how to give a first purchase discount in WooCommerce, or check out our list of the best WooCommerce plugins for your store.
If you liked this article, then please subscribe to our YouTube Channel for WordPress video tutorials. You can also find us on Twitter and Facebook.


Mrteesurez
Personalized coupon comes handy when you want specific user to benefits a discount in your store. It can also be used to to award users after a contest or competition whereby only winners will be allowed to benefits the discount.
Thanks for sharing this.