Finding the perfect image for your WordPress post is a great start, but often it’s a one-way street. Your visitors see a static picture, and they may miss the key details you want to highlight.
This can be frustrating, especially when you’re trying to showcase product features or guide users through a process. What if your images could do more and actively engage your audience?
That’s exactly what interactive images do. After testing several plugins here at WPBeginner, we’ve found a straightforward method that lets anyone add clickable hotspots to their images without needing any code.
In this guide, we will show you how to easily transform your static images into engaging, interactive experiences for your visitors.

In this guide, we will walk you through the entire process. Here is a quick overview of what you will learn.
- What Is an Interactive Image?
- How to Add Interactive Images to Your WordPress Content
- How to Import/Export Interactive Images to Other WordPress Sites
- Frequently Asked Questions About Interactive Images
What Is an Interactive Image?
An interactive image can have hotspot areas, highlights, links, clickable buttons, colors, audiovisual content, and more.
Straight away, this is much more engaging than a simple, standard image that you upload to your WordPress website.
Interactive images can draw the visitor’s attention to specific features and content and then show additional information.
For example, you might show a popup when the visitor hovers over a particular bar in a chart.
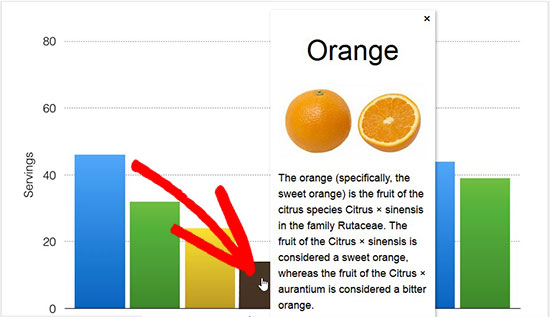
This interaction can encourage visitors to explore your images in more detail, which will keep them on the page for longer. It can also create a more interactive and interesting experience, which can increase your pageviews and reduce the bounce rate in WordPress.
Interactive images can also show visitors the steps they should take next. For example, you might add links to other parts of your site or show a call to action button.
With that said, let’s see how you can create interactive images for your WordPress site.
Note: If you want to add animated images to your website instead, then follow our step-by-step guide on how to add animated GIFs in WordPress.
How to Add Interactive Images to Your WordPress Content
The easiest, most beginner-friendly way to add clickable areas or interactive hotspots is by using Draw Attention. This plugin allows you to either show a ‘more info’ popup or open a new URL when the user interacts with an image.

Note: In this guide, we will be using the free version of the plugin. However, feel free to get the pro version of WP Draw Attention, as it allows you to create multiple interactive image maps, use tooltips and lightbox effects, and more.
The first thing you need to do is install and activate the Draw Attention plugin. For more details, see our step-by-step guide on how to install a WordPress plugin.
Upon activation, go to Draw Attention » Edit Image in the WordPress dashboard. This takes you to a screen where you can create different interactions and then add them to an image as clickable areas.
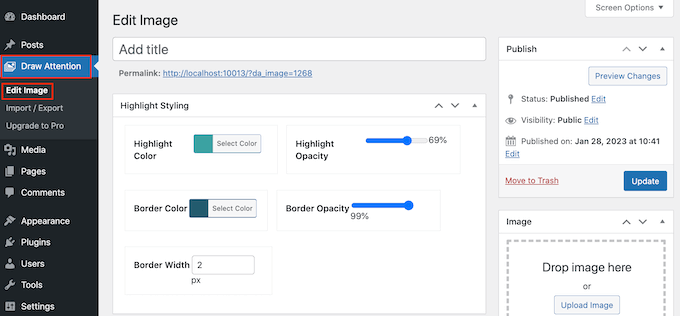
To start, type in a title for the interactive image.
This will appear next to the image on your WordPress website. For example, in the following image, we are using the title ‘OptinMonster Features.’
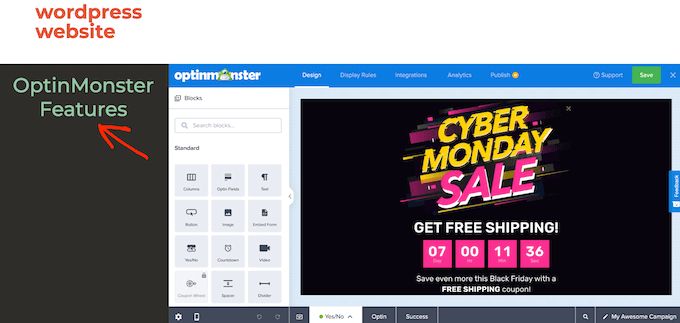
Expert Tip: The example image shows features from OptinMonster, which is the exact tool we use here at WPBeginner. It helps us create popups, slide-in forms, and other campaigns to grow our email list and increase conversions.
It’s the most powerful conversion optimization software on the market. You can learn more about its features in our complete OptinMonster review.
After typing in a title, scroll to the ‘Image’ section and choose the image that you want to use.
You can either select an image from the media library or upload a new image.
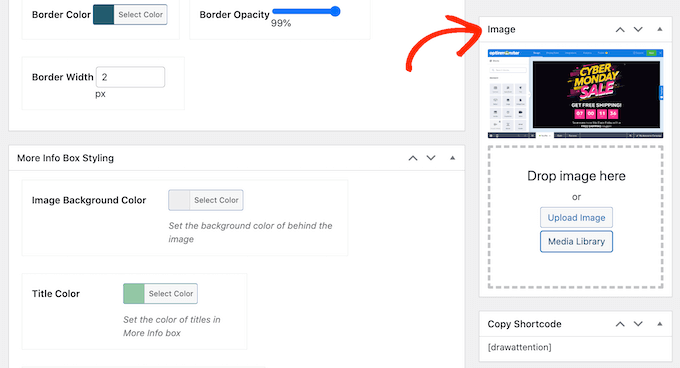
After choosing an image, you can add colors and links, create clickable areas, and more by scrolling down to the ‘Hotspot Areas’ section.
The plugin creates a Clickable Area 1 by default, so click to expand this section.
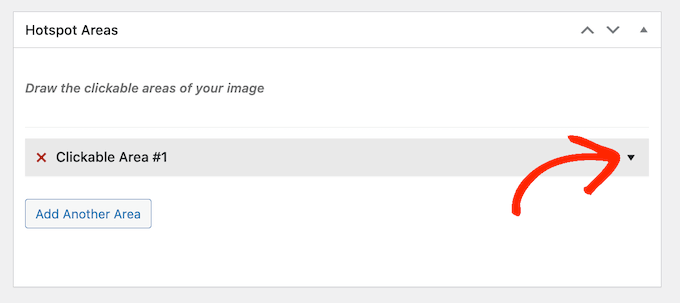
To start, you will need to highlight the area that you want to make interactive.
Draw Attention has a few different shapes you can use for the highlight, so simply click on the shape that you want to use. In the following image, we’ve selected a rectangle.
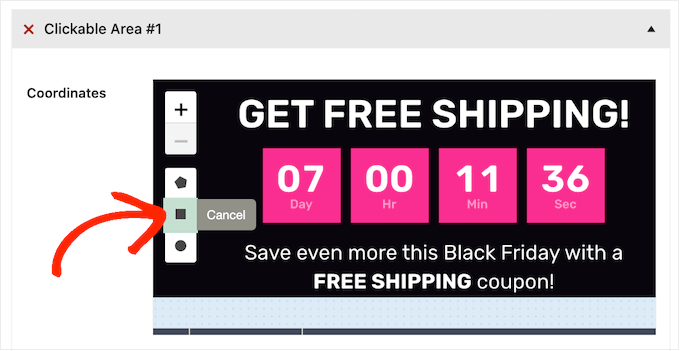
Now, simply click and drag to highlight the area you want to use as the image hotspot.
Draw Attention will now show some new settings for this clickable area. To start, type a name into the ‘Title’ field.
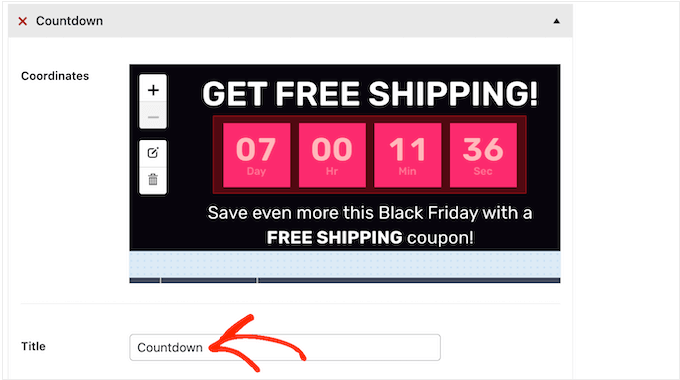
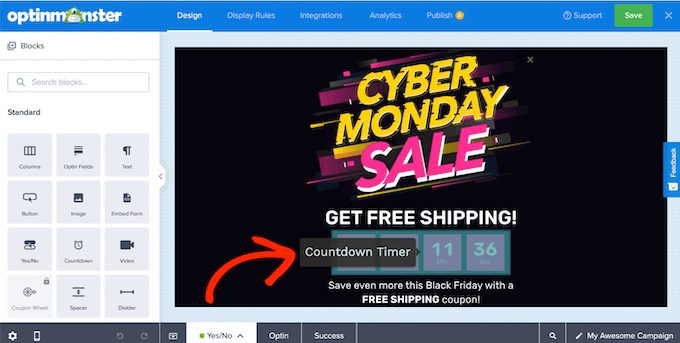
This will appear as a tooltip when the visitor hovers their mouse over the hotspot, so it’s a good idea to use something descriptive.
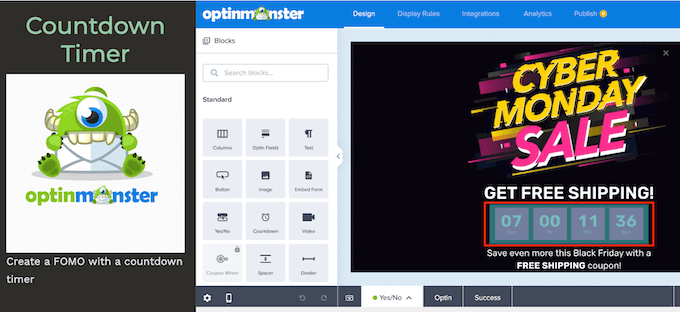
In the following image, we’ve turned the countdown area into a hotspot and added the image title ‘Countdown Timer.’
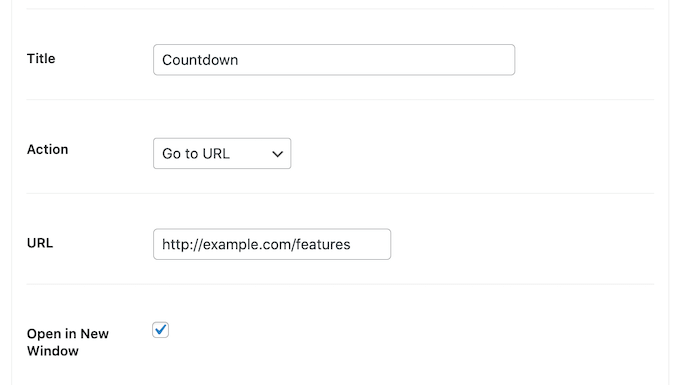
Once you’ve done that, open the ‘Action’ dropdown and choose what will happen when a visitor clicks on this area. Draw Attention can either open a link or show a ‘more info’ box.
You’ll see different settings depending on the options you select. For example, if you choose ‘Go to URL,’ then you’ll need to add a link and specify whether it should open in a new tab.
If you select ‘Show More Info’, then you’ll need to type in the information that will appear when the visitor clicks on the hotspot.
You can also add an optional detail image or URL, which will be included in the info box.
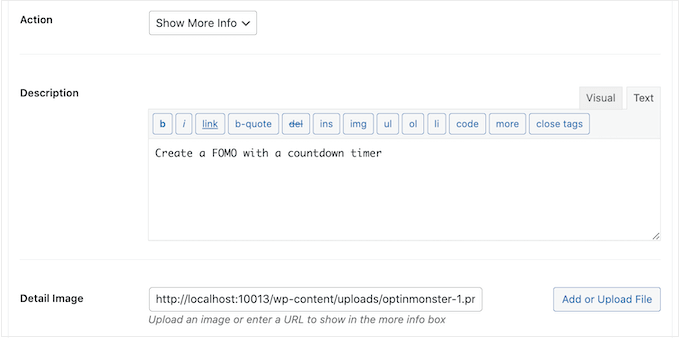
In the following image, we’ve added some text to the more info box.
We’ve also added the OptinMonster logo as a detail image.
When you are happy with how the hotspot looks, click on the ‘Add Another Area’ button.
You can now configure the clickable area following the same process described above.
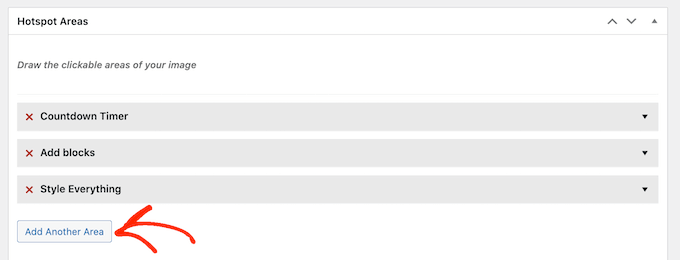
Simply repeat these steps to add all the clickable areas to the image.
With that done, you may want to customize how the highlights and more info box look. For example, you can change the color that Draw Attention shows when visitors hover over a clickable area using the ‘Highlight Color’ settings.
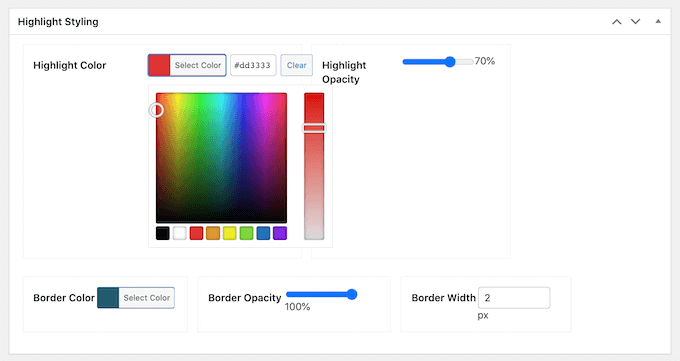
You can also change the highlight opacity and border width, add a border, and more using the settings in the ‘Highlight styling’ section.
After that, you can scroll to ‘More Info Box Styling’ and fine-tune how the box looks. For example, you can change the background color, text color, and more.
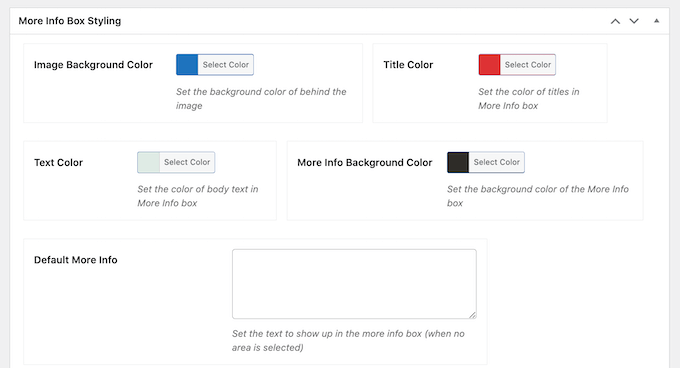
Draw Attention also comes with different themes that you can apply to your interactive image.
To take a look at these themes, simply scroll to the ‘Apply Color Scheme’ box and open the dropdown menu. You can choose between Light, Dark, and Draw Attention.
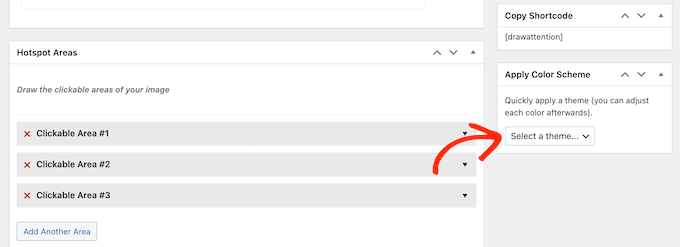
All these options are fairly straightforward, so it’s worth trying different settings to see what looks the best on your website.
As you try the various options, you can preview how they will look on your WordPress website by clicking on ‘Preview Changes.’
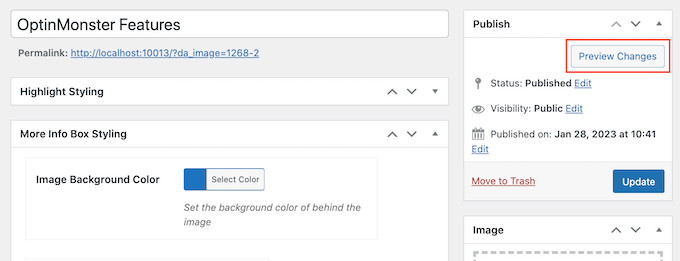
When you are happy with how the interactive image looks and acts, make sure you click on ‘Update’ to save your changes.
You can now add the interactive image to any page, post, or widget-ready area using the shortcode in the ‘Copy Shortcode’ block.

For more information on how to place the shortcode, please see our guide on how to add a shortcode in WordPress.
How to Import/Export Interactive Images to Other WordPress Sites
Sometimes, you may want to reuse the same interactive image across multiple websites.
For example, if you are an affiliate marketer, then you might create an interactive image that promotes one of your products. You can then use the same interactive image across all your Amazon affiliate stores and other affiliate marketing websites.
Uploading the same image and then recreating all the interactions manually can take a lot of time and effort.
Instead, we recommend creating the interactive image once and then using Draw Attention’s import/export feature. This allows you to reuse the same image across countless websites or online stores.
To do this, you’ll need to install the Draw Attention plugin on the original site that has the interactive image and all the other websites where you want to use that image.
On your original site, go to Draw Attention » Import / Export and check the box next to each image that you want to export.
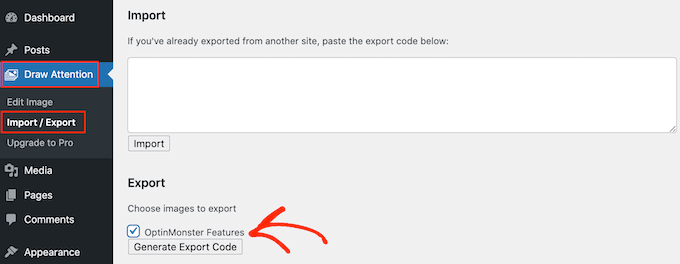
Then, click on the ‘Generate Export Code’ button. After a few moments, Draw Attention will generate some code.
In a different tab, log in to your other WordPress blog or website and go to Draw Attention » Import / Export.
Here, copy the export code into the ‘Import’ box and click on the ‘Import’ button.

Draw Attention will now import the image and all of its interactions, ready for you to use.
Simply repeat these steps on all the websites where you want to use the interactive image.
Frequently Asked Questions About Interactive Images
Here are the answers to some of the most common questions we get about adding interactive images in WordPress.
What is the best plugin for creating interactive images in WordPress?
For beginners, we recommend the Draw Attention plugin because it is easy to use and has a simple interface. The free version provides all the basic features you need, while the pro version unlocks more advanced options like multiple image maps and extra styling for tooltips.
Are interactive images mobile-friendly?
Yes, the Draw Attention plugin is fully responsive. This means your interactive hotspots and info boxes will automatically adjust to fit any screen size, providing a great user experience on mobile devices.
Can I add videos or animations to interactive hotspots?
You can use the ‘Go to URL’ action to link a hotspot to a video on a platform like YouTube or Vimeo. While direct video embedding in the popup might require the pro version, linking is a simple workaround. For animated images, we recommend following our guide on adding animated GIFs to WordPress.
Will adding interactive images slow down my website?
Like any media, interactive images add to your page’s weight. However, the Draw Attention plugin is lightweight and well-coded. The biggest factor is the original image file size, so we recommend always optimizing your images for the web before uploading them.
We hope this article helped you learn how to create interactive images in WordPress. You might also want to see our guide on how to create image flipbox overlays and hovers in WordPress and our expert picks of the best WordPress slider plugins.
If you liked this article, then please subscribe to our YouTube Channel for WordPress video tutorials. You can also find us on Twitter and Facebook.


Andrea Davidson
Hi
Do I need to pay for the pro to add more than one image?
Thank you
Andrea