If you’re looking for a fun and effective way to boost customer loyalty and engagement in your WooCommerce store, contests are a fantastic option. They create excitement, encourage interaction, and give customers a reason to keep coming back.
At WPBeginner, we’ve run our own giveaways and seen how powerful contests can be. In fact, our founder Syed Balkhi has shared how much giveaways have brought us more traffic and helped us connect more with our readers.
In this guide, we will show you how to create a WooCommerce contest that gets your audience excited and delivers real results.
Why Run a WooCommerce Contest?
Running a WooCommerce contest can be beneficial in several ways. One, it can give people a fun reason to return to your store and recover your abandoned cart sales.
If you run a new eCommerce store, WooCommerce contests can also be a great way to collect email addresses for lead generation. This not only helps reach new potential customers but also lets you send them exciting information, like upcoming discounts.
You can even use a contest to boost your customer engagement. People are more likely to buy again from your online store if you give them an incentive to do it. This can turn one-time shoppers into loyal customers.
With that being said, let’s look at how to easily create a WooCommerce contest to grow your business. You can use the quick links below to navigate through the steps:
- Step 1: Install RafflePress and Create a WooCommerce Contest
- Step 2: Add a Prize to Your WooCommerce Contest
- Step 3: Add Actions Users Need to Perform to Join The Contest
- Step 4: Customize WooCommerce Contest Design
- Step 5: Configure the WooCommerce Contest Settings
- Step 6: Publish and Add Contest to Your WooCommerce Store
- Step 7: Promote Your WooCommerce Contest
- Step 8: Choose the WooCommerce Contest Winners
Step 1: Install RafflePress and Create a WooCommerce Contest
The easiest way to create a WooCommerce giveaway is by using RafflePress.
It’s the best WordPress giveaway plugin and lets you create all kinds of contests using a simple drag-and-drop editor. It has tons of features to make your contest look attractive with your website design.
You can see our complete RafflePress review for more details.
First, you need to install and activate the RafflePress plugin. For more details, see our step-by-step guide on how to install a WordPress plugin.
Note: There is a free version of RafflePress, but we will be using the premium version since it supports more contest entry methods, allows participants to enter using their Facebook login, and much more.
Upon activation, you’ll see the RafflePress welcome screen in the WordPress dashboard.
You can now go ahead and enter your license key.
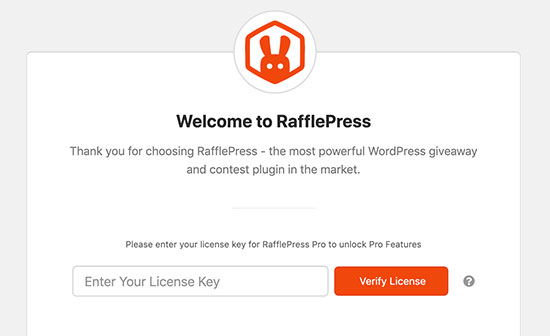
You’ll find this information in your account on the RafflePress website. Once you’ve done that, click on the ‘Verify License’ button.
After entering the license key, you are ready to create your first WooCommerce contest by going to RafflePress » Add New.
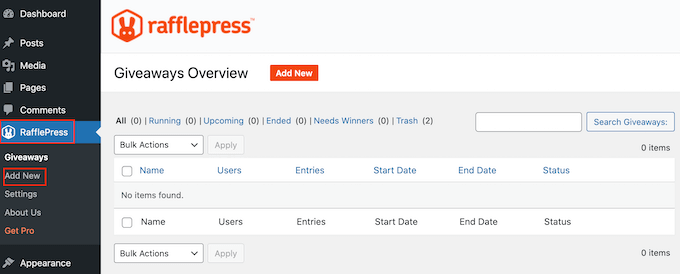
On the next screen, you’ll need to give your WooCommerce giveaway a name.
This is just for your reference, so you can use anything you want.
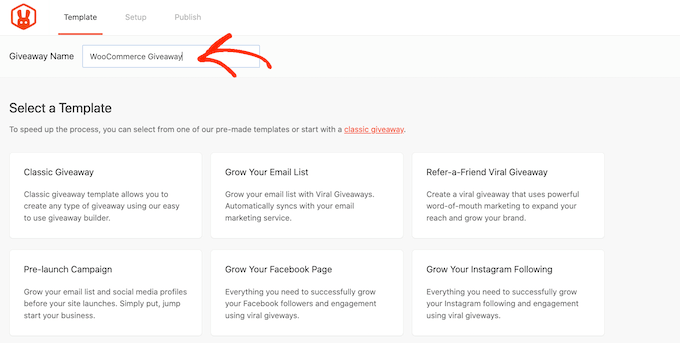
Next, choose the template that you want to use. RafflePress has ready-made templates for specific goals, such as using a Facebook giveaway to boost engagement or getting more followers on Instagram. You can select the template that best suits your goals.
For this guide, we will use the Classic Giveaway template, as it lets us create a contest from scratch. Simply hover your mouse over the Classic Giveaway template and then click on the ‘Use this Template’ button when it appears.
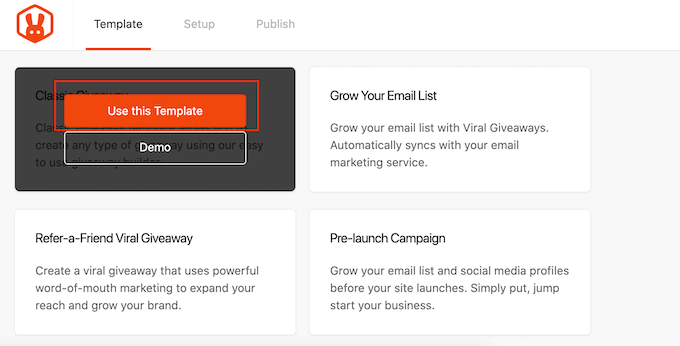
This opens the template in RafflePress’ drag-and-drop builder.
Step 2: Add a Prize to Your WooCommerce Contest
Let’s start by setting the prize for your WooCommerce contest. Simply click to select the headline area, which shows ‘My Awesome Prize’ by default.
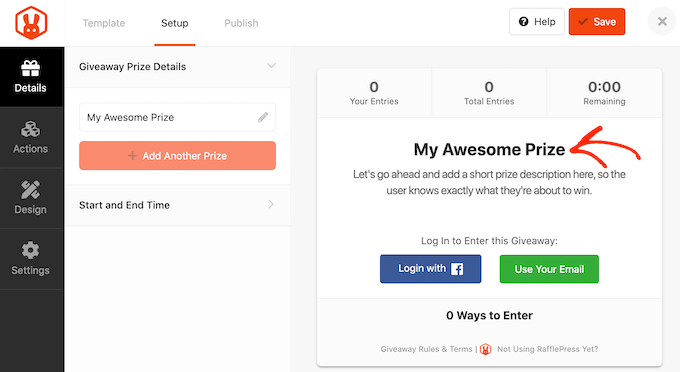
You can now go ahead and type a title into the ‘Name’ field. You’ll typically want to talk about your prize, but you can use any title you want.
Once you’ve done that, type in a description, which will appear below the headline.
For example, you may want to add some more information about your WooCommerce contest, such as why participants will want to win this prize or how much it’s worth.
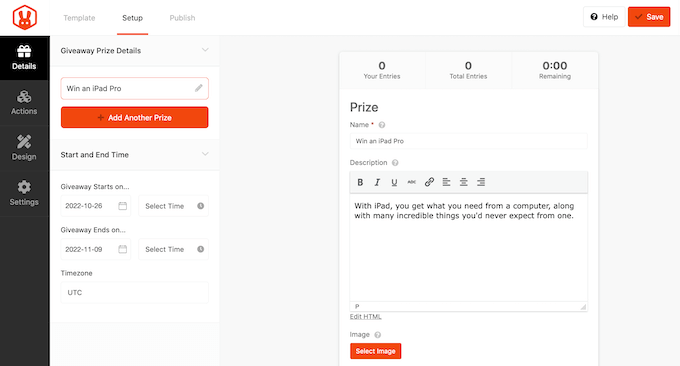
It’s also a good idea to add a photo of the incentive so visitors can see what’s on offer.
To do this, simply click on ‘Select Image’ and then either choose an image from the WordPress media library or upload a new file from your computer.
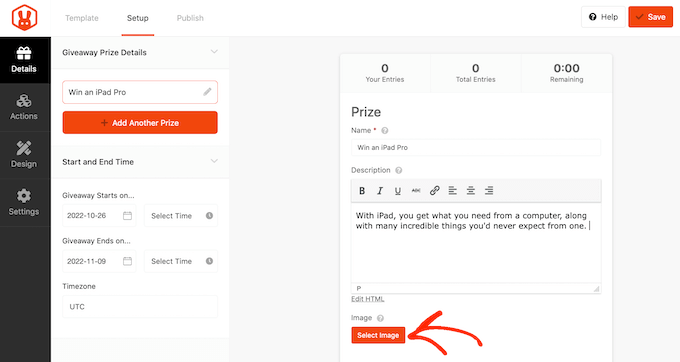
Next, you need to choose the start and end dates for your contest. If you plan to run lots of giveaways on your online store, then this allows you to schedule them in advance. It also guarantees that your contests will start and end on time, no matter how busy you get.
Whenever possible, we recommend leaving enough time before the start date so you can promote the giveaway properly.
For example, you might promote it using web push notifications or by sending SMS messages to your users. This helps build a sense of excitement and anticipation before the contest goes live.
To schedule the WooCommerce contest, simply enter a date and time into the ‘Giveaway starts…’ and ‘Giveaway ends…’ sections.

You’ll also want to check the ‘Timezone’ dropdown. By default, RafflePress uses the timezone in your WordPress settings, but you can change this to anything you want.
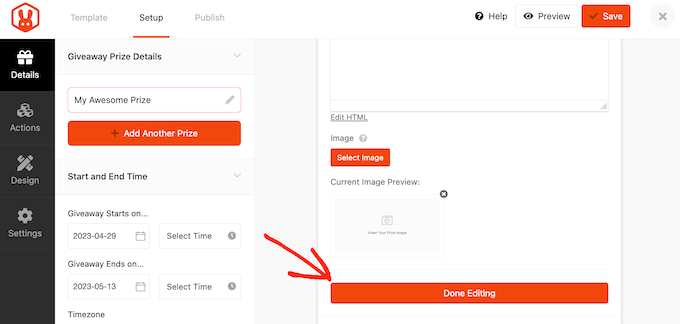
When you’ve finished making changes to this section, click on the ‘Done Editing’ button.
Step 3: Add Actions Users Need to Perform to Join The Contest
Giveaway actions are the ways that users can participate in the contest, such as subscribing to your podcast or leaving a comment on your WordPress blog. RafflePress comes with lots of different actions that you can add to your contest.
You’ll want to use actions that help you reach new customers and keep your existing customers engaged.
For example, if you run an online boutique shop, you may want to use actions that will grow your Instagram following. You can then show these new followers photos and stories featuring your latest clothing products.
To see all the actions that you can add to your WooCommerce contest, simply click on the ‘Actions’ tab.
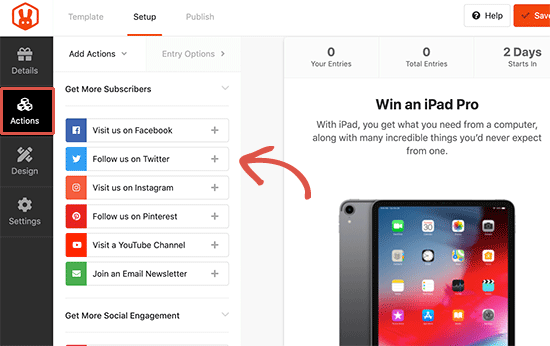
To add an action to your campaign, simply give it a click. The action will now appear below the prize description.
After that, you can click on the action to see its settings in the left-hand menu.
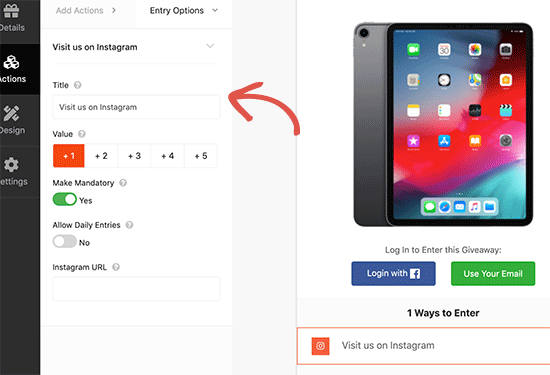
Each action has some basic settings. You can type in a title, which will be shown to your visitors, and make the action mandatory so visitors must complete this action to enter the contest.
This is useful if you are planning to offer multiple entry methods but want to encourage shoppers to complete one action over all the others.
By default, every action is worth one entry, but you can change this to make some actions more appealing than others. Again, this will encourage customers to complete a particular task, even if your contest has multiple entry methods.
Apart from these general options, there are some settings related to specific actions.
For example, if you want shoppers to enter the contest by visiting your Instagram page, then you will need to enter your Instagram profile URL.
Once you’ve filled in these settings, you can click on the ‘Add Actions’ tab and add more entry methods to your competition.
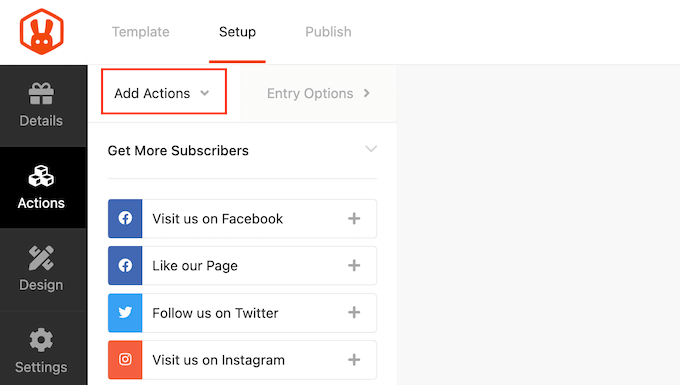
You can add as many actions as you like, which can often get you more entries.
For example, some of your shoppers may have a Facebook account but not an Instagram account. If ‘Follow us on Instagram’ is your competition’s only entry method, then these customers can’t participate even if they want to.
It’s smart to prioritize actions based on your campaign goals. For example, if you want to grow your email list, then it’s a good idea to put the ‘Join an Email Newsletter’ action at the very top of the ‘Ways to Enter’ list.
Simply hover over the action in the editor and then grab the dotted button that appears to the left of the action. Then, move the entry method using drag and drop.
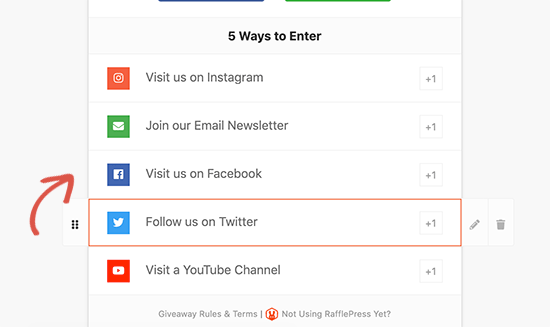
When you are happy with how the giveaway is set up, don’t forget to click on the ‘Save’ button to store your settings.
Step 4: Customize WooCommerce Contest Design
Now that your giveaway is set up, you’ll want to make it stand out to the people who visit your online marketplace or store.
To change how the contest looks, simply click on the ‘Design’ section from the left column.
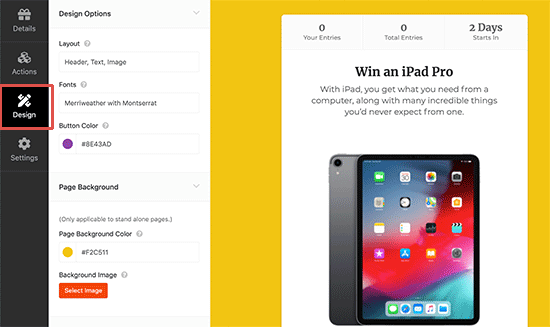
You can then change the fonts, select a new button color, change the background color, and more. You can even customize the giveaway template using custom CSS.
RafflePress will show a live preview of your giveaway as you make changes. When you are happy with the preview, go ahead and click on the ‘Save’ button to save your progress.
Step 5: Configure the WooCommerce Contest Settings
RafflePress has lots of settings that control how your giveaway runs, including showing and hiding options, setting up tracking, and more.
To get started, switch to the ‘Settings’ tab from the left-hand menu and then click on the ‘General’ tab. Here, you can set basic options for your giveaway, including showing the winners and the total number of entries, limiting signups per IP, and more.
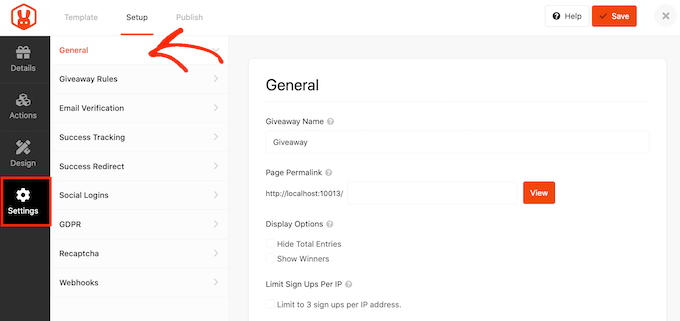
RafflePress also comes with a Rules Generator that you can use to quickly and easily create giveaway rules for your campaign.
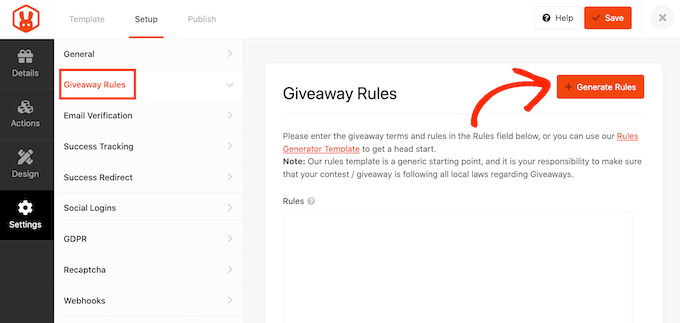
In the left-hand menu, select ‘Giveaway Rules’ and then click the ‘Generate Rules’ button. This will bring up a form where you can enter your giveaway details.
In most cases, you or your company will be the contest’s sponsor. This means you’ll need to type in the company name, business email address, country, and eligible location information.
RafflePress will then use this information to create some basic giveaway guidelines and rules.
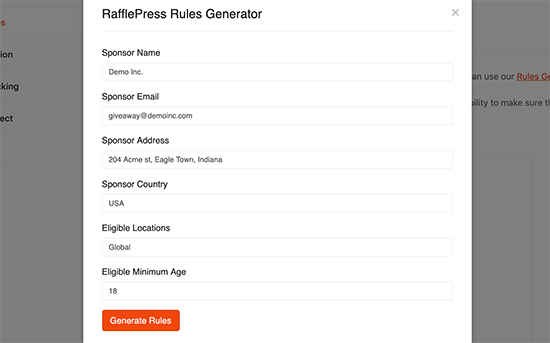
Every country and area has different rules for giveaways, so it’s a good idea to review these guidelines carefully and then add any missing information.
After that, switch to the ‘Email Verification’ settings. Here, you can turn on the ‘Contest Must Confirm Their Email’ toggle so your contest only accepts entries from people who verify their email addresses.
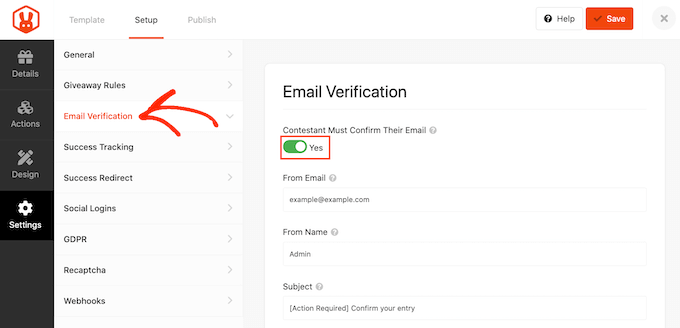
You’ll typically want to enable this setting if you are using the contest to grow your mailing list or get more newsletter subscribers.
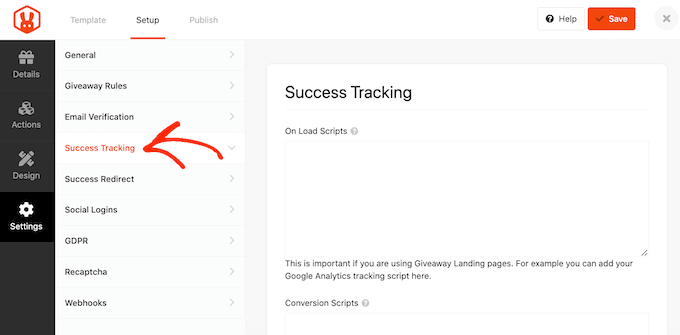
Next, click on ‘Success tracking.’ If you use Google Analytics to track user engagement on your WooCommerce store, then you can add Google Analytics scripts to this section.
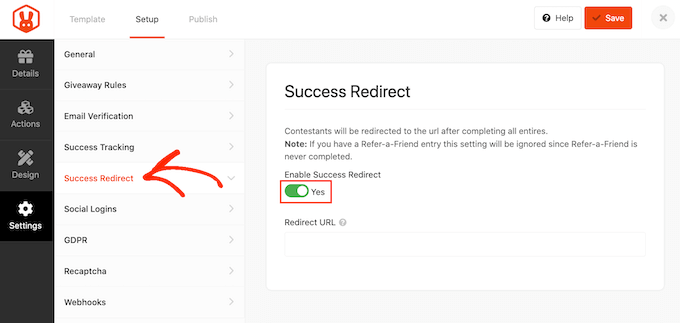
When a customer submits an entry, it’s not the end of the process. You may want to redirect the visitor to a particular page, such as your most popular WooCommerce products, a landing page, or a custom thank you page.
To set up a redirect, select the ‘Success Redirect’ tab and click to activate the ‘Enable Success Redirect’ slider. You can then add the page to the ‘Redirect URL’ field.
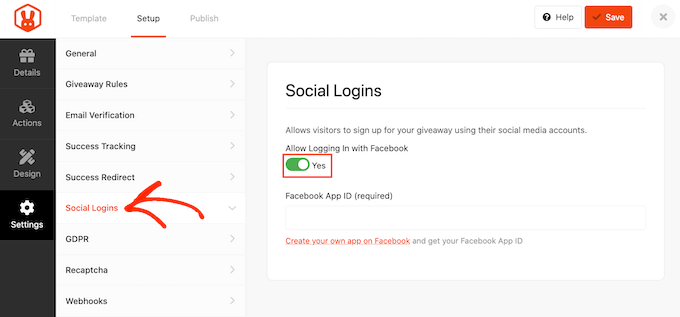
Next, you may want to allow shoppers to enter using their Facebook accounts. This will make it easier for customers to enter your competition, which could get you some extra participants.
To allow logging in with Facebook, simply select the ‘Social Logins’ tab and then activate the ‘Allow logging…’ slider.
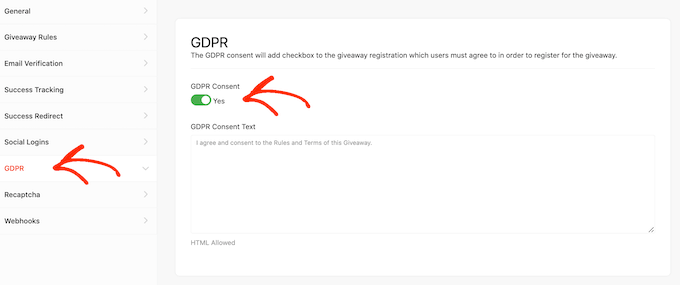
The General Data Protection Regulation (GDPR) is a European Union (EU) law that gives EU citizens more control over their personal data. If you break a GDPR rule, then you could get a fine or even jail time.
RafflePress can help you comply with GDPR by asking for consent before each customer enters your giveaway. To add this checkbox to your contest, select the ‘GDPR’ tab and then activate the ‘GDPR Consent’ slider.
For more on this topic, please see our ultimate guide to WordPress and GDPR compliance.
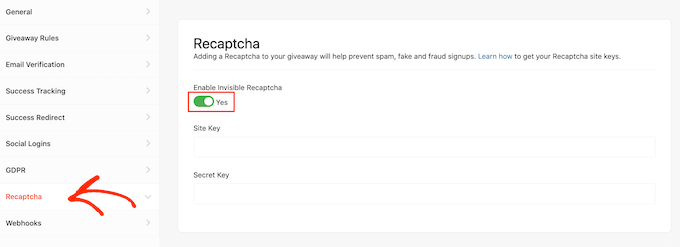
Fake entries and spam can stop you from achieving your goals. With this in mind, you may want to protect your contest using an invisible recaptcha.
Unlike regular captchas that challenge visitors to complete a puzzle, invisible recaptchas run in the background. This allows them to block spam and bots without adding friction to the customer experience.
To add an invisible recaptcha to your WooCommerce giveaway, just click on the ‘Recaptcha’ tab. Then, activate the ‘Enable Invisible Recaptcha’ slider.
For a closer look at recaptcha, see our guide on how to add recaptcha to WordPress.
When you are happy with how the WooCommerce contest is set up, click on the ‘Save’ button to store your changes.
Step 6: Publish and Add Contest to Your WooCommerce Store
Now that your contest is ready, it’s time to add it to your WooCommerce store. RafflePress gives you a few different options:
- Add the giveaway to any page or post using the RafflePress block.
- Use a shortcode to add the giveaway to any post, page, WooCommerce product page, or widget-ready area.
- Create a giveaway landing page.
Let’s check out each of these methods.
Method 1: Adding Contest Block to Blog Posts / Pages
You can add the competition to any WordPress post or page by clicking on the ‘+’ icon to add a new block.
Then, simply type in ‘RafflePress’ and select the right block when it appears.
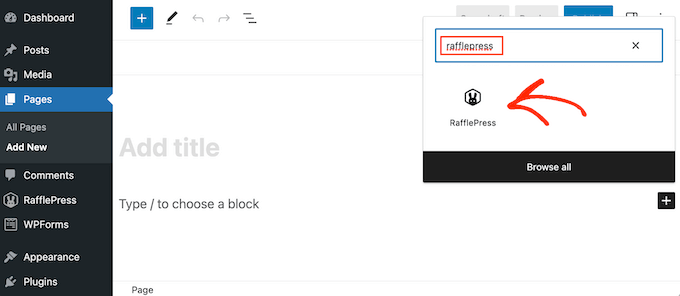
The RafflePress block will now appear in the editor.
Next, simply open the dropdown and choose the WooCommerce giveaway we created earlier.
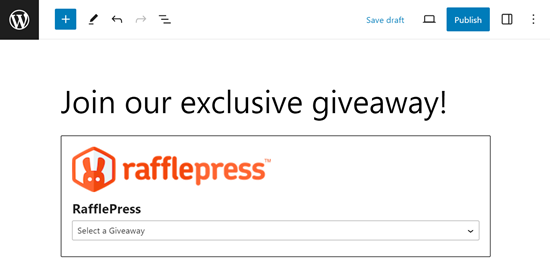
After that, just update or publish the page, and the giveaway will appear on your site.
Method 2: Adding the Contest Using Shortcode
Shortcodes allow you to add the contest to any widget-ready area, post, or page.
If you’re using a page builder plugin that supports WooCommerce, such as SeedProd, then you can even add the shortcode to other areas of your store, like your WooCommerce checkout page or your cart page.
To find this shortcode, open the ‘Publish’ tab in the giveaway editor.
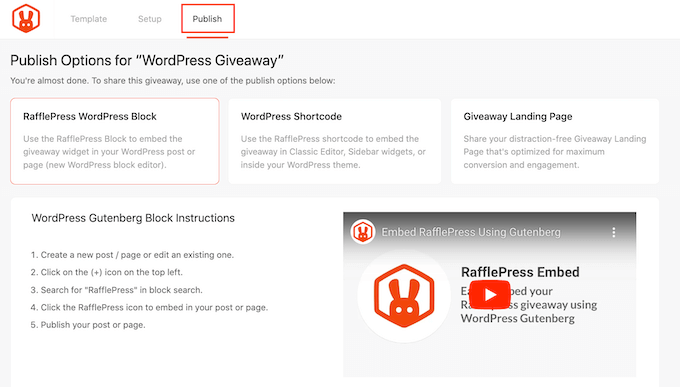
From here, click on ‘WordPress Shortcode,’ and RafflePress will show the shortcode that you can use.
You can now go ahead and paste this shortcode into any page, post, widget-ready area, or even your custom WooCommerce pages, such as your WooCommerce login page.
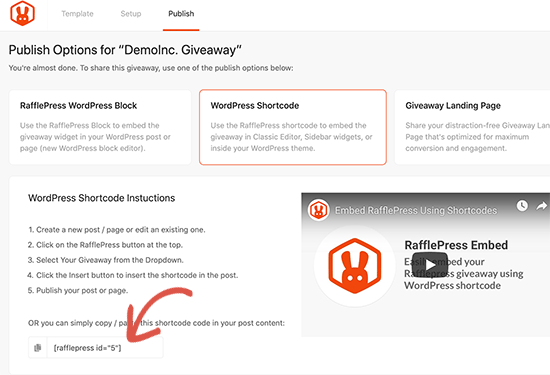
For step-by-step instructions on how to place the shortcode, please see our guide on how to add a shortcode in WordPress.
Method 3: Creating a Contest Page in WooCommerce
RafflePress also allows you to publish the giveaway as a landing page. This is a great choice if you want to share the giveaway on social media or add it to your email marketing newsletter.
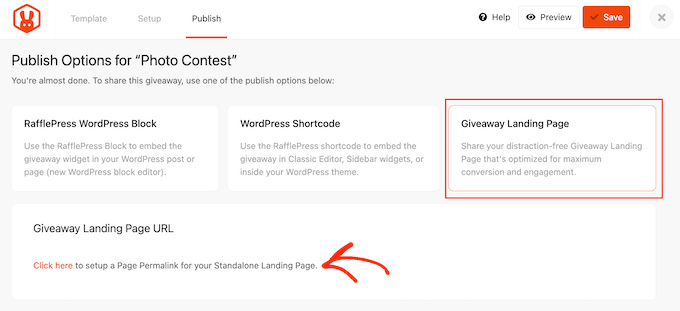
You can find this option under the ‘Publish’ tab in the giveaway editor. Here, choose ‘Giveaway Landing Page’ and then select the ‘Click here…’ link.
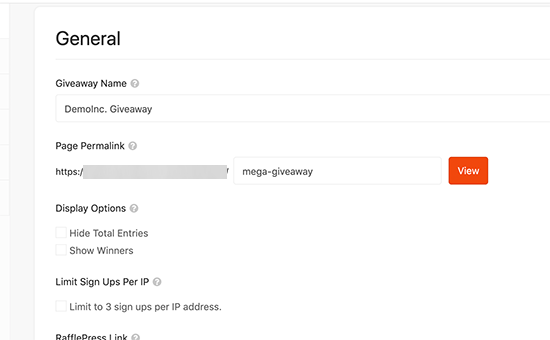
Now, create a URL for your giveaway landing page by typing it into the ‘Page Permalink’ field.
After that, go ahead and click on ‘View’ to see your landing page in action.
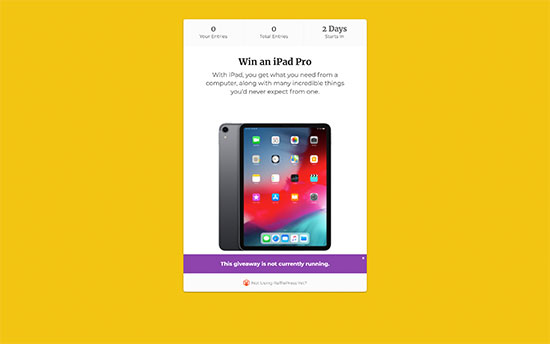
RafflePress will now publish your giveaway as a landing page.
You’re now ready to copy the URL and start promoting the contest.
Step 7: Promote Your WooCommerce Contest
After creating a giveaway, you’ll want to promote it on your WordPress website so that more people can enter.
Wherever possible, it’s a good idea to start promoting a contest before publishing it so you can build anticipation and excitement.
To start, you can announce the contest to all of your subscribers in your email newsletter. You can see our guide on how to do an email blast the right way for more details.
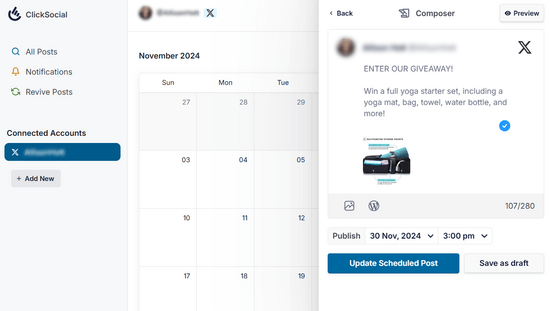
You’ll want to spread the word on your social media profiles as well. With a tool like ClickSocial, you can easily create and schedule social posts for your giveaway well in advance. Plus, you can do it right from your WordPress site to save time.
You might also reach out to influencers in your industry and promote the competition on relevant online communities and forums.
Next, you’ll want to make sure that the people who visit your store know about the contest. The best way to do this is by using OptinMonster.
It allows you to promote the giveaway by creating lightbox popups, floating banners, countdown timers, and more.
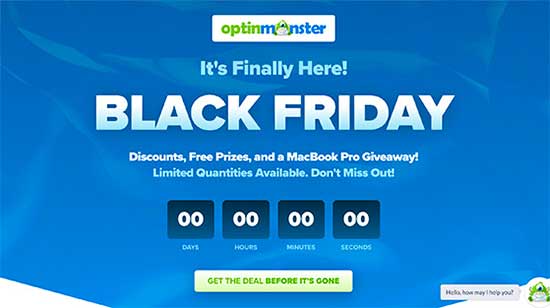
In this way, you can use FOMO on your WordPress site to get more entries.
Sending web push notifications can also get you more participants. For example, you might ask your push notification subscribers to enter the competition or refer any friends or family members who might be interested in participating.
PushEngage is the best push notification tool on the market. It allows you to connect with visitors after they leave your online store by sending them targeted push messages.
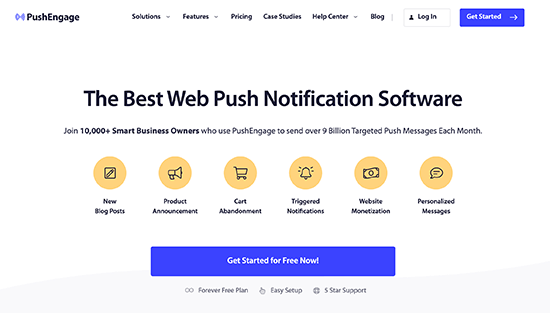
It also has advanced features such as A/B testing, automatic drip campaigns, smart opt-in reminders, custom-triggered campaigns, interactive message options, and more.
Step 8: Choose the WooCommerce Contest Winners
Once your giveaway closes, RafflePress can help you pick a random winner.
In your WordPress dashboard, go to RafflePress » Giveaways and hover your mouse over the giveaway. When it appears, click on the ‘Need Winners’ link.
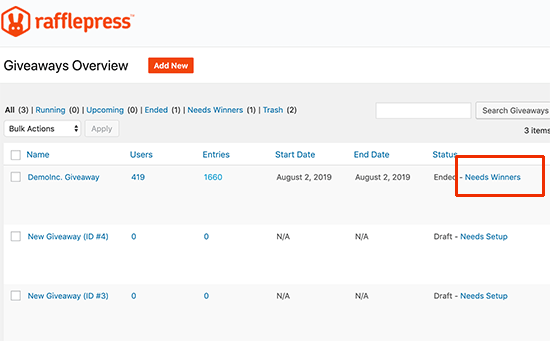
On the following page, RafflePress will show all the people who entered your giveaway, along with how they entered, their total entries, and more.
Here, simply type in the number of winners that you want to pick.
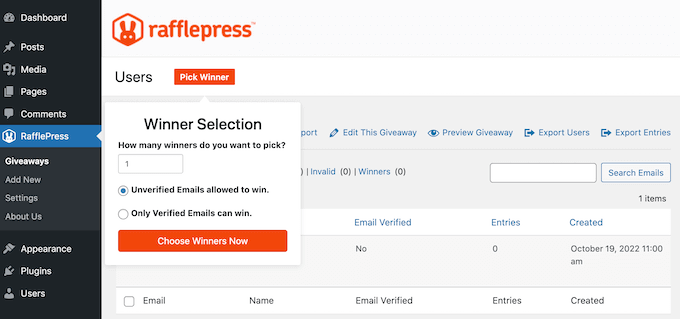
After that, go ahead and click on the ‘Choose Winners Now’ button. RafflePress will then show the winner highlighted at the top of the list.
You can now send this person an email to let them know the good news.
Get More Sales on Your WooCommerce Store With These Expert Tips
If you like learning how to create WooCommerce contests, then you will enjoy these other creative tips to maximize your sales and customer engagement:
- How to Send a Coupon After a WooCommerce Product Review
- How to Send Automated Birthday & Anniversary Emails in WooCommerce
- How to Offer a Shipping Discount in WooCommerce
- How to Add a Free Shipping Bar in WooCommerce
- Ways to Recover WooCommerce Abandoned Cart Sales
- How to Create an Order Bump for WooCommerce (Step by Step)
We hope this article helped you learn how to easily create a WooCommerce contest and build customer loyalty. You may also want to see our expert picks for the best WooCommerce spin-the-wheel coupon plugins and learn how to create a WooCommerce buy-one-get-one-free offer.
If you liked this article, then please subscribe to our YouTube Channel for WordPress video tutorials. You can also find us on Twitter and Facebook.


kzain
I don’t think I could have found this type of information anywhere without giving money.
With that said. Thanks for such exact details that I needed on rafflepress etc!
Jiří Vaněk
Many people love contests, and the proof of this is social networks, where the same phenomenon is used to attract people to the web. This is practically the same method and I believe it can really increase both website sales, conversions and traffic. It’s great that you cover these non-technical articles as well in terms of showing people different marketing strategies to boost their brand name. Everywhere else such advice is only available for a fee, here it is completely free and with practical instructions on how to do it. Amazing.
Kamal
This concept is what i was looking for, but wpbeginner, i have never forgotten since a decade. I use to run a auto blog, i use to refer a lot of To Do stuff from here.
Thanks to keep this so much inspiring and provide the exact details needed from our point of view. I really appreciate the team.
Thumbs Up! and all the very best.
WPBeginner Support
Glad our content has continued to be helpful
Admin