Content sliders are commonplace in WordPress nowadays, but they’re typically only used in a very limited set of circumstances – typically, they’re located on homepages, for showcasing recent posts, or image galleries. A new trend is developing, where WordPress websites are using the potential and flexibility of content sliders to tell compelling stories that motivate visitors to take action – that is, in the form of product tours.
Using a content slider for your WordPress product tour can help you sell products better by guiding users through the key points at their own pace – this is better than simply using a video, because they can skip backwards/forwards to specific, defined points, instead of having to guess at a timecode. In addition, using a content slider this way takes advantage of all kinds of web media – meaning you can include interactive content in the slides, instead of forcing your user to passively watch a video.
Until recently, you needed to know how to code in order to create anything except the most simple content slider product tours, but we’ve been using an awesome slider plugin called SlideDeck 2 which changes all that.
This powerful plugin makes it super-simple to create awesome sliders in minutes, without a single line of code required. We covered one of SlideDeck 2’s other robust features in a previous post, but their latest update enables you to build custom content sliders and tailor the content of each slide to create compelling presentations that motivate your visitors to take action. We’ve put together this quick guide to show you how to make a sweet product tour for your WordPress site using SlideDeck 2.
Purchasing & installing the plugin
First things first: Custom Content slides are a premium feature in SlideDeck 2 so you’ll have to purchase it to use it on your site. We recommend you go to the SlideDeck website & purchase the plugin – for the power it contains, it’s pretty cheap & you can easily upgrade to get better features & use it on more sites.
To unlock the Custom Content feature, you’ll need to purchase either the Professional or Developer package, then install the plugin plus an ‘Addon’ that unlocks the additional features.
To install the plugin, you can follow our handy Step by Step Guide to Installing a WordPress Plugin.
Terminology
Before we start, there are a few terms we should explain:
- Slide Type – There are 4 different types of slides, each designed to accommodate a particular kind of content: image, video, text and HTML.
- Lens – Lenses are like themes for your content slider. They control how your slider looks and behaves, as well as how the content is presented on the page. Just like with WordPress themes, applying a different Lens to your content only takes a few seconds, and can yield a significantly different look and feel for your slider.
Ok, now that the jargon is out of the way, go ahead and activate SlideDeck 2, and let’s get started!
Creating a Custom Content SlideDeck
We’re going to show you how to create a product tour content slider that mixes together four different types of content, using SlideDeck’s Custom Content feature. Begin by clicking on “Manage” to go to the main dashboard. This screen lets you create new SlideDecks and sort your existing SlideDecks.
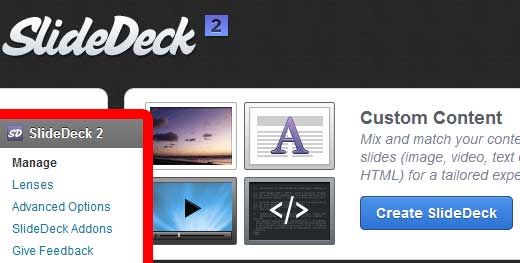
In the Custom Content section, click on the blue “Create SlideDeck” button. You’ll get taken to the Custom Content Editor screen to build your first slide. Once you land on the Custom Content Editor, start by naming your SlideDeck. You’ll notice that your first slide has been created, and you have a choice between three or four different Slide Types, depending on which package of SlideDeck 2 you’re using – Professional package users will have access to Image, Video and Text Slide Types; Developer package users will be able to choose the HTML Slide Type in addition to those three.
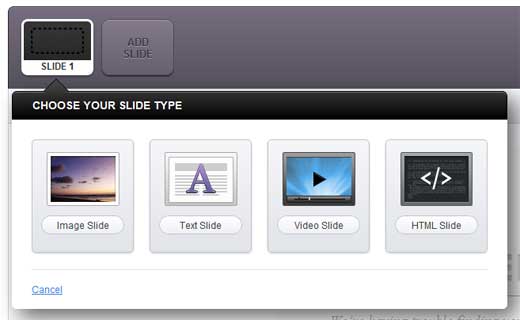
Underneath this flyout menu is one of SlideDeck 2’s most unique features – the live preview window (it’s one of the reasons SlideDeck 2 is a recommended WordPress plugin in WPBeginner’s Blueprint). Here, you see your slider update in real-time as you edit it.
Starting with an Image slide
Let’s start with an image slide – something that gives our visitors a quick & visually engaging overview of the tour they’re about to take. Click on the “Image Slide” Slide Type. The flyout menu will refresh to show you all the options pertinent to creating an image slide:
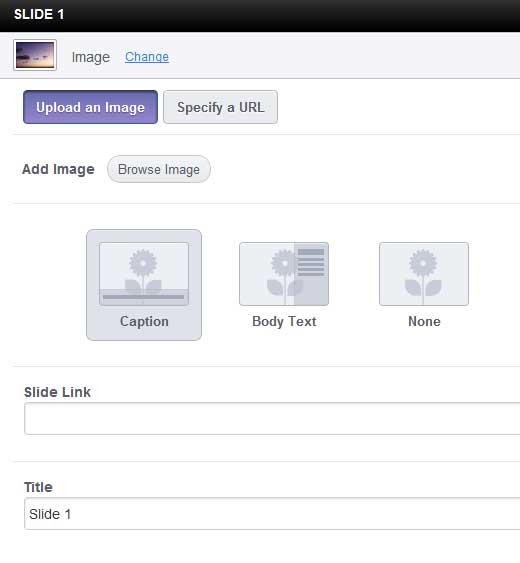
Upload an image | Specify a URL – Choose whether you want to upload your image to the WordPress Media Gallery, or simply paste in a URL, if it’s hosted elsewhere.
Caption | Body Text | None – Tell SlideDeck whether you want a text caption to overlay the image, or have some brief body text to accompany it. Alternatively, you can simply show the whole image, with no associated text.
Slide Link – Specify a URL to visit, if the user clicks anywhere on the slide.
Title – Give the slide a title to be shown in either the caption or body text areas.
Description – Enter the description copy for the slide. You can enter rich-text here!
Caption Position – Determines the position of the text overlay on the slide. Captions can go top/bottom, and body text can go on the left/right.
Once you’ve set up your slide how you like, simply hit the “Apply” button, and the Live Preview area will refresh to show you your first slide. In our example, we’ve built our slide by specifying a URL, with a caption on the bottom and no slide link.
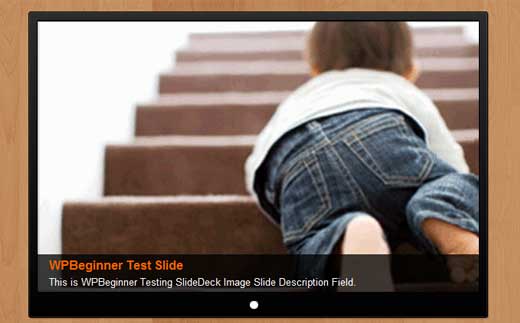
So that’s our first Custom Content slide created – easy right? Now, we’ll add a second to add a video showing our product’s demo.
Creating the video slide
SlideDeck 2 supports video content from three sources – YouTube, Vimeo and Dailymotion – meaning all we have to do is upload our product’s demo video to one of these services and then paste in the URL to the video’s page & hit “Update”.
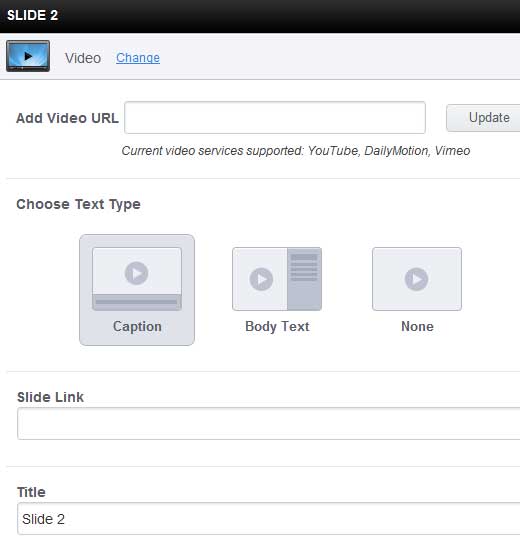
As with the Image Slide Type, you can choose to add a title and a brief caption or paragraph of text to give your visitors an idea of what they’ll see in the video. By default, SlideDeck 2 will pull in the caption content you have on your YouTube/Vimeo/Dailymotion page, but you can adjust it to suit your needs for the product tour.
As before, hit Apply, and take a quick click through the slider – you’ll now be able to go back and forth between your image and video slides.
Creating a text slide
Sometimes, you just need space for some text – to show a features list, for example, or to share a quote from a glowing review of the product. In cases like this, we can use the Text Slide Type.
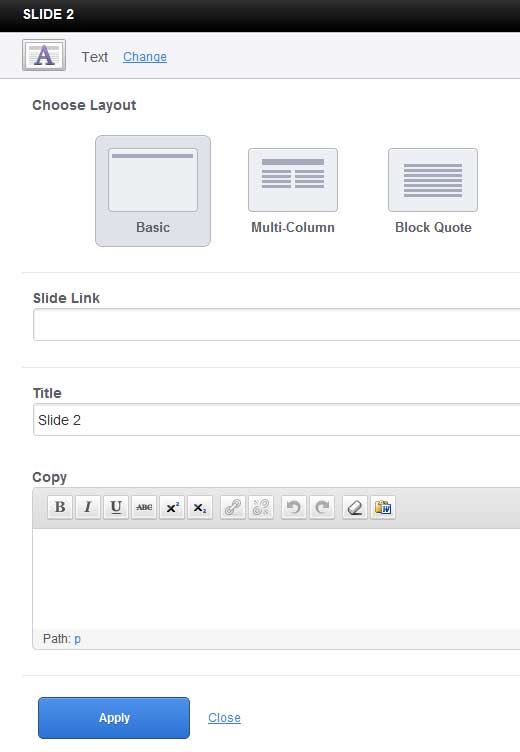
This is a very straightforward Slide Type, with just a few options to consider:
Layout – The basic layout simply places the title at the top of the slide, with the text flowed in underneath. Multi-column provides more of a newspaper-like format, by automatically wrapping the text into two columns. Block Quote allows you to highlight a short snippet of text with large, bold typography. As before, hit Apply to add the slide into your SlideDeck.
Reorganizing slides
At this point, you may be thinking you’d like to lead with your video slide instead of the image, so you can get your users interacting and engaged with the tour right away. SlideDeck lets you do this instantly – in the slide header area, click and drag the video slide, and drop it into the glowing space to the left of the image slide. Super-simple!

Taking it further – using the HTML Slide Type
The HTML Slide Type is a powerful addition to the Developer package of SlideDeck 2, that lets you enter your own HTML code into a slide. It’s perfect for more complex layouts of your content, or for adding more powerful interactions to your content slider. For example you can embed a signup form, so customers can opt to receive an email newsletter at the end of product tour – a powerful call-to-action, if ever there was one!
Select the HTML Slide Type to reveal the HTML editor in the flyout menu.
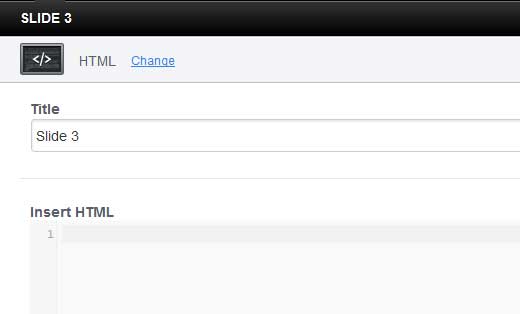
Into the Insert HTML field, you can paste your custom code. You’ll notice that it automatically color-codes the different tags to help you make sure that it’s structured correctly. A couple of important points to note:
- You can include CSS style rules for the slide content between <style></style> tags, and they’ll apply across all slides in the SlideDeck
- Since SlideDeck’s Live Preview isn’t able to predict how your theme’s styles might interact with your content slider, for complex styling you’ll get a more accurate preview if you view it in the page you intend to publish your SlideDeck on.
With the code in place, hit Apply, and the slide will get added into the rotation.
Configuring the Lens
You’ve now created your first Custom Content SlideDeck! Go on and take a few minutes to click through the slides in the Live Preview, and bask in the glow of a job well done.
Now, it’s time to make it look seamless with your site by configuring your Lens. SlideDeck contains a huge amount of options for controlling the appearance of your new product tour by customizing the Lens.
Saving & Publishing Your SlideDeck
Awesome content? Check. Sweet theme chosen and customized? Check. Sounds like you’re all ready to get your new product tour published and converting your visitors into customers!
SlideDeck offers three ways to embed your sliders into your WordPress site – inserting it into an existing page or post’s content, creating a new page or post with the slider embedded, and finally inserting it into your page template, which is most likely your best bet if you want to add the product tour to your homepage.
Wrapping up
Although content sliders are usually only used for image galleries, or featured posts, SlideDeck 2 gives you a ton of flexibility to explore the potential of content sliders to create compelling experiences that keep your visitors engaged and returning. We at WPBeginner highly recommend you check it out! A live example of how we are using a custom SlideDeck can be seen on our Free WordPress Blog Setup page.
Have an example of SlideDeck that you want to share? Let us know about it in the comments! Also, check out part one of this series, where we show you how to create Dynamic Source SlideDecks.
Touch-interface sliders are the future of web design. Get SlideDeck Now. Use the coupon code: WPB-SD2 to get 20% off.


Have a question or suggestion? Please leave a comment to start the discussion.