Interactive elements like calculators can improve the user experience on your site. They can serve multiple purposes, like capturing leads, boosting engagement, or helping visitors find quick answers.
By providing valuable tools that directly answer user needs, you can keep users on your site longer, deepen their online experience, and ultimately achieve your website’s goals.
Our team tested multiple tools and plugins to find the one that makes it easiest to add a calculator for any purpose.
In this article, we will show you how to create a custom calculator in WordPress easily and step by step.

Why Add a Custom Calculator in WordPress?
A custom calculator allows users to quickly calculate things without leaving your website.
For instance, if you have a health and fitness blog, then you might add a BMI calculator so that users can see their BMI and decide which subscription plan or product to purchase from your website.
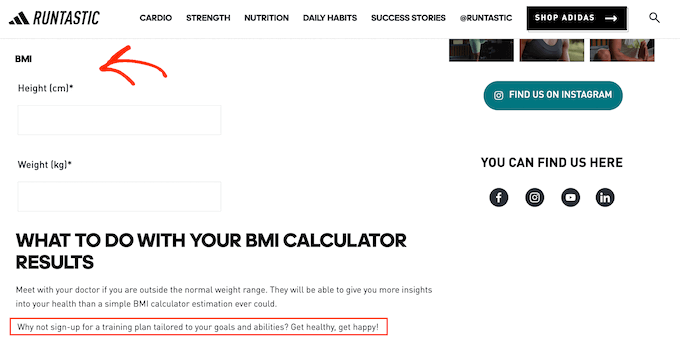
If you sell worldwide, then an online calculator that converts metric units to imperial units can also get you more sales by helping customers check if a product is the desired size or weight.
You can also build trust and reduce cart abandonment by offering a shipping calculator. This way, customers won’t be surprised with unexpected costs at checkout.
Or, you can add a mortgage calculator to your real estate website or a car payment calculator to your vehicle dealership site.

These custom calculators are also a great way to generate leads. For instance, you can ask users to enter their email address so you can send them their results. In this way, a calculator can help you build an email list in WordPress.
Having said that, let’s take a look at how to easily create a custom calculator in WordPress.
How to Create a Custom Calculator in WordPress
You can easily create a custom calculator in WordPress with WPForms. In our opinion, it is the best custom calculator plugin and form builder on the market. It comes with a drag-and-drop builder, 2000+ premade templates, and complete spam protection.
In fact, we love WPForms so much that we use it for all the contact forms on our site, as well as for our annual survey.
During our testing, we realized the plugin also has a Calculations addon that makes it easy to create any calculator you want, including a mortgage calculator, shipping discount, age calculator, and more. To learn more, see our WPForms review.
First, you need to install and activate the WPForms plugin. For detailed instructions, see our beginner’s guide on how to install a WordPress plugin.
Note: WPForms also has a free plan. However, you will need the pro version of the plugin to unlock the Calculations addon.
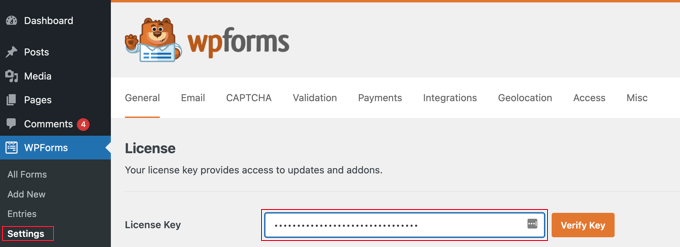
Upon activation, visit the WPForms » Settings page from the WordPress admin sidebar to enter your license key.
You can get this key from your account on the WPForms website.
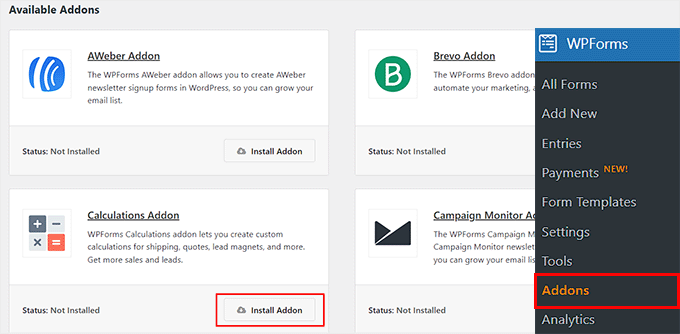
After that, head to the WPForms » Addons page from the WordPress dashboard and find the ‘Calculations Addon’.
Once you do that, simply click the ‘Install Addon’ button to activate it on your site.
Next, head over to the WPForms » Add New page from your admin dashboard.
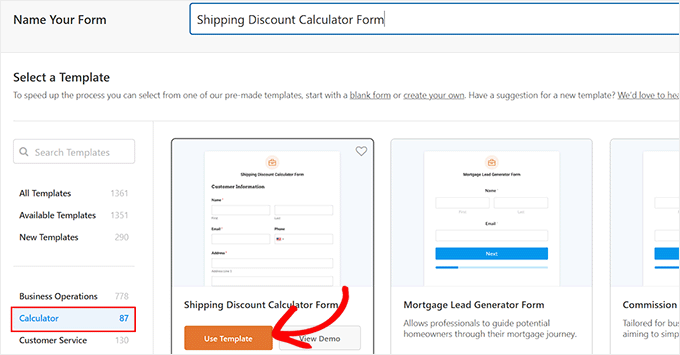
This will take you to the ‘Select a Template’ page, where you can start by typing a name for the form you are about to create.
After that, you can click the ‘Calculator’ option from the left column to open the 87+ premade calculator templates offered by WPForms, including:
- Mortgage Calculator Template
- Tip Calculator Template
- Lease Calculator Template
- BMI Calculator Template
- Savings & Investments Calculator Template
From here, you can click the ‘Use Template’ button under any form template you like. For this tutorial, we will be creating a simple ‘Shipping Discount Calculator’ Form.
This will open the form builder on your screen. Here you will notice a form preview on the right side with form fields in the left column.
You can now easily add more fields from the left panel and also drag them to rearrange their order.
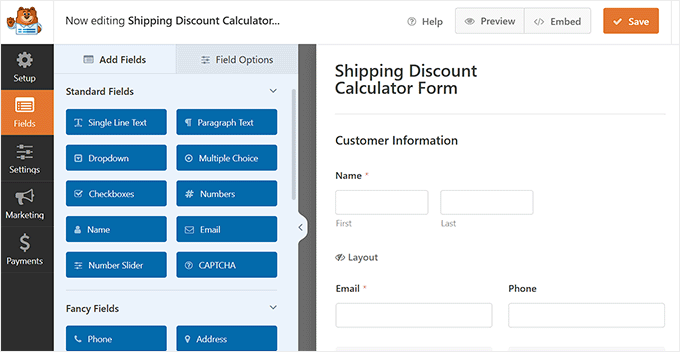
Next, scroll down to the ‘Available Items’ section and click on this field to open its settings in the sidebar.
Once you do that, you can add the title, image, and pricing for all the items that you are selling in your ecommerce store.
However, keep in mind that if you want to add images for the items that you are selling, then you will have to toggle on the ‘Use Image Choices’ option.
You can also click the ‘+’ button to add more items or the ‘-‘ button to remove an item from the section.
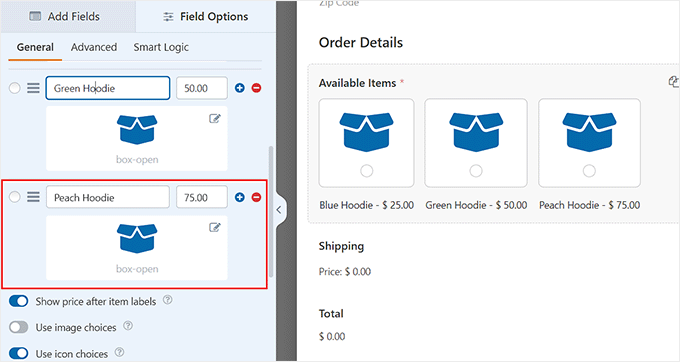
Next, you must click on the ‘Shipping’ field to open its settings in the left column. This field will calculate the shipping discount based on your product total. If you delete this field, then the calculator won’t work for your users, so make sure that you keep it in the form.
By default, the Shipping field offers an automatic 10% discount on purchases less than $50 and then multiplies the discount by 0.25% as your total increases.
However, if you want to change the shipping discount, then switch to the ‘Advanced’ tab from the left column and scroll down to the ‘Formula’ section.
Here, you can replace the value of 10 with the discount percentage that you want to offer. You can also change the product totals.
If you want to further customize the shipping discount, then you can click the ‘Cheatsheet’ link at the top. This will take you to the ‘Calculations Formula Cheatsheet’ page, where you can better understand the rules and strings to use.
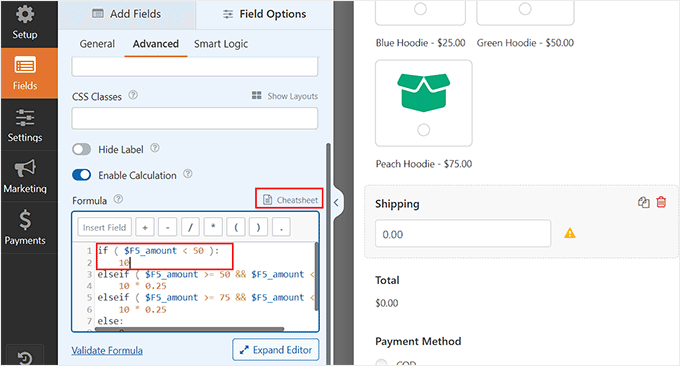
After that, you can also configure the settings for all the other field options in the same way.
New: Want an easier way to create your calculation formulas? WPForms now offers a powerful AI Calculations feature that does the hard work for you.
Simply click the ‘Generate Formula’ button next to the formula box to start chatting with the AI Assistant.
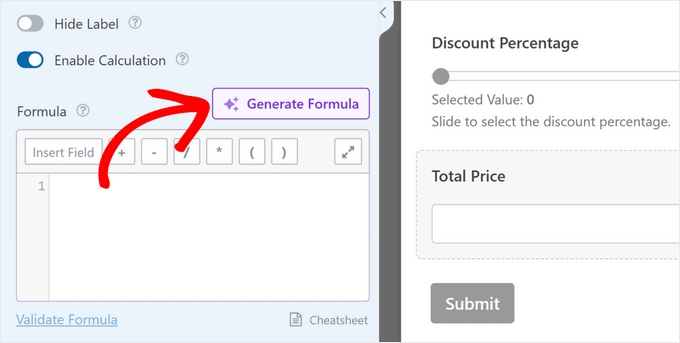
Then, you can simply describe what you want to calculate in plain English.
For example, you might type: “Apply a 15% shipping discount on orders over $100 and then increase the discount by 0.25% for every additional $50 spent.”
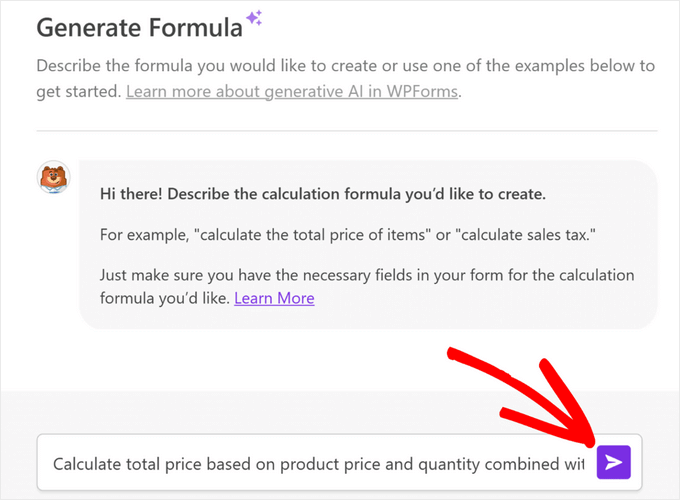
After hitting the ‘Enter’ button, the AI will automatically generate the correct formula, which you can add to your form in 1-click.
💡 Pro Tip: The more specific you are in describing your calculation needs to the AI, the more accurate and customized your formula will be.
Once you are done, don’t forget to click the ‘Save’ button at the top to store your settings.
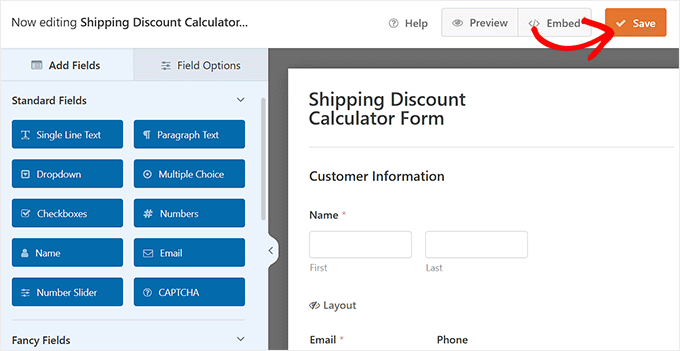
Next, you must open the WordPress page or post where you want to add the shipping calculator form in the block editor.
From here, click the add block ‘+’ button in the top left corner to open the block menu and embed the WPForms block.
Once you do that, just choose the shipping discount calculator form from the dropdown menu within the block itself.
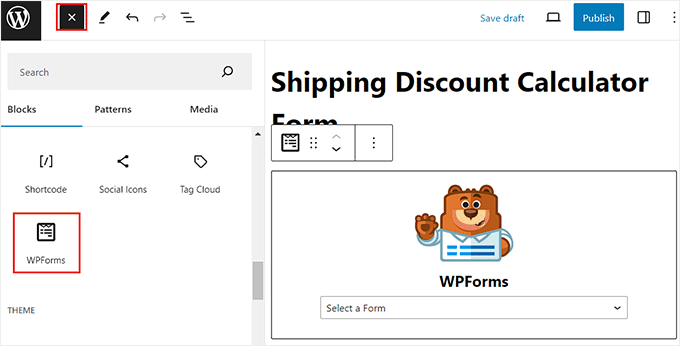
Finally, click the ‘Update’ or ‘Publish’ button at the top to store your settings. Now, you can visit your WordPress website to view the custom calculator form in action.
Here, the shipping field will automatically calculate the shipping cost according to the pricing of the different items that your customer is ordering from your site.

Customizing Your Calculator Form in WordPress
At some point, you might try changing the calculator to see if you can get more conversions. For example, you may want to make the ‘Email’ field mandatory.
To make these changes, simply visit the WPForms » All Forms page from the WordPress dashboard.
Once you are there, click the ‘Edit’ link under the form name to launch it in the form builder again.
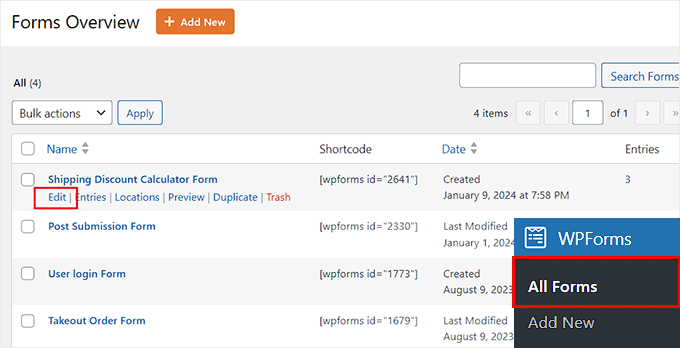
You can now customize the form fields or add new fields by following the process described above.
When you are finished, simply click on the ‘Save’ button, and these changes will appear on your business website or blog automatically.
Viewing Your Calculator Form Entries
Whenever someone completes a form on your website, WPForms automatically saves their entry to your WordPress database. This allows you to see how people are using the form and view the contact information for your visitors.
To see this information, simply go to the WPForms » Entries page in the WordPress dashboard and scroll down to the ‘Form Name’ section.
After that, click on the calculator form to view the entries.
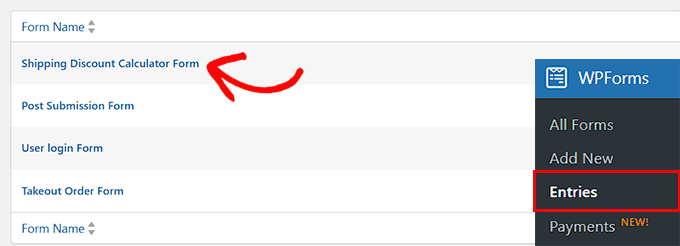
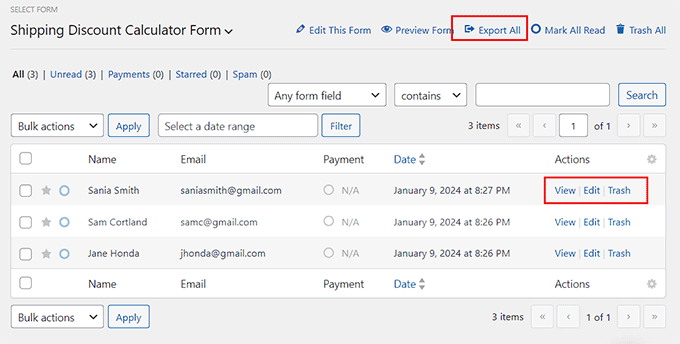
This will open a list of all the form entries on your page. From here, you can click the circle icon to mark an entry as read.
You can also click the ‘View’ link next to each entry to view all the form details, including the email address, phone number, ordered items, shipping discount, and more.
Sometimes, you may want to share a form’s data with people who don’t have access to your WordPress dashboard. For example, you might run a WordPress development agency and manage multiple websites for clients.
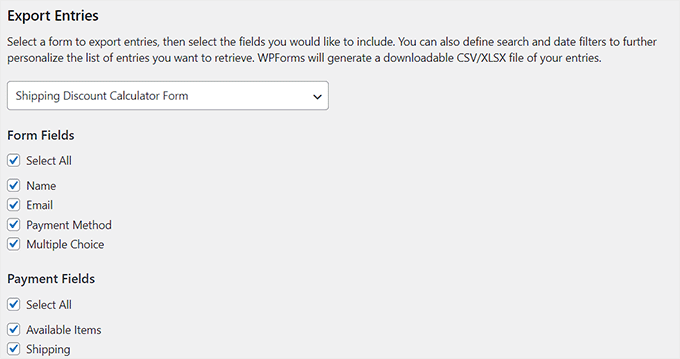
With WPForms, you can export all your data as a CSV or XLSX file by clicking on the ‘Export All’ link at the top.
This will open a new screen where you can select all the form fields whose data you want to export. After that, click the ‘Download Export File’ button to save your form data as an XLSX file.
Bonus: Create Complex Custom Calculators With Formidable Forms
If you are looking to create more complex calculators on your WordPress website, then we recommend using Formidable Forms. It is an advanced form plugin that comes with a drag-and-drop builder, premade templates, and dynamic fields.
Additionally, the plugin can perform advanced calculations like using formulae, conditional calculations, number formatting, and more, making it a great calculator builder.

You can use the plugin to create different types of calculators like a percentage calculator, price calculator, loan calculator, age calculator, life insurance calculator, and compound interest calculator.
For example, if you sell courses online, then you might add an ROI calculator form to show users how buying your course can increase their earning potential.
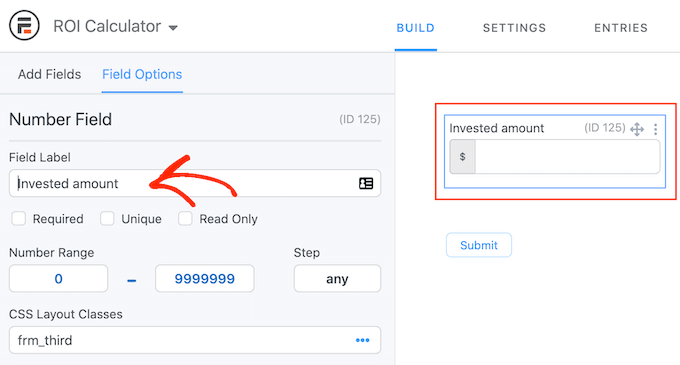
Some of Formidable Forms’ other features include conditional logic, progress indicators, multi-page forms, and a ChatGPT field that helps users fill out the form more quickly.
Formidable Forms can even integrate with different email marketing services to grow your email list. For more information, just see our complete Formidable Forms review.
We hope this article helped you add a custom calculator in WordPress. You may also want to see our step-by-step guide on how to generate more leads with free online calculators and our top picks for the best WordPress contact form plugins.
If you liked this article, then please subscribe to our YouTube Channel for WordPress video tutorials. You can also find us on Twitter and Facebook.


kzain
You’ve taken something complex and made it accessible to everyone. I love how you’ve walked us through creating a custom calculator step-by-step, making it feel achievable and fun! Your emphasis on using calculators to solve real-world problems and improve user experience is spot on. This guide is a game-changer for anyone looking to take their website to the next level. Thank you for sharing your expertise
WPBeginner Support
You’re welcome!
Admin
Anne
Wanted to create a BMI calculator on my health website too, but doesn’t have the WP Forms Pro version. Plan to buy in the future and follow your easy guide. Well, you guided me very well and convinced me to buy this plugin.