Maybe you want all messages copied to your assistant, specific messages sent to different departments, or simply a copy of the information users submit through your website.
Whatever your reason, a contact form with multiple recipients can keep information flowing and your business right on track.
Based on our experience, you can streamline communication, improve lead distribution, and improve overall customer satisfaction by adding a multi-recipient contact form.
In this article, we will share 4 different ways to create a contact form with multiple recipients, so you can choose the option that best fits your needs.
Why Create a Contact Form With Multiple Recipients?
By default, contact forms only send notifications to one email address.
You might want to change this for several reasons. Here are some situations that you might face:
- You run your WordPress site with a friend, and both of you want an identical copy of all the messages that come in through your contact form.
- You want your users to receive a confirmation email whenever they send you a message. You want this confirmation email to be slightly different from the one you receive yourself.
- You want your contact form messages to go to different people depending on the purposes of the message. For instance, you would like sales inquiries to go straight to your sales team vs. billing inquiries going to the billing team in your online store.
- You want to copy your blogging partner and your assistant in on your contact form emails, so you can easily “reply all” to keep everyone in the loop.
In this article, we will show you several different ways to use your contact form plugin to send multiple emails to different people. This lets you deal with all the above scenarios and anything else you might face.
Note: Our tutorial is meant for self-hosted WordPress sites only. For more information, you may want to see our comparison between WordPress.org and WordPress.com.
Here is a list of all the topics we will cover:
- Choose the Right Form Builder
- How to Send Multiple Notifications for Contact Forms in WordPress
- Method 1: Send the Same Notification to Multiple Recipients
- Method 2: Send Different Contact Form Notifications to Multiple Recipients
- Method 3: Add Different Recipients for Different Form Options
- Method 4: CCing Others on a Notification Email
- Bonus: Troubleshooting Email Delivery Issues for Your Forms
Choose the Right Form Builder
Before you start creating a contact form with multiple recipients, you have to select a contact form plugin.
Some of these plugins support multiple email notifications. However, many of them won’t let you customize them.
We will be using the WPForms plugin for this tutorial as it is the best WordPress contact form plugin on the market, used by over 6 million websites.
In fact, we love it so much that we use it to create all the contact forms you see on the WPBeginner site. To learn more, see our WPForms review.
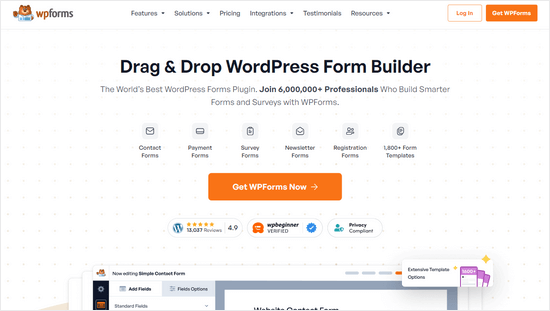
It also has a free version called WPForms Lite, which you can use if you only want to send the contents of your contact form to multiple recipients.
However, if you want to send custom notifications to multiple recipients, then you’ll need the paid version of the plugin.
To demonstrate all four methods, we will be using the pro version in this tutorial.
How to Send Multiple Notifications for Contact Forms in WordPress
There are multiple scenarios for sending contact form email notifications. In this article, we will be tackling each one of them.
First, you need to install and activate the WPForms plugin. For more details, see our beginner’s guide on how to install a WordPress plugin.
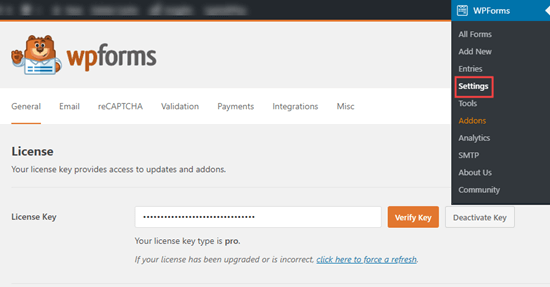
Upon activation, head over to the WPForms » Settings page from the WordPress admin sidebar to enter your license key.
You can find this information in your account on the WPForms website.
After that, you need to visit the WPForms » Add New page to create your first contact form.
For detailed instructions, you may want to see our step-by-step tutorial on how to create a contact form in WordPress.
Now that you’ve created your form, you can use any of the methods below to add multiple recipients and even create custom notifications for your forms.
Method 1: Send the Same Notification to Multiple Recipients
The simplest way to set up multiple recipients is to send the same notification to each person.
To do this, simply go to the WPForms » All Forms page from the WordPress dashboard and click on the form where you want to set up notifications.
This will launch your contact form in the WPForms form builder, where you have to click the ‘Settings’ button in the left corner of the screen.
From here, switch to the ‘Notifications’ tab and enter the recipient’s email in the ‘Send To Email Address’ box.
You can now type as many emails as you like into the field, but remember to separate the multiple email addresses with a comma.
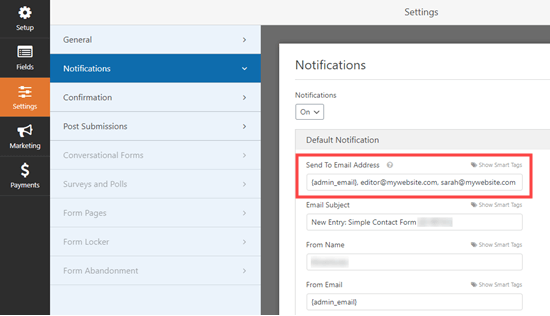
In the example shown above, the email notifications will be sent to:
- The default admin email address
- editor@mywebsite.com
- sarah@mywebsite.com
Tip: The {admin_email} is the email address for your WordPress administrator. This might be you if you are the site owner. It could also be whoever set up the website.
However, if you want, you can easily change the admin email by visiting the Settings » General page from the WordPress admin area.
For more details, check out our tutorial on how to change the WordPress admin email.
Method 2: Send Different Contact Form Notifications to Multiple Recipients
If you want to send different email notifications to recipients after submitting the form, then this method is for you.
For instance, you might want to send users a confirmation email that’s different from the admin email notification you get.
You can easily do this with WPForms. First, open the contact form that you created in the form builder.
Once you’ve done that, visit the Settings » Notifications tab from the left column. Next, click the ‘Add New Notification’ button.

This will open up a prompt on your screen where you’ll have to type a name for the notification. This name is just for your reference, so you can put in whatever makes the most sense to you.
For example, if you want to send an email to thank all the users who purchase a product in your WooCommerce store, then you can name your notification ‘Thank you email’.
Next, click the ‘OK’ button, and your new notification will appear at the top of the Notifications list.
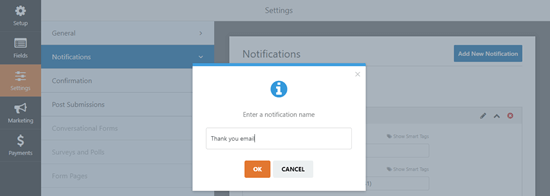
From here, you have to delete the {admin_email} tag from the ‘Send to Email Address’ box.
After that, click on the ‘Show Smart Tags’ link just above the ‘Send To Email Address’ box to show the available fields.
Once you’ve done that, simply click on the ‘Email’ smart tag to add it into the field as {field_id=”1″}.
Keep in mind that your field ID can differ depending on how you’ve customized your form.
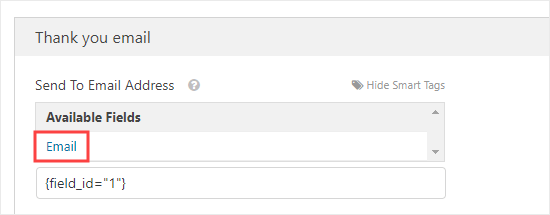
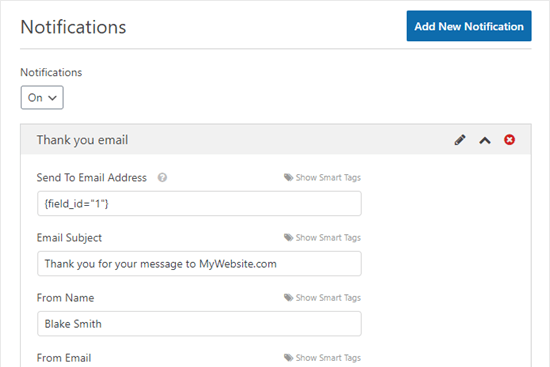
WPForms will now send this notification to the user’s email address, which they entered into the contact form.
Next, you’ll need to fill in the Email Subject, From Name, From Email, and Reply-To fields. Here’s an example of how that could look:
You’ll also want to add a thank you message. By default, the ‘Message’ section contains the tag {all_fields}. This will show all the data that the user entered.
Here’s a preview of a thank you message that we used on our demo website.
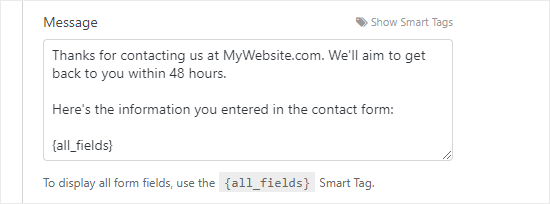
Now, your user will get the thank you message after submitting the form, and you’ll get the standard default notification without the thank you message.
You can set up as many custom notifications as you like. You don’t have to include all the form data in each message, either.
For instance, if you are a coach taking bookings, then you could choose to have all the form data sent to you and the client. Your assistant might only receive the client’s name, email address, and the time(s) for which they’ve booked. That way, any private information stays confidential.
Method 3: Add Different Recipients for Different Form Options
Sometimes, you might have a single form that you want to send to different people, depending on the user’s choice.
For instance, you may want to use a single contact form that allows users to submit questions, ask to buy ads on your site, and suggest guest post ideas.
You might want to:
- Send the questions to your assistant.
- Receive the advertising requests yourself.
- Send the guest post ideas to your editor.
With WPForms, you can easily send notifications to different people depending on the options that your users pick.
To do this, you’ll first need to open your contact form in the form builder.
Once you are there, you’ll need to add a field that lets users choose between two or more alternatives from the left column.
You could use either the Dropdown or the Multiple Choice field for this. For our example, we are going to use the Multiple Choice (radio button) field.
Now go ahead and drag and drop this field into the form. After that, click on it to edit the different choices.
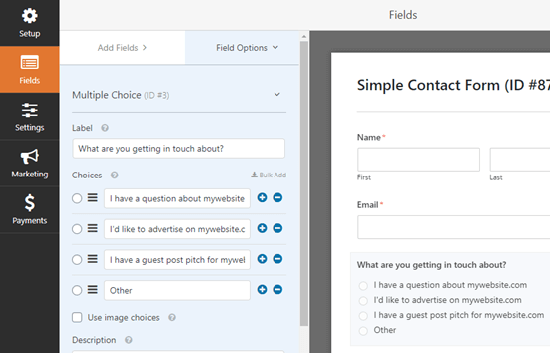
Once you’ve set up the field with various choices, go to the Settings » Notifications tab from the left column.
Next, click the ‘Add New Notification’ button to create additional notifications that you need.
You will now need to add the email address of the user that you want to send each customized notification in the ‘Send To Email Address’ field. After that, fill in the details as appropriate for each notification.
Here’s a preview of a notification that’s being sent when a guest post is submitted:
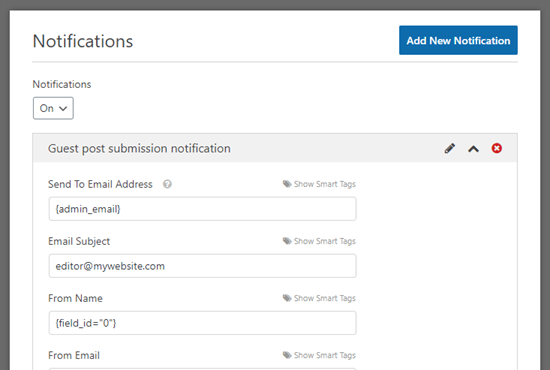
Next, you need to scroll down to the ‘Enable Conditional Logic’ section and toggle the switch to active.
This will open up a few additional settings. From here, select the multiple-choice field that you created from the dropdown menu on the left side of the screen.
After that, select a trigger for the conditional logic from the dropdown menu on the right corner of the screen.
For instance, if you want to send an email notification to the blog editor on your site when someone fills in a form for pitching guest posts, then you can select that option from the dropdown menu.
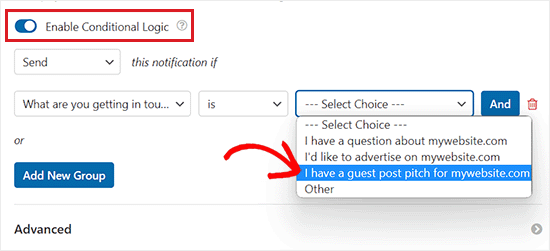
You can then continue to set up new notifications for each of your options.
Tip: You can use this method along with the methods we’ve already looked at.
For instance, you could enter two or more email addresses in the ‘Send To Email Address’ box. That would send copies of the same notification to those two people.
You could also set up an email confirmation message to go to the user.
If you want to use different confirmations for different options, you’ll need to enable conditional logic for these too.
Method 4: CCing Others on a Notification Email
Sometimes, you might want to copy people in on your contact form notifications.
For instance, you may want to copy in your site’s editor and lead writer when you get a notification about a new guest post submission.
The advantage of using this method is that you can easily ‘Reply All’ to the notification email. Instead of everyone receiving a separate email, as with the first method, there’s one email with multiple recipients copied in.
To add a CC field to your form notification settings, visit the WPForms » Settings page from the admin dashboard and switch to the ‘Email’ tab.
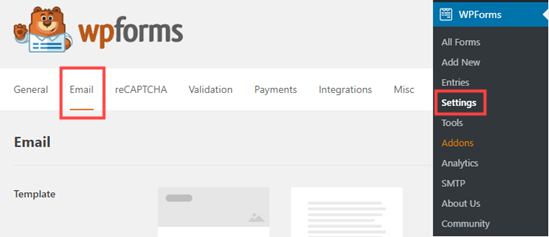
Once you are there, scroll down to the bottom of the page and then check the box next to the ‘Carbon Copy’ option.
After that, don’t forget to click the ‘Save Settings’ button to store your changes.

Next, open the contact form that you want to edit in the WPForms form builder. From here, visit the Settings » Notifications tab from the left column.
You’ll now notice that a ‘CC’ field has been added to your notifications settings.
From here, you can type any email address you want that notification sent to.
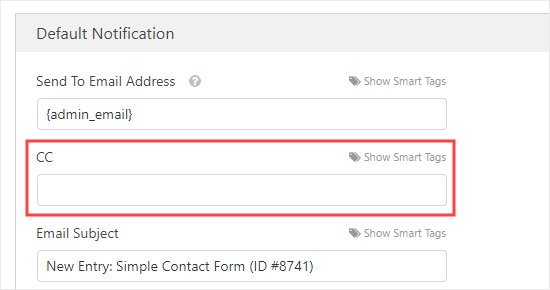
Tip: Don’t enter more than one email address in the ‘Send To Email Address’ box if you are using this method. Otherwise, the people being CC’d will receive multiple emails.
Bonus: Troubleshooting Email Delivery Issues for Your Forms
If you are having trouble sending email notifications from your WordPress contact form, then this section is for you.
By default, WordPress uses the PHP mail () function to send emails. This method can be easily misused by spammers and is limited or blocked by many WordPress hosting companies.
Since it is not a secure method, it is also blocked by popular email providers like Gmail and Outlook. This means your emails will never reach the user’s inbox and will end up in the spam folder.
Luckily, there is an easy solution to fix that. You can either use a professional SMTP service provider or use your hosting company’s free business email address feature to safely send your emails.
You can also use WP Mail SMTP, which is the best WordPress SMTP plugin on the market, to further improve your email deliverability.
For step-by-step instructions, see our guide on how to fix the WordPress not sending email issue.
We hope this article has helped you learn how to create a contact form with multiple recipients in WordPress. You might also like our step-by-step guide on how to create a file upload form in WordPress and our list of ways to use conditional logic in WordPress forms.
If you liked this article, then please subscribe to our YouTube Channel for WordPress video tutorials. You can also find us on Twitter and Facebook.


Jiří Vaněk
Thanks for the example of how to use multiple users in WP Forms. There is still much to learn.
Andrea Klein
Thank you for this article! If I’m aiming for #3, which version of WPForms would I need?
WPBeginner Support
Any of the paid versions of WPForms should be able to handle what you are looking for
Admin